How to Replace an Oxygen Sensor
How to Replace an Oxygen Sensor | YourMechanic Advice
Ask a question, get an answer ASAP!
GET A QUOTE
Oxygen Sensor Replacement Cost
Service Location
$123.80 — $932.74
Price range for all vehicles
(1,540)
Oxygen sensors are one of the most important components on a modern vehicle’s engine management system. They are responsible for monitoring the air fuel mixture of the engine, and their readings affect important engine functions such as timing and air fuel mixture.
Over time, with normal use, oxygen sensors can begin to function with a delayed response, and they will eventually fail. Typical symptoms of a failed oxygen sensor are decreased engine performance, decreased fuel efficiency, rough idle, and in certain cases, even misfires. Usually a failed oxygen sensor will also set off a check engine light, specifying which sensor on what bank has failed.
In most cases, replacing an oxygen sensor is a relatively straightforward procedure that usually only requires a few tools. In this step by step guide, we will go over what removing and replacing an oxygen sensor typically entails.
Part 1 of 1: Replacing an oxygen sensor
Materials Needed
- Basic set of hand tools
- Jack and jack stands
- Oxygen sensor socket
- OBD II scan tool
- Replacement oxygen sensor
Step 1: Identify the faulty sensor. Before beginning, connect the OBD II scan tool to the vehicle and read the codes to determine which specific oxygen sensor has failed and needs to be replaced.
Depending on the engine design, vehicles can have multiple oxygen sensors, sometimes on both sides of the engine. Reading the trouble codes will tell you exactly which sensor is in need of replacing — either the upstream (top) or downstream (bottom) sensor — and on what bank (side) of the engine.
Step 2: Raise the vehicle. Once the faulty sensor has been identified, raise the vehicle and secure it on jack stands.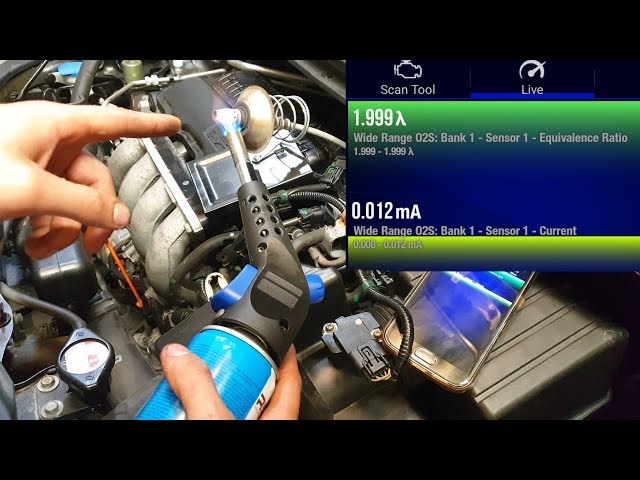 Be sure to raise the vehicle on the side which you will allow you to access the oxygen sensor that needs to be replaced.
Step 3: Disconnect the oxygen sensor connector. With the vehicle raised, locate the faulty oxygen sensor and disconnect the wiring harness connector.
Step 4: Remove the oxygen sensor. Using the oxygen sensor socket or the appropriate size open end wrench, loosen and remove the oxygen sensor.
Step 5: Compare the faulty oxygen sensor with the replacement sensor. Compare your old oxygen sensor with your new replacement to ensure the correct fitment.
Step 6: Install the new oxygen sensor. Once fitment has been verified, install your new oxygen sensor, and connect the harness.
Step 7: Clear the codes. Once the new sensor has been installed, it is time to clear the codes. Connect the OBD II scan tool to the vehicle and clear the codes.
Step 8: Start the vehicle. Once the codes have been cleared, remove and reinsert the key, and then start the vehicle. The check engine light should now be gone, and the symptoms you were experiencing should be alleviated.
In most vehicles, replacing an oxygen sensor is a simple procedure that requires only a few tools. However, if this is not a task you are comfortable doing on your own, this is something that any professional technician, such as one from YourMechanic, can take care of quickly and easily.
Next Step
Schedule Oxygen Sensor Replacement
The most popular service booked by readers of this article is Oxygen Sensor Replacement. YourMechanic’s technicians bring the dealership to you by performing this job at your home or office 7-days a week between 7AM-9PM. We currently cover over 2,000 cities and have 100k+ 5-star reviews…
LEARN MORE
SEE PRICING & SCHEDULING
Replacement Parts
oxygen sensors
Codes
OBD-II
The statements expressed above are only for informational purposes and should be independently verified.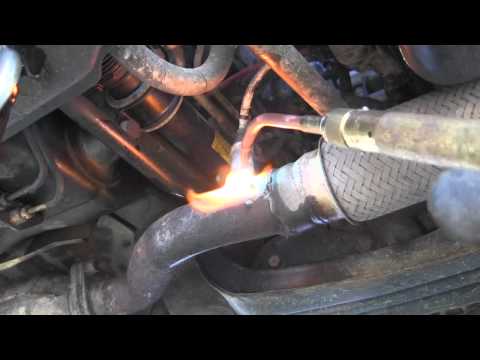 Please see our
terms of service
for more details
Excellent Auto Repair Ratings.
4.2 Average Rating
Service Hours
7 AM — 9 PM
7 days a week
Phone Number
1 (855) 347-2779
Phone Hours
Mon — Fri / 6 AM — 5 PM PST
Sat — Sun / 7 AM — 4 PM PST
Address
We come to you at no extra charge
Guarantee
12-month/12,000-mile warranty
Our certified mobile mechanics perform over 600 services, including diagnostics, brakes, oil changes, scheduled mileage maintenances, and will come to you with all necessary parts and tools.
Get a fair & transparent quote instantly before booking.
Excellent Rating
(
1,540
)
Rating Summary
SEE REVIEWS NEAR ME
Jose
12 years of experience
49 reviews
Request Jose
Jose
12 years of experience
Request Jose
by Eddie
Chevrolet Silverado 1500 V8-4. 8L — Oxygen Sensor Replacement (Front/Upper/Upstream, Rear/Lower/Downstream) — Moreno Valley, California
very knowledgeable and honest , professional and clean explain everything to me and answer all m,y question
by Eli
Scion tC — Oxygen Sensor Replacement (Rear/Lower/Downstream) — Sun City, California
Arrived in a timely manner, was very professional and knowledgeable about any questions. Would definitely recommend to anybody (family, friends, etc) looking for a mechanic!
Joel
11 years of experience
146 reviews
Request Joel
Joel
11 years of experience
Request Joel
by Sriganesh
Honda CR-V L4-2.4L — Oxygen Sensor Replacement (Front/Upper/Upstream, Rear/Lower/Downstream) — Frisco, Texas
I have not seen a more sincere and hard working person than Joel. This, on top of his great skills and know-how of working with an automobile and a very friendly, likeable personality. Unfortunately, it took multiple attempts to fix the Check Engine light on my vehicle. The car needed O2 sensor replacement but due to a couple of reasons the problem was not getting fixed. So Joel would come, run the tests, fix the problem, do the test drive, and leave thinking the problem has been resolved only to find out from me later that the Check Engine light is back on.
However, Joel followed up patiently with me over the course of couple of months to ensure that the problem was fully resolved, even if it took him a couple of visits. Well, he has my business from now on and full trust for my cars!
Thank you, Joel!
by Balaji
Ford Expedition — Oxygen Sensor Replacement (Front/Upper/Upstream, Rear/Lower/Downstream) — Denton, Texas
Joel showed up right on time. Replaced O2 sensors on my Ford Expedition. Ran a diagnostic as well & verified fuel trims etc. Was in and out within an hour. Ensured my driveway was clean when he left and did not leave any mess. I was very pleased with his professionalism. Definitely recommend Joel for auto repair.
James
30 years of experience
873 reviews
Request James
James
30 years of experience
Request James
by Kathy
Toyota Camry V6-3.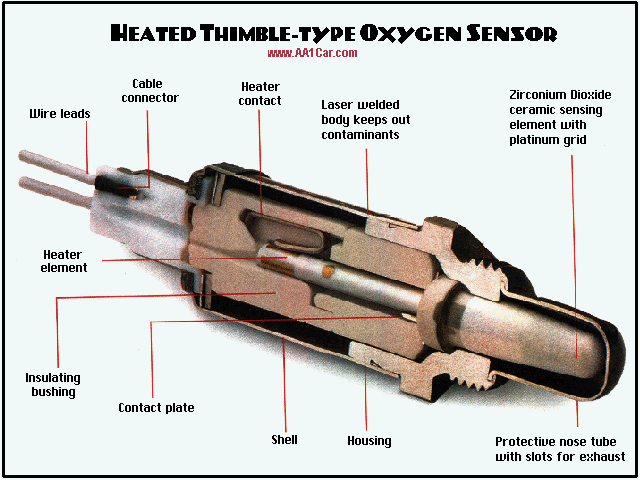 5L — Oxygen Sensor Replacement (Rear/Lower/Downstream) — Orlando, Florida
Mr. James dis an awesome job on my 2007 toyota camry. He was punctual and professional. He fixed the problem very quick.
by HECTOR
Toyota Avalon — Oxygen Sensor Replacement (Front/Upper/Upstream, Rear/Lower/Downstream) — Apopka, Florida
VERY WELL EDCUATED AND VERY SMOOOTH- I KNOW WHO TO CALL WHEN I NEED A SPARE HAND! LOL!
AWESOME PERSON AND THANK YOU FOR SERVICES!
Shane
17 years of experience
217 reviews
Request Shane
Shane
17 years of experience
Request Shane
by David
Ford F-150 V8-5.4L — Oxygen Sensor Replacement (Front/Upper/Upstream) — Cedar Park, Texas
Shane is great. I will be calling on him soon on other vehicles I own. Thank you Shane for a great job.
Need Help With Your Car?
Our certified mobile mechanics make house calls in over 2,000 U.S. cities. Fast, free online quotes for your car repair.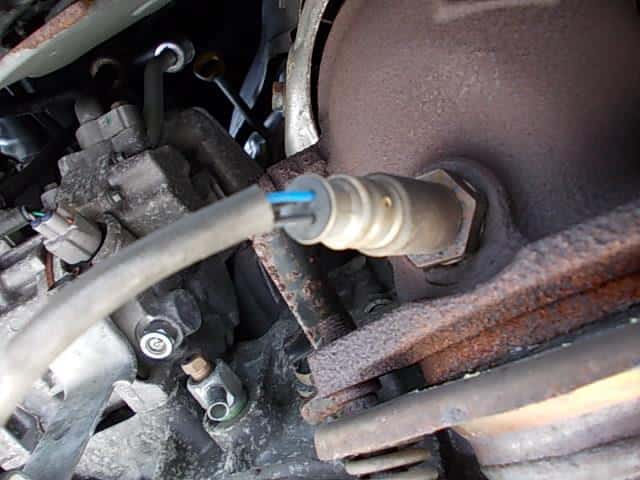
GET A QUOTE
GET A QUOTE
Related articles
B1931 OBD-II Trouble Code: Air Bag Crash Sensor 1 Feed/Return Circuit Failure
B1931 means there is an issue with Sensor 1 in the airbag deployment system, most likely due to a malfunctioning crash sensor.
B1932 OBD-II Trouble Code: Air Bag Driver Circuit Open
B1932 means there is an error with the driver side’s airbag circuit, most likely due to faulty wiring or a defect in the airbag deployment system.
P0974 OBD-II Trouble Code: Shift Solenoid A Control Circuit High
P0974 means there is an abnormal voltage reading regarding the shift solenoid A control circuit, likely due to fluid issues or faulty wiring.
Related questions
Bad crank sensor
Hello. Just about anything is possible but it is unlikely. I have seen crank sensors (https://www.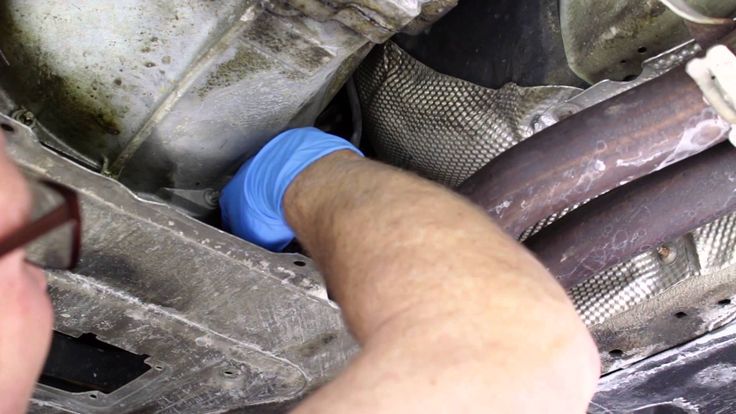 yourmechanic.com/article/symptoms-of-a-bad-or-failing-crankshaft-position-sensor) go bad and cause many issues, but if you are not having any other issues then I think that it is unlikely. If I…
Ambient air temperature sensor location
Hi there: Without knowing the exact make, year and model of your GMC it’s hard to pinpoint the exact location of the ambient air temperature sensor. However, on most GMC pickups, it’s located behind the front bumper, on the passenger…
O2 sensor 2003 Chevrolet Malibu
Hi there — yes, it is possible that a malfunctioning or dead O2 sensor (https://www.yourmechanic.com/article/symptoms-of-a-bad-or-failing-oxygen-sensor) could cause stalling. It will, over time, clog your catalytic converter — an expensive repair — and spew increased toxic exhaust into the atmosphere. In…
Browse other content
Maintenance
Services
Cities
Estimates
Our service team is available 7 days a week, Monday — Friday from 6 AM to 5 PM PST, Saturday — Sunday 7 AM — 4 PM PST.
1 (855) 347-2779 · [email protected]
Read FAQ
GET A QUOTE
How To Replace an Oxygen Sensor
Oxygen Sensor Replacement Is an Intermediate Job for Most DIYers. Here’s Everything You Need to Know to Replace an O2 Sensor at Home.
- DIY Difficulty Level: Intermediate, could be easier or harder depending on the vehicle
- Time Required: 1 to 2 hours
- Tools & Materials:
- New oxygen sensor
- Wrenches and sockets
- Oxygen sensor socket (if your sensor is hard to reach with a wrench)
What Is an Oxygen Sensor?
The oxygen sensor (commonly referred to as an “O2 sensor”) monitors how much unburned oxygen is in the exhaust as the exhaust exits the engine of your vehicle.
Typically, there are one or two sensors in front of your catalytic converter and one behind it. Comparing data from before and after the catalytic converter also tells the computer how well it is working and if there are any problems with your emission system as well.
By monitoring oxygen levels and sending this information to your engine’s computer, these sensors let your car know if the fuel mix is running rich (not enough oxygen) or lean (too much oxygen). Proper air-fuel ratio is critical to keeping your car running as smoothly as it should be.
Be sure to read our in-depth guide to oxygen sensors for more information.
Is It Safe to Drive with a Bad Oxygen Sensor?
When an oxygen sensor fails, there are a variety of diagnostic trouble codes (DTCs) that can pop up. Most of the time, a faulty oxygen sensor will result in a check engine light accompanied with a fault code that you can read with an OBD2 scanner like FIXD. Based on this fault code, it will point to how it failed and then move forward with the diagnosis.
Continuing to drive with a faulty oxygen sensor can cause the engine to run rough, and potentially cause a lack of power or even engine damage. The check engine light being on will also cause you to fail an emissions test if you live in an area that includes them in car inspections.
Whether it’s worth replacing an oxygen sensor yourself or paying a shop to do it depends on how difficult it is to access the sensor. My van’s sensors are easy to reach from inside with the “doghouse” over the back of the engine removed, so it’s a no-brainer to replace it myself. On other cars, the sensor may be crammed between the top of the exhaust pipe and the floor of the car, and/or require a significant dismantling of your exhaust system to reach. If it’s too difficult for you, take it to the shop.
When to Replace an Oxygen Sensor
The oxygen sensor is not a routine maintenance item. They do fail from time to time, though, triggering a check engine light. Use an OBD2 scanner like FIXD to determine the cause of the check engine light. If the trouble code indicates bad data from an oxygen sensor, it’s time to replace it. Unlike other items, you don’t need to replace all of the oxygen sensors at the same time when one fails.
What Are Common Symptoms Indicating You Need to Replace an Oxygen Sensor?
Symptoms of a faulty O2 sensor may include the following:
- Check engine light, often a P0420 code
- Lean or rich running condition
- Poor acceleration
- Engine hesitation
- Black smoke from tailpipe (rich running condition) black smoke is excess fuel exiting the exhaust
- Rough idle
- Vehicle stalling out
- Reduced fuel efficiency
Keep in Mind
Just because the trouble code(s) you scanned indicate a problem with the oxygen sensor doesn’t mean the sensor itself is automatically bad. It might operating correctly and simply doing its job of telling you something is wrong in another part of your engine. For example, a Ford technical service bulletin says that for several codes associated with the oxygen sensor, the first thing you should check is the PCV valve, not the sensor. Research your particular make and model, cross reference any codes you get, and make sure a bad sensor is actually the problem before replacing it.
If in doubt, it’s certainly worth taking your car to a shop for a professional diagnosis. They have the tools and knowledge to determine whether your sensor is bad or if something else is wrong with your car.
How It’s Done
Step 1: Diagnose the bad oxygen sensor
Your car has at least two oxygen sensors, possibly more depending on your engine. Use the Live Gauges feature of FIXD to watch the data coming in from your sensors in real-time. In this example, sensor 1 is fluctuating normally as it should, but sensor 2 appears to be stuck at 0 volts.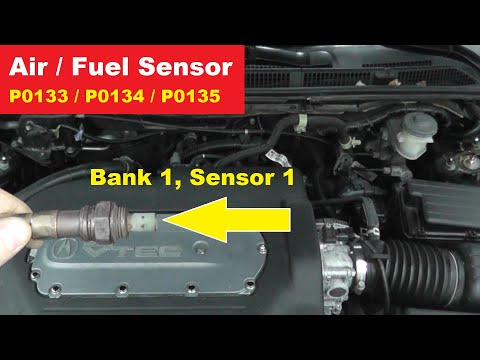 This would indicate that the issue exists with sensor 2. For a detailed description of the diagnosis process, read our article all about oxygen sensors.
Again, research your particular vehicle, and make sure there isn’t another problem that the sensor is correctly indicating, rather than assuming the sensor itself is bad. If everything else is fine and you are confident that the sensor is bad, then replace it.
Step 2: Unplug the sensor
Unplug the oxygen sensor from its wiring harness. This will allow it to turn freely when you remove it from the exhaust pipe.
Step 3: Lubricate the threads
The oxygen sensor screws into your exhaust pipe just like a screw or a spark plug. Numerous cycles of heating up and cooling down cause the metal to expand and contract, which could make the sensor fit tightly. This area is also prone to rust, making matters worse. Spray the area with penetrating oil like WD40 or PB Blaster, then let it sit for a while. This will make removing it easier.
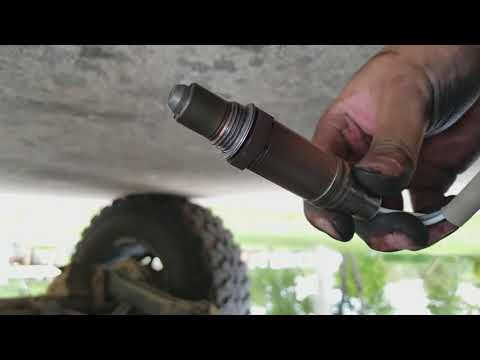
Step 4: Remove the sensor
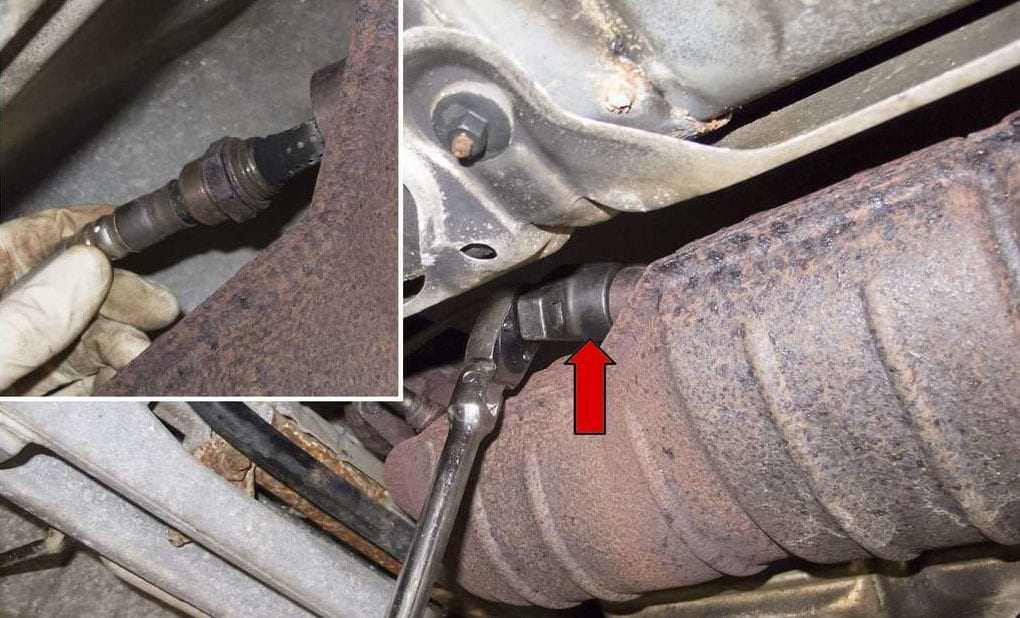
If you have the space, as shown above, you can use an open-end wrench to remove it. In tight quarters, you might need to use an oxygen sensor socket. This is a special socket with a slot to put the wire through so you can slide it down over the sensor. Your socket wrench or extension attaches to an offset flange to give you better leverage on it. Do what it takes to get the old sensor out.
Step 5: Install the new sensor
As the repair manuals say, installation is the opposite of removal. Screw the new sensor tightly into the exhaust pipe, then plug it into the wiring harness.
Step 6: Clear your codes
Using FIXD, scan your trouble codes again, then click the Clear Engine Light button at the bottom of the screen. This will clear all of the codes and turn off your check engine light.
Step 7: Go for a drive
As you continue to drive, your check engine light should remain off, indicating that the problem is fixed.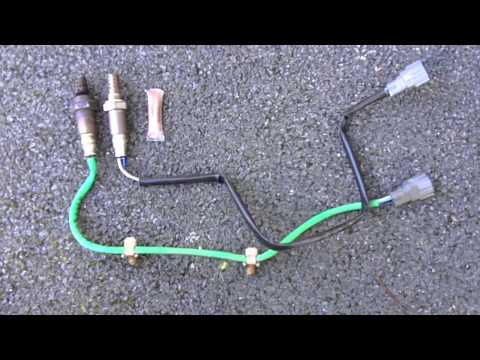 If the light turns back on, the sensor you replaced was not the problem after all. Use FIXD to read the codes and continue diagnosing the problem.
Claim Your Custom Maintenance Schedule
Get the FIXD Sensor and free app today for a custom maintenance schedule based on your make, model, and mileage. Never miss important maintenance again with automated maintenance alerts! Learn more at fixdapp.com.
Justin Hughes
Recovering autocross and track day enthusiast. Once turned a VW Jetta into a pickup truck. Lives in a van down by the river. Dream car: 2001 Subaru WRC rally car.
We’re here to help you simplify car care and save, so this post may contain affiliate links to help you do just that. If you click on a link and take action, we may earn a commission. However, the analysis and opinions expressed are our own.
How sensors work: oxygen sensor
How it works
How to install
For technicians
For DIYers
The oxygen sensor, also called the O2 sensor, performs the function indicated in its name, namely, it measures the amount of oxygen in the exhaust gases.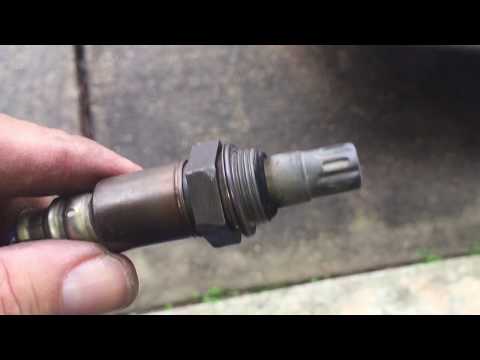 And although it may seem like a simple task, the O2 sensor is one of the most important vehicle sensors, which is responsible for maintaining a balance between fuel and air and minimizing harmful emissions. Therefore, it will be useful for you to know what it is for, why it fails, and, importantly, how to replace it if it breaks.
How does the O2 sensor work?
Most vehicles have at least two oxygen sensors located in the exhaust system. One of them must be installed before the catalytic converter, and one or more — after the catalytic converter. An oxygen sensor upstream of the catalytic converter regulates fuel delivery, and a sensor downstream of the sensor measures the efficiency of the catalytic converter.
O2 sensors can usually be categorized as either narrow range or wide range. The sensitive element is located inside the sensor enclosed in a steel case. Oxygen molecules from the exhaust pass through tiny slits or holes in the sensor’s steel shell to reach the sensing element, or Nernst cell. On the other side of the Nernst cell, oxygen from the air outside the exhaust system travels down the O2 sensor and contacts it. The difference in the amount of oxygen between the outside air and the exhaust gases causes a flow of oxygen ions and creates a voltage.
If the exhaust gas mixture is too rich and there is too little oxygen in the exhaust, a signal is sent to the engine’s electronic control unit (ECU) to reduce the amount of fuel entering the cylinder. If the exhaust gas mixture is too lean, then a signal is sent to increase the amount of fuel supplied to the engine. If there is too much fuel, hydrocarbons and carbon monoxide are present in the exhaust gases. If there is too little fuel, nitrogen oxides polluting the atmosphere. The sensor signal helps to maintain the optimal composition of the mixture. Wide range O2 sensors have an additional O2 pump cell to control the amount of oxygen supplied to the sensor. This allows measurements to be made over a much wider range of fuel mixture ratios.
Why do oxygen sensors fail?
Since the oxygen sensor is in the exhaust stream, it can get dirty. Fouling is usually caused by an overly rich fuel mixture or oil bleed in older engines, as well as coolant seeping into the combustion chamber through gaskets. It is also exposed to extremely high temperatures and, like any other component, can wear out over time. All of these can affect the response characteristics of the oxygen sensor, which can lead to longer response times or altered sensor voltage curves and, in the long term, lower sensor performance.
What are the symptoms of an oxygen sensor failure?
If the oxygen sensor fails, the computer can no longer determine the fuel-air ratio, so it has to «guess». In this regard, there are several tell-tale signs that you should pay attention to:
-
Check Engine Light: Although it can come on for many reasons, it is usually related to exhaust fumes.
-
High Fuel Consumption: A faulty oxygen sensor will prevent proper mixing of air and fuel, resulting in increased fuel consumption.
-
Rough Idle or Misfire: Because the oxygen sensor output helps control engine timing, combustion intervals, and air/fuel mixture, sensor failure can cause the engine to run rough.
-
Sluggish acceleration.
O2 Sensor Troubleshooting
To determine the cause of an O2 sensor malfunction, follow these steps:
-
Read fault codes using a diagnostic tool. Please note that when problems are detected with the O2 sensors, the device will often generate several fault codes.
-
Lambda probes have an internal heater, so the resistance of the heater should be checked — it is usually quite low.
-
Check the power supply to the heater — often the wires are the same color.
-
Check electrical connector for damage or dirt.
-
Check the exhaust manifold and fuel injectors for leaks, as well as the condition of the system components — this may affect the correct operation of the sensor.
-
Verify that the O2 sensor reading is correct by measuring the oxygen concentration using a four or five gas analyzer.
-
Use an oscilloscope to check the signal at idle and at 2500 rpm.
-
If the sensor wiring is difficult to access, use real-time data to check for a signal.
-
Check the condition of the protective tube of the sensor element for signs of damage and contamination
Common fault codes
Below are the most common fault codes and their causes:
- P0135: Oxygen sensor before catalytic converter 1, heating circuit / open
- P0175: rich fuel mixture (bank 2)
- P0713: Incorrect mixture balance (bank 2)
- P0171: lean mixture (bank 1)
- P0162: O2 sensor circuit malfunction (row 2, sensor 3)
Oxygen Sensor Replacement Tips