MS-DOS and Windows Command Line Format Command
Updated: 12/30/2021 by Computer Hope
The format command is used to erase information from a computer diskette or fixed drive.
Tip
Although the information appears to be erased, it is still possible for software recovery programs to recover information from a formatted drive. If you want to make sure no information can be recovered from a drive, use a software utility to ensure all data is erased and overwritten. See: How to make sure all data is erased on a computer hard drive.
- Availability
- Format syntax
- Format examples
Availability
Format is an external command available for the following Microsoft operating systems as format.com.
- All Versions of MS-DOS
- Windows 95
- Windows 98
- Windows ME
- Windows NT
- Windows 2000
- Windows XP
- Windows Vista
- Windows 7
- Windows 8
- Windows 10
- Windows 11
Format syntax
- Windows 10 and Windows 11 syntax.
- Windows Vista, Windows 7, and Windows 8 syntax.
- Microsoft Windows 2000 and Windows XP syntax.
- Microsoft Windows 2000 and Windows XP Recovery Console syntax.
- Microsoft Windows 95, 98, ME syntax.
Windows 10 and Windows 11 syntax
FORMAT volume [/FS:file-system] [/V:label] [/Q] [/L[:state]] [/A:size] [/C] [/I:state] [/X] [/P:passes] [/S:state]
FORMAT volume [/V:label] [/Q] [/F:size] [/P:passes]
FORMAT volume [/V:label] [/Q] [/T:tracks /N:sectors] [/P:passes]
FORMAT volume [/V:label] [/Q] [/P:passes]
FORMAT volume [/Q]
| volume | Specifies the drive letter (followed by a colon), mount point, or volume name. |
| /FS:filesystem | Specifies the file system type (FAT, FAT32, exFAT, NTFS, UDF, ReFS). |
| /V:label | Specifies the volume label. |
| /Q | Performs a quick format. Note that this switch overrides /P. |
| /C | NTFS only: Files created on the new volume will be compressed by default. |
| /X | Forces the volume to dismount first if necessary. All opened handles to the volume would no longer be valid. |
| /R:revision | UDF only: Forces the format to a specific UDF version (1.02, 1.50, 2.00, 2.01, 2.50). The default revision is 2.01. |
| /D | UDF 2.50 only: Metadata will be duplicated. |
| /L[:state] | NTFS Only: Overrides the default size of file record. By default, a non-tiered volume will be formatted with small-sized file records, and a tiered volume will be formatted with large-sized file records. /L and /L:enable forces format to use large-size file records, and /L:disable forces format to use small-sized file records. |
| /A:size | Overrides the default allocation unit size. Default settings are strongly recommended for general use. ReFS supports 4096, 64 K. NTFS supports 512, 1024, 2048, 4096, 8192, 16 K, 32 K, 64 K, 128 K, 512 K, 1 M, 2 M. FAT supports 512, 1024, 2048, 4096, 8192, 16 K, 32 K, 64 K, (128 K, 256 K for sector size > 512 bytes).  FAT32 supports 512, 1024, 2048, 4096, 8192, 16 K, 32 K, 64 K, (128 K, 256 K for sector size > 512 bytes). exFAT supports 512, 1024, 2048, 4096, 8192, 16 K, 32 K, 64 K, 128 K, 256 K, 512 K, 1 M, 2 M, 4 M, 8 M, 16 M, 32 M. Note that the FAT and FAT32 files systems impose the following restrictions on the number of clusters on a volume: FAT: Number of clusters <= 65526 Format will immediately stop processing if it decides that the above requirements cannot be met using the specified cluster size. NTFS compression is not supported for allocation unit sizes above 4096. |
| /F:size | Specifies the size of the floppy disk to format (1.44). |
| /T:tracks | Specifies the number of tracks per disk side. |
| /N:sectors | Specifies the number of sectors per track. |
| /P:count | Zero every sector on the volume. After that, the volume will be overwritten «count» times using a different random number each time. If «count» is zero, no additional overwrites are made after zeroing every sector. This switch is ignored when /Q is specified. If «count» is zero, no additional overwrites are made after zeroing every sector. This switch is ignored when /Q is specified. |
| /S:state | Specifies support for short file names (enable, disable). Short names are disabled by default. |
| /TXF:state | Specifies txf is enabled/disabled (enabled, disabled). TxF is enabled by default. |
| /I:state | ReFS only: Specifies whether integrity should be enabled on the new volume. «state» is either «enable» or «disable» Integrity is enabled on storage that supports data redundancy by default. |
| /DAX[:state] | NTFS Only: Enable DAX (direct access storage) mode for this volume. In DAX mode, the volume is accessed via the memory bus, boosting IO performance. A volume can be formatted with DAX mode only if the hardware is DAX capable. State can specify «enable» or «disable.» /DAX is considered as /DAX:enable. |
| /LogSize[:size] | NTFS Only: Specifies the size for NTFS log file in kilobytes. The minimum supported size is 2 MB, so specifying a size smaller than 2 MB results in a 2 MB log file. Zero indicates the default value, which generally depends on the volume size. The minimum supported size is 2 MB, so specifying a size smaller than 2 MB results in a 2 MB log file. Zero indicates the default value, which generally depends on the volume size. |
| /NoRepairLogs | NTFS Only: Disables NTFS repair logs. If the flag is set, spotfix (i.e., chkdsk /spotfix) will not work. |
Windows Vista, Windows 7, and Windows 8 syntax
FORMAT volume [/FS:file-system] [/V:label] [/Q] [/L] [/A:size] [/C] [/I:state] [/X] [/P:passes] [/S:state]
FORMAT volume [/V:label] [/Q] [/F:size] [/P:passes]
FORMAT volume [/V:label] [/Q] [/T:tracks /N:sectors] [/P:passes]
FORMAT volume [/V:label] [/Q] [/P:passes]
FORMAT volume [/Q]
| volume | Specifies the drive letter (followed by a colon), mount point, or volume name. |
| /FS:filesystem | Specifies the file system (FAT, FAT32, exFAT, NTFS, UDF, ReFS). |
| /V:label | Specifies the volume label. |
| /Q | Performs a quick format. Note that this switch overrides /P. Note that this switch overrides /P. |
| /C | NTFS only: Files created on the new volume will be compressed by default. |
| /X | Forces the volume to dismount first if necessary. All opened handles to the volume would no longer be valid. |
| /R:revision | UDF only: Forces the format to a specific UDF version (1.02, 1.50, 2.00, 2.01, 2.50). The default revision is 2.01. |
| /D | UDF 2.50 only: Metadata will be duplicated. |
| /L | NTFS Only: Use large-sized file records. By default, the volume will be formatted with small size file records. |
| /A:size | Overrides the default allocation unit size. Default settings are strongly recommended for general use. ReFS supports 64 K. NTFS supports 512, 1024, 2048, 4096, 8192, 16 K, 32 K, 64 K. FAT supports 512, 1024, 2048, 4096, 8192, 16 K, 32 K, 64 K, (128 K, 256 K for sector size > 512 bytes). FAT32 supports 512, 1024, 2048, 4096, 8192, 16 K, 32 K, 64 K, (128 K, 256 K for sector size > 512 bytes).  exFAT supports 512, 1024, 2048, 4096, 8192, 16 K, 32 K, 64 K, 128 K, 256 K, 512 K, 1 M, 2 M, 4 M, 8 M, 16 M, 32 M. Note that the FAT and FAT32 files systems impose the following restrictions on the number of clusters on a volume: FAT: Number of clusters <= 65526 Format will immediately stop processing if it decides that the above requirements cannot be met using the specified cluster size. NTFS compression is not supported for allocation unit sizes above 4096. |
| /F:size | Specifies the size of the floppy disk to format (1.44). |
| /T:tracks | Specifies the number of tracks per disk side. |
| /N:sectors | Specifies the number of sectors per track. |
| /P:count | Zero every sector on the volume. After that, the volume will be overwritten «count» times using a different random number each time. If «count» is zero, no additional overwrites are made after zeroing every sector./dir-help-command-windows-10-5a7074bbd8fdd50036e081e8.png) This switch is ignored when /Q is specified. This switch is ignored when /Q is specified. |
| /S:state | Specifies support for short file names (enable, disable). Short names are disabled by default. |
| /I:state | ReFS only: Specifies whether integrity should be enabled on the new volume. The «state» is either «enable» or «disable» Integrity is enabled on storage that supports data redundancy by default. |
Microsoft Windows 2000 and Windows XP syntax
FORMAT volume [/FS:file-system] [/V:label] [/Q] [/A:size] [/C] [/X]
FORMAT volume [/V:label] [/Q] [/F:size]
FORMAT volume [/V:label] [/Q] [/T:tracks /N:sectors]
FORMAT volume [/V:label] [/Q] [/1] [/4]
FORMAT volume [/Q] [/1] [/4] [/8]
| volume | Specifies the drive letter (followed by a colon), mount point, or volume name. |
| /FS:filesystem | Specifies the file system (FAT, FAT32, or NTFS). |
| /V:label | Specifies the volume label. |
| /Q | Performs a quick format. |
| /C | Files created on the new volume will be compressed by default. |
| /X | Forces the volume to dismount first if necessary. All opened handles to the volume would no longer be valid. |
| /A:size | Overrides the default allocation unit size. Default settings are strongly recommended for general use. NTFS supports 512, 1024, 2048, 4096, 8192, 16 K, 32 K, 64 K. FAT supports 512, 1024, 2048, 4096, 8192, 16 K, 32 K, 64 K, (128 K, 256 K for sector size > 512 bytes). FAT32 supports 512, 1024, 2048, 4096, 8192, 16 K, 32 K, 64 K, (128 K, 256 K for sector size > 512 bytes). Note that the FAT and FAT32 files systems impose the below restrictions on the number of clusters on a volume: FAT: Number of clusters <= 65526 FAT32: 65526 < Number of clusters < 268435446 Format will immediately stop processing if it decides that the above requirements cannot be met using the specified cluster size. NTFS compression is not supported for allocation unit sizes above 4096. |
| /F:size | Specifies the size of the floppy disk to format (160, 180, 320, 360, 640, 720, 1.2, 1.23, 1.44, 2.88, or 20.8). |
| /T:tracks | Specifies the number of tracks per disk side. |
| /N:sectors | Specifies the number of sectors per track. |
| /1 | Formats a single side of a floppy disk. |
| /4 | Formats a 5.25-inch 360 K floppy disk in a high-density drive. |
| /8 | Formats eight sectors per track. |
Microsoft Windows 2000 and Windows XP Recovery Console syntax
Formats a disk for use with Windows 2000.
format [drive:] [/q] [/fs:file-system]
| drive: | Specifies the drive to format. |
| /q | Performs a quick format. |
| /fs:file-system | Specifies the file system to use (FAT, FAT32, or NTFS). |
Microsoft Windows 95, 98, ME syntax
Formats a disk for use with MS-DOS.
FORMAT drive: [/V[:label]] [/Q] [/F:size] [/B | /S] [/C]
FORMAT drive: [/V[:label]] [/Q] [/T:tracks /N:sectors] [/B | /S] [/C]
FORMAT drive: [/V[:label]] [/Q] [/1] [/4] [/B | /S] [/C]
FORMAT drive: [/Q] [/1] [/4] [/8] [/B | /S] [/C]
| /V[:label] | Specifies the volume label. |
| /Q | Performs a quick format. |
| /F:size | Specifies the size of the floppy disk to format (such as 160, 180, 320, 360, 720, 1.2, 1.44, 2.88). |
| /B | Allocates space on the formatted disk for system files. |
| /S | Copies system files to the formatted disk. |
| /T:tracks | Specifies the number of tracks per disk side. |
| /N:sectors | Specifies the number of sectors per track. |
| /1 | Formats a single side of a floppy disk. |
| /4 | Formats a 5.25-inch 360 K floppy disk in a high-density drive. |
| /8 | Formats eight sectors per track. |
| /C | Tests clusters that are currently marked «bad.» |
Format examples
Caution
When using the format command, remember all the information on the drive you want to format will be erased entirely.
format a:
Would erase all the contents off a floppy disk. Commonly used on an unformatted diskette or one you want to erase.
format a: /q
Quickly erases all the contents of a floppy diskette. Commonly used to erase all information on the diskette quickly.
format c:
Erase the contents of your C: hard drive. In other words, unless you want to erase all your computer’s information, this command should not be executed unless you’re planning on starting over.
- How to erase my hard drive and start over.

Note
If you’re in Windows or files on the hard drive are in use, this command will not work. If you want to format the primary hard drive, you’ll need to boot from a bootable diskette, restore disc, or another bootable drive.
- How to erase my hard drive and start over.
- How to format a floppy diskette.
format | Microsoft Learn
Feedback
Edit
Twitter
LinkedIn
Facebook
Email
-
Article -
- 6 minutes to read
-
Applies to: Windows Server 2022, Windows 10, Windows Server 2019
Formats a disk to accept Windows files.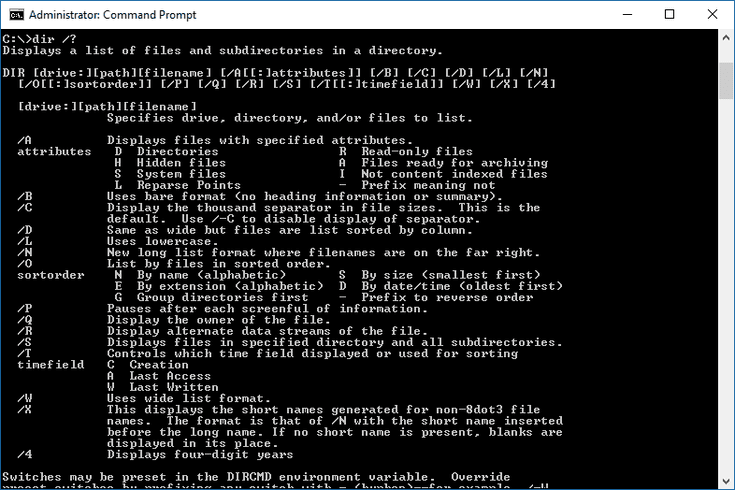 You must be a member of the Administrators group to format a hard drive.
Note
You can also use the format command, with different parameters, from the Recovery Console. For more information about the recovery console, see Windows Recovery Environment (Windows RE).
Syntax
format volume [/FS:file-system] [/V:label] [/Q] [/L[:state]] [/A:size] [/C] [/I:state] [/X] [/P:passes] [/S:state]
format volume [/V:label] [/Q] [/F:size] [/P:passes]
format volume [/V:label] [/Q] [/T:tracks /N:sectors] [/P:passes]
format volume [/V:label] [/Q] [/P:passes]
format volume [/Q]
Parameters
| Parameter | Description |
|---|---|
<volume> |
Specifies the mount point, volume name, or drive letter (followed by a colon) of the drive that you want to format. If you do not specify any of the following command-line options, format uses the volume type to determine the default format for the disk. |
| /FS:filesystem | Specifies the type of file system (FAT, FAT32, NTFS, exFAT, ReFS, or UDF). |
/V:<label> |
Specifies the volume label. If you omit the /V command-line option or use it without specifying a volume label, format prompts you for the volume label after the formatting is complete. Use the syntax /V: to prevent the prompt for a volume label. If you use a single format command to format more than one disk, all of the disks will be given the same volume label. |
/A:<size> |
Specifies the allocation unit size to use on FAT, FAT32, NTFS, exFAT, or ReFS volumes. If you don’t specify unit size, it’s chosen based on volume size. Default settings are strongly recommended for general use. The following list presents valid values for each type of file system unit size:
|
| /Q | Performs a quick format. Deletes the file table and the root directory of a previously formatted volume, but does not perform a sector-by-sector scan for bad areas. You should use the /Q command-line option to format only previously formatted volumes that you know are in good condition. Note that /Q overrides /Q. |
/F:<size> |
Specifies the size of the floppy disk to format. When possible, use this command-line option instead of the /T and /T command-line options. Windows accepts the following values for size:
|
/T:<tracks> |
Specifies the number of tracks on the disk. When possible, use the /F command-line option instead. If you use the /T option, you must also use the /N option. These options together provide an alternative method of specifying the size of the disk that is being formatted. This option is not valid with the /F option. |
/N:<sectors> |
Specifies the number of sectors per track. When possible, use the /F command-line option instead of /N. If you use /N, you must also use /T. These two options together provide an alternative method of specifying the size of the disk that is being formatted. This option is not valid with the /F option. |
/P:<count> |
Zero every sector on the volume. After that, the volume will be overwritten count times using a different random number each time. If count is zero, no additional overwrites are made after zeroing every sector. This switch is ignored when /Q is specified. After that, the volume will be overwritten count times using a different random number each time. If count is zero, no additional overwrites are made after zeroing every sector. This switch is ignored when /Q is specified. |
| /C | NTFS only. Files created on the new volume will be compressed by default. |
| /X | Forces the volume to dismount, if necessary, before it’s formatted. Any open handles to the volume will no longer be valid. |
| /R | NTFS only. Files created on the new volume will be compressed by default. |
| /D | UDF 2.50 only. Metadata will be duplicated. |
/L:<state> |
NTFS only. Overrides the default size of file record. By default, a non-tiered volume will be formatted with small size file records and a tiered volume will be formatted with large size file records. /L and /L:enable forces format to use large size file records and /L:disable forces format to use small size file records. |
/S:<state> |
Specifies support for short filenames. State is either enable or disable. Short names are disabled by default. |
/TXF:<state> |
Specifies TxF is enabled/disabled. State is either enable or disable. TxF is enabled by default |
/I:<state> |
ReFS only. Specifies whether integrity should be enabled on the new volume. State is either enable or disable. Integrity is enabled on storage that supports data redundancy by default. |
/DAX:<state> |
NTFS only. Enable direct access storage (DAX) mode for this volume. In DAX mode, the volume is accessed via the memory bus, boosting IO performance. A volume can be formatted with DAX mode only if the hardware is DAX capable. State is either enable or disable. /DAX is considered the same as /DAX:enable. /DAX is considered the same as /DAX:enable. |
/LogSize::<size> |
NTFS only Specifies the size for NTFS log file in kilobytes. The minimum supported size is 2MB, so specifying a size smaller than 2MB will result in a 2MB log file. Zero indicates the default value, which generally depends on the volume size. |
| /NoRepairLogs | NTFS only. Disables NTFS repair logs. If the spotfix flag for chkdsk is specified (i.e. chkdsk /spotfix), this will not work. |
| /? | Displays help at the command prompt. |
 Also 128K and 256K for a sector size greater than 512 bytes.
 44 or 1.44m or 1.44mb
-
The format command creates a new root directory and file system for the disk. It can also check for bad areas on the disk, and it can delete all data on the disk. To be able to use a new disk, you must first use this command to format the disk.
-
After formatting a floppy disk, format displays the following message:
Volume label (11 characters, ENTER for none)?To add a volume label, type up to 11 characters (including spaces).
 If you do not want to add a volume label to the disk, press ENTER.
 -
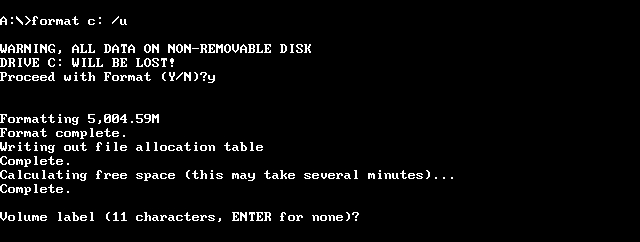
When you use the format command to format a hard disk, a warning message similar to the following displays:
WARNING, ALL DATA ON NON-REMOVABLE DISK
DRIVE x: WILL BE LOST!
Proceed with Format (Y/N)? _
To format the hard disk, press Y; if you do not want to format the disk, press N.
-
FAT file systems restrict the number of clusters to no more than 65526. FAT32 file systems restrict the number of clusters to between 65527 and 4177917.
-
NTFS compression is not supported for allocation unit sizes above 4096.
Note
Format will immediately stop processing if it determines that the previous requirements can’t be met using the specified cluster size.
-
When formatting is complete, format displays messages that show the total disk space, the spaces marked as defective, and the space available for your files.
-
You can speed up the formatting process by using the /q command-line option. Use this option only if there are no bad sectors on your hard disk.
-
You shouldn’t use the format command on a drive that was prepared by using the subst command. You can’t format disks over a network.
-
The following table lists each exit code and a brief description of its meaning.
Exit code Description 0 The format operation was successful. 1 Incorrect parameters were supplied. 4 A fatal error occurred (which is any error other than 0, 1, or 5). 5 The user pressed N in response to the prompt «Proceed with Format (Y/N)?» to stop the process. You can check these exit codes by using the ERRORLEVEL environment variable with the if batch command.
Examples
To format a new floppy disk in drive A using the default size, type:
format a:
To perform a quick format operation on a previously formatted floppy disk in drive A, type:
format a: /q
To format a floppy disk in drive A and assign it the volume label DATA, type:
format a: /v:DATA
Additional References
- Command-Line Syntax Key
Feedback
Submit and view feedback for
This product
This page
View all page feedback
How to Format Hard Drive from Command Prompt or DISKPART. — wintips.org
In this tutorial you ill find step by step instructions on how to format a hard drive in command prompt with the FORMAT command or the DISKPART tool. By formatting a hard drive, you will delete all the data it contains, so make sure that you already have a copy of the data it contains.
In all Windows versions, the classic and most common method to delete, create and format partitions or hard disks is by using the Disk Management tool. But, sometimes it is impossible to delete or format a partition or volume on a hard disk by using the Disk Management tool, because the hard disk is not recognized by Windows for a variety of reasons. (e.g. when the file system on the disk is corrupted or because the hard drive is in RAW format, etc.).
In this guide you ‘ll find detailed instructions on how to format or to securely wipe a hard drive (HDD or SSD), from the Command Prompt with the «Format» command, or by using the «DiskPart» command line tool, in Windows 10, 8 or 7 OS. Keep in mind, that you can use the same instructions to format a hard disk, from the Windows Recovery Environment (WinRE)
- Related article: How to Securely Wipe a Hard Drive or Computer before selling.
How to Format a Drive from Command Prompt or DISKPART.
1. Open command prompt as administrator. To do that:
1. In the Search box type: cmd or command prompt
2. Right click on the command prompt (result) and select Run as Administrator.
2. Now, use one of the two following methods to format the drive:
-
Format Disk in Command Prompt (CMD)
-
Format Disk using DISKPART.
Method 1. How to Format a HDD, SSD Drive in Command Prompt (CMD).
1. Find out the «Volume Label» of the drive that you want to format, by typing this command: *
- vol X:
* Notes:
1. Where «X» = the drive letter of the disk that you want to format.
2. Be very careful when selecting the hard drive to format.
e.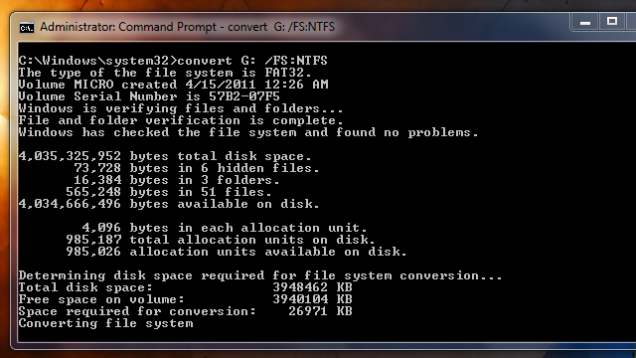 g. If you want to format the drive D:, then type: vol D:
2. To format the hard drive (to erase the data it contains), give the following command and press Enter:
- format X:
3. When asked to «enter the current volume label», type the volume label mentioned after typing the above command and press Enter.
e.g If the want to format the disk D:, with Volume Label «New Volume», then type these commands in order:
-
format D:
-
New Volume
-
Y
Other examples of the FORMAT command:
- To QUICK FORMAT a hard drive in command prompt, type: format X: /q
- To format a hard disk in a specific FILE SYSTEM in command prompt, type: format X: /FS:Filesystem *
* Note: In «Filesystem» you can specify one of the following file systems: FAT, FAT32, exFAT, NTFS or UDF. e.g.:
e.g.:
-
- To format the disk D: in the NTFS file system: format D: /fs:NTFS
- To format the disk D: in the FAT32 file system: format D: /fs:fat32
- To format the disk D: in the exFAT file system: format D: /fs:exFAT
- To preform a LOW LEVEL FORMAT on a hard drive, in order to securely erase it by writing zeros on every sector, type: format X: /FS:Filesystem /p:n *
* Notes:
1. Where «n» = The number of times that you want to write zeros in every sector. Keep in mind that the command takes very long time to complete, even for one pass of writing zeros.
2. By filling with zeros a drive (hard disk, USB, Memory card, etc.), you ensure that all it’s stored data will be erased permanently and no one can retrieve the data from it in any way.
-
- e.g. : To format the disk D: with the NTFS file system and to write zeros in every sectors twice type: format D: /fs:NTFS /p:2
Method 2. How to Format a Hard Disk using DISKPART.
To format a hard drive using the DISKPART utility:
1. In the administrative command prompt window, type:
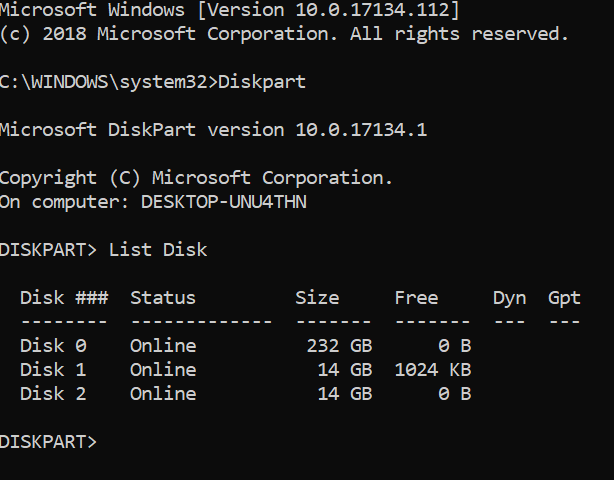
- diskpart
2. At DISKPART prompt, type:
- list disk
3. From the listed disks, locate which one is the disk that you want to format. You can easily find out which disk is in the list from its size in GB (Gigabytes).
4. Then select the disk by typing: *
- select disk DiskNumber
* Note: Where «DiskNumber» = The number assigned to the disk that you want to format.
e.g. At this example, we want to format the «Disk 1» (see screenshot below). So the command in this case is: select disk 1
5. Now according, what you wish to do, give one of the following commands (and press Enter):
- To delete all partitions and data on the drive, type: clean
- To completely erase all partitions (and the data), by writing zeros on every sector (low level format), type: clean all
* Notes:
1. The «clean all» command takes very very long time to complete, so be patient. (For 1TB it takes about 5-6 hours).
2. By filling with zeros a drive (hard disk, USB, Memory card, etc.), you ensure that all it’s stored data will be erased permanently and no one can retrieve the data from it in any way.
6. When the «low level format» is complete, type the following command to create a partition on the disk:
- create partition primary
7. Then format the newly created partition, with this command:
- format fs=ntfs quick
8. When the format is completed, assign a drive letter on the formatted partition, by giving this command:
- assign
9. Finally, type exit to close the DiskPart tool and then close the command prompt window.
That’s it! Let me know if this guide has helped you by leaving your comment about your experience. Please like and share this guide to help others.
If this article was useful for you, please consider supporting us by making a donation. Even $1 can a make a huge difference for us in our effort to continue to help others while keeping this site free:
We’re hiring
We’re looking for part-time or full-time technical writers to join our team! It’s about a remote position that qualified tech writers from anywhere in the world can apply. Click here for more details.
If you want to stay constantly protected from malware threats, existing and future ones, we recommend that you install Malwarebytes Anti-Malware PRO by clicking below (we
do earn a commision from sales generated from this link, but at no additional cost to you. We have experience with this software and we recommend it because it is helpful and useful):
Full household PC Protection — Protect up to 3 PCs with NEW Malwarebytes Anti-Malware Premium!
Formatting a drive to work with Windows.
Command FORMAT allows you to format a disk / floppy disk in the Windows command line.
Command line format:
FORMAT volume [/FS:filesystem] [/V:label] [/Q] [/A:size] [/C] [/X] [/P:passes] [/S:status]
FORMAT volume [ /V:label] [/Q] [/F:size] [/P:passes]
FORMAT volume [/V:label] [/Q] [/T:tracks /N:sectors] [/P:passes ]
FORMAT volume [/V:label] [/Q] [/P:passes]
FORMAT volume [/Q]
Command line options:
volume — Specifies the drive letter (followed by a colon), mount point, or volume name.
/FS:filesystem — Specifies the file system type (FAT, FAT32, NTFS, or UDF).
/V:label — Volume label.
/Q — Quick format. Overrides the /P option.
/C — NTFS only: Set the default compression mode for all files created on a new volume.
/X — Initiates a volume shutdown as the first action if needed. All open handles to the volume will be invalid.
/R: Revision — UDF only: Formatting in the specified UDF version (1.00, 1.02, 1.50, 2.00, 2.01, 2.50). The default is revision 2.01.
/D — UDF 2.50 only: Metadata will be duplicated.
/A:size — Overrides the default cluster size. In general, it is recommended to use the default cluster sizes.
NTFS supports sizes 512, 1024, 2048, 4096, 8192, 16K, 32K, 64K.
FAT supports sizes 512, 1024, 2048, 4096, 8192, 16K, 32K, 64K, (128K, 256K for sector size > 512 bytes).
FAT32 supports sizes 512, 1024, 2048, 4096, 8192, 16K, 32K, 64K, (128K, 256K for sector size > 512 bytes).
exFAT supports sizes 512, 1024, 2048, 4096, 8192, 16KB, 32KB, 64KB, 128KB, 256KB, 512KB, 1MB, 2MB, 4MB, 8MB, 16MB, 32MB.
The FAT and FAT32 file systems impose the following restrictions
per number of volume clusters:
FAT: number of clusters
FAT32: 65526
The FORMAT command will immediately abort if
a violation of the above restrictions will be detected,
using the specified cluster size.
NTFS compression is not supported for cluster sizes
more than 4096.
/F:size — Specifies the size of the formatted floppy disks (1.44)
/T:tracks — The number of tracks on each side of the disk.
/N:sectors — Number of sectors per track.
/P:times — Zeros each sector of the volume the specified number of times. This option has no effect with /Q
/S:state — Where «state» can be either «enable» or «disable». Short names enabled by default
Command examples FORMAT :
format /? — Display help for using the command
format /? | more — display help on using the command with paging mode.
format /? > C:\formathelp.txt — display help on using the command with output to a text file C:\formathelp.txt
format A: — format floppy disk in drive A: with default settings.
While executing the format command, the following messages are displayed:
Insert a new disk into drive A:
and press ENTER…
File system type: FAT.
Verification: 1.44 MB
The floppy disk will be formatted with file system type FAT and
1.44 MB
If there are open files on the disk being formatted, the format command will issue a warning:
The Format command cannot be run because the volume is being used by another process.
You can start Format if you first disable this volume.
ALL OPEN VOLUME HANDLES WILL BE FURTHER INCORRECT.
Are you confirming that the volume is offline? [Y(yes)/N(no)]
The user has the option to cancel or continue formatting by entering
Y . After confirming the request, all files will be forced closed and the volume will be dismounted. This operation cannot be performed on the system drive.
The volume is disabled. ALL OPEN VOLUME HANDLES BECAME INCORRECT.
After the start of formatting, information about its progress is displayed, a volume label request and results:
Initializing File Allocation Table (FAT)…
Volume label (11 characters, ENTER — no label needed):
Formatting is complete.
1,457,664 bytes total on disk.
1,457,664 bytes available on disk.
512 bytes per cluster.
2,847 clusters per disk.
12 bits per FAT entry.
Volume serial number: 3281-2839
FORMAT A: /T:80 /N:9 720kb).
FORMAT F: /FS:NTFS — format a removable disk (flash drive) to the NTFS file system. Please note that the NTFS file system is not supported on devices that are optimized for fast deletion. Therefore, in order to format a regular flash drive in NTFS, you need to change the optimization method, for which, in the Windows Device Manager, open the properties of the removable drive and go to the tab
«Politics»
After policy 9 is installed0005 Optimize for formatting the flash drive partition to the NTFS file system will be possible:
Insert new disc into drive F:
and press ENTER…
File system type: FAT32.
New file system: NTFS.
format L: /fs:UDF /V:UDFTOM /Q — format an optical disc into the UDF (Universal Disk Format) file system. The label of the volume being formatted is UDFTOM . Quick formatting is used ( /Q ), i.e. creating a table of contents without checking blocks. If the rewritable optical disc contains data, the program will ask for the label of the existing volume:
Enter the volume label for disk L: Disk19 is the label of an existing volume.
If the disk is not empty and the current volume format does not allow quick formatting, then the format utility will display a message:
Invalid current format.
It is not possible to quickly format a disk.
Start unconditional formatting [Y(yes)/N(no)]?
After answer Y formatting will continue:
Performing low-level formatting…
Creation of file system structures.
Formatting is complete.
4.38 GB total on disk.
Available: 4.38 GB.
After formatting is completed, the rewritable optical disc with the UDF file system can be used both in Explorer and in
the Windows command line to create, modify, and delete files and directories, just like a large-capacity floppy disk or flash drive.
How to format a hard drive or flash drive using the command line
In some cases, you may need to format a flash drive or hard drive using the command line. For example, this can be useful when Windows is unable to complete formatting, as well as in some other situations.
This guide details several ways to format a USB flash drive or hard drive using the command line in Windows 10, 8 and Windows 7, as well as an explanation of when which methods are more suitable.
Note: Formatting deletes data from the disk. If you need to format drive C, you won’t be able to do it on a running system (since the OS is located on it), but there are ways, nevertheless, about which at the end of the instructions.
Using the FORMAT command on the command line
Format is a command for formatting drives on the command line, which has existed since the days of DOS, but also works properly in Windows 10. With it, you can format a USB flash drive or hard drive, or rather, a partition on them.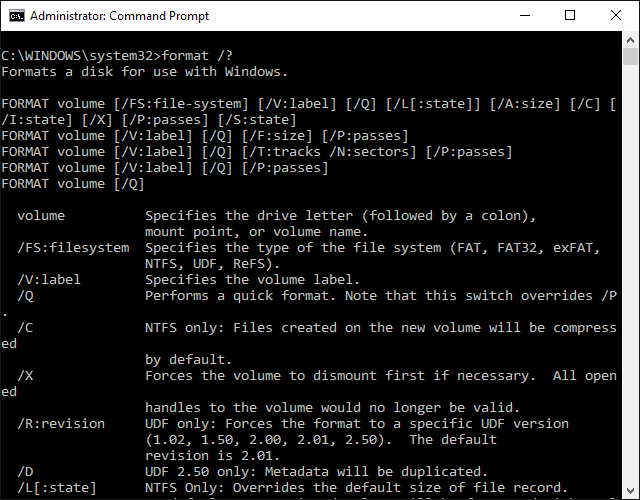
For a flash drive, this usually does not matter, provided that it is defined in the system and its letter is visible (since they usually contain only one partition), for a hard drive it may: with this command you can format only partitions by separately. For example, if the disk is divided into partitions C, D, and E, you can use format to format D first, then E, but not merge them.
The procedure is as follows:
- Run a command prompt as an administrator (see How to run a command prompt as an administrator) and enter the command (an example is given to format a flash drive or hard drive partition with the letter D).
- format d: /fs:fat32 /q (In the specified command after fs: you can specify NTFS to format not in FAT32, but in NTFS. Also, if you do not specify the /q parameter, then not a quick, but a full formatting, see Quick or full formatting of a flash drive and disk).
- If you see the message «Insert a new disk in drive D» (or with a different letter), just press Enter.
- You will also be prompted to enter a volume label (the name under which the disk will appear in Explorer), enter it at your discretion.
- At the end of the process, you will receive a message that formatting is complete and you can close the command line.
The procedure is simple, but somewhat limited: sometimes it is required not only to format the disk, but also to delete all partitions on it (ie, merge them into one). Format won’t work here.
Formatting a flash drive or disk using DISKPART on the command line
The Diskpart command-line tool, available in Windows 7, 8, and Windows 10, not only allows you to format individual partitions on a flash drive or disk, but also deletes them or creates new ones.
Let’s first look at using Diskpart to simply format a partition:
- Start a command prompt as administrator, type diskpart and press Enter.
- Use the following commands in order, pressing Enter after each.
- list volume (here, pay attention to the volume number corresponding to the letter of the drive to be formatted, mine is 8, you will use your number in the next command).
- select volume 8
- format fs=fat32 quick (instead of fat32, you can specify ntfs, and if you need not quick, but full formatting, do not specify quick).
- exit
This completes the formatting. If you need to delete all partitions without exception (for example, D, E, F and others, including hidden ones) from a physical disk and format it as a single partition, you can do this in a similar way. On the command line, use the commands:
- diskpart
- list disk (you will see a list of connected physical disks, you need the number of the disk that will be formatted, I have it 5, you will have your own).
- select disk 5
- clean
- create partition primary
- format fs=fat32 quick (it is possible to specify ntfs instead of fat32).
- exit
As a result, one formatted primary partition with the file system of your choice will remain on the disk. This can be useful, for example, when a flash drive does not work properly due to the fact that there are several partitions on it (more on this here: How to delete partitions on a flash drive).
Command line formatting — video
In conclusion, about what to do if you need to format the C drive with the system. To do this, you will need to boot from a LiveCD boot drive (including utilities for working with hard disk partitions), a Windows recovery disk, or a Windows installation USB flash drive. Those. it is required that the system is not running, since it is also deleted during formatting.
If you booted from a Windows 10, 8 or Windows 7 bootable flash drive, you can press Shift+f10 (or Shift+Fn+F10 on some laptops) in the installer, this will bring up a command prompt where formatting the C drive will already be available. Also, the Windows setup program, when choosing the «Full installation» mode, allows you to format the hard drive in the graphical interface.
remontka.pro in Telegram | Other ways to subscribe
Support the author and the site
format | Microsoft Learn
E-mail address
- Article
- Reading takes 5 minutes
Applies to: Windows Server 2022, Windows 10, Windows Server 2019
Formats the drive to accept Windows files. To format a hard drive, you must be a member of the Administrators group.
Note
You can also use the Format command in the Recovery Console with various options. For more information about the Recovery Console, see Windows Recovery Environments (Windows RE).
Syntax
 format volume [/FS:file-system] [/V:label] [/Q] [/L[:state]] [/A:size] [/C] [/I:state] [ /X] [/P:passes] [/S:state]
format volume [/V:label] [/Q] [/F:size] [/P:passes]
format volume [/V:label] [/Q] [/T:tracks /N:sectors] [/P:passes]
format volume [/V:label] [/Q] [/P:passes]
format volume [/Q]
Parameter
| Parameter | Description |
|---|---|
|
Specifies the mount point, volume name, or drive letter (followed by a colon) of the drive that you want to format. If you do not specify any of the following command-line options, the Format command uses the volume type to determine the default disk format. |
| /FS: FileSystem | Specifies the file system type (FAT, FAT32, NTFS, exFAT, ReFS, or UDF). |
3. 3 3 |
Specifies the volume label. If you omit the /v command-line option or use it without specifying a volume label , you will be prompted for a volume label after formatting is complete. Use the syntax /v: to prevent the volume label from being prompted. If you are formatting multiple drives with one command format , all disks will be given the same volume label. |
Specific |
Specifies the allocation unit size for FAT, FAT32, NTFS, exFAT, or ReFS volumes. If you don’t specify the unit size is , it will be chosen based on the size of the volume. For general use, it is highly recommended to use the default settings. The following list shows the valid values for each type units of measure file system.
|
| /Q | Performs a quick format. Deletes the file table and root directory of a previously formatted volume, but does not perform a sector-by-sector check for bad areas. The /q command-line option should only be used to format previously formatted volumes that are known to be in good health. Note that /q overrides /q . |
W |
Specifies the size of the floppy disk to be formatted. Whenever possible, use this command line option instead of command line options /t and /t . The following size values are valid on Windows:
|
T |
Specifies the number of tracks on the disc. Use the command-line option /f whenever possible. If option /t is used, option 9 must also be used0356 /n . These options are used together as an alternative way to specify the size of the disk to be formatted. This option is not valid with option /f . |
\N |
Specifies the number of sectors per track. If possible, use the command line option /f instead of /n . When using /n , you must also use the /t option. These options are used together as an alternative way to specify the size of the disk to be formatted. This option is not valid with option /f . |
W |
Zero each sector on the volume. After that, the volume will be overwritten with time using another random number. If the value of Count is zero, then after zeroing each sector, no additional rewrites are performed. Specifying option /q ignores this option. After that, the volume will be overwritten with time using another random number. If the value of Count is zero, then after zeroing each sector, no additional rewrites are performed. Specifying option /q ignores this option. |
| /C | NTFS only. Files created on a new volume will be compressed by default. |
| / X | Forces a volume off, if necessary, before formatting. All open handles to the volume are invalidated. |
| /R | NTFS only. Files created on a new volume will be compressed by default. |
| /D | UDF 2.50 only. The metadata will be duplicated. |
H |
NTFS only. Overrides the default file entry size. By default, a non-tiered volume will be formatted with small file entries, and a tiered volume will be formatted with large file entries. /L and /l: enable force large file entries and /l: Disable force the format to use small file entries. |
#D0 |
Specifies support for short file names. Status can be enable or disable . Short names are disabled by default. |
System |
Indicates that the TxF system is enabled or disabled. Condition can enable or disable . TxF system enabled by default |
Saving |
ReFS only. Specifies whether integrity should be enabled on the new volume. Status can be enable or disable . Storage, which supports data redundancy by default, has integrity enabled. |
Which |
NTFS only. Enable Direct Access Storage (DAX) for this volume. In DAX mode, the volume is accessed through the memory bus, improving I/O performance. A volume can only be formatted in DAX mode if the hardware supports DAX mode. Condition can enable or disable . /dax is considered the same as /dax: enable . Condition can enable or disable . /dax is considered the same as /dax: enable . |
/Logize:: |
NTFS Specifies the size of the NTFS log file in kilobytes. The minimum supported size is 2 MB, so specifying a size smaller than 2 MB will result in a 2 MB log file. Zero means the default value, which usually depends on the size of the volume. |
| /norepairlogs | NTFS only. Disables NTFS recovery logs. If chkdsk flag is set to (i.e. chkdsk/spotfix), this will not work. |
| /? | Display help on the command line. |

 44, 1.44, or 1.44 MB
 -
The Format command creates a new root directory and file system for the disk. Moreover, it can check for bad areas on the disk and delete all data on the disk. To be able to use the new drive, you must first use this command to format the drive.

-
After formatting a floppy disk in format , the following message is displayed:
Volume label (11 characters, ENTER for none)?Enter up to 11 characters (including spaces) to add a volume label. If you don’t want to add a volume label to the disk, press Enter.
-
When using the Format command to format a hard drive, a warning similar to the following is displayed:
 WARNING, ALL DATA ON NON-REMOVABLE DISK
DRIVE x: WILL BE LOST!
Proceed with Format (Y/N)? _
To format the hard drive, press the Y key ; If you don’t want to format the drive, press the N key.
-
FAT file systems limit the number of clusters to 65526. FAT32 file systems limit the number of clusters between 65527 and 4177917.
-
NTFS volume compression is not supported for clusters larger than 4 MB.
Note
The Format option stops processing immediately if it determines that the previous requests cannot be met using the specified cluster size.
-
After formatting is complete, the Format field displays messages showing total disk space, spaces marked as bad, and space available for files.
-
You can speed up the formatting process using the command line option /q . Use this option only if there are no bad sectors on the hard drive.
-
Do not use the Format command on a disk prepared with the subst command. You cannot format drives over the network.
-
The following table lists the exit codes and a brief description of each.
Exit code Description 0 Formatting completed successfully. 1 Invalid parameters specified. 4 A fatal error has occurred (any error other than 0, 1, or 5). 5 The user pressed N at the «Do you want to continue formatting (Y/N)?» prompt to abort the process.