How to Diskpart Erase/Clean a Drive Through the Command Prompt
This article explains the Microsoft Diskpart Erase utility. The command that erases the drive during this process is «Clean». In this article «Clean» and erase are used interchangeably. Cleaning or erasing a storage device removes all data and partitions from the drive.
Critical Instructions:
- Disclaimer: Seagate Technology, LLC is not responsible for lost user data. Be sure to back up any important data on this drive before proceeding.
- This article explains the Microsoft Diskpart Erase utility. The command that erases the drive during this process is «Clean». In this article «Clean» and erase are used interchangeably. Cleaning or erasing a storage device removes all data and partitions from the drive.
- Please read all steps, instructions, and warnings before attempting the Diskpart Erase/Clean.
- Diskpart Erase/Clean will permanently erase/destroy all data on the selected drive. Please make certain that you are erasing the correct disk.
- Remove all additional drives from the computer excluding the drive you are booting from and the drive you want to Erase/Clean.
Items to note:
- This article will walk through the steps of using the Microsoft Diskpart Erase utility to Clean the disk of a previous partition and format, including any data on the drive. This command takes only a few minutes to complete.
- This article covers Diskpart Erasing a 3TB or larger drive that has a Master Boot Record (MBR) Partition table, which is thereby limiting its capacity to 2TB. However, this article also applies to any scenario where a Diskpart Erase of an entire disk is necessary.
- For more information regarding drives over 2TB and GPT/MBR partition tables please see the following articles.

- knowledge.seagate.com/articles/en_US/FAQ/218619en
- http://www.seagate.com/support/downloads/beyond-2tb/
- To determine the disk number assigned to the 3TB+ MBR partitioned drive follow the steps below.
- From the Start menu right click on Computer which will provide a drop down menu. (If you are on Windows 8 or 8.1 move your mouse to the bottom left hand corner of the desktop screen and right click. Then select Disk Management).
- Choose Manage.
- Select Disk Management (listed under Storage).
- Look for the drive that is identified as the 3TB drive (2794GB). The properties window shows that the partition table on the drive is MBR . Important: note the Disk number (such as Disk 1).
- Open a Command Prompt window. To open the Command Prompt on a Windows Vista or Windows 7 machine click on Start and type cmd in the search bar.
 Then right click on cmd.exe and run as administrator. It will prompt you with the message, «Do you want to allow the following program to make changes to this computer,» click yes. A black Command Prompt window will open.
On Windows 8 move your mouse to the bottom left hand corner of the desktop screen and right click. Select Command Prompt (Admin) from the pop-up menu.
This is the Command Prompt window.
- From the command prompt, type diskpart and press Enter.
The diskpart prompt will open.
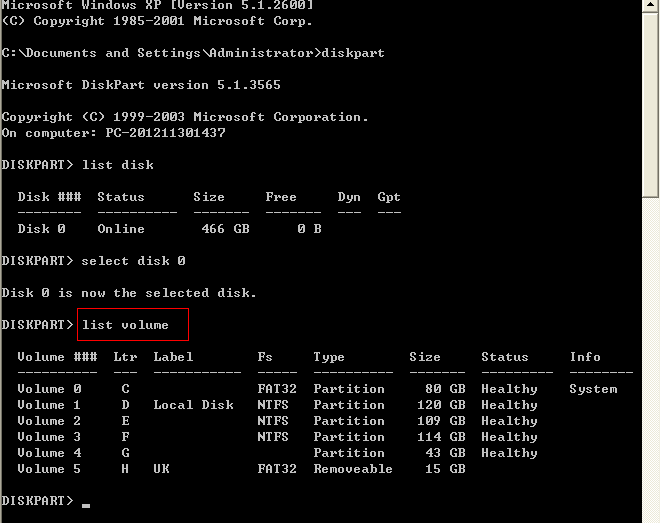
- From the diskpart prompt, type list disk and press Enter.
A list of disks will appear in a text format. You will return to the diskpart prompt. Step one verified that Disk 1 is the 3TB drive. Warning: Diskpart Erase/Clean will permanently erase/destroy all data on the selected drive.
 Please be certain that you are erasing the correct disk.
 - From the diskpart prompt you will need to select a disk disk number (for instance, if the 3TB+ drive is Disk 1, you would type select disk 1) and press Enter. Warning: Diskpart Erase/Clean will permanently erase/destroy all data on the selected drive. Please be certain that you are erasing the correct disk.
A message appears saying that the disk is selected. You will return to the diskpart prompt. Warning: Diskpart Erase/Clean will permanently erase/destroy all data on the selected drive. Please be certain that you are erasing the correct disk.
- From the diskpart prompt, type clean and press Enter. The drive’s partition, data, and signature is now removed. You will return to the diskpart prompt. Warning: Once you type clean and hit enter the drive will be erased.
 No warning will be provided.
- The Command Prompt window will display the message «DiskPart succeeded in cleaning the disk«. Close out of the Command Prompt window by clicking the red X in the upper right hand corner.
Now the 3TB+ drive can be re-initialized, partitioned, and formatted.
404: Page not found
SearchWindowsServer
The page you were trying to reach at this address doesn’t seem to exist. This is usually the result of a bad or outdated link. We apologize for any inconvenience.
What can I do now?
If this is your first time visiting TechTarget, welcome! Sorry for the circumstances under which we’re meeting. Here’s where you can go from here:
Search
- Check out the latest news.
- Our home page contains the latest information on Windows Server.
- Our about page contains more information about the site you are on, SearchWindowsServer.

- If you need to, please contact us, we would love to hear from you.
Browse By Category
Cloud Computing
-
Latest Google Cloud AI shines spotlight on retail automationAI-powered automated inventory tracking systems aren’t perfect. However, retailers with high rates of lost sales from missing …
-
How to set up autoscaling in Azure Kubernetes ServiceExplore scaling options in AKS, such as the horizontal pod and the cluster autoscaler. Then, follow a step-by-step tutorial on …
-
IaaS vs. PaaS options on AWS, Azure and Google Cloud PlatformLooking to shift your organization’s workloads to the cloud? Understand the advantages and disadvantages of IaaS and PaaS options.
 ..
..
Enterprise Desktop
-
5 steps to identify and fix Windows 11 performance issuesWindows 11 administrators may encounter numerous desktops with varying performance issues. Follow these steps to identify the …
-
Troubleshooting the most common issues with Windows 11When Windows 11 administrators encounter an issue with a desktop without a clear fix, they should perform general troubleshooting…
-
Slowing PC sales spark lower pricesPC prices are dropping as manufacturers lower prices to move inventory. Market saturation following the pandemic is a significant…
Virtual Desktop
-
Understanding Azure Virtual Desktop management and storageIn this Q&A, author Ryan Mangan discusses best practices for Azure Virtual Desktop management, the importance of storage and more.
 ..
.. -
Test your Azure Virtual Desktop storage management skillsUse these questions to test how well you know the best practices for managing Azure Virtual Desktop storage.
-
How to fix a remote desktop microphone that’s not workingHybrid work can create new technical issues for employees, and a remote desktop microphone not working is one frustrating …
How to format a hard drive with Windows 10: 3 formatting methods
Home »Guide» Windows 10
Author Maria Reading 3 min Views 227 Published
9000 Complete guide to Windows 10 9000 9000
Formatting formatting formatting formatting disk storage is the process of preparing a storage device for initial use. In addition to preparing the device for use, formatting the drive will also delete any existing data on the drive. This will undoubtedly cause the problem of losing files and data on the drive. Therefore, we recommend that you back up your data and files on your hard drive in advance. nine0003
Check and back up all essential disk data before formatting.
Formatting a drive using Explorer
To format a drive in Explorer using the right-click format function, you must be clear about how many partitions your target drive has. You can open Disk Management to view and confirm the number of partitions on your drive and remember the letter of each partition.
You can then repeat the following space to format the drive on your Windows computer:
- Press the Windows key + E to open File Explorer and find the disk partitions.
- Right-click one of the disk partitions and select Format….
- Set the hard disk partition to a new file system format — NTFS and check «Perform quick format».

- Click «Start» and click «OK» to complete the format.
Repeat the above steps until you have finished formatting all disk partitions. nine0003
Formatting a drive using Disk Management
Disk Management is a built-in disk utility for Windows that helps advanced users manage hard drives and solid state drives. This allows owners the flexibility to create, format, delete, and expand volumes for free.
Note that to do this you must first confirm which partition to format if you are formatting the wrong volume.
- Right-click the Windows icon, then select Disk Management.
- Locate and right-click the disk partitions you want to format and select Format.
- Set the file system format to NTFS and check «Perform a quick format».
- Press OK to confirm.
Repeat the steps above until you have finished formatting the entire drive in Windows 10.
Formatting a drive using the CMD DiskPart 9 command0021
The DiskPart Command Prompt, also known as CMD, is a command line disk utility that processes commands for the operating system and allows users to perform disk management operations for free. This tool is for some advanced users to process their computer commands to manage hard drives.
10 Ways to Open Command Prompt in Windows 10
Please note that this process is a little more complicated than using File Explorer or Disk Management, so make sure you follow the guide below carefully. nine0070 exit to close DiskPart.
How to split drive C into two drives on Windows 10: instructions » Format disk and flash drive
Updated: 05/03/2020, author —
Ilya
Ilya is the editor-in-chief of the site softdroid.net. He is the author of several hundred guides and articles on Android setup. For about 15 years he has been repairing equipment and solving technical problems for iOS and Android. I dealt with almost all more or less popular brands of mobile smartphones and tablets Samsung, HTC, Xiaomi, etc. I use iPhone 12 and Samsung Galaxy S21 with the latest firmware version for testing.
nine0003
About the author
Sometimes formatting the first two ways causes the computer to freeze or display an error about the process being unable to complete. In this case, you should resort to using the command line. It allows you to format in two ways: using the Diskpart utility or using the Format command.
Contents of :
Run command line
Proceed as follows:
- Open the Task Manager (right-click on the taskbar — «Task Manager» or keyboard shortcut Ctrl+Shift+Esc),
- Click «File» and go to the «Run new task» menu,
- In the window that appears, enter the command CMD and check the box «Create a task with administrator rights.»
- Click OK.
- After that, the console (command line) will be displayed on the computer screen.
Attention ! The following actions may result in the loss of personal data from the user’s device.
Follow the specified sequence of actions and carefully enter each command without making any typos.
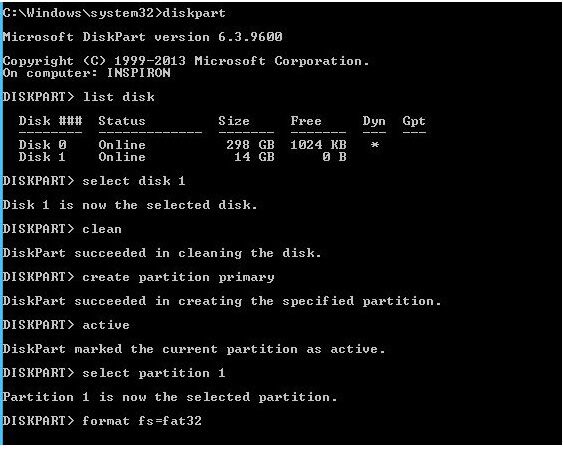
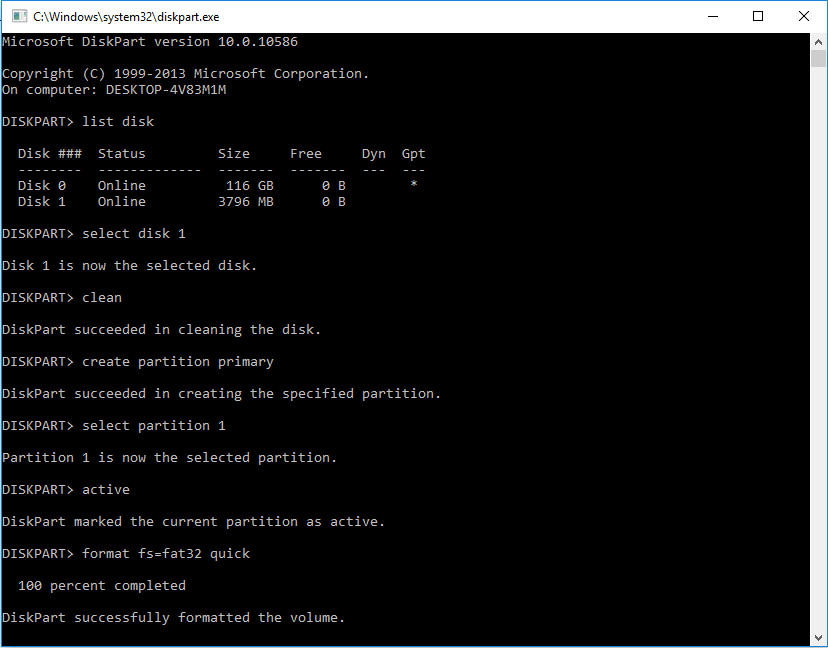
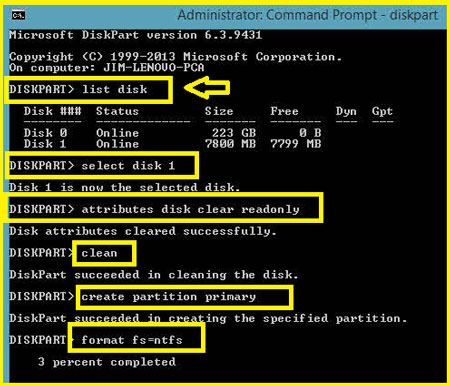
Method 1: DiskPart Utility
- Insert the flash drive into the USB port on your PC or laptop.
- Next, enter the following tasks in the command line (after each task entered, press Enter):
- diskpart (the utility for working with connected devices will start),
- list volume (a list of all disks in the system will be displayed. The flash drive we are formatting, suppose it will be displayed as volume 15),
- select disk 14 (select device),
- attributes disk clear readonly,
- clean (we clean it),
- create partition primary (we create a primary partition on the media),
- format fs=fat32 (if necessary, change the file system to FAT32). nine0028
Method 2. Format command
The second way to format a flash drive via the command line is to use a special task.
The main thing is not to confuse the name of the removable disk.
So, to format the flash drive, do the following:
- We look under what name the disk is reflected in «My Computer» (for example, a removable disk (K :)),
- At the command line, enter: format [flash drive or drive letter]: / FS: FAT32 quick, press Enter,
- The message «Insert a new disk in drive K:» appears,
- Press Enter.
- The file system of the flash drive has been changed, the drive has been formatted.
Thus, there are two basic ways to format sd cards and usb flash drives through the command line interface.
Frequently Asked Questions
What should I do if the operating system does not boot and I need to format the media?
You can use a Windows boot disk by specifying it as a boot device through the BIOS.
Read more here. nine0003
The flash drive is formatted in exFAT, is it possible to convert it to FAT32 via the command line?
Yes, use the format command for this (the method is described above). There are also various GUI formatting applications, see all exFAT to FAT32 conversion methods.
When formatting via cmd, you have to wait a very long time.
The fact is that when using format K:/FS:FAT32, normal formatting is applied, it takes up to 10 minutes or more. You can use DiskPart or use the “quick” key for the format command, then the fast method with clearing the headers will be used. nine0003
Please rate the article:
Ilya is the editor-in-chief of softdroid.net. He is the author of several hundred guides and articles on Android setup. For about 15 years he has been repairing equipment and solving technical problems for iOS and Android. I dealt with almost all more or less popular brands of mobile smartphones and tablets Samsung, HTC, Xiaomi, etc.