How To Format Hard Drive From Command Prompt
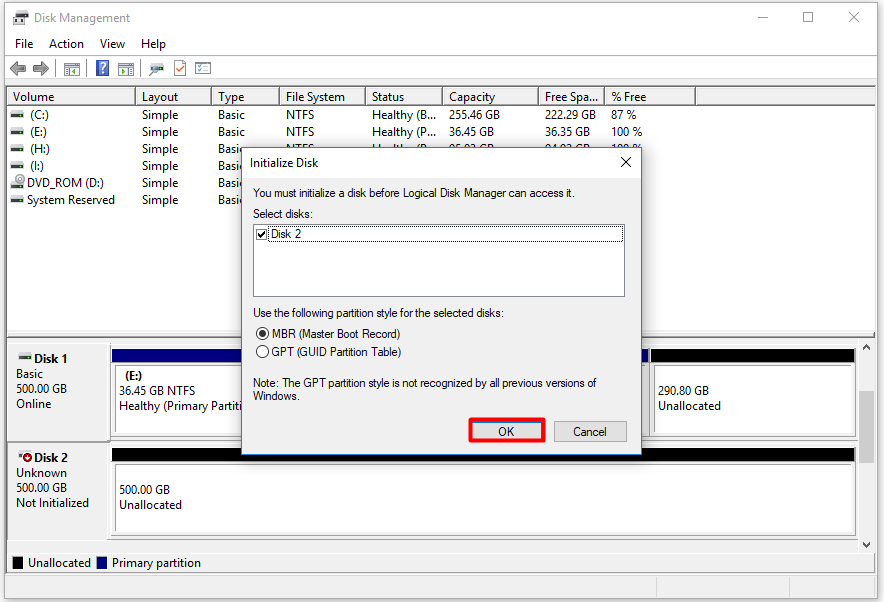
Generally, GUI components like File Explorer or Disk Management are easy-to-use and sufficient to format a hard drive in Windows. However, for certain scenarios, such as when you need to convert a drive’s partitioning scheme, mark a partition as active, or simply format the boot drive, command line tools become necessary.
Even in a general context, the formatting process can be confusing if you’re unfamiliar with things like partitions, partitioning flavor, and filesystems. As such, we’ve included all such necessary details and listed the full steps to format a hard drive using CMD.
Formatting Options
Let’s talk about the options you’ll need to specify when formatting a hard drive, starting with MBR and GPT. A hard drive is partitioned into blocks or sectors, and the layout of such partitions on the HDD depends on the partitioning scheme used.
We have an in-depth article on the differences between MBR and GPT, but the key takeaway for practical reasons is that GPT is recommended in most cases as it addresses and improves on many of MBR’s limitations. In certain cases, such as when you need to install Windows 11 on the drive, GPT is actually a necessity as it’s a core requirement for Windows 11.
Similarly, a file system is how the OS manages and names groups of data. In the case of Windows, FAT32, NTFS, and exFAT are the relevant file systems. FAT32 drives have excellent compatibility and will work on other systems like Mac and Linux as well. But it’s limited by the fact that it can only support a max of 4 GB files and 32 GB partitions.
NTFS is the default file system in Windows. As it’s designed for Windows, it offers the best performance and the most features. But by the same token, NTFS drives have terrible compatibility with other platforms. exFAT, to put it simply, is the best of both worlds, with a mix of compatibility and performance.
Important: When formatting drives from the command line, it’s very easy to mess up the commands and format the wrong drive. So, make sure to double-check the commands before executing them to ensure you format the correct drive.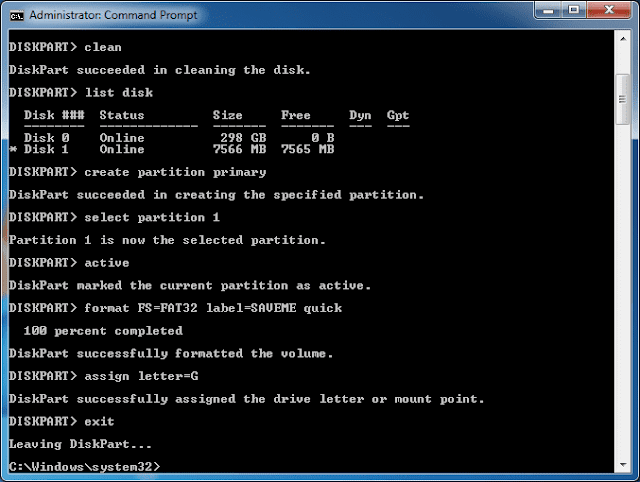
How to Format Hard Drive From CMD?
If the hard drive has a single partition, you can simply use the format command (e.g., format E:) to format the drive entirely. You can use additional parameters to modify its functionality, as shown below:
- The format command by itself performs a thorough sector-by-sector scan during the format, while using the /Q option performs a quick format (e.g.,
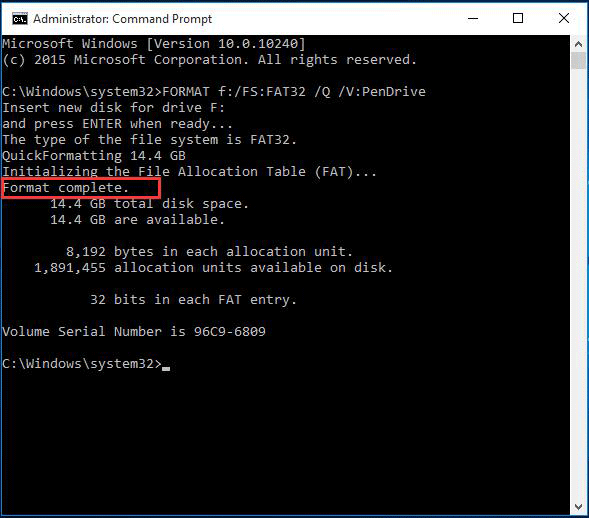
format E: /q). - To format the disk with a specific filesystem, you can use the /FS option (e.g.,
format E: /fs:ntfs), replacing NTFS with exFAT or FAT32 as you prefer. - The /P option lets you zero-fill every sector on the disk. After that’s done, you can also set the count for how many times random numbers are used to overwrite the sectors (e.g.,
format E: /P:2). This is important if you’re trying to completely wipe the drive so that the data can’t be recovered later.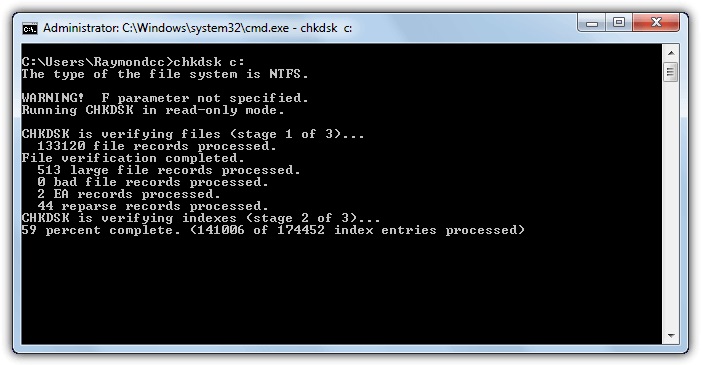
- These are the important parameters, but there are various others that can be useful sometimes (like /V to specify the volume label). For the full list of such options, we recommend referring to Microsoft’s documentation.
When you need to perform tasks like formatting specific partitions only or cleaning all filesystems and partitions, you can use diskpart with the steps listed below:
- Press Win + R, type
diskpart, and press Enter. - Enter
list diskand note the disk # you’re trying to format. - Use
select disk #to select the disk.
After selecting the disk, you can do a couple of things. First, to format certain partitions only, you can follow the steps listed below:
- Enter
list vol, identify the volume you want to format and note its volume # or letter. - Select the volume with
sel vol #.-Step-5.jpg/aid6640403-v4-728px-Recover-Photos-Using-Command-Prompt-(CMD)-Step-5.jpg)
- Type
format fs=ntfs quickand press Enter.
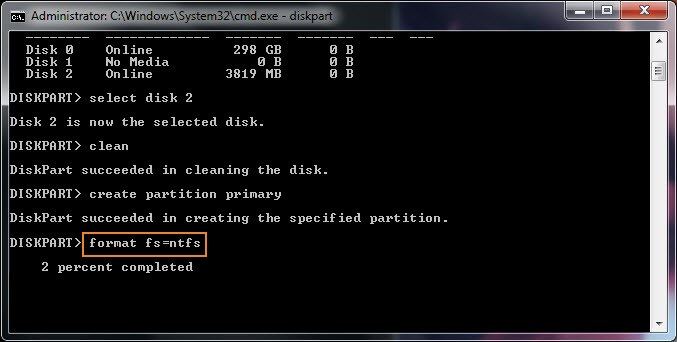
Second, to completely format the drive and remove all the partitioning information, you can select the disk as shown above and use the clean command as such:
- Assuming the disk is selected, enter
cleanto clear all formatting information first. - (Optional) At this stage, you can convert the disk to MBR (
convert MBR) or GPT (convert GPT) if you want. - As there are currently no partitions on the drive, you can use the
create partition primarycommand to create a primary partition. - Now, you can format the partition with your preferred file system (e.g.,
format fs=fat32 quick). - Then, you can assign it a drive letter if it doesn’t already have one (e.g., E, with
assign letter=E). With this, the drive should be formatted and accessible.
How to Format Boot Drive?
If you attempt to format the boot drive from a live Windows environment, you’ll encounter the Volume is in use by another process error. Instead, you must boot to the Windows Recovery Environment (WinRE) first.
Here’s how you can do this:
- Hold Shift and restart your PC to boot into WinRE. Alternatively, you can force-restart the PC 3 times in a row to do the same.
- If these methods don’t work, you can also insert an installation media and boot to it. Then, you can use the Repair your computer option to boot into the recovery environment.
- In WinRE, select Troubleshoot > Advanced Options > Command Prompt.
- In CMD, execute the following commands:
DiskpartList vol - Note the drive letter of the boot volume. Double-check at this stage, as the volume letters may be different from that in the live Windows environment.
- Now, select the boot drive and the format it as shown in the example below:
Sel vol #Format fs=ntfs quick - Enter
exittwice to exit diskpart and command prompt.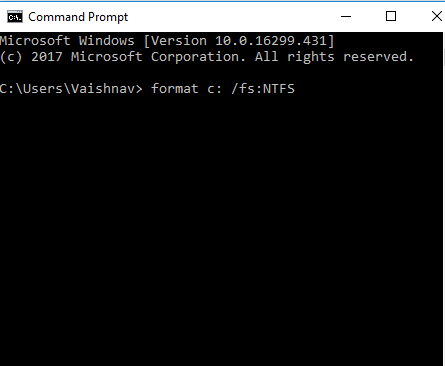
Format Hard Drive from Command Prompt
• Filed to: Hard Drive Recovery • Proven solutions
«How to reformat a hard drive in MS Windows 10 using the command prompt’s disk format command? I tried to wipe my drive clean through windows explorer but was unsuccessful at it? Can I format it quickly using something else?»
— a question from Quora
Among the computer’s many functions, formatting storage space from any optical device is the frequently used ones. Just like any other operating system in the market, Windows offers different variations to format both the internal and removable hard drives. If the system somehow fails to clean it with Disk Management or Window Explorer, then format hard drive from Command Prompt is the best way to format/reformat the storage device.
Here you will learn which command to use to format the drive, the method to format pc using cmd, and the solution to one of the common queries of all PC users—«Can I recover data from a formatted hard disk?»
Read also:
Advisable Tools for Hard Drive Repair in 2021.
How to Backup iTunes to an External Hard Drive?
- Part 1: What is Format Command in CMD?
- Part 2: How to Format a Hard Drive Using the Command Prompt?
- Part 3: Is It Possible to Recover Files from Formatted Hard Drive?
- Part 4: How to Recover Lost Data from Formatted Hard Drive?
Part 1: What is Disk Format Command in CMD?
Before understanding the disk format command of the Command Prompt utility, it is essential to know the functions and origin of Window’s essential service.
Command Prompt is the GUI version of MS-DOS, which works as an input field and stimulates different functions in a command-line interface display for Windows. It is a convenient tool that automates specific operations that do not operate under normal circumstances. One of them is the format command, which you can use when Disk Management or Windows Explorer fails to deliver.
The disk format command in Windows Command Prompt interface is the facility that offers you to clean and change the file system of the intended drive/partition, USB, external hard disk, and other storage devices.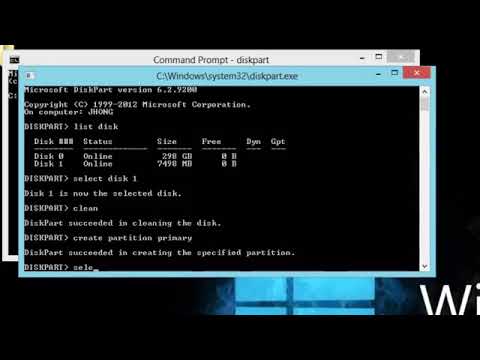 Command Prompt’s disk format command is available in all the latest and older version of Windows and can only work if the selected device isn’t locked or password protected.
Part 2: How to Format a Hard Drive Using the Command Prompt’s Diskpart Format Command?
With time, your system’s hard drive may experience some glitches due to physical damage, virus/malware infection, wear and tear, or incompatible software installation. It is strongly advised to reformat the hard drive at least yearly to help stabilize or even resolve the disk’s performance hiccups.
It is also ideal for taking a few precautions before wiping the storage device clean. One of them is creating a back up of valuable files consistently. Here is the guide to format a hard drive from the command prompt on Windows 10 using the diskpart format command.
- Type «CMD» in the taskbar’s search bar, then «Comman Prompt» will appear, click «Run as administrator» to run the program as an administrator.

- Type «diskpart» from the keyboard and press the enter key.
- Type «List Disk» and hit enter from the keyboard.
- Type select disk and disk number to select the drive you want to format.
For example, from the list, select the Drive you want to Format by writing Select Disk 2 in the interface. Cmd will notify you of that selection.
- Type «Clean» and hit enter to remove all the partitions from the disk in focus.
- Write «Create Partition Primary» and press enter. The interface will inform you that it has succeeded in creating the partition primary.
- Now format your drive with FAT32, exFAT, or NTFS file system by entering the disk format command «format fs=ntfs».
- Assign a new letter to the formatted drive.
 Type «Assign» and enter.
- In the end, type «Exit» to close the Command Prmpt Diskpart Windows whenthe process finishes.
That’s it! You have successfully formatted your drive with the help of disk format command in command prompt.
If you want to know how to format hard drive on Mac, click how to format hard drive on Mac?
Part 3: Is It Possible to Recover Data from Formatted Hard Drive?
It is one of the most frequently asked questions in forums like Quora when users format PC using cmd and hope to recover the erased content again. The query has a simple yes and no answer!
Yes, you can recover data from your formatted drive/partition when you delete items from your HDD. It is because the files don’t get deleted immediately from the memory of the device.
The thing you remove is the file’s address table, and their previously occupied space is marked as available after the format. Until you overwrite your data by saving some new items, the content inside can quickly be recovered.
But if you install a new OS in that drive/volume, the space in question will be overwritten as the new operating system will write its system files and occupy the vacant storage space, and your data will be erased forever.
Part 4: How to Recover Lost Data after you Format PC using CMD? [Recommended]
There may be different ways to restore formatted/deleted data, but some of them require a stronghold on technical knowledge. If you intend to skip through any difficulty and unwanted consequences to recover all of your lost items, then try using the Recoverit Data Recovery program for Windows.
It is one of the only few recovery applications in the market that will retrieve your formatted content through its user-friendly characteristics and close to 100% efficiency. You will not only be able to recover those files, but you’ll also be given the option to save the newly recovered data to a location of your choosing. Here you will know some of the application’s unique selling point and the easy three-step guide that will help you through the recovery process.
Step 1 Choose the Location of the Formatted Disk/Partition:
Run the application on your system and select the drive that you have recently formatted. After performing this action, click on the Start button for the scan to commence.
Step 2 Wait for the Program to complete the Scan:
Recoverit interface offers you to stop/pause the scan in between to preview the partially recovered items. After a few minutes, you will receive a pop-up message that will confirm the completion of the scan.
Step 3 Save your Items to a Safe Location:
Once the program completes the scan, you can now preview the items under the different categories provided by the interface. After a thorough review of the recovered items, please extract them to a save location by hitting the Recovery button placed at the bottom of the display window.
Bottom Line
Having a brief understanding of the functions of Windows’ different utilities makes it simple to operate the computer. Even though formatting a hard drive is a simple job, it can cause concern or two if the disk is in bad shape. Now you comprehend the ins and outs of command prompt’s disk format command, which you can utilize if the standard methods do not work.
Read more about How to format hard drive on Mac
Moreover, you know the fact that data is easily recoverable with the assistance of the Recoverit program. It is an accessible tool to have when the files inside a drive are continuously under threat of getting erased due to a virus attack or an accident. You can share this article with your family and friends if they are dealing with a related problem.
Free Download Free Download
How to format a drive using the command line in Windows
The command line is a program that allows you to control the operating system using special text expressions called commands.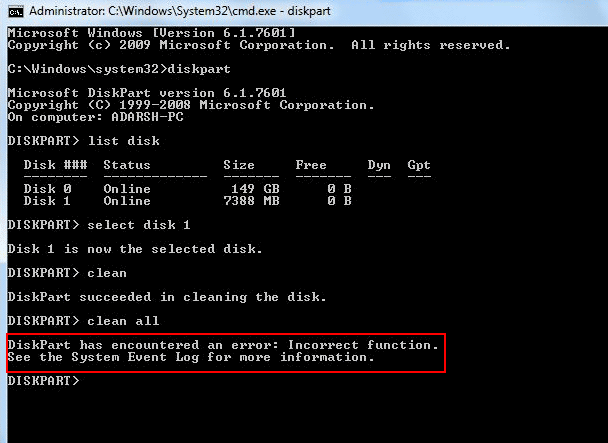 It is a versatile and advanced tool for diagnosing and fixing computer problems. Of all its functions, it is worth highlighting the ability to check for errors and format the disk via the command line in Windows.
The hard drive of a computer is a data storage facility for both the OS itself and users. A well-known weakness of Windows is its inability to clean up after itself «garbage»: the remnants of unused files and deleted applications, registry problems and data recording. Therefore, periodically, in addition to all other measures, it is necessary to diagnose whether there are errors. Also formatting may be required in many cases:0003
- When installing a new hard drive.
- In the presence of a large number of failures, glitches in work, virus infection.
- When reinstalling the OS.
Formatting is the marking of a data storage area, the formation of a file system, i.e. a set of logical rules by which access to the recorded information is carried out.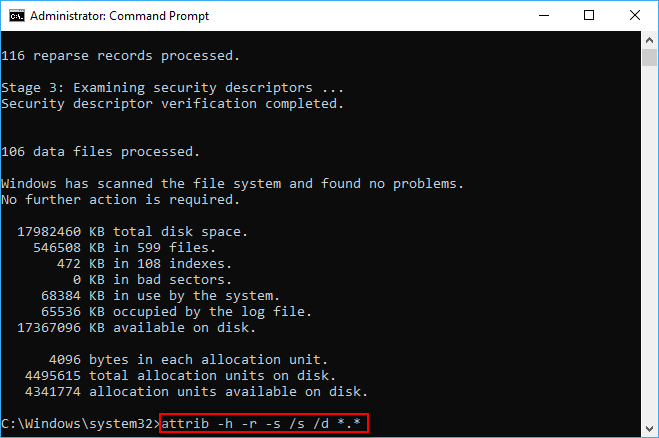 Moreover, the old information is erased, the damaged areas of the hard drive are marked so that data is not written there. Before formatting a hard drive, it must be checked for errors.
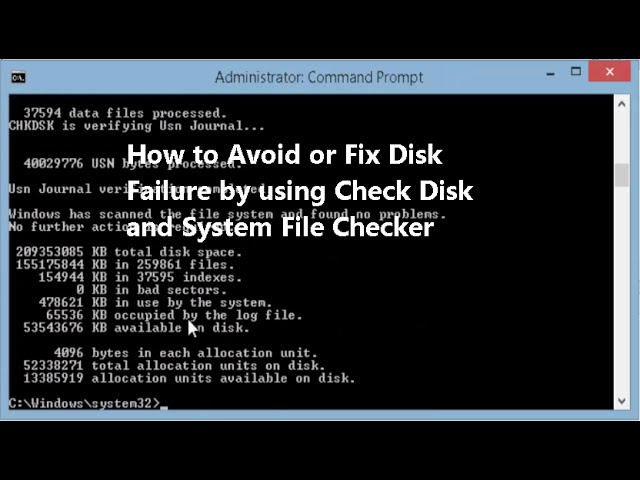
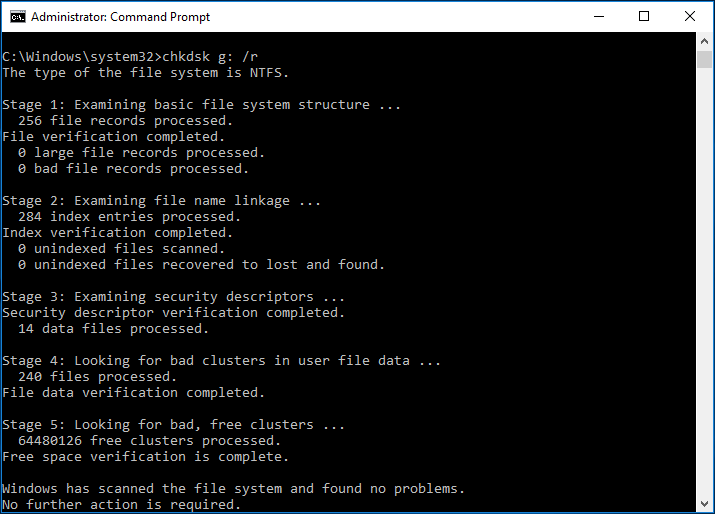
Troubleshooting with ChkDsk
Windows has a special tool called Check Disk (ChkDsk) that runs through the command line. It is also possible to use it through the explorer window, but not with all the parameters and a different interface. The utility allows you to improve performance, fix problems and damage. Be sure to refer to this tool before you decide to format your media. Perhaps this will solve the problems of poor performance. To run the program do the following:
- Run a command prompt as an administrator.
- Type chkdsk c: where c is the media you are checking.
- Press enter.
- If the computer says that the command cannot be executed because the disk is in use by Windows and prompts you to check before the next OS boot, type «y» (yes) and press enter.

- Reboot, and before the OS starts, a disk check will be launched, after which a report on the result will appear on the screen. How many problems and bad sectors were found and how many were fixed.
Disk check can be performed with different parameters:
- /f — fix errors;
- /v—shows the names of files and directories to be checked;
- /r — searches for and restores damaged sectors;
- /I — check indexes with less thoroughness, used only for the NTFS file system;
- /x — with the f option, forces the volume to be disconnected;
- /l:size — changes the log file to the specified size, works only with NTFS system.
The parameter is written after the command, for example:
chkdsk c: /f /r
This means that the disk will be checked, errors will be corrected automatically (/f), sectors will also be checked for damage and an attempt was made to restore the information (/r).
If the checkdisk found errors but cannot fix them, run the following command:
chkdsk with: /f /offlinescanandfix
This will perform the so-called offline diagnostics of the hard drive, you may also have to reboot.
ChkDsk can work correctly only if the command prompt is run as an administrator, and only with FAT32 and NTFS.
Formatting
Formatting is a more radical way to put your hard drive in order. All information on it will be lost, in most cases, it will be impossible to recover it. It depends on the chosen method and on the presence of damage. There are special data recovery programs, but it’s still better not to take risks and format the hard drive only after copying data from it to another medium.
You can format through the command line using the following algorithm:
- Open the command prompt as an administrator.
- Type format c, where c is the letter of the drive you want to format.

- When asked about your confidence in the action, press «y» and enter.
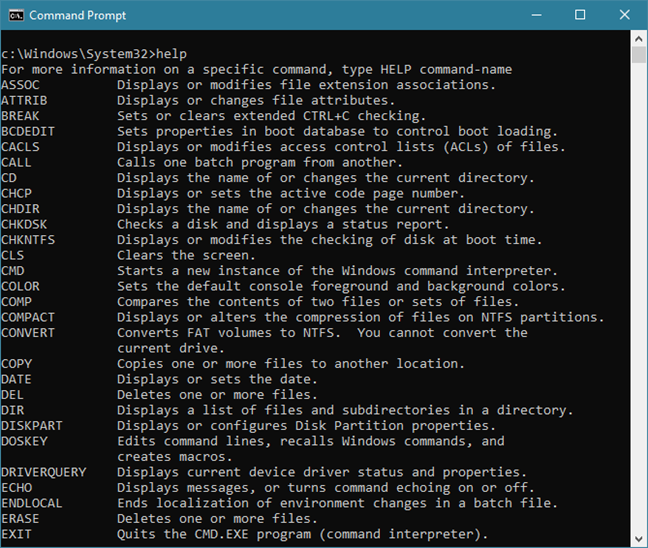
As with ChkDsk, you can set options here. Help on features can be obtained with the expression format/?. We note the following most important:
- format c: /FS:filesystem — formatting in a specific file system, instead of «filesystem» you need to specify FAT32 or NTFS.
- /q — quick format. The table of contents is cleared, but the data itself is not destroyed. They continue to be physically there, but Windows sees the disk as completely empty and writes information over the old data. If possible, we recommend that you do not use this option to avoid further problems with the media.
- /a:size—Format to change the default cluster size.
- /v:label — create a volume label, that is, a disk name.
Formatting your hard drive will allow you to use it like new again, improve its performance and eliminate errors.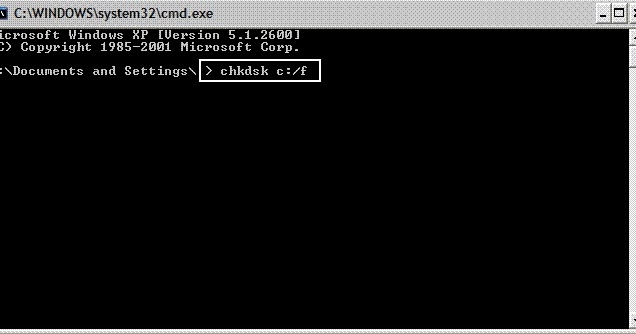 Together with the ChkDsk and Format commands, you can also run one such as DiskPart through the command line to partition the media into sections with different sizes and names. Remember that if you bought and installed a new hard drive in your computer, you need to format it. And if you are simply not satisfied with the work of the old hard drive, first try just running a check with ChkDsk, especially if the OS is installed on it.
Formatting a disk via the command line: 3 ways
Users encounter situations where it is necessary to format a disk via the Windows command line, for example, if for some reason formatting a hard disk in another way fails.
In this case, the user has the option to format the hard disk via the command line in the Windows operating system. Using the command line, depending on the situation, you can format the entire hard drive or one of the partitions (volumes) on the hard drive.
If the computer has one partition: «Logical drive (C:)», which contains the Windows operating system and user data, it is not possible to format the drive in a running system, because this drive is currently used for system operation. In this guide, we will analyze how to proceed in this situation.
Please note that when formatting, all data will be completely deleted from the disk: files, folders, programs, photos, videos, music, etc. Therefore, take care of the safety of the necessary information in advance: copy important data to another disk , which will not be formatted, or to removable media such as an external hard drive, flash drive, or CD/DVD drive.
Disk formatting is carried out in some situations:
- when installing an operating system on a disk;
- in case of virus infection, PC malfunction;
- when using a new hard drive;
- to delete unnecessary data.
In this article, we will look at several ways to format a hard drive through the command line, the instructions provide examples for various situations that users encounter. These methods work on Windows 10, Windows 8.1, Windows 8, Windows 7 operating systems.
How to format a drive from the command line using the format command
The Command Prompt (CMD) tool has a «format» command that formats a drive to a specified file system.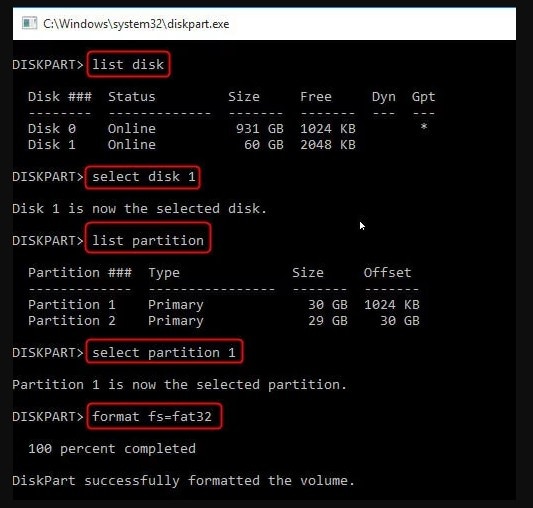 In a running operating system, using this command, you can format partitions on a disk that do not have Windows installed.
If there are several partitions on the hard disk (the system is located on drive «C»), for example, drives «D» and «E» that need to be formatted, then using the «format» command, the drive «D» is formatted first, and then drive «E». If another optional hard drive is connected to the computer, this drive can be completely formatted because it does not have an operating system.
You may also be interested in:
- Windows command line commands: list
- How to run the command prompt as an administrator — 7 ways We format the disk through the Windows command line (standard):
- Run the command prompt as an administrator.
- Enter the command to format the drive:
format d: /FS:NTFS
In this command, «d» is the name of the local drive on the computer that you want to format. “FS:NTFS” is the selected file system, instead of the “NTFS” file system, you can select another suitable file system.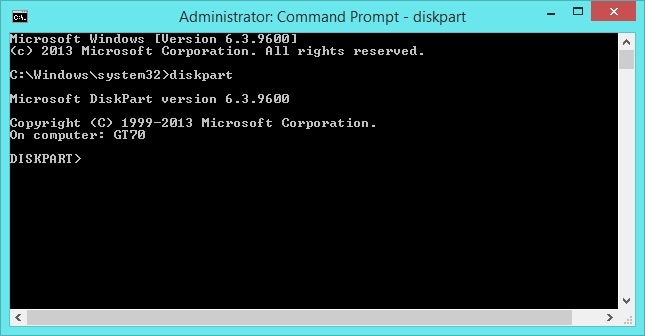 In the vast majority of cases, there is a choice between the NTFS and FAT32 file systems.
 - Enter the volume label for the disk to be formatted.
Assign a volume label (disk name) to the disk. You can choose any convenient name that can be changed later from the Windows settings.
- Next, you need to press the «Y» key to agree with the conditions for formatting the disk, and then press the «Enter» key. You are warned that all data on the disk will be destroyed.
This will start the disk formatting process.
2nd option. If you add additional switches to the «format» command, you can customize the formatting options.
- Run a command prompt as an administrator.
- In the command line interpreter window, execute the command:
format d: /FS:NTFS /x /q
The following switches have been added to this command: /x — turn off the volume, / q — quick format. The first key disables external influence on the disk from the running operating system so that everything goes well. The second key starts a quick format. With a quick format, Windows marks all disk space as unused. The data remains on the disk, the operating system does not see it, new files are gradually written to this place. A normal, full format deletes all data on the drive, but this process takes much longer than a quick format.
 - Press the «Y» key to start formatting.
After the process is completed, information about the completion of this operation will appear in the command line window.
We have considered the option of formatting individual partitions of a hard disk, or another hard disk on which Windows is not installed, on the command line.
How to format drive C in Windows 7, 8 and Windows 10
In general, this guide will work for previous versions of Windows. So, if you try to format the system hard drive in Windows 7 or 8, you will see a message that:0003
- You cannot format this volume.
 It contains the version of the Windows operating system currently in use. Formatting this volume may cause your computer to stop working. (Windows 8 and 8.1)
 - This disk is in use. The disk is being used by another program or process. Format it? And after clicking «Yes» — the message «Windows cannot format this disk. Quit all other programs using the drive, make sure no windows are displaying its contents, and then try again.
What is happening is easy to explain — Windows cannot format the drive on which it is located. Moreover, even if the operating system is installed on disk D or any other, the first partition (i.e., disk C) will still contain the files necessary to boot the operating system, since when you turn on the computer, the BIOS will first start loading from there.
Some notes
Thus, when formatting the C drive, you should remember that this action implies the subsequent installation of Windows (or another OS) or, if Windows is installed on another partition, the OS boot configuration after formatting, which is not the most trivial task and if you are not a very experienced user (and apparently you are, since you are here), I would not recommend taking it.

Formatting
If you are sure what you are doing, then continue. In order to format the C drive or the Windows system partition, you will need to boot from some other medium:
- Windows or Linux bootable flash drive, boot disk.
- Any other bootable media — LiveCD, Hiren’s Boot CD, Bart PE and others.
Special solutions are also available such as Acronis Disk Director, Paragon Partition Magic or Manager and others. But we will not consider them: firstly, these products are paid, and secondly, for the purposes of simple formatting, they are redundant.
Formatting using a bootable flash drive or Windows 7 and 8 disk
In order to format the system disk in this way, boot from the appropriate installation media and select «Full installation» at the stage of choosing the installation type. The next thing you will see will be the selection of the partition to install.
If you click on the «Disk Setup» link, then right there you can already format and change the structure of its partitions.
 You can read more about this in the article «How to partition a disk when installing Windows.»
 Another way is to press Shift + F10 at any time during the installation, a command prompt will open. From which you can also format (how to do this, it was written above). Here you need to take into account that in the installer the drive letter C may be different, in order to find it out, first use the command:
wmic logicaldisk get deviceid, volumename, description
DIR D: command, where D: is the drive letter. (With this command, you will see the contents of the folders on the disk).
After that, you can already apply format to the desired partition.
Using the DiskPart utility
The Diskpart utility is designed to work with disks, the application performs the following operations: creating a new disk (volume), deleting an existing disk, creating a bootable flash drive, formatting a disk partition or the entire hard disk.
The program can be used on a running Windows operating system, but for simple formatting it is much easier to use the «format» command.
 We will consider two options for using DiskPart: formatting a hard disk partition, or formatting a hard disk system partition, the entire hard disk, if we have only one partition on it.
 Due to the fact that we will not be able to format the system disk in a running Windows, we will use bootable media from which we will launch the command line. To do this, we need bootable media from which we can boot on the computer, and then run the command line: bootable Windows USB flash drive, Windows Recovery Disc, Windows installation DVD, Windows PE flash drive or disc, Live CD (Live CD, Live DVD, Live USB).
You need to boot your computer from a USB flash drive or CD/DVD, depending on which media you are using. First, enter the BIOS or UEFI boot menu, select a boot device, and then, after booting from the media, in the Windows RE recovery environment, launch a command prompt.
You may also be interested in:
- How to enter the Boot Menu on a desktop PC or laptop
- Windows Recovery Environment (Windows RE)
Through the installed OS
Through Explorer
- in the lower left corner and then select your computer — you can also go to the explorer if it is displayed on your desktop.
- Once you select the partition you want to clear, right-click on it and then select the appropriate item.
- The file system usually does not need to be changed — we leave the parameter that was set earlier. The label and cluster also usually do not need to be changed. The default will be «Quick (clearing the table of contents)» — I strongly recommend unchecking this box if the section is large and you want to clean it thoroughly.
- At the very end, click «Start».
Command line
In the search box, enter: «Command line» or «cmd». Be sure to run the utility with admin rights, otherwise you will not be able to clean up the desired partition.
We have two options. Specify a regular command with a default value — at the end we write the volume letter:
format D:
The second option — we add two more parameters to the command.
format D: fs:NTFS /q
- fs:NTFS — here we specify the file system we want to turn the partition into. If this parameter is not specified, then the file system that is currently installed will be used.
- /q — quick cleaning. It is better to put if the section is small.
Press the Enter key to run the command.
Disk Management
- On the keyboard, press the Win key (May have a Windows icon) and the English letter R at the same time. As soon as the execution window pops up, enter the command: diskmgmt.msc . If this window is not there, then go to «Start» and enter a similar command in the search box, and then run the utility.
- Everything is the same here — select a partition, go to the formatting section.
- Similarly, as in the first method: select the volume label, file system. Set the cluster size to default.
 Also, uncheck the box next to Quick Cleanup. Click «OK».
- A warning window will pop up — just agree and wait until the procedure is over.
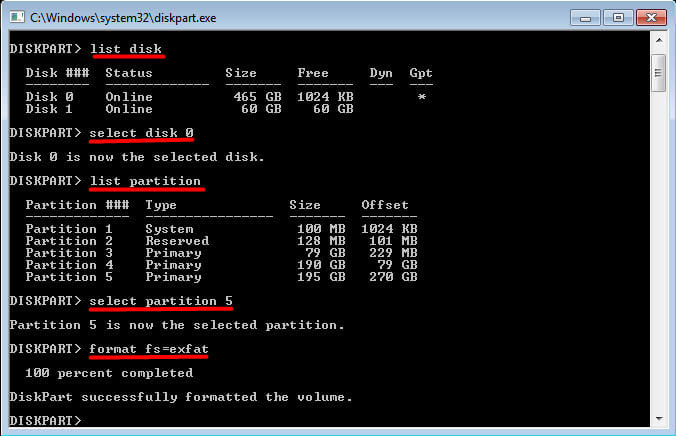
How to Format a Drive Using Diskpart — 1 Method
To format a separate non-system partition or hard drive, you can work from Windows or from bootable media.
In the command line interpreter window, you need to execute sequential commands (after entering the command, press the «Enter» key):
- Starting the DiskPart utility.
diskpart
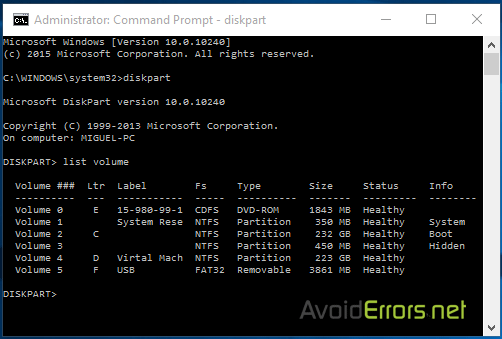
- Enter a command to list all disks (volumes) on the computer.
list volume
We need to know the volume number (disk number) to be formatted. When working from the recovery environment, the disk name may differ from the volume letter in the running operating system, be guided by the size of the partition.On this computer, this is «Volume 3». You need to select your drive number to be formatted.

- Select the volume letter (you will have your own number).
select volume 3
- Start formatting in the NTFS file system, if necessary, you can select the FAT32 file system.
format fs=ntfs quick
In this case, the NTFS file system is selected. The «quick» command performs a quick format.- Run the command to exit the DiskPart application.
exit
Formatting
Formatting is a more radical way to put your hard drive in order. All information on it will be lost, in most cases, it will be impossible to recover it. It depends on the chosen method and on the presence of damage. There are special data recovery programs, but it’s still better not to take risks and format the hard drive only after copying data from it to another medium.
You can format through the command line using the following algorithm:
- Open the command prompt as an administrator.
- Type format c, where c is the letter of the drive you want to format.
- When asked about your confidence in the action, press «y» and enter.
As with ChkDsk, you can set options here. Help on features can be obtained with the expression format/?. We note the following most important:
- format c: /FS:filesystem — formatting in a specific file system, instead of «filesystem» you need to specify FAT32 or NTFS.
- /q — quick format. The table of contents is cleared, but the data itself is not destroyed. They continue to be physically there, but Windows sees the disk as completely empty and writes information over the old data. If possible, we recommend that you do not use this option to avoid further problems with the media.
- /a:size—Format to change the default cluster size.
- /v:label — create a volume label, that is, a disk name.
Formatting a hard drive will allow it to be used again as a new one, increase its performance and eliminate errors.
 Together with the ChkDsk and Format commands, you can also run one such as DiskPart through the command line to partition the media into sections with different sizes and names. Remember that if you bought and installed a new hard drive in your computer, you need to format it. And if you are simply not satisfied with the work of the old hard drive, first try just running a check with ChkDsk, especially if the OS is installed on it.
 Formatting a disk via the command line in Diskpart — method 2
If you need to format the entire system disk with all partitions, you need to boot to your PC from bootable media.
When using this method, all partitions on this disk will be cleared, all information will be marked as deleted.
In the Windows RE recovery environment, enter the command prompt, and then run the following commands in sequence:
diskpart list volume
select volume 2
In our case, the system is located on the C: drive, which corresponds to Volume 2.
 On your computer, the system drive may have a different volume number.
 clean
The «clean» command performs a quick disk cleanup, during which all partitions or volumes are deleted.
create partition primary format fs=ntfs quick exit
Via System Restore
ATTENTION! If you can’t format the partition with Windows in this way, then use a bootable USB flash drive.
Before you start formatting, look at the size of the partition you want to clear. Also, this method is suitable if the system is already installed on you. After the procedure, in any case, you will need to install a new OS.
- Reboot the computer and hold down the «F8» button, and when the auxiliary menu pops up, run «Computer Troubleshooting».
- Select the language by logging in to your account, if you have one, and launch the console.
Formatting of one section
- And now we enter the command in turn:
Diskpart List VOLUME 9000 9000
- Further, you will see the sections that are the same.
 You need to focus not on the letter (as it may differ from the one in the system), but on the size of the partition. Once you find the right one, select it with the command:
- Introduce:
Diskpart
- Next, you need to see the number of the physical disk connected to the system, we enter the command:
List Disk
- 9000 9 you will see only one device, select it:
- Creating a basic markup for further work with the hard drive. It is performed after the first connection of the new HDD to the PC, otherwise it simply will not be visible among the local drives.
- Clearing all saved files. Over the years of a computer or laptop, a huge amount of unnecessary data accumulates on the hard drive. These are not only user, but also system files that are no longer needed, but are not deleted on their own.
As a result, the drive may be full, unstable and slow. The easiest way to get rid of garbage is to save the necessary files to cloud storage or to a USB flash drive and format the hard drive. This is in some way a radical method for optimizing the operation of the HDD. - Complete reinstallation of the operating system. For a better and cleaner installation of the OS, it is best to use a blank disk.
- Bug fixes. Fatal viruses and malware, bad blocks and sectors, and other problems with the hard drive are often corrected by creating a new markup.
- Low-level. The term «low-level formatting» originally referred to a slightly different process, and has been adapted for users. In the usual sense, this is a complete and irretrievable overwriting of information, as a result of which all disk space is freed. If bad sectors were found in the process, they are marked as unused in order to eliminate problems with writing and reading data in the future.
On older computers, the Low Level Format feature was available directly in the BIOS. Now, due to the more complex structure of modern HDDs, this feature is not available in BIOS, and real low-level formatting is done once — during manufacture at the factory. - High level. This method is in fact the only one available among users. During this process, the file system and file tables are formed. After that, the HDD becomes available for data storage. Formatting at a high level is performed after partitioning, data on the location of all files recorded on the hard drive are erased. After it, you can fully or partially restore data, unlike the low-level one, where information is completely overwritten.
- Quick. It does not take very long, since the whole process boils down to overwriting data about the location of the files. At the same time, the files themselves do not disappear anywhere and will be overwritten with new information — as a result of the operation, an empty place is designated, where new files can be written in the future, «displacing» the old ones.
 The structure is not optimized, and if there are problems, they are skipped and not fixed. However, such a process takes, as a rule, up to 1 minute, depending on the volume, and the data can be partially or completely restored using special software.
select disk 0
- 9000
Cause of the malfunction
As a rule, the user himself is the culprit in a situation in which the system refuses to clean a certain area of the hard drive. Due to limited knowledge, a novice user is not always able to predict the result of his actions. The desire to optimize the performance of the hard disk with the help of any of the service programs often ends in disastrous consequences.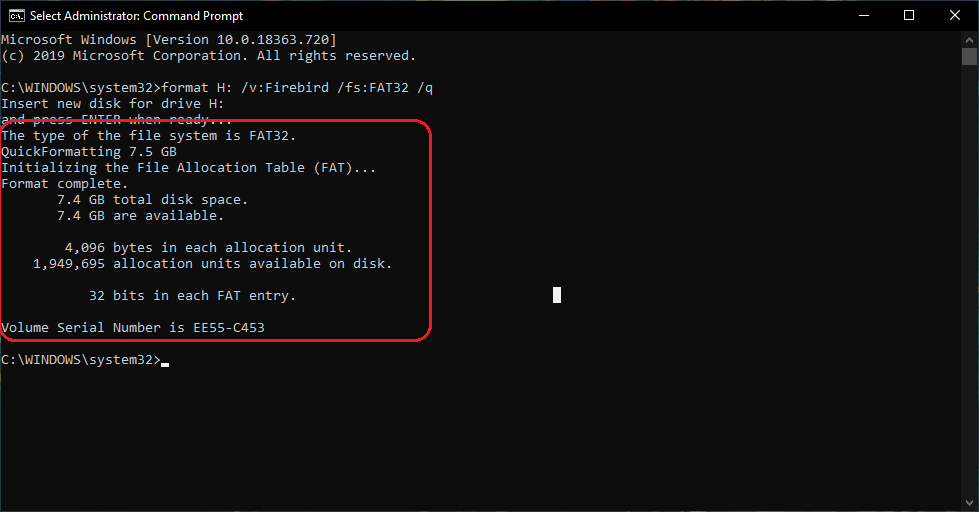 As a result, unconsciously made changes to the operation of the hard drive affect literally immediately. Again, not every user will notice such metamorphoses. Only later, when the operating system needs to be reinstalled, or the experimenter needs to permanently delete data from the screw, completely or partially format one of its partitions, the user will most likely be incredibly surprised by the message: «Windows could not format the disk.» However, there is a hole in the old woman.
Why formatting is necessary
HDD formatting is required for several reasons:
Types and types of formatting
This procedure is divided into 2 types:
In addition, there are two types that are used to format the internal and external HDD:
Diagnostics
If the drive you are having problems with is not a solid state drive, then its functionality is achieved through the interaction of electronics with mechanics. It is this symbiosis that ensures the correct functioning of your hard drive, as a result of which you can capture the special sound that one or more rotating plates make.
It should be noted that in some cases resonant clicking sounds of the positioner are added to such noise.
All of the above indicates the health of the drive. If, however, we take into account the moment that the OS works without any failures and defects, except for the fact that the hard drive is not formatted, then replacing the hard drive is absolutely not necessary.