Completely removing old Nvidia drivers
Pay your attention to ubuntu-drivers devices command output — there are following lines:
driver   : nvidia-340 - third-party free
driver   : nvidia-driver-390 - third-party free
driver   : nvidia-driver-396 - third-party free recommended
driver   : xserver-xorg-video-nouveau - distro free builtin
The lines mean you can use nvidia 340, 390, 396 drivers from third-party repository and open-source nouveau driver from distro repository. Only one driver is recommended to you. The list doesn’t mean all of the mentioned drivers has been installed in your system. It indicates only potential possibility to install the drivers. The list can’t be changed manually as being formed with ubuntu-drivers utility designed to automate proprietary drivers detecting, inspecting and installing from available to Ubuntu repositories.
Thus, to change the list it’s necessary to remove third-party repository, which is proprietary GPU drivers repo in the particular case. But it’s highly unrecommended to do, since your goal is to keep nvidia 396 driver anyway and remove from automatically created list nvidia 340 and 390 drivers. If you remove the third-party repository, only distro drivers will be detected as available, which will be in the particular case only 340 and 390 — thus, you’ll obtain most undesired for you situation.
My suggestion for you is to do nothing. Your system looks healthy, everything works well.
If you like experiments, follow guide below.
The described below is for experimental purposes only — if you’re not sure don’t do it!
Press Ctrl+Alt+F4, log in and remove all of the nvidia staff:
sudo apt remove nvidia-*
Next remove proprietary PPA GPU drivers repository. Run in terminal:
sudo add-apt-repository --remove ppa:graphics-drivers/ppa
sudo apt update
Afterwards check available drivers in terminal:
ubuntu-drivers devices
You’ll see the third-party nvidia drivers have dissapeared and only distro nvidia drivers are available.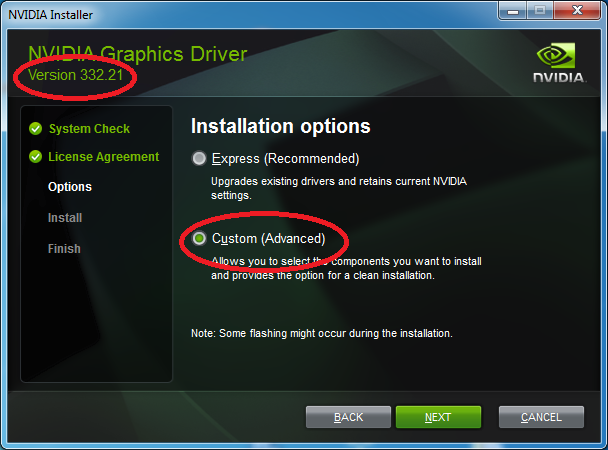 Among the drivers nvidia 396 will be absent since the driver isn’t a part of Ubuntu distro repository.
Add your PPA proprietary GPU drivers repository back:
sudo add-apt-repository ppa:graphics-drivers/ppa
sudo apt update
Install your desired nvidia 396 again:
sudo ubuntu-drivers autoinstall
Reboot:
sudo reboot
After reboot, type nvidia-smi which will show different information about your graphic card like below:
xyz@xyz-workstation:~$ nvidia-smi Mon Apr 27 12:41:50 2020 +-----------------------------------------------------------------------------+ | NVIDIA-SMI 440.64.00 Driver Version: 440.64.00 CUDA Version: 10.2 | |-------------------------------+----------------------+----------------------+ | GPU Name Persistence-M| Bus-Id Disp.A | Volatile Uncorr. ECC | | Fan Temp Perf Pwr:Usage/Cap| Memory-Usage | GPU-Util Compute M. | |===============================+======================+======================| | 0 GeForce GTX 166... On | 00000000:01:00.0 Off | N/A | | N/A 45C P8 1W / N/A | 470MiB / 5944MiB | 5% Default | +-------------------------------+----------------------+----------------------+ +-----------------------------------------------------------------------------+ | Processes: GPU Memory | | GPU PID Type Process name Usage | |=============================================================================| | 0 1905 G /usr/lib/xorg/Xorg 28MiB | | 0 2058 G /usr/bin/gnome-shell 47MiB | | 0 2956 G /usr/lib/xorg/Xorg 145MiB | | 0 3133 G /usr/bin/gnome-shell 120MiB | | 0 3587 G ...AAAAAAAAAAAACAAAAAAAAAA= --shared-files 122MiB | +-----------------------------------------------------------------------------+
For systems having nvidia-prime, if it returns an error then type sudo prime-select intel and then reboot and then type sudo prime-select nvidia and then reboot again. Now type
 nvidia-smi and it should work. This method works on most of the system with kernel till 5.4
Additionally see this my post.
How to Update NVIDIA Drivers
Keeping your NVIDIA graphics card drivers up to date is important. Driver updates provide bug fixes, address compatibility issues, and can enhance in-game performance.
If you aren’t sure how to update your NVIDIA drivers, then keep reading. We’ll show you how to download and install the latest NVIDIA drivers with some pointers to help make the process go smoothly.
Update NVIDIA Drivers Through GeForce Experience
The quickest and easiest way to update NVIDIA drivers is through the GeForce Experience app. GeForce Experience automatically detects and downloads the latest drivers for your system, taking the guesswork out of finding the right driver.
Also Read: GeForce Experience Not Working? How to Fix it Quickly
To start, first go to NVIDIA’s website to download the GeForce Experience app and install it on your computer.
Once installed, run GeForce Experience and click on the Drivers tab.
If there are updates available, then click the Download button. If the latest driver doesn’t show up automatically, then click the Check for Updates button first.
Once the driver has finished downloading, click Express Installation. From here, the app will finish installing your driver and prompt you to restart your computer now or later.
Update NVIDIA Drivers Manually From Nvidia’s Website
Aside from using the GeForce Experience app, you can update your drivers manually by finding the drivers on NVIDIA’s website. This is useful if you need drivers for an offline system, or you’re experiencing issues with the GeForce Experience app.
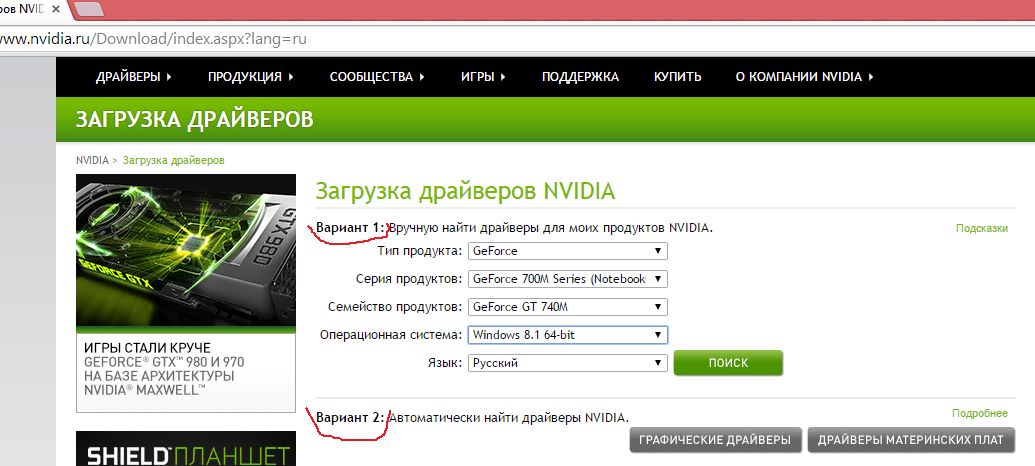
Start by going to the driver downloads page on NVIDIA’s website. Here you’re greeted with multiple drop-down lists allowing you to pick the product type, series, and model of your card, as well as your operating system and the type of driver you want.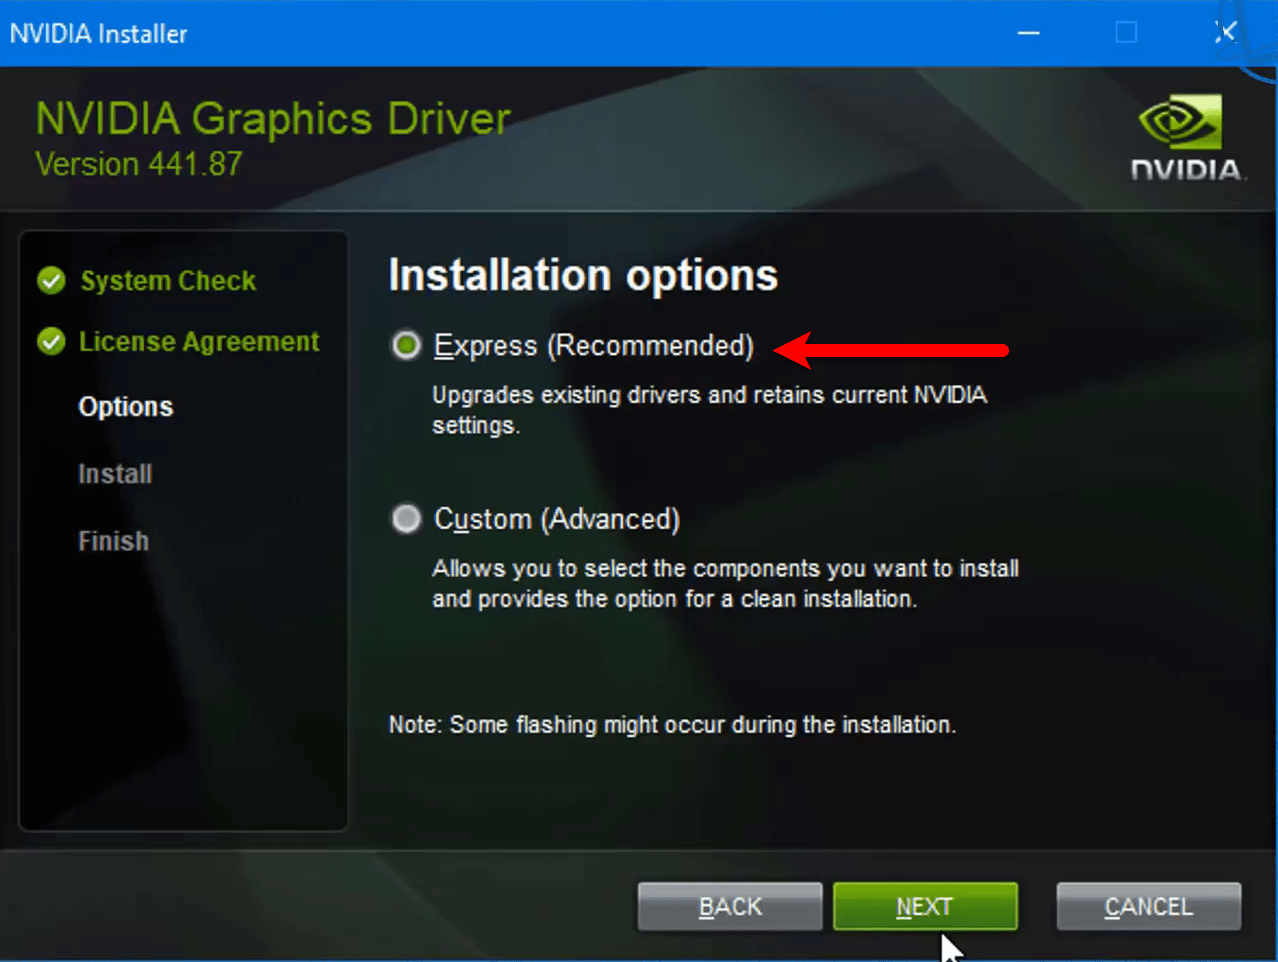
Note: If you primarily game, you’ll most likely want the Game Ready driver if you’re searching for a Windows driver. The Studio driver is most suitable for creative applications.
If you’re unsure about which GPU is in your system, open the Run box (Win Key + R), type dxdiag, and press Enter.
Also Read: How to Check Your Computer Specs
In the DirectX Diagnostic Tool window, click on the Display tab. In the Device group box you’ll find your GPU information.
Once you’ve picked your card on the website, click on the Search button.
If there’s a driver available, it should show a page of the latest driver for your card. Click the Download button on the result page, and then again on the following page.
Once the driver finishes downloading, you can run it and follow the instructions to install the driver.
When to Do a Clean Installation of Your NVIDIA Drivers
Updating your NVIDIA drivers from one version to the next is usually a painless and problem-free endeavor. But if you find yourself running into issues, you might consider doing a clean installation.
A clean installation wipes all previous graphics drivers and settings from your system before installing your new drivers.
The most common reason you’d do a clean install is if you’re swapping out your graphics card for a different one. However, there are times when a regular driver update can cause issues, making a clean installation a necessary step in troubleshooting and fixing the issue.
Also Read: Do You Need to Uninstall Old Graphics Drivers Before Installing A New Graphics Card?
There are generally two ways you’d do a clean install: through the GeForce Experience app, or with a third-party tool, such as Display Driver Uninstaller (DDU).
Note: remember that a clean installation will wipe your existing settings and profiles, changing them back to default values.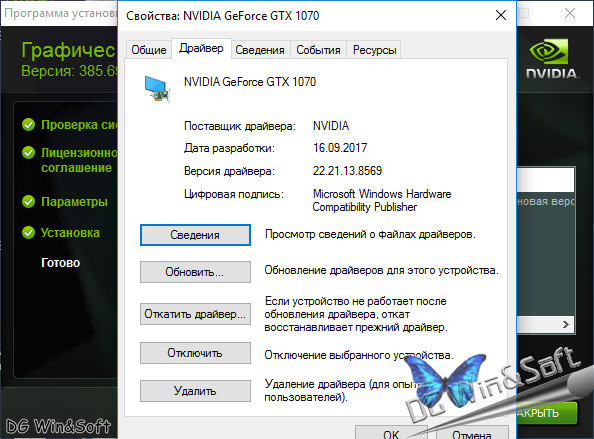
How to Do a Clean Installation in GeForce Experience
To do a clean install of a driver in the GeForce Experience app, first download the driver for your card. When you’re presented with the option to do an Express Installation or a Custom Installation, choose Custom Installation.
Once the next screen finishes loading, click the checkbox next to Perform a clean installation, then click the Install button and proceed as normal.
How to Do a Clean Installation With Display Driver Uninstaller
Whether you’re coming from an AMD or Intel GPU, or you really want to be sure you’ve thoroughly nuked your old NVIDIA drivers, Display Driver Uninstaller is a go-to tool for clean GPU and audio driver installation.
To start, you’ll need to boot your computer into Safe Mode. You can do this by opening the Run box (Win key + R), typing msconfig, and pressing Enter.
In the System Configuration window, go to the Boot tab, check the box next to Safe Boot, then click the Apply and OK buttons.
When you’re prompted to restart your computer, click the Restart button.
Once in Safe Mode, run DDU. In the Select device type drop-down, select GPU.
In the Select device drop-down, select the appropriate option based on which drivers you’re uninstalling. Then click the Clean and restart button.
After your computer restarts, update your NVIDIA driver through the GeForce Experience app or manually, following the steps at the top of this article.
Note: DDU recommends disconnecting your machine from the Internet or blocking Windows Update until you’ve installed your new drivers when doing a clean installation, as Windows Update is a common cause for GPU driver and updates issues.
Also Read: How to Reset Your Graphics Driver
5 Ways to Uninstall Nvidia Drivers on Windows
by Anatoliy | Updated 02/28/2023 | by Anatoliy
Complete driver uninstallation is not an easy task for most common users.
This takes a lot of time and requires very careful preparation.
Most importantly, uninstalling some types of drivers such as display drivers, audio drivers, and network drivers can cause device errors and even PC crashes.
In this article, we provide 5 steps to help you successfully remove old, problematic and unnecessary drivers step by step.
As an example, we’ll take a look at uninstalling a problematic Nvidia graphics driver on Windows 10.
Tip:
Uninstalling the driver can cause critical system problems such as blue screen, device failure, and system failure. Therefore, you should check very carefully whether the name and version of the driver matches the one you want to remove. In addition, to reduce the risk of unexpected problems during driver removal, we recommend that you create a system restore point and backup the driver before uninstalling the driver.
Note: Methods 1 and 2 are manual methods and require some knowledge to participate in uninstalling the driver. For those who are inexperienced, prefer an automatic solution, or want to avoid any unexpected problems, please go to method 3.
Why remove old, problematic and unnecessary drivers?
Old, problematic, and unnecessary drivers may be installed on your computer. For example, when a device or software is no longer needed, an installed driver may be left on the system, or the current version of the driver may be unstable and intermittent.
Over time, unused, unstable, and bad drivers can cause driver-related problems such as:
blue screen, system freezes, crashes, device misbehavior, and slowdown of the entire PC.
Therefore, you must remove those drivers that are no longer needed or that cause problems in the system.
Method 1: Use Device Manager to uninstall problematic Nvidia graphics drivers
Device Manager is a tool built into Windows that helps users manage all the devices that are currently connected to the computer. You can use the Device Manager to remove unwanted devices and uninstall device drivers. By default, Device Manager does not show all devices, but some of them are hidden in Windows. For readers who want to check hidden devices, we will also show you how to work in Windows 10 with the method.
Step 1
Press ‘Windows key + R’ to open the Run dialog,
type ‘devmgmt.msc’ and press OK
Step 2
You are now in Device Manager.
Click on «View» in the menu bar and select «Show Hidden Devices».
Step 3
After that, all hidden devices will be displayed in the list. You can browse the categories and find the Nvidia graphics device that is associated with the problematic driver.
>Simply right click on the Nvidia graphics device and select «Delete» to delete the entry.
Step 4
After clicking on the ‘Uninstall or Remove’ button, a confirmation window will appear, select ‘Uninstall the driver for this device’, then click OK to uninstall the device and the problematic Nvidia graphics driver.
Method 2: Use Control Panel to uninstall problematic Nvidia 9 graphics drivers0028
In addition to method 1, Windows offers another built-in tool that allows users to uninstall drivers through «Uninstall a Program». Here you can check all currently used drivers including display drivers, audio drivers, network drivers, etc. This method will show you how to uninstall a problematic Nvidia graphics driver step by step. Step 10003
Step 2
Then click on «Uninstall a program».
Step 3
You will see a list of installed programs, including Nvidia graphics drivers.
Right click on any program you don’t need and just
select ‘Uninstall/Change’ to uninstall it.
Please note that only the current driver version is shown in the list. Old and unused drivers will not appear in this list. You can use the system cleanup tool to remove all junk files from your computer.
There are many driver tools on the market to help Windows users solve driver problems, such as updating drivers, fixing device problems, uninstalling display drivers, backing up drivers. Third-party driver tools offer easier driver removal solutions and make it easier to update and fix common PC problems.
In Ways 3,4,5 we will talk about 3 tools that offer the function of uninstalling drivers.
It is worth noting that when installing drivers, you may install some unnecessary components. Many manufacturers now offer bundled components along with the driver installer. In order to avoid installing unnecessary components on your computer, Driver Booster can help you install and update clean drivers without any imposed solutions, and uninstall unnecessary drivers easily.
Method 3. Driver Booster: One-Click to Remove Problematic Nvidia 9 Graphics Drivers0028
Driver Booster is a free driver update tool from IObit. Driver Booster offers an ‘Uninstall Driver’ feature to help users uninstall any unnecessary drivers, including problematic Nvidia graphics drivers. It can detect old, outdated, missing and problematic drivers and install the latest drivers directly from vendors.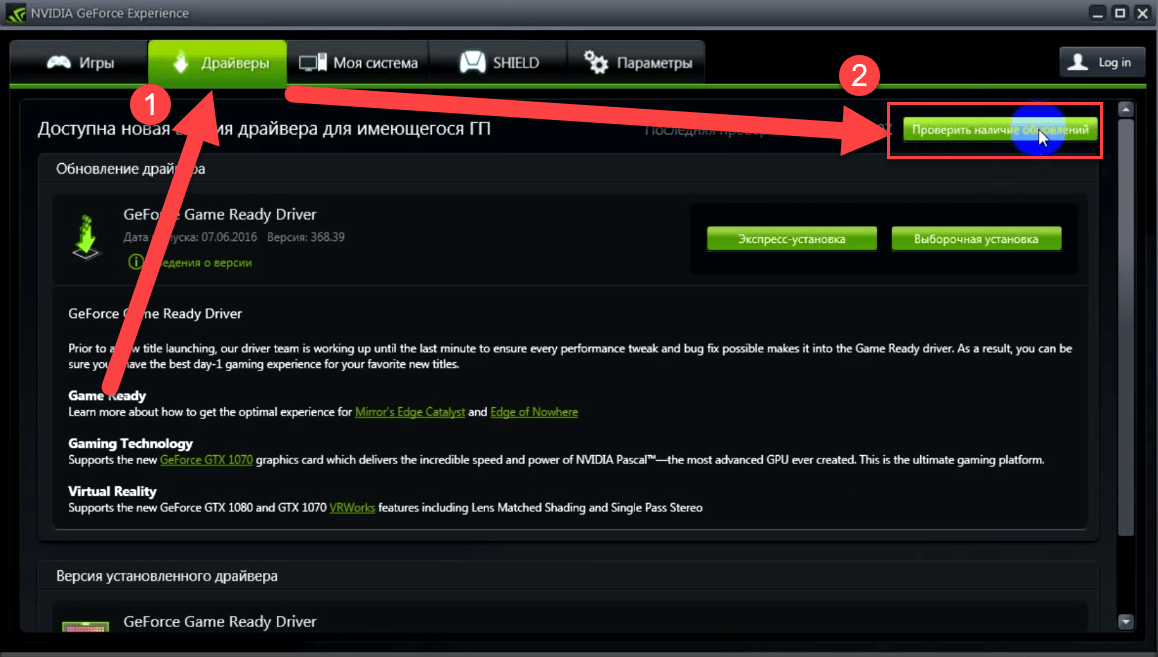 Additionally, driver backup and system restore functions are offered.
Step 1
Download and run Driver Booster
Download Buy Now
Download now
Step 2 removing problematic Nvidia drivers
After scanning, Driver Booster will show a list of drivers in the categories: Obsolete , Updated and flags bad drivers. You can uninstall any drivers or update outdated, faulty and missing drivers with one click.
Right-click on one unwanted driver and select «Uninstall» to remove all unwanted drivers, including problematic Nvidia drivers.
If you want to reinstall the Nvidia graphics driver on your PC, you can use Driver Booster to easily get the latest graphics driver
Some devices have been used on your computer one or more times. Data about such devices remained on your PC, but they are no longer needed. However, most of us are PC cleaners and we can’t just store unnecessary data on our system. Therefore, it would be great if there was a tool that would help you clean them up easily.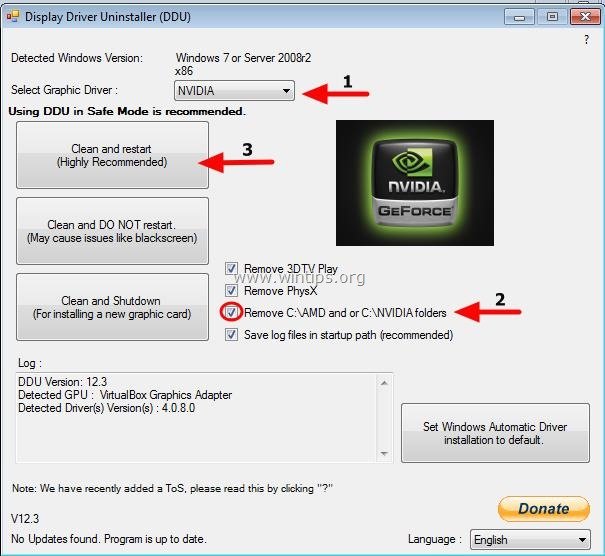 Driver Booster just offers a useful tool to detect and clean up all data about disabled devices with one click.
Step 3
Clear Disabled Device Data
> Select Tools
> Select ‘Clear Invalid Device Data’ to detect disabled device data > Then click ‘Clear’.
Pros of the method
1 Removes problematic drivers
2 One-click to create a system restore point and back up drivers
3 Offers detailed information about drivers
4 Intuitive user interface
Method cons
1 Driver scan required before uninstallation
Method 4: Use Driver Easy to uninstall a problematic Nvidia graphics driver
90 002 Driver Easy is a driver update tool that also offers «Driver Uninstall» feature to help users uninstall unwanted drivers. As a driver update tool, it can also detect and update outdated drivers, backup and restore drivers, and check system information. But many features are only available for PRO users, including uninstalling drivers.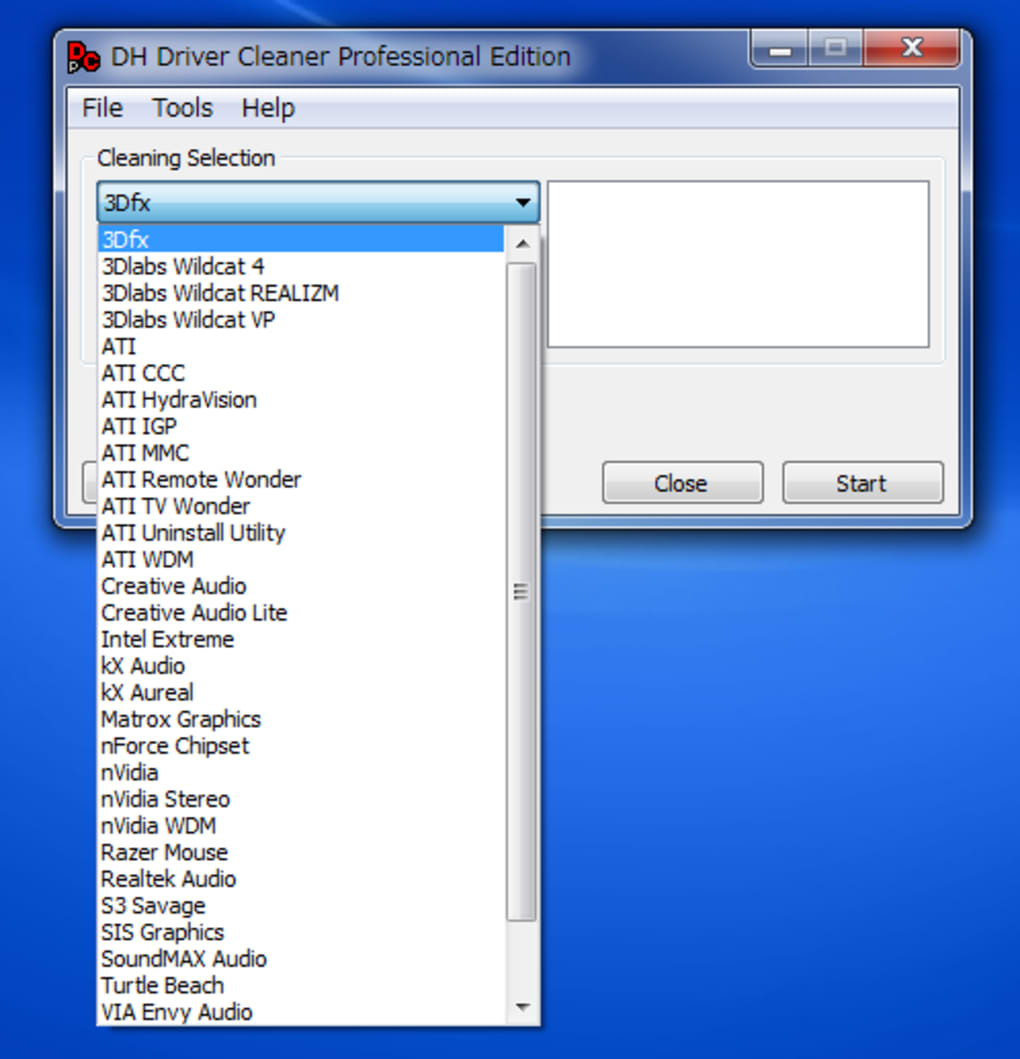
Step 1
Run Driver Easy
> Tools — Tools
> Driver uninstall — Driver uninstall 0027 Step 2
Select one unnecessary driver and
click the ‘Uninstall’ button to continuation.
To uninstall the drivers, you need to upgrade to the PRO version. So you have to pay $29.95 to use Driver Easy PRO to remove drivers from your system.
Pros of the method
1 Offers detailed information about drivers
2 Backup and restore of drivers
3 Easy interface
Cons of the method
1 Paid solution
9000 2 2 Does not categorize problematic drivers
Method 5 Use DDU Display Driver Uninstaller to uninstall a problematic Nvidia graphics driver
Step 1
Run Display Driver Uninstaller DDU
> Select the options shown below 02
Step 3
Remove the device and driver
You have 3 options: Clean and restart, Clean and NOT restart, Clean and shut down. Choose one of them and complete the driver removal the way you want.
Pros of the method
1 Offers a full range of options: Recommended and NOT recommended options for uninstallation
Cons of the method
1 Unable to back up drivers
If you need to uninstall the driver, you can try the above 5 ways removing unwanted drivers from all manufacturers such as Nvidia, AMD, Intel, Dell and HP. Methods 1 and 2 use built-in Windows tools, while methods 3, 4, 5 use third-party tools that can help users uninstall drivers easily.
Complete removal of NVIDIA drivers on Windows 10 — how to remove completely in 2023
Author Oleg Savchenko Reading 5 min Views 3.7k. Posted by
NVIDIA has gained popularity among computer users solely due to the quality of its products. And of course, for the correct operation of the graphics accelerators and processors produced by it, one cannot do without special software that has to be changed when changing components from other manufacturers.
But to install new software components, you need to know how to uninstall nvidia geforce experience completely Windows 10.
Contents within the overall system.
And if, for example, you had one video card that you were suddenly going to change to another, then be prepared for the fact that you will have to remove old drivers in order to install new ones. Cases with the replacement of the NVIDIA GeForce Experience model are no exception, and even vice versa.
Control panel
In what situations might it be necessary to uninstall drivers? Let’s just say there are a lot of them. This is, for example, a banal installation of a video card from another manufacturer, or the need to update already used drivers / reinstall, which is not uncommon.
In any case, if such a need suddenly arises, you need to be ready to act decisively.
When replacing a graphics card, you must reinstall its drivers, removing old and all residual files
Let’s see how to do it. There are several ways. If you are not a supporter of software from «left» manufacturers, then we hasten to please you: Windows 10 has standard tools that allow you to easily and simply solve the task. You can uninstall NVIDIA GeForce drivers through the old control panel.
To do this:
- Open «Run» by clicking on Win + R.
- Enter control and click OK.
- At the top right, in the control panel that opens, select «Small Icons».
- Open «Programs and Features».
- We find in the list that appears all the programs related to the INVIDIA graphics adapter.
- At the top of the window, click «Delete / Change».
- Opt out of automatic reboot to uninstall other NVIDIA components.
Device Manager
NVIDIA drivers can also be uninstalled via Device Manager (provided the NVIDIA component is connected to the computer).
How to do it:
- Right-click on the Start menu icon, select the appropriate item from the menu that opens.
- In the list of devices in the window that appears, expand graphics adapters.
- Select the NVIDIA device connected to the computer.
- Right-click on the device, select «Properties».
- In the window that appears, click the Driver tab.
- Click on the «Delete» button.
- Check the box «Delete the driver software for this device».
- Click «OK».
It is important to remember that if you do not remove the old divers completely, then their residual files can provoke incorrect operation of the component or constant errors on the blue screen of the PC
Complete removal of the NVIDIA driver using universal utilities
a common problem, like removing software from Windows 10, including drivers. There are a large number of applications that are designed to remove various utilities integrated into Windows.
We present to your attention a list of the most effective of them in the matter of specifically removing drivers for graphics adapters.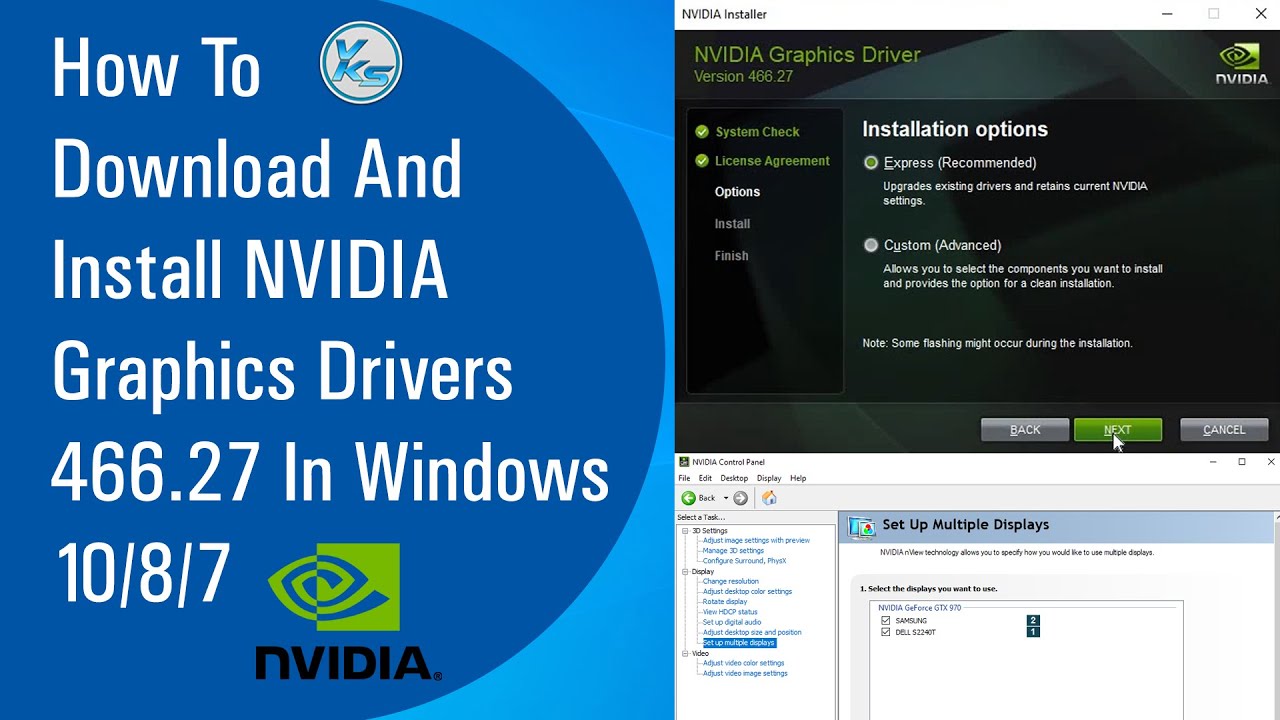
Driver Fusion
Excellent software that will help you remove old and unnecessary software from your computer. After installing the program, you will see a simple and intuitive user interface.
In the menu on the left you will find the option to clean drivers.
After clicking on the corresponding menu item, you will see a list of devices and drivers that ensure their operation. By analogy with the «Through Device Manager» method, find the one you need and delete it.
Display Driver Uninstaller
Another useful program that allows you to remove not only the driver itself, but also all traces of its presence on the computer. To use the program, you need to install it, enter through the «Safe Mode», run the Display Driver Uninstaller, and then select the desired driver and demolish it.
Uninstalling drivers through the Control Panel or Task Manager does not always give a 100% result. That is why experienced users and developers advise using special software
for these purposes.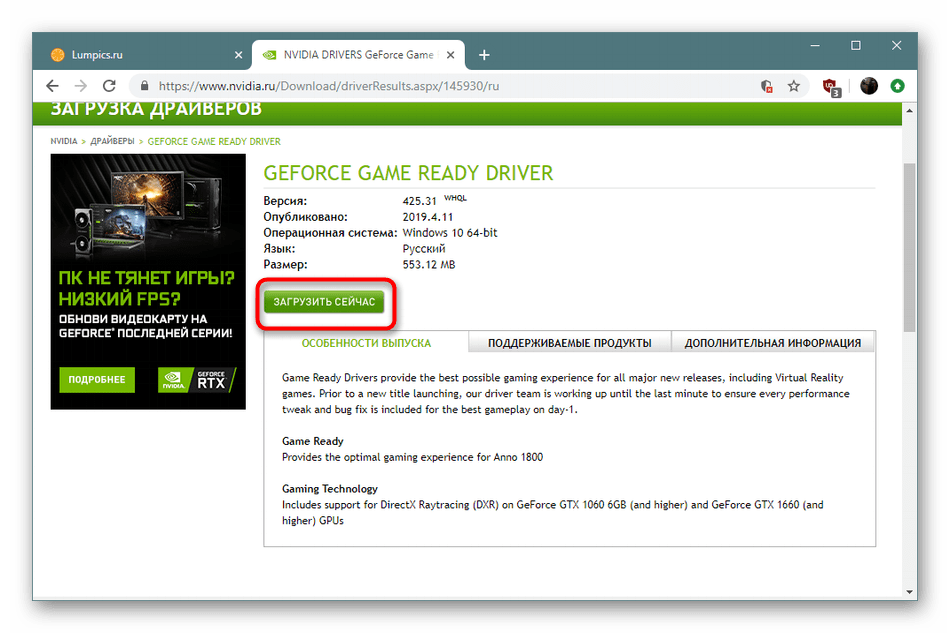 After uninstalling the driver, you can choose three scenarios — with a reboot, without a reboot, and with the device turned off.
CCleaner
A well-known utility that is very versatile. With it, you can configure auto-start programs, clear the application cache, uninstall applications and, of course, remove an unnecessary graphics adapter driver.
To find the driver, you need to run the utility, open the “Tools” and “Uninstall programs” sections, and then select the current software (in our case, “NVIDIA graphics driver”) and click “Uninstall” (not to be confused with “Delete” ).
Driver Sweeper
This program is specifically designed to work with drivers. However, as in the case of using the «Device Manager», you need to be careful not to remove any unnecessary component.
Most of these applications allow you to get rid of unnecessary files for free, which also adds points to them
When you boot up, you will immediately see a list of drivers.