Graphics Card Tests | Tom’s Hardware
(Image credit: Tom’s Hardware)
Running a few graphics card tests is one of the first things we do whenever we build a PC or upgrade one, perhaps with one of the best graphics cards. Not only is it a great way to find out just how much things have improved thanks to the upgrade, but it also lets you ensure you’re getting the expected performance from your new hardware. Stress testing to check power, temperatures, and overall cooling on your PC is also important so that you don’t run into future problems. And it’s not just about GPU testing ; if you upgrade your processor with one of the best CPUs for Gaming, you can use these same techniques to check performance improvements. These are the best GPU tests: the ones we use for our reviews (or have used in the past) and our GPU benchmarks hierarchy, how we run them, and some other options you can look at to see how your PC and graphics card stacks up.
There are three primary types of GPU tests: actual games, ‘synthetic’ graphics card benchmarks, and compute benchmarks. Running a game you actually play, or want to play, is usually the best way to test performance. We’ll cover how to do that in a moment. Synthetic tests are typically very easy to run, but they only tell you how your PC handles that specific benchmark — which may or may not equate to real-world gaming performance. Finally, GPU compute tests are usually quite different in how they work compared to games. If you’re big into running Folding@Home or you use a GPU accelerated application like LuxCoreRenderer, that’s great, but specific optimizations for certain GPU architectures can make a big difference in how your PC runs any specific workload.
Tools of the Trade
Before you start using one of the best GPU tests, there are a few useful utilities to install. First, for a lot of real world gaming tests, you need a tool to capture frametimes. There are three main programs we’ve used in the past. PresentMon is a command-line interface for logging frametimes. This is the least user friendly option and we don’t recommend it (unless you really like text interfaces), and it’s been supplanted by OCAT (Open Capture and Analytics Tool) and FrameView — both of which are based off of PresentMon’s core functionality. If you’re wondering, FRAPS hasn’t been updated since 2013 and has some bugs with Windows 8/10, so it’s best to use a modern utility.
OCAT was created by AMD engineers and is fully open source, while FrameView comes from Nvidia. There are minor differences in the interfaces and functionality, with the biggest being that FrameView logs power data. We’ve tested graphics cards power consumption using in-line hardware to measure precise loads, and the Nvidia power figures are accurate to within a few watts for Nvidia GPUs. AMD GPUs however report GPU-only power consumption, which can mean a difference of anywhere from 10W to as much as 100W, depending on the specific GPU (Vega being the worst offender). Otherwise, all three of these tools spit out the same general file format that gives frametimes, clock speeds, and a bunch of other details.
We’ve standardized on using OCAT for our GPU testing, but you can use FrameView or even PresentMon if you prefer. One important thing to note is that a lot of games do not like the overlay functionality built into these programs. Microsoft Store UWP apps and anything else with heavy DRM will often fail to start if the overlay is enabled, so we run without the overlay. If you want a framerate counter in the corner, you can give it a shot, but you’ll know there’s a problem if the game stops launching. Also note that games that use the Vulkan API aren’t compatible with framerate overlays in our experience; they won’t necessarily fail to run, but you won’t be able to make the overlay actually appear on screen.
Because PresentMon and its derivatives already capture so much data, there’s no need for additional tools like GPU-Z or HWiNFO64, though both are still handy to keep in your back pocket. HWiNFO64 is your one stop solution to monitoring just about every other component, including motherboard sensors, CPU clocks, and more. But it’s not really necessary for GPU tests.
One other tool you still might want is something for overclocking or tuning your GPU, to help improve your benchmark results. Many graphics card vendors have custom software that only works with the specific brand of card you purchase, but not all of those software packs offer the same level of tuning.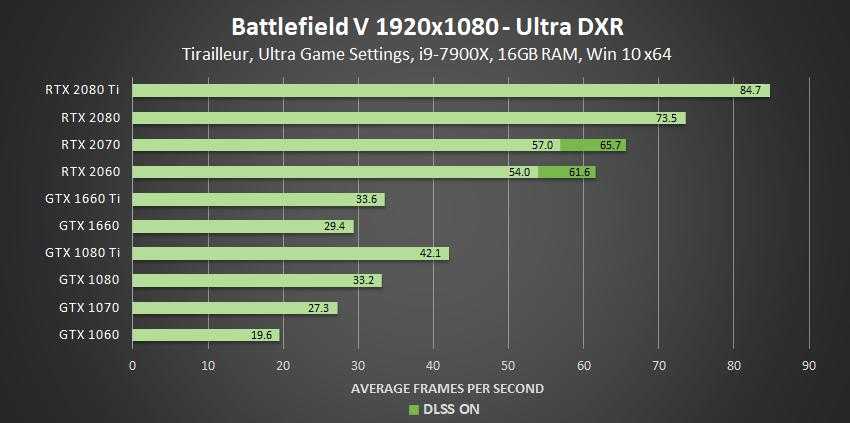 We generally skip the Asus, Gigabyte, ASRock, Sapphire, etc. utilities and just use MSI Afterburner, or maybe EVGA Precision X1. Afterburner works with pretty much any GPU made in the past decade or more, while Precision X1 only works with Nvidia GPUs, which means we typically prefer Afterburner. Tweaking your fan speed / cooling curve is a great way to reduce GPU temperatures and potentially improve performance, though it comes at the cost of more fan noise.
(Image credit: Tom’s Hardware)
Games for GPU Tests
With OCAT in hand, any game can be used for GPU testing purposes. The main key is to find a repeatable section and test it multiple times. Also, some games have a locked framerate or a framerate cap, so benchmarking something like Cuphead isn’t going to be particularly meaningful unless you’re just trying to confirm that you’re able to hit a steady 60 fps. We’ve tested Doom Eternal and Minecraft RTX using the methods we’ll describe here, which can take dozens of hours if you’re testing lots of different GPUs. But if you’re only looking at your own PC, pre- and post-upgrade, it’s pretty painless.
If you’re after easy GPU tests, however, it’s best to just pick one of a relatively large number of games that have built-in benchmarking tools. You can still use OCAT to log frametimes, which we recommend as a universal way of collecting performance metrics — plus it allows you to control the start/stop points for frametime logging. But if you’re mostly just curious to see how much performance has changed with an upgrade, the built-in benchmarks certainly suffice.
Of course you need to own most of the games in question to be able to use them, but here are a bunch of games with built-in GPU tests. We’ll stick with games released post-2015, but here’s a bunch we use or have used in the past, in alphabetical order. We’ll also include the download/install sizes, because if you’re looking for a quick GPU test you probably don’t want to download 100GB or more of data. And if you’re wondering what today’s state-of-the-art PC can do, we’ll also provide a benchmark result for 1440p ultra on a Core i9-9900K with a GeForce RTX 2080 Ti.
Recent Games with Built-In GPU Tests
Ashes of the Singularity (Image credit: Tom’s Hardware)
Ashes of the Singularity (22.0GB): Jokingly referred to as Ashes of the Benchmark, thanks to its widespread use in CPU and GPU reviews, AotS and its Escalation expansion are great for punishing your CPU — yes, CPU not GPU. It throws tons of units and objects on the screen, which is where low-level APIs often perform better. The game supports DirectX 11 (DX11), DirectX 12 (DX12), and Vulkan rendering, with the latter two being preferred over DX11 as they allow the CPU to process things more efficiently (DX12 performed best in our testing). The benchmark lasts about three minutes, and the built-in results browser is quite extensive, breaking down performance into various categories based on the complexity of the scene. AotS is also perhaps the only game to support explicit multi-GPU support in DX12, allowing you to try mixing and matching GPUs of different levels — like, say, RTX 2070 with RX 5700 XT! It sounds better than it works in practice. Don’t focus too much on absolute framerates, especially if you choose to run at the ‘Extreme’ or ‘Crazy’ presets where the CPU becomes the primary bottleneck.
1440p Extreme performance (DX12): 108.8 average fps, 71.7 99th percentile
Assassin’s Creed Odyssey (Image credit: Tom’s Hardware)
Assassin’s Creed Odyssey (98.5GB): The built-in GPU test only takes about a minute to run, though the amount and variety of clouds in the sky can have a modest (up to 10%) impact on performance. We recommend running the test at least 3-5 times, trying to get a «clear / sunny» day for comparison purposes, or run it five times and take the average. Annoyances include the need to restart between most settings changes (not resolution), plus the benchmark drops you out to the initial loading screen between runs. Basically, you spend over a minute prepping for the test , and then 60 seconds in the actual benchmark. But Assassin’s Creed is a popular series, and as the latest installment Odyssey is worth considering as a GPU test.
1440p Ultra performance (DX11): 74.5 average fps, 58.7 99th percentile
Assassin’s Creed Origins (Image credit: Tom’s Hardware)
Assassin’s Creed Origins (70.5GB): The previous game in the Assassin’s Creed series, Origins came out in 2016. It’s a bit less demanding with a GPU test sequence that lasts nearly twice as long (115 seconds). AC games tend to max out at around 120-140 fps, regardless of settings, but then they’re not twitch games like CS:GO where you’d benefit from extreme refresh rates and framerates. Origins doesn’t force you back to the start screen after each test either, and the weather is fixed so the benchmark results are far more consistent.
1440p Ultra performance (DX11): 96. 1 average fps, 71.4 99th percentile
Batman Arkham Knight (Image credit: Tom’s Hardware)
Batman Arkham Knight (35.2GB): Originally released in such a poor state of optimization that it was temporarily pulled from Steam before being reinstated, Arkham Knight is the most recent Batman game (though rumors of another being in the works are still swirling). The various Batman games have had some decent built-in GPU tests. They’re also part of a select few games to make use of Nvidia’s PhysX API in a meaningful way. RIP, PhysX — it’s not technically dead, but very few games make full use of it these days. The benchmark sequence lasts about 95 seconds and is easy to run, and five years later PC hardware has reached the point where getting relatively high performance in Arkham Knight isn’t nearly as challenging as it once was.
1440p Max + PhysX performance (DX11): 126. 2 average fps, 63.2 99th percentile
Borderlands 3 (Image credit: Tom’s Hardware)
Borderlands 3 (82.7GB): A modern game built using Unreal Engine 4, Borderlands 3‘s GPU test takes about two minutes from the time you press start, about 30 seconds of which is waiting for the level to load. BL3 supports DX11 and DX12 rendering, with the latter doing better on AMD cards. If you have an Nvidia card, DX12 is only better at lower settings on high-end hardware, like an RTX 2070 Super or better at 1440p medium or lower settings. Basically, use DX11 for Nvidia and DX12 for AMD. Note that the first time you launch the DX12 version of the game, there’s a rather lengthy shader pre-compilation pass that can take a couple of minutes, depending on your hardware. The built-in benchmark generates a CSV file of frametimes for you, which is potentially one less thing to worry about, but the generated CSV contains about five seconds of data at the start that isn’t particularly useful and should be omitted from any performance calculations.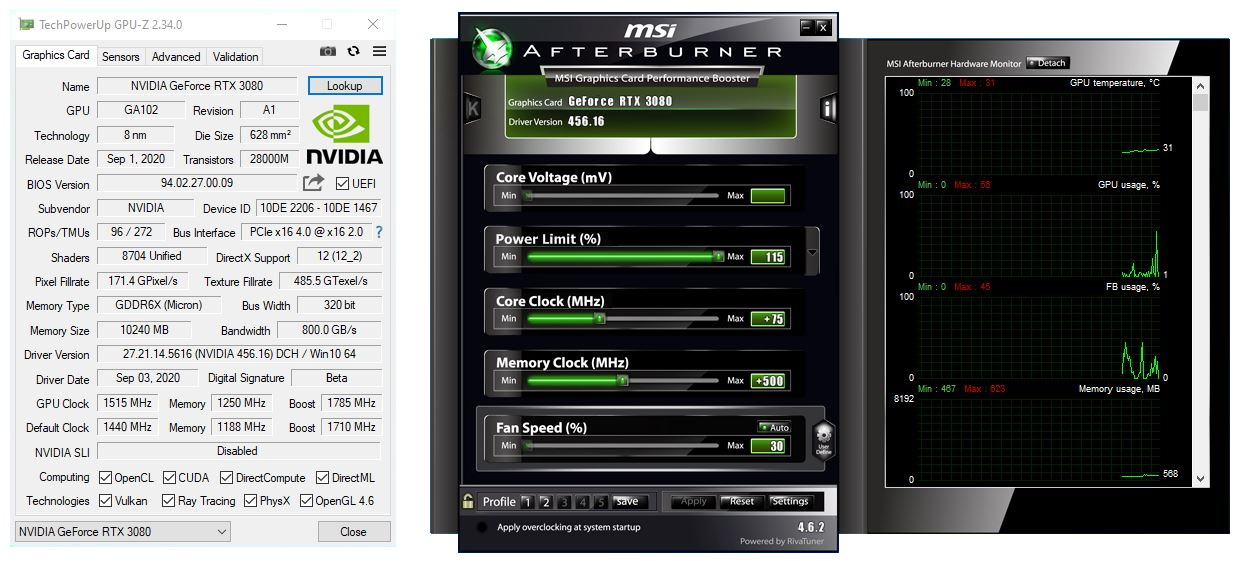 We maxed out the quality settings with the ‘Badass’ preset, because why not? (Actually, there’s almost zero visual benefit of going from the ultra preset to badass, even though performance drops 10%, but whatever.)
1440p Badass performance (DX12): 80.7 average fps, 62.0 99th percentile
The Division 2 (Image credit: Tom’s Hardware)
The Division 2 (65.1GB): Ubisoft’s open-world post-pandemic-that-wipes-out-much-of-the-population setting might feel a bit too on the nose right now, but the built-in benchmark is still a staple of our GPU tests and reviews. Like Borderlands 3, it also generates a CSV of frametimes, with sensible start/stop points that give results nearly identical to our own OCAT logging. DX11 and DX12 are supported, with DX11 typically performing a bit better on Nvidia cards, particularly older/slower models, but we stick with the DX12 version for our testing to keep things standardized.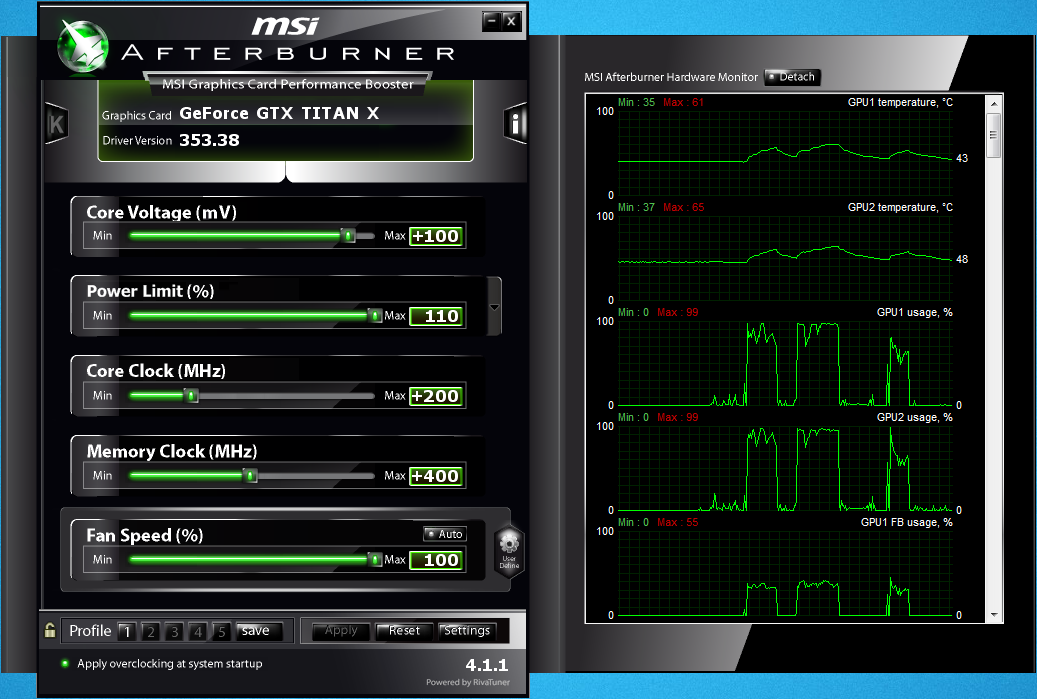
1440p Ultra performance (DX12): 99.7 average fps, 80.9 99th percentile
Far Cry 5 (Image credit: Tom’s Hardware)
Far Cry 5 (73.0GB): Nearly every Far Cry game has included a built-in GPU testing tool. For FC5, the test sequence is quick and painless, lasting about one minute. The game comes with four presets plus a variety of other settings you can customize as needed. The first run is usually a bit more erratic than subsequent tests, so make sure you run it at least three times to get a good idea of the typical performance.
1440p Ultra HD performance (DX11): 130.2 average fps, 101.4 99th percentile
Far Cry New Dawn (Image credit: Tom’s Hardware)
Far Cry New Dawn (41.2GB): One year newer than the above, it takes place 20 or so years after the ending of Far Cry 5. The engine is the same, but the benchmark sequence is slightly different, and performance tends to be a bit lower in New Dawn. You really only need to test one of the Far Cry games, as the results tell the same story.
1440p Ultra performance (DX11): 114.5 average fps, 85.3 99th percentile
Far Cry Primal (Image credit: Tom’s Hardware)
Far Cry Primal (20.1GB): Going the other direction, FCP is a few years older and is theoretically slightly less demanding. It still uses the Dunia 2 engine, however, so again there’s no need to run multiple different Far Cry tests. Somewhat ironically, performance in Primal is lower than Far Cry 5, likely because the benchmark sequence has a lot of water in it and that reduces framerates compared to some other areas in the game.
1440p Ultra performance (DX11): 115.0 average fps, 78. 0 99th percentile
Final Fantasy XIV (Image credit: Tom’s Hardware)
Final Fantasy XIV Shadowbringers Benchmark (2.2GB): This one is free, small, and easy to run. It’s also quite a bit less demanding — even at maximum quality, Final Fantasy XIV doesn’t need a beast of a GPU. It’s a long benchmark by default, lasting about seven minutes. You can log frametimes and exit after the first few minutes, which is how we use the GPU test, and you’ll want to log frametimes as the test only reports a nebulous score.
1440p Maximum performance (DX11): 151.5 average fps, 73.5 99th percentile
Forza Horizon 4 (Image credit: Tom’s Hardware)
Forza Horizon 4 (75.8GB): If you like car racing games, Forza Horizon 4 is great and the built-in GPU test is easy enough to use. It takes about 80 seconds to complete and generates consistent results.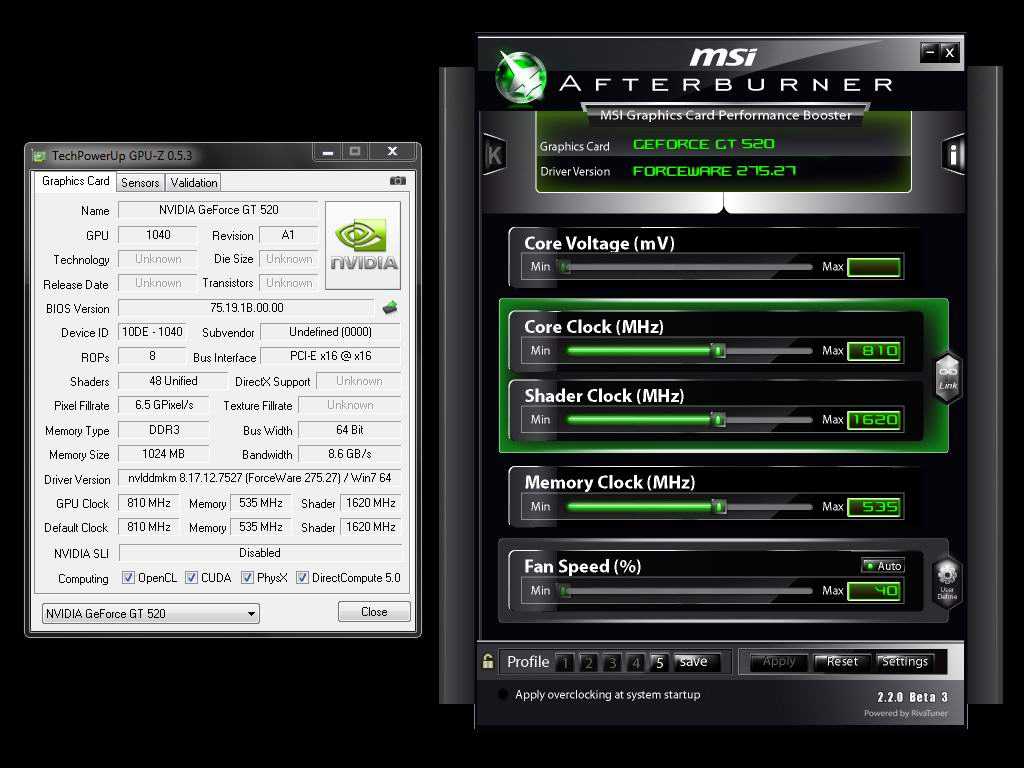 Note that it’s only available on the Microsoft Store, which remains one of the most user unfriendly digital storefronts. It also requires a DX12 compatible GPU, which means it tends to run better on AMD GPUs.
1440p Ultra performance (DX12): 159.0 average fps, 131.2 99th percentile
Grand Theft Auto V (Image credit: Tom’s Hardware)
Grand Theft Auto V (86.3GB): The oldest game in our list, GTAV came out in 2013 on consoles, but didn’t arrive on PC until 2015. It has a comprehensive set of graphics options you can adjust, and at maximum settings, with the advanced features enabled as well, it remains a fairly demanding game. (At lower settings, however, it’s a piece of cake to get 60 fps on GTAV.) One major downside to GTAV is that there are no presets, so you have to make sure you manually input the same settings on each GPU you test. The benchmark takes about four minutes to run and has five different scenes, but only the last scene (116 seconds long) is truly useful as a benchmark as the others are too short. It’s a lot like Red Dead Redemption 2 in that regard.
1440p Max 4xMSAA performance (DX11): 93.0 average fps, 59.1 99th percentile
Hitman 2 (Image credit: Tom’s Hardware)
Hitman / Hitman 2 (65.6GB / 149GB): The 2016 reboot of Hitman brought DX12 to the series, which can boost performance quite a bit on most GPUs. Hitman 2 initially skipped the DX12 support but later added it. Both games use the same engine, but Hitman 2 has been updated with newer rendering features, making it arguably the better choice to buy and play since it includes all the previous game’s levels. It also has two different test sequences, Miami and Mumbai, both of which last a couple of minutes.
Hitman: 1440p Max (no SSAA) performance (DX12): 158.5 average fps, 104.5 99th percentile
Hitman 2 Miami: 1440p Max (no SSAA) performance (DX12): 123. 6 average fps, 73.0 99th percentile
(Image credit: Sony)
Horizon Zero Dawn (70.8GB): This is a DirectX 12 only game, and our Horizon Zero Dawn benchmarks piece covers it in extreme detail. The game appears to favor newer GPU architectures, and the built-in benchmark tends to be a bit lighter than actual gameplay (but it’s more reliable in terms of consistency of results). Future patches are still planned to improve performance, and this is one to keep an eye on.
1440p Ultimate Quality performance (DX12): 94.1 average fps, 72.6 99th percentile
Metro Exodus (Image credit: Tom’s Hardware)
Metro Exodus (77.7GB): One of the first games to support Nvidia’s RTX hardware via the DirectX Raytracing (DXR) API, Metro Exodus can punish even the fastest graphics cards at higher settings and resolutions — and turning on ray tracing adds insult to injury.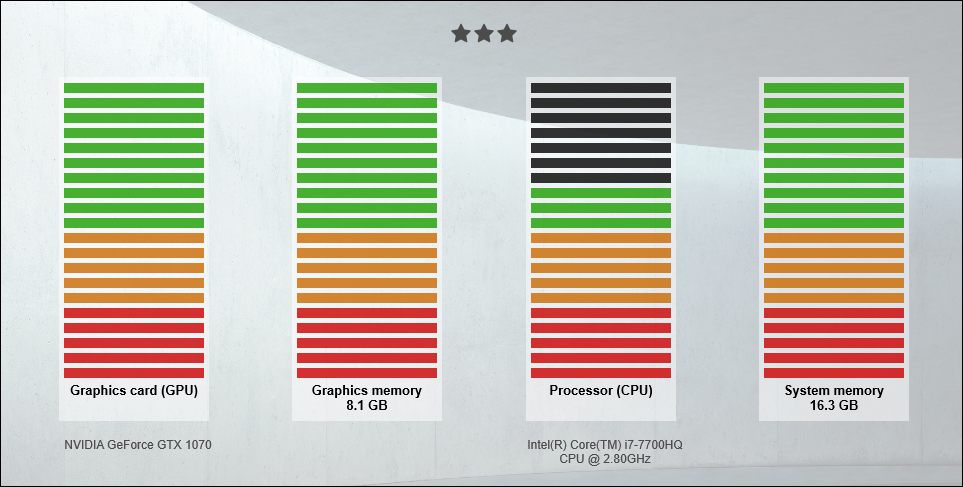 DLSS does help mitigate the DXR tax, but this is the original DLSS, not DLSS 2.0. The built-in GPU test can be launched by browsing to the game’s installation folder and running the Benchmark.exe program, which has five presets along with an RTX mode. If you purchase a graphics card with ray tracing support, this is a great benchmark to see how ray tracing runs, and the difference between rendering modes. Indoor areas with lots of shadows show the biggest difference, but the performance hit for global illumination (indirect lighting) via DXR is massive.
1440p Ultra performance (DXR+DLSS): 68.7 average fps, 43.8 99th percentile
Middle-Earth Shadow of War (Image credit: Tom’s Hardware)
Middle-Earth Shadow of War (151GB): From 2017, Shadow of War can push GPUs with less than 8GB VRAM to their breaking point — especially if you use AMD GPUs. It also happens to be one of the fattest games we’ve encountered, tipping the scales at a whopping 134. 7GB download in Steam and occupying 151GB of drive space. Frankly, the HD texture pack doesn’t make that big of a difference and you should probably skip it. The built-in test takes about a minute to run and generates fairly consistent results, provided you don’t exceed your GPU’s VRAM. As usual, the first run should be ignored since your GPU is probably still warming up, plus you’ll get more stuttering on the first pass while things get cached into memory.
1440p Ultra performance (DX11): 112.9 average fps, 84.1 99th percentile
Red Dead Redemption 2 (Image credit: Tom’s Hardware)
Red Dead Redemption 2 (115GB): Rockstar’s latest magnum opus, Red Dead Redemption 2 has a lot of similarities to GTAV. There are no proper presets (ignore the preset slider as it chooses different settings based on your GPU). There are also about 40 settings you can adjust, although only five or so make a major difference in performance. For this test, we maxed out everything except MSAA, though lesser PCs will probably need to run at much lower settings. RDR2 supports the Vulkan and DX12 APIs, with Vulkan generally performing best in our experience. We log the frametimes during the fifth test sequence, which lasts about 130 seconds and starts with Arthur robbing a cash register.
1440p Max no MSAA performance (Vulkan): 64.2 average fps, 52.8 99th percentile
Rise of the Tomb Raider (Image credit: Tom’s Hardware)
Rise of the Tomb Raider (20.9GB): The built-in GPU test actually isn’t very good, as especially the first scene is less complex and generates higher framerates. Still, it’s easy to run and you can log frametimes from just the second and/or third sequence for a more representative benchmark. Of course, RotTR has been supplanted by its younger sibling now.
1440p Very High performance (DX12): 142. 1 average fps, 105.9 99th percentile
Shadow of the Tomb Raider (Image credit: Tom’s Hardware)
Shadow of the Tomb Raider (35.3GB): There are several benefits to using the latest Tomb Raider as a benchmark. First, it’s a newer game, so it better represents the latest trends in game engines and hardware requirements. Second, while it still has three test sequences, the first and third are relatively good representations of typical gameplay. Third, and perhaps most importantly, it supports DXR, making it another potential showcase for your RTX graphics card (or AMD RDNA 2 or Nvidia Ampere in a few months). Except, the DXR effects are only for shadows and honestly don’t look that impressive, especially for the performance hit they inflict. At least DLSS mostly offsets the drop in performance.
1440p Ultra performance (DXR+DLSS): 86.2 average fps, 54.9 99th percentile
Strange Brigade (Image credit: Tom’s Hardware)
Strange Brigade (33. 6GB): This is an asymmetrical co-op game sort of in the vein of Left 4 Dead, by the people behind the Sniper Elite games and using the same Asura engine. It utilizes the Vulkan or DX12 APIs, with Vulkan generally being preferred, and has a benchmark sequence that lasts around one minute. It’s a quick and easy benchmark, though not of a tremendously popular game or engine. The GPU test also has no enemy AI running, as far as we know — all the players and enemies are frozen in time — which means performance in the benchmark may be higher than actually playing the game, particularly on slower/older CPUs.
1440p Ultra performance (Vulkan): 193.4average fps, 153.8 99th percentile
The Talos Principle (Image credit: Tom’s Hardware)
The Talos Principle (5.3GB): It’s a few years old, using the Serious Sam 4 engine (which is still not out), but with puzzle gameplay. The Talos Principle is a small download and the GPU test is easy enough to run. The benchmark is under the Extras menu, and runs with the current settings. It also supports the DX 11, DX 12, and Vulkan APIs. The full test sequence takes about three minutes, and in testing the DX11 API still performs best for Nvidia GPUs. (We haven’t tested AMD performance recently, but Vulkan may be the best option there.)
1440p Ultra performance 4xMSAA (DX11): 203 average fps, 137.2 99th percentile
Total War Warhammer 2 (Image credit: Tom’s Hardware)
Total War Warhammer 2 (53.4GB): This is an AMD promoted game with DX12 support, but the support is listed as ‘beta’ even two years after the game launched. For Nvidia, you’ll still get better performance from the DX11 API, while AMD sometimes performs better with DX12 — it varies by driver and GPU. There are three different benchmarks you can run: Battle, Campaign, and Skaven.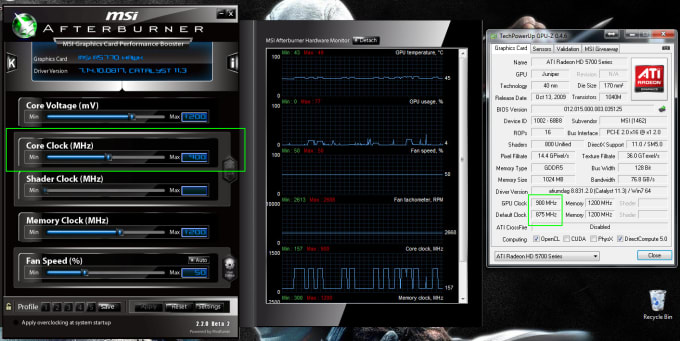 We prefer the Skaven test, which seems to best represent ‘realistic’ gameplay and takes about 60 seconds to run (plus 20-30 seconds in load times).
1440p Ultra performance (DX11): 99.8 average fps, 62.2 99th percentile
Wolfenstein Youngblood (Image credit: Tom’s Hardware)
Wolfenstein Youngblood (42.8GB): Vulkan ray tracing support for reflections was added many months after the initial launch, along with two different built-in GPU tests (Riverside and Lab X), each lasting about 30 seconds. That’s a bit on the short side, unfortunately, and the ray traced reflections don’t make that much of a visual difference. DLSS 2.0 support was also added, which generally undoes any performance loss from ray tracing. The Lab X test is slightly more demanding, with lots of shiny and reflective floors, so we used that. Performance is surprisingly high for a game with ray tracing effects, which makes us wonder if perhaps more games should be using VulkanRT instead of DXR.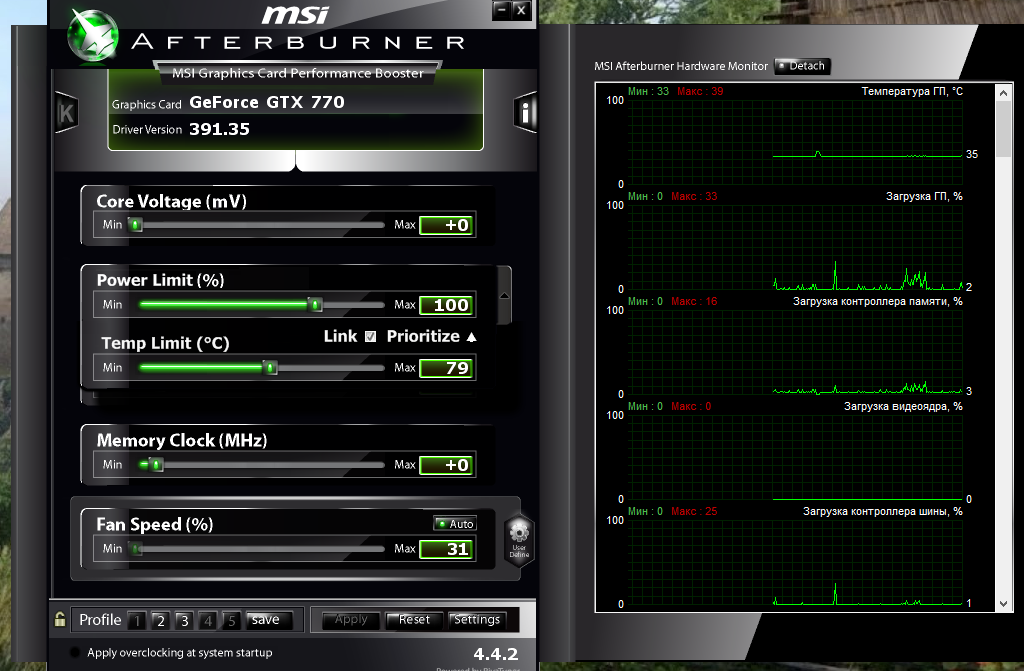
1440p Mein Leben! with RT performance (VulkanRT+DLSS Quality): 154.9 average fps, 121.1 99th percentile
Zombie Army 4 (Image credit: Tom’s Hardware)
Zombie Army 4 (49.0GB): Last in our not at all complete list of games with built-in benchmarking tools, Zombie Army 4 uses the same Asura engine as Strange Brigade, generally with similar performance characteristics — though the actual test is different so you can’t compare ZA4 scores with SB scores. Likewise, you can choose between DX12 and Vulkan APIs, with the latter being preferred. Performance is lower than in Strange Brigade, but again that’s probably more to do with the test sequence than the actual game.
1440p Ultra performance (DX12): 146.7 average fps, 93.1 99th percentile
What about testing games without built-in GPU test features? It can be done, and it’s not super difficult. The key is to consistently use the same test sequence, as much as possible — so testing in the middle of a shootout with multiple enemies isn’t a good idea, as the battle will rarely go the same way each time. We recommend using at least a 60 second test sequence, and while you could go as long as you want, anything more than two minutes usually passes the point of diminishing returns.
We use OCAT, in part because it has proven reliable with every game we’ve tried, and also because we like the audio cue feature — since the overlay often fails to work, having an audible start/stop sound lets you know you’ve properly got the frametime capture running. We also set it to capture performance for all processes, which sometimes generates extra files (e.g. for Explorer.exe) that can be deleted from the results directory. Here are some of the more recent popular games for manual GPU testing.
One important point to make is that because manual benchmarking doesn’t have a preset route, you can’t compare scores between different publications — unless they’re all using the same sequence. If you test a game like Battlefield V on different maps, and even in different areas of the same map, performance will vary quite a bit. This is why most benchmarks stick with singleplayer testing as well, as multiplayer introduces a slew of other variables. We’ve included videos below of the benchmark sequences used for each of the games.
Battlefield V (88.6GB): Besides being a popular series, Battlefield V holds the perhaps dubious distinction of being the first full game to get ray tracing support. A patch was released about a month after launch … and the initial performance was pretty awful, cutting fps in half. Nvidia and DICE worked to refine the algorithms and eventually reduced the framerate drop to 20-30%, depending on the area and level. What’s more, the DXR effects are only for reflections, so you mostly see them when you’re specifically staring at a shiny car or window. Most of the time, we can play without DXR and not feel like we’re missing much. Plus, in multiplayer mode where framerates are critical, image fidelity takes a back seat. Battlefield V was also the first game to get support for DLSS, but with restrictions, like the fact that you can’t enable DLSS on an RTX 2080 Ti unless you’re running at 4K. Sigh. Our test sequence is an assault on artillery fortifications in the Tirailleur mission — but other missions where there isn’t so much combat might be easier for benchmarking purposes.
1440p Ultra + RT performance (DXR): 89.5 average fps, 73.8 99th percentile
Call of Duty: Modern Warfare (212GB): Ho. Ly. Crap. Over 200GB of data for a single game? Congrats, Activision, you ‘win’ this round. If you love the Call of Duty series, have at it, but we don’t recommend downloading this game purely for GPU testing purposes. (It took about 90 minutes to download on a 350 Mbps connection!) It does support DXR effects, for shadows, and they look a bit better than in some of the other games (Shadow of the Tomb Raider). The performance hit isn’t massive either, though in multiplayer mode you’ll almost certainly prefer higher framerates to improved shadows.
1440p Max + RT performance (DXR): 96. 3 average fps, 79.4 99th percentile
Control (41.8GB): Of all the ray tracing games, this is the one where the difference between traditional rendering and DXR is most pronounced. It uses DXR for reflections, transparent reflections, indirect diffuse lighting, and contact shadows. If you have a DXR-capable graphics card, Control might actually make you feel it was worth the added cost. Hopefully with future ray tracing hardware providing improved performance, we’ll see more games offer enhanced visuals in the vein of Control rather than just slightly improved shadows or reflections.
1440p Max + RT performance (DXR + DLSS): 89.3 average fps, 71.6 99th percentile
Dishonored 2 (42.1GB): Arcane has released several great ‘immersive sims,’ including Prey and the Dishonored series. Performance at launch was a bit iffy for Dishonored 2, but things have improved quite a bit since then, thanks to patches, new drivers, and faster hardware. It’s a game that’s worth revisiting, just for the Clockwork Mansion level. For GPU testing , we ran around the dock area of Karnaca. One quick note is that after maxing out the graphics settings, you need to set vsync to enabled and then force vsync off in the Nvidia Control Panel; otherwise you end up with a 120 fps framerate cap.
1440p Ultra + HBAO+ performance (DX11): 143.3 average fps, 104.6 99th percentile
Doom Eternal (43.8GB): id Software’s latest in the Doom series boasts more visceral combat than ever before. It also runs incredibly well compared to many other games that frankly don’t look as good. You can see our Doom Eternal benchmarks, which also show the path we used in our test sequence. Besides being a great game and another example of a highly optimized Vulkan implementation, perhaps most interesting is the lack of ray tracing support — something that was promised but hasn’t arrived yet.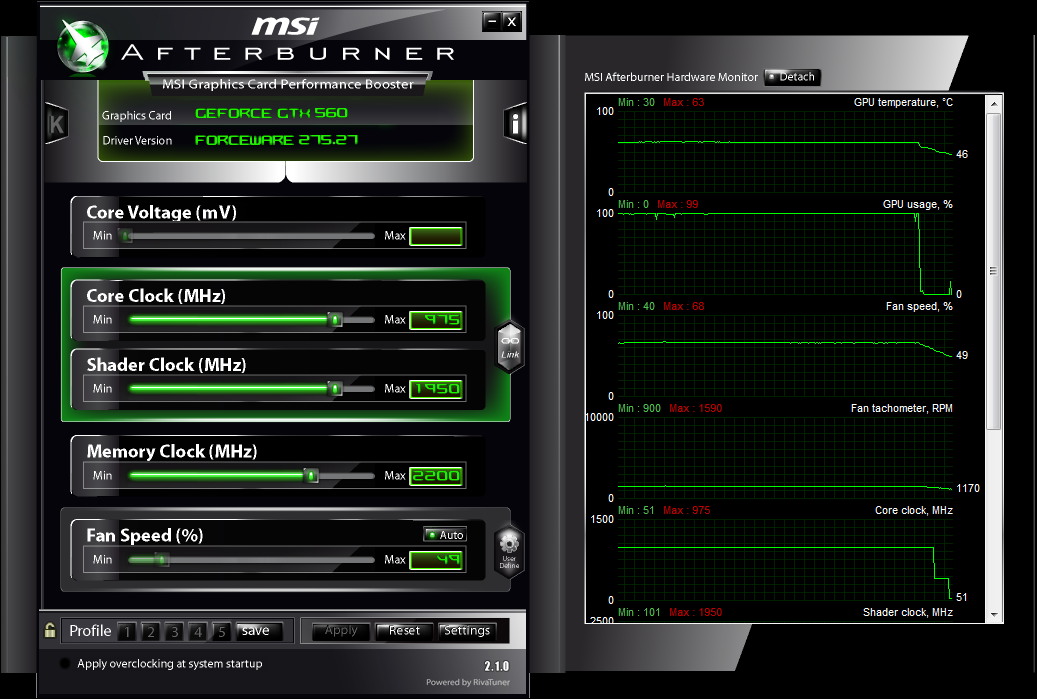 It will likely come in a patch, but if Wolfenstein Youngblood is any indication, it could be months before it arrives.
1440p Ultra Nightmare performance (Vulkan): 207.4 average fps, 157.8 99th percentile
(Image credit: Tom’s Hardware)
Microsoft Flight Simulator 2020 (100GB): The latest installment in the flight sim series is a beast, capable of punishing CPUs and GPUs. Even at ultra quality, in our testing many of the fastest graphics cards hit a CPU bottleneck. To ensure consistent results, we recommend using the autopilot feature and a saved position, so that the weather and other elements are the same each run. We used a 90 second clip of a plane coming in for a landing for our in-depth Microsoft Flight Simulator benchmarks. Note also that a DirectX 12 patch is supposed to be coming, which could dramatically improve performance.
1440p Ultra performance (DX11): 49. 1 average fps, 41.0 99th percentile
Minecraft RTX (0.9GB): What’s the most popular game in the world? Minecraft. It’s also extremely easy to run on just about any relatively recent PC … until you enable the DXR path tracing effects, at which point it becomes one of the most demanding games around. Our full Minecraft RTX benchmarks provide more details. DLSS 2.0 isn’t just helpful here, it’s basically required — otherwise even an RTX 2080 Ti will choke at 1080p with all the DXR rendering effects enabled. There are a bunch of free sample worlds from Nvidia sponsored creators, assuming you have an RTX card and the Microsoft Store version of the game — sorry Minecraft Java users.
1440p Ultra + 24 RT render distance (DXR + DLSS): 71.4 average fps, 46.6 99th percentile
(Image credit: Tom’s Hardware)
Project CARS 3 (45.5GB): As with MSFS, this game tends to hit CPU limits at lower settings, though not to the same extent.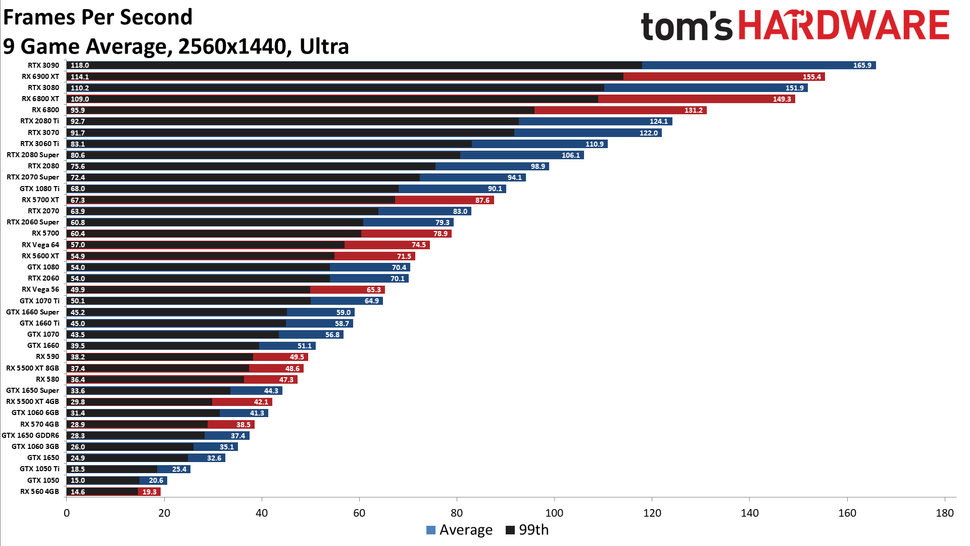 There are also no graphics presets, at least not at launch. You can see our full Project CARS 3 benchmarks for additional results, and we used the replay feature to get precisely repeatable benchmarks. Different tracks, camera selection, time of day, and weather all impact performance, so be sure to test in the same manner. Also, the replay tends to perform a bit worse (10-15%) than live gameplay.
1440p Max performance (DX11): 113.4 average fps, 87.3 99th percentile
The Witcher 3 (27.9GB): This is an oldie by goodie, now past its fifth birthday. It remains one of the better looking games around, and with a high-end gaming PC it runs quite well even at maxed out settings — though you’ll still need an RTX 2080 Ti if you’re hoping to run 4K at max settings with 60 fps or more. If you’re looking for a demanding test sequence, riding around Novigrad or any other large city can tax both your CPU and GPU. Plus, since this is from the same studio that’s making Cyberpunk 2077, it’s a best estimate at what that game may require — except far less demanding since there are no DXR effects in The Witcher 3.
1440p Ultra + HBAO+ performance (DX11): 116.6 average fps, 77.7 99th percentile
That’s a lot of potential gaming benchmarks, and you definitely don’t need to run all of them — or even half of them. However, these benchmarks represent the ‘good’ games I’ve used for GPU testing over the past five years. More will be coming this fall, when a bunch of new games are slated to launch, and we’ll see even more ray tracing games once the next generation consoles arrive. We’ll keep this list updated with any interesting new additions as time rolls on, and if there’s a great game for GPU tests you feel we’ve missed, let us know in the comments.
Synthetic GPU Tests
Testing with real games is generally preferred to testing with synthetic GPU tests that merely try to mimic games. If you want to know how well ‘Game X’ runs, testing with that game is the only way to get the true answer. Using a different game to try to guess performance wouldn’t make sense, and using synthetic GPU tests to estimate gaming performance won’t necessarily give a useful answer either. However, there are advantages to such benchmarks.
First, they’re often free. You can pay for an upgraded version that allows custom benchmark runs and automation, but such features aren’t necessary if you’re just trying to check out how your new PC performs. Some of these tools are cross-platform, so you can compare Windows PCs with iOS, MacOS, and Android devices. This is also a weakness, as fast PC graphics cards are often an order of magnitude more powerful than mobile devices, which means the benchmarks are often very limited in order to not overtax a smartphone. Finally, synthetic benchmarks are often much smaller downloads — the largest of the test suites, 3DMark, is only 6GB, which is about the same size as the smallest game we listed above.
These are the best GPU tests , so we’re leaving out tests that don’t meet our criteria — simplistic graphics benchmarks that don’t properly represent modern graphics hardware, for example.
3DMark Time Spy and other tests (Image credit: Tom’s Hardware)
3DMark: One of the oldest, most popular and best GPU tests, it generates reasonably accurate results if you want to know the overall performance difference between GPUs, at least on the more demanding tests.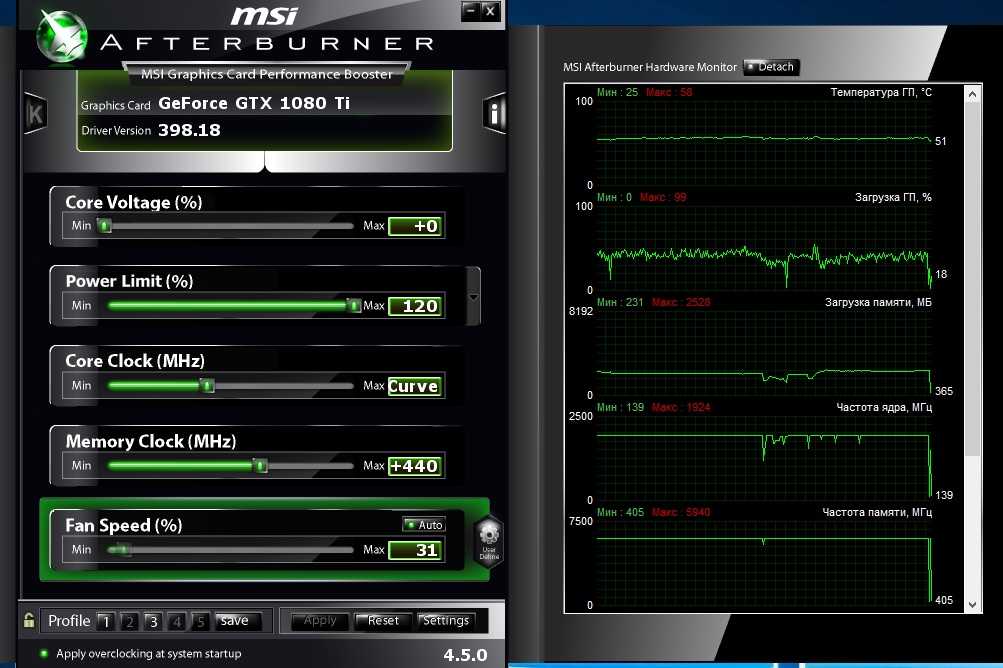 We recommend Time Spy and Fire Strike as the best options for PC; the cross-platform Night Raid is less useful, as it needs to scale down to mobile devices. The difference in performance between various GPUs can fluctuate by as much as 20% in either direction, depending on the test, which is more than the gap between GPU tiers. As with any single benchmark, it’s merely one data point, but 3DMark is arguably the best representation of GPU performance outside of game testing.
It’s by no means a universal metric, however. For example, across our test suite of nine games and six different resolutions and settings combinations, the RTX 2080 Ti ends up 14% faster than the RTX 2080 Super, and 18% faster at 4K. 3DMark Time Spy shows the 2080 Ti leading by 20% while Fire Strike shows a 15% lead. But Night Raid only shows a 5% difference — because it’s more like running a lightweight game than something that will push your GPU to its limits.
Get 3DMark (6.0GB)
Basemark GPU (Image credit: Tom’s Hardware)
Basemark GPU: Compared to 3DMark, Basemark GPU is an even faster test that feels less representative of real-world performance. It takes about 30 seconds to run is all, and you can select either the Vulkan (usually best), DirectX 12, or OpenGL rendering API. It’s also cross-platform, which means it needs to run on a wide range of hardware and is thus less likely to showcase the power of high-end GPUs. Still, it gives a 21% lead to the 2080 Ti over a 2080 Super, so for a short benchmark it’s not bad. Of course, our gaming suite shows a 2080 Ti beating the Radeon VII by 28%, while Basemark gives the 2080 Ti a 65% lead, and numbers are missing for the RX 5700 series for some reason.
Get Basemark GPU (1.0GB)
FurMark (Image credit: Tom’s Hardware)
FurMark: Less about performance and more about stress testing, FurMark is one of the best GPU tests for trying to max out power use on your graphics card. Who knew rendering a fuzzy donut could be so taxing for a GPU? It can push GPUs so far past their usual limits that most modern GPUs have protections now to prevent tools like FurMark from causing them to fail. Still, there are some GPUs that go well beyond their official limits — we use FurMark as one of the tools in our graphics card power consumption testing. What could possibly go wrong with an R9 Fury X drawing 370W of power?
Get FurMark (12MB)
Superposition (Image credit: Tom’s Hardware)
Unigine Superposition Benchmark: Unigine has been creating GPU tests for over a decade, starting with Heaven back in 2009, Valley in 2013, and most recently Superposition from 2017. Superposition uses advanced rendering techniques like SSRTGI (Screen Space Ray Traced Global Illumination) to generate some impressive results — without the need for RTX hardware. Stepping through the 14 ‘debug’ rendering modes is also pretty cool as you can see what each rendering pass focuses on. Only a handful of games have used the engine so far, with the upcoming Dual Universe perhaps being the first major game to do so.
Get Superposition (1.3GB)
That’s it for the synthetic graphics benchmarksThere’s a reason 3DMark is the most used graphics benchmark outside of games. You can’t hope to properly simulate games that include 50-100GB of geometry and texture data with a test that’s less than 100MiB in size.
GPU Compute Tests
Last, we have the GPU compute tests . Such workloads can be quite different from games, as they don’t tend to focus on textures and geometry but instead do various scientific computations. It’s also worth noting that some of these benchmarks, like FurMark, can push graphics cards well beyond their usual ‘safe’ limits. There’s a reason data center GPUs often have lower clocks (and larger fans) than consumer graphics cards. They’re designed to run 24/7 computational workloads without failing. If there’s one thing we learned from the cryptocurrency mining era, it’s that consumer GPUs often fall apart within a year if you run them at 100% load all day, every day.
That’s not to say all compute workloads are brutal. Many applications, like Adobe’s Creative Cloud suite, now have GPU acceleration. Some 3D rendering applications also use compute shaders to improve performance. It’s also possible to limit how demanding some of these workloads are, like telling Folding@Home to only run your GPU at 80% load.
AIXPRT: Deep learning is a big topic these days, with AI powering everything from cars to doctors to music composition and more. How do you go about making a deep learning network, and which GPUs are best for the task? That’s a seriously deep rabbit hole, but AIXPRT is one of the few deep learning training benchmarks that’s not extremely difficult to get up and running. Which isn’t to say it’s easy — you still have to jump through quite a few hoops — but it’s at least manageable. It can run on CPU or GPU, and supports Nvidia GPUs for TensorFlow and TensorRT calculations. Or you can run OpenVINO on CPUs, or MXNet if you want to use Linux instead of Windows. The tests can also take quite a while to run, because training Resnet50 is still a lengthy process.
Get AIXPRT (147MB+)
(Image credit: Tom’s Hardware)
CompuBench: This is a relatively easy benchmark to get up and running, and it will run physics, graphics, video processing, face detection, and 3D rendering (path tracing). The test supports OpenCL and CUDA, with the latter only running on Nvidia GPUs while OpenCL works on ‘all’ GPUs (maybe not older Intel integrated graphics).
Get CompuBench (18MB)
Folding@Home: If you haven’t heard of Folding@Home with all the COVID-19 stuff going on, you apparently don’t normally read tech publications, so welcome to Tom’s Hardware! But seriously, FAH consists of a bunch of computational packages for helping scientists and researchers figure out how proteins fold, which can lead to a better understanding (and potentially cures) for a variety of diseases. It’s distributed computing on a massive scale, and the FAH network now boasts more computational power than even the fastest supercomputers — about 2.6 ExaFLOPS at present. Donating your ‘spare’ compute cycles to the project is a nice way to test performance and also help others.
Get Folding@Home (30MB)
LuxMark: A 3D rendering tool that uses OpenCL to run the workload on your GPU, it’s been a staple of our GPU compute tests for quite a while. It’s sort of like a Cinebench tool for your graphics card.
Get LuxMark (117MB)
V-Ray Next: V-Ray is a self-contained benchmark from ChaosGroup, and V-Ray Next is the latest GPU-accelerated version of the benchmark. It does path tracing via CPU or GPU, calculating the number of ‘paths’ your hardware can perform in a one minute benchmark. As an example, an RTX 2080 Ti managed 363 mpaths (millions of paths), a Core i9-9900K only did 80 mpaths, and together the CPU and GPU were able to compute 438 mpaths. It’s a great example of why many path tracing applications are moving to support GPUs in addition to traditional CPU rendering.
Get V-Ray (309MB) — registration required
Closing Thoughts on GPU Tests
Testing the performance of your GPU is a great way to ensure everything is running properly. Your graphics card isn’t the only factor, of course — the CPU, RAM, storage, and potentially display (or at least resolution) are also factors in both gaming and overall performance. But if you’re playing a game and find it’s running poorly, checking your benchmarks compared to what others are getting can help eliminate or confirm the root cause. Maybe it’s time to upgrade to a new GPU, or maybe it’s another component that’s the bottleneck, or it could be software or drivers bringing down your score. Armed with some benchmark results, you’ll be better equipped to determine if performance is where it should be, or if investing some time in tuning is worthwhile.
Jarred Walton is a senior editor at Tom’s Hardware focusing on everything GPU. He has been working as a tech journalist since 2004, writing for AnandTech, Maximum PC, and PC Gamer. From the first S3 Virge ‘3D decelerators’ to today’s GPUs, Jarred keeps up with all the latest graphics trends and is the one to ask about game performance.
Topics
GPUs
Components
How to benchmark your graphics card
Home / PCs & Components / How-To
How-To
Even if you aren’t into overclocking, benchmarking your graphics card can help ensure your GPU is running as expected.
By Thiago Trevisan
PCWorld
Thiago Trevisan/IDG
Sure, benchmarking your graphics card may sound like rocket science, but it’s not as difficult as you might think. Roll up your sleeves, because this guide will show you just how easy, enjoyable, and important it is to benchmark your GPU. And not just when you’re overclocking! We’ll cover benchmarking for both stability and performance.
For even more information, be sure to check out our roundup of the best graphics cards, as well as our supplementary guide to the best GPU benchmarking software.
Why you should benchmark your GPU
First, though, here’s why you should be benchmarking your graphics card even if you aren’t trying to make it to the top of the competitive overclocking charts:
- To get a baseline performance metric so that you know if your GPU is performing as it should by comparing to other standard results.
- To be able to compare your current PC’s performance against your future hardware upgrades. How much performance will you gain by buying a new graphics card? Now you’ll know!
- To check for stability and other vitals like thermals, clock speeds, etc.
First, test for stability and temperatures
Unigine’s Heaven benchmark
Now that you know why you should benchmark, it’s time to get into the how. Let’s start with stability and vitals. It’s rare, but sometimes a graphics card can be defective from the factory. That can mean a dead card, but in many cases you’ll get what are called “artifacts”—basically imperfections on the image, flickering, or even pulsating colors.
The first program we’re going to use is Unigine Heaven 4.0. It’s free for personal use and runs a loop of a graphical environment that really utilizes your GPU. The first order of business here is to make sure your graphics card can run without shutting down or displaying any weird graphical glitches, so you should allow it to run Heaven for at least 30 minutes, to allow the GPU to get up to temperature.
If all looks good, you’ll also want to keep an eye on the vitals, Those will be displayed in the top right corner, along with your GPU info.
The first vital is temperature, which can indicate various potential issues with your hardware and case airflow. If your GPU quickly reaches its maximum temperature limit, it could indicate a rare (but possible) issue with its thermal paste, or (more likely) restricted airflow in your case if there isn’t enough clearance for the fans to get cool air.
A custom liquid-cooled GPU setup created by the author.
A good example of recent issues have been in the GDDR6X memory temperatures of Nvidia’s GeForce RTX 3090 Founders Edition. You’d never know without stress-testing the GPU that the memory can get very close to the VRAM temperature limit, potentially throttling your performance. (Some people have successfully updated their thermal pads and noticed a significant improvement)
the best 1080p graphics card
Radeon RX 6600 Swft 210
How do you know the normal operating temperature for your graphics card’s GPU core? It varies by model (Google your GPU name for concrete details) but basic reference-style coolers can often run as high as 84 Celsius, while some larger graphics cards with hefty heat sinks and multiple fans—like EVGA’s fantastic FTW3 series—can be lower in the 60s and 70s. You’ll know if you’re in the danger zone if your temperatures are in the higher 80s, and your fans are spinning aggressively; this often will indicate poor case airflow. Add some fans or open some case panels and temperatures should improve. That’s a direct benefit of knowledge gained while benchmarking and testing your GPU.
You can also keep an eye on the core clock and memory clock of your GPU, to make sure it is performing near the intended specs. An easier way is to just run the benchmark option in Unigine Heaven, and then you can compare your score with others online and get a good baseline to make sure you’re in the ballpark.
How to benchmark your GPU to gauge baseline performance
An example of 3DMark Time Spy scores and estimated game performance.
After you’ve tested for stability and thermals, you can take your benchmarking degree up to a doctorate by testing performance. Here we’ll use the popular 3DMark benchmarking suite, which includes some free modes. Time Spy (which tests DirectX 12 graphics performance) and Port Royal (ray tracing performance) are some of the most widely used benchmarks around. 3DMark even has an online hall of fame where you can compare your scores against others!
What numbers should you keep an eye on? It’s simple. There’s one total score, and then separate individual scores for the CPU and GPU if you’re running Time Spy. Port Royal just has GPU scores and a total score. If you make a tweak to a component in your PC, the individual scores give you a better idea of the affect it has on the total score. (This especially useful if you’re looking to overclock. Take a look at our article on Nvidia’s Automatic overclocking tool in GeForce Experience.)
A full page of scores and results for 3DMark’s Port Royal test.
3DMark mark can also show you the approximate frame rate performance you’d get on a chosen game and resolution, which is very useful information to gauge your performance and compare it against what new upgrades may accomplish for you. If you’re doing some overclocking, running 3DMark can also reveal instabilities in your system, such as crashes, so you can adjust your numbers and try again.
How to benchmark your GPU in games
Another very fun way to benchmark your GPU is to use the automated benchmarks built into many games. (Check out our GeForce RTX 3080 Ti review to see some common ones, or the list of games with built-in benchmarks at the always fantastic PC Gaming Wiki.)
The results overview from Shadow of the Tomb Raider‘s built-in benchmark.
Shadow of the Tomb Raider is a favorite of mine because you can easily see the frames per second performance that you’re getting in each scene, giving you a good indication of how the game will run overall. As a bonus, if you upgrade your graphics card or other PC hardware, you can re-run the benchmark and you’ll know exactly what gains you’ve netted.
More advanced gamers can use software such as Fraps or OCAT to manually benchmark performance of games that don’t have a built-in benchmark, but this will require more time, testing, and figuring out a repeatable testing scenario to avoid potential scene-to-scene variance.
Game on.
There you have it! You’ve graduated to GPU benchmarking pro. Now you know how to check that your graphics card is stable and fully functioning, how to validate performance numbers to make sure your GPU is up to spec, and how to gauge the baseline performance of your hardware for future upgrade comparisons. And who knows? You may enjoy benchmarking so much, you’ll turn it into a hobby!
Author: Thiago Trevisan
10 BEST FREE GPU Benchmark Software For PC In 2022
Here we review and compare the top GPU Benchmark Software with features that test the performance of the Graphics Processing Units:
PC benchmark software is used to test the performance of computers. The computer benchmark test allows you to test and compare the results of your computer processor, memory, and graphics card.
In this blog post, we will review benchmark software used for testing Graphics Processing Units (GPU). You can read about the price, main features, and description of the best GPU benchmark apps available online for free.
What You Will Learn:
- GPU Benchmark Software Review
- Frequently Asked Questions
- List of the Best GPU Benchmark Software
- Comparison Table of Top Benchmarking Software
- #1) Heaven UNIGINE
- #2) Novabench
- #3) PassMark
- #4) 3DMark
- #5) Geekbench
- #6) MSI AfterBurner
- #7) Basemark GPU
- #8) Cinebench
- #9) HWMonitor
- #10) OverClock Checking Tool
- Other Noteworthy GPU Benchmark Software
- Conclusion
- Recommended Reading
GPU Benchmark Software Review
Fact Check: GPU market size was about $19. 75 billion in 2019. The market size of graphics cards is expected to reach $200.85 billion by 2027–a CAGR of 33.6 percent.
The following graph shows the graphic card market share of PC GPUs by the vendor as of Q1 2022:
[image source]
Pro-Tip: Look at the supported graphics card and processor before downloading a free GPU benchmark tool. You should also check whether your operating system is supported before downloading a benchmarking app.
Frequently Asked Questions
Q #1) What is the benchmark software?
Answer: A benchmark app is used for testing computer performance. They are mainly used to compare the performance of computer systems across different hardware. GPU benchmark app specifically tests the performance of the graphics card.
Q #2) How do I check if my GPU is bad?
Answer: If your computer crashes during a GPU benchmark test, your graphics card may be faulty. Remember that low benchmark scores don’t necessarily indicate a faulty GPU. Poor GPU test scores are caused due to old drivers, overheating, or power supply issues.
Q #3) Why is my GPU not detected?
Answer: A GPU may not be detected by a benchmarking app if you have an old model graphics card. Another reason for the app not detecting your GPU is that the drivers are outdated.
Q #4) What is real-time GPU benchmarking?
Answer: Real-time benchmarking software measures graphics card performance, during the actual gameplay. Also known as real-world benchmarking, it involves measuring the frames per second (fps) of a game during gameplay.
Q #5) How we can use a GPU benchmark app?
Answer: Download a GPU benchmark app and run the software. You should compare the benchmark score of your card with the average score for the same card. A significantly lower score shows an issue with the graphics card.
=>> Contact us to suggest a listing here.
List of the Best GPU Benchmark Software
Here is the list of popular and best benchmarking software:
- Heaven UNIGINE
- Novabench
- PassMark
- 3DMark
- Geekbench
- MSI AfterBurner
- Basemark
- Cinebench
- HWMonitor
- OverClock Checking Tool
Comparison Table of Top Benchmarking Software
Let us review the benchmark software:
#1) Heaven UNIGINE
Best for overclocking and benchmarking graphic card performance.
Heaven UNIGINE is an extreme benchmarking tool to test the capabilities of your computer system to the fullest. The application allows you to test graphics cards, a cooling system, and a power supply. You can also rig your graphic card using stock or custom mode.
Features:
- Extended stress test
- Benchmark reporting
- Command-line automation
- Stress test
Verdict: Heaven UNIGINE provides an interactive benchmarking experience in a detailed environment. A limitation of the GPU benchmark tool is that it does not support the latest DirectX 12 cards.
Price: Free
Website: Heaven UNIGINE
#2) Novabench
Best for testing and optimizing system performance.
Novabench benchmark tool lets you test computer performance within minutes. The app provides detailed information about graphic performance. You can also compare the results online to know about any performance issues.
Features:
- Check disk read and write and memory transfer speed.
- Compare performance.
- Troubleshoot and repair system.
Verdict: Setting up and running the benchmark tool is easy. To get the most accurate benchmark results, close apps and don’t use the computer during testing. You must buy the Pro version if you want detailed performance monitoring and reporting features.
Price:
- Basic: Free
- Advanced: $19
Website: Novabench
#3) PassMark
Best for benchmarking and diagnosing system performance.
PassMark allows you to test the detailed performance of your computer. You can check and monitor 2D and 3D graphics performance. The free benchmarking tool also allows you to test processor, memory, and storage performance.
Features:
- Compare GPU, memory, and storage performance
- Customize tests
- Stress test
Verdict: PassMark is an easy-to-use and quick benchmarking tool to test GPU performance. The application can be used for benchmarking and comparing both desktop and mobile systems.
Price: Free
Website: PassMark
#4) 3DMark
Best for comprehensive testing of computer performance.
3DMark is a top-rated professional graphic card benchmarking tool. You can use the software for both personal and professional use. It supports advanced benchmarking tests to test the full graphic processing capability of your computer systems.
Features:
- Time Spy
- Night Raid
- Fire Strike
- Ray tracing (Paid version)
- GPU Stress tests (Paid version)
Verdict: 3DMark is probably the most popular PC benchmarking tool. The application is used by most professional computer magazines for testing and comparing CPU and graphic cards performance.
Price:
- Basic: Free
- Advanced: $29.99
- Professional: $124.58 per month
Website: 3DMark
#5) Geekbench
Best for measuring gaming and image processing performance and comparing results.
Geekbench benchmark GPU software supports evaluating computer performance on mobile and desktop computers. It can measure the performance of single and multiple core processors.
Features:
- Supports Windows 10+, Ubuntu 16.04+, macOS 10.13.5+, iOS 12+, and Android 7+
- GPU benchmarking
- Game and image-processing test
- Share results online
Verdict: Geekbench is a free graphics benchmark tool that runs multiple operating systems. You can evaluate performance easily using a single mouse click.
Price: Free
Website: Geekbench
#6) MSI AfterBurner
Best for overclocking and monitoring in-game GPU performance on Windows devices.
MSI AfterBurner is a free benchmark test application you can use to evaluate system performance. You can use it to overclock your graphic card. You can also run a stress test to check the performance of the overclocked graphics card.
Features:
- Supports Windows 10, 8.1, 8, 7, Vista, and XP.
- Compatible with AMD Radeon HD 2000 and Nvidia Geforce 6 or newer.
- Overclock and test graphic card performance.
Verdict: MSI AfterBurner is one of the most popular graphic card overclocking tools. The app can also monitor the performance of your graphic card in-game. You also need to install an additional MSI Kombuster stress test tool to check your overclocked graphic card performance.
Price: Free
Website: MSI AfterBurner
#7) Basemark GPU
Best for evaluating and comparing the performance of graphic cards on desktop and mobile devices.
Basemark is a great graphic benchmark app for carrying out custom system testing. The app allows efficient objective benchmarks for different system configurations. It runs through a series of game-like scenes to test the capabilities of the graphic cards.
Features:
- Compare performance with other configurations.
- Custom options for detailed testing.
- Supports Windows 10, macOS, Ubuntu 18.04, Android 7+, and iOS 14+
Verdict: Basemark is a free benchmark test application for testing and comparing system performance. The online comparison service is a unique feature of the app that lets you compare scores with other systems with similar configurations.
Price: Free
Website: Basemark
#8) Cinebench
Best for benchmarking and comparing CPU and GPU devices on Windows and macOS devices.
Cinebench is one of the best GPU benchmark test software for Windows and Mac devices. The app can carry out a series of tests to test the capabilities of your computer system. Unlike most other benchmark apps, Cinebench provides real-world benchmarking including common tasks performed by users.
Features:
- Three tests to check GPU performance.
- Render and compare visuals.
- Complex and large testing.
Verdict: Cinebench has been in the graphical benchmarking market for decades. The free GPU benchmark app is great for evaluating your computer processor and graphic cards capabilities.
Price: Free
Website: Cinebench
#9) HWMonitor
Best for monitoring computer’s video card, processor and hard drive temperature, fan speed, and voltages on Windows.
HWMonitor allows you to test the performance of core computer components. You can check the temperature of your GPU, processor, and hardware devices. It can read sensors of most Windows chipsets and hard drives.
Features:
- Monitor GPU temperature.
- Support ITE IT87series sensor chips and DDR5 memory chips.
- Read CPUs on-die thermal sensors.
- GDDR6 temperature monitoring on NVIDIA chips.
- Support AMD 5700, 5600G, 5300 G, 6900 XT, and 6700 XT GPUs.
Verdict: HWMonitor
Price:
- Basic: Free
- Personal: Starts at $2.08 per month
- Pro: $12.5 per month
- Enterprise: $41.67 per month
Website: HWMonitor
#10) OverClock Checking Tool
Best for checking the stability of graphics cards and monitor system performance on Windows devices.
OverClock is a good benchmark test to troubleshoot hardware issues. The software features a stress test that allows you to know whether a game performance issue is due to a graphics card or a game bug. You can also monitor computer performance through an easy-to-read and appealing graphical dashboard.
Features:
- Graphical reports
- Stress test
- CPU core test
- Real-time computer monitoring
- Suggest ideal overclock values for stable performance
Verdict: OverClock is a useful tool to monitor and troubleshoot computer performance issues. The test is useful if you want to know whether overclocking the processor or graphics card has made it unstable.
Price: Free
Website: OverClock
Other Noteworthy GPU Benchmark Software
#11) GFXBench
Best for video card benchmark on Windows, macOS, iOS, and Android devices.
GFXBench is a good benchmark app that is simple and easy to use. The benchmark software carries out a variety of tests. It also monitors the video fidelity and battery performance of mobile devices.
Price: Free
Website: GFXBench
#12) FurMark
Best for benchmarking OpenGL graphic cards on Windows.
FurMark is a simple to use GPU benchmark app that can benchmark OpenGL compliant cards. The benchmark app lets you adjust resolution, anti-aliasing, and other settings. It also allows you to carry on a burn-in test where the graphic card is tested for an extended time to identify any problems.
Price: Free
Website: FurMark
#13) UserBenchmark
Best for benchmarking performance of computer processor, GPU, memory card, and storage devices in Windows.
UserBenchmark is a lightweight benchmarking tool that can test the performance of the main components of your computer. The app can test the effective 3D speed to check performance for recent games.
Price: Free
Website: UserBenchmark
#14) Speccy
Best for evaluation of major computer components on Windows devices.
Speccy is a lightweight tool that you can use to find out information about your computer components. The app provides detailed information of the computer processor, motherboard, memory, storage, graphic card, operating system, and more.
Price:
- Basic: Free
- Professional: $19.95
- Speccy+CCleaner: $44.95
Website: Speccy
#15) CPU-Z
Best for real-time evaluation of computer processor, memory, and other parts on Windows and Android devices.
CPU-Z allows Real-time evaluation of computer processors and memory. The app can also report memory size, type, timings, and module specifications. You can generate reports through a graphical or command-line interface for more control over application parameters.
Price: Free
Website: CPU-Z
Conclusion
Heaven Unigine, 3DMark, and Cinebench are the best devices for benchmarking and comparing CPU and benchmark performance on Windows and Mac devices. Passmark, Geekbench, and Basemark GPU are the best benchmarking software for testing your graphic cards on Linux and mobile devices.
If you simply want to test the stability and performance of an overclocked graphic card, use OverClock Checking tool.
Research Process:
- Time taken to research this article: Writing and researching on the article tool as almost 9 hours so that you can select the best GPU benchmark software.
- Total tools researched: 30
- Top tools shortlisted: 15
=>> Contact us to suggest a listing here.
Recommended Reading
10+ BEST GPU Benchmark Software for PC (Free/Paid) in 2022
ByMatthew Martin
Hours
Updated
A GPU benchmark is a test that helps you to compare the speed, performance, and efficiency of the GPU chipset. The benchmarking software enables you to know the performance of various hardware components in the GPU, like RAM, GPU cycle, processing throughput, etc. Many such applications enable you to check the speed of the disk using various caching options, file and block sizes.
Following is a handpicked list of Top GPU Benchmark programs & Software with their popular features and website links. The list contains both open source (free) and commercial (paid) software.
BEST GPU Benchmark Software
| Name | Supported platforms | Link |
|---|---|---|
| ? AIDA64 Extreme | Windows, iOS, and Android platforms | Learn More |
| Speccy | Windows | Learn More |
| PassMark | Windows and Android. |
Learn More |
1) AIDA64 Extreme
AIDA64 Extreme is a GPU benchmark software that provides detailed information on computer components. The information given by this software can be saved in CSV (Comma Separated Values), HTML, or XML formats.
Features:
- This GPU benchmark software offers more than 50 pages of information on installed programs, software licenses, etc.
- It provides details of computer internals without the need to open it.
- Supports multi-threaded memory and cache to analyze system RAM bandwidth.
- It has a panel that can be used with different graphs, custom images linked with sensor data.
- AIDA64 Extreme can display data on devices like LCD or VFD (Variable Frequency Drive).
More Information >>
2) Speccy
Speccy gathers all the information from your PC regarding your RAM, CPU, motherboard, graphics card, network, optical drives, etc.
Features:
- Gives a detailed rundown of every component, and most drivers, currently available on your PC.
- Displays the critical components with their real-time temperatures so that you can easily spot the problems before their occurrence.
- It allows you to save your scan results directly as snapshots, text files, or XML.
- Free version available.
More Information >>
3) PassMark
PassMark is one of the best GPU benchmark Software that enables you to compare the performance of your PC to similar computers. It offers easy to search baseline databases that are submitted by other people.
Features:
- This video card benchmark software allows you to run GPU performance tests directly from a USB drive.
- Enables you to check the speed of disk using various caching options, file and block sizes.
- This free GPU benchmark tool allows you to test the speed of the 3D video card.
- You can measure the network speed between two computers using TCP/IP.
- This GPU Benchmark Software enables you to check the read and write speed of RAM.
Link: https://www.passmark.com/products/performancetest/
4) Geekbench
Geekbench is a tool that enables you to measure computer performance with one mouse click. This free benchmark testing tool can measure the multi-core and single-core power processor.
Features:
- Geekbench enables you to test your computer for image processing and gaming.
- This is one of the best GPU benchmarks that allow you to share test results with other people.
- Supported platforms are Windows, Linux, Mac, iOS, and Android.
Link:https://www.geekbench.com/
5) FurMark
FurMark is a GPU stress testing tool that enables you to monitor the graphics processing unit temperature. It uses a rendering algorithm for video card benchmarks and test the performance of the GPU.
Features:
- This GPU benchmark test program offers two modes full screen and windowed.
- Allows you to perform stability and stress for a graphics card.
- It plays an alarm when the GPU temperature exceeds to certain centigrade.
- This is one of the best GPU benchmark software that enables you to customize testing performance.
Link:https://geeks3d.com/furmark/
6) Basemark GPU
Basemark GPU is a tool that helps you to evaluate and compare the performance of your graphics. It works with all desktops, tablets, computers, and laptops.
Features:
- This GPU test tool allows you to compare device performance with other systems.
- Provides custom options that allow you to detailed benchmarking.
- Allows you to select the test with ease.
- You can customize the configuration.
Link:https://www.basemark. com/benchmarks/basemark-gpu/
7) Novabench
Novabench is a tool that enables you to test your PC performance. It enables you to test your result online to find potential issues. This GPU stress testing software offers easy to view an instant comparison chart.
Features:
- This videocard benchmark tool allows you to check memory transfer and disk read and write speed.
- This pc benchmark program enables you to compare with numerous system you already have.
- You can save the result with ease.
- This GPU benchmark software helps you to optimize and repair your system.
Link:https://novabench.com/
8) OverClock Checking Tool
OverClock Checking Tool is software that enables you to perform tests for memory, VRAM, and power supply. This free pc benchmark app can monitor your computer in real time.
Features:
- Provides graphical reports that can be easily saved to your system.
- This free graphics benchmark software offers built-in protection for your computer system.
- This GPU stress test software supports a command-line interface.
- This tool allows you to analyze the behavior of the computer during the test.
- It can generate a CSV file containing a report.
Link:https://www.ocbase.com/
9) 3dMark
3dMark is a tool that allows you to compare mobile device and PC performance with other models. This graphics card testing software can automatically scan your hardware and recommends a good test for your system.
Features:
- Allows you to choose the test you need with no hassle.
- This tool enables you to monitor GPU and CPU temperatures, clock speeds, and frame rate.
- Offers custom settings to benchmark according to your need.
- This GPU benchmark software offers two ways to test your device: a quick benchmark and a longer stress test.
- This benchmark software enables you to search, filter, and sort lists of available devices with ease.
Link:https://benchmarks.ul.com/3dmark
10) UserBenchmark
UserBenchmark is a tool that enables you to quickly speed test your computer. This CPU and GPU benchmarking software allows you to compare the result of other people with the same components.
Features:
- This CPU benchmark software includes six 3D game simulations.
- You can identify the strongest components in your computer.
- This online GPU benchmark software offers drive test that includes read, write, and more.
- It allows you to generate and view the report online.
- You can compare the components to current market leaders.
- View speed test result from other people
Link:https://www.userbenchmark.com/Software
11) AIDA64 Engineer
AIDA64 Engineer is software that enables you to get detailed information about the installed software and offers diagnostic functions. This free benchmark software allows you to perform stress testing on Hard disk, SSD, and GPGPU.
Features:
- It can monitor computer sensors in real time.
- This pc benchmark software provides 50 pages of information on the hardware configuration.
- Allows you to perform software audits for programs, security applications, and licenses.
- Display information on system data on LCD/VFD devices connected to your PC.
- This is one of the best benchmark software that supports more than 250 sensor devices.
More Information >>
12) Heaven UNIGINE
Heaven UNIGINE is a benchmarking software that helps you to test the performance of GPU and diagnostics stability. This graphics card benchmark testing tool helps you to judge the effectiveness of your graphics card cooler.
Features:
- It is one of the best benchmark for GPU that allows you to perform extreme hardware stability testing.
- This is one of the best pc benchmark tools that provide support for DirectX and OpenGL.
- Enables you to monitor GPU temperature.
- Offers stereo 3D and multi-monitor configurations
Link:https://benchmark.unigine.com/heaven
13) GFXBench
GFXBench is a tool that provides complete graphics performance analysis with more than one test. It provides detailed information on your device. This free GPU benchmark tool helps you to compare your graphic card with other similar ones.
Features:
- Allows you to customize your graphics test.
- You can perform a cross API benchmark using OpenGL and Vulkan 2D and 3D graphics applications.
- Test the performance of mobile and desktop PC.
- This is one of the best benchmark software that enables you to check the performance of the device battery.
Link: https://gfxbench.com/result.jsp
Buying Guide
❓ What is GPU Benchmark Software?
A GPU benchmark is a test that helps you to compare the speed, performance, and efficiency of the GPU chipset. The benchmarking software enables you to know the performance of various hardware components in the GPU, like RAM, GPU cycle, processing throughput, etc. Many such applications enable you to check the speed of the disk using various caching options, file and block sizes.
? Which are the Best GPU Benchmark Software?
Here is a list of the best GPU benchmark software:
- AIDA64 Extreme
- Speccy
- PassMark
- Geekbench
- FurMark
- Basemark GPU
⚡ What Is the need of a Graphic Card Benchmark Software?
Here are the important reasons of using Graphic Card Benchmark Software:
- Allows you to customize your test.
- You can perform a cross API benchmark using OpenGL and Vulkan 2D and 3D graphics applications.
- Test the performance of mobile and desktop PC.
- Enables you to monitor GPU temperature.
- Helps you to do software audits on installed software, program, security applications, and licenses.
- It enables you to perform extreme hardware stability testing.
❗ How do I know if my GPU is dying?
Following are the signs of dying GPU:
- Your computer frequently crashes and will not reboot.
- Graphic glitches while you play game.
- Abnormal fan performance or noise.
- Display strange artifacts like small colored dots on the screen.
? How do you troubleshoot a GPU problem?
Here are the ways to troubleshoot a GPU problem:
- Computer hanging problem: If your computer screen is locked or hanged, then ensure that you have the latest driver game/program installed. This will prevent conflict between drivers. You can also discharge your electricity by pressing the power button down for a few seconds.
- Display visual artifacts when your program loads: Your monitor displays visual artifacts because of your GPU running for a long period of time and overheating. It can be overcome if you turn off the game and try to open other software after a few hours.
? What are the types of Graphics Card Benchmarks?
Here are the types of Graphics Card Benchmarks:
- Synthetic Graphics Card Benchmarks: This type of graphic card benchmark is designed for Windows. It is run using software having built-in graphics card test tools to calculate the performance scores. This GPU benchmark testing software provides an easy way to know how well your graphics card works.
- Real-Time Graphics Card Benchmarks: Real-time graphics card benchmarks measure the FPS (Frames Per Second) during gameplay. Here, more FPS means your graphics card has the capacity to play games smoothly.
? What games can be used for GPU benchmarking?
GPU benchmarking can be done for all kinds of games. Below are games for GPU benchmarks.
- Control
- Battlefield V
- Doom Eternal
- Dishonored 2
- Call of Duty: Modern Warfare
- Minecraft RTX
✅ How to see and interpret the benchmark results?
Here are ways to interpret the benchmark result:
- If your benchmark does not run smoothly, then this depicts that the graphics card has no efficiency to manage certain visuals.
- Any FPS rating below 30 describes that the gaming experience will not be as smooth as your expectation. Your ideal frames per second should be 60.
- High temperature of the GPU means it is overheating and struggling to run high-resolution games.
❗ How to improve the benchmarking scores?
Here are the ways to improve benchmarking scores
- Download compatible graphics card drivers. Update them on regular basis.
- If you have installed beta version drivers, then roll back them to an earlier version.
- Close all unwanted Windows programs and perform the GPU benchmark tests again.
How to benchmark your graphics card
From troubleshooting issues to comparing performance, learning how to benchmark your graphics card brings with it a whole host of benefits
(Image: © TechRadar)
When it comes to how to benchmark your graphics card, there are lots of different ways to do it and while it may sound like you need to be a rocket scientist to figure it out, you’ll be relieved to hear that the process is actually a lot easier than you might think. But first, you might be wondering why on earth you would want to benchmark your graphics card in the first place.
Well, for starters, if you want to easily get an idea of what your graphics card can do, benchmarking your GPU is a great way to see how it will cope with all best PC games. Even the best graphics cards will be pushed to the limit with these benchmarking tests, which means you’ll get a very clear idea of exactly what your graphics card can handle and at what resolution.
If you have the best gaming PC, these benchmark results will give you an idea of how your computer can handle the latest game and if you’ve just splashed out on that Nvidia GeForce RTX 2080 Ti, you’ll be able to share your benchmark results with all of your friends.
When you benchmark your graphics card, you’ll not only get a baseline performance metric but it also gives you a handy way of being able to compare your graphics card with the new ones getting rolled out, so you can see exactly how big the benefits on offer are before you upgrade. Plus, you can check for stability and other vital signs that are important to be aware of.
Below, we walk you through how to benchmark your graphics card and if you’re looking to overlock your graphics processing unit at the same time, check out our guide to how to overclock your GPU.
1. Why benchmark
Because GPU benchmarks throw a number of intensive graphical tests at your GPU, it’s a great way to see how your graphics card performs under load. If you’ve built your own rig, or overclocked your graphics card to eke out more performance, than running a benchmark for a few hours can give you confidence that your GPU is stable.
The last thing you want in the middle of a game is for your graphics card to fail, so running benchmarks can catch any problems early on. If it can run them for a couple of hours without problem, you’re good to go. If there are crashes, artifacts or other graphical glitches then you can begin working out what the problem is.
One of the most likely culprits will be a GPU getting too hot, so if your graphics card fails to run a benchmark, it might be worth making sure it’s getting plenty of cool air.
2. How to benchmark
When it comes to choosing software to benchmark your graphics card you’re spoiled for choice. There are a number of popular benchmarking suites available that can put your graphics card through its paces.
Not all of them are free, however, such as the popular 3DMark benchmark. There is a free version, (but the options are limited.) However, 3DMark is available on Steam, and is often discounted.
For a free version which still comes with enough settings to properly test out your graphics card we’d recommend going for Heaven Benchmark . Scroll down the page until you see ‘Download now’. Click the link, and then select where you want to download it from.
Once installed, run the program. A window will appear letting you select various options, such as the texture quality and the resolution you want the benchmark to run at. When choosing the resolution it’s best to run the benchmark at the resolution you usually run games. That’s the resolution you run Windows in as well (such as 1920 x 1080), then select ‘System’.
If you fancy testing out how well your gaming rig will cope with stereo 3D such as Nvidia 3D vision, you can enable 3D as well. If the benchmark runs well without any crashes or major framerate drops then you’re good to grab a pair of 3D glasses and get gaming.
If you’re not sure about what settings to use, there are a couple of ready made presets that will help you get benchmarking quickly and easily. Next to where it says ‘Presets’ click the drop down box and choose either ‘Basic’ or ‘Extreme’.
But, if you’re looking to see how your graphics card handles a specific game, a lot of high-profile PC games come with built-in benchmarks. Usually these will be located in the graphics settings screen. Even if the game you’re interested in doesn’t feature a built-in benchmark, you can use programs like FRAPS or MSI Afterburner to record your performance in-game.
3. Benchmark results
When the Heaven benchmark runs you’ll see a number of attractive 3D environments with the camera panning over them.
This is a handy way to see how well your GPU handles this level of graphics. Just with your eyes you should be able to make out any dropped frames, graphical glitches or tearing.
If the benchmark doesn’t run smoothly then you already know that your graphics card is going to struggle with certain graphics. On the top right-hand corner of the screen you’ll see and FPS (frames per second) counter which gives you a lot more information. For a smooth gameplay experience you’ll want that counter to sit around at least 30.
Any drops below can result in your games feeling slow and choppy. The higher this score the better, and ideally you’d like to see it at 60FPS. If your graphics card is struggling here, try changing the settings in the Heaven Benchmark settings page.
This area will also tell you about your GPU including the model and memory. It will also record the temperature of your GPU – pay close attention to this as high temperatures can mean your GPU is struggling. An overheating GPU can also lead to problems and system instability.
To begin recording the results of the benchmark, click ‘Benchmark’ on the top-left hand side of the screen or press F9 on the keyboard. Heaven will now run a number of tests and then display your results in a new window.
These results with give you your average, min and max frames per seconds along with a score. The higher the score, the better. There’s no quick way to compare scores with other people, but there are plenty of websites such as TechPowerUp and Overclock.net that feature message boards dedicated to discussing Heaven benchmark results.
What might improve it?
If your graphics card isn’t getting the score you hoped for, there are a number of things you can do to improve the score before you resort to ripping out your GPU and replacing it with a newer model.
First of all you should make sure have the latest stable drivers installed for your graphics card. You can check this by either going to the website of your graphics card manufacturer, or using a program such as GeForce Experience for Nvidia graphics cards to ensure that you’re running the latest drivers.
Nvidia Gefore Experience is a handy tool for keeping your graphics drivers up to date (Image credit: Nvidia)
If you are using experimental or beta drivers it might be worth rolling back to the last official stable release. Once that’s done, you can restart your computer and wait two minutes for all the start up programs and services to launch.
Close down any open programs once Windows has restarted and re-run the benchmarks. If you’re still not happy, there might be another reason for the issues.
Try opening up your PC and make sure that it is dust free and well ventilated, as overheating graphics cards could be the cause of poor performance and low benchmark scores. Clean the insides carefully with compressed air and a light brush.
If that doesn’t work, you might want to consider buying a new graphics card. You know that juicy RTX 2080 is just calling your name.
Matt is TechRadar’s Managing Editor for Computing and Entertainment, looking after two of the best, and most exciting, channels on the site. Having written for a number of publications such as PC Plus, PC Format, T3 and Linux Format, there’s no aspect of technology that Matt isn’t passionate about, especially computing and PC gaming. Ever since he got an Amiga A500+ for Christmas in 1991, he’s loved using (and playing on) computers, and will talk endlessly about how The Secret of Monkey Island is the best game ever made. He’s also a huge film and TV fan and Marvel geek, and his favorite recent film is Dune.
Best GPU Benchmarking Software [Sept. 2022]
- The best GPU benchmarking software
- Built for GPUs
Download
The old measuring stick of “Can It Run Crysis?” doesn’t hold water anymore.
Numerous applications have been developed to provide a more accurate way of testing the latest GPUs, but there are different ways to perform these tests and many more types of GPU benchmarking software available.
In this guide, we will show you a closer look at a few of these applications and help you find the best GPU benchmarking software for 2022.
First of all, you should know why we’re even using benchmarking software and why it’s important to know which one is the best. There are a variety of reasons why you might want to benchmark your GPU but the most common one is knowing how much intensity your graphics card can handle.
You could be looking for bottleneck issues in your machine, or maybe you just want to test your brand new GPU and compare it with other users. It could also be that you’re overclocking your card and wondering just how close to the limit you have managed to push it.
We also need to discuss the different methods of benchmarking. On the surface, this may seem like a simple stress test but, if we dig a little deeper, there are clearly two separate ways of benchmarking your graphics card.
Synthetic Benchmarks are programs designed to simulate the characteristics of a large set of software. For this reason, they’re also called Artificial Benchmarks.
The aim is to create a single benchmark program where the execution frequency of statements in the benchmark matches the statement frequency of a large set of benchmarks. The results will usually be presented as a score/points, but this doesn’t tell gamers what they really want to know: their frame rate.
Real-time benchmarking provides exactly that. This type of benchmarking is also called Real-world benchmarking as it can be used to test specific games and provide accurate FPS, which is why gamers opt for this sort of test in the first place.
Keep in mind that, even when trying both benchmarking methods, you might still have a poor frame rate despite having a high-quality graphics card. This is likely the result of a bottleneck elsewhere, such as your CPU or RAM.
Let’s look at best GPU benchmarking software currently available.
Table of ContentsShow
3DMark
This is probably the top result of almost any benchmarking-related software search. It was produced by a software company called Futuremark, which develops various benchmarking tools for both business and home use.
3DMark Screenshot
Download 3DMark
Something cool about 3DMark is that there is a free version available. If you plan on using a benchmarking tool regularly, however, it’s probably worth trying the Advanced Edition. You should also use the Advanced Edition if you’re looking to test for 4K settings as that preset is only available there. There is also a Professional Edition, but that one is intended for business use.
3DMark displays detailed charts for temperatures (both CPU and GPU) and shows how clock speed and frame rates change during testing. The best part of this software is that it recognizes the hardware you own and assigns a suitable benchmark test.
It is also available for Android and iOS platforms, which is another major positive.
PassMark PerformanceTest
PassMark is fast and easy to use, which is a good benchmark for any software (pun intended). PerformanceTest can benchmark your CPU, 2D/3D graphics, Memory, Storage, and CD drive via 28 standard benchmark tests across 6 suites. A detail that many tech nerds will love is the ability to create their own custom tests.
PassMark PerformanceTest Screenshot
Download PassMark PerformanceTest
The biggest downside of PerformanceTest is that while it technically comes in two versions, free and paid, the free one barely resembles the full edition. It’s practically useless.
However, the paid version of PassMark is considered one of the best benchmarking tools because it is very intensive and thorough.
Heaven UNIGINE
This is a very intensive GPU benchmarking tool. The fact that it is primarily a GPU benchmarking software is what separates it from the others. It is designed to perform very heavy and prolonged stress tests for the graphics card and can be used to accurately measure its stability.
Heaven UNIGINE Screenshot
Download Heaven UNIGINE
Another reason why this might be the best tool for overclockers is the ability to monitor the GPU cooler and see how much it can handle when pushed to the limit.
FurMark
FurMark is a GPU benchmarking software for cards that are OpenGL compliant (this applies to the vast majority of GPUs so don’t worry). This tool can also be used to monitor the temperature. As such, it’s useful when overclocking.
FurMark Screenshot
Download FurMark
Although FurMark (also known as GPU Burner) is free, it’s only available on Windows platforms. Still, this software is useful enough to be among the most popular benchmarking apps out there.
GFXBench
Your first impression might be that this is just another free GPU benchmarking software, but it’s far more than that. Unfortunately, the stigma against ‘free software’ still exists, but GFXBench is doing its best to fight it.
It’s an excellent tool with tests designed specifically for different uses. The best part is that you can compare the performance of your graphics card against pretty much any other.
GFXBench Screenshot
Download GFXBench
As seen above, GFXBench offers the possibility to test across a multitude of different platforms and compare the performance against other systems.
Superposition
Coming to you from the makers of Heaven, Superposition is another great release. It tests for high-grade visuals using the UNIGINE 2 Engine and, best of all, it’s free. It can also compare the performance of your graphics card on the Unigine leaderboard.
Superposition Screenshot
Download Superposition
It also includes some cool mini-games that you can use to directly check how your GPU performs while playing.
Cinebench
Although primarily CPU benchmarking software, this tool is also awesome for GPU testing. It’s unique because it can render an image and compare it with various “real-world” tasks. It does this because image rendering is often assigned to the CPU.
Cinebench Screenshot
Download From Microsoft
Download From App Store
As a result of this CPU-centric benchmarking, Cinebench uses much larger and more complex test scenes than other GPU benchmarking tools. A very impressive feature is that it can test up to 16 cores of your processor.
Last but certainly not least, we have MSI’s overclocking tool. It’s freeware and if you’re confused about the MSI label, don’t worry; you can use it on pretty much any graphics card, regardless of its manufacturer.
It allows you to monitor the performance of your GPU while in-game; there is a transparent overlay while you play. How cool is that? This might seem intrusive at first, but there’s no more effective way to assess how your machine is functioning.
MSI Afterburner Screenshot
Download MSI Afterburner
One of the coolest features of Afterburner is its ability to control fan speed. If that seems unnecessary, remember that bumping the fan speed from 50% (usually the default setting) to 75-100% can make a game go from system-crashing to perfectly stable and playable.
Afterburner requires an additional stress testing tool called MSI Kombustor to be installed, but it’s easy and integrates well with the best part of this software: overclocking.
MSI Afterburner allows you to overclock your GPU manually as well as run an overclocking analysis test, which gives you a great overview of what exactly your graphics card is capable of. When combined with Kombustor, you can see effectively in real-time the improvement that your card is making.
Alright, it’s time to pick a winner. Drum roll, please.
The Best GPU Benchmarking Software Right Now
MSI Afterburner is our choice for the best GPU benchmarking software of 2022. It’s specially designed for GPUs and is an almost perfect tool for overclocking.
Of course, this is only our choice. You’re free to have a different preference and you should consider your needs and budget when choosing overclocking software.
A simple guide to testing a video card in 2022 — Hardware on DTF
How to check a video card for performance, which temperatures are too high, how to measure performance in games and more.
83679
views
At the beginning of 2022, the situation with the availability of electronics improved little. Gamers especially suffer from this — video cards are still in short supply, and prices are 2 times higher than recommended even in the secondary market. Moreover, many used graphics adapters were used in mining. Therefore, before purchasing a video card, it is worth checking it for stability and performance. If the first helps to identify the technical problems of the video card itself, then the second will not only show the exact number of FPS in your favorite game, but can also highlight the weaknesses of the rest of your PC components.
Fortunately, you don’t have to be a programmer or know advanced mathematics to test graphics adapters. It is enough to install a couple of benchmarks and set up monitoring in games. In this guide, I will cover all the most necessary information on this topic.
Note: In this text, we will only talk about desktop video cards.
Why test the video card
First, let’s take a closer look at the reasons and benefits of testing video cards:
- Check stability. This is especially true for used graphics cards. Testing will quickly reveal problems like overheating or graphical artifacts and will help you avoid unwanted purchases. Also, checking stability is important for budget models with a weak cooling system and other cheaper components. And, of course, stress testing is vital after overclocking.
- Check performance. Often you just want to understand how well the video card «pulls» a new game.
Or compare the performance of your graphics adapter with others of similar or higher performance.
- Identify a weak point in the system. If the number of FPS in test applications or games is noticeably lower than the average for your video card model, then the processor or other system components are most likely to blame. What to do with it I will tell at the end of the article.
How to check the operation of the video card
You can run a beautiful benchmark at high settings or a utility for testing the stability of a video card — this is exactly what they do in service centers. Such programs usually take up little space, and therefore download quickly:
- Heaven Benchmark from UNIGINE «weighs» only 247 megabytes and is absolutely free. In addition, it shows a graphically rich scene by scrolling endlessly, which will be useful for stress testing.
- FurMark from Geeks3D takes up 12 megabytes.
It allows you to properly warm up the video card, loading the graphics core to the limit. This allows you to check the stability of the core (the main element of the video card) and measure the maximum temperature of its heating. The latter will identify problems with the cooling system. NOT RECOMMENDED FOR OVERCLOCKING OR LAPTOP TESTING!
How to use Heaven Benchmark
Download the application and set the settings to maximum:
Press the button Run . A test scene will appear and start playing endlessly. You can start testing by clicking the «Benchmark» button in the upper left corner, but it’s better NOT to do this so that the 3D scene plays indefinitely. If after a couple of runs the computer did not freeze, the application did not crash, and artifacts (graphic distortions) did not appear on the screen, then the video card is working stably.
Heaven Benchmark test scene
You should also pay attention to the temperature of the graphics core — it is indicated in the upper right corner:
A high temperature may indicate a poor-quality cooling system, dry thermal paste, or poor air circulation in the system unit. We will analyze the temperature of the graphics core in more detail at the end of the chapter.
How to use FurMark
Download the latest app and press the button Preset: 1080 (FHD) on the right (this preset will be enough for most video cards).
The test scene (“donut”) will start and FurMark will start loading the graphics core. A problematic video card will give itself away in a few minutes. And to be sure, you should wait about half an hour. Monitor the temperature of your graphics card using the chart below:
What video card temperatures are considered high?
First, let’s figure out which are considered normal. In the absence of cooling problems, the graphics core operates approximately in the following temperature ranges:
- Idle: 30°-45°C.
- Gaming: 60°-80°C.
- Rendering: 70°–90°C (up to 120°C on professional graphics cards).
But if your video card is heated to 90 degrees or higher, then there are probably problems with cooling (the exception is RTX 3090 and professional models). It is worth contacting the service with this problem. Also, the video card cooling system can be replaced by buying a new custom one in a computer equipment store. However, be aware that the latter will void your warranty.
Also, the cause of overheating may be poor air circulation in the system unit. At least a couple of fans must be installed in the case: one for intake (front) and one for exhaust (rear).
How to quickly measure the performance of a video card
Another benchmark from UNIGINE will help us with this — Superposition . It is newer and more technologically advanced, so the load on the hardware in it is much closer to modern games. In addition, Unigine.com has a leader board where you can compare your final scores with those of other users. It will also allow you to calculate the approximate increase in performance after upgrading the video card.
Download the benchmark and select preset 1080p Extreme . After that press the button Run .
After the test is completed, the benchmark will display the results of your system. They can be compared with the results of other users of the benchmark on the leader board at Unigine.com. Find the same video card as yours and compare your scores with the column Score . You can also see how much more powerful video cards scored than yours. This will help plan future upgrades.
How to properly test a video card in games
In addition to benchmarks, it is important to test the video card in games. Monitoring applications are used to obtain detailed performance information. The most popular solution today is MSI Afterburner bundled with the RivaTuner Statistics Server utility. So let’s just use them.
- Download MSI Afterburner.
- Unzip the archive and run MSIAfterburnerSetup.exe .
- Follow the prompts of the installer and install MSI Afterburner in the standard path.
- At the same time, the RivaTuner Statistics Server installer will start — install it also using the standard path.
- Run MSI Afterburner .
- Press the gear button to open settings and go to tab «Monitoring» .
- Check only the following sensors (uncheck the others): GPU1 Temperature , GPU1 Load , GPU1 Memory Load , GPU1 Core Clock , GPU1 Memory Clock «CPU1 Temperature» , «CPU2 Temperature» CPU2 Frequency» , … , «RAM Load» , «RAM Load \ Process» , «Frame Rate» , «Frame Time» .
- Go through all enabled sensors and check the box «Show in OED» .
- To monitor the frame time, it is better to switch the display method to the graph (next to item «Show in OED» ).
- Then go to tab «OED» and set a hotkey to switch monitoring visibility to any idle in the game.
- Press the OK button to save the new settings and minimize MSI Afterburner (do not close!).
Any game can now be launched. If monitoring does not appear, then press the visibility switch button. If this does not help, then you will have to restart MSI Afterburner.
And how many FPS should be in games? If once upon a time a value of 30 FPS was considered acceptable, today a stable 60 FPS is considered a comfortable minimum for PC gaming. It’s only from this frame rate that the footage looks really smooth, and the camera controls with the mouse feel really responsive.
What to do if the results are not as expected
Most often, a weak processor is to blame for the lack of FPS with a powerful video card. Many save on the processor, trying to spend most of the money on the video card. However, paired with a weak CPU, a high-performance graphics adapter will be idle up to half the time. 9 sensors help detect processor overload0011 «GPU Utilization» and «Frame Rate» : There is not enough processor power if the first sensor shows 80% utilization or lower most of the time, and the FPS does not increase even after lowering the graphics settings. You can try to reduce the load on the CPU by loosening options such as visibility range, shadows, animations, and number of characters. But this will not help much — it is better to replace the processor with a more powerful one.
Another reason is throttling. You can track it by high temperatures and dropping frequencies, when in the game the processor or video card first runs at a high frequency, and then after overcoming the mark of 80–90°C (sometimes even after 100°C) the frequency drops sharply. Throttling is most often to blame for a poor-quality cooling system or dried thermal paste. In the latter case, it is enough to replace the thermal paste with fresh one, and the weak cooling system will need to be upgraded to something more powerful.
«Peaks» on the frame time graph mean slowdowns or freezes
Freezes often occur when there is not enough memory on the video card. Pay attention to sensor «GPU1 memory load» — The value in megabytes must not exceed the amount of available video memory. Otherwise, the deficiency will be made up for by the system RAM, which is much slower. You can reduce video memory consumption by lowering the resolution or graphics settings. Textures consume the most memory — set them to medium quality or lower.
Worst of all, if the game does not have enough video memory and RAM at the same time. Then additional megabytes are taken from the paging file on the drive (which is even slower than RAM). This will almost inevitably lead to friezes. The situation is aggravated if the swap file and the game are on a slow hard drive — move them to a fast SSD. And also be sure to add RAM to the computer.
* * *
Now you know everything you need to successfully test your graphics card for performance and stability. This will allow not only to find out what it is capable of in games, but also to avoid unwanted purchases from the hands, as well as identify problems with other system components.
If you have any questions, write them in the comments.
Video card performance test: free programs
When purchasing a new or used video card, you need to look not only at its characteristics before buying, but also visually inspect for defects (swollen capacitors, scratches, other breakdowns). Unfortunately, this is all that can be done in a store or on the street.
But at home, it is advisable to fully check the video card, find out if there are any defects (artifacts, flickering or image loss) in order to take appropriate measures in time. This is done with the help of special tests through programs. Consider the most popular and free of them.
Contents of the article
- Beginning (recommended reading)
- Programs for testing video card performance
- FurMark
- AIDA64 GPU-Z «.
Now go to the « Graphics Card » tab, open the table with the characteristics of your card on the Internet (preferably on the manufacturer’s website, here is a link to NVIDIA, but to AMD Radeon) and compare if the data matches.
It is also useful to go to the “ Sensors ” tab, look at the temperature “ GPU Temperature ”, it should not exceed 90 degrees in load mode (in games or demanding software) and 50 degrees in idle mode.
Do not forget to install the latest drivers for the card. This is important to obtain reliable information. Drivers are best downloaded from the official website. Here is a link to NVIDIA, here to AMD/ATI Radeon.
If everything is in order with this, we proceed to check the performance of the video card.
Tests will be carried out through special programs. They are compatible with Windows 10, 8 and 7, some even support Russian.
Graphics Card Performance Test Programs
So, the applications that I will discuss below are considered the best of the free ones, and they also show reliable data. Go!
FurMark
Probably one of the best applications that allows you to find out the power of a video card using the so-called «graphic donut» (special animation during the test). Thanks to him, the video card receives the maximum load, which allows you to get detailed information about the operation of the graphics adapter.
Detailed instruction:
- Download Furmark to a PC or laptop and install it.
- Open the settings section « Settings «.
- Check the two items « Dynamic background » and « Burn-in «, click « OK «.
- Select the current screen resolution and click « GPU stress test «.
Or you can click on the appropriate button in the « Benchmarks » section.
- After 20-40 minutes (all this time we are monitoring the performance of the video card and heating in the upper corner, FPS is also displayed here), we stop testing.
The received data can be compared on the Internet, be sure to compare them with your video card model. For example, enter the phrase “GeForce GTX 760 furmark ” into a Google or Yandex search, look at the results of other users and compare with your own.
AIDA64
Now let’s test the video card in AIDA64 (formerly Everest). Its advantage is that it is able to diagnose the entire iron. Let’s find out the power of the system, as well as how stable everything works. FPS (number of frames) of course will not show, but everything else is easy.
How to do it:
- Download from the official site, install on a laptop or computer, and then run.
- In the top menu, select « System Stability Test «.
- Uncheck all items except « Stress GPU(s) «.
- At the bottom of the window, click on « Preference » and navigate to « Temperatures «.
- Choose any color like blue and set it to » GPU Diode «.
- Do the same in the other tabs (set the GPU parameter to blue). At the end, press « OK » to save the settings.
- Start the test with the « Start » button.
- Now we are closely monitoring the following indicators:
- In the “ Temperatures ” tab, the temperature (blue line on the graph) should not exceed 90 ℃ (the lower the better).
- Cooling Fans — cooling system (cooler speed).
- Voltages — voltage.
- Powers — power.
- Clocks — frequency.
- Undefined — all together.
- Statistics — all information in one place. This is the most convenient tab for control.
- We wait 20-40 minutes and complete the check, all this time we monitor the performance of the video card, it should not fall, no sharp jumps (subsidence) either up or down.
If no errors, crashes (blue screens, picture distortions, monitor shutdown, twitches) and artifacts appear after the time has elapsed, then everything is in order with the video card.
Additionally, you can check the overall stability of the system (processor, disk, RAM, etc.) in maximum load mode. To do this, check the boxes for all items and start testing.
3D Mark (Free)
Another well-known program that combines a number of game-based tests, which makes the performance test process not only effective, but also fun. The current free version is available on Steam (link below).
Procedure:
- Install « Steam «, search for « 3DMark «, go inside and click « Download Demo of «. Launch after download.
- At the top of the window, move to « Benchmarks «, click on « Filters » and specify the system parameters (DirectX, resolution).
- Run any of the available tests by clicking « RUN «.
- We are waiting for the completion of testing (it lasts about 15 minutes, it goes through several stages) and analyze the results. It is possible to compare the received data online by uploading them to the network. A very handy feature.
Unigine Heaven Benchmark
A modern benchmark that uses game graphics for real performance evaluation. Shows FPS (frames per second), core frequency and video memory. It has a user-friendly interface, albeit in English. Supports all operating systems and is regularly updated.
How to use it:
- Install and open.
- We select the Russian language and set the profile, for example, « Extreme «. To change individual parameters, you need to select the profile « Own «.
- Click « RUN » to start testing.
- Next, a window with various hot keys will appear, take a screenshot or remember them.
Suitable for easy control.
- We follow the process and observe the values in the upper right corner.
UserBenchmark
The last tool I want to talk about is an application from the developers of the popular resource https://www.userbenchmark.com/. It has three main advantages — ease of use, fast verification speed (at the same time I consider it a minus, since full-fledged testing should take at least 20 minutes, and preferably 40), instant uploading of results to the network (automatically opens a browser with a table).
Brief instruction:
- After starting, mark the components of interest for verification.
- We are waiting for the completion of the test (it lasts approximately 5 minutes). In most cases, this is enough to identify the problem.
- Performing analysis. For example, go to the « Graphics » tab.
- We go down to the section « Graphics Card «.
- Look at the « Bench » column.
If we see that it says » Poor «, then the performance is reduced. In other columns, problem areas are marked with a red line. It also shows the FPS and much more.
In fact, UserBenchmark deserves a separate article, and perhaps it will appear.
Alternatives without software
There are additional ways by which you can determine the power of your card. In this case, it is necessary to have an external utility to display various technical information during testing. For example, « GPU-Z «.
- Start video rendering. Create a project in any rendering application, upload your video files (estimated at 20-40 minutes for an objective estimate) and start the process.
- Enable high quality large format movie or YouTube video.
- Play a demanding game, preferably at maximum settings.
Perhaps these are the simplest options, the combination of which will be no worse than any software. The data obtained on the basis of different tests are more reliable.
Summing up
I have reviewed only a few applications, in fact there are many more. I don’t see the point in sorting through each one, since they work on the same principle. And if there is an unknown problem with the video adapter, any of the utilities will display it in the form of graphical defects. When they are detected, you need to stop the software and deal with the reasons. Otherwise, the card can be finished off and nothing will revive it.
If you have doubts about the power and operation of the device, then save the obtained data and compare it with the results of other users. Where to find them? To help the search engine Yandex, Google.
Finally, I will leave a few useful links.
All about artifacts and their removal.
Additional applications for stress testing, for whom these were not enough.
Overclocking to super power.
For miners who want to know the hash using the WhatToMine service.
Any questions? Feel free to ask.
I’m not a beast, I don’t bite, I’ll help everyone.
detailed video lesson
TOP 15 best programs for testing video cards
Contents Contribution
- Video cards testing
- Methods for testing video cards
- The best software of video cards 900MA 900M
- PassMark 9 performance test0026
Review of programs for testing video cards
In theory, a particular graphics card may seem ideal, but there may be certain tasks that other graphics cards can perform better.
Therefore, there is a need for an accurate method for testing GPUs. Graphics card testing software can help in this regard.
Video Card Performance Testing Methods
- Synthetic or artificial comparison
Synthetic benchmarking is a GPU performance test under ideal conditions to check if the execution frequency matches the request frequency for the given parameters.
The results will be general and will be presented in the form of scores / points.
While it can give you a clear idea of GPU performance, it largely ignores an important aspect that gamers are looking for — frame rate (FPS).
Real-time benchmarking or benchmarking in the real world
Real-time testing is performed on specific games to determine the exact FPS. This allows gamers to know how the graphics card performs in real-life gaming environments, with all of its issues such as internet traffic, lags, game settings, etc.
This is more like testing graphics card performance while playing. Therefore, such a test presents a more realistic picture.
Despite using both test methods, a high quality graphics card can still deliver low frame rates. The problem may lie elsewhere, such as low memory, incompatible processor, etc.
Let’s discuss some of the best graphics card testing software available today.
Best Video Card Testing Software
3DMark GPU test
If you’re looking for a good synthetic benchmarking tool, 3DMark Basic Edition should fit the bill as it allows you to quickly evaluate your graphics card’s performance against other GPUs.
In addition, the basic version is free software, while the advanced version is also available for in-depth analysis and 4K testing.
This software automatically scans your device and helps you select the test to run. In addition, it displays detailed charts showing clock speed, GPU temperature, and frame rate. As a result, it is one of the most accessible software tools to use.
It allows you to run seven different benchmark tests with support for DirectX9, 10 and 11 versions. In addition, the 3D Mark testing software is compatible with Android and iOS.
Three different versions of 3DMark are available for download, as shown below.
- 3DMark Vantage : DirectX 10 testing application for older DirectX 10 graphics hardware.
- 3DMark: A version of 3DMark that contains Time Spy (DirectX 12 Test), Fire Strike, Sky Diver, Cloud Gate, and Ice Storm tests.
- 3DMark 11: For testing DirectX 11 video cards. It contains Deep Sea and High Temple graphics tests, as well as physical and combined test.
Depending on your graphics hardware, you can download and test any of the above versions of 3DMark. The basic version of 3DMark is completely free to download and use.
PassMark
performance test
Passmarkis a widely used Windows GPU testing software that performs synthetic performance tests.
The Passmark 3D Graphics Test can be used to determine the performance of your PC’s 3D graphics hardware. At 4K resolution, it supports DirectX 9- DirectX 12.
You can check the speed of your 3D graphics card by selecting settings such as Fog, Lighting, Aplha Blending, Texture, Wireframe, Resolution, Color Depth, Object Rotation and Object Movement.
These custom tests give you a deeper understanding of your graphics card’s performance. Technical support and updates are available free of charge. The program performs 28 standard performance tests.
MSI Afterburner
MSI Afterburner is a great option because it allows you to run in-game tests.
By providing regular information about your graphics card, it allows you to overclock your GPU, create a custom fan profile, run benchmarks, and record and capture screenshots.
Beginners and amateurs can use this program comfortably. This allows you to easily access the graphics card settings. Although overclockable, MSI Afterburner provides users with detailed real-time hardware information.
Afterburner requires an additional stress testing tool called MSI Kombustor to be installed, but it’s simple and works well with the software’s best overclocking feature. MSI Afterburner is one of the best graphics card overclocking software.
Stress Test Furmark GPU
FurMark is a robust GPU testing software tool used to test GPU stability and ability to handle load. It is also known as a GPU recorder.
However, it needs an OpenGL compatible GPU. Since it monitors GPU temperature in test mode, it is considered as a useful software for overclockers.
It can run in full screen or windowed mode. While FurMark allows for individual testing, it does warn you if the graphics card’s temperature is too high.
Heaven Unigine
Gamers and overclockers prefer Heaven Unigine for its advanced features to help test hardware stability.
This is a synthetic test software that pushes your graphics card to its limits to determine its stability under extreme operating conditions. In addition, it can be used to judge the efficiency of the video card cooling system.
Heaven Unigine supports multiple platforms such as DirectX9, DirectX11 and OpenGL 4.0. In addition to determining hardware stability and checking graphics cooling performance, it offers multi-monitor settings with stereo 3D configurations. What’s more, it is compatible with various OS such as Windows, macOS and Linux.
Heaven Unigine is one of the best graphics card overclocking software.
Read: Should I overclock my graphics card?
GFXBench GPU test
GFX Bench is a popular free graphics card benchmarking program that makes it easy to compare results with other users.
All you have to do is download the software, select the desired API, run the test, and wait for the program to display the results.
You can also personalize GPU performance tests with this software.
It supports low-level APIs such as Metal , DirectX 12 and Vulkan. Also, since GFXBench is compatible with Android, iOS, Windows and macOS, you can perform GPU performance benchmarks on your smartphones and PCs.
In addition, it also allows you to check the battery life.
Read: Best GeForce RTX 3080 graphics cards
Unigine Superposition
Superposition is a good offering from Unigine as it allows you to run rigorous benchmarks on your GPU to evaluate performance and stability levels.
The program uses the UNIGINE 2 Engine to test high quality visual effects, and it’s completely free.
It also offers an interactive mode with free mini-games. Other features include the Loop stress test to test hardware stability, VR mode with Oculus, over 900 interactive objects, and SteamVR VR headsets.
Read: How to choose a good video card and which one to buy?
Cinebench
Cinebench is considered one of the best graphics card testing tools because it is a neat and simple OpenGL testing software. Cinebench can run multiple benchmarks on your GPU and compare them to other users with a similar configuration.
Compared to other GPU testing tools, Cinebench uses larger and more complex test scenes. In addition, it performs stress tests on the PC to check its stability.
This software runs on Windows and macOS. Grade comparison is available in this software.
UserBenchmark
UserBenchmark evaluates the 3D speed of the GPU and allows you to compare it with other graphics cards. The best aspect of UserBenchmark is that it is freely available for Windows systems.
This software is ad-free with an easy-to-use interface. Because it focuses on real-time graphics card performance, it’s a great comparison tool.
The program offers six different 3D game simulations. Helping to check the speed tests of others, it offers an online report on even the most reliable components of your PC.
Geekbench GPU test
Like Heaven Unigine, Geekbench is another powerful, cross-platform graphics card testing software that is easy to use. While it’s simple software, Geekbench can determine how well your graphics card performs when you take it to the extreme.
The program compares the performance of the GPU with other similar GPUs.
What makes Geekbench special is that it uses augmented reality and machine learning to measure CPU and GPU performance. In addition, it works on various systems and platforms.
As a result, Geekbench is the best software for testing gaming, image processing, and video editing capabilities on your PC because it supports CUDA, OpenCL, and Metal APIs. Geekbench also offers a separate browser for downloading and sharing results.
Novabench GPU test
Novabench is a free software for testing the performance of your computer. It offers tools for testing, optimizing and repairing GPUs. This critically acclaimed software solution tests CPU and GPU performance, memory transfer rates, and hard drive read/write rates.
You can compare your test scores online to identify potential problems. These test results can help you improve and optimize GPU performance.
Basemark
Basemark GPU is another good graphics card testing software that allows you to perform individual tests on your graphics card to determine its performance under high pressure conditions. It supports all major graphics APIs and operating systems.
Basemark makes tens of thousands of independent draw calls per frame in a complex game scenario. These tests demonstrate the benefits of modern graphics APIs such as Vulkan and DirectX 12, both in terms of performance and content creation.
Overclock Checking Tool
The
Overclock Checking Tool is a useful software because it offers a graphical representation of the temperature and voltage of system components during testing.
In addition, it supports more than 16 cores.
OCCT contains six tests: OCCT and Linpack for your CPU, Memory for testing system RAM, 3D and VRAM for graphics cards, and Power for loading your power supply.
This multilingual software solution allows you to run customized tests on various parameters such as priority, duration, etc. Overclock Checking Tool software also supports third party applications such as Speedfan and MBM5.
Catzilla
Catzilla is ideal for determining whether a particular game will run on your PC or not, as it compares the PC’s hardware configuration to the requirements of the game. In addition, the application tests the performance of the video card and offers a graphical and numerical representation of the test results.
Catzilla indicates whether the GPU can handle complex gaming situations or not. Since it displays graphical and numerical results, it is easy to use and understand.
AIDA64 Extreme
AIDA64 Extreme analyzes the GPU in depth to decide whether it needs to update drivers or overclock processors.
Offering real-time monitoring, it offers a touch panel to check all the sensors you have on your PC.
This tool uses 64-bit multi-threaded stress testing modules to push GPUs to their limits. In addition, AIDA64 monitors CPU temperature and diagnoses hardware problems.
CPUID PowerMax
CPUID PowerMax is one of the best programs for testing the efficiency of the cooling system when performing the GPU burn-in test. In addition, it can test the performance of the GPU under maximum load conditions to check how the power supply is performing.
This GPU testing software tool runs a test based on a 3D scene that stresses the graphics card. CPUID PowerMax contains a simple and intuitive interface. This tool allows you to test multiple CPUs and GPUs at the same time.
The
PowerMAX puts a lot of stress on your computer, which can expose weaknesses in some components and permanently damage your motherboard VRM, graphics card VRM, power supply, or any other component.
Therefore, you should use powerMAX solely at your own risk.
How to improve test scores?
The following steps can help you improve your benchmarking results.
- Download and update drivers for compatible video cards regularly.
- Roll back all beta drivers to an earlier version.
- Close any unnecessary Windows programs and run the benchmark again.
What are the best games for GPU testing?
You can test any game. Here are some examples like Watch Dogs: Legion, Red Dead Redemption 2, Doom Eternal, Forza Horizon 4, GTA V, Battlefield V, Call of Duty Modern Warfare etc.
Video Card Performance Test
The problem in conducting tests for the stability and performance of a video card can arise for almost any user of a desktop or laptop, and especially for those who are fond of modern heavy computer games or use powerful graphic editors. People who try to make money on bitcoin mining fall into the same category.
All of them just need to be able to check the video card for stability and performance.
Contents
- Built-in Windows test
- Video Memory stress test program
- FurMark Software
- 3D Mark 2011 software
There are many different applications for performing these tests. Let’s dwell on the 4 most popular:
- Built-in Windows test;
- Video Memory stress test program;
- FurMark Program;
- 3D Mark 2011 software.
All of them perform a video card test in various ways, but this is also good for obtaining complete and truthful information about its performance, whether it is used in a desktop PC or laptop.
Built-in Windows test
This is the first test to start checking your video card. It does not provide information about its performance, but allows you to determine whether the video adapter is working at all. To run this test, click «Start», type «dxdiag» in the search box and press «Enter».
The view window will appear:
The first tab (System) provides general information about the PC and its components. You can get information about the performance of the video adapter by going to the next page using the button of the same name. Here we will get a window like this:
It already contains detailed information about the installed video card (external or integrated), its parameters, the list of installed drivers, and the DirectX library settings. If the test found that the video card is working properly, then the Notes field will say «No problems found.» Otherwise, a message about found faults in the video system will appear here.
Video Memory stress test program
This program is designed to test video memory on a bit-by-bit basis — as it is done in RAM tests. This utility can be especially useful when overclocking a video adapter; it is no coincidence that the word “stress” is present in its name. The program has two language interfaces — Russian and English, and when launched, it displays a window like:
The main setting of the utility is to set the size of the surfaces.
It is advisable to check the video adapter twice, the first time with a square shape, for example 1024×1024, and the second with a rectangular shape, for example 1024×680. The test is started with the «Start» button, and the test is stopped with the «Stop» button. Each test must be completed for at least half an hour. The program works with video memory through DirectX, so it does not depend on the hardware configuration. Like the previous program, this utility does not determine the performance, but the stability of the video memory is checked quite well.
FurMark Software
This is really the tool that simultaneously tests the stability and performance of the video adapter. Visually, the window of this utility, when it is launched, shows a rotating «hairy donut» (in the first versions it was a cube):
The test contains a number of options with which the user can set the screen resolution, enable full-screen or windowed mode, enable and test full-screen anti-aliasing.
The performance of the video card is given in the upper left corner by the fps value (frames per second — frames per second), and if the adapter is unstable, this manifests itself in the form of artifacts in the image.
The utility’s main window has a bilingual interface and looks like this:
This test requires an OpenGL 2.0 compatible graphics card and the latest drivers.
3D Mark 2011 software
3D Mark series utilities have been known for a very long time. Their manufacturer is the Finnish company FutureMark. The latest version of 3D Mark 2011 was released in 2013 and, like all previous versions, is designed to determine the performance of the PC graphics subsystem in computer games. The utility visually looks like a non-interactive computer game, since the user does not have the means to influence it.
3DMark 11 is, at its core, a tool for testing the capabilities of modern GPUs. For this reason, there is no point in using this utility to test outdated graphics adapters — it will not even start on them.
The situation is similar with laptop video adapters that do not have an external video card other than an integrated one, or with a video adapter with poor performance. The results of determining the performance of the video adapter are given in arbitrary units (sometimes called «parrots»), which allows only a relative comparison of different video cards.
The full-featured version of the utility is paid, but there is also a free (cut down) version of the Basic Edition. It is enough to carry out many tests.
This is how the main program window looks like:And this is one of the frames of this exciting but very useful «game»:
Similar articles
HOW TO TEST A VIDEO CARD
There are many reasons to test a video adapter. For example, you decide to buy a half-price computer on OLX, but you are afraid that it will not work even for a month.
Are you planning to overclock the adapter, are you worried about crashes when starting heavy games, etc. How to check a dubious video card on a PC? Read on and find out.
Topchik vidyakh: Best video cards 2021: rating of 5 models . You can pause a resource-hungry antivirus.
- View graphics adapter temperature at rest. Make sure it’s less than 50 degrees. If this threshold value is exceeded, it is impossible to test the hardware, since if you check a hot video card, components may burn out. At best, the test result will be incorrect. You can check the temperature at rest, for example, using the GPU-Z utility. It will be discussed below.
- Check that the radiators are spinning. If new turntables were installed on an old video, most likely it was repaired, and not just the cooling was updated. And this is an absolute minus.
- Look for burnt or broken parts, cracks, traces of soldering during repairs, flux residue, scratches, areas of textolite that has changed color to dark yellow or black from overheating. In the presence of such defects, it is better to refuse to buy a video device.
- Dynamic background;
- Burn-in.
- the computer decided to turn off or reboot,
- the picture is loaded with artifacts,
- the system scolded the video driver and so on.
- Go to the «Service».
- Click «Test GPGPU».
- Selecting a video adapter.
- We start with the Start Benchmark button.
- We go again to the «Service».
- Click «System stability test».
- We remove items from all equipment except for the video card, leaving only the Stress GPU.
- We are starting.
- Entry PC,
- home computers and laptops,
- gaming hardware.
- If during testing the picture is normal, but the video card is very hot, then there may be problems with cooling.
- An even more unpleasant situation is when the temperature is within normal limits, but the computer freezes, the monitor loses signal, the system scares you with a blue screen of death, etc. In such cases, there is a high probability of malfunctions of the graphics processor or video memory. If you’re lucky, you’ll find an easily fixable video driver issue.
Perhaps, before the test, you did not install the vidyakha in the case, it worked there for several months and became rather dusty. In this case, it is worth removing the dust “under the hood”, as the suspension can cause overheating.
How to check the performance of a video card: simple methods
Visual inspection is a mandatory check item. If obvious defects are visible to the eye, there is no point in wasting time on testing. Even if it is successful, no one can guarantee that a battered video adapter will last more than 2-3 months. First of all, you need to take care of good lighting. If you inspect the goods at the New Post office, where there are weak light bulbs in the room, use a flashlight from your smartphone. To visually check the performance of a used video card, as recommended by repair experts, you need to go through the following steps:
If no defects are found, proceed to the next stage of verification — software testing.
About the right selection of components: How to choose a compatible motherboard and video card: a guide in 4 sections
How to test a video card using programs
A variety of software for checking adapters somewhat complicates the choice. To figure out the best way to test a video card, descriptions of the most relevant tools will help. To start the plate:
Now let’s take a quick look at these five utilities.
FurMark
The FurMark test can check the video card for both serviceability and declared performance. The program is a rather crude but effective diagnostic tool. It puts a lot of strain on the graphics adapter, but doesn’t test all the technologies supported by the device. Before starting, you need to select the monitor resolution on the main application window and a couple of key settings in Setting. In the 3D test options section, you must leave 2 checkmarks in front of the items:
Testing is accompanied by surreal animation. During the work of the program, there may be the following negative symptoms:
Their appearance means that the video card is most likely defective. If nothing like this happened within 20 minutes, you can finish testing and watch the report. In it, a key indicator is the maximum heating temperature. It should not exceed the level declared by the manufacturer. Usually it is not more than 80-90 degrees. The functionality of the program includes the ability to reconcile your indicators with the values obtained by other users. The main window has a GPU-Z button that launches the popular FurMark utility.
Calculating the video card model: How to find out which video card is in the PC: 7 easy ways
OCCT
OCCT is a delicate testing tool with fine tuning. You can check several components at once or just the video card. During testing, the program shows the minimum, current and maximum temperature. Draws a graph. You can drive the video memory or run a 3D test to assess the stability of the hardware.
Before starting, you need to select the screen resolution and shader complexity. The load on the video chip depends on the second parameter. It is also possible to set an FPS limit. Another interesting parameter is the temperature at which the program will immediately stop testing. You can eliminate the risk of finishing off by testing the breathable video adapter for incense.
OSST has a Russian interface, which simplifies setup and testing. In the process, the same red fluffy bagel is displayed as in the case of FurMark, but its image is static.
Pros and cons of two types: Two video cards in a PC: good or bad — 3 answers
AIDA64
The app allows you to both test a suspicious video card in a delicate mode and arrange an extreme check using a stress test.
Light version:
Hard check:
During the verification process, the program shows in the form of graphs the load in the range of 0-100% and the temperature — 0-100 degrees. If desired, you can narrow or expand the temperature range by going to the settings — Preferences. You can stop the test at any time with the Stop button.
About choosing a video card for a gaming computer: Gaming video cards for PC: 5 criteria, how to choose
3Dmark
Prog is used not only by ordinary users and employees of repair organizations, but also by video card developers. There is a free and paid version of the app. You can download a free full-featured release with no customization options. The program offers several verification options that differ in intensity. They are designed for:
Consider a couple of options for failing the test:
About checking phones: How to check a smartphone when buying: 5 recommendations worth its weight in gold To do this, many use the popular GPU-Z utility. After installing the program, about 30 parameters of the video adapter are displayed in the main window: name, name of the graphics chip, its characteristics, video BIOS version, video memory information, etc.
The Sensors tab also has a lot of interesting things: video processor and memory frequencies, adapter temperature, airflow speed, and so on. GPU-Z is an information utility, it does not load the adapter: it simply displays information about the current state of the video card. It is sometimes used in tandem with a testing program.
How to check the video card on a laptop: features
In the case of a laptop, you can use any of the above applications for testing. Just keep in mind that for compact equipment, the problem of overheating is more relevant. And laptop users are less likely to perform maintenance. Many are afraid to remove the housing cover on their own, and they also do not want to give the equipment to the service. Thermal paste dries out over time, the laptop becomes clogged with dust. There are other problems, especially if you regularly freeze in games. To minimize the risks, it is a good idea to check the graphics card on a laptop as described above and do this at least once a year.
Signs of incorrect operation of the video card
A faulty graphics adapter can not only produce artifacts and stripes, but also cause a system crash in games. There are many signs of incorrect operation: shutdowns, PC freezes, slow playback of dynamic content, and more. If there are two video adapters on the computer, then in case of frequent failures or a bad picture, remove the discrete video card from the case and connect the monitor to the motherboard connector. Is the problem gone? So, most likely, the discrete video card is faulty.
You also need to take into account that many symptoms, such as spontaneous shutdowns and reboots, may not be related to the video card. Comprehensive PC diagnostics often help to find the cause of malfunctions.
In conclusion, it is worth noting that the repair of a video card, especially one that has already worked for 3-5 years, is not the best option. If you can’t fix the problem without soldering, it’s better to buy a new adapter, get a warranty on it, and work or play in peace, without fear of breakdowns in the near future.
About checking a monoblock: How to check a monoblock when buying: 5 recommendations from an expert
5 programs video card performance test
What should be done first after you have bought and installed a new video card in your computer? Of course, get to know her better. Find out what it really is, what kind of load it can pull and how it will behave in games. Or maybe you just want to know what state your card is in: is it in good condition, is it overheated, can it be overclocked … These and other properties of video cards are easy to determine at home using special testing programs. Today we’ll talk about how to test a video card for performance and stability, how to identify problems, and in general how to get the most information about the video subsystem of your computer.
Signs of a bad video card.
The first thing to look for when a video adapter fails is the presence of various artifacts on the monitor. As described above, artifacts can appear as dots, twitches, the presence of squares of a different color, or half of the monitor screen changes color, and then returns to the original colors.
To try to get rid of such symptoms, you need to inspect the cooler, whether it spins or not, clean the radiator, update the drivers. Check if the capacitors are swollen, if they are swollen, unsolder and replace. If all else fails, you should try to warm up the processor of the video card, as there is a possibility of it moving away from the board.
If the image is doubled or distorted when playing, then the graphics processor or video controller may already be almost out of order. You should check the video card on another computer, and also test the cable connections. Perhaps they are not closely pressed to the interface.
If the image does not appear on the screen, but the computer is already running, and the monitor has nothing to do with it, the video card is most likely burned out. However, don’t throw it away right away. It is necessary to clean the interface contacts with an eraser, try to turn it on on another computer.
BIOS will also emit certain signals when turned on if the video card is faulty. Usually these are eight short beeps.
If you are buying a used video card, you need to pay attention to the price. No one will sell a good card cheaply, even if it was used.
Before buying, you must use special programs and check it immediately on the spot. In order not to pay for repairs or not to buy a new one. How to do this will be described below.
Windows diagnostic tools
standard video card test
First, you need to check for the presence of the driver using Windows tools. To do this, right-click on «My Computer» and select the «Device Manager» menu.
Click on it with the left mouse button, in the window you need to find the item «Display adapters» and click on it.
If the brand of the installed card is displayed in the list, then the driver is installed.
In order to learn more about the video adapter, it is recommended to use the DxDiag utility. To open it in the start button, search for
(also possible by pressing the Win + R keys) and type the name of the program (dxdiag). In the list that appears, click on it, and it will open. This is a built-in utility for checking the video card for serviceability, therefore it does not require installation.
After starting up, the adapter is immediately checked for various errors and malfunctions. The utility shows normal, non-critical failures that are detected during the operation of the adapter.
GL Mark 2
GL Mark 2 is a more powerful tool released by the developers of the Lenaro distribution. Unlike glxgears, glmark offers a large number of tests for various aspects of the graphics card (buffering, lighting, texturing, building, etc. ) that allows you to better evaluate the video card.
Each test is run for 10 seconds and the frame rate is calculated individually. At the end, the program issues a performance score based on all tests performed. I like this tool for its simplicity and flawless performance. You can find it in the official repositories of most distributions under the name gmark2. To install on Ubuntu, run:
sudo apt install glmark2
Once installed, the video card test can be run with the command:
glmark2
Checking the load on the video card
*.exe. We click on it LMB twice and the application starts.
Displays GPU temperature, fan speed and other adapter settings. When you turn on the game, you need to play it for 5-10 minutes, minimize the game screen window using the Alt + Tab buttons and see how the temperature values \u200b\u200bhave changed. If it rises slightly, then everything is fine. If the temperature exceeds 80 degrees, then this indicates a problem with cooling. The thermal paste between the heatsink and the GPU has probably dried up.
Program #5: 3DMark
When answering the question of how to check if a video card is working properly, this wonderful utility cannot be ignored. You can download it from the link, as always, for free. The application is used to evaluate devices installed in both gaming PCs and work machines. The parameters obtained with its help can be safely called reference.
The process is launched after downloading and installation by clicking on the main window button Run 3D Mark . Testing lasts several minutes — at this time it is better to leave the car alone and do other things. Upon completion, a full report on the operation performed is displayed on the screen, including the errors found. The result obtained can be compared with the data of other users who gave permission to publish.
Among other things, the application is available for mobile devices on all popular platforms.
Furmark video card test
A popular utility for checking video cards. It is also called the «hairy donut», since the diagnosis takes place with a similar image on the screen. After you download Furmark, you need to install and run it. To do this, double-click on the downloaded program file, agree to the terms and license and click the «Next» button.
Application installed. Go to the «Settings» menu or settings. You can specify the permission in it.
In the settings, set the items that are shown in the figure, except for «Xtreme burn in». This setting can bring the card out of the standing position, since the test will take place at maximum loads.
Click the «Burn in Test» button.
The utility will display a warning that the load will be large, which may cause the system to become unstable or even shut down the computer. However, we do not pay attention to this and click the «Go» button.
So, the process has begun.
The temperature may rise too high as a result of testing. Therefore, it is not recommended to run the test for more than 20 minutes. The utility immediately loads and tests the GPU, which dramatically raises the temperature. Testing with this program is not comparable even with the most powerful game.
If the adapter is OK, the temperature will begin to equalize after two or three minutes of utility operation. If the video card is faulty, the temperature will rise above 100 degrees, the image will freeze or turn off.
With this behavior of the computer, you should check the cooler and heatsink of the card. If they are clean, dust-free and the cooler spins freely, then it is recommended to unscrew the heatsink and check the thermal paste on the chip. It may have dried out and needs to be replaced. If the user does not know how to do any of the above, it is better to contact the workshop.
Visual inspection
The easiest way to check the card is to carry out an external inspection. To do this, remove the cover of the system unit and carefully remove the video card. These actions must be performed with special care and attention. Often, an additional power cable is connected to the video card, which should be disconnected. Also, to remove the part, you need to bend the latch on the motherboard.
Visual inspection of the video card
Having taken out the video card, you need to carefully inspect it in search of burnt chips. Then you need to remove all dust from the radiators and cooler of the system, wipe the contacts with a cotton swab dipped in alcohol or with an ordinary eraser. In addition, you need to make sure that the video card fan itself rotates freely. If necessary, it must be blown out of dust and the bearing lubricated.
Then you should reassemble everything and try to start the computer. Sometimes these simple manipulations can revive your system unit.
Video — How to check the performance of a video card
https://youtu. be/xYGvOXbYgjE
Aida 64 — stress test of a video card
The next program for testing a video card for a malfunction will be Aida 64. We are conducting a stress test.
After downloading, you need to install it in the same way as in the Furmark installation instructions. Click on the file with *.exe extension. Agree with the terms, click on the «Next» button. Now open the utility and go to the «Service» tab and go to the «Test GPGPU» item.
Run it, select your device and click on the «Start Benchmark» button.
In addition, you can stress test the video adapter. To do this, again go to the «Service» tab, click on «System stability test» and select «Stress GPU».
At critical temperatures, warnings will be displayed and the graph bar will be red, and the system may reboot itself. If everything is fine with the video card, no failures will occur.
ATITool video adapter test
Despite the name, this utility can also test Nvidia video adapters. After you download Ati Tool, install it and run it.
This window will open.
Displays the temperature and frequency at which the adapter operates. The frequency can be changed with the sliders, but this should not be done without proper knowledge.
If you click on «Show 3D» you can see the number of FPS.
The program should test the video card for ten minutes. During this time, keep an eye on the temperature. If it exceeds 85 degrees, then immediately stop the test. This means that your adapter is damaged.
If a lot of yellow dots appear in the 3D window, this means that the video card is also defective. It is recommended to replace the thermal paste. If after that nothing has changed in the work, then it is better to buy a new one.
GLX-Gears
GLX-Gears is a popular OpenGL benchmark included in the mesa-utils utility package. To install on Ubuntu, run the command:
sudo apt install mesa-utils
To test, run the glxgears command in the terminal:
glxgears
The program will open a window in which three gears will be rendered rotating in 3D space. The frame rate (FPS) is measured and output to the terminal every 5 seconds. This is a very old tool and therefore only allows you to test a small part of the capabilities of modern OpenGL.
It used to be used to verify that the proprietary video driver was properly installed and working. Open source drivers tended to perform horribly, and this was very noticeable during this opengl linux test. Now you won’t notice any difference, at least in glxgears.
OCCT graphics adapter test
You can not install OCCT, just unpack it from the archive to your desktop and run it.
The utility has a set of tabs for diagnostics under stress conditions, to perform a video card stability test, and battery testing. It is not recommended to use this utility to test a damaged video card on a laptop or computer, as the adapter may fail.
Check the video card online
In fact, it will not work to test the video card for stress resistance online. It is not so much the stability of the connection that plays a role here, but the restrictions on the operation of applications from the browser with computer components. But whether this or that toy is suitable for your video card is possible.
To do this, go to the official NVidia website and click on the «Find out if your computer is ready for new games» tab. All details about the video adapter will be displayed.
For a more in-depth check, it is best to use the above programs.
Testing with software
However, the method of checking a video card online has one very significant drawback, it does not show the user more detailed information about the state of the card. In addition, if you have an AMD board installed, this method will not work for you at all.
Therefore, in order to check the video card as efficiently as possible and get more data, such as temperature, check power, find out about errors, other programs are often used. Let’s look at the most popular and effective ones.