Folding@Home: Nvidia GTX 1080 Review Part 3: Memory Speed
In the last article, I investigated how the power limit setting on an Nvidia Geforce GTX 1080 graphics card could affect the card’s performance and efficiency for doing charitable disease research in the Folding@Home distributed computing project. The conclusion was that a power limit of 60% offers only a slight reduction in raw performance (Points Per Day), but a large boost in energy efficiency (PPD/Watt). Two articles ago, I looked at the effect of GPU core clock. In this article, I’m experimenting with a different variable. Namely, the memory clock rate.
The effect of memory clock rate on video games is well defined. Gamers looking for the highest frame rates typically overclock both their graphics GPU and Memory speeds, and see benefits from both. For computation projects like Stanford University’s Folding@Home, the results aren’t as clear. I’ve seen arguments made both ways in the hardware forums. The intent of this article is to simply add another data point, albeit with a bit more scientific rigor.
The Test
To conduct this experiment, I ran the Folding@Home V7 GPU client for a minimum of 3 days continuously on my Windows 10 test computer. Folding@Home points per day (PPD) numbers were taken from Stanford’s Servers via the helpful team at https://folding.extremeoverclocking.com. I measured total system power consumption at the wall with my P3 Kill A Watt meter. I used the meter’s KWH function to capture the total energy consumed, and divided out by the time the computer was on in order to get an average wattage value (thus eliminating a lot of variability). The test computer specs are as follows:
Test Setup Specs
- Case: Raidmax Sagitta
- CPU: AMD FX-8320e
- Mainboard : Gigabyte GA-880GMA-USB3
- GPU: Asus GeForce 1080 Turbo
- Ram: 16 GB DDR3L (low voltage)
- Power Supply: Seasonic X-650 80+ Gold
- Drives: 1x SSD, 2 x 7200 RPM HDDs, Blu-Ray Burner
- Fans: 1x CPU, 2 x 120 mm intake, 1 x 120 mm exhaust, 1 x 80 mm exhaust
- OS: Win10 64 bit
- Video Card Driver Version: 372.
 90
90
I ran this test with the memory clock rate at the stock clock for the P2 power state (4500 MHz), along with the gaming clock rate of 5000 MHz and a reduced clock rate of 4000 MHz. This gives me three data points of comparison. I left the GPU core clock at +175 MHz (the optimum setting from my first article on the 1080 GTX) and the power limit at 100%, to ensure I had headroom to move the memory clock without affecting the core clock. I verified I wasn’t hitting the power limit in MSI Afterburner.
*Update. Some people may ask why I didn’t go beyond the standard P0 gaming memory clock rate of 5000 MHz (same thing as 10,000 MHz double data rate, which is the card’s advertised memory clock). Basically, I didn’t want to get into the territory where the GDDR5’s error checking comes into play. If you push the memory too hard, there can be errors in the computation but work units can still complete (unlike a GPU core overclock, where work units will fail due to errors). The reason is the built-in error checking on the card memory, which corrects errors as they come up but results in reduced performance.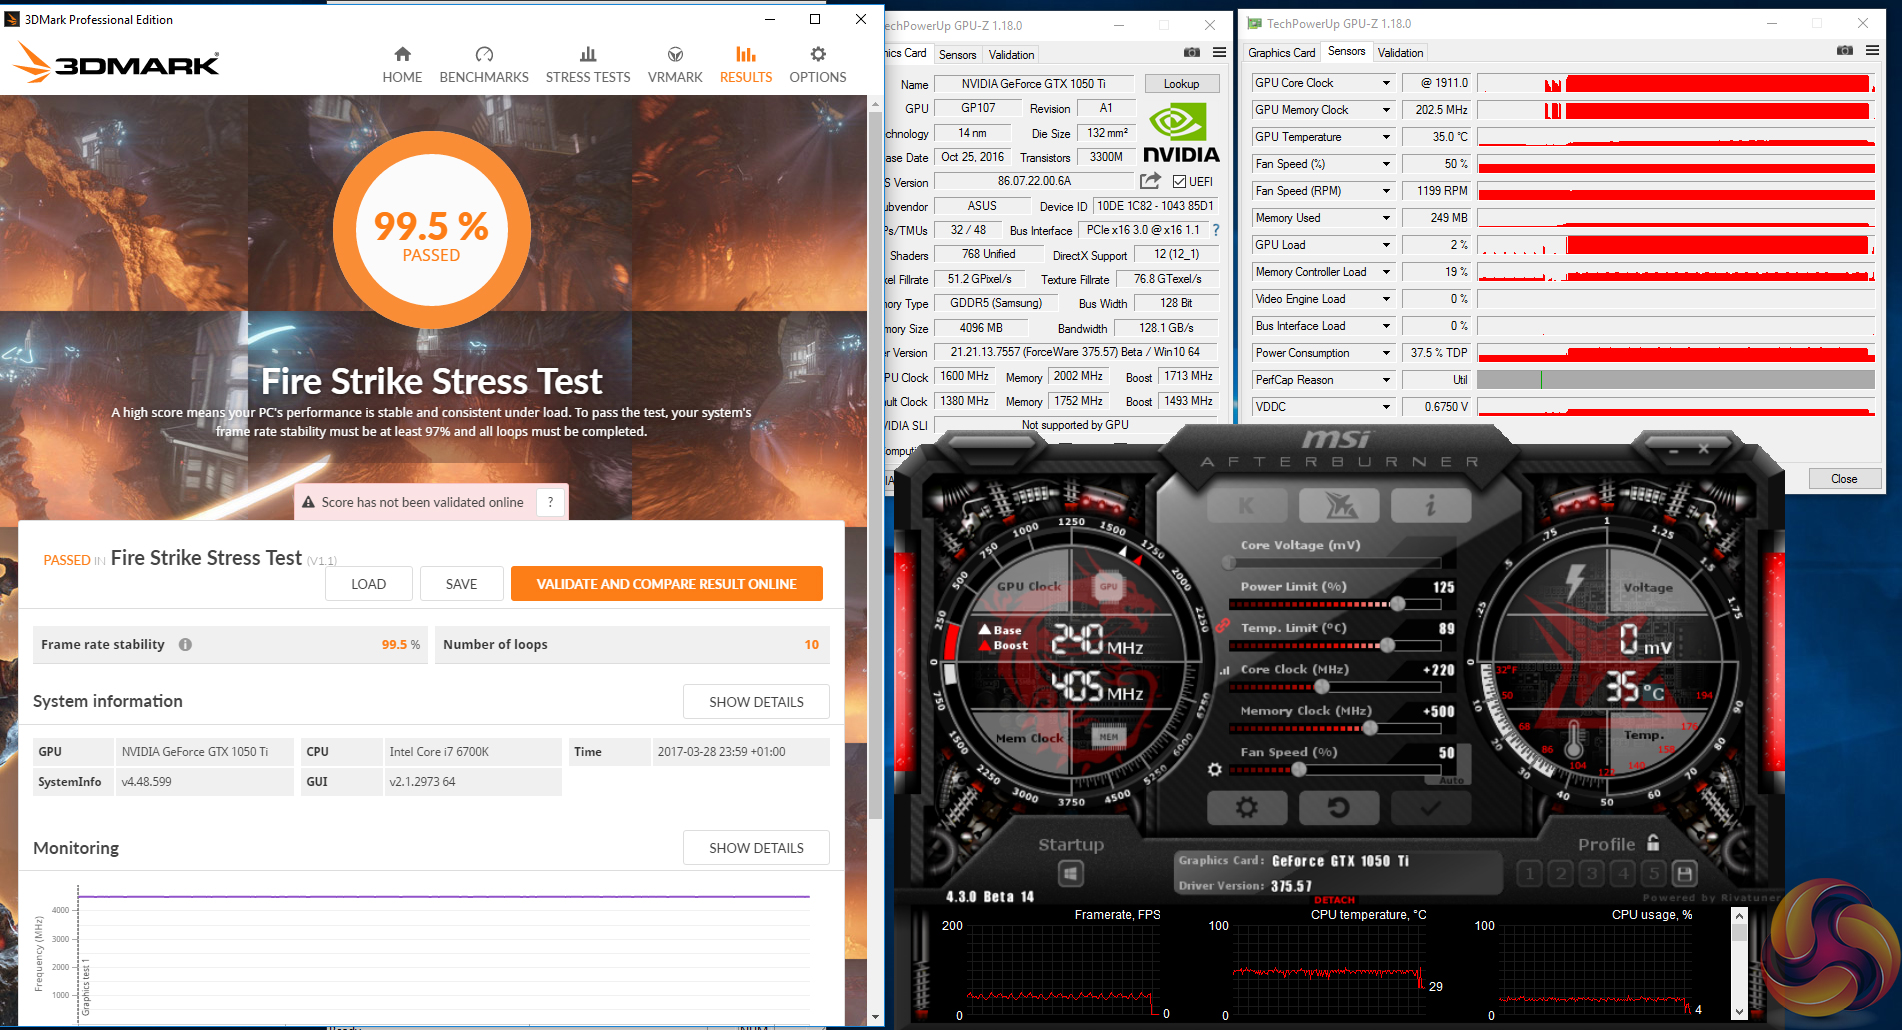 By staying away from 5000+ MHz territory on the memory, I can ensure the relationship between performance and memory clock rate is not affected by memory error correction.
Memory Overclocking Performed in MSI Afterburner
Tabular Results
I put together a table of results in order to show how the averaging was done, and the # of work units backing up my +500 MHz and -500 MHz data points. Having a bunch of work units is key, because there is significant variability in PPD and power consumption numbers between work units. Note that the performance and efficiency numbers for the baseline memory speed (+0 MHz, aka 4500 MHz) come from my extended testing baseline for the 1080 and have even more sample points.
Nvidia GTX 1080 Folding@Home Production History: Data shows increased performance with a higher memory speed
Graphic Results
The following graphs show the PPD, Power Consumption, and Efficiency curves as a function of graphics card memory speed. Since I had three points of data, I was able to do a simple three-point-curve linear trendline fit. The R-squared value of the trendline shows how well the data points represent a linear relationship (higher is better, with 1 being ideal). Note that for the power consumption, the card seems to have used more power with a lower memory clock rate than the baseline memory clock. I am not sure why this is…however, the difference is so small that it is likely due to work unit variability or background tasks running on the computer. One could even argue that all of the power consumption results are suspect, since the changes are so small (on the order of 5-10 watts between data points).
Conclusion
Increasing the memory speed of the Nvidia Geforce GTX 1080 results in a modest increase in PPD and efficiency, and arguably a slight increase in power consumption. The difference between the fastest (+500 MHz) and slowest (-500 MHz) data points I tested are:
PPD: +81K PPD (11.5%)
Power: +9.36 Watts (3.8%)
Efficiency: +212.8 PPD/Watt (7.4%)
Keep in mind that these are for a massive difference in ram speed (5000 MHz vs 4000 MHz).
Another way to look at these results is that underclocking the graphics card ram in hopes of improving efficiency doesn’t work (you’ll actually lose efficiency). I expect this trend will hold true for the rest of the Nvidia Pascal series of cards (GTX 10xx), although so far my testing of this has been limited to this one card, so your mileage may vary. Please post any insights if you have them.
Like this:
Like Loading…
This entry was posted in Computer Efficiency, GPUs, PPD/Watt and tagged distributed computing, Efficiency, F@H, Folding@home, GTX 1080, PPD, PPD/Watt. Bookmark the permalink.
How To Overclock and Undervolt NVidia GTX 1080
Overclocking and undervolting NVidia GTX 1080 is a great and completely free way to get more performance out of your graphics card. You can increase its performance and decrease temperatures by adjusting the clock speed, voltage, fan curves, and other advanced settings on your NVidia GPU.
In this guide, you will find step-by-step instructions on how to overclock and undervolt the NVidia GTX 1080, as well as a few tips on how to achieve optimum results.
Before we get into it, let’s clear some things most of you might be worried about.
Will overclocking void the warranty of the NVidia GTX 1080?
No, overclocking and undervolting will not void the warranty of your NVidia GTX 1080. This is because it’s just a software adjustment that involves no physical changes to your card. Even if you try to overclock too high or give too much voltage to the card, it will shut itself down to avoid any damage until you revert the overclock.
Will this guide work for other NVidia Graphics cards as well?
Yes, this guide will work for other NVidia graphics cards as well. Overclocking and undervolting an NVidia GTX 1080 is relatively similar to other NVidia GPUs. However, depending on your card’s capabilities and cooling solutions, you may need to adjust specific settings. It is best to research before attempting any overclocking for your particular model.
Overclocking and Undervolting the NVidia GTX 1080
Before you start overclocking the NVidia GTX 1080, I highly recommend you go ahead and reinstall some fresh NVidia GPU drivers. Follow my guide on how to completely uninstall any previous drivers and then go ahead and download the best driver depending on the games that you play.
Now that you have the best NVidia driver installed let’s start.
Step 1 – Download and Install MSI Afterburner
MSI Afterburner is a GPU overclocking tool that allows you to overclock your graphics card’s core clock, and memory clock, and adjust the fan speed. To get started with overclocking your NVidia GTX 1080, you will need to download and install MSI Afterburner.
The MSI Afterburner installer can be downloaded from the MSI website.
Once the installer has been downloaded, simply run it and follow the on-screen instructions to complete the installation process.
After installing MSI Afterburner, you can begin overclocking your NVidia GTX 1080 graphics card.
Step 2 – Download and Install Superposition.
It is time to download and install a benchmarking tool to properly test if the overclocks you will apply later on are stable or not.
Superposition by UNIGINE is one of the most popular benchmarking tools available today that will allow you to test the stability of your NVidia GTX 1080 overclock accurately.
To download Superposition, simply visit their website and follow the instructions provided.
Once you have downloaded the program, install it on your computer and now you can proceed to the third step of this guide where we are going to show you exactly how to overclock and undervolt your NVidia GTX 1080.
Step 3 – Overclocking & Undervolting NVidia GTX 1080
Go ahead and run MSI Afterburner, and it looks like the image below.
As you can see, there are a few options that you can instantly change, like Core Voltage, Core Clock, Memory Clock, Power Limit, Temp Limit, and Fan Speed.
The first thing I highly recommend you do to your NVidia GTX 1080 when overclocking is to increase the Power Limit and Temp Limit to the maximum. To do that, bring the slider to the right.
Putting the Power Limits to the maximum doesn’t mean that your GPU will automatically consume more power, it just means that your NVidia GTX 1080 will consume more power if it actually needs it to perform better.
Now that you have set the power limits of your NVidia GTX 1080 to the maximum, it is time to start tweaking it.
Now the way that I like to overclock NVidia GPUs is the following:
I start with Memory Clock=300 and Core Clock=0 and perform an 8k Optimized test on the Superposition benchmark.
If everything is good and the test ends with no stuttering, artifacts, or FPS drops close to 0, go ahead and raise the Memory Clock by +100 and do another test on Superposition.
Repeat the same steps until the Benchmark crashes or it’s unstable and go ahead and use the last stable value.
Once you find the maximum Memory Clock speed that your NVidia GTX 1080 can handle, start tweaking the Core Clock.
Start with a Core Clock=50 while having the Memory Clock on whatever value you found stable and perform a test on Superposition.
If it’s stable, go ahead and raise it by +25 and do a test again.
Repeat the same steps with increments of 25 until Superposition crashes or is unstable.
Once you’ve found the perfect overclock for your NVidia GTX 1080, go ahead and do the following:
- Click the “Apply” button.
- Click the “Save” button.
- Click on 1 on the right column to save your NVidia GTX 1080 overclock.
Let me give you an example of a possible scenario when overclocking your NVidia GTX 1080 so you can understand it better:
Overclocking NVidia GTX 1080 example 1
| Attempt N. | Core Clock | Memory Clock | Stress Test Results |
|---|---|---|---|
| Default | 0 | 300 | Finished |
| Attempt 1 | 0 | 400 | Finished |
| Attempt 2 | 0 | 500 | Finished |
| Attempt 3 | 0 | 600 | Finished |
| Attempt 4 | 0 | 700 | Finished |
| Attempt 5 | 0 | 800 | Crashed |
| Attempt 6 | 50 | 700 | Finished |
| Attempt 7 | 75 | 700 | Finished |
| Attempt 8 | 100 | 700 | Finished |
| Attempt 9 | 125 | 700 | Crashed |
DON’T COPY THESE NUMBERS. THIS IS AN EXAMPLE SO YOU CAN UNDERSTAND HOW TO OVERCLOCK YOUR NVidia GTX 1080.
With the above table, you can see that Attempt 4 is the best possible speed for your Memory Clock that your NVidia GTX 1080 can have, and Attempt 8 is the best possible Core Clock + Memory Clock overclock that you can have on your NVidia GTX 1080.
You will need a lot of testing and back and forth to get the best overclock settings for your NVidia GTX 1080, but it’s worth it since once you find the best overclock, you don’t have to do it again.
Step 4 – Fan Tuning your NVidia GTX 1080
Since the NVidia GTX 1080 gets pretty hot at high speeds and often overheats, I would recommend creating an “aggressive” fan configuration to keep it as cool as possible.
If you want to keep your NVidia GTX 1080 as cool as possible, you can copy the best fan configuration for NVidia GTX 1080 below:
Once you’ve done everything, save your changes, and you are ready!
Gtx 1080 is not chasing | MiningClub.
 info
info
Aka_prorok
Dancing with a tambourine
-
-
#1
Others help with advice.
There is a zoo rig.
4*1080 jetstream
1* Asus strix
1*msiai
1* zotak amp
hashes on kefir.
2050 for the core and 5250 for memory only on the way. On mt 6.
2 sinister msiai and zotak are not subject to overclocking (((they work in stock and everything touched the memory the worker fell off.
Pl change the core without problems, too, but the memory is only exclusively on the drain. , -100 dump, in general, any value is immediately dumped.What with the tablet or with the MT.It doesn’t matter.
What is it?The cards are tired or?
cjiab9h3017
Forum friend
-
-
#2
Aka_prorok said:
Others help with advice.

There is a zoo rig.
4*1080 jetstream
1* Asus strix
1*msiai
1* zotak amp
hashes on kefir.
2050 for the core and 5250 for memory only on the way. On mt 6.
2 sinister msiai and zotak are not subject to overclocking (((they work in stock and everything touched the memory the worker fell off.
Pl change the core without problems, too, but the memory is only exclusively on the drain. , -100 back off, in general, any value is right there back off. What is with the tablet, what is with the MT. It does not matter.
What is it? Cards are tired or?Click to expand…
Well, maybe the memory is overheating, the gaskets are dry, disassemble, clean from dust, change the gaskets. I have 1080 turbo chasing 150/700 without problems
Kayzer
Forum friend
-
-
#3
Tired old lady do maintenance
Swat333
Own person
-
-
#4
try changing the thermal pads in memory.
space1982
Own person
-
-
#5
Aka_prorok said:
2050 for the core and 5250 for memory only on the way. On mt 6.
Click to expand…
On which miner?
Aka_prorok
Dancing with a tambourine
-
-
#6
Tirex is dripping.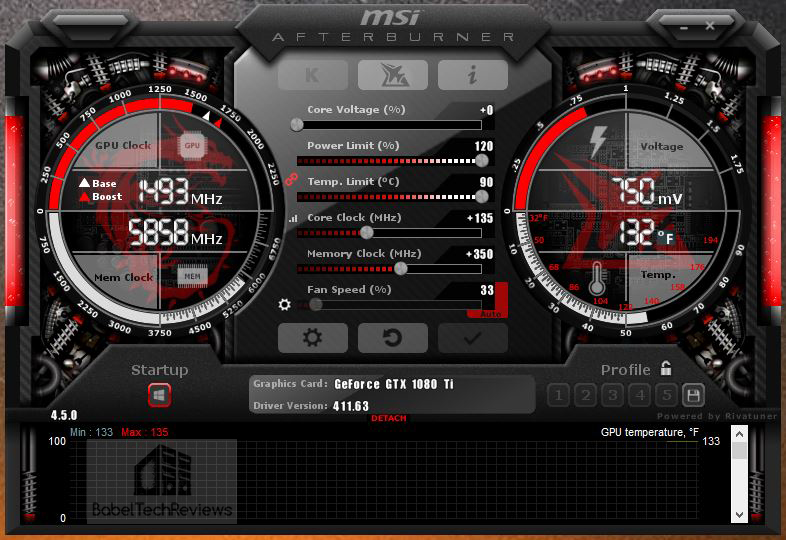
Now I’m looking at them, the temperature is 52 degrees.
The most interesting thing when I turn down the frequency is also a dump ….
Walera
Own person
-
-
#7
Do delayed acceleration at the rave and everything will be fine
Aka_prorok
Dancing with a tambourine
-
-
#8
I change on the go. …
…
That is, the rig started dripping hashes stabilized min 10 passes all the cards overclocked.
Then I will bring the pl up to 150 watts, the core is +100.
Cards accepted overclocking and square.
Another 2-3 minutes.
I put +1 to the memory of the rig blade ….
Aka_prorok
Dancing with a tambourine
-
-
#9
Swat333 said:
try changing the thermal pads in memory.
Click to expand…
Why, then, can drip in the drain for a week? And if the memory is in — then also dump . .
.
Aka_prorok
Dancing with a tambourine
-
-
#10
And more interestingly, more than 5235, the memory does not want to rise on slabs, what’s the catch? In the hive, at least +2500, setting it above this frequency does not raise it. On an asus above 5450? Are there any restrictions or what?
Sergeybn
Knowledgeable
-
-
#eleven
to b
Aka_prorok said:
Others help with advice.

There is a zoo rig.
4*1080 Jetstream
1* Asus Strix
1*Msiai
1* zotak amp
So, 4 palitas and asus pile in hive for 39 hashes on kefir.
2050 for the core and 5250 for memory only on the way. On mt 6.
2 sinister msiai and zotak are not subject to overclocking (((they work in stock and everything touched the memory the worker fell off.
Pl change the core without problems, too, but the memory is only exclusively on the drain. , -100 back off, in general, any value is right there back off. What with the tablet, what with the MT. It doesn’t matter.
What is it? The cards are tired or?Click to expand…
MSI worked fine for me only when I abandoned MSI Afterburner, and only on Nbminer with Tweak 5 (frequency 1949 and 5005 memory, 37.1 Mx). Overclocking only through nvidia inspector and only then launching the miner’s batch file.
Aka_prorok
Dancing with a tambourine
-
-
#12
Sergeybn said:
According to b
MSI, they worked fine for me only when I abandoned MSI Afterburner, and only on Nbminer with Tweak 5 (frequency 1949 and 5005 memory, 37.
1Mx). Overclocking only through nvidia inspector and only then launching the miner’s batch file.
Click to expand…
I have no burner hive.
Cards are working now on the drain. At 120 watts 33.5 hashes. Core 1870 memory 4513. When raising or lowering the memory rig to the dump.
Swat333
Own person
-
-
#13
10th generation I dug the norms on G miner + win 7 tablet until sold
Aka_prorok
Dancing with a tambourine
-
-
#14
Swat333 said:
10th generation I dug norms on G miner + win 7 tablet until sold
Click to expand.
..
So here’s the funny thing is that 5 cards drip well, and 2 cards do not accept overclocking from memory
Evrey18
Experienced
-
-
#15
Because the first revision, set memory overclocking and -60 delay before starting the tablet, reboot and everything will work
Aka_prorok
Dancing with a tambourine
-
-
#16
Evrey18 said:
Because the first revision, set memory overclocking and -60 delay before starting the tablet, reboot and everything will work
Click to expand.
..
I’m on a Tirex with MT, what should I do there? Apply overclocking after the start of the miner?
Just how to do it in hive(
Evrey18
Experienced
-
-
#17
Aka_prorok
Dancing with a tambourine
-
-
#18
Well, this is with a pill, but I have a meme tweak
Evrey18
Experienced
-
-
#19
Aka_prorok said:
I’m on a Tirex with MT, how can I be there? Apply overclocking after the start of the miner?
Just how to do it in hive(Click to expand.
..
Why do you need mt, with a tablet and overclocking norms, the speed will definitely not be lower. In general, break off, these cards are the only way
ValeriiRX
Own person
-
-
#20
Aka_prorok said:
Others help with advice.
There is a zoo rig.
4*1080 Jetstream
1* Asus Strix
1*msiai
1* zotak amp
So, 4 Palit and Asus pile 39 hashes on kefir in hive.
2050 for the core and 5250 for memory only on the way. On mt 6.
2 sinister msiai and zotak are not subject to overclocking (((they work in stock and everything touched the memory the worker fell off.
Pl change the core without problems, too, but the memory is only exclusively on the drain. , -100 dump, in general, any value is immediately dumped.What with the pill, what with the MT. It doesn’t matter.
What is it? Are the cards tired or?Click to expand…
I have asus rog 1080ti working under Windows 10, 47-49 Mh / s with a tablet on ETH without problems, the temperature of the cards is 48-58 degrees, and there are two cards that give out a maximum of 44Mh / s when you drive the memory to -350 using Afnerburner. if you put +350 then the acceleration drops a lot, but there are no dumps.
The other day there was a problem, after a minute of work, one card began to throw off the hashrate in the miner to 0, the problem was solved by replacing the thermal paste.
How to overclock a video card
Evgeny Melnikov
February 16, 2020
For many video cards, the potential for overclocking the graphics chip and memory is provided by the manufacturer. For example, let’s take the nVidia GeForce GTX 1080 Ti — not the newest, but still popular among gamers graphics card.
- Important point #1. Before you start overclocking, you need to make sure that the PC power supply has a power reserve. For example, the GTX 1080 Ti has a recommended wattage of 600W. Ideally, the power of the PSU should be higher — 650-700 W, since overclocking (i.e. overclocking) always increases the power consumption of the card.
- Important point #2. Some novice overclockers fear that the card may burn out during overclocking. Such an outcome is indeed possible — in the event that you carelessly increase the voltage on the GPU (Core Voltage). Therefore, at the initial stage, it is better to leave this parameter unchanged.
Programs that you need to overclock your video card
There are only three of them: GPU-Z, Afterburner and Fur Mark. All of them are free and downloaded from the official websites of manufacturers. Let’s look at these utilities in the same order as the overclocking steps follow.
GPU-Z is a program that shows the technical characteristics of the video card, including the frequency of the GPU graphic chip (Core Clock) and the memory frequency (Memory Clock) — we will change them.
Photo: techpowerup.сom
The bottom line of Default Clock shows the standard frequency of the graphics chip, the top line — GPU Clock — overclocked. The same — with the lower and upper lines of memory (Memory). If the upper indicators differ from the lower ones, then the video card already has factory overclocking (our video card, as we see, does not have such). Factory overclocking can be reset using Afterburner. Well, or overclock the card even more.
MSI Afterburner is called the «gold standard for overclocking software».
Photo: msi.com
The first step after starting Afterburner is to increase the power supplied to the video card (Power Limit) so that the card can «pull» the increased frequencies. The slider can be brought to the maximum.
Then we move on to overclocking. It is recommended to raise the Core Clock and Memory Clock values separately — this will make it easier to determine the overclocking limit for each of the modules. If a failure occurs due to an increase in the frequency of the GPU, say, by 250 MHz, it will be clear that this is precisely due to the manipulation of the frequency of the graphics chip.
Overclocking order
- You can start by increasing the GPU frequency. If the video card does not have factory overclocking, you can safely raise the frequency by 100-200 MHz. After clicking the Apply checkbox / button, you should make sure that the increase in frequency did not cause problems in the operation of the video card or the system — the computer did not turn off, there are no visual bugs, the screen does not blink or go out, the colors have not changed, etc. After that, you can try to raise frequency by another 50 MHz. If the video card is stable, you can proceed to the next step — stress testing using the Fur Mark utility.

- Fur Mark is one of the easiest and fastest benchmarks for stress testing video adapters.
Photo: ytimg.com
After starting the program, you need to watch how the overclocked video card performs the test. It is better to bring the temperature of the board to 80 degrees, this may take 10-15 minutes. If artifacts appear at this temperature or, which often happens, the video card driver fails, you need to reduce the frequency of the GPU.
If, after 15 minutes of testing, the video card shows stable operation, Core Clock can be further increased. In fact, overclocking the GPU and memory comes down to finding the upper frequency limit at which the video card works without failures.
- Fur Mark stress tests are best done first by separately increasing the Core Clock and Memory Clock frequencies, and then when both parameters are already increased at the same time. Then you can proceed to the final stage of testing on a demanding game — let’s say GTA V or Battlefield 1.
