hard drive — 2TB HDD, bad sectors in one area around 3GB, can I safely use it if partitioned beyond that defective area?
My main HDD is a 2TB Seagate ST2000DM001. Recently I got weird issues which turned out to be related to bad sectors (the HDD disappearing all of a sudden from the system, a BSOD with no other likely cause) : a red warning in HD Sentinel indicates that there are more than 1300 weak / bad sectors. I stopped using it, then successfully cloned it to another healthy 2TB HDD using ddrescue. There was indeed an unreadable area around the 3GB mark, leaving about 600KB of error size. The rest of the HDD was flawlessly recovered, with no slowdown, so it would appear that there is just one spot that is problematic.
I’m currently attempting to repair it using HDD Regenerator – a quite controversial piece of software from what I could gather, but so far it seems to be working, albeit very slowly (180 sectors considered «recovered» in 30min.). In the past I successfully regenerated a bad sector on a 2TB WD HDD, which caused CHKDSK to fail with a «not enough space» error, using that software followed by a defragmentation (WD’s Data Lifeguard Diagnostic only reported a failure and could fix nothing) ; the SMART parameters were back to normal after that, CHKDSK could finish its process, and that HDD is still in use several years later.
Now, in case that defective area can not be repaired, would it be safe to continue using that HDD for non-critical / temporary data storage ? Or should I consider that it is no longer safe for the integrity of any data whatsoever ? Is it harmless for the the drive’s heads unless they come directly over a severely defective area, or can they get damaged even if working in the vicinity, without attempting to directly read from or write to that area ?
- hard-drive
- partitioning
- bad-sectors
3
Just to share my experience regarding HDD Regenerator…
Before using it, I checked Hard Drive Sentinel which reported 1312 “weak sectors” (in the SMART tab they appeared at the “Current pending sectors count”).
I then ran HDD Regenerator, which after about 105min claimed to have “recovered” all the 1312 sectors, all contiguous and located around the 3072MB mark.
Then, it proceeded at a much higher rate (although still slow – it went from about 1 sector / second to about 5MB / second).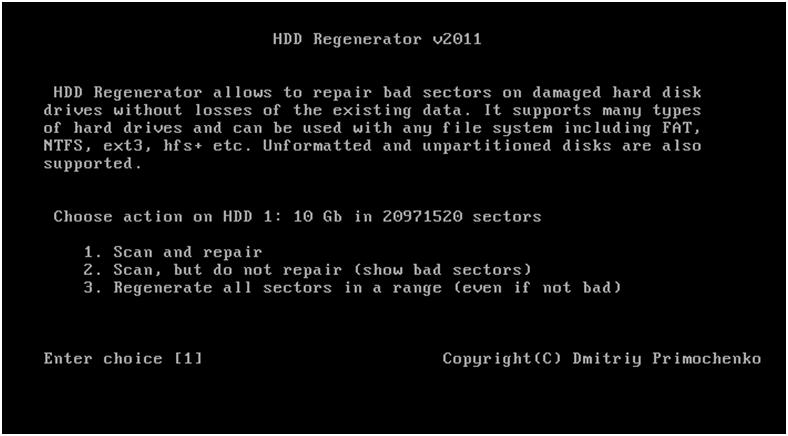 I stopped it, and checked Hard Drive Sentinel again : the red warning was still there, the health status was still estimated at 9%, and it appeared that the bad sectors had merely been remapped / reallocated (now in the SMART tab they appear at the “Reallocated sectors count”). Plus there are many more data transfer errors (“Reported uncorrectable errors” went from 1333 to 3958 – although I’m not sure what it means exactly).
So, it turns out that HDD Regenerator did not in fact regenerate anything, it just forced the reallocation of those sectors, just like attempting to write on them with any other tool would have done. Bummer.
A nice thing though is that this software provides a list of the affected sectors, which can be useful. If they are all located in the same area (as is the case here), one can take the risk of partitioning around that bad area so as to continue using the HDD for really non-critical data, like storing movies which are backed-up elsewhere to watch them through a set-top box or whatnot (that kind of usage has the advantage of not impacting a working computer in case of a severe failure, which may freeze the system, cause a BSOD, resulting in some loss of data or other possibly serious inconveniences) ; if they’re scattered all around the surface with no particular pattern, then the HDD is really toast and should be discarded remorselessly.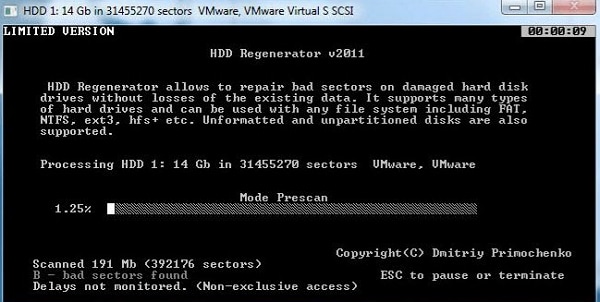
Been using WD black 1TB with 2 bad block isolated in separated partition almost 2 years, and everything is just fine. Just make sure to separate a little more than just bad block’s size. 1GB before and after will suffice.
But no one can guarantee you anything. May work just fine, may die tomorrow.
Use it for non-important data only.
1
Your Answer
Sign up or log in
Sign up using Google
Sign up using Facebook
Sign up using Email and Password
Post as a guest
Required, but never shown
Post as a guest
Required, but never shown
By clicking “Post Your Answer”, you agree to our terms of service, privacy policy and cookie policy
windows 7 — Continuous scanning of hard disk for bad sectors
I have a WD hard disk (1 TB additional drive to my PC). For the last 10 days, surprisingly its accessing speed plunged. I thought something wrong with my PC first. Later on, I realized that I may be victim of bad sectors.
I used «Advanced system manager» to scan the disk which confirmed bad sectors on my disk. But it stuck on J: after 58%. I tried 2 times. It fixed bad sectors of H:, and I: was free from bad sectors. [I left the PC for processing at least for 16 -18 hours]
Now my PC started to work properly. But since i was worrying about my data, I tried widows disk scan utility who stuck again. [I left the PC for processing at least for 10 -12 hours]
Next time I tried «HDD Regenerator» who found 22 bad sectors. But it failed to repair same in windows mode. And since its bootable USB was not working, so I failed reparing at the time of system startup.
This time I tried programs from «Hiren Boot CD». One of the tool stuck after 58% done. I tried «WD diagnostic tool» who found errors on my drive and returned 007 response code. It recovery tool failed with response code 225 (as I remembered). So this time I again tried «HDD regenerator». Till 58% It was running fine and found around 34 bad sectors. He regenerated them too. But now onwards it is regularly finding bad sectors and regenerating sectors which is making me afraid.
Now my questions are;
- Whether scanning a HDD continuously for bad sectors can increase them?
- If a software find bad sectors and repair them then whether another application again report same bad sectors?
- Whether I must replace my hard disk.
- If I cut/copy data from this disk to new one, whether the bad sectors can be copied to. (It might look a stupid question, but I am able to backup smoothly. So I am doubtful)
- If a HDD gets bad sector (even if very less number of bad sectors) then the chance of HDD crash gets increased?
- windows-7
- hard-drive
- bad-sectors
First off, bad sectors will not be copied over.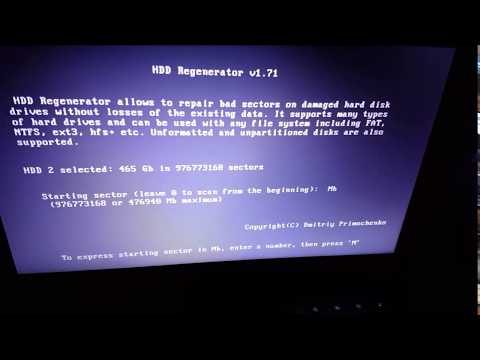
Most of the time, programs that claim to fix bad sectors do not fix them. What they do is find out where the bad sectors are and put police ropes all around them to prevent your system from writing data to those blocks. Does is work all of the time?, no.
You should replace the disk. You risk your data by not replacing the disk.
Copy everything as soon as possible.
You can also try to do a full format on the hard drive (once you get as much data off as possible). Sometimes a full format will help clear up any bad sectors, but is more of a long shot.
Scanning the HDD continuously should not increase bad sectors, but got, it’d be annoying to keep scanning drives with bad sectors.
One thing i’ve done in the past with a bad disk (more motor related) with is plugged it in outside of the computer. I had a pan of some water and ice sitting on the drive (after having it in the freezer for a bit). I kept the drive extremely cold and was able to copy over data.
7
HDD SPARE SECTORS!
Seems everyone forgets that HDDs have spare sectors.
The HDD replaces bad sectors with these, but only when the bad sector is written to!
Also, the HDD itself decides on what sector is «bad», unreadable correctly.
That is, sectors have checksums so HDD firmware can detect «bad» sectors.
(or more complex error checking mechanisms).
Additional detection obviously by other means inside the HDD.
Notes:
-
spare-sectors are limited, «how many» and «where» are well kept secret by manufacturer, but assumption is that they exist on the same track (circle, or cylinder). That is, no extra seek needed for read head, just a delay until the spare is under the read head.
-
since «long ago» HDDS has had two internal lists of defects (bad sectors)
-
Factory List, constructed at factory before shipment
-
Grown List, defects «grown» while in customer usage
«Long time Ago» one could read these lists, usually with «negative sector numbers» and/or writing some unlocking code to HDD controller.
However, as this would give ordinary users information on HDD quality, the info was made more secret.
(it also makes it possible for manufacturer to sort the HDDs in different quality classes, some for CIA, some for Google and the rest for you) -
-
HDDreg, HDD Regenerator clearly activates this spare-by-writing but clearly also does some other tricks to «save the data».
Claims it «regenerates» by detecting,using, humping some «magnetic hysteresis» of the surface. Might be true, maybe not, but sounds like selling stuff.
BEST TOOL ON MARKET!! -
However, some new HDDs «crash their own firmware» when a too defective surface. HDD disappears from OS, might lock the SATA,etc controller, etc deadly stuff (for rest of computer).
Luckily power-off-on of just the HDD gets the controller-firmware running again (no need to reboot, but only if you’re using hot-swappable SATA) -
Usual warning signals are «timeouts» and synchronized «clickings». (when HDD tries to recalibrate heads,etc but it doesnt work).

IN a recent case it cycles through a click-click and frozen cycle.- 30-60sec drive runs, but clicks.
- Then 3-4 minutes of «totally dead», keyboard,mouse,network, even HDD LED (ON).
All of this obviously dependent on HDD firmware, SATA controller and Operating System.
Hope this helps understanding the «magic»
PS the actual physical sectors are now 4k byte, not 512 as before.
PPS the old AT command for «raw read of data and checksum» has now disappeared, as sectors now a more complicated thing.
Scanning a HDD continuously or often reading/writing at bad sectors may cause the bad sectors to propagate. You should isolate the bad sectors out of partitions, or mark them bad in file system.
Scanning a HDD continuously or often reading/writing at bad sectors may cause the bad sectors to propagate./
Or could
- make the little magnets get better, taking them out of their hysteresis-lock
- or maybe the write head is getting weak, replacing old good magnets with weak new ones.

- or maybe the defects just grow by themselves
But obviously if the head servo is getting bad, doing anything will make things worse. SMART, SCSI info has an attribute for «bad servo» too
Scanning a HDD continuously/
is what some anti-virus programs and even operating systems already do.
Additionally also «outside partitions» which is snart as that is one good place for viruses. (as are unused sectors inside partition, MFT tables,etc,etc)
Typically this starts after Computer has been idle for a while, for example middle of night,
If either anti-virus or OS-syst then run into bad sectors, weird things can again happen.
The reason for this is that the chain HDD-COntroller-OS typically cant speak properly with each other, decode the error codes produced by HDD firmware, controller,low level drivers and finally stoopid Windows GUI.
But then another journalist will again claim that NSA deletes her files at nights, and that she heard NSA clicking on internet
0
Your Answer
Sign up or log in
Sign up using Google
Sign up using Facebook
Sign up using Email and Password
Post as a guest
Required, but never shown
Post as a guest
Required, but never shown
By clicking “Post Your Answer”, you agree to our terms of service, privacy policy and cookie policy
HDD Regnerator Tutorial — How to repair bad sectors
This article is telling how to repair bad sectors when your hdd, external hard disk, usb
drive etc has bad blocks. You may regenerator your disk as new one if you start to repair bad sectors.
Anyone that uses a computer for anything from business to personal use will have noticed that even with its
enormous capabilities they are still prone to failure over a period of time. One of the reasons for these
failures may be a result of “Bad Sectors” located in ether the Hard Disk Drive or Solid
State Drive. Most people that have encountered this problem will have considered it devastating, seeing that
their data is crucial to them. Since this problem has been occurring more frequently, various software
providers have attempted to create a solution that can recover bad sectors, while minimizing the
possibilities of data loss.
Since we know this problem can be fixed via software, it is crucial to find a program that can scan and
repair your sectors while maintaining a safe environment for your data. The program that we will be
demonstrating this process is called “HDD Regenerator”, if you would not like to purchase
it as of now, you can go ahead and download the FREE trial version here.
This
program is a must have when it comes to the current digital storage period. To keep hard disk, external
drive working with better performance, it is nice to keep your disk always cleaned and repaired. If your
hard disk runs with weird sound or it does not work properly, it is high time that you repair your bad
sectors on your hard drive.
Key Features:
- Full compatible with Windows 7 XP Vista to repair hard disks
- All brands of hard disk repaired like Seagate, Samsung, Western Digital, Maxtor etc.
- Ability to repair physical bad sectors (magnetic errors) on a hard disk surface.
- Detect possible bad sectors on your hard disk
- Working with any operating system without losses of any data (bootable regenerating CD / DVD or flash should be used for non-Windows operating systems)
- Bootable regenerating flash can be created from the program and used to automatically start regenerating process.
Once you have downloaded the program, we may continue onto the next step, the tutorial.
Download
HDD Regnerator Free to repair bad sectors
Download and install the program.
Once you have installed HDD Regenerator, go ahead and right click on it, then click “Open”.
As you can see, the layout seems nice and simple. HDD Regenerator gives you the option to ether scan and
repair any storage devices that are connected to your PC, or create a “Bootable USB Flash” or “Bootable CD /
DVD” to scan the drive with the operating system you are currently using. In our scenario, we will show you
how to scan the drive you are currently using by making a bootable USB flash drive.
WARNING! This process will delete any data located on your selected drive, it is highly recommended to do a
backup of any irreplaceable data located on the selected drive.
1 Select a USB flash drive.
2 Click “Reset Flash Size”.
3 Click “OK”. (After you have clicked “OK” on stage 3, the program may redirect you to the
front page, but do not worry, just go back and click “OK” on stage 4 to create the bootable drive)
4 Click “OK”.
Next, the program will ask you if you want restart your computer, click “Yes”.
(Please ignore the dead pixels at the top of the screen)
(If your computer does not boot from the USB drive, you will need to change the “Boot Priority Order” in the
BIOS. Simply use Google to search for a tutorial, If you are not exactly sure how to)
Once you have booted from your USD drive, select the drive you would like to scan, and then press “Enter” on
your keyboard.
Next, we have four options. Since we want to repair the drive, we will press “2” on our keyboard, and then
followed by the “Enter” key.
Now we have proceeded to the longest stage, the scanning process. As you can see, HDD Regenerator lets you
monitor what sectors have been scanned, diagnosed, and recovered while your drive is being scanned.
And there you have it; you have just scanned, and repaired bad sectors on your Hard Disk Drive.
As you can see, HDD Regenerator is a powerful tool for anyone looking for a solution to fix
bad sectors. Whether you would like to repair your primary Hard Disk Drive, external Hard Disk Drive, or a
USB flash drive, HDD Regenerator is the perfect tool to get the job done, while maintaining a safe
atmosphere for your data.
Download
HDD Regnerator Free to repair bad sectors
|
|
HDD Regenerator 2011 … $59.95
Program features
Main benefits
Hard disk drive is an
How it works
Almost 60% of all hard drives damaged with
Can the HDD Regenerator repair your drive?
Almost 60 % of damaged hard disks can be
HDD Regenerator’s Delays Detected
Permanent delays mean that the hard drive has sectors with long access time. A drive with permanent delays is actually
Important notes
Since the program does
|
|
|
Download | Buy Online |
||
How to Repair Bad Sector on Hard Disk in Windows 10/8/7
Updated by
Daisy on Sep 22, 2022
Written by
Brithny
| Disk/Partition Clone
| EaseUS Disk Copy Windows 11 Features | |
|---|---|
|
To upgrade to the newly released Windows 11, your computer’s boot mode should be UEFI, the disk partition style should be GPT, and Secure Boot should be enabled.
Read Also: How to Download and Install Windows 11> |
What to do when a hard disk has bad sectors? This guide includes the best solutions to repair bad sectors on hard drive and protect your data effectively.
PAGE CONTENT:
- Hard Disk Bad Sector Overview
- How to Check Bad Sectors in Hard Disk Windows 10
- How to Repair Bad Sectors on Hard Drive in Windows 10
- First Back Up and Clone Hard Drive with Bad Sectors by Using a Disk Cloning Tool
- Repair Soft/Logical Bad Sectors in Windows
- Hard/Physical Bad Sector Repair
Occasionally, when one or more bad sectors come upon a hard disk, the disk will go bad. When this happens, the data in those bad sectors may be lost, but the data on the rest of the disk will be unaffected and the disk is still completely usable. In order to help you perform bad sectors repair on hard drive and rescue your data as soon as possible, we suggest you follow through with the tips below before you take action to repair bad sectors.
HDD Bad Sector Overview
Before you start, learn the basic information of bad sectors to pick a better solution and remove bad sectors from your drive.
What Is Bad Sector
According to Wikipedia and professional IT sites, the bad sector is defied a permanently managed storage unit on a hard disk. Once the sector gets damaged, all saved information in that section is lost. Usually, the operating system like Windows 10/8/7 will skip the bad sector once it’s found and marked.
Two types of Bad Sectors
Basically, there are two types of bad sectors — Hard bad sector (also called Physical bad sector) and Soft bad sector (also known as the Logical bad sector).
Hard bad sector is mainly caused by physical damage (in 1,2 causes), such as manufacturing error, physical broken, etc. While the soft bad sector is usually related to software issues (in the 3rd cause) such as improper operations on hard drive, file system error, etc.
Due to the different causes of bad sectors, the ways to repairing bad sectors are also varied. Continue reading, you will find the best solutions to repair bad sectors on your hard drive in Windows 10/8/7.
How to Check Bad Sectors in Hard Disk on Windows 10/8/7
Although we have explained that bad sectors can be defined as physical and logical bad sectors, you may still don’t know how to distinguish them. Here is a simple rule for you to tell the difference: whether you can check bad sectors on your drive.
If you can run a disk checking and get the basic information about bad sectors, it’s highly possible that your drive is having soft bad sectors. If not, the situation will become worse and it could be the hard bad sectors.
To know about the amount of the bad sectors clearly, a professional and free disk management tool is recommended — EaseUS Partition Master Free. It can check for bad sectors on a hard disk on Windows 10/8/7 for free with one click.
Besides, it has comprehensive hard drive partitioning options, such as resize/move partitions, create, merge, format, and wipe partitions. You can also use it to convert FAT32 to NTFS without losing data, convert MBR disk to GPT disk, or vice versa.
Step 1. Open EaseUS Partition Master. Right-click the disk that you want to check, and then click «Surface Test».
Step 2. The operation will be immediately performed and all bad sectors will be marked as red.
When there are too many bad sectors, the scanning process will be stuck. Wait patiently. After the process, you could know exactly how many bad sectors are there.
- Tips
- 1. If there are only a few bad sectors, you may use a disk repair tool to fix them efficiently.
- 2. If the bad sectors have accumulated to a certain extent, your best choice is to replace the drive with a healthy disk by cloning the hard drive.
- 3. If the error is serious with abnormal noise on the drive, replacing the disk by cloning still worths a shot. But take action immediately in case the error becomes worse.
How to Fix Bad Bad Sectors on HDD in Windows 10
As you know that when the operating system detects bad sectors, it would mark them as unusable no matter it’s logical or physical bad sectors. As a result, data loss and the loss of disk capacity are unavoidable. Then, how to fix and remove bad sectors from the hard disk? Read on for in-depth tutorials.
First Thing to Do: Back Up and Clone HDD to a Good Hard Drive (Skip Bad Sectors)
If the disk contains many soft bad sectors, always stuck or slow to load data on the computer, or the drive is failing due to physical bad sectors, it is impossible to repair bad sectors. The wise choice is to back up and save your data at first. But how to copy a hard drive with bad sectors?
EaseUS Disk Copy, a powerful disk cloning software, can skip the bad sectors and clone disk to make a full copy of your hard drive.
Some key features of EaseUS disk cloning software:
- Transfer OS to new hard drive without reinstalling Windows and applications
- Clone a larger HDD to a smaller SSD
- Clone hard drive to USB flash drive easily
Download and apply this disk copy software to upgrade and clone HDD with bad sectors to a healthy hard drive without effort.
If your computer can’t boot into your operating system, create a bootable USB in advance, and then follow the steps below to copy your data. Remember to connect the new hard drive to the computer as a storage device.
Step 1: Choose «Disk mode» and select the smaller hard drive as the source disk.
Step 2: Choose the bigger hard drive to save the data and then click «Next».
Step 3: A warning message tells you that the data on the destination disk will be overwritten. Click “OK” to continue if you do not have important data on the destination disk.
Step 4: Edit the disk layout and then click «Proceed» to continue.
- «Autofit the disk» resize the layout on destination disk according to the size of it to make the disk as the best status.
- «Copy as the source» doesn’t change anything on destination disk and the layout is same as source disk.
- «Edit disk layout» allows you to manually resize/move partition layout on this destination disk.
Step 5: Wait for the process to complete.
When the cloning process finishes, shut down your computer, insert the newly upgrade hard drive into your computer and replace the old drive. If it’s a system drive, set the computer to boot from a new hard drive instead of the old one in BIOS.
Repair Soft/Logical Bad Sectors in Windows
If your hard drive is experiencing one or more bad sectors, still accessible, follow our instructions to fix your problem and remove bad sectors permanently from hard disk with bad sectors repair tools.
1. Run CHKDSK Command and Format Hard Drive
If there only a few bad sectors on your drive, you can run CHKDSK command and format the drive to repair those bad sectors:
Step 1. Run the CHKDSK command to fix soft bad sectors.
1. Press the Windows key and type cmd.
2. Right-click «Command Prompt» and choose «Run as administrator».
3. Type chkdsk E: /f /r /x and hit Enter. (Replace E with the drive letter of your hard drive.)
Step 2. Format hard drive to usable again
1. Open Windows File Explorer, locate and right-click on your hard drive.
2. Select «Format», reset the file system as NTFS, tick «Quick Format» and click «Start».
After this, you can save your data back to your hard drive and use it again.
2. Use a free disk check and repair tool to fix bad sectors
EaseUS partition management software offers the simplest method to check and fix hard drive errors. You can apply its Check File System option to check and repair hard disk partition errors in Windows 10. Just download and start EaseUS partition management software, locate the hard disk, then run the check file system.
Hard/Physical Bad Sectors Repair
Mostly, when your hard drive contains hard bad sectors, you cannot repair bad sectors by using normal solutions. The only possible way is to low-level format the drive, resetting the hard drive blocks, clusters, and sectors.
A low-level format is also called a physical format. Modern hard drives are low-level formatted at the factory for the life of the drive. A PC cannot perform an LLF on a modern IDE/ATA or SCSI hard disk, and doing so would destroy the hard disk. That is to say, you can’t repair a bad sector.
To resolve this issue, you have two choices:
1. Send your hard drive to the manufacturer or a local repair center, customize for low-level format.
2. Choose to clone the disk with bad sectors to a good hard drive to avoid the hard disk getting worse with more bad sectors.
Summary of Bad Sector Repair
This page provides the complete guide to help you fix bad sectors on HDD. To remove bad sectors from hard disk permanently, you can use the Windows CHKDSK command or EaseUS free partitioning software. With the two bad sector repair tools, you can efficiently fix and repair bad sectors on the hard drive, external storage devices.
In contrast to logical bad sectors, if there are physical bad sectors on your hard drive, it’s almost impossible to repair your hard disk. You need to replace it with a new hard HDD. So, to avoid data loss, when you find bad sectors on your disk, be sure to use EaseUS disk clone software to copy and make a backup of your data.
More Information About Bad Sectors
Some people may also have questions about diagnosing if bad sectors are on your drive. You may judge from the following two factors:
1. What are the symptoms of bad sectors?
When you meet one of the following symptoms, your hard drive or external storage devices may contain bad sectors:
- Strange friction sound when booting or running hard drive.
- System pops up an error message, like «Sector not found» or «General error in reading drive C», etc.
- Disk won’t format, getting an error.
- Scandisk (a diagnostic utility) automatically runs when the system is booted.
- Some operations are stuck or become random to a certain process.
2. What are the causes of hard bad sectors?
1. Hard drive was shipped from the factory with bad sectors. (e.g. SSD disk)
2. Physical damage, like:
- Manufacturing error
- Accidental drop, break, etc.
- The touch of the hard drive header to the platter
- Dust
3. What are the causes of soft bad sectors
- Software issue, like:
- Sudden shutdown of the computer
- Sectors that contain data don’t match the error-correction code
- Viruses, malware messes computers, cause bad sectors.
4. How to avoid bad sectors?
Some of you may also want to know how to protect the drive from bad sector errors. Here are some tips:
- Run Disk Check or CHKDSK command on your drive regularly to remove soft bad sectors.
- Run virus cleaner software to remove viruses and malware.
- Execute proper operations on your drive, for example: close all running programs before shutting down the computer.
10 Advantages Of Having An HDD Regenerator
(Many of the links in this article redirect to a specific reviewed product. Your purchase of these products through affiliate links helps to generate commission for Storables.com, at no extra cost. Learn more)
HDD Regenerator repair software has gained quite a popularity with time. Is the use of an HDD regenerator free from complexities? A big yes. And that is why they’re being used in different facilities to restore data. And since it applies to all hard drives, it’s not very hard to use it.
Let’s have a look at the features and advantages of HDD Regenerators and how they solve your problems regarding damaged data. But first, let’s see what an HDD Regenerator is so we’re all on the same page.
HDD regenerator is a restoration platform for data that is erased or damaged. As the name suggests, it regenerates the data on a hard disk drive. Data recovery professionals mostly need this program. Even if this program is not able to recover your data from scratch, it is useful enough to repair the bad sectors.
Once the bad sectors are fixed, the HDD repair software can pull off the recovery of most of your data, if not all. Let’s be real: data recovery is a unique art. Not everyone can use programs like these, and not everyone has enough patience. Sometimes even the data repair shops don’t have enough regenerator ability to help out. Actually, it’s tough to repair and recover someone’s lost data, but – it’s not impossible.
HDD regenerator is brilliant free software, but it does take a long time to scan and repair – therefore, patience is something you need to have a lot of. As the capacity of hard drives is getting wider and wider nowadays, the HDD regenerator would likely take a considerable portion of time in order to scan, diagnose, and repair your data successfully. And if you are in luck, this tool may recover most of your lost data too.
HDD regenerator is one great program that provides backup for hard drive data. It is widely used in offices, IT-based companies, repair shops, and on the desks of professional users. There is no guarantee that data on hard drives will never be corrupted.
In fact, there is always a threat because hardware and software do, at some point, get outworn and cause problems. However, it’s hard to foresee when a hard drive might start causing problems, and this way you can easily end up losing your data. That is exactly why HDD regenerator repair software is so important.
HDD regenerator can detect physical bad sectors on the surface of the hard drive, therefore, it can diagnose your erred data. It repairs those bad sectors or magnetic errors despite your file system. Moreover, HDD regenerator free can be used with FAT, NTFS, or any other file system.
In addition to that, an HDD regenerator can repair unformatted or unpartitioned disks. And these features are just the starters, there’s so much more than an HDD regenerator can provide. With an impressive feature set, the HDD regenerator comes with various advantages to offer.
You might not know, or you probably don’t have the perfect share of information regarding hard drive’s problem – but the HDD regenerator does. HDD regenerator is designed in a way that it can detect problems on your hard drive.
Be sure to invest some time into learning how to use an HDD regenerator. Its main advantage is that it can scan, diagnose, and detect the problem that lies on the surface of your hard drive. The problems caused by magnetic errors are beyond human reach to identify, but the HDD regenerator can identify those problems for you.
This program has a strong regenerator ability to detect the physical bad sectors. It’s the primary advantage is that it comes with this program. If your hard drive has a data that gets corrupted, you can not retrieve it until you run your drive through an HDD regenerator scan. It will detect bad physical sectors that lay on the surface of your hard disk drive.
A strong possibility is that it will be able to repair those bad sectors or magnetic errors on the hard disk drive’s surface by using a Hysteresis loops generator.
One of the best advantages we can extract out of the HDD regenerator is that it protects your data in every mode. Whether you’re using old operating systems or the latest ones, it will perform the same for you.
A lot of people go for average laptops on which the Windows run on safe mode. Well, HDD regenerator looks past that – works perfectly fine even on the safe mode for your HDD meaning wherever your data is, it’s protected.
A problem that a lot of people face during their computer experience is data corruption. Usually, there are different ways to recover the corrupted data and bring it back to its original shape.
Though HDD regenerator is a program that makes your data readable in an efficient way. If your information is not showing up or opening up from your HDD, this means that it has probably become unreadable or corrupted. Before you go thinking that it cannot be recovered, try out an HDD regenerator. It will, while taking its time, repair your data and make it readable again.
Although it cannot be denied that HDD regenerators are not used by average PC users because they have repair shops to do go to for help, it is still worth mentioning here that the regenerator is designed to be user-friendly. And to make it easy for you: HDD regenerators have a smooth and friendly user interface so you can do most HDD checkups on your own.
Its layout isn’t even a little bit complicated for an HDD, meaning now you don’t have to run to repair shops and waste time and money when, in fact, you can use it by yourself.
While the name ‘HDD regenerator’ sounds a bit technical and complicated, the process it performs isn’t.
The HDD regenerator is free from all the complexities that an average user may find overwhelming while using. Most people believe it is far better to just go to the repair shop and get your data repaired and recovered instead of burning their heads with complicated settings of the HDD regenerator. And they’re not wrong, just unaware. Unaware of the fact that the HDD regenerator does not require you to go through complicated and unnecessary settings.
HDD regenerator is not a program for specific file systems. It can operate and work on your hard disk drive despite the file system or motherboard model you’re using. Yes, it completely ignores the file system and focuses on your data, which is essential. It scans your disk only at a physical level.
Furthermore, you can use it on file systems like FAT, NTFS, or any other one – it will run the same on everyone. A great advantage is that HDD regenerators also perform scans the same energy and efficiency on both unformatted and unpartitioned disks.
Another great advantage of HDD regenerators is that they come with pre-scan mode. But why is that useful, you may ask? Well, pre-scan mode in HDD regenerators allows users to get their bad sectors determined as fast as possible.
Repairing and recovering is an HDD regenerator’s job – but its pre-scan mode adds a great advantage to search for the bad sectors’ location. If your hard disk drive is messed up and there are a lot of bad sectors, the regenerator will come for the quick rescue. It saves your time; corrupted hard drives get scanned and repaired even faster than usual hard drives in this model.
Windows by Microsoft is a series of operating systems for PCs or laptops that are used widely throughout the globe. Most of the programs do not work on old operating systems like Windows XP or Windows Vista – but the HDD regenerator performs at the same speed.
It directly starts the process of scanning your data on hard drives. Whether you’re using Windows XP, Vista, 7, 8, or 10, it will work just fine on any of them. It’s direct processing on all mainstream Windows versions is a great advantage for the users of all categories.
Last but not least, the loss prevention process of HDD regenerators is, without a single doubt, the most significant advantage it has to offer. It fulfils the purpose of the program. Why does one need to recover their data in the first place? Because it somehow is essential to them.
The loss of any sort of data is unbearable for the user. To prevent your data from getting lost, an HDD regenerator can create a bootable regenerating flash. It can regenerate CD/DVDs to revive the process under DOS. HDD regenerator can even run through DVD if there is a non-Windows operating system present on your PC.
Let’s get into detail. Can an HDD regenerator repair your hard drive? Of course, it can. But hold on; apart from what is said above, about 60% of corrupted hard drives are repairable through HDD regenerator. Why? Because let’s be real, some HDDs are so worn out and messed up that retrieving their data becomes impossible.
However, it won’t hurt to try; it would be worth a shot. While you scan your hard drive using an HDD regenerator, see if it’s finding any bad sectors. If you are lucky and the HDD regenerator successfully finds out the first bad sector, it means the hard drive is repairable, and your data is recoverable. Though if, after a considerable time, the HDD regenerator fails to find out any bad sector, it’s a hint that your hard disk drive is beyond recovery. You should then replace it with a new one.
Having an HDD regenerator at hand is a genius decision – you never know when your hard drive might need a repair. And if it does not work on the hard drive, you can still use the same regenerator for future use.
The initial step in the process of data recovery is fixing the bad sectors. If your hard disk drive‘s data is recoverable, the HDD regenerator will start finding bad sectors to repair soon after it starts operating. It repairs bad sectors with a specific magnetization algorithm, scanning disks only physically.
In the physical scanning, the HDD regenerator looks for the damaged areas on the hard drive i.e., bad sectors. Once they are found, the generator starts repairing them with continuity to save any potentially lost data. You can even use this program through CD, DVD, or flash drives to fix the bad sectors.
However, there will be different options on your screen once you launch the HDD regenerator. You can either just scan hard drive for bad sectors. Or you can switch to scan and repair in the same process.
Moreover, you can also regenerate the whole hard drive, including the areas in good condition. Once you launch the program, just keep following the instructions of the dialogue boxes, and soon, you’ll be on the stage where the HDD regenerator will be scanning and repairing bad sectors of the hard drive on its own.
Hard disk recovery. How to repair a damaged HDD
Today we will get acquainted with one of the simple and, at the same time, one of the most powerful programs for diagnosing and restoring a damaged hard drive at a low level — HDD Regenerator
A low level of work with a hard drive means that the program will have exclusive access (usually the DOS environment is used) not only to the hard drive, to its sectors and clusters, but also to the controllers and mechanisms that are involved in the operation of the hard disk.
Also at a low level is ignoring the disk file system and format problems (failure of disk system records).
The program has gained its popularity in computer service centers because, unlike many similar programs, it really restores bad sectors by remagnetizing them.
Other programs simply block access to the cell, which could contain the necessary piece of information for the file. On the one hand, this is good, as they allow you to quickly bring the HDD (hard disk) into working condition by deleting non-working sectors in the disk.
On the other hand, with this approach, you lose not only the information that was stored in these sectors, but also the volume of your disk. If you have a bit of broken sectors up to 100, then we strongly recommend using the software product from Dmitriy Primochenko «HDD Regenerator».
The latest versions of HDDR are paid, but it is from the series of programs that can recoup the funds invested in it for 1 time of its use. In addition, this program has a demo mode, which we will use to show you how it works.
The program also allows you to diagnose the disk.
So, how to use the HDD Regenerator program.
For an example of working with HDDR, we will use version 1.7, which is almost the same as version 2011 and works just as well on win7 as on XP.
Download the demo version of the program from the official site http://www.dposoft.net.
Try button.
Install and run.
After installation, you can Russify the program by downloading the file: «HDD Regenerator Rus». However, Russification only translates the start interface of the program. And since all HDDR work takes place in DOS or in its emulation (on a Windows system), you still have to deal with English. But we will help you.
Suppose we need to test and repair the hard drive. We press not the upper part of our window in the place where it says «Click to …».
In some cases, a warning window may appear: IMPORTANT!
This warning says that as a result of the HDDR check, it has determined that your SATA controller is operating in ANCI mode and you are prompted to reboot and change it to IDE mode in the BIOS.
If these are unfamiliar words for you, then it is better to refuse. The program will still work, but a little slower.
In the next window, the program will find and identify drives connected to your computer. In our case, HDDR identified 1 Samsung HM251Ji hard drive with 488 billion sectors.
The broken word at the top stands for Selected Discs. Disks are selected with the mouse button from the bottom window «Select Disk». After the disk description line becomes active, press the start button or double-click to activate the disk description.
The program will try to start DOS emulation. What is DOS emulation? In short and simple language, DOS is a working environment (text-based operating system) for direct access to computer hardware in a Windows system. Also used by some old or specific programs.
If you run the program on a Windows system, then most likely you will receive the following message: programs use them. You are prompted to close all windows and running programs and repeat (Retry) the launch.
If it doesn’t work, try rebooting and try again. In case of a repeated error, try manually closing the processes that were not started on behalf of the system through the «Task Manager», or you can try to do the same in Safe mode — «Safe Mode» (F8 button when the computer boots).
As a last resort, you can ignore this warning and click OK. In our case, we will do just that, since it will only further complicate the operation of HDDR, but it will still work.
In the next window, HDDR will report that it could not get exclusive access to hard disk 1 (in our case, Samsung), but will still try to start working with it.
Let’s analyze its interface in more detail.
1. Scan and repair
- Test (Scan) and repair (repair) your hard drive.
2. Scan, but do not repair (show bad sectors)
- Scan, but do not repair, only show bad sectors.
3. Regenerate all sectors in a range (even if not bad)
- Regenerate all bad sectors in a range from and to.
For example, start testing with 200 billion sectors and finish with 320 billion. (You will understand what it is a little later)
4. Show statistics
- Show disk statistics. It will be available only after the testing process or disk regeneration.
If you are running HDDR for the first time, it’s better to select «2» first. In the Enter choice place, simply enter the number «2» from the keyboard. If the number is not entered, activate the DOS window with the mouse and repeat the entry.
The following window will open.
Here you are offered to start testing the disk not from 0 (by default), but from a certain place on the hard disk.
For example, we have a 230 GB disk divided into 3 sections, each of which is approximately 70 gigabytes. And only in the third section did we notice a freeze, extraneous sounds (or other reasons) indicating that “something not right” was going on with the disk. Accordingly, we divide our 488 billion by 3 and enter the resulting number rounded down there. That is, we save time.
Or you can use the second (indicated at the very bottom of the window) option, by which you can simply enter the size of the disk from which you should start testing and press the M (English layout) button. The «M» button will add a suffix to the number indicating that we are using MB.
If we want to start checking the disk from the very beginning, we just press Enter (input).
In the next window, the disk test process starts. As the disk goes through, it will display information about how many sectors it went through and how many bad (damaged) sectors it found.
It will also determine the degree of their damage. If at any point you want to stop the testing process or pause, press the ESC button.
If at the time of testing, strange sounds were heard and the system suddenly began to freeze heavily, this means that HDD Regenerator has detected bad sectors and uses all computer resources to determine the nature of the damage. Disk activity is disabled at this point, and the system freezes completely.
As the bad sector passes, the computer is restored. This is one of the reasons for such an operation to be carried out only in DOS mode outside of the widows system. We will describe how to do this at the very end of the article.
So. After he finds the first bad sectors. HDDR running in DEMO mode will show you the following window.
This indicates that the process is paused because you are using an unregistered version of HDD regenerator. To get the full version of the program, you need to buy a license (key) for it on the manufacturer’s website: http://www.dposoft.net
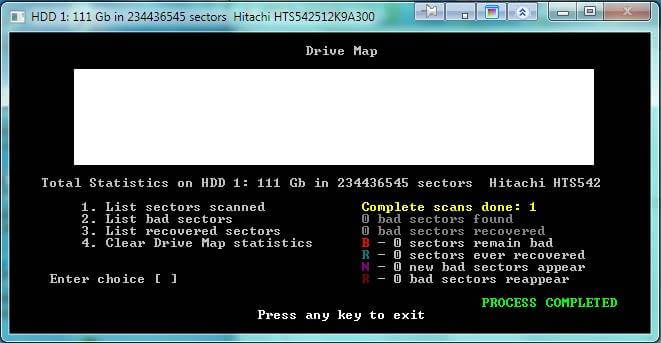
The next window will show us statistics on our disk. This window will show you how many sectors it found damaged, how many recovered, and how many it failed to recover.
Let’s describe in more detail:
1. List sectors scanned
o List of scanned sectors
2. List bad sectors
o List of bad sectors
3. List recovered sectors
o List of recovered sectors
Clear Map 4. Drive statistics 4. o Clear statistics window.
B — Sectors damaged
R (green) — sectors restored
R (red) — sectors could not be restored.
Operation of the HDD regenerator program in the DOS system.
Well, now about how to run the program in DOS mode, where HDDR will have the maximum speed and performance on checking and repairing your disk.
This requires an empty Flash card. We insert it into the USB socket and run the HDD Regenerator program.
Next, click «Bootable USB flash drive …».
In the window that opens, select the flash drive and click OK.
HDDR will remind you that all data on it will be destroyed. Click OK, and then HDD regenerator will format it and write its files on it, which will first make it bootable, then allow it to run HDDR files on its own.
In a DOS system, you will see all the same windows that we wrote about in this article. When restoring a disk via DOS, remember that if you decide to abort the operation, you need to do this only through the ECS button and be sure to wait until a window appears prompting you to exit the system by pressing ESC again.
The fact is that when the regeneration process is interrupted, the program writes to the flash drive information about the process statistics and the point at which the program was stopped.
When the program is restarted, HDDR will start from where the pause was pressed. Thus, it is possible to recover disks with a large number of bad sectors, the recovery of which requires a significant amount of time.
For example, restoring 100 bad sectors can take several days of continuous HDDR operation.
Unfortunately, today’s hard drive manufacturers are focusing more on its amount of speed and performance than its reliability. Hard drive warranties rarely exceed 1 year these days.
In view of this, my personal opinion as the author of the article is that I do not recommend storing important information on one hard drive. You need to either duplicate it to another hard drive (optical discs will not work) or use another better option.
For example, for these purposes, as the use of Internet resources for storing file information, which we will talk about a little later in another article.
Thank you: Oleg Kuznetsov
Problems with hard drives on your computers always appear spontaneously. The main indicator of possible problems with the HDD is time! Yes, time is not only a “doctor”, but also an absolute destroyer!
Signs that indicate problems with «tin» are very commonplace.
First of all, these are strange sounds that occur during the operation of your hard drive: squeaks, clang and other sound effects.
Secondly, this is the heating of the surface of the hard disk case: as you know, a normal HDD does not heat up at all (well, at most its surface is slightly warm).
Thirdly, frequent crashes of the operating system: this indicates a huge number of bad sectors of your hard disk (clusters).
As you can see, friends, there are quite a few reasons. How to solve a problem? There are two solutions:
- buy a new hard drive;
- try to «cure» the old one.
Consider option number two, that is, let’s try to restore the damaged sectors of our HDD disk. So!
To begin with, you should know the reasons that are the catalyst for the occurrence of bad sectors on the HDD:
- improper computer shutdown;
- viruses and Trojans;
- Incorrect removal of programs and games.
These reasons are the most common. Of course, your hard drive will not immediately show its «malaise», because bad sectors accumulate for quite a long time (six months or a year). But the time will surely come and your «tin» will give you an unpleasant surprise! And to prevent this from happening, you must from time to time check your HDD for the number of bad sectors and “treat” these very bad sectors.
How to do it? There is nothing complicated in the procedure, because it is as simple as three pennies. We go to «Start — My Computer». Hover over any local drive and right-click. A menu will pop up in which you select the last line «Properties». By clicking on «Properties», you open the «Properties: system drive (drive letter)» window. In the same place, in this window, you see several active tabs — click on the «Service» tab. See: there are three sections and there are active buttons in each section? In the «Check disk (Check volume for errors)» section, click on the «Check» button, and then check the boxes in the «Check and repair bad sectors» and «Automatically fix system errors» items.
Next, click on «Start» and wait for the end of the process. Warning: The process of troubleshooting hard drive problems can take a very long time! This directly depends on the condition and «age» of your hard drive. Therefore, do not panic if your disk is “healed” for several hours in a row: this is normal for old or badly “broken” HDDs. Attention: if your broken disk (for example, C) is currently busy with work, then the OS will prompt you to check the sectors the next time you boot the system. We agree, click «OK» and restart the system. That’s it: now your disk has begun to «treat». You just have to wait for the end of the process. After that, we check the disk for adequacy: we try to run programs and applications, and monitor the speed and quality of performance. But still, it should be taken into account that the old hard drive, sooner or later, will definitely be covered with a «copper basin»! Therefore, if your HDD is old, be prepared to replace it. Good luck!
Let’s take a look at the recovery of hard drives using improvised means at home.
In fact, in the vast majority of cases, the hard drive flies due to the abundance of the so-called «bad sectors». If you clean them, then the hard drive can last a very long time. The easiest way to check the «screw» for the presence of «bads» is to test it using standard diagnostic methods for the Windows operating system. In the functions, you can choose two ways to check the disk and wait … After the work is completed, the hard disk recovery, in theory, should be successful.
Another standard tool is the defragmenter, which began shipping with Windows operating systems starting with Windows 98. The principle of operation of this tool is quite simple, but, as a rule, very effective. When working, this tool collects all the «bad sectors» in a pre-reserved space on the hard drive. It turns out that they are not «treated», but are blocked and do not interfere with the full operation of the hard drive. The disadvantage of this method is the occupied hard disk space.
Over time, the number of still broken clusters accumulates and, accordingly, the space allocated for them gradually increases, which, frankly, is not at all correct. Therefore, in order to carry out a normal, full-fledged hard drive recovery
, third-party developers have begun to develop alternative ways to better restore hard drives.
This is how proven software products like HDD Regenerator were born
and «Victoria»
. Thanks to their algorithms, these programs repair bad sectors, and do not block them. Due to this, free space on the hard drive is saved, and not reserved for incomprehensible needs. Let’s pay a little attention to the Victoria utility. This program performs low-level hard drive diagnostics, making hard drive recovery as successful and fast as possible.
The utility is absolutely free. There is support for IDE and SATA interfaces. The disadvantages can be attributed to the lack of desktop, it only works under MS-DOS from a boot disk. It has a mode of sector-by-sector recovery of clusters on the hard disk. It can test the position of the heads, which is important for maintaining the normal performance of the hard drive after recovery.
We welcome all of you, dear friends. As you know, the role of the hard disk drive (HDD) in a personal computer cannot be overestimated. It is a key link in the chain of components of any computer. Trouble-free operation of the HDD is a guarantee of system stability, because The operating system of the computer is loaded from the hard drive. But still, its main purpose is the storage of large volumes of digital information. Sometimes it happens that for one reason or another, the hard drive fails. Agree, this is not very good news. In this article, we will tell you about recovery of broken hard drives
. Let’s list the most common causes of software and physical problems in the operation of a modern hard drive.
MECHANICAL PROBLEMS
1. Recovery of hard disk sectors
is used in cases where hard-to-read sectors (bad-sector) are formed on the surface of the HDD. The characteristic signs of this phenomenon are considered to be a long loading of the disk and a rattle that is slightly noticeable during its operation. In such a situation, you can cure the hard drive using specialized utilities. With just a couple of clicks, any PC user can make a copy of it with sectors and burn the image to another hard drive.
2. PCB failure. It will be very easy for you to notice this problem, since the hard drive stops showing signs of life at all. All this is caused by problems with the power supply of the hard drive. Its engine does not start or tapping is heard inside its body. A possible reason for the power failure of the HDD is its incorrect connection to the PC. It will be possible to correct the situation in two ways: completely replace the board with a new one, or repair it.
3. Problems in the operation of the block of magnetic heads (BMG). For the performance of a hard drive, a faulty BMG threatens with serious difficulties. Symptoms of this problem are unstable HDD operation, constant knocks and clicks. Repair of such a disk must be done very carefully. It should be returned to working condition by replacing the faulty block of magnetic heads with a new one, from a similar model of the hard drive. Further data resuscitation is performed using special high-tech equipment.
4. Damage to the hard drive motor is one of the common causes of failure of modern HDDs. This may occur as a result of negligent attitude to technology (non-compliance with operating temperature, falling). In such a situation, the operation of the hard disk is not possible, because it does not spin up. The barely noticeable hum coming from it will disappear if the engine wedge is eliminated using a special method. In severe cases, hard drive repair can be carried out by installing magnetic plates on a working HDA from an identical manufacturer.
5. Another common ailment is the failure of the HDD magnetic head unit switch. This is a small microcircuit, which is located in the HDA of the hard drive. In the vast majority of cases, salvation lies in the complete replacement of the BMG. In quite rare cases, everything costs only by soldering the microcircuit. If you are faced with the goal of recovering the information available on the disk, then you need to use the services of special equipment.
LOGIC PROBLEMS
1. The most common problem is disk drive formatting. When logical problems occur, the technical condition of the hard disk remains the same as it was before they occurred. Formatting a hard drive will certainly end with a complete cleansing of its virtual space, i.e. all files on it will be deleted. You can restore your HDD using the wide range of software tools. Data rescue will be successful if you ensure complete isolation of the hard drive. Writing new information to this hard drive is possible only after a complete recovery of deleted files.
2. Hard drive boot block failure. This problem is also very unpleasant, because this circumstance does not give the user the opportunity to start the computer’s operating system. Serious errors in the operation of the personal computer OS are to blame for this matter. Also, the negative activities of malicious software should not be discounted. It is worth noting that this trouble, like the previous one, is completely solvable.
Happy data recovery!
Is it possible to restore sectors on the hard disk. HDD Regenerator — looking for and recovering bad sectors on a hard drive
Bad sectors are found on almost all HDDs. Especially those that are actively used for a long time. Sometimes the problem gets out of control and turns into a real disaster, destroying all data on the HDD in any partitions. To prevent this from happening, find out how to repair bad sectors of your hard drive at home.
What are bad sectors and why do they appear?
You can imagine a bad block as a book with the last chapter torn out. You can read it up to a certain point. But as soon as there is a gap in the pages, you will not be able to finish reading. The same goes for the HDD. The magnetic head reads information within the track, but in some area it encounters a damaged surface or an empty bit of information, which makes it impossible to extract the information to the end.
Almost all hard drives have bad partitions. It can be one or more, and in most cases it is not scary. But over time, there are more and more of them, and they make it more and more difficult to operate information on the HDD. Such areas can be identified by scanning the hard disk for bad sectors with special utilities.
There can be many reasons for the appearance of bad sectors:
- disk impact or use in incorrect conditions;
- abort recording by turning off the power;
- overheating and temperature fluctuations;
- natural wear of heads and writing disc;
- poor quality products.
You can immediately divide bad sectors into non-recoverable and recoverable. The first are those caused by shock or overheating. They are destroyed once and cannot be restored, and information, as a rule, disappears forever. The second type of bad sectors appears as a result of a break in the recording process. They can be reanimated by simply overwriting the disc.
Write and read speeds may slow down over time. And after a slight fall of your laptop, the disk may even refuse to work. Everything would be really bad if there was no way to regenerate bad blocks in some way. The fact is that hard drives have a certain reserve area, which means a potentially larger volume than stated in the check. You can use the extra space to transfer content from damaged areas to it. How to recover bad sectors of a hard drive in this way is indicated below.
Danger is close
You can notice the problem not only after a hard drive failure, but also at the initial stages. You should be alert after the following signs:
- the speed of writing / reading the disk has dropped;
- An unusual noise is heard when accessing the HDD;
- began to overheat;
- has been subjected to mechanical stress;
- The system often crashes, and chkdsk starts automatically at startup.
As a rule, these reasons indicate the beginning of the end of your HDD. In order not to lose data, the first good solution is a backup. Transfer all the necessary files to another computer, flash drive, disk, and if possible, set up synchronization with the cloud.
Most modern hard drives are checked for bad sectors themselves, without user intervention. This is both good and bad, since you cannot influence the elimination of bad blocks and find out about their appearance on system partitions.
When should I scan?
You can scan the hard disk for errors at a certain frequency, which depends on the frequency of computer use and is calculated individually. Someone conducts scheduled maintenance of the computer once a month, someone — once every six months.
To do this, you can use system utilities or programs to repair bad sectors of the hard disk. Scan should be performed as soon as the problems listed above are detected.
Scanning with standard tools
Starting with Windows 8, the system itself is able to scan disks on a schedule and thus prolong the operation of the HDD. You can set up a scanning schedule at: «My Computer» / «Management» (a tab will appear in the main menu when the section is active). In Windows, checking the hard drive for bad sectors can be done with the standard chkdsk program. The utility can be launched in several ways:
The work is not fundamentally different, so let’s consider the first option:
- Open a command prompt as an administrator. Right-click on the Start menu icon or just in the bottom left corner on Windows 8 and select «Command Prompt (Admin)» from the list.
- If you want to scan a non-system drive, enter the chkdsk /f /r command to scan and fix the entire drive at once, and chkdsk D: /f /r to fix only partition D or any other of the available ones. Additionally, you can enter the /x switch to disable the scanned volume for the duration of the scan. In the case of diagnostics of a working disk, the program will prompt you to reboot in order to complete the work without logging in.
- If chkdsk finds errors in the partitions in use, it will prompt you to reboot and fix the sectors before the system starts.
Type help chkdsk to display all options. A list will appear showing all available keys with explanations. You can use any combination at your discretion, if you understand the essence of what is happening and the possible consequences. At the end of the scan, all data about the operation will be displayed in the log.
Third party programs
In addition to the built-in chkdsk, you can use third-party programs to fix bad sectors on your hard drive. There are many software that can repair damaged partitions.
Among the popular free software I would like to highlight Victoria. This program for recovering bad sectors of a hard disk is well known and at one time was very popular with masters. The Victoria program is able to work both in windowed and in DOS mode, which allows you to use it even on dead systems to recover information.
Interface Victoria
The program is perfect for recovering bad sectors of a hard drive. Victoria is intended rather for experienced users, since it practically does not contain an interface and does not even have a crack in the kit. But this does not prevent it from working correctly with hardware and file systems.
There are quite a lot of settings, switches and different numbers, and when you open the program for the first time, it can be difficult to navigate. But by following the instructions below, let’s find out how to repair bad sectors on your hard drive.
Testing and analysis
In the Smart tab of this program, you can quickly assess the overall health of the drive. The score is set based on the analysis of the various values given in the table. You can also view the status of each parameter individually.
For simple testing, go to the Tests tab. There are quite a lot of settings in each section, so for the initial analysis, you can leave everything by default. Click on the Start button and wait for the test to complete. A full check of the hard disk for bad sectors takes a long time. Therefore, you can safely leave testing for the night and go to bed.
Additionally, the window contains a speed graph or color indication of sectors. You can switch the view with the Grid flag next to the timer.
Sector repair
If there is no time to wait for several checks, then after assessing the condition, you can immediately start treating bad sectors of the hard disk. To rewrite blocks, Victoria uses the Remap method. It remaps the bad blocks to normal ones from the spare disk space. To remap bad sectors, do the following:
During the check, the log will display all found errors and a report on the measures taken. It also indicates on which part of the disk problems were detected.
How to cut?
Bad partitions often predominate at the beginning or end of a disk. The thought immediately comes to mind: “And if you don’t use space with broken sectors?” Yes, it can be cut off and not used again. You can find out which partition of the disk space is better to cut off like this:
You should work with the system disk only in DOS mode until the OS is loaded. While a backup or restore can be marked up directly from under Windows. This method is good for large HDD. But it does not help to restore broken partitions on the hard drive, as it happens during the remap process.
Prevention
In order for the hard drive not to “die” in your hands, it is advisable to carry out some preventive maintenance. depending on the type of technology.
If you have a laptop:
- try not to hit it;
- do not shake vigorously, especially during working hours;
- Do not expose to vibrations or temperature extremes.
If you have a desktop computer:
- do not place the system unit in a damp place;
- do not allow components to overheat;
- although the HDD itself is sealed, the board can be damaged by a layer of dust, so get rid of it;
- Install additional hard drive cooling if the computer is being actively used or the hard drive is unable to cool itself.
A useful preventive measure for all hard drives is defragmentation. For its implementation, there are a lot of programs, both regular and third-party.
Now you know how to repair bad sectors on your hard drive and you may even be able to save valuable information on it in case of problems.
10/14/2018
does not force developers to think through data storage to the smallest detail. However, in the conditions of actual operation of the device, all their tricks do not help.
Why sectors deteriorate
The principle of operation of a mechanical hard drive is very simple. There are several round magnetic plates. Reading heads “run” along them and look for the necessary information. When the hard drive mechanism is subjected to vibration or hard impact, microscopic scratches may occur on the surface of the hard drive. This leads to damage to sectors and loss of data — programs, books, music or movies.
No matter how carefully you use your PC, bad sectors can still appear on your hard drive.
If the hard drive has been in operation for several years, its tightness may be compromised. Any speck of dust that gets inside is a potential cause of bad sectors.
Add to this power surges, sudden PC shutdowns and simply improper handling of the computer, and there will be much more reasons for data corruption.
Is there a way out of position
If bad sectors appear, you do not need to immediately panic and urgently change the hardware. There are ways to either mark problem areas so that they do not create problems in the future. Or fix the damage with some special programs.
When bad sectors appear, there are two ways — use the system’s own program or a third-party program.
The simplest thing you can do is run a surface check on the discs. To do this, right-click on the failed logical partition, select «Properties», then the «Service» tab and «Run a scan», checking the box » Scan for and repair bad sectors». The system will scan the disk, find errors and either return the sectors to a working state, or mark them as bad so that the read heads bypass them and do not create “brakes” in work.
For more «advanced» users, we can recommend the HDD-Regenerator program. It works at the physical level and helps to cope with the problem where the regular disk check program is useless. The regenerator does deep work and in most cases returns sectors to normal. You will not lose data and significantly increase the life of the hard drive.
There are many other programs, even those that only real «hackers» or experienced users can understand. However, in most cases, those two products described above are sufficient. They are time-tested and have helped in many difficult cases.
What are bad sectors or bad blocks? ), microdamage to the surface, damage to the internal firmware of the hard disk (P and G sheets, defect sheets) and others. When bad blocks appear on the hard disk, the disk slows down or does not even open.
Access to data on such a disk is possible when connected to a specialized hardware and software complex (PC-3000 Data Extractor Express complexes are used in DATARC). This toolkit allows you to carefully (to prevent the appearance of new bad blocks) to read undamaged areas, and then performs multiple readings of problem areas. In some cases, it is required to recreate the defect lists of the disk or even replace the block of magnetic heads.
How bad blocks appear
Possible symptoms:
- no files or folders can be read;
- part of the data is not displayed;
- — does not open, requires formatting;
- the disk “slows down”, “freezes”, is detected in the BIOS for a long time or does not work at all.
As a rule, the user notices alarming symptoms when there are already a lot of bad blocks on the disk. It is possible to identify a problem at an early stage only with the help of diagnostic programs, for example, Victoria
but the average user does not use them.![]()
The condition of a disk with bad sectors worsens if you continue to work with it with standard software tools. The number of bad blocks will increase, and repeated unsuccessful read attempts made by such a disk, as a rule, lead to the failure of the magnetic head block.
To work with «bad» disks, which are considered physically faulty devices, our specialists use the latest hardware and software systems PC-3000Express + DataExtractor.
With their help, you can access the contents of the disk, which cannot be handled by standard software tools. Special tools allow you to subtract the contents of the entire disk space that is not damaged by bad sectors, and then proceed to improve the quality of recovery. To do this, multiple attempts to read data from bad blocks are made in a special mode, most of them are successful.
Thus, data on a disk with unreadable bad sectors can be restored either completely or with minimal loss.
What is the difficulty of working with bad blocks
When performing such work, the most valuable resource is the time for which the channel of expensive equipment will be occupied. Unreadable sectors on the disk is one of the problems that takes a lot of time to get a quality result.
We guarantee the shortest possible time for work, relying on the high level of professionalism of our specialists. This is achieved by choosing the methods and modes of data recovery that are optimal for each specific case. Continuous investments in the purchase of new equipment and an increase in laboratory throughput are aimed at the same.
Combined problems
The most common comorbid diagnosis for disks with unreadable sectors is logical structure corruption
. Partitions that cannot be opened, the absence of folders or files (the main symptoms of the problem) are a consequence of the fact that, having partially got into bad sectors, the file system was damaged. In such cases, with a sector-by-sector image obtained using the software and hardware complex
, there is still work to be done, as with a disk with logical destruction. That is, specialists produce further restoration with the help of special programs.
Logical file system damage caused by unreadable sectors or bad blocks should never be corrected by procedures like CheckDisk
or fsck
. They will only worsen the situation and complicate the further work of professionals
Specialists in the recovery of hard drives with unreadable sectors
How we work
Delivery
by courier free
Diagnostics
fast and free
recovery
on professional equipment
check
quality and completeness of the recovery
how much does the recovery of a hard disk 903 cost only if the result is successful 903?
| Problem description | Cost |
| Copying data from sound media (without data recovery work) | 2000 |
| Create a sector-by-sector copy of healthy media | 2000 |
| «Logic» (deleting, formatting, partition magic/acronis/ghost errors, reinstalling windows, files/folders missing, viruses, asking to format, partition missing, RAW file system, etc. |
from 3 000 rubles. |
| Unreadable sectors | from 6 000 rubles. |
| Controller failure | from 3 000 rubles. |
| Magnetic head block failure | from 12 000 rubles. |
| Magnetic head sticking | from 6 000 rubles. |
| Spindle wedge | from 15 000 rubles. |
| Firmware problems (service information) | from 3 000 rubles. |
| Pancake damage (scratches/cuts) | from 40 000 rubles. |
Recovery of bad HDD sectors is a task for specialists. First, the disk is tested for system errors. Depending on the reasons for their occurrence, hard disk sectors can be restored in two ways — if it is impossible to read the data due to a mismatch between the information in it and the amount at the end of the sector, and in case of physical damage to the sectors.
In the first case, you need to write new checksums. In the second case, you will need to enter a new physical address in the spare area, the logical address will remain the same. This option of recovering bad HDD sectors leads to a decrease in the speed of reading files, which is associated with the movement of magnetic heads to the reserve area. A similar fix is recommended when there are a small number of bad sectors that have to be redirected.
Restoring a damaged HDD is often a long and painstaking job that can bring back seemingly lost data to life.
In order to save time and obtain a positive result, it is recommended to restore HDD sectors of a hard disk only if you have special knowledge, skills and sufficient software and hardware tools.
FAQ — popular questions on bad sectors
Have questions?
Leave the phone and the manager will call you back
A hard drive is a tiny piece of disk space that fails during operation. Such a sector does not respond to read or write requests.
Bad sectors can occur on both traditional magnetic hard drives and modern SSDs. There are two types of bad sectors — some are the result of physical damage to the disk and cannot be repaired, others are the result of software errors and can be repaired.
Bad sector types
There are two types of bad sectors. They are often called «physical»
or «logical»
bad sectors.
Physical bad sectors are hard disk space that is physically damaged. The head of the hard drive may have come into contact with the moving plate and damaged it, or moisture or dust may have entered the drive and clogged it. In the case of SSD drives, bad sectors can occur as a result of wear or overheating of microcircuits, moisture. Bad sectors of this type cannot be fixed.
Logical bad sectors are hard drive space that is not working properly. The operating system, trying to read data from such a bad sector, receives an adjustment error code that does not match the contents of the sector. This means that something went wrong. Such sectors are marked as bad and Windows no longer uses them to store information. However, such sections can be restored by overwriting the disk with zeros (so-called low-level formatting). The built-in Windows disk check utility can also fix bad sectors.
Causes of physical bad sectors
Your hard drive may have bad sectors right from the factory, especially for cheap models made in China. Modern manufacturers of equipment are not perfect, so there is an error in everything. This is why SSDs are often shipped with multiple bad blocks. Such blocks are marked as bad and the data is moved to additional memory locations on the SSD.
Bad sectors occur naturally in solid state drives as a result of a large number of write attempts. The contents of such sectors are moved to additional SSD memory cells until the memory is exhausted. After that, with the appearance of new failures, the capacity of the drive begins to decrease.
In traditional magnetic hard drives, bad sectors often result from physical damage. Hard disks may have manufacturing errors, moving parts of the disk are subject to natural wear and tear, the disk can be dropped causing the head to scratch the magnetic plates, air with dust and moisture can get inside the disk and damage the disk.
Causes of software (logical) bad sectors
Logical bad sectors appear as a result of software errors. For example, if the power is turned off or the power cable is disconnected while writing to the computer’s hard disk, data writing to the sector is interrupted in the middle of the operation. In most cases, this results in data sectors that fail the data write check. Such sectors are marked as bad. Viruses and other malicious software can also cause system errors and bad sectors.
Data loss due to hard drive error
In reality, bad sectors lead to a frightening fact — even if your hard drive continues to work properly, your data can be seriously damaged, leading to the loss of important information. Whether it’s work documents or family photos, all the data stored on a computer is valuable to us. This is another reason why you should always back up your data. Only having multiple backups on different storage media can protect you from data loss due to bad sectors or other disk failures.
When the computer detects a bad sector, it ignores it in further work. The data that was in this sector will be moved, so the system will not read and write this sector. Modern hard drives support S.M.A.R.T. and keep a record of the number of moved sectors. The accounting variable is called “Reallocated Sectors”, its value can be viewed in the free utility CrystalDiskInfo. A situation is possible in which the contents of a bad sector cannot be read and moved. This will corrupt the file and you won’t be able to open it anymore.
A few bad sectors is not an indicator that the hard drive will soon fail. However, if the counter of bad sectors of the disk increases regularly and the computer warns about this with an S. M.A.R.T. you should replace your disk as soon as possible.
How to check and fix bad sectors
Windows has a built-in Check Disks utility (also known as chkdsk). The program checks your hard drives for bad sectors, flags physically damaged sectors as bad, and fixes logically bad sectors making them available for further use.
If Windows thinks there is a bad sector problem on the hard disk, the Chkdsk utility will be launched automatically at system startup. But you can also run this utility manually at any time.
Other operating systems, including Linux and OS X, also have their own built-in disk utilities for detecting bad sectors.
Bad sectors are the harsh reality of hard drives and don’t panic when you encounter them. However, you should always back up your important files in case of a spike in bad sectors. It should be remembered that the presence of a large number of bad sectors indicates the imminent failure of the hard drive.
I came across a recently broken external hard drive… Well, how did you get it? I bought it cheap.
Disk as disk: iron box, inside — USB2SATA controller and Samsung laptop disk for 1 TB. . According to the description of the seller, it turned out that it was the USB controller that was buggy. At first, they say, he writes and reads well, and then gradually starts to slow down and generally falls off. The phenomenon for external drives without additional power is quite common, so of course I believed him. Well, what is cheap.
So, I joyfully dismantle the box, take out a disk from there and stick it into the adapter, tested by time and adversity. The disk turned on, started up, was determined, and even mounted in Linux. The NTFS file system and about a dozen movies were found on the disk. No, not about erotic adventures, but quite the contrary: “Leviathans” are all sorts. It would seem — hurrah! But no, it was just the beginning.
Viewing SMART «a showed a disappointing picture: the Raw Read Error Rate attribute dropped to one (at a threshold of 51), which means only one thing: the disk has something very, very wrong with reading from platters. The rest of the attributes are true , were within reason, but that didn’t make it any easier.0016
An attempt to format the disk produced the expected result: a write error. It was possible, of course, to compile a list of bad sectors with the standard badblocks utility, and then slip this list when creating the file system. But I rejected this idea as impractical: too long would have to wait for the result. And, as it turned out later, a compiled list of sectors would be useless: sectors are read unstable in damaged areas, so what was read once, the next time, it may give a reading error.
Having played enough with all sorts of utilities, I found out the following details:
- There are a lot of bad sectors, but they are not randomly located throughout the disk, but in dense groups. Between these groups there are quite large areas where reading and writing go without any problems.
- An attempt to fix a bad sector by overwriting (so that the controller replaces it with a backup one) does not work.
Sometimes after that the sector is read, sometimes not. Moreover, sometimes an attempt to write to a bad sector leads to the fact that the disk “falls off” from the system for several seconds (apparently, the controller of the disk itself is reset). There are no resets when reading, but it takes half a second, or even more, to try to read a broken sector.
- «Broken areas» are pretty stable. So, the very first of them starts in the region of the 45th gigabyte from the beginning of the disk, and stretches quite far (how exactly, it was not possible to find out at a glance). Through trial and error, we also managed to find the beginning of the second such region somewhere in the middle of the disk.
The thought immediately arose: what if the disk is divided into two or three partitions in such a way that “broken fields” remain between them? Then the disk can be used to store something not very valuable (watch movies, for example). Naturally, for this you first need to find out the boundaries of «good» and «broken» areas.
No sooner said than done. A utility was written on the knee that reads from the disk until a bad sector is found. After that, the utility marked as faulty (on its plate, of course) an entire area of a given length. Further, the marked area was skipped (why check it — it was already marked as bad) and the utility read the sectors further. After a couple of experiments, it was decided to mark a bad area of 10 megabytes: this is already enough for the utility to work quickly, but also small enough for the loss of disk space to become too large.
The result of the work was recorded as a picture for clarity: white dots — good sectors, red — bad sectors, gray — bad area around bad sectors. After almost a day of work, a list of broken areas and a clear picture of their location were ready.
Here it is, this picture:
Interesting, isn’t it? There were much more damaged areas than I imagined, but the undamaged areas clearly make up more than half of the disk space. It seems to be a pity to lose so much space, but I don’t want to fence a dozen small partitions either.
But we are already in the 21st century, the time of new technologies and disk arrays! So, you can glue one disk array out of these small partitions, create a file system on it and not know grief.
Based on the map of broken areas, a mega-team was compiled to create partitions. I used GPT so I didn’t have to worry about which should be primary and which should be extended:
# parted -s -a none /dev/sdc unit s mkpart 1 20480 86466560 mkpart 2 102686720 134410240 mkpart 3 151347200 218193920 mkpart 4 235274240 285306880 mkpart 5 302489600 401612800 mkpart 6 418078720 449617920 mkpart 7 466206720 499712000 mkpart 8 516157440 548966400 mkpart 9 565186560 671539200 mkpart 10 687595520 824811520 mkpart 11 840089600
0320 mkpart 12 0320 976035840 mkpart 13 9
880 1078026240 mkpart 14 10
920 11
- 040 mkpart 15 1205288960 1353093120 mkpart 16 1366794240 1419
- 0 mkpart 17 1433600000 1485148160 mkpart60 1757368320 mkpart 21 1768263680 17
400 mkpart 22 1800
0 1862307840 mkpart 23 1872199680 1927
88 worked for a few minutes.
Partitions
# parted /dev/sdc print
Model: SAMSUNG HM100UI (scsi)
Disk /dev/sdc: 1000GB
Sector size (logical/physical): 512B/512B
Partition Table: gpt
Number Start End Size File system Name Flags
1 10.5MB 44.3GB 44.3GB 1
2 52.6GB 68.8GB 16.2GB 2
3 77.5GB 112GB 34.2GB 3
4 120GB 146GB 25.6GB 4
5 155GB 206GB 50.8GB 5
6 214GB 230GB 16.1GB 6
7 239GB 256GB 17.2GB 7
8 264GB 281GB 16.8GB 8
9 289GB 344GB 54.5GB 9
10 352GB 422GB 70.3GB 10
11 430GB 461GB 30.8GB 11
12 469GB 500GB 30.9GB 12
13 508GB 552GB 44.4GB 13
14 559GB 610GB 50.3GB 14
15 617GB 693GB 75.7GB 15
16 700GB 727GB 27.2GB 16
17 734GB 760GB 26.4GB 17
18 767GB 812GB 44.7GB 18
19 818GB 830GB 11.8GB 19
20 836GB 900GB 63.8GB 20
21 905GB 917GB 11.2GB 21
22 922GB 954GB 31.4GB 22
23 959GB 987GB 28.5GB 23
24 992GB 1000GB 8346MB 24
The next step is to mold them into a single disk. The perfectionist inside me suggested that it would be most correct to stir up some kind of fault-tolerant RAID6 array. The practitioner, however, objected that there would be nothing to replace the partition that fell into the astral anyway, so the usual JBOD will do — why waste space in vain? Practitioner won:
# mdadm —create /dev/md0 —chunk=16 —level=linear —raid-devices=24 /dev/sdc1 /dev/sdc2 /dev/sdc3 /dev/sdc4 /dev/sdc5 /dev /sdc6 /dev/sdc7 /dev/sdc8 /dev/sdc9 /dev/sdc10 /dev/sdc11 /dev/sdc12 /dev/sdc13 /dev/sdc14 /dev/sdc15 /dev/sdc16 /dev/sdc17 /dev/sdc18 /dev/sdc19 /dev/sdc20 /dev/sdc21 /dev/sdc22 /dev/sdc23 /dev/sdc24
Well, that’s all. It remains to create a file system and mount a revived disk:
# mkfs.ext2 -m 0 /dev/md0
# mount /dev/md0 /mnt/ext
The disk turned out to be quite capacious, 763 gigabytes (that is, we managed to use 83% of the disk capacity). In other words, only 17% of the original terabyte went to waste:
$df -h
Filesystem Size Used Avail Use% Mounted on
rootfs 9.2G 5.6G 3.2G 64% /
…
/dev/md0 763G 101G 662G 14% /mnt/ext
A test set of junk movies was uploaded to disk without errors. True, the write speed was small and floated from 6 to 25 megabytes per second. Reading was stable, at a speed of 25-30 Mb / s, that is, it was limited by an adapter connected to USB 2.0.
Of course, such a perversion cannot be used to store something important, but it can be useful as an entertainment. When the question is whether to disassemble the disk on the magnets or suffer first, my answer is: “of course, suffer!”.
The material was prepared jointly with Zapuskay.RF technical specialists — you can order inexpensive computer repairs from them.
Before dealing with the issue of diagnosis and treatment of faulty areas, let’s dwell on the features of the equipment design and the organization of the information storage system on it. The hard disk itself is a collection of rotating magnetic disks, above which the heads move to read information.
These heads perform the following function. They magnetize the corresponding sections of the hard drive, leaving information on them in the form of zeros and ones. Since the recording process is characterized by a strict order, the information is not entered randomly, but in certain places, which are called.
If the information is easily read by the program, then it is in order and functions in accordance with the norm and requirements for equipment. Otherwise, when the information resource is not available for perception, the sector is considered broken.
What are the reasons for the formation of such sectors? As a rule, such sections of the hard disk are formed as a result of an improper shutdown of the computer due to the fault of the user or an unexpected power outage. The reason also lies in the mechanical impact, for example, in the impact of a personal computer. Overheating and marriage is another way to get a broken sector.
The presence of such sectors can significantly complicate the operation of the computer, and directly affect the efficiency of the system, in the most severe cases, disable the hard drive.
Checking for bad sectors
How can bad sectors be detected on a PC hard drive? In practice, several methods are used. One of them is using the free Victoria program developed by Sergey Kazansky, a talented programmer from Belarus.
It is popular with many users and programmers, because it effectively copes with all the tasks assigned to it. In addition to DOS versions, Windows versions are also available for use. But for the most efficient work, we still recommend using the first option, on the example of which we will consider the features of diagnostics.
The range of functionality of the utility includes:
- the ability to generate and view a summary table for diagnosing the condition of a PC hard disk
- start scanning the surface and searching for defective, unreadable areas
- resuscitation of damaged areas
- full formatting of the hard disk at all levels
Attention! You perform all actions at your own peril and risk, information may be lost
stored on the hard disk during the recovery process.
This program has many features and algorithms of work, this article discusses only some of them. In addition, there are nuances depending on the manufacturer and model of the HDD.
We save the program to removable media (bootable flash card), and configure the BIOS so that the work with the program is as correct as possible. We enter the BIOS menu
and set SATA mode to IDE value.
The image shows that the menu is set to AHCI mode. With this setting, the program we use will not be able to diagnose the hard drive. Next, run the Victoria program from a bootable USB flash drive.
Select the IDE channel with which the hard drive of the personal computer works. The procedure is as follows:
- on the keyboard in the English layout, press the P key, a window appears with the menu
- select the desired channel and press «Enter»
We observe the following conditions:
- hard disk (HDD) is connected to the SATA port, menu item “Ext. PCI ATA/SATA»
- HDD features IDE connector, other option offered by software
Provided that the controller settings are correct, the diagnostic program will display a window with a list of channels. Directly from the keyboard, enter the number of the channel number (in the image it is number three), and press «Enter».
In order to check the correctness of the actions performed, we carry out the following series of manipulations. Press the function key F2. The screen presents service information, which contains data on the model, volume, number and other characteristics of the hard disk. If such information appears, it means that the program has connected to the disk, and everything is done correctly.
Next, we look at the SMART table, if the case is not severe, then such a table may well provide data on the presence of bad sectors without further scanning. Table view is available by pressing the function key F9.
The main points that interest us the most are called:
- Reallocated sector count
- Current pending sectors
The first item contains information about how many sectors are in the reserve recovery area. The second point characterizes the number of suspicious sectors, more often than others, sectors that could not be decrypted when reading the hard disk fall here.
As the image in the figure shows, the number of recovered sectors is 767 units, and the number of problem sectors is 5 units. The information is disappointing, since the volume of problematic components is significant, and such a hard drive will completely fail in the near future. While all the information can still be saved, it is urgent to make a backup copy and replace the hard drive. Exit to the main menu of the program is carried out by pressing any key on the keyboard.
Methods for recovering bad sectors
So, the diagnostics is over, and the utility has presented a report on the status of the hard disk of a personal computer. How to repair bad sectors of a hard drive? For the most part, this is pretty easy to do. An easy option is to activate scanning in automatic recovery mode.
Let’s analyze the essence of the work. The defective areas themselves are divided into two types. The first one is when the recorded information is not readable, because there is a discrepancy between the volume of the information field and the total amount of control at the end. As a rule, this happens due to the sudden cessation of the PC.
Such sectors in most cases are not defective, just the process of recording information was stopped suddenly, so the final control element is old and not relevant to the current moment. Restoring such a disk is simple — format it. As a result, you can use it without fear for the quality of work.
The second case, when the sector has mechanical damage in the form of a scratch or demagnetization. The cause of such damage is usually overheating, less often a blow. Correcting such a sector is much more difficult, but nevertheless possible. This is done at the expense of the potential of the sector, which is arranged in such a way that the information stored on it occupies only a part of the volume, while the real potential is much greater. The hard disk uses a redirection system, and can quickly overwrite information from areas inaccessible to read.
Logically, the process looks like this, the recorded information is physically located in a different place, and the path to it remains the same. Naturally, this method somewhat slows down the reading process, but if the number of such sectors is insignificant, then working in this mode is quite acceptable.
Let’s turn to the Victoria utility presented here, and its capabilities for resuscitation of broken disks. Function key F4 call the context menu, and select the item «BB: Erase 256 sect». Press «Enter» and activate the scan of the hard drive.
The process takes a long time, from half an hour to a couple of hours, so it’s best to be patient. As soon as a bad sector is detected, the utility will immediately try to format it. Provided that the sector does not have mechanical damage, the procedure will be easy, and the sector will be suitable for subsequent use.
If the program finds a seriously damaged sector, an error message will appear on the screen.
It is recommended not to stop the process of scanning the hard disk, and even if there are many errors, to finish it. Since there is no guarantee that sectors of the first type will not appear, it is not rational to transfer all information from the defective part to the backup area.
Of course, all these manipulations can be quite difficult for an inexperienced computer user, in which case you can use the alternative option and contact the http://start.rf/information/territory/yasenevo/ service, where professionals will repair your HDD.
Other readers can read the instructions for transferring unreadable hard disk sectors to the backup area.
Use the F4 function key to call the context menu of the utility, and select the line with the name «BB: Classic REMAP». Press «Enter».
The process of scanning the hard disk surface will start again, but this time formatting will not occur, each sector that cannot be read and identified will be transferred by the utility to the backup area. It is important to take into account the condition of the hard drive and its degree of wear. In critical cases, the backup area may be insufficient, and then the program will not be able to perform the operation. But as the figure below shows, everything went perfectly.
The utility has completed its work. All areas of the hard drive have been scanned. Defective sectors of the first and second types are found and put in order. After the whole complex of procedures, the hard disk should meet a satisfactory condition.
To properly shut down the hard drive, you need to additionally diagnose the file system. You can implement the task using special software products. An excellent option is the program « CHKDSK
«, more details can be found.
The process of checking the hard disk for bad sectors is a search for erroneous records and bad sectors located on the drive.
Some of these problems can cause loss of information — in most cases, beyond recovery.
Therefore, every user should be aware of their appearance — both in order to try to fix errors on the disk, and to back up important information to another location.
The principle of the formation of bad sectors
The owner of almost every HDD has to deal with problem sectors over time.
The principle of their appearance is as follows:
- During the production of disks, sectors are created, with the help of which magnetization can be used to write information to the drive.
- Reading and writing information on (especially if the disk is hit or dropped), and sometimes also the influence of computer viruses, lead to a gradual deterioration of its structure.
- Bad sectors begin to appear on the surface of magnetic disks — areas in which information is stored incorrectly or is not recorded at all.
It is possible to fix bad sectors, but the system does not automatically perform such actions — the user will have to manually start the check and fix.
If there are few bad sectors, they are replaced by spare areas.
When bad HDD blocks appear, their addresses are reassigned to sectors from the reserve, and no data loss occurs.
Signs of a problem
Among the main signs that problem sectors have appeared on the disk and their recovery is required, the following are worth noting:
- Computer freezes while loading operating system;
- failure to start the OS — in most cases, the download only reaches a certain point (for example, the Windows logo or the inscription «Welcome») and stops;
- Unreasonable and frequent restarts of the computer;
- errors in the system, expressed in the inability to launch applications, closing windows and slowing down the response to user actions.
The list of utilities that can be used to solve the problem is quite large.
They are divided into two main groups
— those that are already built into the operating system (for example, in Windows), and applications from other manufacturers.
The latter can also be conditionally divided into paid programs and free versions that are more popular among domestic users.
Using Windows tools
To fix errors and bad sectors, Windows already contains .
The advantages of its use include the possibility of restoring areas damaged during operation or as a result of system infection with viruses.
Another plus
— the ability to start in two ways, in normal mode or.
The utility is able to check any physical and logical drives, however, there are slight differences in working with inactive and system areas.
So, the steps for checking and restoring a normal partition (which does not contain system control files and the OS itself) will be as follows:
1
Going to window «My Computer»
.
2
Right-click opens the properties of the selected disk
.
3
Tab «Service» is selected
.
4
Check disk button is pressed
.
5
a check mark is placed in front of the item for checking bad sectors
.
System volumes on which Windows is installed are checked differently.
The start of the utility launch is the same as for a regular partition, but when you try to check the disk, an inscription about the impossibility and a suggestion to do it after reboot will appear on the screen.
After the reboot, the system does not boot — instead, the HDD system partition is checked, the progress of which can be found from the information displayed on the screen.
And you can run Hitachi Drive Fitness Test not only from Windows, but also in mode if problems with the drive have already led to the inability to boot the system.
Seagate Seatools
Seatools is a free application that includes:
- detection of HDD structure violations, including bad sectors and write or read errors;
- fixing bad sectors or overwriting them with zeros so that the system ignores damaged areas in the future;
- Windows OS problems;
- damage to the system bootloader;
The application works best with Seagate drives.
The average time to fix detected errors (together with the verification process), depending on the size of the partition, can be up to 4 hours.
The advantages of the program include its free distribution and the provision of a detailed report.
HDD Health
Free HDD Health program features while checking bad sectors for the following information:
- HDD manufacturer and firmware;
- current storage temperature;
- general state of the device structure, including intact and bad sectors;
- a number of other useful attributes.
The utility is distributed free of charge by Panterasoft.
At the same time, the evaluation of the disk condition is carried out only by S.M.A.R.T-indicators and is less effective than the disk check by other applications.
Recovering bad sectors will help extend the life of your hard drive and even recover some previously lost files. However, you should remember that this is a responsible and rather risky business, since by clicking on the wrong buttons, you can completely ruin your hard drive. Follow strictly the instructions provided in this article and you will be able to recover some bad sectors. Before starting work, select the software with which you will restore sectors. There are many convenient programs for you to choose from: Victoria, HDAT2, HDDregenerator.
How to repair bad sectors of a hard disk using HDAT2
Working with this utility requires a boot disk or a bootable flash drive. How you can write them down, you will learn in another article. You must have Daemon Tools or Ultra ISO installed on your computer.
- Download the HDAT2 program from the official website https://hdat2.com.
- You need a «CD/DVD Boot ISO» partition.
- Download the latest version, which comes in ISO format, not SFX.
- Find your file in the downloads folder and open it with Daemon Tools or other image mounting software.
- Take a blank disc and click on the «Burn image to disc» field.
Please note that all your further work with this utility will take place entirely in BIOS. Read the fields you click on carefully.
- First, turn off the computer and enter the BIOS. Each brand of computer has its own login buttons. Try holding F12 or F7, or better yet, read about it on the Internet.
- After entering the BIOS, select the system boot method — CD / DVD, and then enter the HDAT2 command, as in the screenshot below.
- After that, you will see a menu with hard drives that are connected to your computer. If he is alone, then you should not have any problems with the choice. Click on your hard drive and press Enter.
- In the window that appears, select the line “Hidden areas menu”.
- Now test your computer for bad sectors. Even if you know their exact number, you still have to run the test, as the program needs it to further fix the problem.
Press “Powerful test READ/WRITE/READ/COMPARE”
- That’s it. Click on the very first line, as shown in the screenshot, to repair your sectors. Keep in mind that this will take quite some time, so you can move your laptop aside and go about your business. As soon as the program finishes working with Bad sectors, do not forget to return the system boot not from CD, but from the hard disk.
How to recover bad sectors of a hard disk using HDD Regenerator
Getting started with this utility, you can read a lengthy article about its work in order to roughly imagine the structure of the program: . The advantage of the utility is that you do not have to create a bootable USB flash drive or disk and go from under the BIOS. Experienced users note that this program actually fixes the problem by degaussing, and not just disabling bad sectors.
Download the program on the Internet, please note that only its first use is free. If you want to treat broken sectors again, then you will have to buy the software.
Installing the program takes a few seconds.
Look closely at the window interface:
- The left button “Bootable USB Flash” will help you create a bootable USB flash drive to work with the program in BIOS.
- The right «Bootable CD/DVD» creates a bootable disk for the same purpose.
- The top line allows you to work from under the Windows axis, which saves a lot of time.
Click on the top line.
Select your hard drive. The model, the amount of memory and all sectors will be written on it. Just double click on it.
Please note that all windows must be closed and all processes stopped. Only then can you start working with sectors — the hard disk must be unloaded as much as possible.
Select the second item in the menu that appears — “Normal Scan (with / without repair)”. This option repairs bad sectors right in the process of scanning all sectors of the hard disk. Please note that the mouse does not work in this program. You need to enter the number 2 and then press Enter.
Now you need the “Scan and repair” item to confirm your intention to repair all sectors. Enter the number 1.
You can also enter the number 3 to activate the item “Regenerate all sectors”. This option carries out the prevention of absolutely all sectors, even if they are not broken. This is more suitable for experienced users who can independently deal with possible problems during the regeneration process.
Now you have to select the start of the scan:
- Item number 1 “Start sector 0” starts the scan and treatment from the very beginning.
- The second option “Start sector ***” continues the previous scan if it was interrupted for one reason or another.
- And the third item “Set start /end sectors manually” allows you to enter the range of scanning sectors manually.
It is better to start from the very beginning by selecting the first item.
The process will start instantly, you just have to wait.
A hard drive is a fragile device. Bad sectors are damaged cells for storing information on a hard drive. After some time of using the hard disk, a problem with bad sectors may occur. Therefore, it is so important to deal with the restoration of bad sectors from time to time.
This is easily done with various programs, but first you need to determine if there are bad sectors. About this, as well as how to restore the boot sector of a hard drive, our article.
How to repair bad disk sectors
There are many ways to repair bad disk boot sectors. Let’s look at some of these methods in detail.
How to restore sectors through Windows
If you can enter the OS, then restoring the hard drive will not require much effort. To do this, call the context menu of the hard disk and select the «Properties» item.
In the new window that opens, select the «Service» tab, where we click on the «Perform check» item. Check the boxes next to «Automatically fix system errors» and «Check for and repair bad sectors.» After that we start the check.
If the drive is a system drive, then a reboot will occur and the verification process will begin. If the drive is not a system drive, then the check will pass without rebooting.
The system itself will find all the errors and restore them. Then it will display the statistics of the work done.
But sometimes it happens that the OS does not boot due to bad sectors.
How to recover bad sectors if the OS does not start
If Windows does not start, you can take a disk with a virtual system and load a virtual OS. In it, all actions for restoring a hard disk are performed in the same way as in the previous section.
If you do not have a virtual disk with an OS, then the Windows installation disk will help. After downloading it, you must select «System Restore». The recovery console will appear, where you need to select the local disk with your OS. This is usually the «C:» drive.
After the reboot, a console will appear where you need to enter the command «CHKDSK [drive:]», where:
- /F is a disk check and error correction,
- /R is a search and recovery of bad sectors.
After that, press «Enter», wait for the recovery to begin. Then exit the console and restart the computer. All is ready.
How to repair sectors using programs
To repair bad sectors on your hard drive, there are many programs that can be easily downloaded from the Internet. Consider their principle of operation on the example of the HDD Regenerator program.
The program restores bad sectors by remagnetizing them again. This is achieved by creating a virtual flash drive.
After installation, run the program. In the window that opens, several options will appear in Russian. You can recover bad sectors both in the Operating System itself and using a flash drive or a regular disk from the console.
The program will check bad sectors (broken) and restore them. For the most efficient use of the program, it is better to use a bootable USB flash drive or disk that is created after installing the program.
Overwriting bad sectors on a hard disk
Contents
- 1 Eliminating bad sectors in Windows XP and Windows 7
- 2 Eliminating bad sectors in Windows 8 and Windows 10
- 3 Determining the location and volume of bad sectors using the Victoria program .
- 4 Trimming HDD with AOMEI Partition Assistant
- 5 Using the Remap function in Victoria
- 5.1 Video — Trimming a hard disk from bad sectors REMAP, Cure HDD bad sectors
- 6 Checking HDD for bad sectors
- 6.1 Video — How to remove bad sectors on a hard disk
- 0059
- 8 Is it possible to recover hard disk bad blocks?
- 9 Victoria HDD
- 10 HDD Regenerator
- 11 Disk Revival
- 12 DiskGenius
copying data — all this may indicate the presence of bad sectors on the disk that need to be eliminated.
Special, logically marked areas, or rings, called tracks, are magnetically created around the HDD, divided into clusters and sectors. Information on the disk is written in sectors of size 512 or 4096 bytes, but is actually stored in clusters ranging in size from 1 to 128 sectors.
A broken (damaged, bad, bad) sector on the HDD is a place that has lost its ability to be written or read, and the operating system (OS) cannot find data in it, and also write information to it.
Bad sectors occur either due to physical damage to the disk surface, or due to software errors and are corrected using system utilities, in particular, «Chkdsk».
These utilities restore logical sectors by matching them to an index in an MFT (Master File Table) file, and mark the physical sectors so that they are not used by the system.
Eliminating bad sectors in Windows XP and Windows 7
Before using the chkdsk utility, you must close all running programs, because the utility will not be able to repair bad sectors when they are used by the system.
Step 1. To do this, press «Win» on the keyboard, and while holding it, «R» (Win is between Ctrl and Alt on the left), and in the Run window that starts, type «taskmgr» by pressing «OK» .
Step 2. In the «Windows Task Manager» that opens, go to the «Applications» tab and close all applications running in the operating system one by one, selecting them with the mouse button and clicking «End task».
Step 3. Next, open Windows Explorer with the Win + E keys, right-click on the icon of the HDD to be checked, and left-click «Properties».
Step 4. In the window that appears, click on the «Service» tab and in the «Error-Checking» segment, click the «Check Now» button.
Step 5. The Check Disk dialog box will appear. If you need to check and fix only bad sectors, uncheck the «Automatically fix file system errors» checkbox (top item).
Step 6. Click the «Start» button to begin the process of checking and fixing bad sectors.
Step 7. If the HDD being checked is a boot disk for the OS, Chkdsk will prompt you to perform the selected procedures the next time you start it. Click «Yes» as an answer.
The next time the system boots, a blue window will appear with a countdown (timer). At this time, no buttons need to be pressed. As soon as the countdown reaches zero, the disk check will begin. After it is completed, the computer will restart on its own.
When chkdsk does a job to repair bad sectors on the hard drive, it will generate a report about it. The code «0» means that no errors were found during the disk scan, and the code «1» means that errors were found and they were fixed.
Important! If the drive check process fails, there is a problem with the drive and it is important to back up your data to protect your data.
In Windows XP and Windows 7, there is a utility built into the operating system called NTBackup for this purpose.
Troubleshooting bad sectors in Windows 8 and Windows 10
Step 1. Open Windows Explorer with Win+E, right-click on the icon of the required HDD, and click Properties.
Step 2. Go to the «Tools» tab and click «Verify» (this step may require you to enter administrator account information).
Step 3. The bug checker will tell you if the hard drive has bad sectors or not. If no errors are found, the application will still allow you to run a search for errors on the disk. Click «Check drive» (Scan drive).
Step 4. You will be able to use the disc during the test. If errors are found, they can be corrected. At the end of the disk check, the system will issue a report on the results. Click «Close».
Help! Although Windows 8 and 10 allow you to use OS applications while the utility is running, this is not recommended to avoid interrupting the scan process.
![]()
If the HDD has physical deterioration of its sections, there are «unstable» sectors, etc., the OS may «freeze» when the above utilities are running. Forced interruption of their work can damage the system files of the OS.
Important! Corruption of OS system files requires loading the Last Known Good OS Configuration (using the F8 button) or restoring Windows from the installation disk.
Despite the fact that physical bad sectors are not recoverable, except for marking with chkdsk, they can be reassigned (in English remap) or cut off.
Determining the location and volume of bad sectors using the Victoria program.
Step 1. Install and run the Victoria program under an administrator account. Select the Standard tab in the window. If there are several HDDs in the system, in the right part of the window, select the required one with the mouse.
Step 2. To locate bad sectors on the HDD, go to the Tests tab and click Start.
The example shows that from block No771093375 there are:
- «candidates» for bad sectors with a read delay of 600 ms, there are 190 of them in the example;
- bad sectors (Err) in the example 8 pcs. Just below the counter shows the figure 376507 MB (376 GB).
You can also see that from the point of 376 GB you can cut off the entire HDD space to its end, cutting off the bad sectors grouped here in one place.
Help! In the example shown, the start of the hard disk scan (Start LBA) is set manually from block No750000000. When conducting a test scan of «your» HDD, this value does not need to be set.
The HDD shown in the example has an exact capacity of 465 GB, and the cut volume calculation will look like this: 465-376=89 GB. In this case, it is better to cut off the volume of the disk with a margin — for example, 100 GB, for the possible appearance of additional bad sectors in this area.
Trimming HDD using AOMEI Partition Assistant
To increase the speed of trimming bad sectors on the HDD to «acceptable», it is desirable that it does not contain partitions at this time. Important data from the disk before starting the procedure must, if possible, be copied.
Step 1. Install and run the program. In the main window, select the desired HDD and click «Delete Partition».
Step 2. Select the Quick Delete Partition option and click OK.
Step 3. Click Apply.
Step 4. In the next window, click «Go» (you may need to restart the OS). The partition deletion process will begin.
Step 5. An unallocated area (Unallocated) will appear instead of the disk. Select it and click «Create Partition».
Step 6. In the window that appears, click the «Advanced» button.
Step 7. In «How to create» select «Primary Partition». When creating a disk, move the slider with the mouse by a certain amount, leaving an unallocated area where bad sectors will be located.
Help! The program has left and right sliders (delimiters). The delimiter that is required in a particular case of trimming a hard disk is used. In the presented example, the right slider is shifted to the left by 100 GB.
Step 8. Click Apply.
Step 9. Click Go.
Step 10. Click Yes.
The HDD partition creation process will start.
As a result, a partition will be created on the HDD, at the end of which there is unallocated space (Unallocated area) with bad sectors.
Using the Remap function in the Victoria program
If the bad sectors marked in the program are not grouped nearby, but distributed throughout the HDD, the remap function present in Victoria can help.
The remap function repeatedly writes to the problem sector, and if these attempts fail, the sector is replaced by assigning its address to a healthy sector taken from a special place on the HDD.
-
In the running Victoria program, in the “Tests” tab, check the “Remap” and “read” items (reading), and click the “Start” button.
Help! In this technical scenario, you need to create a bootable USB drive (flash drive) containing the Victoria program, and after booting from the USB drive via DOS, get rid of bad sectors on the HDD.
Watch the video below to see how these steps can be done in practice.
Video — Trimming a hard disk from bad sectors REMAP, Treatment of HDD bad sectors
Checking the HDD for bad sectors
After treating bad sectors, you can find out if there are still damaged sectors on the disk. To do this, you need to manually run the «Chkdsk» check.
Press “Win + R” on the keyboard, and in the “Run” window that opens, type: chkdskH: / F / R, and “OK”.
Help! Instead of «H», type the letter of the hard disk partition to be checked. The /F flag runs file system error fixes, and the /R flag scans for bad sectors.
If no bad sectors are found, when chkdsk is finished, it will display information about 0 KB in bad sectors in a special window.
Physical damage to the HDD is often caused by manufacturing problems, overheating, scratches due to shock, dust, etc. Software (logical) bad sectors are caused by software conflicts, viruses, sudden termination of a program or OS, including due to power problems.
Eliminating situations that can cause damage to HDD sectors will allow you to preserve the integrity of important data and avoid buying a new HDD if its physical resource is exhausted.
Video — How to remove bad sectors on your hard drive
Like this article?
Save so you don’t lose!
-
- Author: admin
- Date: 17-10-2015
How to use the Victoria program to perform a sector-by-sector erasure of information from a hard disk and thereby get rid of bad sectors (bad blocks)
- Note: for those who are interested, a more detailed article on bad sectors (bad blocks) is here.
I go to the tab Tests and check the items Ignor and read , press Start . Runs a simple hard disk surface test without error correction. This test is not dangerous for the information on the hard drive. I’m interested to know what condition the hard drive is in after ten years of operation. The most important thing is not to run any programs during the test, otherwise errors may occur, in general it is ideal to test the HDD in DOS mode using the bootable flash drive of the Victoria program, but we will do this a little later.
After 30 minutes we get the test result:
In our case, there are no bad blocks, but there are sectors with a long delay of more than 600 ms, look at the screenshot, everything is shown by arrows.
500 blocks of sectors with a delay of more than 50 ms.
31 blocks of sectors with a delay of more than 200 ms.
7 blocks of sectors with a delay of more than 600 ms (blocks of sectors with such a delay are dangerous and are most likely candidates for bad blocks).
There is a small chance that due to these seven sectors, the computer freezes.
I propose to use the algorithm Write (Record, erase) in the jargon of repairmen — «Write across the clearing» for the hard drive in the Victoria program. There will be a sector-by-sector erasure of information from the disk in blocks of 256 sectors and subsequent forced writing to sectors of zeros. This is how you can get rid of logical bad blocks and, in some cases, physical bad blocks (remap will occur).
Logical «bads» after such a forced write will simply lose incorrect information in their sectors, it will be overwritten with zeros.
Physical «bads» may disappear because Victoria will show them too clearly to the built-in firmware of the hard drive and she will simply reassign the bad blocks with spare sectors from spare tracks!
On the Tests tab, check the Write item. Be careful, all information will be deleted from your hard drive! So make sure you choose the right disk to test. You can check the item DDD Enable (enhanced erase).
Will be lost
The process of sector-by-sector erasing information from the hard disk begins
If we start Disk Management at the moment, we will see that all partitions on the tested hard disk are deleted along with the data.
After erasing, we again perform a simple hard disk surface test.
On the tab Tests check the items Ignor and read , click Start . Runs a simple hard disk surface test without error correction.
After 30 minutes I get the result, all sectors with long delays are fixed.
Our veteran is back in service.
Now the WDC WD1200JS-00MHB0 hard drive is working again and so far without freezes.
Note: you can erase all information from a hard drive sector-by-sector not only with Victoria, but also with Acronis Drive Cleanser and AOMEI Partition Assistant Standard Edition.
How to perform sector-by-sector erasing of information from the hard disk in DOS (DOS) mode
Friends, in some cases you will not be able to perform sector-by-sector erasing of information from the HDD in a running operating system, then you need to do this operation in DOS (DOS) mode.
You will need to create a bootable flash drive with the Victoria program. Enter BIOS and switch hard drives from AHCI to >Victoria, then all work will take place in «DOS» mode. Read about it in our detailed article: — How to create a bootable flash drive with the Victoria program and how to get rid of bad sectors (bad blocks) in DOS (DOS) mode.
BAD blocks — logically or physically bad sectors of hard drives, reading or writing information to which is impossible or difficult. There are bad blocks for various reasons — due to careless transportation of the hard drive, power failures to the device, internal errors in the control board / program, natural wear of the disk surface, etc.
See NoDevice.com for more details on this issue.
Is it possible to recover hard disk bad blocks?
In some cases, BAD blocks can be restored with specialized utilities. If the sectors are physically damaged, then it is impossible to restore them programmatically. In this case, the sector address reassignment method is applied. Each hard drive has a dedicated area for such events. As long as this area remains free, it can be used in place of bad sectors.
Thus, in order to restore bad blocks, one of two conditions must be met — either the fault is logical in nature, or there is service space on the disk for reassigning the bad block. But it should be borne in mind that it is not always possible to «cure» bad blocks, because much depends on the design features of the hard drive, the functionality of its firmware and many other factors.
Let’s consider the most common utilities that allow you to restore bad sectors of hard drives with some probability.
Victoria HDD
Probably the whole world knows this utility from the Belarusian programmer Sergei Kazansky. Victoria HDD is a very powerful tool for diagnosing and repairing hard drives. One of the key functions of the utility is sector-by-sector scanning of the entire disk surface in order to detect bad sectors.
As options for such a scan, Victoria HDD provides the ability to restore (Refresh), completely erase (Erase) or redistribute (Remap) a bad sector. The first option helps to eliminate logical errors, the second and third — physical and non-removable (without destroying information) software malfunctions.
Using the program is quite simple:
- Go to the “Tests” tab.
- In the block of options for actions upon detection of errors (lower right part of the window), switch the switch to “Refresh”, “Erase” or “Remap” (it is recommended to use the first option first, then the second option).
- Press the «Scan» button.
- Wait for the end of the scan procedure, which may take several hours depending on the size of the disk.
Among the advantages and features of the Victoria HDD program, we highlight:
- The program is free.
- High performance with any hard drive models from any manufacturer.
- The presence of a large number of additional options and settings for scanning.
- The built-in HEX editor allows you to edit the hex data of any empty or full area of the hard disk.
- Ability to read passport information and SMART attributes of a hard drive.
- USB storage support and more.
- The Victoria HDD program is designed for advanced users, so its management can be difficult.
- There is no Russian language support in the official version.
HDD Regenerator
HDD Regenerator is a rather highly specialized utility that solves one single task — detecting and fixing bad blocks.
Using the program is relatively simple:
- Immediately after starting, from the drop-down menu «Regeneration» select «Start Process under Windows».
- In the «Choose Drive to Process» block, select the drive to be scanned, then click «Start Process»
- A console opens with options to start the restore function.
- Enter «2» from the keyboard, press the enter key.
- Enter «1», press the enter key.
- Enter «1» again and then «Enter».
- Wait until the end of the procedure.
The above instruction starts scanning the hard disk surface with the option to recover bad blocks, starting from the very first sector. Other modes of operation are also available.
- Relatively easy to use.
- Ability to create a bootable flash drive/disk with a bootable version of HDD Regenerator on board directly from the program.
- View SMART attributes of hard drives.
Disadvantages of the HDD Regenerator program:
- The program is paid. The free version allows you to restore only 1 damaged block. There are no such restrictions for the boot version of HDD Regenerator.
- The hard drive must be completely free of any tasks to run a scan. For example, if you open any file on the hard drive, the program will not work. Those. scanning the hard drive where the Windows system is stored is basically impossible.
- No Russian language support.
Disk Revival
The Disk Revival program is positioned by the author as a tool for blocking «almost» bad and/or slow hard disk sectors. That is, in fact, the utility does not restore bad blocks, but «preserves» them. We note right away that the utility cannot cope with physical malfunctions of sectors, which is why the expression «almost broken» blocks was used above. However, such sectors are often marked (by the same Victoria, for example) as broken. And it is with such — «not quite» broken — blocks that Disk Revival works.
In general, the process of fixing slow sectors by the program can be considered a hard disk recovery, because. the faulty sections available on it will no longer be used, which means that all the problems associated with the presence of such blocks will disappear.
Using the Disk Revival program is quite simple:
- In the «Disks» menu, select the scanned disk partition.
- Press the «Start» button.
- We are waiting for the end of the procedure.
The Disk Revival utility will detect all slow sectors on the disk and fill them with random data. In other words, bad blocks are locked at the file system level.
Advantages of the Disk Revival program:
- Easy to use, Russian-language interface with built-in instructions and explanations for using the program.
- The ability to speed up the hard drive by blocking slow sectors.
- According to the developer, Disk Revival can handle situations that even Victoria often can’t handle.
Cons of Disk Revival:
- The program is paid. The free version only allows you to process 10 GB of disk space.
- No sector reallocation function.
- When formatting or defragmenting a disk partition, the result of the work is reset, i.e. slow sectors again become available for processing. To work around this situation, the program should be run again after formatting/defragmenting.
Disk Genius
DiskGenius is a multifunctional program for working with information drives and data stored on them. The application also implements the function of checking the disk surface for the presence of poorly readable and bad blocks.
- After starting the program, a list with media connected to the PC will be displayed in the left part of the window.
- To launch the scanning module, right-click on the selected disk, and then select «Verify Of Repair Bad Sectors».
- In the newly opened window, click on the «Repair» button.
- Wait until the end of the process.
Fixing bad block problems is done by DiskGenius in much the same way as Disk Revival does.
Positive qualities of DiskGenius:
- Fairly simple operation even for inexperienced users — you don’t have to make any settings.
- Availability of many functions for recovering data from disks and lost partitions.
- Support for multiple file systems.
- Ability to create a bootable USB flash drive/disk with DiskGenius.
The disadvantages of DiskGenius include:
- The program is paid. However, the bad sector repair feature works without restrictions in the free version of DiskGenius.
- Does not support sector remapping technology.
- There is no Russian language.
All the programs discussed above are designed to work in the Windows environment (except for the bootable versions of Victoria and DiskGenius). The MHDD utility does not work from the operating system (the Windows version, although it exists, usually has all sorts of problems with its launch). The program was originally created and is currently being developed as a bootable software for testing, diagnosing and repairing hard drives.
The most difficult for beginners is the process of starting MHDD, which always starts with creating a bootable flash drive or disk. Here we will not consider this process, but we will provide links for downloading the necessary files:
Next, it remains to boot the computer from the newly created flash drive and follow a few simple steps to restore the bad blocks of the hard drive:
- Press F2 to build the list of hard drives by the program.
- Enter the number corresponding to the hard drive number in the list, press Enter.
- In a small window, move with the arrows on the keyboard to the “Remap” item, set it to “ON”, then to the “Erase Delays” item, also set it to “ON”. The first option enables the mode of reassignment of unrecoverable bad blocks, the second option helps to restore programmatically bad sectors by completely overwriting them.
- Press Enter and wait for the procedure to complete.
It is difficult to judge the pros and cons of MHDD, because the program in one case perfectly copes with its task, in others it does not even detect the hard drive. A lot depends on the hard drive model and motherboard configuration.
The fact that all sorts of system drivers and other intermediary software are not used in the process of working with hard drives (i.e., work with the drive occurs almost directly), makes MHDD a very fast and error-free tool, which cannot be said about any utilities launched from — under Windows.
Have questions, suggestions or comments? Contact us and ask a question.
What to do with bad sectors on hdd
Contents
- 1 What is a bad sector?
- 2 Types of HDD damage
- 3 Symptoms of HDD damage
- 4 Causes of bad sectors
- 5 Recovering data from a damaged HDD using Starus Partition Recovery
- 6 Windows HDD scan and repair
- 6.1 Explorer0059
- 6.2 HDD Regenerator
- 6.3 Seagate Seatools
- 6.4 HDD Health
- 6.5 HDDSCAN
- 7 Similar articles about 10, 8, 8
- 7.0.1 How to combine it
- 7.0.2 How to fix INACCESSIBLE_BOOT_DEVICE error in Windows 10
- 7.0.3 Infinite loading of external hard drive
- 13.1 Video — Trimming a hard disk from bad sectors REMAP, HDD bad sectors treatment
In this article, we will look at the detailed repair process of HDD and share with you information on how you can recover data even in the face of a heavily damaged disk. However, first we recommend that you familiarize yourself with some technical information that will allow you to understand the essence of the problem.
It is hard to overestimate the role of information in the modern world. Not only the level of our knowledge depends on it, but also, often, a professional career — something that is always given with great difficulty. Any damage to the physical disks of the computer can lead to the most unpleasant consequences, including the collapse of the device and the complete loss of personal data. What to do if bad sectors are found on the disk and there is a risk of its death?
Contents of the article:
What is a bad sector?
A bad sector is a specific hard disk space that cannot be used due to its physical damage or lack of access to it. This problem manifests itself primarily in the slow operation of the HDD, the inability of the system to fully boot, and the failure of WIndows to request to format the device. The occurrence of these phenomena can confidently indicate the presence of bad sectors on the disk.
Types of HDD damage
There are only two types of hard disk bad sectors: physical and logical. Let’s look at them in more detail.
A physically bad sector is a hard disk cluster that has been physically damaged. If the HDD head touches a rotating plate during operation, it is guaranteed to be damaged. It is impossible to repair such a sector.
A bad sector is a cluster that has stopped working properly. When the operating system tries to read data from it or write new ones, it encounters an error and loses any ability to interact with the sector. Such sectors can be easily restored.
Signs of damage to the HDD
The hard drive is perhaps one of the most fragile components of a computer. If you do not properly monitor its condition, sooner or later the moment of its failure and complete loss of data may come. Just like any other device, the HDD has its own unique symptoms that indicate errors that have occurred. Let’s look at some of the signs that indicate obvious hard drive sector corruption.
- Significant increase in processing time. The PC slows down its work or even “freezes”.
- The hard disk becomes RAW. When you try to connect to it, messages about the device being unavailable appear on the screen.
- HDD makes unnatural sounds for it.
- While formatting a disk, the operating system displays an error message «Windows could not complete the format».
- The operating system cannot be loaded. Any attempt to launch ends with a blue screen of death.
- The error «Windows has detected a problem with the hard drive» intermittently appears on the screen, prompting you to back up your data.
Causes of Bad Sectors
Hard disk clusters can easily become corrupted for a number of reasons. They can significantly complicate the work with a PC or even lead to the death of a hard drive. To prevent this problem, we recommend that you familiarize yourself with some common causes of its occurrence.
- Hard disk obsolescence.
Like any other device, a hard drive has its own strictly allotted service life and after its expiration the probability of various kinds of errors increases significantly. - Incorrect computer shutdown.
Due to the high rotational speed of the hard drive components, a sudden reboot or power off may cause the HDD head to touch the platter and cause physical damage. - Shaking and hitting the hard drive.
Although HDD manufacturers try hard to make their devices more rugged, careless handling can easily lead to serious damage. - Dirty device.
Dust is one of those causes of bad sectors that users remember last. If enough dirt accumulates, bad clusters will immediately appear in the hard drive.
So, we figured out the technical side of the issue and now it’s time to start practicing!
Recovering data from a damaged HDD using Starus Partition Recovery
Unfortunately, in some cases it is simply impossible to save a hard drive. He is “crumbled” and, perhaps, he has no more than a few days left to work. Therefore, the only important task for the user is to save personal data.
We recommend using Starus Partition Recovery . This program is designed specifically for recovering files in difficult working conditions with damaged drives, when other software loses any effectiveness.
- Compatible with all versions of Windows.
- Convenient, intuitive Russian interface.
- The presence of step-by-step instructions that will guide you through all the stages of working with the program.
- Possibility of deep analysis.
- Distribution of found files by signature (format).
- Presence of a preview window. You will be able to study both graphic and text documents in advance.
- Availability of all types of export.
Use the guide below to recover data from a damaged HDD:
1. Launch the Starus Partition Recovery application.
2. Specify the drive to be scanned.
3. Select the desired analysis type.
4. Select the files you want to recover.
5. Select the appropriate export type and complete the restore process.
Note!
Do not, under any circumstances, export documents to the drive from which you are restoring them.This action can lead to their permanent loss.
HDD scan and repair
As you probably know, there are a large number of various applications whose purpose is to help the user check and repair a damaged disk. However, not all of them are effective or easy to understand the interface, which to some extent complicates the process of restoring the device. Therefore, we have prepared for you a list of, in our opinion, the best HDD repair applications.
Windows Explorer
Opens our top built-in utility of the Windows operating system — Explorer. If you are not a big fan of using third-party software, then this program will appeal to you, because it saves you from the tedious search for suitable software on the Internet. How to use it?
1. Open My computer/This computer (hotkeys Win + E ).
2. Go to Properties of the disk you want to work with.
3. Go to section Service and find the utility Check for errors . Run it by clicking on the button Check .
4. Click on the button Check disc .
5. Wait for the scan to complete.
6. Done! If Windows detects logical damage to the HDD, it will immediately offer you to fix it.
HDD Regenerator
A simple but no less effective program for repairing bad sectors of a hard disk. According to official sources, HDD Regenerator is capable of repairing almost 60% of hard drives that were previously considered hopeless. The application scans disks exclusively at the physical level and, as a result, can work with all file systems (FAT, NTFS, etc.). An additional nice feature of the software is the ability to work with unallocated disks.
- Support for FAT and NTFS file systems.
- Provide detailed HDD performance statistics.
- Quick scan mode.
- Real-time monitoring of HDD operation.
Use the instructions below to repair bad sectors on your hard drive:
1. Run the application.
2. Click the Click here to repair physical sectors on damaged drive surface directly under Windows icon. Selecting this option indicates that you will work exclusively with PC hard drives.
3. Select the physical disk to be scanned and press the Start Process key.
4. Wait for the HDD to scan and repair.
SeaGate SeaTools
SeaTools is a powerful application for free hard drive diagnostics, error correction and logical damage. The program allows you to timely detect some HDD problems before contacting a service center, which significantly increases the chances of the disk to maintain its performance.
- Availability of S.M.A.R.T. checks.
- Restores the HDD file system.
- Recovers logical bad sectors.
- Fixes driver related bugs.
- Fixes a bug where the drive would stop being detected.
- Fixes an incompatibility bug.
- Resolves an issue with the Windows Boot Loader (MBR).
- Kills malware.
Quick start guide:
1. Start the application.
2. Select the desired drive and open the drop-down menu Basic Tests .
3. Select the test you want to test your hard drive with.
We’ll choose Short Universal, because it allows you to actively use the process of reading from the drive.
Important note:
Although scanning is available for hard drives of all manufacturers, only SeaGate-branded HDDs can be repaired by the application.
HDD Health
HDD Health is another free disk diagnostic application. It will check your hard drive or SSD for errors, set their current health status and generate predictions.
- Presence of manufacturer ID, model and firmware version.
- Disk temperature monitoring capabilities.
- Ability to see the overall structure of the disk.
The process of working with the application consists solely in monitoring such characteristics as the «state» and «temperature» of the disk.
HDDScan
HDDScan is a free tool for diagnosing drives for various damages. A distinctive feature of the program is its ability to write a scan log, thanks to which you can study the diagnostic process in as much detail as possible.
- Ability to check for errors that cannot be detected by the built-in Windows utilities.
- Possibility of versatile hard disk testing (reading, checking, etc.)
- Monitoring of temperature and other data.
- Ability to write the scan log.
The app is easy to use. Just press the Test button and run the desired test algorithm.
We hope that the article was useful for you and helped you find answers to your questions.
Similar articles about data recovery:
- Views: 266 403
- Author: admin
- Date: 28-10-2015
How to trim a section with bad sectors on a hard disk
It is from this block of sectors that bad blocks begin to appear.
At the end of the scan, there were more than two hundred sectors with an unsatisfactory read delay of 600 ms, and 8 bad blocks.
- Note: If you come across such a hard drive, then first try to get rid of bad sectors in the Victoria program using the algorithms BB = Advanced REMAP, BB = Erase 256 sect and finally, if nothing helps, record the entire glade using the Write (erase) algorithm, there may well be logical bad blocks and they will be corrected by the program, this is exactly what we managed to achieve in past articles. If the state of the drive remains unchanged, then we will have nothing left but to cut off the area with bad sectors on the hard disk. How to do it.
that is, from this point I need to cut off the rest of the hard disk space to its end (turn it into unallocated space). Since our drive is 500 GB, or rather 465 GB, it means that we will cut off space from the end of the hard disk from 465-367 = 98 GB, but it’s easier to cut off with a margin — 100 GB
Quickly delete a partition.
Click on the Apply button.
Go . In some cases, the program may ask you to restart. Next, the process of deleting the partition will begin.
In place of the disk (D :), unallocated space is formed, select it with the left mouse and click on the button Create partition .
Click on the button Extended .
Select Primary Partition . We move the delimiter to the left, but not to the end,
creating disk D: we leave an unallocated area of 100 GB, it is in this area that bad sectors are located.
The disk (D:) creation process starts.
The result of our actions. We have created a partition on the hard drive where you can store data or even install an operating system on it. At the end of the partition is the unallocated space where bad sectors (bad blocks) are located.
This is how we cut off the area with bad sectors on the hard disk, but our HDD lost 100 GB.
To check if you currently have bad blocks on the drive (D:), run the command prompt as an administrator and enter the command: chkdsk D: /f (where D: is the letter of the drive being checked) and the utility (CHKDSK ) checking the hard disk for errors will start with a special option to search for bad sectors on the specified partition (in my case D:).
If no bad blocks are found, then CHKDSK will display the relevant information at the end of the scan: data — all this may indicate the presence of bad sectors on the disk that need to be addressed.
Special, logically marked areas, or rings, called tracks, are magnetically created around the HDD, divided into clusters and sectors. Information on a disk is written in sectors of 512 or 4096 bytes, but is actually stored in clusters ranging in size from 1 to 128 sectors.
A broken (damaged, bad, bad) sector on the HDD is a place that has lost its ability to be written or read, and the operating system (OS) cannot find data in it, and also write information to it.
Bad sectors occur either due to physical damage to the disk surface, or due to software errors and are corrected using system utilities, in particular, «Chkdsk».
These utilities restore logical sectors by matching them to an index in an MFT (Master File Table) file, and mark physical sectors so that they are not used by the system.
Eliminating bad sectors in Windows XP and Windows 7
Before using the chkdsk utility, you must close all running programs, because the utility will not be able to repair bad sectors when they are used by the system.
Step 1. To do this, press “Win” on the keyboard, and while holding it, “R” (Win is between Ctrl and Alt on the left), and in the Run window that starts, type “taskmgr” by pressing “OK” .
Step 2. In the «Windows Task Manager» that opens, go to the «Applications» tab and close all applications running in the operating system one by one by selecting them with the mouse button and clicking «End task».
Step 3. Next, open Windows Explorer with the Win + E keys, right-click on the icon of the HDD to be checked, and left-click «Properties».
Step 4. In the window that appears, click on the «Service» tab and in the «Error-Checking» segment, click the «Check Now» button.
Step 5. The Check Disk dialog box will appear on the screen. If you need to check and fix only bad sectors, uncheck the «Automatically fix file system errors» checkbox (top item).
Step 6. Click the «Start» button to begin the process of checking and fixing bad sectors.
Step 7. If the HDD being checked is a boot disk for the OS, Chkdsk will prompt you to perform the selected procedures the next time you start it. Click «Yes» as an answer.
The next time the system boots, a blue window will appear with a countdown (timer). At this time, no buttons need to be pressed. As soon as the countdown reaches zero, the disk check will begin. After it is completed, the computer will restart on its own.
When «chkdsk» does a job to repair bad sectors on the hard drive, it will generate a report about it. The code «0» means that no errors were found during the disk scan, and the code «1» means that errors were found and they were fixed.
Important! If the drive check process fails, there is a problem with the drive and it is important to back up your data to protect your data. In Windows XP and Windows 7, there is a utility built into the operating system called NTBackup for this purpose.
Troubleshooting bad sectors in Windows 8 and Windows 10
Step 1. Open Windows Explorer with Win+E, right-click on the icon of the required HDD, and click Properties.
Step 2. Go to the «Tools» tab and click «Verify» (this step may require you to enter administrator account information).
Step 3. The bug checker will tell you if the hard drive has bad sectors or not. If no errors are found, the application will still allow you to run a search for errors on the disk. Click «Check drive» (Scan drive).
Step 4. You will be able to use the disk during the test. If errors are found, they can be corrected. At the end of the disk check, the system will issue a report on the results. Click «Close».
Help! Although Windows 8 and 10 allow you to use OS applications while the utility is running, this is not recommended to avoid interrupting the scan process.
If the HDD has physical deterioration of its sections, there are «unstable» sectors, etc., the OS may «freeze» when the above utilities are running. Forced interruption of their work can damage the system files of the OS.
Important! Corruption of OS system files requires loading the Last Known Good OS Configuration (using the F8 button) or restoring Windows from the installation disk.
![]()
Despite the fact that physical bad sectors are not recoverable, except for marking with chkdsk, they can be reassigned (in English remap) or cut off.
Determining the location and volume of bad sectors using the Victoria program.
Step 1. Install and run the Victoria program under an administrator account. Select the Standard tab in the window. If there are several HDDs in the system, in the right part of the window, select the required one with the mouse.
Step 2. To locate bad sectors on the HDD, go to the Tests tab and click Start.
The example shows that from block No771093375 there are:
- «candidates» for bad sectors with a read delay of 600 ms, there are 190 of them in the example;
- bad sectors (Err) in the example 8 pcs. Just below the counter shows the figure 376507 MB (376 GB).
You can also see that from the point of 376 GB you can cut off the entire HDD space to its end, cutting off the bad sectors grouped here in one place.
Help! In the example shown, the start of the hard disk scan (Start LBA) is set manually from block No750000000. When conducting a test scan of «your» HDD, this value does not need to be set.
The HDD shown in the example has an exact capacity of 465 GB, and the cut volume calculation will look like this: 465-376=89 GB. In this case, it is better to cut off the volume of the disk with a margin — for example, 100 GB, for the possible appearance of additional bad sectors in this area.
Trimming HDD using AOMEI Partition Assistant
To increase the speed of trimming bad sectors on the HDD to «acceptable», it is desirable that it does not contain partitions at this time. Important data from the disk before starting the procedure must, if possible, be copied.
Step 1. Install and run the program. In the main window, select the desired HDD and click «Delete Partition».
Step 2. Select the Quick Delete Partition option and click OK.
Step 3. Click Apply.
Step 4. In the next window, click «Go» (you may need to restart the OS). The partition deletion process will begin.
Step 5. An unallocated area (Unallocated) will appear instead of the disk. Select it and click «Create Partition».
Step 6. In the window that appears, click the «Advanced» button.
Step 7. In «How to create» select «Primary Partition». When creating a disk, move the slider with the mouse by a certain amount, leaving an unallocated area where bad sectors will be located.
Help! The program has left and right sliders (delimiters). The delimiter that is required in a particular case of trimming a hard disk is used.
In the presented example, the right slider is shifted to the left by 100 GB.
Step 8. Click Apply.
Step 9. Click Go.
Step 10. Click Yes.
The HDD partition creation process will start.
As a result, a partition will be created on the HDD, at the end of which there is unallocated space (Unallocated area) with bad sectors.
Using the Remap function in the Victoria program
If the bad sectors marked in the program are not grouped nearby, but distributed throughout the HDD, the remap function present in Victoria can help.
The remap function repeatedly writes to the problem sector, and if these attempts fail, the sector is replaced by assigning its address to a healthy sector taken from a special place on the HDD.
-
In the running Victoria program, in the “Tests” tab, check the “Remap” and “read” items (reading), and click the “Start” button.
Help! In this technical scenario, you need to create a bootable USB drive (flash drive) containing the Victoria program, and after booting from the USB drive via DOS, get rid of bad sectors on the HDD.
Watch the video below to see how these steps can be done in practice.
Video — Trimming a hard disk from bad sectors REMAP, Treatment of HDD bad sectors
Checking the HDD for bad sectors
After treating bad sectors, you can find out if there are still damaged sectors on the disk. To do this, you need to manually run the «Chkdsk» check.
Press “Win + R” on the keyboard, and in the “Run” window that opens, type: chkdskH: / F / R, and “OK”.
Help! Instead of «H», type the letter of the hard disk partition to be checked. The /F flag runs file system error fixes, and the /R flag scans for bad sectors.
![]()
If no bad sectors are found, when chkdsk is finished, it will display information about 0 KB in bad sectors in a special window.
Physical damage to the HDD is often caused by manufacturing problems, overheating, scratches due to shock, dust, etc. Software (logical) bad sectors are caused by software conflicts, viruses, sudden termination of a program or OS, including due to power problems.
Eliminating situations that can cause damage to HDD sectors will allow you to preserve the integrity of important data and avoid buying a new HDD if its physical resource is exhausted.
Video — How to remove bad sectors on your hard drive
Like this article?
Save so you don’t lose!
>
Today we will get acquainted with one of the simple and, at the same time, one of the most powerful programs for diagnosing and repairing a damaged hard drive at a low level — HDD Regenerator A low level of hard disk operation means that the program will have exclusive access (usually DOS environment is used) not only to the hard drive, its sectors and clusters, but also to the controllers and mechanisms that participate in the hard disk operation. The program has gained its popularity in computer service centers because, unlike many similar programs, it really restores bad sectors by remagnetizing them. Other programs simply close access to the cell, which could contain the necessary piece of information to the file. On the one hand, this is good, as they allow you to quickly bring the HDD (hard disk) into working condition by deleting non-working sectors in the disk. On the other hand, with this approach, you lose not only the information that was stored in these sectors, but also the volume of your disk. If you have a bit of broken sectors up to 100, then we strongly recommend using the software product from Dmitriy Primochenko «HDD Regenerator». The latest versions of HDDR are paid, but it is from the series of programs that can recoup the funds invested in it for 1 time of its use. So, how to use HDD Regenerator. For an example of working with HDDR, we will use version 1.7, which is almost the same as version 2011 and works just as well on win7 as on XP. Download the demo version of the program from the official site http://www.dposoft.net. Install and run. After installation, you can Russify the program by downloading the file: «HDD Regenerator Rus». However, Russification only translates the start interface of the program. And since all HDDR work takes place in DOS or in its emulation (on a Windows system), you still have to deal with English. But we will help you. After starting and Russifying the program, you will see the following window. Suppose we need to test and repair a hard drive. We press not the upper part of our window in the place where it says «Click to . In some cases, a warning window may appear: IMPORTANT! This warning says that as a result of the HDDR check, it has determined that your SATA controller is in ANCI mode and you are prompted to reboot and change it to IDE mode in the BIOS. If these words are unfamiliar to you, then it is better to refuse. The program will still work, but a little slower. In the next window, the program will find and identify drives connected to your computer. In our case, HDDR identified 1 Samsung HM251Ji hard drive with 488 billion sectors. Do not be afraid of such a large number of sectors, the program tests working sectors quickly enough. The broken word at the top stands for Selected Discs. Disks are selected with the mouse button from the bottom window «Select Disk». After the disk description line becomes active, press the start button or double-click to activate the disk description. The program will try to start DOS emulation. If you run the program on a Windows system, then most likely you will receive the following message: This is a warning that HDDR was unable to gain exclusive access to the virtual partitions of drive C, D, E, due to the fact that some programs use them. You are prompted to close all windows and running programs and repeat (Retry) the launch. As a last resort, you can ignore this warning and click OK. In the next window, HDDR will report that it could not get exclusive access to hard disk 1 (in our case, Samsung), but will still try to start working with it. Next, we will finally start a DOS window with the following interface: Let’s analyze its interface in more detail. Scan and repair The following window will open. Here you are offered to start testing the disk not from 0 (by default), but from a certain place on the hard disk. For example, we have a 230 GB disk divided into 3 sections, each of which is approximately 70 gigabytes. And only in the third section did we notice a freeze, extraneous sounds (or other reasons) indicating that “something not right” was going on with the disk. Accordingly, our 488 billion. divide by 3 and enter the number rounded down there. That is, we save time. Or you can use the second (indicated at the very bottom of the window) option, by which you can simply enter the size of the disk from which you should start testing and press the M (English layout) button. The «M» button will add a suffix to the number indicating that we are using MB. If we want to start checking the disk from the very beginning, we just press Enter (input). In the next window, the disk test process starts. As the disk goes through, it will display information about how many sectors it went through and how many bad (damaged) sectors it found. He will also determine the extent of their damage. If at any point you want to stop the testing process or pause, press the ESC button. If at the time of testing, strange sounds were heard and the system suddenly began to freeze heavily, this means that HDD Regenerator has detected bad sectors and uses all computer resources to determine the nature of the damage. Disk activity is disabled at this point, and the system freezes completely. As the bad sector passes, the computer is restored. This is one of the reasons for such an operation to be carried out only in DOS mode outside of the widows system. We will describe how to do this at the very end of the article. So. After he finds the first bad sectors. HDDR running in DEMO mode will show you the following window. It says that the process is paused because you are using an unregistered version of HDD regenerator. To get the full version of the program, you need to buy a license (key) for it on the manufacturer’s website: http://www.dposoft.net The next window will show us statistics on our disk. This window will show you how many sectors it found damaged, how many recovered, and how many it failed to recover. Describe in more detail: List sectors scanned Operation of the HDD regenerator program in the DOS system. Well, now about how to run the program in DOS mode, where HDDR will have the maximum speed and performance on checking and repairing your disk. This requires an empty Flash card. We insert it into the USB socket and run the HDD Regenerator program. Next, click «Bootable USB flash drive …». HDDR will remind you that all data on it will be destroyed. Click OK, and then HDD regenerator will format it and write its files on it, which will first make it bootable, then allow it to run HDDR files on its own. In a DOS system, you will see all the same windows that we wrote about in this article. When restoring a disk via DOS, remember that if you decide to abort the operation, you need to do this only through the ECS button and be sure to wait until a window appears prompting you to exit the system by pressing ESC again. The fact is that when the regeneration process is interrupted, the program writes to the flash drive information about the process statistics and the point at which the program was stopped. When the program is restarted, HDDR will start from where the pause was pressed. For example, recovering 100 bad sectors can take several days of continuous HDDR operation. Unfortunately, today’s hard drive manufacturers focus more on its amount of speed and performance than its reliability these days. Hard drive warranties rarely exceed 1 year these days. In view of this, my personal opinion as the author of the article is that I do not recommend storing important information on one hard drive. You need to either duplicate it to another hard drive (optical discs will not work) or use another better option. For example, for these purposes, as the use of Internet resources for storing file information, which we will talk about a little later in another article. Good luck and long life to your hard drives! http://www.yachaynik.ru/content/view/324/1
|
How to rid your hard drive of bad sectors.
Recovering an external hard drive without formatting. Reasons for the appearance of bad sectors
Today we will look at:
Hard drives, especially if they are not SSDs, tend to fail frequently. This can happen for many reasons: a large load, a breakdown of rotating elements, a sharp power outage when the light goes out in the apartment, and others. All this ultimately leads to the fact that some sectors on which information is stored may be damaged, which will affect the performance of the entire PC.
To prevent this in the future or fix existing problems with the hard drive, there are special utilities that allow you to check for errors and «treat» these devices. Let’s look at some of them.
Seagate SeaTools
Seagate SeaTools is the first representative of programs on our list that are perfect for fixing critical errors in the HDD.
This utility is very easy to use:
- Launch the Seagate software.
- You will see a list of hard drives currently connected to your computer.
- Next, you have a wide range of possibilities:
- various types of disk error checks;
- selective or complete repair of hard drives;
- the ability to obtain additional information about a particular connected drive.
- Select the operation you want and wait for it to complete.
As you can see, it is very easy to work with Seagate SeaTools, besides, in the utility itself you can find a user manual completely in Russian.
HDD Scan
HDD Scan practically repeats its predecessor in functionality (or vice versa). With this utility, you can both check the hard drive and «cure» it from existing errors. In addition, the utility works great with flash drives.
How it works is also very simple:
- Launching the application.
- Select a hard drive.
- Click on the operation you want to perform on this disk.
- Wait and look at the result.
Checking with BIOS
Of course, you can check the hard drive not only with the help of third-party utilities. The Windows operating system also provides for the diagnostics and «treatment» of hard drives with tools. We have already written about this before, and in order not to repeat ourselves, we leave a link to this material for you here.
Victoria Freeware
Victoria is an «adult» hard drive diagnostic program that gives the user «tons» of information that a knowledgeable person can use in a variety of ways.
This article will probably not be enough to describe the full range of features of the Victoria application. However, if you are specifically interested in the possibility of diagnosing a hard drive, then you should pay attention to the Tests tab.
After testing the selected hard drive, you will receive detailed information about its condition. If you see a large number of «broken» sectors — take care of the safety of the data and copy them to another medium.
Especially for you, we have prepared a detailed video review of the program:
Summary
Here we have reviewed several useful utilities that you can use to diagnose and “treat” your hard drive. Most of them are very simple and understandable programs for the average user, others, such as Victoria, require some time to understand how everything works here. If you are not at all confident in your abilities, then we recommend that you contact specialists who will help you analyze your hard drive and correct, if possible, errors on it.
A hard drive designed to store basic system and user information is not immune to failures both at the software and physical levels. Accordingly, programs for treating a broken hard drive can be divided according to their purpose. Further in the article, some popular and effective utilities will be considered that allow you to restore hard drives even in especially critical situations.
What the problem is
In the end, problems with hard drives come down to the loss of information stored on them. There are several types of failures.
First of all, it is worth taking into account software failures that programs for treating a hard drive can fix quite simply and quickly. Secondly, the possibility of damage to the surface of the hard drive or even just physical wear and tear of the media should be taken into account. Like any other «iron», hard drives have their own, specific life.
Depending on the root cause that caused the failure, utilities should be used to allow the hard disk to be cured. The program in Russian or its English version, depending on the type chosen, can perform completely different operations with the hard drive. Therefore, you first need to determine the nature of the failure, and only then decide on the use of a particular tool.
Programs for the treatment of the hard drive
To begin with, based on the root cause of problems with the hard drive, let’s see what the modern computer market offers us. Among all the software, the following packages and applications should be noted separately:
- Viktoria;
- HDD Regenerator;
- R. Saver;
- Acronis products and related applications.
Hard drive or information recovery: what’s the difference?
First, remember the American action movies in which FBI officers break into hackers’ apartments, seize burnt hard drives and restore (partially or completely) the information stored there. This movie! In fact, almost no program for treating hard disk sectors, including the most modern tools, can do this.
The fact is that physical damages somehow affect the organization of the file system, which can only be put in order through formatting, which allegedly entails the destruction of data. Yes, information is destroyed, but only by renaming and hiding objects in such a way that the operating system does not see them (for example, by assigning a “$” symbol at the beginning of a file or folder name).
Programs for treating a hard disk just use the search for such renamed objects in terms of information recovery. But not all of them justify their purpose. Suffice it to recall the Recuva utility. It seems to be considered the simplest and most popular. In fact, she does not know how to restore anything. If you compare the search results in it with what the R.Saver application finds, you can immediately notice that Recuva marks most of the files in red, which indicates the impossibility of recovery. But R.Saver reanimates such files without problems, including the recognition of many removable media. For SD-cards, the use of this particular applet becomes practically the only solution for data recovery.
But when the hard drive, roughly speaking, “fell down”, that is, it became worn out, then no program for treating bad sectors of the hard disk will help. It may be possible to partially restore information, but, alas, it is impossible to talk about a full recovery of the hard drive. Nevertheless, in the event of failures, you can even use the built-in utilities of Windows operating systems, which are desirable to use at the initial stage.
Program for the treatment of the hard drive.
Windows 7: System Tools
Before turning to third-party utilities, you should use the system check tool itself, which can be accessed through the properties section called from the right-click menu on the disk, in the Explorer system partition or in any other file manager.
Automatic troubleshooting and error correction should be enabled during testing. But it doesn’t always work. Therefore, you should check from the command line (cmd in the «Run» menu), launched as an administrator. This uses the standard chkdisk command with a variety of additions. In the general case, to bring the hard drive in order, it is enough to write the line chkdisk x / / f / r. To check the file system, you can use chkntfs x: /c, which excludes initialization at OS boot.
Viktoria
Now let’s go directly to the programs. Viktoria is the most powerful utility that allows you to treat your hard drive. The program is in Russian (it was created by Belarusian developers).
Its application allows not only to completely scan the hard drive for software errors, but also to identify bad sectors resulting from physical damage. Of course, we are not talking about correcting the latter, but it is possible to deal with software problems based on the information provided.
HDD Regenerator
This program for treating hard disk sectors is considered almost the best in its field. Judging by the description and statements of the developers, it allows you to recover bad sectors of hard drives through magnetization reversal.
The question of calling a physical procedure by a program method raises legitimate doubts if the computer does not initially have such a device. Nevertheless, somehow it works, and many users admit that with the help of this program they were able to check and restore the surface of the disk.
R.Saver
According to many users and experts, R.Saver is the best hard disk repair software. The in-depth scanning technique used in it is such that even on SD cards, the application is able to find deleted files after several media formatting operations. This, however, takes quite a lot of time. For example, a 500 GB hard drive will be scanned for 8-9 hours, and removable SD memory cards — even more. But the result will not keep you waiting.
Other software products
Talking about hard drive recovery programs, one cannot fail to mention packages like Recovery Expert from Acronis or Partition Recovery from Hetman.
They work on similar principles and are designed to eliminate software failures rather than physical problems associated with the inability to read information due to damage to the media surface. Nevertheless, in terms of testing, such programs for treating a hard drive can be used.
Questions of preference
Which one to choose? It seems that development in the form of the Viktoria program will be an ideal option for testing the state of the HDD. But for a complete data recovery, it is better to use the portable application R.Saver or its equivalent in the form of R.Studio. Of course, it will take a lot of time to check and restore, but in some cases, the use of these applications is the only possible option for restoring not only hard drives, but also most known removable media.
And you should not use simple free programs like Recuva to recover information. It’s more of a brand name than a powerful file recovery tool that’s been advertised so much. It is better to use domestic developments in the form of R.Studio and R.Saver, which are superior to most well-known utilities in this area in all respects. It plays a key role in our age. In addition, applications of this type are focused specifically on data recovery, and not on checking the status of the hard drive.
No matter how good your hard drive is, sooner or later problems may arise with it. Incorrect removal of programs, viruses and harmful applications, wear and tear — all this can lead to a breakdown of the “hard drive” and the appearance of so-called. The latter do not make themselves felt instantly, most likely months will pass before you notice the problem.
Scheme of work
Delivery
by courier free of charge
Diagnostics
fast and free
recovery
on professional equipment
checking
the quality and completeness of the recovery
only with a successful result 9033
For a more understandable definition of a broken sector, it will not be superfluous to understand the design of your hard drive. In general, it consists of rotating magnetic disks, which are divided into tracks, and these same tracks, in turn, are divided into sectors. They contain any information that you copy to your hard drive. Disk sectors have one unpleasant property — they deteriorate over time and you lose access to them. And this process is accelerated by incorrect work with the computer.
You most likely will not know about the existence of several bad sectors without the use of special programs.
They practically do not affect the operation of the computer and become a real problem only in large numbers.
Computer freezes when trying to access some files, long copying from one partition to another, errors and reboots of the PC — all this can be the result of a large number of bad blocks on your “screw”. Some of them can be corrected, and some cannot be treated. According to this feature and the nature of the damage, all broken sectors can be divided into two types: physical and logical.
- Physical problems are the result of damage (for example, ), dust ingress into the hard drive, and normal wear and tear on the hardware. The main thing is to understand that in such cases, which is no longer subject to recovery. Even the usual data recovery from such sectors will be a miracle;
- Logical bads, on the other hand, appear under the influence of viruses, file system errors, and incorrect writing of information to the disk (for example, a sudden shutdown of the computer while copying files or other active work).
In such cases, it is not the magnetic coating of the sector that is damaged, but its data. Such broken sectors are subject to treatment and can be corrected using a variety of programs in normal home conditions.
For 19 years
87 750
customers have chosen us
We know RAID better than the manufacturers
Transparent scheme of work
Competitive prices
Privacy and a complete set of documents
Programs for recovering hard disk bad sectors
Microsoft provides a built-in utility
for working with hard drives. By default, the utility checks only for file system errors, but if you add the key /f
then chkdsk
will check the disk for bad blocks and try to fix them automatically. Of course, there are many alternative third-party solutions for checking your hard drive and fixing bad sectors that can be easily found on the Internet. Let’s talk about the most popular of them in a little more detail:
- — probably the most popular program for testing hard drives and recovering bad sectors on a hard drive.
It can be used not only for treatment, but also for equipment testing. As the developers themselves note, when interacting with the hard drive, it ignores the file system and works at the level of I / O ports. This property provides the most efficient and high-quality work. In addition, there are two versions of the program, one of which works directly from under Windows, and the other from under DOS. The latter is more versatile, but is also recommended for advanced users.
- is another popular program that works with equipment through the controller ports. It also has two versions (Windows and DOS), both of which are completely free. It has a very fast speed of work, which does not affect its quality in any way. In addition, it gives complete statistics on your device: the number of on and off cycles, the number of spindle revolutions, etc. The unfriendly interface of the program can be considered a minus, which will become a problem for inexperienced users.
- is a unique program that, according to the developers, can even restore physical damage.
The point is that often physically damaged sectors have the wrong magnetization, which this program eliminates. The rest of the set of characteristics and capabilities is similar to the above utilities.
On the most reliable and high-quality hard drives, some time after installation in a computer, bad sectors may appear. If there are too many bad sectors, the hard drive stops functioning normally and needs to be replaced. However, it is often possible to repair a hard drive using third-party software. In this article, we will describe programs for treating hard drives, as well as provide detailed instructions for working with them.
Broken sectors
User information on a personal computer can be recorded on magnetic disks. Their surface is divided into sectors and tracks. If it is not possible to extract information from a sector, it is called a bad sector. Recovering such bad blocks is difficult, but quite realistic. It should be borne in mind that after treatment, information from the hard disk must be rewritten to another drive. Over time, the hard drive is better to replace. If bad sectors began to appear on the hard disk, then their distribution after repair will not stop. The device may fail at any time.
Victoria HDD
One of the most effective programs for treating hard disk sectors is Victoria HDD. The program is distributed completely free of charge. The application runs in DOS mode, so it requires certain preparatory operations. First you need to create a bootable flash drive. You also need to download the Victoria HDD utility image in ISO format. You will need to download and run an application called Win Setup FormUSB. In the drop-down menu, you need to select the USB drive, which should become bootable as a result. Opposite the item «Autoformat» you need to check the box. Also check the «LinuxISO» item and specify the full path to the image of the Victoria HDD program. To start the process of writing these files, click on the «Go» button.
BIOS settings
Since the hard disk repair programs work in DOS mode, you need to configure the BIOS. Then you need to restart your computer. After shutting down, to enter the «Setup BIOS» utility, you need to press the F8 or DEL button several times. On some devices, other keys may be set to launch BIOS settings. To find out which key is responsible for entering SetupBIOS on your PC, you need to read the information at the bottom of the screen immediately after turning on the device. After that, go to the «Main» section and find the «SATAMode» item in it. Here you need to press the «Enter» button and select «IDE». In the «First Boot Device» field, you need to set the value to «USB». Now, to save the settings changes, press the F10 key. After that, the computer will restart.
Check and restore
If the above steps have been performed correctly, VictoriaHD should start automatically after booting up the computer. To start hard disk recovery, you must press the key with the English letter «P» on the keyboard. In the menu that opens, you need to select the port to which the hard drive is connected. Today, almost all drives work through a SATA socket. Therefore, you must set the switch to Ext PCIATA/SATA. Now press the F9 key. As a result, the information obtained from the SMART table should appear on the screen. Particular attention should be paid to the «Currentpendingsectors» column. This indicates the number of sectors from which information is not read. This number must be remembered or written down. After that, you need to press the F4 key and start scanning in the «BB: Erase 256» mode. The utility will automatically try to find bad sectors and repair them. Information stored on these sectors will be deleted. You need to open the SMART table again and see if the number of bad sectors has decreased. If some of them could not be restored, then you can try to scan the hard drive in another mode. To do this, press the F4 button again and select «BB: ClassicRemap». In this mode, when a bad sector is detected, the application will not restore it, but will simply mark it as non-working.
This approach allows you to stop the propagation of bad sectors. After the Victoria HDD application completes the check, you need to restart your personal computer.
HDD recovery software: operating system tools
After the drive is scanned by the Victoria HDD utility, you need to check it with a special utility that is installed by default in the operating system. To do this, open «My Computer» and right-click on the local disk icon. Now go to the «Service» tab and select the «Perform verification» item in it. In the window that opens, next to the line «Automatically fix errors» you need to check the box. After that, click on the «Start» button and wait for the program to complete. Before the end of the verification process, in no case should you turn off the computer.
HDD Regenerator
HDD Regenerator is a free program designed to cure hard disk. The main advantage of this program is a clear and friendly interface. It is for this reason that many users choose HDD Regenerator. Before starting this program, it is better to close all applications first. After that, you need to open the «Recovery» menu and click on the inscription «Start processing» in it. A window with a warning about the BIOS settings should appear on the screen. Here you need to click on the «No» button. Now select the drive that needs treatment. After that, a command line should open on the screen, in which you need to enter a number from 1 to 4. You need to enter the value «2» and press the «ENTER» key. The utility will ask you to specify where to start scanning from. Then you need to press the «Enter» button. The application will scan the HDD and display information about bad sectors. When the check is completed, enter 2. After that, the utility will not only check hard drives, but also try to repair bad sectors. It should be noted that the built-in hard drive cure is very slow. The process sometimes takes several days. The HDDRegenerator utility allows you to restore the ability of blocks to store information, and not just mark them as unused.
This explains such a long scan time.
The MHDD program has the same functionality as the Victoria HDD. This application works in DOS mode. With the help of MHDD, you can view the SMART table, diagnose and treat the hard drive. There is no Russian version of the program. To work with MHDD, you need to create a bootable flash drive, just like for the Victoria HDD utility. After that, you need to configure the BIOS and restart the PC. Then you need to press the F2 key and select the device with which you have to work. To scan the surface of the hard disk, press the F4 key or enter the word «SCAN». As a result, the screen will display settings in which all destructive functions are disabled, such as erasing and deleting bad sectors. After that, you need to press the F4 key again. This will start the scanning process. The display will show a table in which the colors of the cells will change during the test. White, gray and green colors indicate that the sector is operational. Yellow color indicates the risk of damage to the sector. Red means the block is damaged. If the drive has bad sectors, then you will need to copy all the information to another hard drive, and then enter the ERASE command, which will completely erase all data from each sector. This will allow you to get rid of soft-bad blocks. If this action does not solve the problem, then you can try pressing the «F4» key and enable the REMAP option. After that, the utility will simply mark bad sectors so that they will no longer be used, as the built-in tools of the Windows operating system do to treat a hard drive.
— one of the most important components of the system, with a breakdown of which, all user information, system files and account data can be lost. In this regard, it is necessary to use only reliable HDDs, be able to handle them correctly and know what to do if it breaks down.
Causes of failures
Depending on the reason for the failure, you need to look for program
. Two similar programs can solve completely different problems, so it’s worth figuring out what caused the hard drive to fail.
List of the most common HDD problems:
- bad sectors;
- damage;
- wear;
- software failures.
If the damage occurred as a result of a long service life or excessive external mechanical impact, then it will no longer be possible to help him with the help of programs, but if the cause is a software failure, then it is possible to cope with this problem.
Windows programs that can «cure» hard drive
Regardless of the task that the user faces, there are many programs created to solve hard drive problems
and which can be downloaded today for Windows. List of the best of them:
- Viktoria;
- CheckDisk;
- R. Saver;
- GetDataBack;
- Acronis products and similar utilities.
The good news is that there are a large number of various utilities for solving HDD problems on the Internet
. In this regard, their prices are not very high and there are many free analogues. It is also easy to find a utility in Russian.
Viktoria
The Viktoria utility was created by Belarusian developers for the Windows operating system. It is considered the most powerful and can perform many different actions with the hard drive, such as testing, healing, scanning for software errors and identifying bad sectors resulting from physical damage. The interface language is Russian, so Russian-speaking users should not have any difficulties in managing the program. It is worth noting that the program can be downloaded for free.
One of the most interesting features is HDD testing. You can start testing in the program on the “Test” tab. After the test is run, you will be able to see disk statistics. It includes: the number of checked sectors, slow sectors and bad sectors. By selecting any sector, you can find out how much the response delay is. If a bad sector is found during the test, the user may be prompted to try remapping a sector from a spare or attempt to write to that sector.
The main purpose of this program is hard drive treatment
, namely, the restoration of bad sectors of the hard disk through magnetization reversal. It is almost impossible to do this with ordinary programs, but users notice that after treatment with this program, bad sectors become smaller or they disappear completely.
«HDD renegator allows to repair bad sectors
hard drive without data loss. The program supports a large number of types of hard drives, as well as all file systems, including: fat32, NTFS, ext and so on. Unformatted disks are also supported, ”these are the assurances of the developers, it is up to you to believe or not.
The main function is to test the hard drive
for errors and bad sectors. During the scan, you can pause the process and view statistics. However, there is little useful there: the number of checked sectors and sectors with a delay. Surprisingly, the program is paid, but most free analogues provide the user with much more information about the scanning process, which, in turn, allows you to more accurately determine the status of the disk.
The main function of the program called «Regeneration», in addition to the fact that it does not work in 100% of cases, it can also completely delete data from the device
. Given that the program can only be downloaded for money and only for the Windows operating system, we can conclude that this is not the best option for hard drives.
R. Saver
One of the best programs for the treatment of ID according to most users. The utility uses an in-depth scan method, which can help recover files even after several formats. Works with both hard drives and SD cards. This recovery takes a long time. It will take more than 4 hours to check a 250 GB HDD, and SD card recovery takes even longer. Despite the duration of the work, the program is popular and has established itself as a reliable utility for Windows.
Healing a hard disk using Windows 7 system tools
You can run a hard disk check on windows 7 in the properties of the selected disk. You can open the properties by right-clicking on it.