windows — Connecting a desktop SATA DVD drive to laptop over USB with USB HDD adapter
Asked
Modified
4 months ago
Viewed
4k times
I have a SATA DVD drive (pulled from an old computer) that I want to use with my laptop over USB. I have a USb-SATA hard drive adapter that I’m trying to use to make this work. When I plugged the drive into the USB-SATA adapter and try to use it, the following happens:
- I push the button to open the tray, it opens and I put a disc in, I push the button to close the tray
- The drive tray closes and the green activity light on the DVD drive starts blinking
- I can feel a slight vibration from the drive, but I don’t think the disc is spinning at full speed
- After about 30s, the activity light stops blinking and goes dim
At no point during the above process is the disc recognized in Windows. Device manager has the USB-SATA adapter listed as a «JMicron SCSI Disc Device».
Parts involved:
- DVD Drive: HP Super Multi DVD Rewriter (model gh80n)
- USB-SATA adapter: Sabrent USB 3.0 Enclosure
Why wouldn’t this work? From reading online, it seems that this could be a power supply issue over USB, but I don’t think this is the case. The USB-SATA adapter is connected via a powered USB hub. Could it be the way that the adapter is recognised in Windows?
- windows
- windows-10
- usb
- sata
- dvd
6
The desktop-size DVD Writers 5.25″ formfactor are power-hungry and usually need both 12V and 5V power sources. The Sabrent enclosure is for 2.5″ drives, which only uses +5V power.
To use your old HP drive, you need to find a USB-to-SATA enclosure designed for 3.5″ formfactor. It usually takes an external 12V power to operate.
2
Sign up or log in
Sign up using Google
Sign up using Facebook
Sign up using Email and Password
Post as a guest
Required, but never shown
Post as a guest
Required, but never shown
By clicking “Post Your Answer”, you agree to our terms of service, privacy policy and cookie policy
laptop — Is it safe to use a SATA to USB enclosure with a Blu-ray drive?
Ask Question
Asked
Modified
3 years, 7 months ago
Viewed
9k times
I have an ASUS N56JR laptop, and I’ve just replaced the optical drive (Blu-ray reader/DVD writer combo) with an HDD caddy. This allowed me to install an SSD into the primary hard disk drive slot, and replace the optical drive with a 2nd hard disk drive, for data storage.
I bought this hard disk drive caddy for the laptop in order to do this. (I removed the plastic bezel from the optical drive so the hard disk drive caddy would look ”stock,” even though the eject button does not do anything)
The optical drive is now sitting in my drawer, but I’d like to make some use of it, if I can, especially since its a Blu-ray drive.
The eBay listing for the hard disk drive caddy suggests buying this SATA to USB external enclosure to re-use the optical drive as an external USB DVD drive.
My question is, is it safe to do this with a Blu-ray drive? It appears to be a SATA to USB 2.0 enclosure. It uses one USB cable for power, and a second USB cable for data transfer. I guess I’m just wondering if USB can provide enough power for a Blu-ray drive.
Or am I just better off buying a new external USB 3.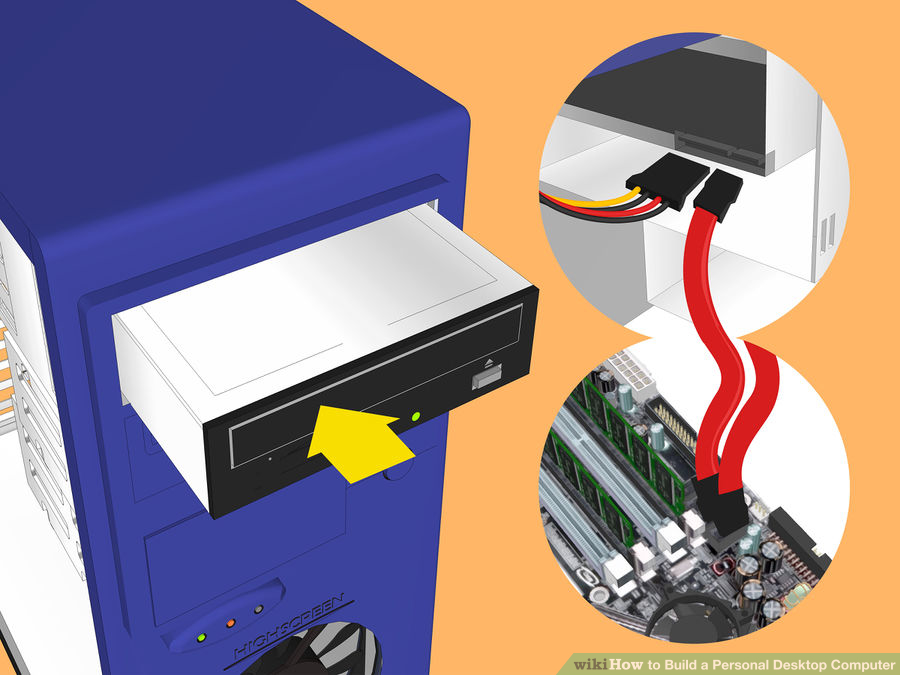 0 Blu-ray drive from Amazon instead?
- laptop
- usb
- sata
- blu-ray
5
You can connect an internal optical SATA drive to a USB port.
A full size 5.25″ drive will require external power. A Slimline enclosure can be powered by USB alone.
- NexStar DX, External 5.25″ Optical Drive Enclosure USB 3.0 External Interface
- USB 3.0 to Slimline SATA ODD Enclosure
1
Sign up or log in
Sign up using Google
Sign up using Facebook
Sign up using Email and Password
Post as a guest
Required, but never shown
Post as a guest
Required, but never shown
By clicking “Post Your Answer”, you agree to our terms of service, privacy policy and cookie policy
How to connect a disk drive to a computer
HomePeripherals and hardware
The drive — until recently a mandatory element in any computer, today is losing ground to flash drives and retires.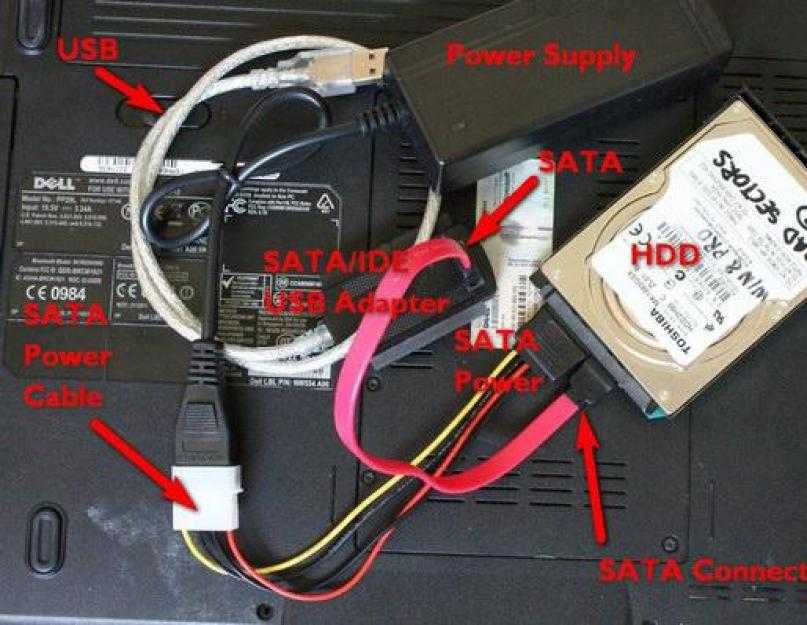 Manufacturers have caught on to this trend and are now happy to follow it, refusing to install a drive in computers and laptops. But what if you need a drive? About this — in our article.
How to connect a disk drive to a computer
Contents
- Selecting a drive
- Removing the old drive
- Installing a new drive in the system unit
- Connecting the installed drive to the motherboard
- Let’s start with the option with IDE
- Now the option with SATA
- Video drive) PC
Drive selection
First we need to decide what we need a drive for. It’s not about his type — by default, he should be able to read and write DVDs, such is the time. But there is such a thing as a connection type — an interface that our drive connects to a computer. He is to be chosen.
The easiest way to determine this is to visually inspect the motherboard and determine the available connection points.
Visually inspect the motherboard and determine the available places for connection
Let’s sort it out in order:
- legacy IDE interface. A data bus that dates back to the dawn of computers and has gone through several reincarnations. It is characterized by a rather low data transfer rate, a wide and uncomfortable cable, but the relative cheapness of devices on it. The appearance of the connector on the motherboard and the cable for it — in the screenshot below, pay attention;
External view of the connector on the motherboard of the IDE interface
Cable for connection to IDE interface
- Modern Serial-ATA, or SATA interface. Appeared relatively recently, about ten years ago, and survived three reincarnations, each of which added a serial index to the name — 1, 2 or 3. It is distinguished by a high data transfer rate that grows with each generation, comfortable and durable cables (1 cm in thickness versus 6 for IDE!), as well as ease of setup.
 Photo — below.
Serial-ATA connection interface, or SATA
Cable for connection to SATA interface
Have you considered the motherboard? Let’s evaluate the availability of free ports. If there are several free SATA ports and an IDE port, then you definitely need to choose the first option. He has seriously more pluses, and it’s easier to connect. If there is only one free SATA port, then you can think about it — what if you want to connect another hard drive to your computer? He needs this port. Well, the easiest option is if you have either SATA or IDE ports. You have no choice, act according to the circumstances.
Removing the old drive
For this you will need a medium thickness Phillips screwdriver with a good slot and a vacuum cleaner.
Note! Take care to collect the mounting fittings in a separate place in advance — it will be very helpful when reassembling.
It is very unpleasant to look for bolts all over the apartment.
- Remove the side covers from the system unit. To do this, unscrew a pair of screws on the back of each side and pull the covers back. After shifting them a couple of centimeters and freeing the grooves, remove the covers.
Remove the side covers from the system unit
- It’s vacuum time. Carefully, without touching the electronic components (this is important!), remove the top layer of dust. Residues are best removed with a can of compressed air — there is less risk of damaging components.
We clean the system unit from dust with a vacuum cleaner and a cylinder of compressed air
- Locate your drive from the inside. Remove traces of hot glue from the cables with a screwdriver. Be careful!
- Gently remove the ribbon cable from the drive and motherboard connectors. Then take out the power.
We remove the cable from the connectors of the drive and the motherboard, then power
- The drive is secured with rather thin screws on the sides — their number varies from two to four on each side.
 Unscrew them and remember the approximate position.
Unscrew the screws securing the drive
- Now remove the drive. Pull it inside the system unit and pull it out, being careful not to touch the rest of the computer components. If the drive does not pull in, push it from the inside out and pull it towards you.
We pull the drive inside the system unit and pull it out
Note! Some models of system units do not allow you to pull the drive in. Pulling it out is prevented by the front panel — for example, the drive bays have rounded edges, for which the drive clings. In this case, you need to remove the front panel by unscrewing the four bolts or slightly bending the latches in four places. Do this with the utmost care: a system unit with an insecurely fixed front panel will finally lose its presentability.
If you cannot pull the drive inward, remove the front panel of the system unit by unscrewing four bolts or slightly bending the latches in four places
Installing a new drive in the system unit
In addition to the screwdriver, you may need pliers.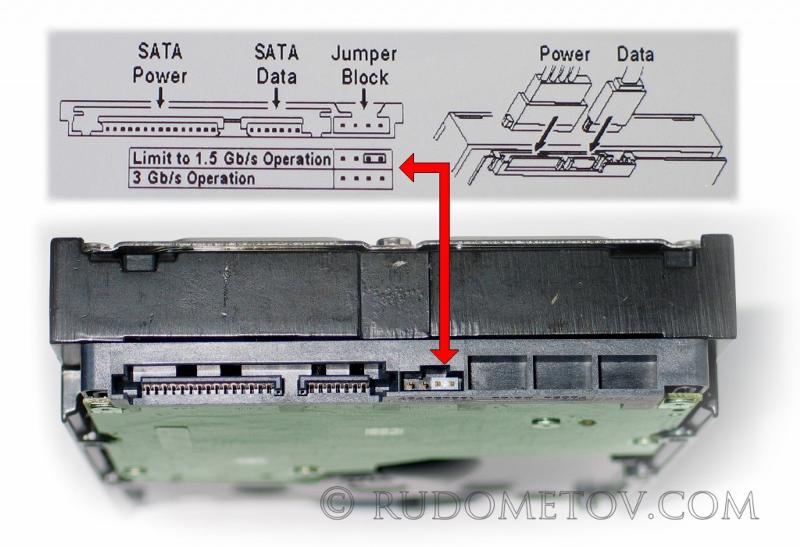
Note! If you have replaced the drive and completed the previous step to remove the old one, then you have already prepared everything for installation.
Now we’ll look at how to be someone who wants to put a drive in a new computer where it never was, or wants to put a second drive in addition to the old one.
- Using the instructions from the previous paragraph, open the system unit and remove the front panel.
- Gently pull one of the 5″ plugs out of the front panel. Be careful not to break the slots, as it may come in handy in the future if you want to get rid of the drive.
Carefully remove one of the plugs for five-inch devices from the front panel
- Using a pair of pliers, break out the metal plate opposite the selected plug on the front panel. The plate is definitely not useful, so just break it out. You can bend.
Using pliers, we break out the metal plate opposite the selected plug on the front panel
- Remove the new drive from the antistatic packaging.
 Remove all shipping labels. Carefully insert the drive into its place in the system unit.
We insert the drive into its place in the system unit
Note! It would be nice to find complete bolts from the system unit, but there are none, buy four or eight bolts along with the drive to mount it.
- Secure the drive with screws. Watch its position: it is important that it fits neatly with the front panel. One way or another, its position can be adjusted after.
We fix the drive with screws to the system unit
- Replace the front panel. If the drive does not align with it, loosen the screws and slide it into position. Tighten the screws.
Connecting an installed drive to the motherboard
Let’s start with the variant with IDE
- Unpack the included drive cable. If you already have one, use it, and if you don’t have your own or the bundled one, then buy a new one along with a drive.

- Make sure your power supply has IDE (MOLEX) power connectors. If there are no free connectors, ask the store for a splitter or adapter with SATA connectors (however, this is rarely found in nature).
Power adapter with SATA
- Connect the floppy drive to the motherboard using a cable. Observe the connector keys when installing.
We connect the drive to the motherboard using a cable
Note! The standard IDE cable is divided into three sections. The central one is offset from the center. That extreme connector, from which the distance to the middle one is greater, is inserted into the motherboard, and the other into the drive. If there are two drives, both connectors, the distance between which is the smallest, are used sequentially in the drives.
- Connect power to the drive.
Connecting power to the drive
- Turn on the computer, then check the presence of the disk drive in the BIOS.
 You can find the information you need either on the main tab (“Main” or “General”), which describes all connected devices, or on the “Boot” tab.
We find information about the drive on the main tab «Main» or «General», or in the tab «Boot»
Please note! Here we consider the option of connecting to a more or less modern motherboard. But even then, problems can also arise.
IDE is an old format with its own configuration rules. The loop implies the installation of two devices, so it turns out that one device is always the master (“Master”), and the other is always the slave (“Slave”). This is where the problem may lie if the connected drive is not detected. To fix it, check the position of the jumper on the back of the drive. Pay attention to the screenshot.
Checking the position of the jumper on the back of the drive
Universal case: if there is only one drive on the cable and it is connected by the last connector, then set the jumper to the left position (“Cable Select”, or auto-detection of the connection type). If there are two drives or devices in general on the cable, then the jumper should take a position based on the position of the device: if the connector is extreme — “Master”, that is, the right position, if the middle one is “Slave”, that is, the middle one. However, IDE motherboards have been around for a very long time, so they can easily fall short of standards. In this case, there is only one advice — refer to the instructions.
Now available with SATA
- In addition to the bundled cable, you most likely need a MOLEX to SATA adapter (the power supply for SATA devices has the same name for universality). Check the availability of such power in your system unit and, if necessary, purchase the necessary adapter.
MOLEX to SATA adapter
- In the same way, connect the motherboard to the drive and connect the power. There are no subtleties here: the SATA cable has only two connectors.
We connect the motherboard with the drive, connect the power
- Turn on the computer.
 Again, check the presence of the drive in the BIOS, as described in the previous paragraph. Ready!
It remains only to close the side covers, tighten their fixing screws and start using the computer. Ready!
Video — Connecting (installing, replacing) a PC drive
Did you like the article?
Save so you don’t lose!
Recommended related articles
How to install an SSD in a laptop instead of a DVD drive — detailed instructions
Every user would like to install a modern SSD drive on their PC for better productivity and higher system speed. Installing a solid state drive on a computer is incredibly easy, and the process itself is usually not accompanied by any difficulties.
By the way, there was a similar article earlier, but in it we installed an SSD instead of a regular hard drive, for this we just had to remove a small cover on the back of the case, which does not create any difficulties.
But installing an SSD in a laptop instead of a DVD drive is much more difficult, because you first need to carefully disassemble it. And many users at this stage already have difficulties. So let’s take a look at the whole process in more detail.
Contents of the article
- What is required for installation?
- How to choose an adapter?
- Disassembling the laptop
- Removing the top cover
- DVD drive
- Software settings
- The topic is completely covered in this video
- User comments
What do you need to install?
First, you should familiarize yourself with the characteristics of your laptop to understand what components you need to purchase. As practice shows, in most modern models with a CD drive, you can easily install an additional hard drive. Therefore, problems should not arise.
Before you begin, make sure you have everything you need to get the job done.
You will need:
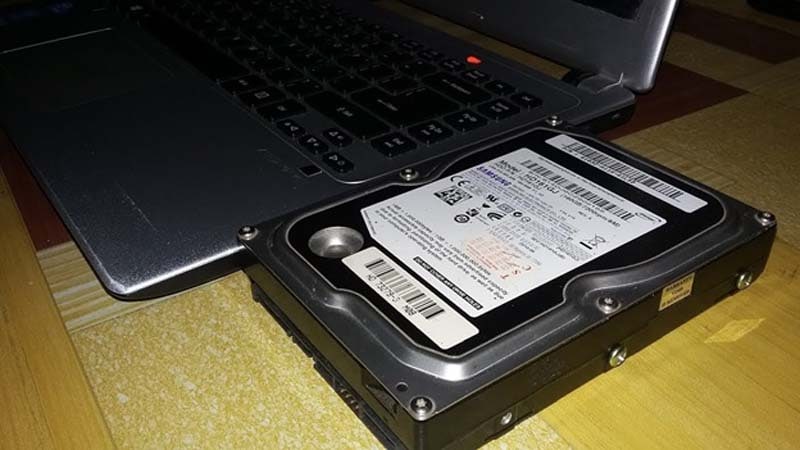
- 2.5” SSD.
- Tools for disassembling a laptop. Since the heads of all screws are the same, a small Phillips screwdriver is often required.

- Plastic pick, regular bank card or similar item for opening the case. The main thing is that it should be without sharp corners, so as not to damage the cable.
- Pocket (adapter, sled) for changing the drive to 2.5”.
Special attention should be paid to the last point, so let’s analyze it in more detail
How to choose an adapter?
The size of the drive comes in two types and differs in its thickness — 9.5mm and 12.7mm. Before buying an adapter, carefully measure the thickness of your drive and only then buy the appropriate adapter. Otherwise, the SSD drive adapter simply will not fit into the laptop in place of the DVD drive.
Also pay attention to the interface with which the drive is connected. If the interface is SATA, then using an adapter with an adapter to mSATA, you can easily put an SSD instead of a drive. But if your DVD drive is connected via IDE, which is an outdated technology, then you will need an IDE to SATA adapter to connect the SSD.
As mentioned above, the adapters differ only in thickness, while their shape and width are the same. The adapter usually comes with a disposable screwdriver, screws for mounting the hard drive and a plastic cover. The latter is needed for installation on an adapter in order to close the free space that forms after removing the drive.
Laptop disassembly
After we have prepared everything necessary for replacement and purchased a suitable adapter for the SSD, we can proceed to open the laptop and then replace the drive.
You can do this as follows:
- Turn off the laptop and wait until it turns off completely.
- Turn over and remove the battery.
After the battery is disconnected, the installed hard drive must be removed.
To do this:
- Unscrew the screws and remove the cover on the other side of the battery.
- To remove the cover, pry it off and lift it up.
Under the cover is the hard drive and memory modules. We need to remove the hard drive, as a solid state drive will be installed in its place.
If you ask why we install the SSD here, and not instead of the drive, then there is a simple explanation for this.
When the speed of the bus to which the hard disk is connected is faster (in this case, the hard disk is connected via SATA 3, while the drive has SATA 2), then the SSD is installed in place of the HDD.
To properly remove the drive, you must follow the following instructions exactly:
- Unscrew the screws that secure it.
- Move the hard drive to the left and carefully remove it from the case.
- Then pull the hard drive out of the mounting frame and set aside. We will return to it later.
- Install the SSD drive into the mounting frame.
- After that, we install our old hard drive into the adapter. It has a small instruction on how to properly fix the hard drive.
We put both drives aside, we will return to them later.
Removing the top cover
Now we need to remove the top cover of the laptop by unscrewing all the fixing screws. You should take into account the fact that they come in different sizes and be sure to remember where they were unscrewed from.
Once all the screws have been removed, it’s up to the pick. Now you need to separate the bottom and top of the laptop. You need to be extremely careful when opening, as most models have unreliable latches that can easily break. Check again if all the screws have been unscrewed, otherwise there is a risk of damaging the device case.
To remove the cover, insert a pick into the slot between the top and bottom covers and slowly turn it to release the latches inside the body. You should start from the front of the laptop, where the indicator lights are located. It is necessary to walk with a mediator along the perimeter of the entire body.
Once you have separated the top cover from the bottom cover, never lift it up abruptly.
Both parts are connected by cables, and you can damage them.
When working with some devices, you do not have to disconnect the cables, because sometimes you can replace the DVD drive without removing the top of the device, which can save you a lot of time.
DVD drive
Now unscrew the DVD drive. We will need a short screwdriver to unscrew the screw that secures the drive to the case. After it is unscrewed, you can remove the drive without any problems.
Then remove the plastic cover from the DVD drive. To do this, it must be opened. This will require a paperclip or a needle. We find a small hole on the front panel of the device and insert a paper clip there. After a slight push, the drive carriage will come out of the case, and you will have full access to its lower part and can easily separate the plug from the carriage.
Once the plug has been removed, it must be placed on the adapter.
Next, remove the bracket from the drive that attaches it to the laptop, and rearrange it to our adapter in the same place.
After that, we install the adapter in place of the drive we removed earlier and tighten the fixing screw.
It remains to turn the laptop upside down and install the SSD drive in place of the old HDD. We close the cover removed at the beginning of disassembly and tighten the remaining bolts around the perimeter of the device, insert the battery.
The laptop is now assembled and ready to go. We carried out the installation of two hard drives: we put the old HDD into an adapter and connected it instead of a drive, and a new solid-state drive was mounted in its place.
Software settings
The next step is to configure Bios, namely, enable AHCI mode. This mode allows you to increase the speed of the drive, mainly due to the advantages of NCQ technology. Other possibilities are also opening up, such as hot swapping, for example.
- We enter Bios. Instruction.
- Go to the «Main» section and set the «Configure SATA as» option to «AHCI».
