How To Control Fan Speed On PC
A computer adjusts its fan speed according to the load it gets. If you are doing some CPU-intensive tasks, your CPU cooler will spin at a higher RPM (Rotations Per Minutes). The same goes for your GPU.
However, you can control your fan speeds according to your needs using third-party applications or tweaking fan settings on your BIOS.
How Does a Computer Change the Fan Speed?
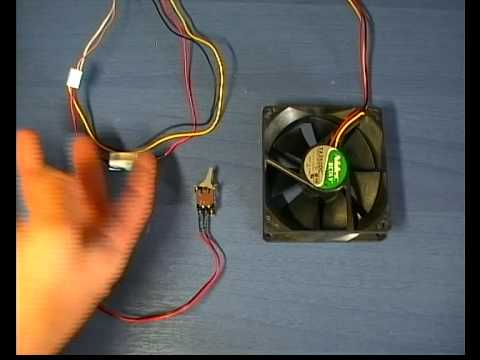
First, let’s discuss how a computer controls its fan speed. Depending on the cables attached, the fans on a desktop PC are connected either to the motherboard or the power supply. You can find three types of cables that connect the fans to the motherboard/power supply.
- 3-pin DC fan connector cable connects the fan to your motherboard. Fans connected with this cable spins at maximum RPM unless we change the speed from the BIOS.
- 4-pin Pulse Width Modulation (PWM) is also connected to the motherboard. However, it uses the sense pin to control the RPM according to the CPU load.
- Molex Fan Connector connects the fan to your PSU (Power Supply Unit). Fans connected with this cable also spin at maximum RPM. We need a Molex to 4-pin PWM hub to control its speed.
How to change fan speeds?
Here are a few techniques to change/control the fan speeds.
Controls From BIOS
Any piece of hardware attached to a motherboard will have settings in the BIOS to control it. If you have connected the fans to your motherboard, you can easily adjust its speed with the help of the BIOS.
Sometimes, the fans on your computer will spin at their maximum RPM. This is because the RPM, by default, is set to maximum on your BIOS (Basic Input/Output system).
- To enter your motherboard’s BIOS, press the Del or F12 key rapidly
(If you do not know how to enter the BIOS, please refer to the user manual for your laptop/motherboard). - Once inside the BIOS, use the arrow keys to navigate through it.
- Search for a Fan Speed Control option. Again, the option displayed will be different according to the motherboard manufacturer.
Some motherboards will have a Smart Fan Mode feature in the BIOS. This feature will automatically increase or decrease the fan speed according to the temperature of your system.
If you want to run the fans at maximum speed all the time, you can disable this feature. Once you disable the Smart Fan Control, all CPU and system fans will spin at a high RPM.
Some motherboards will also let you adjust the fan curve that enables the user to set the fan speed according to the temperature.
Fan Controlling Kit
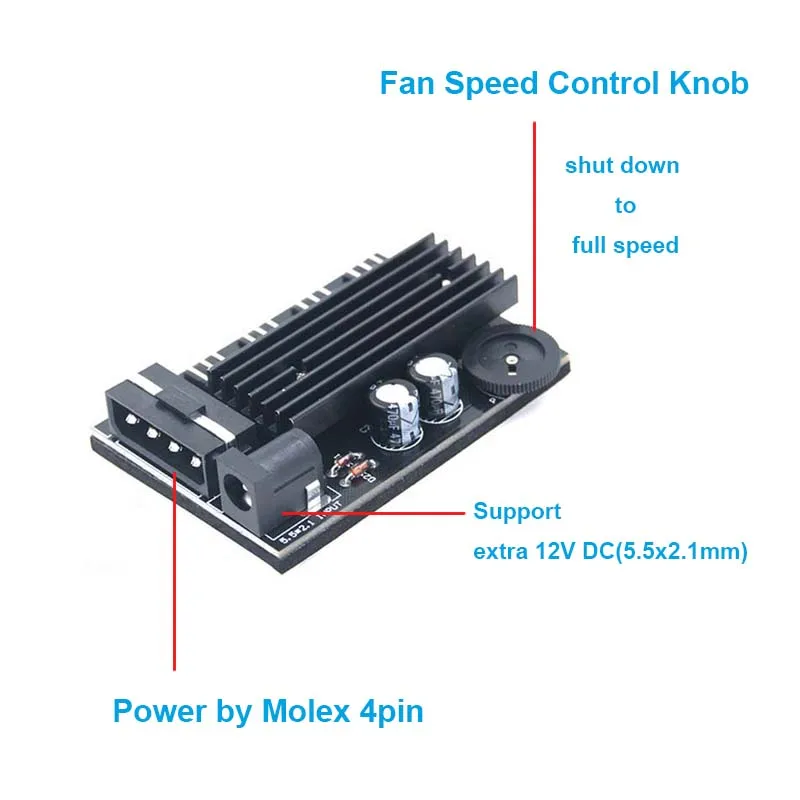
If you do not want to open the application every time you want to change the fan speed, then the fan controlling kit will be your best friend. Using the equipment, you can do this manually by turning a knob.
A fan controlling kit is a physical device that adjusts your CPU and case fans. You can adjust this kit on the front side of the PC case like any CD/DVD drive.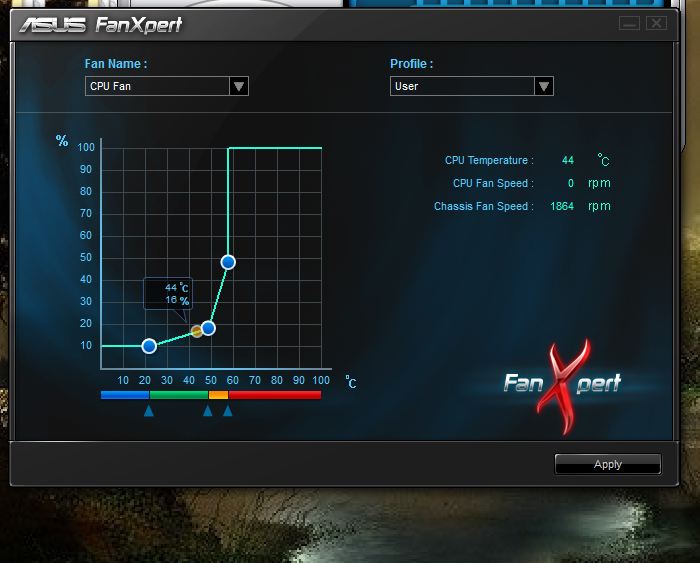 The kit will either have a knob or an LED display to adjust the RPM of your fans according to your need. The equipment will also display the current RPM of all your fans.
One downside to this kit is that these kits cannot control the fans connected with a Molex Fan Connector and the GPU fans.
Third-party software
Tweaking the BIOS setting can be a little risky as there is always a chance that your OS may not boot. If you are on a desktop computer and do not want to change the BIOS settings, you can always use a third-party application. These applications will help you tune the CPU and GPU to get maximum performance with low noise.
Please note that you cannot control all fans inside your motherboard. You cannot change its speed if the fan is connected to a PSU (Power Supply Unit) through a Molex Fan Connector.
However, if the fans are connected to the motherboard, either with 3-pin or 4-pin, these third-party applications can control the fans’ speed with a click of a button.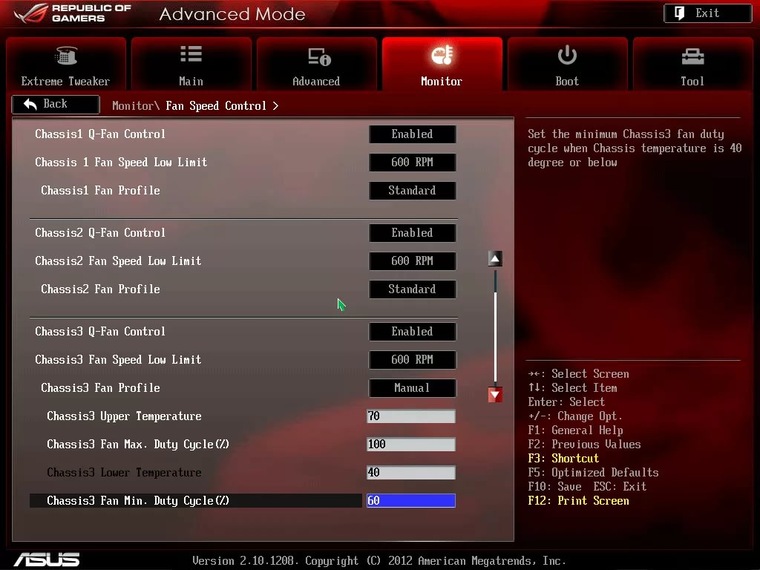 Some of the best Fan Control Software are listed below.
- MSI Afterburner (supports any motherboard and graphic card)
- Corsair iQue (Corsair products only)
- FanControl (Simple yet elegant)
- ZOTAC Firestorm (ZOTAC products only)
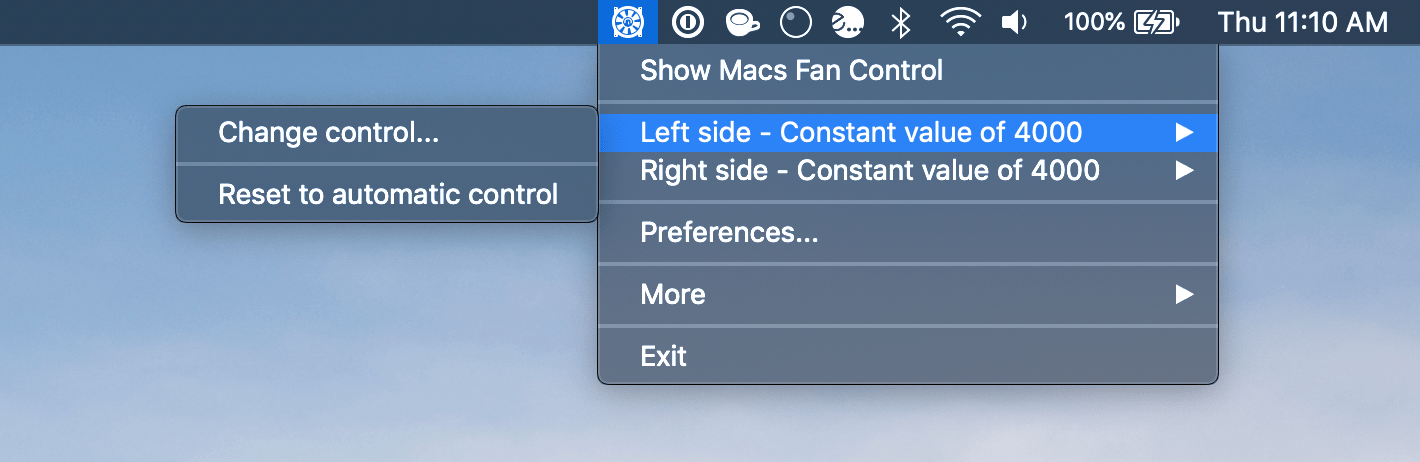
- Mac Fan Control (For Mac only)
Adjust from Windows settings
This is a simple Windows feature that lets you change the fan speed. You can follow these steps below:
Note: Only desktop users can access this Window feature to change the fan speed.
- Press the Windows key and open Control Panel.
Make sure that the View by option is Large icons on the top right. - Click on Power Options.
- Under Choose or customize a power plan, click on Change plan settings.
- Click on Change Advanced power settings. A new Power Options dialog box will open.
- Scroll down to Process power management and click the “+” icon beside it.
- Select System Cooling Policy. Then, click the dropdown icon.
- Now select active from the dropdown menu.
- Click Apply, then OK.
FAQs
How to Control All Computer Fans Simultaneously?
You can control all computer fans simultaneously using a fan hub. It is a junction-type device that connects all the cables from your case fans.
How to Control Fan With Molex Fan Connector?
If you want to control the Molex fans (fans with Molex Fan connector) with the kit, you can get a cable that has three ends:
- One end is a 4-pin PWM connector.
- Another one is a Molex connector.
- The final one is connected to the fan.
One end (Molex Connector) of this cable is attached to the PSU, while the other (the 4-pin PWM) is connected to the motherboard.
Can I Control Molex Fan without Any Adapters?
Yes, you can lower its speed by providing the fan with a low voltage. A Molex connector has four pins attached: two ground pins on the center, one pin that provides 5V, and the last one providing 12V.
You can rewire the Molex fan connector to a 5V line instead of the 12V, and this will make your fan spin at a lower rate. However, if the fan doesn’t spin on 5V, connect it to the 12V line.
Can I Convert a 3-Pin DC Fan Connector to 4-pin PWM?
If you want to control a 3-pin fan, you can find adapters that convert a 3-pin DC fan connector to 4-pin PWM.
How to Control Fan Speed on PC
Computers usually have multiple fans to cool off the electronics, unless you’re using a water cooling system. Your system may have one fan for the processor, another for the graphics card, one for the power supply, and maybe 1-4 additional fans attached to the PC case.
Cooling fans are absolutely necessary to keep your system cool, but they shouldn’t make your PC sound like an engine. To find the optimal balance between noise and cooling, you need to learn how to control the fan speed on your PC.
Table of Contents
Fan speed is often controlled automatically based on the hardware temperature. Your PC should be fairly silent when you’re browsing the internet, but it can get loud when you’re playing a demanding game. However, if your computer fans are loud all the time or fail to kick in and your CPU becomes hot, you can fix both issues quickly.
This article focuses on several methods of controlling fan speed. If you’re having problems with your fans, first clean your computer properly because fans work extra hard when there is dust and grime. Once the hardware is clean, you can optimize fan speed to your liking by using one of our methods.
How to Control Fan Speed in the BIOS
The most straightforward way to control fan speed is by making changes in the BIOS. If you don’t know how to enter BIOS, check our extensive guide before proceeding.
Controlling fan speed in the BIOS depends on your PC or laptop. There are many BIOS versions, and each one has different menus and labels.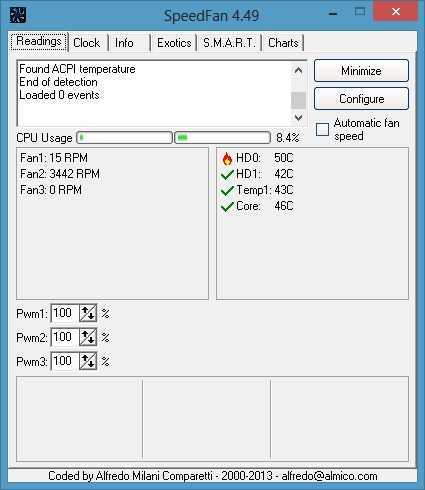 You won’t find a fan speed control option in some cases because the BIOS doesn’t support this feature. Some Lenovo Legion laptops are the perfect example of this. You can’t control fan speed because they run continuously and use the TDP (Thermal Design Power).
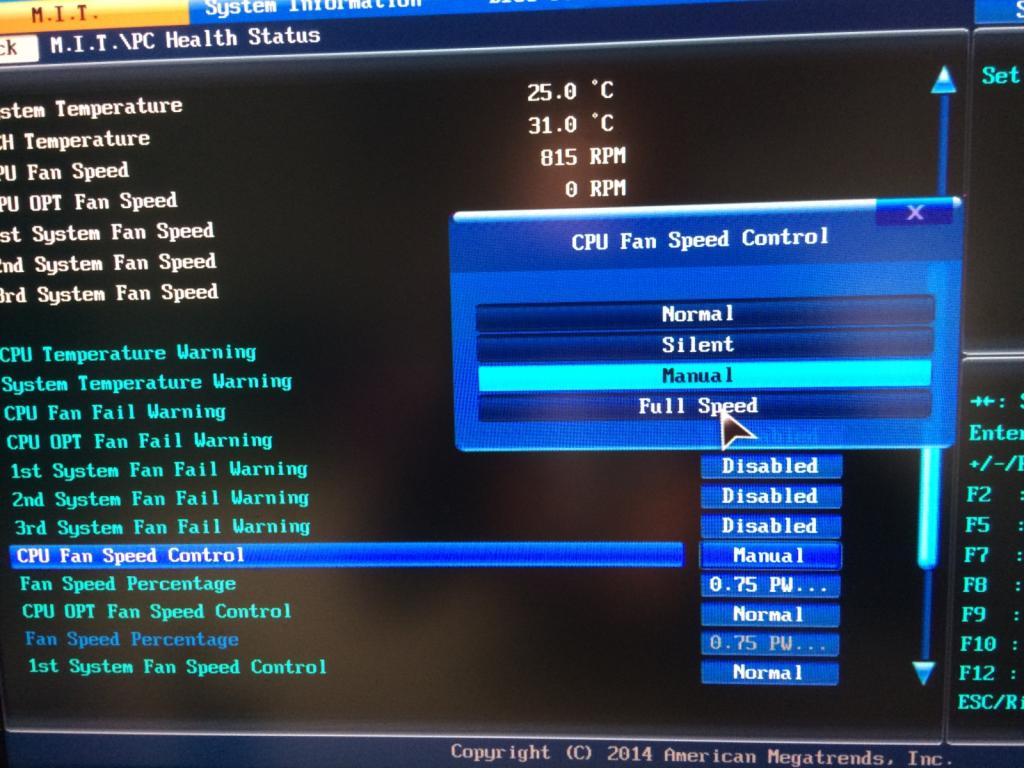
However, in most BIOS versions, you need to scroll through the menu until you find a menu called “Monitor”, “Status” or something similar, depending on the manufacturer. In the submenu, you’ll find a Fan Speed Control or Fan Control option. The label and the location of the submenu depend on the manufacturer.
The image above is an example of the fan speed control curve you might find with an MSI motherboard. Move the points to adjust fan speed based on temperature intervals.
The image below shows the fan speed control menu in the BIOS from Gigabyte, the principal being the same.
How to Control Fan Speed with Software
If you’re uncomfortable making changes in the BIOS, look into software options. Many programs allow you to control your fans by deciding how fast they should spin at specific temperatures.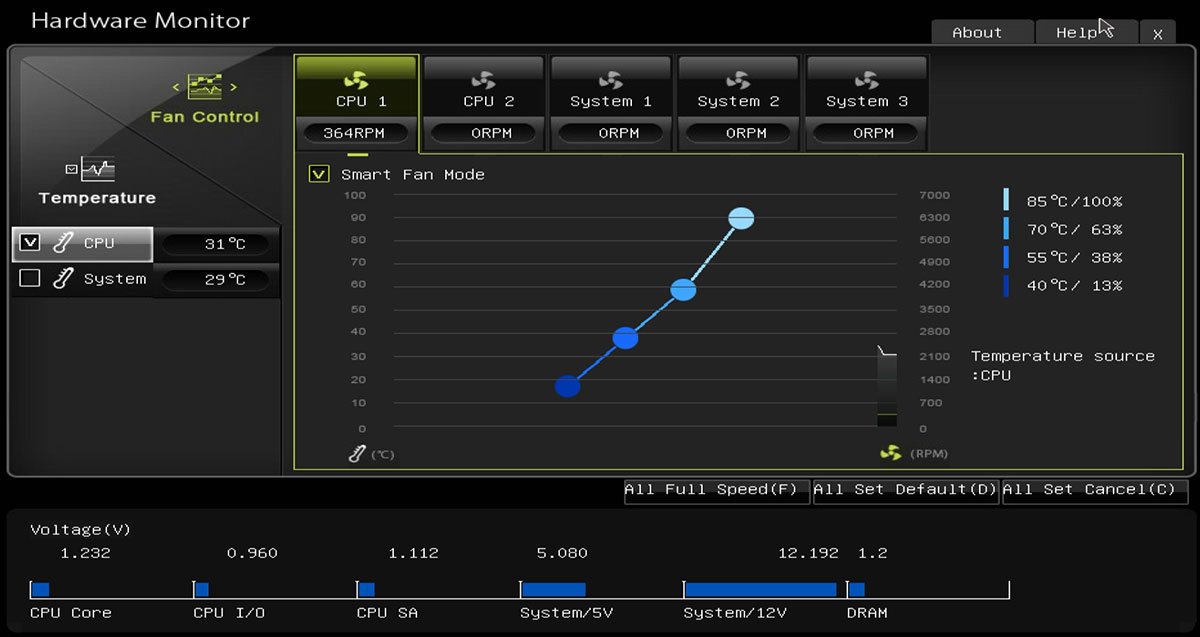 Such software also lets you track your hardware’s temperature, voltages, and fan speeds, which can tell you when it’s time to clean your PC.
However, adjusting fan speeds in the BIOS is still the most recommended option. If you mess anything up, you can always reset to the default settings.
SpeedFan
SpeedFan is a powerful tool and extremely popular because it offers many features while being completely free. Its user interface looks outdated and rudimentary by today’s standards, but SpeedFan offers a lot. As one of the oldest tools of this kind, it lets you monitor your hardware temperatures, voltages and make fan speed configurations. It’s free and easy to use.
You can select each fan and then make adjustments to the response curve. If you’re mostly browsing or performing other non-demanding tasks, you can make your computer very quiet by lowering the fan speed for low-temperature ranges.
If you don’t want to bother with manual configurations, but your default fan speeds are out of control, you can enable SpeedFan’s Automatic fan speed setting.
Note that this software doesn’t support all available motherboards, which means it might not detect your PC fans, so you won’t be able to make any configurations. In this case, you should either make the changes in the BIOS or use a fan controller.
MSI Afterburner
One of the essential fans under your control is the GPU fan. Depending on your graphics card type, it might have 1, 2, or even 3 fans. If the fans aren’t configured or managed correctly, your PC might sound like a jet engine even though your GPU is under light load, which is where a tool like MSI Afterburner comes in.
MSI Afterburner is famous in gaming circles for being an overclocking tool, allowing you to control GPU fan speed.
By default, your fan speed is set to automatic, which should fix any GPU fan speed problems you might have. If you’re not happy with the speed, you can make a simple manual adjustment by clicking on the A-looking symbol to disable Auto mode and increasing or decreasing fan speed by moving the slider.
Note that the fan will work at the set speed no matter the temperature. If you set a low speed, you need to be careful when playing a game that demands a lot from your GPU.
Alternatively, MSI Afterburner also comes with a fan speed curve. To access it, click the Settings button.
In the Fan tab, you’ll find the fan control speed curve.
Just like SpeedFan’s fan speed curve, the graph represents fan speed and temperature. Move the points up-down or left-right to adjust the fan speed based on specific temperatures.
How to Control Fan Speed with a Fan Controller
Computer hardware has become a lot more powerful in the past few years, but power generates much heat. Demanding CPUs and GPUs increase the ambient temperature inside the case, negatively impacting other components like hard drives or the motherboard. You need extra cooling fans to improve airflow, so having a setup with 3, 4, or more case fans is quite normal, which also makes fan controllers important.
Fan controllers are useful, but many PC builders overlook them. Changing fan speed settings inside the BIOS can be bothersome, and using software isn’t always the best solution due to support issues. A fan controller helps you control your fans and organize them.
Corsair iCUE Commander PRO
Fan controllers, like in the image above, let you connect multiple fans. Instead of connecting them to the motherboard or the PSU, you plug them all into the controller. Then you can use the controller’s software to adjust the fan speed. Some fan controllers come with physical controls like a touch screen or dials that let you manually control your fans.
Noctua PC Fan Controller
Choose the fan controller type that suits your needs.
Which fan speed control method do you prefer? Let us know in the comments below!
Nicolae is a Jack of all trades technology writer with a focus on hardware, programming languages, and AI image-processing software. Over the last five years, he has ghostwritten numerous tech how-to guides and books on a variety of topics ranging from Linux to C# programming and game development. Nicolae loves everything that has to do with technology and his goal is to share his knowledge and experience with others. Read Nicolae’s Full Bio
Subscribe on YouTube!
Did you enjoy this tip? If so, check out our YouTube channel from our sister site Online Tech Tips. We cover Windows, Mac, software and apps, and have a bunch of troubleshooting tips and how-to videos. Click the button below to subscribe!
Subscribe
How to adjust the fan speed in a PC
- Computer store
- Blog
([email protected])Published: 29 July 2021
Modern computer technology for cooling the system independently regulates the speed of the fans. However, in most cases, in order to achieve a comfortable ratio of efficiency and noise, it is better to do this in manual mode.
Today we will talk about ways to regulate the speed of case fans and processor cooling.

Why is fan adjustment necessary?
Initially, the fan operation parameters are set by the motherboard, depending on the temperature sensors and BIOS settings.
But not always the automatic system effectively copes with its functions. Most often this is one of the following scenarios:
- Overclocking system components.
- Constant work of the computer at high loads.
- Replacing coolers with more powerful ones.
- Change in room climate.
- Outdated cooling system.
- The computer has not been cleaned for a long time.
If the reason for excessive operation of the coolers is the overheating of the system due to heat or contamination of the system with dust, you cannot manually reduce the fan speed. The first step is to clean and maintain your computer. You may need to replace the thermal paste on the processor. If the device has not been serviced for a long time, these manipulations will reduce the temperature of the working units by 10 — 15 ° C.
In the case of overclocking, you should pay increased attention to the operating temperatures of the system components and take timely measures to adjust them. Excessive overheating is fraught with failure of overclocked components. If overheating is not observed, and the coolers operate at maximum speed, this leads to unnecessary power consumption and noise load.
In other cases, if there is no system overheating, and the fans operate at full capacity, performing more than 2000 — 3000 thousand revolutions per minute, you should change their operation parameters manually.
This can be done in three ways.
BIOS setup
You can enter the BIOS by pressing the appropriate button on the keyboard when the computer starts up. Depending on the motherboard model, this may be F2 or Del.
Typically, the fan settings section is located on the start page and is called «Fan Control». In the section you can find 3 types of devices:
- CPU FAN — CPU fan.
- Chassis FAN or CHA FAN — case fans.
- AUX FAN — ports for connecting additional fans. Their control is carried out by remote regulators, and the motherboard only provides power.
Near the name of each fan, its speed is indicated. To proceed to the settings, you must select a device.
Usually, the CPU fan setting is implemented in the form of a graph, to which basic modes are offered: Silent, Standard, Turbo, or others, at the discretion of the manufacturer. As well as manual mode — Manual or Custom.
To adjust, move the control points of the graph. However, it is not recommended to completely set the fan performance to the minimum values, especially when configuring processor cooling. The graph should look like a smooth curve, in which the minimum fan speed should correspond to a temperature of 30 °C, and the maximum fan speed should correspond to 80 °C. If possible, check the cooling efficiency at maximum load. Due to the peculiarities of both the fans themselves and the radiators, there may not be a difference in cooling efficiency between 85% speed and 100%, but the noise will increase significantly.
 The test should be carried out for at least 10 minutes in duration — during this time the system will reach the level of temperature stability. Of course, we are talking about air and 240-mm liquid systems. When using 360 or more overall radiators, warming up to a state of equilibrium can take up to half an hour. Select intermediate values based on the system parameters, evaluating each indicator and selecting the required value in a practical way under load.
Setting up case fans is rarely implemented visually. It is usually suggested to enter power as a percentage for each of the three operating modes: Min, Middle, and Max.
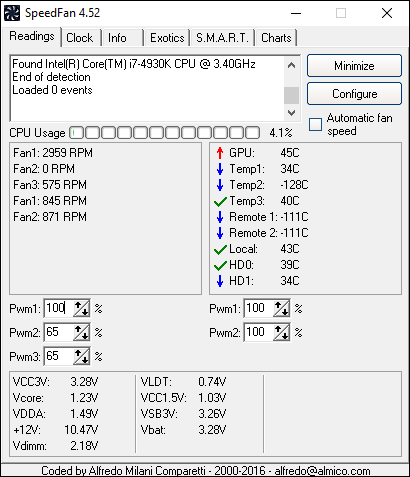
SpeedFan adjustment
SpeedFan is the most popular free application with a Russian-language interface. Among its features:
- Determination of the degree of loading of the processor and each core.
- Temperature monitoring of main PC components.
- Monitoring system operating parameters.
- Fan speed control.
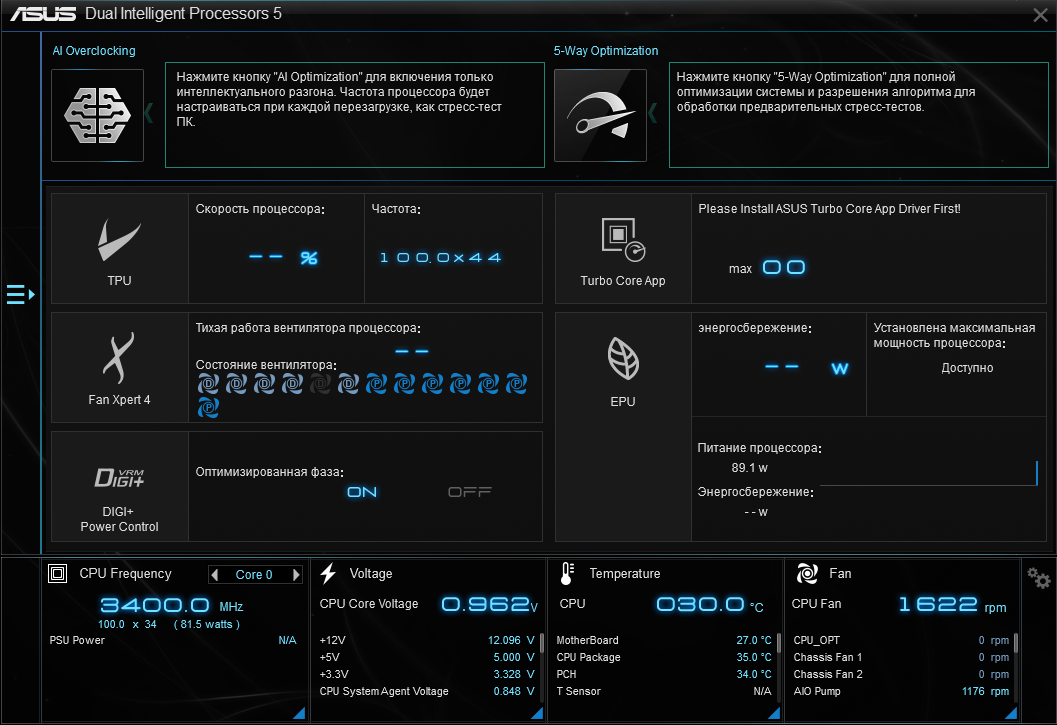
The program allows you to adjust the speed of each fan connected to the motherboard, while simultaneously evaluating how the temperature changes on the sensors. You can set the required temperature levels, and the system will automatically adjust the speed of the coolers. You can also set automatic mode. To do this, check the Automatic fan speed box.
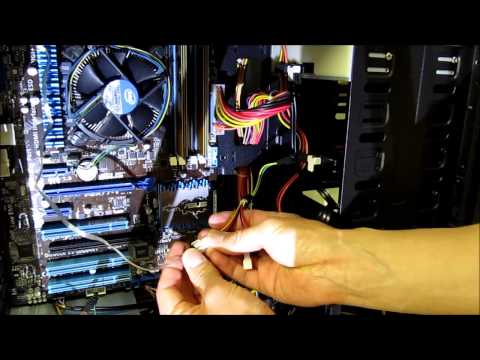
In most cases, if the fans are connected directly to the power supply, they can only be physically controlled.
Physical adjustment
To control the speed of the fans, a special multi-channel speed controller is used — reobas. It is mounted in the system unit or on the front panel. You can also find external devices that are fixed to the case with magnets or Velcro.
Depending on the configuration, reobas can perform several functions at once:
- Increase the number of connectors for connecting coolers.
- Adjust the operating parameters of the fans: rotation speed, energy consumption.
- Monitor system temperature.
- Visualize the performance of coolers and the system.
Reobas is chosen according to a number of characteristics:
- Type of control: manual or automatic.
- Functional.
- Number of connected fans.
- Number of temperature sensors.
- Display presence.
The simplest reobasses will show the speed of only one cooler, passing the values to the motherboard sensor. Readings are not taken from other coolers.
Some top models can be equipped with microphones and are able to automatically adjust the mode of operation of the cooling system in accordance with the noise background of the room.
- All posts
- KVM equipment (equipment)
- Powerline adapters
- security
- Wireless adapters
- Power supplies
- Video cards (videocard)
- Video surveillance (CCTV)
- HDDs and Solid State SSDs
- Disk shelves (JBOD)
- Sound cards
- Instruments
- Uninterruptible power supplies (UPS, UPS)
- Cables and patch cords
- Switches
- Computer peripherals (computer peripherals)
- Computers (PC)
- Controllers (RAID, HBA, Expander)
- PC Cases
- PC Motherboards
- Multifunction devices (MFPs)
- Memory modules for PCs, laptops and servers
- Monitors
- Monoblocks (All-in-one PC)
- Desktop storage systems (NAS)
- Notebooks (notebook, laptop)
- General help
- Cooling
- Tablets
- Plotters
- Printers
- Software
- Software for corporate consumer
- Projectors
- Processors for PCs and servers
- Workstations (workstation)
- Power Distribution Unit (PDU)
- Consumables for office equipment
- Wi-Fi extenders (repeaters, repeaters)
- Routers (routers)
- Servers and server hardware
- Network cards
- Scanners
- Telecommunication cabinets and racks
- Telephony (phone)
- Thin Clients
- Transceivers
- Smart watch
Change the rotation speed of the cooler on the Case, CPU and GPU
Every computer or laptop has built-in cooling fans to keep components like the processor or graphics card from overheating.
 If you run a massive game that requires powerful computer specs, you may hear the fans start to run faster and make more noise. If you run a lot of tabs in Chrome on a laptop, then the laptop will start to work with more resources, and accordingly it will start to heat up more, which will lead to an increase in the speed of rotation of the cooler. The fact is that a computer or laptop has sensors that periodically monitor the temperature of your system, and when it reaches a certain threshold, they begin to rotate faster in order to cool this or that component of the equipment.
 For example, I had a Readon 4870 video card, it was one of the first cards that had turbo blowing, and its operating temperature was 83 ℃ all the time. Before that, there were ordinary cards on the market in the form of an open board, but the Readon 4870 was in a plastic box and worked by blowing hot air. During the summer, the temperature reached 94℃, which made me worried, and I decided to manually increase the fan speed, which allowed me to drop the temperature to 73℃, sacrificing wild noise.

If you want to control the fan speed in Windows 10, you can do this by changing the settings in the BIOS or using third-party programs. You must understand that not all coolers will be regulated by programs, as they can be connected directly through the power supply or have two or three pin connectors. I tested popular programs like RivaTuner, SpeedFan, HWiNFO and none worked for my hardware.
Change the fan speed on the CPU and chassis via BIOS
This is the best option, since no third-party program helped me to change the cooler rotation speed on the central processor and case. When turning on the computer or laptop, immediately press the button on the keyboard DEL or F2 to enter the BIOS settings. Since motherboard manufacturers have different BIOS or UEFI, I will show an example on Asrcok, but you can google your model in the pictures. In most cases, you need to search for the word FAN or Speed . In my case, we have:
- CPU Fan 1 Setting set the value opposite Automatic mode .
 Next comes Target CPU Temperature and Target Fan Speed .
 - Target CPU Temperature we will set 50℃ , and in Target Fan Speed we will set Level 9 . It turns out that at temperatures above 50℃, the cooler will start to spin faster with level 9. Level 9 is the maximum fan speed. You can set your own temperatures and rotation level.
- Parameter Chsssis Fan 1 Setting is responsible for the fans that are connected via the motherboard to a 4-pin connector. These may be fans that are located on the case. But if the case fans are connected directly through the power supply, then this option will not work.
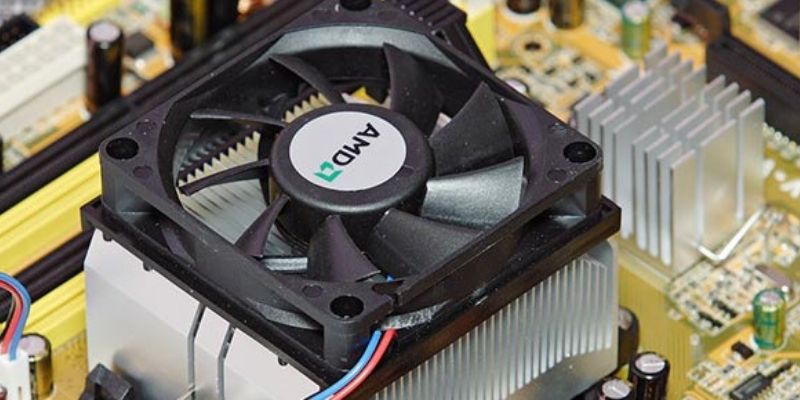
3-pin and 4-pin
3-pin — The wire responsible for the signal transmits the rotation speed of the cooler at a normal voltage of 4 or 12 volts. In a word, the speed of the cooler is controlled by increasing or decreasing the voltage on the power cable.