How to overclock Intel CPUs
(Image credit: Future)
Overclocking is not as difficult as you’d imagine. Indeed plenty of modern motherboards sell themselves on how easy they make squeezing a bit more performance out of your CPU. Some of these will offer you a single click option to try and get more from your chip, while those that relish a more hands-on challenge can go down the manual route. Something for everyone, basically.
Starting from the basics, you may be wondering what overclocking is. The good news is that’s a fairly easy thing to answer: as the name suggests it’s about running a component, in this case, your Intel CPU, at a high frequency, or clock speed, than intended. It gets a bit more complicated straight away though because as you run the chip faster it produces more heat, and becomes more unstable.
Staying on top of the thermals is key to overclocking.
Is overclocking worth it?
(Image credit: Future)
This is a bit of a contentious take in an overclocking guide, but overclocking Intel’s newest CPUs is unlikely to get net you a tangible performance boost in your games. New tech basically means the CPU is far better at dynamically pushing its frequencies than you can manage manually. You’ll do much better with slightly older CPUs, like the Coffee Lake Core i7 8700K we’ve looked at here.
As far as the concept of overclocking goes though, that’s it. You’re good to go. Run the CPU a bit quicker, stay on top of the cooling, and enjoy the benefits. Reality is a bit more complicated than that though because modern chips are complex, delicate slithers of silicon and if you just up the frequency and do nothing else, your machine will invariably crash if that’s all you do. This is where this guide comes in to help you with some of the subtler aspects of the processor.
Oh before we move on, it’s worth pointing out that not every CPU is the same. What one person manages to achieve with the exact same motherboard, memory, and everything else, is no guarantee that’ll you be able to do the same. Even with the seemingly same processor model. This means it’s rarely as simple as copying someone’s settings for their Core i9 11900K and assuming you’ll manage exactly the same with your chip.
Not every chip can be overclocked either. For Intel’s chips, only the K-series offerings, those with a trailing K on their product names, can have their multiplier tweaked. If you have a non-K chip, then you may get away with some bus-based tweakery, but it’s definitely not as straightforward. If you’re looking to overclocking your AMD CPU, then check out our AMD overclocking guide instead.
Get your system in shape first
Before unleashing your CPU’s inner beast, it’s best to give the system a quick tune-up first and ensure everything is ready. We’re using an Intel Core i7 8700K (Cofee Lake) processor here, but these instructions apply across all modern Intel CPUs (up to Rocket Lake) and Z-series motherboards from Skylake onward, with minor modifications for series-specific values such as voltage, AVX offsets, ring ratios, and a few others.
If you’re looking to overclock an existing build, it’s worth giving your PC a good clean first. Not only is a dirty PC gross, but it’s also like putting a fur coat on your computer. While cleaning, take note of the location of the CMOS reset button or jumper and make sure you can reach it. If the system hangs before reaching the BIOS on reboot, you’ll be using this to return things to normal.
You won’t get far overclocking with a basic air cooler. An all-in-one is pretty much essential these days.
This is also the time to evaluate your CPU cooling. The vast majority of Intel’s processors don’t bundle a stock cooler these days, which means you’ll need a third-party chiller to help keep your CPU in check.
It’s getting on a bit now, but for the likes of the Core i5 11600K or older quad-core CPUs, we recommend the $35 Cooler Master Hyper 212 EVO as a good starting place. If you’re running an older 6-core or 8-core processor, we recommend a liquid cooling closed-loop system like Corsair’s h215i Pro or NZXT’s Kraken X62 . In addition to offering better performance, it’s easier to mount the waterblock on liquid-cooled systems compared to a large air cooler.
Most good coolers also include an appropriate thermal compound, but if you’re reusing parts, get a tube of high-quality non-conductive heatsink compound, such as Arctic MX-4 or Artic Silver 5 and apply it properly .
Now is also a good time to measure your base performance level. You want to know how your PC performs before and after the overclock, to see how much it helps. There are many applications that you can use, but we recommend Cinebench R23 as it’s quick and easy to use. You can use a heavy load test like Prime95, but it really isn’t necessary for normal day-to-day overclocking.
(Image credit: Maxon)
The important thing to keep an eye on when running Cinebench is your CPU temperatures—use something like HWiNFO64 to keep an eye on these. If you’re seeing anything more than 75°C, you either need a better cooler or you need to reapply the thermal paste. For Cinebench, simply use the default CPU (Multi Core) test and don’t worry about the Minimum Test Duration just yet (this can be useful later on to check for stability though). Run it multiple times just for good measure, keeping the high score.
With these results in hand, it’s now time to start overclocking.
Understanding CPU multipliers and the base clock
Your CPU’s clockspeed is determined by two numbers, the base clock (BCLK) and the multiplier, also called the CPU ratio. Specifically, your CPU clockspeed is your base clock times the multiplier, eg, 45 * 100MHz = 4.5GHz.
BCLK affects more than just the CPU and influences the speed of DRAM, storage controllers, and other integrated components to varying degrees. Usually set to 100MHz, most overclockers avoid changing this number initially since it can cause difficult-to-pinpoint system instabilities even with a modest increase. There are tuning advantages to be had, but they are best left for future exploration once the top clockspeed of the processor is established by more stable means, namely changing the multiplier or ratio.
In this case, the multiplier is called the ‘Core Ratio. ‘ (Image credit: Future)
Unlike BCLK, the multiplier affects CPU speed alone, so it’s the perfect place to start. Intel’s Core i7 processors since the i7 2600K have had plenty of headroom in unlocked form, typically reaching overclock speeds between 4.5–5.1GHz when properly cooled.
Since Coffee Lake and the Core i7 8700K, most chips will hit all-core overclocks of 4.8–5.1GHz. The process to determine where your own CPU falls in this spectrum is straightforward.
(Image credit: Future)
To start, boot into your BIOS settings (usually by pressing F2 or Del while booting, but it varies between motherboards) and load the defaults. Set DRAM speeds to AUTO or the recommended spec for the chipset; for example, 2666MHz for Coffee Lake’s Z370 chipset. Higher speeds are possible, but find your maximum CPU overclock first and then tune DRAM second for the best overall performance.
If there are previous settings you wish to retain for later use, write them down, save a screenshot, or take a photo of the BIOS screens for later referral. Most motherboards provide storable BIOS profiles for this purpose as well and even allow saving them on USB sticks.
Finding the right multiplier for your CPU
Next, set a safe manual CPU voltage—around 1.25V is a good start for the Core i7 8700K, and we wouldn’t go beyond a maximum of 1.4V even with a good liquid cooler. Avoid using adaptive or offset voltage while initially setting up a system for overclocking. Stress tests performed while using adjusted adaptive settings can cause voltage spikes well beyond the listed numbers and can trigger crashes or even processor damage.
If you’d like to research and experiment with adaptive and offset voltage settings, consider doing so after stability testing is done with a manual voltage and a safe overclock has already been determined and saved. There are plenty of additional settings and risks to consider when running with adaptive voltage, and finding the right mix can take plenty of tweaking.
(Image credit: Future)
Link the cores so the multiplier change affects them all. Now you’re ready to start adjusting your multiplier. With Coffee Lake, begin with a value of 47 and keep raising the number until the system starts to show signs of instability or overheating, such as blue screen crashes, boot failures, or application freeze-ups.
Most chips manage 4.8GHz or higher, and the sample for this test maxed out at 4.9GHz via simple multiplier changes. The number you reach is the basic maximum speed for your chip. That’s far from the end of the road when it comes to overclocking, however.
Start with a manual voltage of 1.25V and bump up in small increments after finding the maximum multiplier. (Image credit: Future)
How to raise the voltage for overclocking
Boosting voltage to the CPU is the next step, and it pays to be careful here. Coffee Lake’s starting default voltage is low enough that a boost to 1.30V or 1.35V should result in a few hundred additional MHz to the top overclocking speed. In the case of the test Coffee Lake sample used here, 1. 35V allowed us to reach the rarified 5.0GHz CPU club.
Note that as voltages rise, so do temperatures, and the curve is not linear. After 1.4V or so, serious cooling solutions are recommended, and the clockspeed benefits start to thin out. Since every chip and motherboard has different potential, you need to test your unique setup to find the sweet spot for that rig. While you may see gonzo overclocking pros push Intel’s stated 1.5V limit or more to win benchmarking contests, stay under 1.4V with 24/7 overclocks for the sake of processor longevity.
(Image credit: Future)
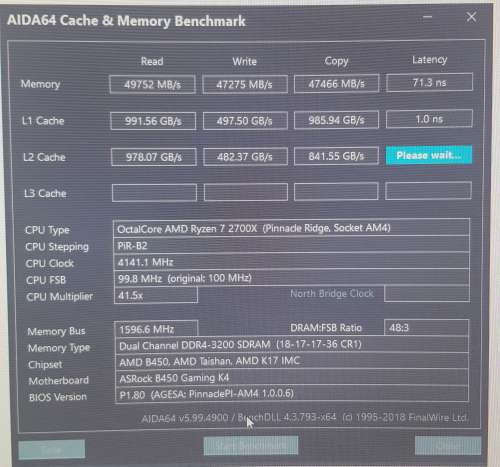
Check system Stability after each clock increase, using the same programs as before. AIDA64 is also a good option here. AIDA64 combines system information, synthetic benchmarking, monitoring, and stress testing into a single, modern package.
For stress testing, use the system stability test on the tools menu. Fire it up and select combinations of CPU, FPU, memory, and cache to test general stability, but use FPU test alone for temperature.![]() Processors run hot when AIDA’s FPU test is executed by itself, so take solace that actual full-load temps will be a few degrees lower in typical use. Consider it a safety margin against throttling.
Processors run hot when AIDA’s FPU test is executed by itself, so take solace that actual full-load temps will be a few degrees lower in typical use. Consider it a safety margin against throttling.
Once you have a stable overclock, run the benchmark suite again and compare results with your initial scores to take stock of your gains. Coffee Lake’s six or eight cores and the VRMs on many Z370 and Z390 motherboards run warmer than their predecessors, so don’t be alarmed if idle temps are higher than Kaby Lake or Skylake. Under load, peak temperatures shouldn’t be allowed to exceed about 80°C. Much past that point and you potentially shorten the life of the CPU due to thermal degradation.
Technically, Intel Coffee Lake CPUs won’t throttle until around 95C-100°C, reducing clockspeed to reduce heat. This can negate any overclocking benefits, but more importantly, running a CPU at 90°C or more on a regular basis is just asking for trouble. We’ve burned out CPUs in the past, or had once-stable processors require lowering the clockspeed below stock after pushing them too far. You’ve been warned: High temperatures are really not good for your CPU.
The Core, uncore, AVX, and per-core overclocking
The uncore, or system agent, takes care of all the system processes not performed by the main CPU cores, such as integrated memory controller and cache functions. While boosting the uncore frequency can result in minor performance increases, the main benefits to adjusting the uncore come from reducing it.
If your CPU is having problems going past 4.8GHz, try reducing the uncore speed to see if that frees up additional headroom for the cores to use. Any performance lost with lower uncore speeds is more than returned via higher core clockspeeds. If reducing uncore doesn’t help free up more GHz or results in instability, restore it to its former value or try a slight boost. Uncore is also referred to as the cache or ring ratio on some motherboards; the exact term depends on the manufacturer.
AVX offsets
Intel’s latest CPUs provide a series of updated AVX instructions, which are designed to accelerate audio, video, and image processing functions. However, these greatly increase the power usage and heat produced by a CPU.
To prevent AVX power spikes from limiting general overclocking potential, Intel introduced the AVX offset in the BIOS. This feature detects AVX workloads and adjusts the multiplier downward by a specified value to maintain system stability, so a system overclocked to 5GHz with an AVX offset of 2 would adjust to 4.8 GHz automatically during AVX enabled workloads and switch back again when completed.
(Image credit: Future)
Applications that make use of AVX instructions are more common these days, and it pays to check system stability under such workloads. Cinebench R23 is a good option for AVX testing. If you find a hard limit with these tests or with other AVX packages that you use frequently, adjust the offset to compensate so you can keep the overclocking gains found in typical CPU workloads without crashing.
As an example, our Core i7 8700K can hit 5.0GHz normal CPU workloads, but AVX loads can crash, so we’ve set an AVX offset of -1.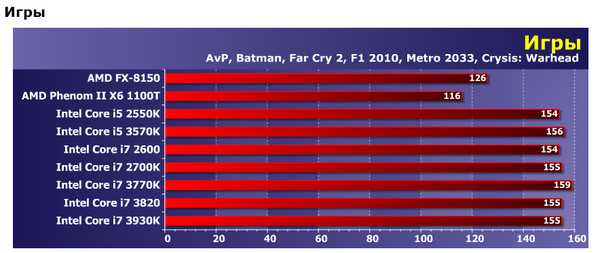 With a Core i9 9900K, we were also able to hit 5.0GHz, but with two additional CPU cores, we had to adjust the AVX offset to -2. You can expect an even larger offset with AVX512 applications too—as much as a -5 or -6, so don’t worry about dropping those in to ensure a reliable overclock.
(Image credit: Martin Malik)
Per core overclocking
Another potential trick with Intel CPU overclocking is per core overclocking. Every CPU has a ‘hero’ core that outperforms the others, and occasionally the discrepancy is great enough to hold back the package a multiplier or two. Per core overclocking allows you to set the high performing cores to a higher ratio, allowing for a slight speed boost. This also works in reverse for lazy cores, helping even out the silicon lottery.
The gains here are modest, but it can be fun to tweak the numbers a bit once the rest of the system has been tuned to a stable overclock and you’re looking to put a bit of polish on your project.
To determine which cores overclock best (and worst), run an all-core workload like any of those mentioned already, and use a utility like HWiNFO64 to monitor temperatures.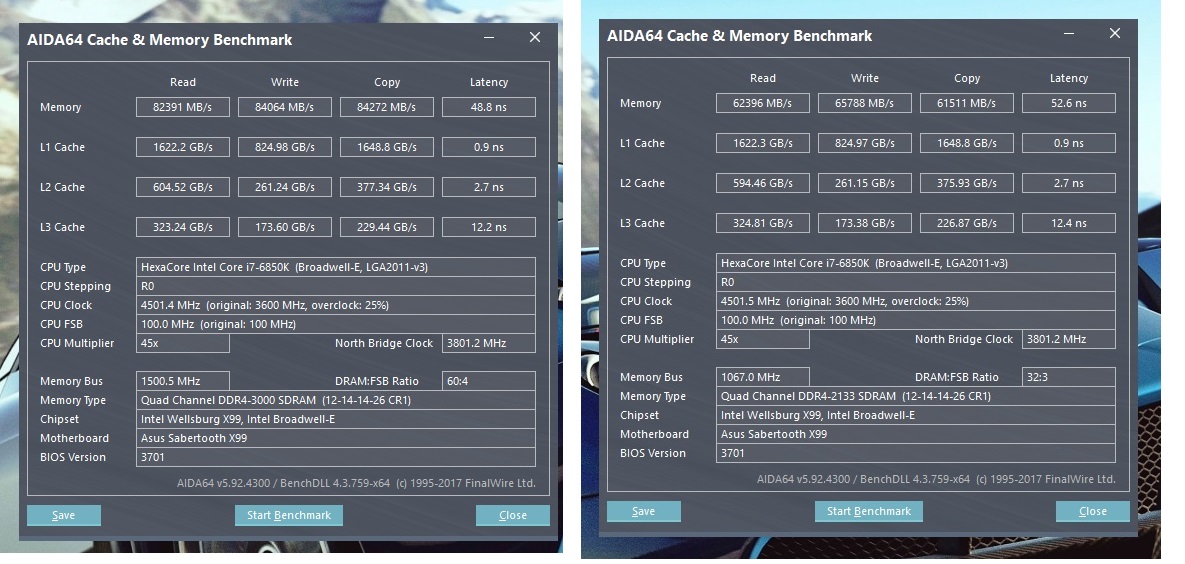 Then look at the max temperature for each core. In our above screenshot (which is running hotter than we’d like), core 2 hit 92°C while core 4 maxed out at 86°C, so core 2 is the worst and core 4 is the best.
BCLK and DRAM dabbling
Getting past multiplier stability limits can require some BCLK creativity. (Image credit: Future)
You can go beyond simple multiplier tweaking via BCLK tuning and DRAM speed adjustments. Carefully tuning these separates the digital dilettantes from the hardcore hobbyists. Increasing the multiplier ratio results in the most gains, but there’s eventually a number past which the processor won’t work properly. Bumping the BCLK allows the cores to exploit the last hundred or so MHz of potential.
For example, the Coffee Lake test CPU for this guide was not stable in a 51×100 configuration but was able to run normally using a 50×102 configuration. That produces the same 5.1GHz result, but idiosyncrasies allowed for one and not the other. BCLK adjustments go both ways, so you can always go lower for added stability, e. g. 51×99 might work where 50×100 did not.
Tweaking the BCLK gives more granular control, with many motherboards supporting 0.01MHz adjustments. However, for practical purposes, there’s usually very little difference in performance between a 5.0GHz and 5.05GHz CPU. Unless you’re chasing every last spec of performance, we’d leave the BCLK alone.
Bumping from 5.0GHz to 5.1GHz via BCLK adjustment also raised DRAM speeds, so leave some headroom for memory. (Image credit: Future)
For your memory, enabling the XMP profile for your kit and leaving other settings on AUTO will frequently result in a quick and dirty memory ‘overclock’ that optimizes around memory stability and performance. If you find yourself at a crossroads between pushing the CPU or the RAM speed, always go with the processor. That’s where you’ll find the most benefits and fewest headaches. Memory doesn’t overclock as reliably, and problems are a pain to troubleshoot.
Shortcuts, software, and satisfaction
Most motherboard makers along with Intel themselves offer software that duplicates some of the overclock settings usually kept locked away in BIOS. This allows tweaking without constantly rebooting into Windows to check the stability and performance returns for each adjustment, which saves a lot of time and frustration.
(Image credit: Intel)
One-step overclock solutions via desktop utilities are also common on enthusiast motherboards, offering an automated version of the adjustments discussed here with varying levels of user input along the way.
Results from these are mixed and usually on the conservative side speed-wise, although all of them seem to apply far too much voltage (which is bad for operating temperatures), so take note if you decide to use this feature as a starting point for your system tuning. They make for a good starting point, but we wouldn’t recommend using them for long-term overclocking.
The truly dedicated can take the final step and buy a motherboard made especially for overclocking. In addition to sporting beefier components built to withstand the strain of hardcore overclocking. Some even support pro-level competition features such as provisions for LN2 cooling pots.
MSI’s Godlike Gaming Z370 comes with a boatload of overclocking features, including hardware knobs and trick VRMs. (Image credit: MSI)
You don’t need liquid nitrogen or high-tech trophies to enjoy the speed increases or sense of satisfaction a healthy overclock brings, however. All you need to do is use your rig to feel the difference. We managed about a 20% overclock boost compared to stock with the Core i7 8700K, and 20–30% overclocks are possible on some CPUs (eg, the i5 8600K can typically reach 4.9GHz compared to 4.0GHz stock).
As we said at the start, it’s hard to hit these kinds of increases in more recent Intel CPUs (you’ll do well to get much out of Rocket Lake for example), but if you’re still rocking an older Intel CPU, then you should be able to squeeze a bit more from it.
Sign up to get the best content of the week, and great gaming deals, as picked by the editors.
Contact me with news and offers from other Future brandsReceive email from us on behalf of our trusted partners or sponsors
Alan has been writing about PC tech since before 3D graphics cards existed, and still vividly recalls having to fight with MS-DOS just to get games to load. He fondly remembers the killer combo of a Matrox Millenium and 3dfx Voodoo, and seeing Lara Croft in 3D for the first time. He’s very glad hardware has advanced as much as it has though, and is particularly happy when putting the latest M.2 NVMe SSDs, AMD processors, and laptops through their paces. He has a long-lasting Magic: The Gathering obsession but limits this to MTG Arena these days.
asus prime overclocking — Google Suche
AlleShoppingVideosBilderMapsNewsBücher
Suchoptionen
ASUS AI Overclocking
www.asus.com › microsite › motherboard › Intel-Z490 › AI-Overclocking
ASUS AI Overclocking ist ein intelligentes Utility, das dir dabei hilft, das Optimum aus deinem System herauszuholen. Es erstellt vollautomatisch ein Profil …
Einführung in AI Overclocking | Offizieller Support | ASUS Deutschland
www.asus.com › support › FAQ
04.02.2021 · AI Overclocking ist eine der Funktionen der AI Suite 3 Software. AI Overclockingevaluiert die optimalen Übertaktungseinstellungen für Ihre …
Ähnliche Fragen
Was ist AI Overclock Tuner?
Was ist ein AI Tweaker?
ASUS AI Overclocking
www.asus.com › Microsite › Intelligent-motherboard
AI Overclocking moves the needle way beyond the limitations of traditional overclocking presets. From the moment you turn on the system, dedicated onboard …
Anleitung: Prozessor mit AI Overclocking übertakten — ROG — ASUS
rog.asus.com › … › anleitung-prozessor-mit-ai-overclocking-bertakten
02.07.2020 · Mit AI Overclocking ist es so einfach wie nie zuvor, euer System mit wenigen Mausklicks zu übertakten. In dieser Anleitung zeigen wir euch, …
The Only Automatic Overclocking Tool You Will Ever Need? — YouTube
www.youtube.com › watch
03.11.2020 · Is ASUS AI Overclocking — The Only Automatic Overclocking Tool You Will Ever Need? ? **Get …
Dauer: 13:56
Gepostet: 03. 11.2020
How to Overclock Intel CPU on Asus Motherboard — YouTube
www.youtube.com › watch
28.02.2022 · A simple 2 minute guide on how to safely OC your 10700K using any Asus motherboard. The …
Dauer: 1:43
Gepostet: 28.02.2022
ASUS Prime X470 Pro Ram overclocking Guide — YouTube
www.youtube.com › watch
08.12.2021 · ASUS Prime X470-Pro Ram overclocking Guide, In this video we will be showing 3 different …
Dauer: 9:27
Gepostet: 08.12.2021
ASUS Z690 AiOC Overview & Guide — Overclock your Intel 12th Gen …
www.youtube.com › watch
16.12.2021 · In this video, JJ from ASUS walks you through overclocking Intel 12th Gen K series CPUs on …
Dauer: 20:56
Gepostet: 16.12.2021
ASUS-BIOS für Z690: Overclocking von Non-K-Alder-Lake-CPUs …
www.hardwareluxx.de › Hardwareluxx › News › Hardware › Prozessoren
20.01.2022 · ASUS-BIOS für Z690: Overclocking von Non-K-Alder-Lake-CPUs möglich.
Help Me Overclock 12700K On Asus Prime Z690 P D4 — Reddit
www.reddit.com › overclocking › comments › help…
05.04.2022 · Help Me Overclock 12700K On Asus Prime Z690 P D4. Hello Guys. i’m new to overclocking and i searched and watched alot of videos but my main …
Ähnliche Suchanfragen
ASUS Overclocking Tool Download
ASUS AI Overclocking Z690
AI Suite 3
Asus GPU overclocking Tool
ASUS AI Suite
Asus AI Overclocking deaktivieren
ASUS AI Overclocking review
ASUS AI Overclocking Test
characteristics of Intel Core i7-2700k Sandy Bridge: TESTS, competitors, price
- Main page
- >
- Processors
- Intel
- >
- Core i7-2700K
Core i7-2700 Core
Core
Core
Core
Core
Core
Core
Core
Core
Core
Core
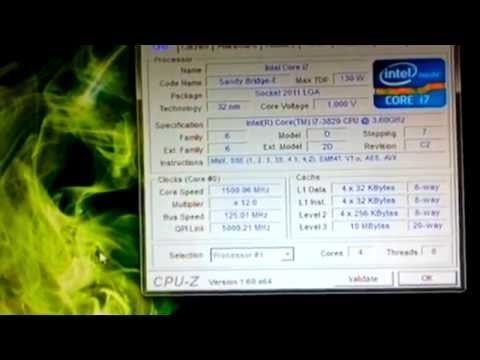
manufacturer as: BX80623I72700K.
Number of cores — 4, manufactured according to 32 nm process technology, Sandy Bridge architecture. Thanks to Hyper-Threading technology, the number of threads is 8, which increases the performance of multi-threaded applications and games. nine0019
The base frequency of the Core i7-2700K cores is 3.5 GHz. The maximum frequency in Intel Turbo Boost mode reaches 3.9 GHz. Please note that the Intel Core i7-2700K cooler must cool processors with a TDP of at least 95W at stock frequencies. When overclocked, the requirements increase.
With the built-in Intel HD 3000 graphics core, the computer can operate without a discrete graphics card because the monitor is connected to the video output on the motherboard.
Price in Russia
Do you want to buy Core i7-2700K cheaply? Look at the list of stores that already sell the processor in your city. nine0019
Family
- Core i7-2600K
- Core i7-2600
- Core i7-2600S
- ASUS P8Z68-V Pro Gen3
- Bin Bin
- ASUS P8Z68-V Gen3
- ASUS P8Z77-V LX
- ASUS MAXIMUS IV EXTREME-ZTREME -Z IV EXTREME-ZTREME-ZTREME-ZTREME-ZTREME-ZTREME-ZTREME -Z
- GIGABYTE GA-Z68X-UD3H-B3
- GTX 1070
- GTX 970
- GTX 1060-6GB
- 850 Evo 500GB
- 860 Evo 500GB
- 860 Evo 1TB
Intel Core i7-2700K
Speed in games
Production and similar applications, according to our tests.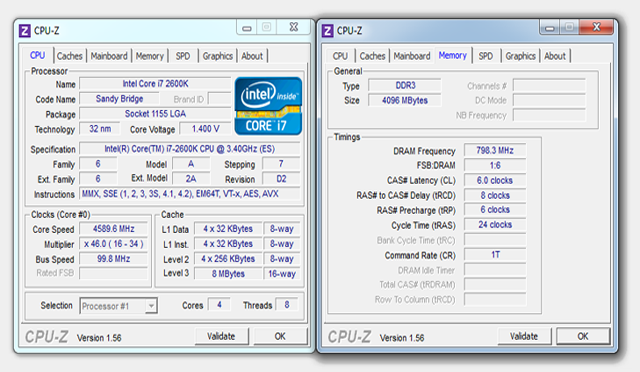
The performance of 4 cores, if any, and performance per core has the greatest impact on the result, since most games do not fully use more than 4 cores.
The speed of caches and working with RAM is also important. nine0019
Speed in office use
Performance in everyday work such as browsers and office applications.
The performance of 1 core has the greatest impact on the result, since most of these applications use only one, ignoring the rest.
Similarly, many professional applications such as various CAD programs ignore multi-threaded performance.
Speed in heavy applications
Performance in resource-intensive tasks loading a maximum of 8 cores. nine0019
The performance of all cores and their number has the greatest impact on the result, since most of these applications willingly use all the cores and increase the speed accordingly.
At the same time, certain periods of work can be demanding on the performance of one or two cores, for example, applying filters in the editor.
Data obtained from tests by users who tested their systems with and without overclocking. Thus, you see the average values corresponding to the processor. nine0019
Speed of numerical operations
Simple household tasks |
||
| Minimum | Average | Maximum |
| 81 | Memory: 89 | 97 |
|
Memory 92.2 nine0076 | ||
| 76 | 1 core: 98 | 121 |
|
1 core 42.1 |
||
| 145 | 2 cores: 186 | 235 |
|
2 cores 40. nine0076 | ||
 5
5
Demanding games and tasks |
||
| Minimum | Average | Maximum |
| 252 | 4 Cores: 329 | 416 |
|
nine0020 4 cores
35.9 |
||
| 352 | 8 cores: 480 | 609 |
|
8 cores 27.6 |
Extreme |
||
|
nine0076 | ||
| Minimum | Average | Maximum |
| 367 | All cores: 483 | 610 |
|
All cores 8 |
Different tasks require different CPU strengths. A system with few fast cores and low memory latency will be fine for the vast majority of games, but will be inferior to a system with a lot of slow cores in a rendering scenario. nine0019
We believe that a minimum of 4/4 (4 physical cores and 4 threads) processor is suitable for a budget gaming PC. At the same time, some games can load it at 100%, slow down and freeze, and performing any tasks in the background will lead to a drop in FPS.
Ideally, the budget shopper should aim for a minimum of 4/8 and 6/6. A gamer with a big budget can choose between 6/12, 8/8 and 8/16. Processors with 10 and 12 cores can perform well in games with high frequency and fast memory, but are overkill for such tasks. Also, buying for the future is a dubious undertaking, since in a few years many slow cores may not provide sufficient gaming performance. nine0019
When choosing a processor for your work, consider how many cores your programs use. For example, photo and video editors can use 1-2 cores when working with filtering, and rendering or converting in the same editors already uses all threads.
Data obtained from tests by users who tested their systems both with overclocking (maximum value in the table) and without (minimum). A typical result is shown in the middle, the more filled in the color bar, the better the average result among all tested systems. nine0019
Compare
Benchmarks
Benchmarks were run on stock hardware, that is, without overclocking and with factory settings. Therefore, on overclocked systems, the points can noticeably differ upwards. Also, small performance changes may be due to the BIOS version.
Passmark
Intel Xeon E3-1220 V5
5687
Intel Core i7-3720qm
5684
Intel Core i5-6600t
5655
I0019
5649
Intel Core i5-4690K
5640
Intel Core i7-2700K
5632
Intel Core i5-5675C
5626
Intel Core i7-4700HQ
5622
Intel Core i7-4722HQ
5620
Intel Core i5-4690
5594
Intel Core i7-4750HQ
5590
Tests in games
FPS measured in popular games at Intel Core i7-2700K and compliance with the system requirements. Please note that the official requirements of developers in games do not always match the data of real tests. Also, the result is strongly influenced by the overclocking of the system and the graphic settings in the game. We test at high settings in FullHD resolution to get numbers close to real gameplay. nine0019
Complexes
Maternal boards
Video cards
9004 Vengeance DDR3 2X410043
Also with these components, the best results in tests and stable operation are achieved.
The most popular config: motherboard for Intel Core i7-2700K — Asus P8Z68-V PRO GEN3, video card — GTX 1070, RAM — Vengeance DDR3 1600 C9 2x4GB, SSD — 850 Evo 500GB. nine0019
Features
Main
| Socket Installed in motherboards with a suitable socket. Note that a socket is not guaranteed to be compatible. The manufacturer may not add support to the BIOS. | LGA 1155 |
| Manufacturer Firm | Intel |
| Presentation datePresentation in mass media, official information. | |
| Code name of the Microarchitecture family. | Sandy Bridge |
| GenerationCode name for the microarchitecture generation. | Core i7 (Sandy Bridge) |
Performance
| Cores The total number of physical cores. | 4 |
ThreadsNumber of threads. The number of logical processor cores that the operating system sees.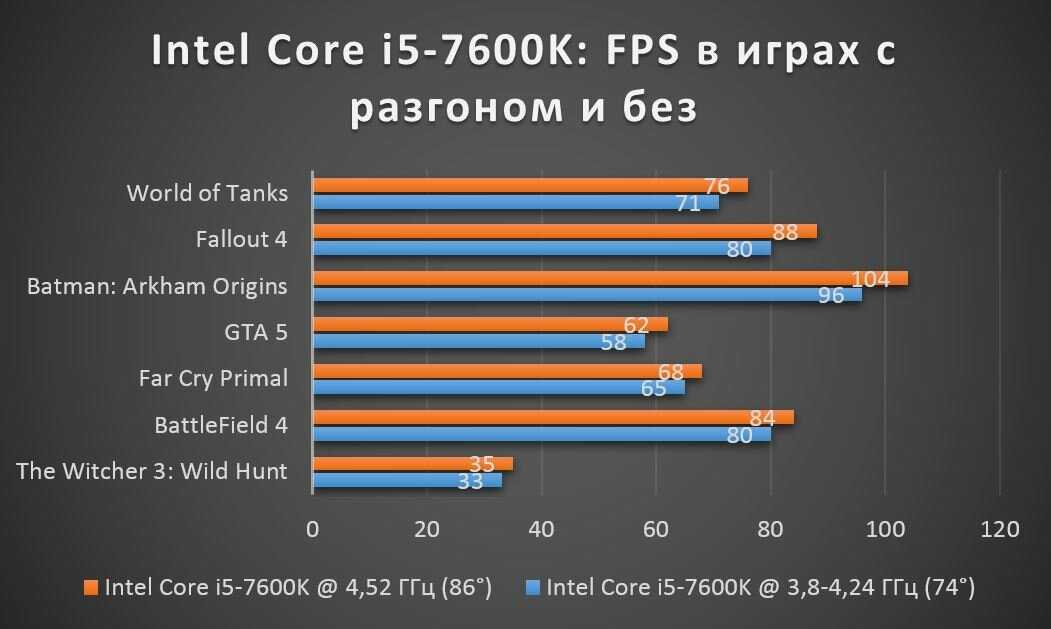 nine0076 nine0076
| 8 |
| Multi-Threading Technology With Intel’s Hyper-threading and AMD’s SMT technology, one physical core is recognized by the operating system as two logical cores, thereby increasing processor performance in multi-threaded applications. | Hyper-threading (note that some games may not work well with Hyper-threading, for maximum FPS you can try to disable the technology in the BIOS of the motherboard). nine0076 |
| Base frequencyGuaranteed frequency of all cores (P-cores in case of corresponding architecture) of the processor at maximum load. It is important to remember that speed and frequency are not directly related. For example, a new processor at a lower frequency may be faster than an old one at a higher one. | 3.5 GHz |
Turbo frequencyThe maximum frequency of one processor core in turbo mode. Manufacturers allow modern processors to independently increase the frequency of one or more cores under low-threaded loads, due to which performance is noticeably increased. It may depend on the nature of the load, the number of loaded cores, temperature and the specified limits. Significantly affects the speed in games and applications that are demanding on the frequency of the CPU, but do not load all threads. nine0076 It may depend on the nature of the load, the number of loaded cores, temperature and the specified limits. Significantly affects the speed in games and applications that are demanding on the frequency of the CPU, but do not load all threads. nine0076
| 3.9 GHz |
| Free multiplier Allows you to specify any multiplier, which is convenient for manual overclocking. It’s worth mentioning that old-school multiplier or bus overclocking is a thing of the past. | Yes |
| BCLK System bus frequency. Some motherboards allow you to achieve a good performance boost by slightly raising the bus frequency. Often this has a bad effect on the stability of the system. nine0076 | 100 |
CPU multiplier. The final CPU frequency is determined by the simple formula BCLK * CPU multiplier. Modern processors instantly change the multiplier of each of the cores, taking into account the type of load, temperature, consumption and settings in the BIOS.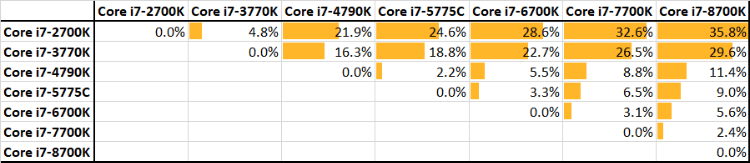 |
35 |
| TDPThermal Design Power is an indicator that determines heat dissipation in standard operation. The cooler or water cooling system must be rated for a larger value. Remember that with a factory bus or manual overclocking, TDP increases significantly. nine0076 | 95W |
Cache and RAM
| L1 Cache First level cache. Modern processors use a multi-level cache. The first is the fastest, but the smallest. In the case of an L1 access and a miss, the L2 cache is searched for the next stage. | 64K (per core) |
| L2 Cache Second level cache. Holds more data, but is slower. | |
L3 Cache L3 cache. AMD created the Ryzen 7 5800X3D with a record-breaking L3 volume, which reduced the requirements for memory frequency and significantly increased the number of frames in many games.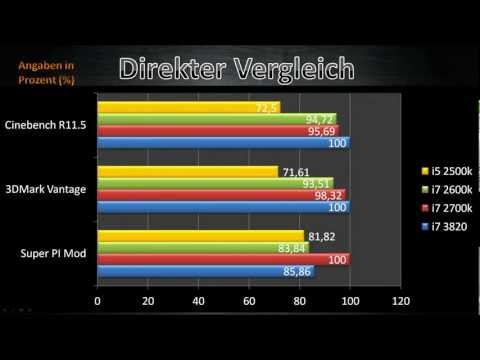 |
8MB (shared) |
| Maximum RAM Amount of RAM that can be installed on a motherboard with this processor. | 32 GB |
| Supported type of RAM The type of RAM depends on its frequency and timings (speed), availability, price. | DDR3 Dual-channel |
| RAM Channels The multi-channel memory architecture increases data transfer speed. On desktop platforms, two-channel, three-channel and four-channel modes are available. | 2 |
| RAM bandwidth | 21 GB/s |
Video core
Integrated graphics core Allows you to use your computer without a discrete graphics card. The monitor is connected to the video output on the motherboard. If earlier integrated graphics made it possible to simply work at a computer, today it can replace budget video accelerators and makes it possible to play most games at low settings. nine0076 nine0076
| Intel HD 3000 |
| GPU base clockFrequency in 2D and idle. | 850 MHz |
| Maximum GPU frequencyMaximum 3D frequency. | 1350MHz |
| Intel® Wireless Display (Intel® WiDi) Supports Wireless Display technology using the Wi-Fi 802.11n standard. Thanks to it, a monitor or TV equipped with the same technology does not require a cable to connect. nine0076 | No data |
| Supported monitorsThe maximum number of monitors that can be connected to the integrated video core at the same time. | 2 |
PCI
| PCI-E The PCI Express computer bus version. The bandwidth and power limit depend on the version. There is backward compatibility. | Gen 3, 16 Lanes (CPU only) |
Details
Model Official name.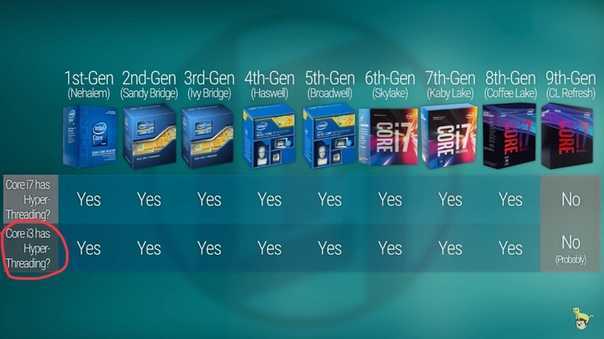 |
i7-2700K |
| ArchitectureCode name for the microarchitecture generation. | Sandy Bridge |
| Chip manufacturer A company that manufactures chips in its own factory. | Intel |
| Number of transistors | |
| Process The manufacturing process, measured in nanometers. The smaller the technical process, the more perfect the technology, the lower the heat dissipation and power consumption. For Ryzen with a chiplet layout, the CCD process is implied. | 32 nm |
| Chip size Varies with process technology and number of transistors. For chiplet Ryzen, the area of all CCDs is indicated. | 216 mm² |
| Socket type | FC-LGA10 |
| Spec Code | SR0DG |
DescriptionInformation about the processor, taken from the official website of the manufacturer. |
Intel® Core™ i7-2700K Processor (8M Cache, up to 3.90 GHz) |
| Instructions | 64-bit |
| Extended instruction set Allow to speed up calculations, processing and execution of certain operations. Also, some games require instruction support. | SSE4.1/4.2, AVX |
| Bus frequency The speed of communication with the system. | 5 GT/s DMI |
Competitors
| Games | Office | Heavy duty | |
|---|---|---|---|
| Better than | AMD Ryzen 5 1500X | AMD Ryzen 7 5700U | AMD Ryzen 3 1300X |
| Worse than | AMD Ryzen 5 5600U | AMD Ryzen 7 5800U | AMD Ryzen 5 1400 |
Please note that competitors are selected automatically based on performance in a particular task. Therefore, some may puzzle you. We are improving our selection algorithm, treat with understanding.
Compare
Intel Core i7-2700K vs AMD Ryzen 5 1500X
Intel Core i7-2700K vs AMD Ryzen 7 5700U
Intel Core i7-2700K vs AMD Ryzen 3 1300X
Intel Core i7-2700K vs AMD Ryzen 5 5600U
Intel Core i7-2700K vs AMD Ryzen 7 5800U
Intel Core i7-2700K vs AMD Ryzen 5 1400
nine0070
Overclocking intel i5-2500k/i5-2550k/i7-2600k/i7-2700k.
Brief description of overclocking the processor Sandy Bridge 2500K-2600K-2700K
4.5MHz, and so on (the tab is called CPU Ratio ). After that, we set the voltage on the processor, and do not forget that you do not need to get carried away by raising the voltage. The voltage step, when overclocking, is 0.02, for example: 1.28V, the next step will be 1.3V. nine0019
3. When testing the processor for stability, do not forget about the tab. On some motherboards, the function not only removes drawdowns, but is also able to raise the Vcore by several positions relative to the one set in the BIOS.
Raising the voltage on the processor does not always contribute to its stable operation, everything can be reversed. Overclocking memory is not needed for this, as well as buying overclocker memory modules, unless you are doing benchmarks.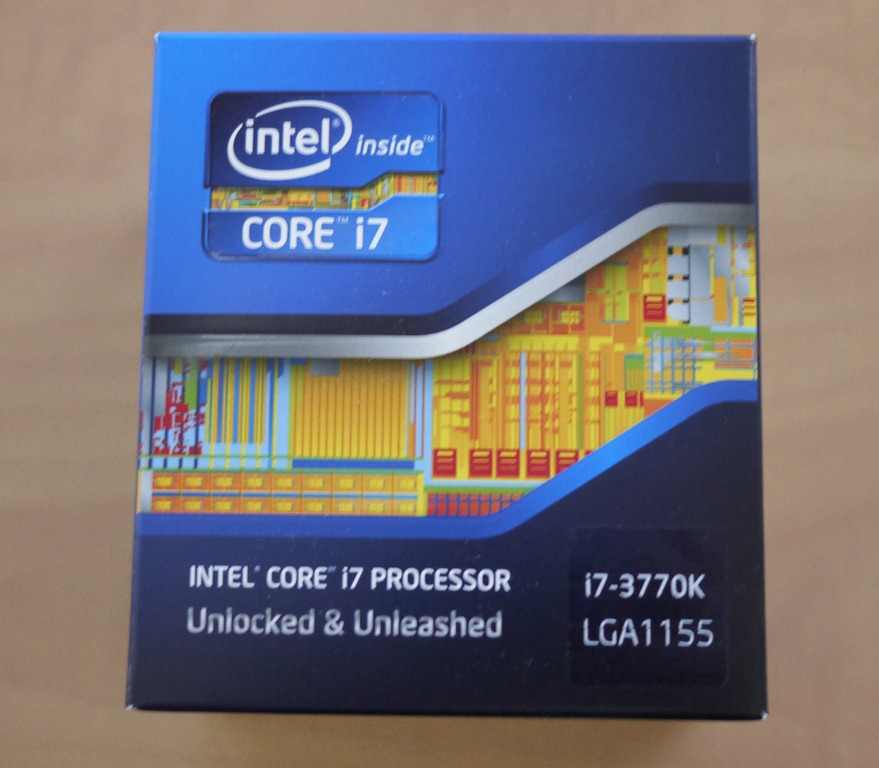 nine0019
4. For overclocking over 4.5MHz, you must first enable the function called Internal PLL Overvoltage — it positively affects stability during high overclocking, it is recommended to enable it when overclocking more than 4500 MHz. But also do not forget about the function LLC (LoadLine Calibration) .
5. The intel specification specifies an allowable temperature of 72.6° Tcase, (the actual temperature in degrees Celsius in the geometric center of the processor heat distribution cover), at the moment of throttling (i.e. at the moment the declared TDP value is reached). Throttling turns on when the temperature of at least one of the DTS(Digital Thermal Sensors) reaches 100. The distance of the measurement point from the DTS sensors played a role here. nine0019
This overclocking , everyone does at their own peril and risk, in everyday life, fatal cases of processor degradation or failure were not particularly noticed, but the choice is yours.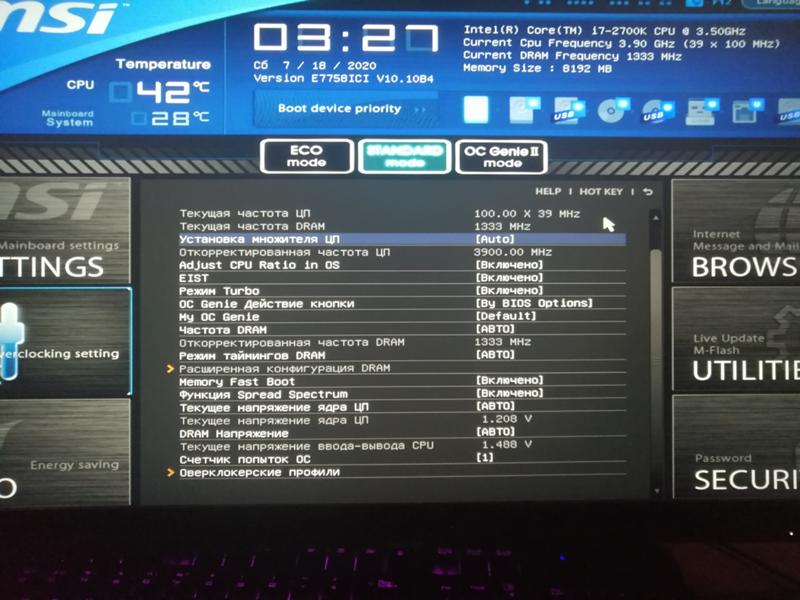 In order for the settings you set to be saved in the BIOS profile, after setting all the parameters, press F10, and confirm your agreement to the values you set.
Processor Stability Test Utilities:
A set of programs to monitor temperatures, voltages and frequencies during testing:
If the processor is unstable during overclocking:
we look at the error code on the blue screen, below are descriptions of what you can try to fix this.
BSOD Codes
Small FAQ :
Q: What does VCCPLL voltage affect: during overclocking?
A: Power supply voltage of the built-in PLL (Phase Locked Loop, or more simply — a clock generator). At high frequencies (>4500), raising VccPLL sometimes has a positive effect on system stability. The default value is 1.8v, it is not recommended to raise it above 1.9in. With low overclocking (<4500), the voltage can be reduced below the default value without loss of stability.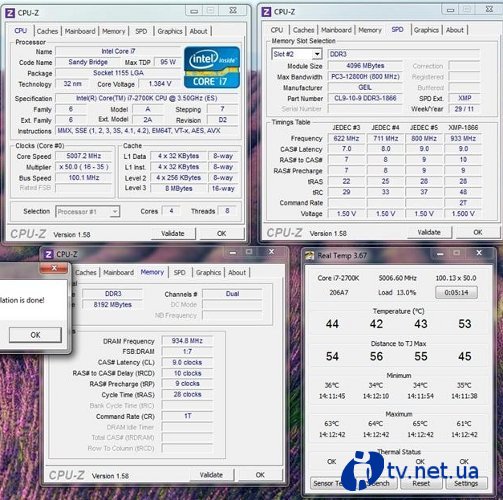
Q: What is Internal PLL Overvoltage, what does enabling this option do?
A: Internal PLL Overvoltage has a positive effect on stability at high overclocking, it is recommended to turn it on when overclocking more than 4500 MHz. However, enabling this option on Asus motherboards leads to problems with sleep mode and double start. The nature of this option is not known, at least it does not affect the VCCPLL voltage in any way (special thanks to comrade Humane who took the measurements). nine0019
Q: What is VCCSA?
A: System Agent integrated northbridge supply voltage (System Agent, includes DDR3 memory controller, Power Control Unit (PCU), PCI-Express 2.0, DMI controllers). The default value is 0.925v, it is not recommended to raise it above 1.1v.
Q: What is HT?
A: HT or Hyper-Threading is a technology that allows one physical core to process two virtual data streams. This technology was first used in the NetBurst architecture. nine0019
Q: Should I enable Hyper-Threading? What will it give ?
A: For dual-core models, SB HT gives a good performance boost. For quads, everything is not so simple — it all depends on the software you use. In most cases, HT for quads does not give any increase, and sometimes it reduces performance (for example, in a linpack, the loss is about 10%), in games, and everyday applications there will be no gain either.
HT for quad cores makes sense only if the computer is used for video encoding, 3D rendering (and similar tasks), and the software «understands» multithreading — you will get a good increase. nine0394 Overclockers should take note — disabling HT will lower the temperature while keeping the performance level almost unchanged.
Q: What is EIST?
A: EIST or Enhanced Intel SpeedStep is a power-saving technology that reduces the CPU multiplier when idle.
Q: What is C1E?
A: The technology works in tandem with EIST to reduce Vcore voltage in idle.
Q: The frequency/multiplier of the processor is different from what I set in the BIOS.
A: If the processor frequency is lower than the one you set in the BIOS, then one or both of the processor power management functions — C1E and (or) EIST are enabled.