Choosing the Best PSU for Nvidia’s GeForce GTX 1060 GPU
Learn about what to look for when choosing a power supply for Nvidia’s GeForce GTX 1060 GPU.
Check out our top CPU, Graphics Card, SSD, Pre-built PC, and Monitor deals in the Amazon Prime Early Access Sale, which is going on now!
In this article, I’ll go over the things you should consider when choosing a power supply for your computer with an Nvidia GeForce GTX 1060 graphics card.
Check out my Recommended Power Supplies for GTX 1060 GPUs below.
Best 450–750 Watt PSU
Corsair SF Series 80+ Platinum Fully Modular Power Supply
Check Price on Amazon
Amazon Affiliate Link
How to Choose a Power Supply for the GTX 1060 GPU
The main job of a power supply is to convert the alternating current (AC) from your wall outlet into the direct current (DC) needed by the components inside your computer.
Power Output
An important factor when buying a PSU is the supported wattage.
You can estimate your power needs by using the following chart.
| Component | Peak Power Usage |
|---|---|
| GTX 1060 GPU | 120 W |
| Top-Tier CPU (e.g., Intel Core i9 12900K) | 241 W |
| Mid-Tier CPU (e.g., Intel Core i5 12600K) | 150 W |
| Motherboard | 80 W |
| Optical Drive | 30 W |
| 3.5″ Hard Drive | 9 W |
| M.2 or 2.5″ SSD | 9 W |
| 140 mm Case/CPU Fan | 6 W |
| 120 mm Case/CPU Fan | 6 W |
| 80 mm Case/CPU Fan | 3 W |
By adding up these numbers, you can estimate peak power usage. Check out the top-tier and mid-tier example builds below.
It’s generally a good idea to add a 100–150 W buffer to your expected usage. This buffer will give you some flexibility in case of miscalculations and will allow you to add more drives, fans, or add-in cards in the future.
In most cases, buying a little more wattage than you need is a safer choice for ensuring system stability.
Don’t forget to account for the additional power required for overclocking if you intend to overclock your CPU or GPU. Overclocking could require roughly an extra 50–100 W, depending on how much you overclock these devices.
Check another Nvidia GPU:
GeForce RTX 3090 Ti GeForce RTX 3090 GeForce RTX 3080 Ti GeForce RTX 3080 GeForce RTX 3070 Ti GeForce RTX 3070 GeForce RTX 3060 Ti GeForce RTX 3060 GeForce RTX 3050 TITAN RTX GeForce RTX 2080 Ti GeForce RTX 2080 Super GeForce RTX 2080 GeForce RTX 2070 Super GeForce RTX 2070 GeForce RTX 2060 Super GeForce RTX 2060 GeForce GTX 1660 Ti GeForce GTX 1660 Super GeForce GTX 1650 Super GeForce GTX 1650 TITAN X Pascal TITAN Xp GeForce GTX 1080 Ti GeForce GTX 1080 GeForce GTX 1070 Ti GeForce GTX 1070 GeForce GTX 1060 GeForce GTX 1050 Ti GeForce GTX 1050 GeForce GT 1030 GeForce GTX TITAN X GeForce GTX 980 Ti GeForce GTX 980 GeForce GTX 970 GeForce GTX 960 GeForce GTX 950 GeForce GTX TITAN Z GeForce GTX TITAN Black GeForce GTX TITAN GeForce GTX 780 Ti GeForce GTX 780 GeForce GTX 770 GeForce GTX 760 Ti GeForce GTX 760 GeForce GTX 760 192-bit GeForce GTX 750 Ti GeForce GTX 750
Top-Tier Estimate:
| Top-Tier Components | Peak Power Consumption |
|---|---|
| GTX 1060 GPU | 120 watts |
Top-Tier CPU (e. g., Intel Core i9 12900K) g., Intel Core i9 12900K) |
241 watts |
| Motherboard | 80 watts |
| 4 M.2 or 2.5″ SSDs | 36 watts |
| 3 Case Fans (120 mm) | 18 watts |
| 2 CPU Fans (120 mm) | 12 watts |
| Total Estimate: | 507 watts |
| Recommended Power Supply Wattage: | 650 watts |
Check the latest price of the 450–750 watt Corsair SF Power Supplies on Amazon
(affiliate link).
Check out my Recommended Power Supplies for GTX 1060 GPUs below.
Amazon Affiliate Links
EVGA 750 N1, 750W, 2 Year Warranty, Power Supply 100-N1-0750-L1
Check Price on Amazon
Corsair RMX Series, RM750x, 750 Watt, 80+ Gold Certified, Fully Modular Power Supply (Low Noise, Zero RPM Fan Mode, 105°C Capacitors, Fully Modular Cables, Compact Size) Black
Check Price on Amazon
Mid-Tier Estimate:
| Mid-Tier Components | Peak Power Consumption |
|---|---|
| GTX 1060 GPU | 120 watts |
Mid-Tier CPU (e.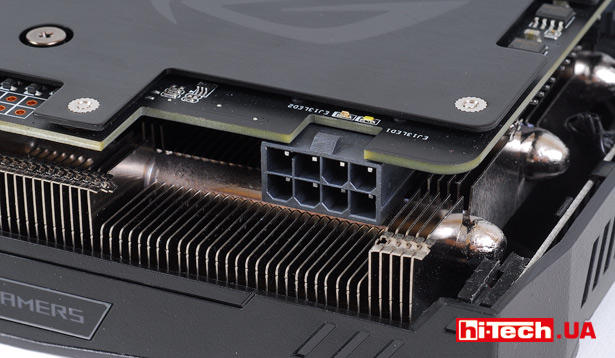 g., Intel Core i5 12600K) g., Intel Core i5 12600K) |
150 watts |
| Motherboard | 80 watts |
| 2 M.2 or 2.5″ SSDs | 18 watts |
| 2 Case Fans (120 mm) | 12 watts |
| 2 CPU Fans (120 mm) | 12 watts |
| Total Estimate: | 392 watts |
| Recommended Power Supply Wattage: | 550 watts |
Check the latest price of the 450–750 watt Corsair SF Power Supplies on Amazon
(affiliate link).
Check out my Recommended Power Supplies for GTX 1060 GPUs below.
Power Efficiency
PSUs with higher efficiency ratings use less energy and produce less heat, improving their reliability and reducing noise.
The 80 PLUS certification program for power supplies helps to promote energy efficiency by indicating its efficiency rating.
Higher efficiency power supplies may have a higher upfront cost. However, they could potentially save you money on electricity in the long run.
Lower wattage PSUs will be more power-efficient even when idle. For this reason, you may be able to save more on electricity by getting the correct wattage of PSU than by getting the one with the best 80 PLUS rating.
| Certification Level | 10% Load | 20% Load | 50% Load | 100% Load |
|---|---|---|---|---|
| 80 Plus | 80% | 80% | 80% | |
| 80 Plus Bronze | 82% | 85% | 82% | |
| 80 Plus Silver | 85% | 88% | 85% | |
| 80 Plus Gold | 87% | 90% | 87% | |
| 80 Plus Platinum | 90% | 92% | 89% | |
| 80 Plus Titanium | 90% | 92% | 94% | 90% |
Cables
Connectors
Make sure your PSU has the correct connectors to support the hardware in your system. Cheaper PSUs may cut costs on connectors and cables by offering fewer options and shorter lengths.
Check with your motherboard and graphics card documentation to determine which connector types are needed. Buy a popular, recently-released PSU; it will likely have the necessary connectors for a new PC build. However, if you use old components or an old power supply, you may find some incompatibilities.
Here are some common connector types that power supplies support:
- 24-pin connector for the motherboard
- 4/8-pin connector for the CPU
- 6/8-pin connectors for graphics cards
- SATA Power connector for each SATA HDD or SDD storage device
The latest graphics cards and PSUs are starting to support a new 16-pin PCIe 5.0 connector that replaces multiple 8-pin connectors.
Modular Cables
Typical power supplies come with various cables to connect your components. However, extra unused power cables can work against you by interrupting airflow.
In comparison, modular and semi-modular power supplies allow for attaching only the cables you need. As the name implies, semi-modular power supplies have some wires soldered on, while you can optionally connect others.
Cable Lengths
Most power supplies will have cables long enough to support mid-sized towers comfortably. If you have a full-size tower, you may want to check reviews and documentation to ensure that the cables are long enough to allow good cable management.
Power Supply Form Factors
Various form factors are available for power supplies. However, a standard-size desktop PC build will use an ATX power supply.
Small form factor PSUs allow for usage in many computer case shapes, including mini-PCs.
Power Supply Features
Overvoltage protection and short circuit protection can help to save your components in the case of a surge or accident.
LED lighting is another feature you might consider, depending on your PC goals.
Choosing a Cost-Effective Power Supply for the GTX 1060
Perhaps you live in a dorm or a family member’s house and don’t pay the power bill. Or maybe you don’t expect the computer to have heavy daily usage. In those cases, the lower upfront cost of a less efficient PSU may be the better choice.
On the other hand, if you care more about the electric bill or the environment and plan to maintain higher CPU or GPU usage, then a more efficient PSU may be better.
Don’t go too far over 150 W above your expected power needs. Rightsizing your power supply will keep electricity costs to a minimum, as higher wattage PSUs will consume some additional power, even when idle.
Recommended 750–1000 Watt PSU: Seasonic Prime Series
- Titanium 80 PLUS efficiency rating means the Seasonic Prime TX is at least 94% efficient at 50% load.
- Fully modular cabling allows you to optimize airflow and minimize clutter.
- Silent during low usage.
- 12-year warranty.
- This series of power supplies comes in power outputs including 750, 850, and 1000 watts.
- It also is available in a Gold rated (GX) version.
Seasonic Prime TX-750
Check Price on Amazon
Amazon Affiliate Link
Recommended 450–750 Watt PSU: Corsair SF Series
- Platinum 80 PLUS efficiency ratings.
- Fully modular cabling allows you to optimize airflow and minimize clutter.
- Near silent during low usage.
- 7-year warranty.
- This series of power supplies comes in power outputs including 450, 600, and 750 watts.
Corsair SF Series 80+ Platinum Fully Modular Power Supply
Check Price on Amazon
Amazon Affiliate Link
Other Considerations When Building a PC
Want to brush up on other new technologies to consider when building a computer? Check out these articles:
- Cases:
- How to Choose the Best PC Case
- CPUs:
- Which Intel and AMD CPUs Support PCIe 5.
 0?
0? - Which Intel and AMD CPUs Support PCIe 4.0?
- LGA 1700 CPU List
- LGA 1200 CPU List
- Look up an Intel or AMD CPU on TechReviewer for related recommendations:
- Which Intel and AMD CPUs Support PCIe 5.
- CPU Coolers:
- What is the Best Type of CPU cooler for a Gaming PC?
- How to Choose a CPU Cooler for Your PC
- Best LGA 1700 CPU Cooler for Intel’s 12th Gen Core Processors
- Best AM4 CPU Cooler for AMD Processors
- Storage:
- Can an SSD Improve PC Gaming Performance? and Does an SSD Increase FPS for PC Gaming?
- Storage Type Comparison: M.2, U.2, NVMe, SATA, SSDs, HDDs
- Memory:
- How to Choose the Best RAM for Your PC
- How Much RAM Do You Need for Gaming? and Is 32 GB of RAM Worth It for Gaming?
- DDR4 vs. DDR5? Which You Should Buy
- Is DDR5 Worth It? The Benefits of DDR5 and What Is DDR5?
- Which Intel and AMD CPUs Support DDR5?
- PCI-Express:
- Is PCIe 5.
 0 Worth It?
- Is PCIe 5.
- Motherboards:
- Which Motherboards Support PCIe 5.0?
- Which Motherboards Support PCIe 4.0?
- Which Motherboard Should You Buy for Intel’s 12th Gen CPUs?
- Graphics Cards:
- Which Graphics Cards Support PCIe 4.0?
- Power Supplies:
- How to Choose the Best Power Supply for a Gaming PC
- How to Choose a PC Power Supply
- Keyboards:
- Best Mechanical Keyboard for Gaming
- Monitors:
- How to Choose a Gaming Monitor
Have a suggestion or correction for this article? Send us an email at:
[email protected]
You can also contact the author at:
[email protected]
AMD Ryzen 5 3600 NVIDIA GeForce GTX 1060 — PSU Calculator
Export PSU Calculator Part List — Reddit
Copy and paste the following markup into your post:
[OuterVision PSU Calculator part list](https://outervision. com/b/seuOE3)
Type|Item
:—-|:—-
**Motherboard** | Desktop
**Socket** | Socket AM4
**CPU** | 1 x AMD Ryzen 5 3600
**CPU Speed** | 3600MHz
**CPU Vcore** | 1.1V
**CPU Utilization** | 90%
**Memory** | 2 x 8GB DDR4 Module
**Video Card Set 1** | 1 x NVIDIA GeForce GTX 1060
**Core Clock** | 1506MHz
**Memory Clock** | 2002MHz
**Storage** | 2 x SATA SSD
**Storage** | 2 x SATA 7.2K RPM
**Keyboard** | 1 x Gaming Keyboard
**Mouse** | 1 x Gaming Mouse
**Fan** | 2 x 120mm
**Computer Utilization** | 8 hours per day
**Gaming / Heavy 3D Application Time** | 8 hours per day
**Load Wattage** | 332W
**Recommended Wattage** | 382W
**Amperage** | +3.3V: 10.0A, +5V: 9.4A, +12V: 21.0A
**Recommended UPS Rating** | 650VA
Generated by OuterVision PSU Calculator 2019-07-30 09:22:49.0
Export PSU Calculator Component List — BBCode
Copy and paste the following markup into your post:
[url=https://outervision. com/b/seuOE3]OuterVision PSU Calculator part list[/url]
[b]Motherboard:[/b] Desktop
[b]Socket:[/b] Socket AM4
[b]CPU:[/b] 1 x AMD Ryzen 5 3600
[b]CPU Speed:[/b] 3600MHz
[b]CPU Vcore:[/b] 1.1V
[b]CPU Utilization:[/b] 90%
[b]Memory:[/b] 2 x 8GB DDR4 Module
[b]Video Card Set 1:[/b] 1 x NVIDIA GeForce GTX 1060
[b]Core Clock:[/b] 1506MHz
[b]Memory Clock:[/b] 2002MHz
[b]Storage:[/b] 2 x SATA SSD
[b]Storage:[/b] 2 x SATA 7.2K RPM
[b]Keyboard:[/b] 1 x Gaming Keyboard
[b]Mouse:[/b] 1 x Gaming Mouse
[b]Fan:[/b] 2 x 120mm
[b]Computer Utilization:[/b] 8 hours per day
[b]Gaming / Heavy 3D Application Time:[/b] 8 hours per day
[b]Load Wattage:[/b] 332W
[b]Recommended Wattage:[/b] 382W
[b]Amperage:[/b] +3.3V: 10.0A, +5V: 9.4A, +12V: 21.0A
[b]Recommended UPS Rating:[/b] 650VA
[i]Generated by OuterVision PSU Calculator 2019-07-30 09:22:49.0[/i]
Export PSU Calculator Part List — HTML
Copy and paste the following markup into your post:
OuterVision PSU Calculator part list
| Type | Item |
|---|---|
| Motherboard | Desktop |
| Socket | Socket AM4 |
| CPU | 1 x AMD Ryzen 5 3600 |
| CPU Speed | 3600MHz |
| CPU Vcore | 1. 1V 1V |
| CPU Utilization | 90% |
| Memory | 2 x 8GB DDR4 Module |
| Video Card Set 1 | 1 x NVIDIA GeForce GTX 1060 |
| Core Clock | 1506MHz |
| Memory Clock | 2002MHz |
| Storage | 2 x SATA SSD |
| Storage | 2 x SATA 7.2K RPM |
| Keyboard | 1 x Gaming Keyboard |
| Mouse | 1 x Gaming Mouse |
| Fan | 2 x 120mm |
| Computer Utilization | 8 hours per day |
| Gaming / Heavy 3D Application Time | 8 hours per day |
| Load Wattage | 332W |
| Recommended Wattage | 382W |
| Amperage | +3. 3V: 10.0A, +5V: 9.4A, +12V: 21.0A 3V: 10.0A, +5V: 9.4A, +12V: 21.0A |
| Recommended UPS Rating | +3.3V: 650VA |
| Generated by OuterVision PSU Calculator 2019-07-30 09:22:49.0 |
Export PSU Calculator Part List — Plain Text
Copy and paste the following markup into your post:
OuterVision PSU Calculator part list https://outervision.com/b/seuOE3
Motherboard: Desktop
Socket: Socket AM4
CPU: 1 x AMD Ryzen 5 3600
CPU Speed: 3600MHz
CPU Vcore: 1.1V
CPU Utilization: 90%
Memory: 2 x 8GB DDR4 Module
Video Card Set 1: 1 x NVIDIA GeForce GTX 1060
Core Clock: 1506MHz
Memory Clock: 2002MHz
Storage: 2 x SATA SSD
Storage: 2 x SATA 7.2K RPM
Keyboard: 1 x Gaming Keyboard
Mouse: 1 x Gaming Mouse
Fan: 2 x 120mm
Computer Utilization: 8 hours per day
Gaming / Heavy 3D Application Time: 8 hours per day
Load Wattage: 332W
Recommended Wattage: 382W
Amperage: +3. 3V: 10.0A, +5V: 9.4A, +12V: 21.0A
Recommended UPS Rating: 650VA
Generated by OuterVision PSU Calculator 2019-07-30 09:22:49.0
| Motherboard: | Desktop | |
| Socket: | Socket AM4 | |
| CPU: | 1 x AMD Ryzen 5 3600 | |
| CPU Speed: | 3600 MHz | |
| CPU Vcore: | 1.1 V | |
| CPU Utilization: | 90 % | |
| Memory: | 2 x 8GB DDR4 Module | |
| Video Card Set 1: | 1 x NVIDIA GeForce GTX 1060 | |
| Core Clock: | 1506 MHz | |
| Memory Clock: | 2002 MHz | |
| Storage: | 2 x SATA SSD | |
| Storage: | 2 x SATA 7. 2K RPM 2K RPM |
|
| Keyboard: | 1 x Gaming Keyboard | |
| Mouse: | 1 x Gaming Mouse | |
| Fan: | 2 x 120mm | |
| Computer Utilization: | 8 hours per day | |
| Gaming / Heavy 3D Application Time: | 8 hours per day | |
| Load Wattage: | 332 W |
|
||||||||||||
| Recommended UPS rating: | 650 VA | |||||||||||||
| Recommended PSU Wattage: | 382 W | |||||||||||||
 3V
3VNote: The above results may differ from the actual, current PSU Calculator results due to PC parts wattage updates, bug fixes, etc.
GTX 1060 Power Consumption Guide
This post may contain affiliate links. If you click one, I may earn a commission at no cost to you. As an Amazon Associate I earn from qualifying purchases.
Building a gaming PC doesn’t have to be a complete extravagance, but at the same time, the graphics card is always going to be the component that costs you the most money. This is why a lot of people still prefer to pick up an older card, and the GTX 1060 is a perfect example.
The GTX 1060 can’t run every modern game, but there are plenty that it can manage fine. It’s not good enough for 4K gaming, but in 1080p HD it’ll be able to handle some titles like Death Stranding, although some more demanding games (Cyberpunk 2077 and Microsoft Flight Sim) will still struggle (source).
So, depending on the games you want to play, the GTX 1060 could be the perfect budget solution for your PC, but how much power does it consume and what power supply do you need? Let’s take a look.
How Many Watts Does A GTX 1060 Use?
The GTX 1060 is considered a low-power graphics card.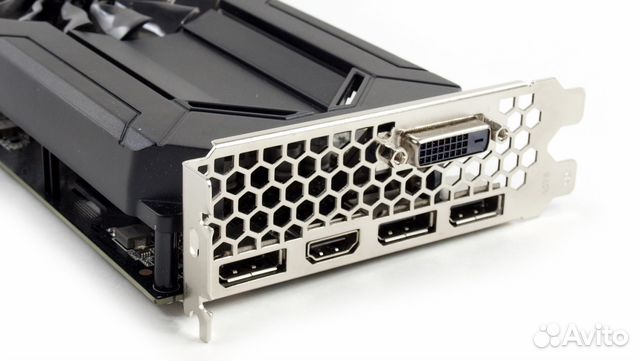 When being used for gaming or rendering animations, it uses 114 watts of power – less than a third of some of the most powerful graphics cards that you can buy.
And while yes it won’t do as good a job as those cards, it still packs enough of a punch to run most of the latest games, even if you will need to turn the settings down a little.
The card uses just 8 watts of power when it’s idle, which only increases to 9 watts if you add a second monitor (provided it’s on the same resolution as the first, otherwise the graphics card will need to work harder). And if you use the graphics card to watch videos, it’ll only use 10 watts, which is very low.
There will be times when the graphics card spikes – when it draws more power than its usual maximum. This won’t happen for long, but this is why you always buy a power supply with enough headway to cope with spikes from the components. More on that below. The GTX 1060 has been recorded at having spikes up to 136 watts (source).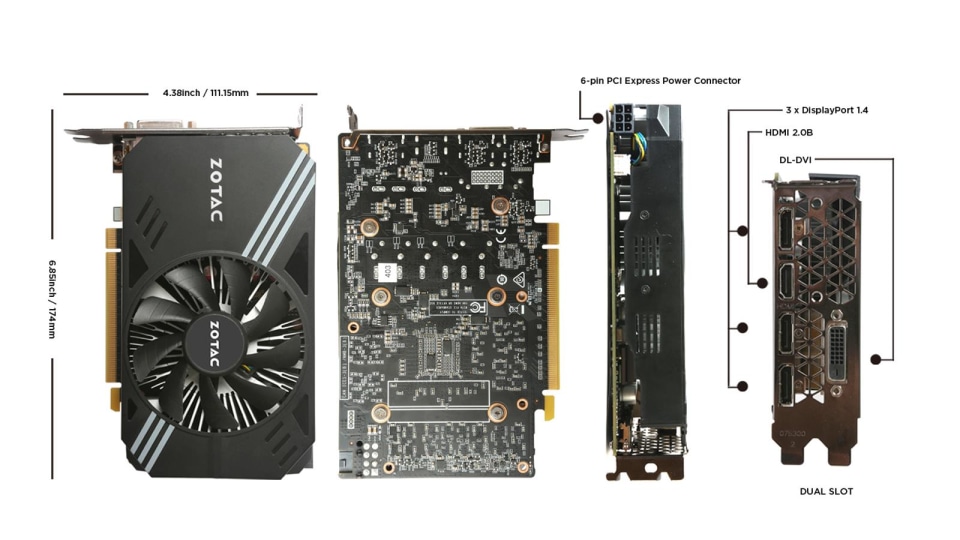
Check Latest Price
How Many Watts Does A GTX 1060 Use Per Hour?
A GTX 1060 graphics card will use around 114 watt-hours per hour, which is the same as 0.11 kilowatt-hours. This means that, for every hour you use the graphics card, it will cost an average of just 1.5 cents.
This obviously depends on the cost of electricity where you live, with that value based on the typical cost of $0.14 per kilowatt-hour. The average time that people use a gaming PC for games every week is 8.5 hours, so over the course of a week, the card will only use 12 cents of power, which is just $6.24 per year.
That is just the graphics card though, and really you’ll want to know how much power your whole PC is using when calculating the cost of electricity. As a guide, a graphics card normally makes up around 40-50% of the total power draw of your PC, so a typical build with a GTX 1060 would likely cost around $12.50 to run for a year.
Read more: How Many Watts Does A Gaming PC Use?
What Power Supply Do I Need For A GTX 1060?
As a minimum, you should aim for a power supply with a 350- or 400-watt capacity. It’s possible to run a GTX 1060 on a high-end 300-watt power supply but you’ll be limited in your choice of processor and motherboard.
A good rule of thumb when deciding which power supply to buy is to add up the expected maximum wattage of your PC’s components and then add an extra 20%. This gives you some extra capacity to cope with any spikes in the power – that way, if there is a surge, it shouldn’t overload your PSU and shorten its lifespan.
Then there’s the question of efficiency. You’ll want a power supply that’s rated 80+ or better – this means that, at most, it only draws an extra 20% of power than the PC needs to run. The more efficient a power supply is, the less extra power it draws from the mains.
80+ Gold PSUs are even more efficient but you won’t really find these in power supplies that are 300-400 watts.
Read more: Power Supply Ratings Explained
If you want a more efficient power supply that wastes less electricity, you might need to spend more upfront for a 500-watt or better power supply.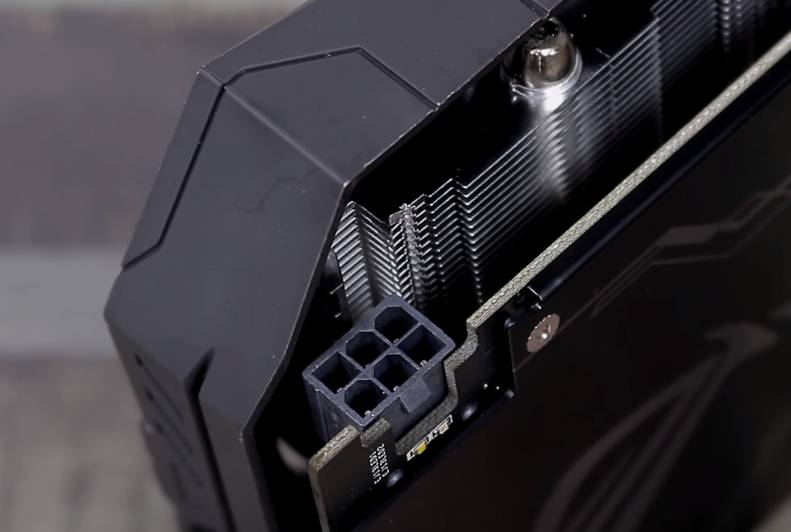 They’re also easier to find anyway – power supplies with 450 watts and lower are becoming rarer.
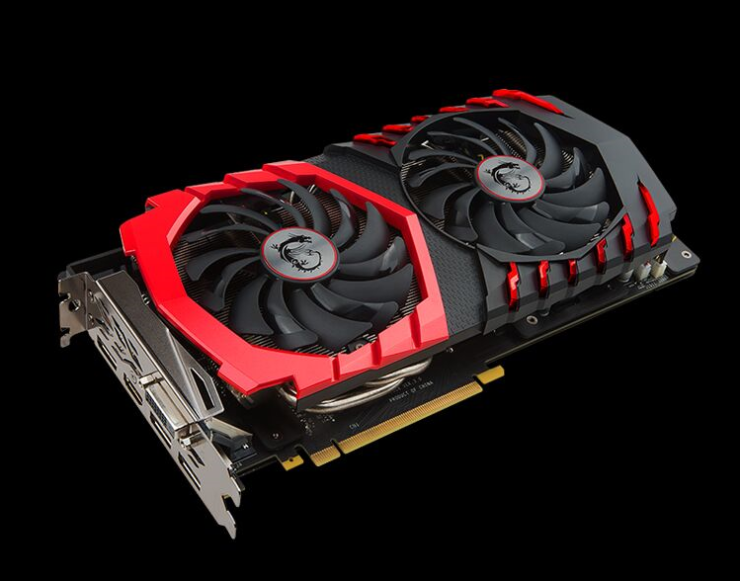
The Best Power Supply For A GTX 1060
If you’re planning on running a PC with a GTX 1060, you’re likely on a tight budget. So you need to decide whether to prioritize the upfront cost of an 80+ Gold power supply, or save the money when buying but pay more to run it over time.
Check Latest Price
This Thermaltake Smart Series 550W PSU is an 80+ Bronze power supply that has more than enough capacity for any PC with a GTX 1060 graphics card.
While there are more efficient 80+ Gold options available, the low cost of this one makes it a good choice if you’re building a gaming PC as cheaply as possible.
Because it’s low-priced that does mean that it’s non-modular, so all the cables are hardwired – any that you aren’t using will need to be hidden away in the PC case. But it does come with a 5-year warranty for extra peace of mind.
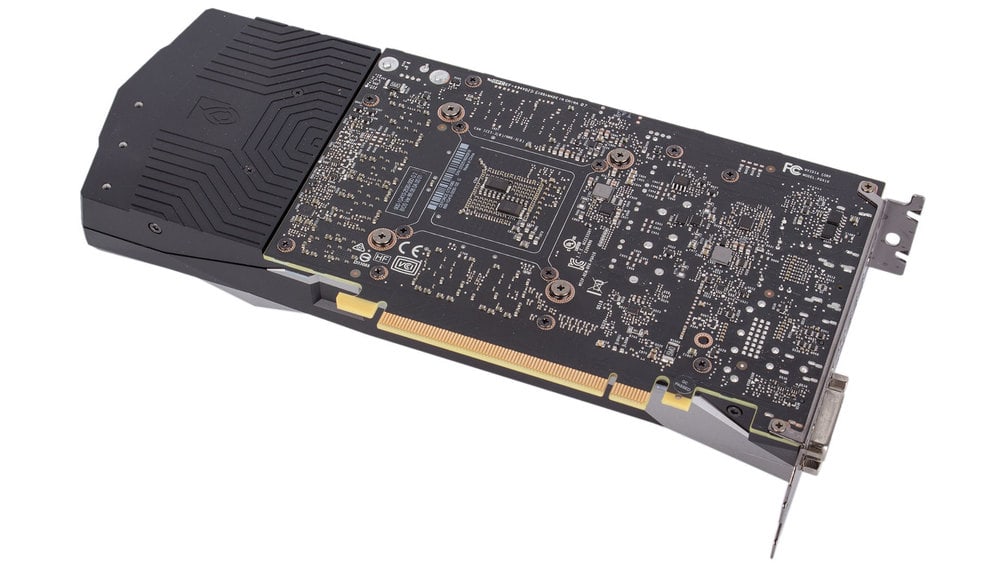
What GTX 1060 Power Cable Do I Need?
The power cable you need for your GTX 1060 will depend on the model. Some only require a single 6-pin connector, while others will use both a 6-pin and an 8-pin (6+2). Make sure your power supply is compatible and has the cables you need for your card.
If your 1060 has two ports but you only have one PCI-e power cable from your power supply, you’ll need to swap the power supply out. You can’t get away with only connecting one wire, it won’t power the card.
GTX 1060 Power FAQs
Is The GTX 1060 Power Efficient?
The GTX 1060 graphics card is really efficient when it comes to power consumption. It outperforms some older cards for performance while using fewer watts. It’s a great entry-level graphics card if you want to play some modern games while keeping power consumption low.
Is 300W Enough For A GTX 1060?
A 300-watt power supply might be enough for a GTX 1060 graphics card depending on the quality, but it’s better to get one with a higher capacity to be sure – 400 watts will easily be enough for a budget gaming PC build with a 1060 installed.
Is A 550W PSU Enough For A GTX 1060?
A 550-watt power supply is more than enough for a GTX 1060 graphics card. The graphics card will only use around 114 watts in total, and unless you install it in a super-powered PC with a top-end processor then it won’t get anywhere near the upper limits.
Related Posts:
- GTX 1070 Power Consumption Guide
- GTX 1080 Power Consumption Guide
- R9 390 Power Consumption Guide
Gtx 1070 ti power supply connection • Web cheat sheet for internet entrepreneurs!
Contents
- 1 How to connect the video card to the power supply
- 1.1 Selecting the power supply for the video card
- 1.2 Connecting the video card to the power supply
- 1.3 The video card does not display an image on the monitor
#
#
Installing and connecting the power supply
- 7.
1 recommend reading
9000 9000 9000 9000 9000 9000 9000 9000 video cards require an additional power connection for correct operation. This is due to the fact that it is impossible to transfer so much energy through the motherboard, so the connection takes place directly through the power supply. In this article, we will describe in detail how and with what cables to connect a graphics accelerator to a PSU.
How to connect a video card to the power supply
Additional power for cards is rarely required, mainly for new powerful models and occasionally for older devices. Before inserting the wires and starting the system, you need to pay attention to the power supply itself. Let’s look at this topic in more detail.
Choosing a power supply for a video card
When assembling a computer, the user must take into account the amount of energy consumed by it and, based on these indicators, select the appropriate power supply. When the system is already assembled, and you are going to upgrade the graphics accelerator, be sure to calculate all the capacities, including the new video card. How much the GPU consumes, you can find out on the official website of the manufacturer or in the online store. Make sure you pick up a power supply with enough power, preferably about 200 watts, because at peak times the system consumes more power. Read more about power calculations and choosing a PSU in our article.
Connecting the video card to the power supply
First, we recommend paying attention to your graphics accelerator. If you meet such a connector on the case, as shown in the image below, then you need to connect additional power using special wires.
Older power supplies do not have the right connector, so you will have to purchase a special adapter in advance. Two Molex connectors go into one six-pin PCI-E. Molex are connected to the power supply to the same suitable connectors, and PCI-E is inserted into the video card. Let’s take a closer look at the entire connection process:
- Turn off the computer and unplug the system unit from power.
- Connect the video card to the motherboard.
This completes the entire connection process, it remains only to assemble the system, turn it on and check for correct operation. Watch the coolers on the video card, they should start almost immediately after turning on the computer, and the fans will spin quickly. If there is a spark or smoke, then immediately disconnect the computer from the power supply. This problem occurs only when there is not enough power from the power supply.
The video card does not display an image on the monitor
If, after connecting, you start the computer, and nothing is displayed on the monitor screen, this is not always indicated by an incorrect connection of the card or its breakdown. We recommend that you read our article to understand the cause of this problem. There are several ways to solve it.
In this article, we examined in detail the process of connecting additional power to the video card. Once again, we want to draw your attention to the correct selection of the power supply and checking the availability of the necessary cables. Information about the wires present is on the manufacturer’s official website, online store or indicated in the instructions.
Thank the author, share the article on social networks.
| June 19, 2017 |
⇡#Step #4. Installing and connecting the power supply
For this assembly, the Cooler Master MasterWatt 500 W power supply was used — this is an inexpensive model, the power of which is nevertheless quite sufficient for the stable operation of all components. The PSU is non-modular: its design does not provide for the use of detachable wires, however, during assembly, all wires were used, except for the cable with MOLEX and FDD connectors. The photo below shows all the connectors that any modern power supply has. The dependence is natural: the higher the power of the device, the more different connectors it has. For example, Cooler Master MasterWatt 500W is only suitable for gaming systems with a single graphics card.
Power supply connectors (from left to right): 20+4 pins for powering the motherboard; 4 + 4 pins for powering the central processor; PCI-E 6+2 to power the video card; SATA for powering drives; MOLEX for powering drives, fans and other equipment; FDD to power floppy drive
Please note that the cable connectors for powering the motherboard, CPU and video card are separated. Naturally, this was done on purpose, since there are components with different connectors on sale. To be honest, I have not seen boards with a 20-pin port for a very long time. But there are plenty of devices with a 4-pin connector for powering the central processor on sale.
In fact, one 4-pin connector is enough for any motherboard. Through it, the CPU is transmitted through a 12-volt line up to 192 watts of electricity. You can absolutely safely insert the 4-pin power supply connector into the edge of the 8-pin connector on the motherboard, and the system will be fully operational. This is what users do when they buy the cheapest PSUs with a limited set of cables. Additional four contacts on the motherboard and power supply allow you to transfer twice as much energy, which is important mainly when overclocking the CPU.
The location of power connectors on motherboards usually does not change. This applies to all form factors. In very rare devices, you can find two ports for powering the CPU.
Video cards are also equipped with different connectors. Some graphics accelerators do not require additional power at all. This means that 75 watts are enough for them, which are transmitted through the PCI Express x16 slot. More powerful adapters need one wire with six or eight pins. The MSI GeForce GTX 1070 GAMING X used in our system requires one 6-pin and one 8-pin power supply connector to be connected at the same time.
Some PSUs do not have as many PCI-E ports. Either this power supply does not have the necessary power for a stable power supply to the video card, or the manufacturer simply saved on wires. In the second case, you will have to use a MOLEX-to-PCI-E adapter. Often it comes with a graphics adapter.
Connecting the power supply cables to the motherboard, drives and video card
Inserting the power supply connectors incorrectly into the corresponding ports on the motherboard and video card will not work — all elements are protected (although sometimes there are especially persistent craftsmen). As a result, a pair of PSU cables (4 + 4 and 20 + 4) are connected to the motherboard, two more to SATA drives. Two PCI-E 6+2 connectors required for the video card to work are implemented on one wire. MOLEX and FDD in the case of our assembly are out of work.
Just before connecting all the cables, you need to secure the power supply itself.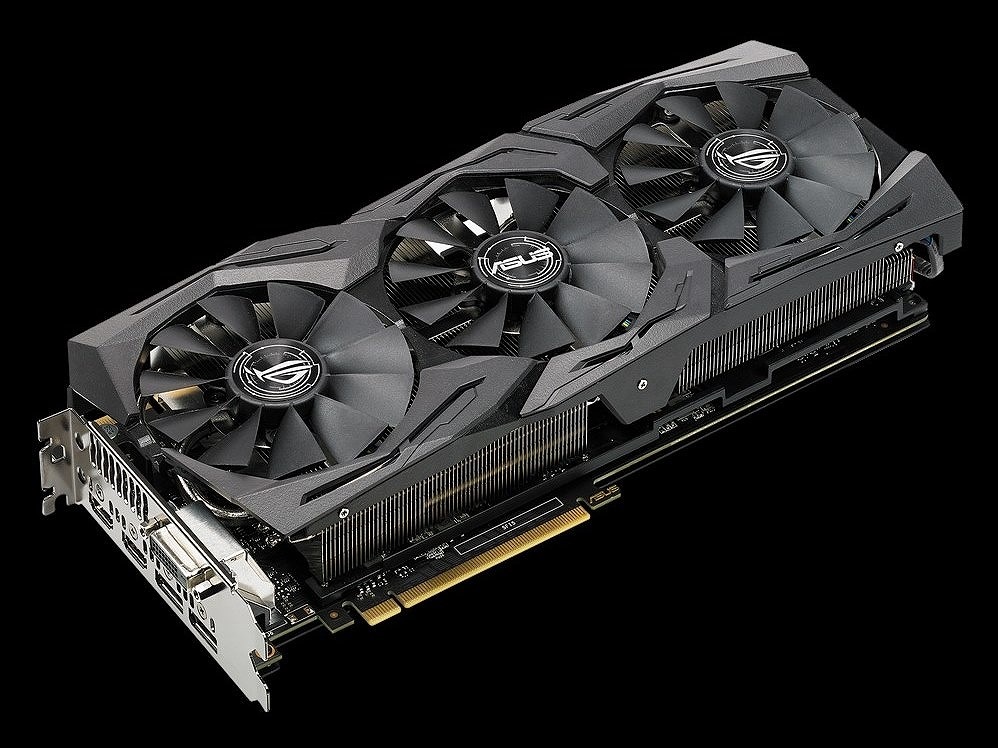 To do this, use the four screws that come with the case. Then we stretch all the wires (except for the cable with MOLEX, since it is not needed in this assembly) behind the barrier wall and connect them one by one to the motherboard and drives. We do not touch the cable for the video card yet.
The only embarrassment that can happen is the lack of a length of wire with a 4+4-pin connector to power the CPU. The use of an extension cord will correct the situation, but, as I said, it is better to control these points in advance, even at the stage of choosing components.
⇡#Step #5. Installing the cooler and video card
After the work done, it remains to complete two steps: install the processor cooling system and the video card. Let’s take the cooler first. Since the test PC uses a maintenance-free water cooling system, you need to start by fixing the radiator to one of the walls. As we have already found out, Cooler Master MasterBox 5 MSI Edition supports the installation of a 120mm single-section CBO radiator on the back side. Naturally, the installation should be done in such a way that the Cooler Master MasterLiquid 120 fans blow air out of the case.
Transferring the fan from the rear panel to the front panel, applying thermal paste and installing the CBO on the rear panel
Therefore, first of all, remove the 120 mm fan from the rear wall and move it to the front panel, but in such a way that it works for blowing. For installation, we use four threaded fixing screws or plastic clips from the kit. Then we connect the fan to one of the 4-pin connectors on the motherboard, for example, to the SYS_FAN4 connector.
Now you need to apply thermal paste to the surface of the processor. To do this, squeeze out a small amount of liquid substance from the tube that comes with the cooling system. The main thing here is not to overdo it. The debate about how to properly apply thermal paste continues to this day. Someone just leaves a drop of thermal interface exactly in the middle of the CPU cover.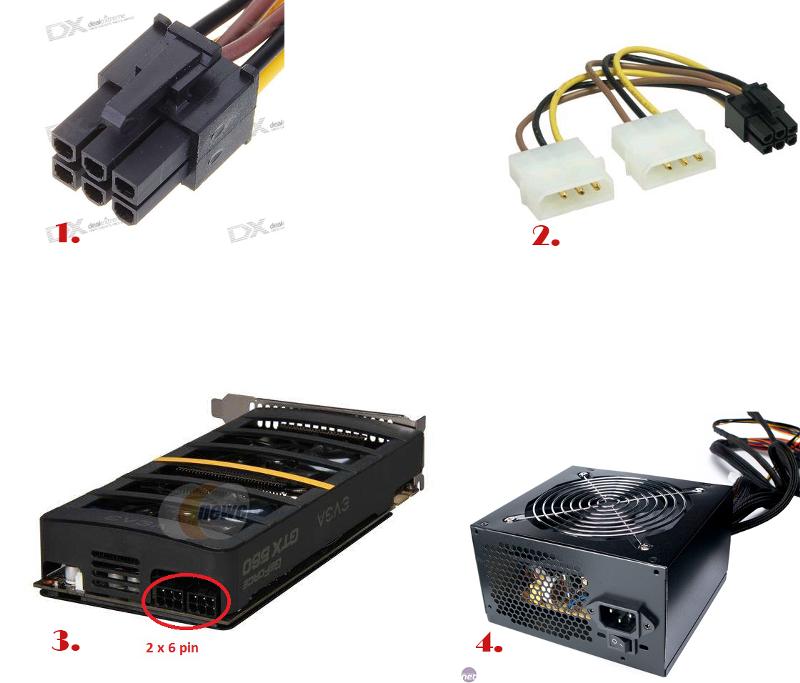 Personally, I use a plastic card or cardboard business card, with which I spread the paste in an even layer. The processor and the base of the cooler are preliminarily wiped with a cleaning cloth or cotton swabs moistened with some kind of technical liquid (alcohol, thinner or Nefras gasoline). This will remove grease and dust from the surface of the chip and the CO sole.
After applying the thermal interface, all that remains is to fix the CBO heatsink on the back wall of the case, and the water block with the pump in the processor socket. The Cooler Master MasterLiquid 120 comes with a splitter that allows you to connect two fans to one 4-pin header on the motherboard. I used it. We bring out all the wires from the CBO through special holes behind the dividing wall and immediately bring them to the appropriate connectors: the cable from the pump to the PUMP_FAN1 port, the cable from the fans to the CPU_FAN1 port.
Video card installed last. The longest motherboard expansion slots, called PCI Express x16 (also called PEG ports), are used. The prefix «x16» means that 16 PCI Express lines are connected to the connector, but when using several discrete devices, their mode of operation may change. For example, if two video adapters are installed in the MSI X370 GAMING PRO CARBON, the PCI Express x16 ports will work in x8+x8 mode. In principle, such a bandwidth (for standard 3.0 — 7.9+7.9 GB / s) will be enough even for the fastest single-chip video cards.
First remove the two plugs from the back of the housing. Most often, the graphics adapter is installed in the first (closest to the socket) PCI Express x16 slot. MSI X370 GAMING PRO CARBON supports AMD CrossFire and NVIDIA SLI technologies, allowing you to combine multiple graphics cards in one system. If desired, you can install a second 3D accelerator in the second PEG slot.
In very cheap cases, the plugs will have to be broken out, that is, they cannot be fixed back. And some cases allow you to use long video cards only on the condition that the basket (or baskets) for drives is dismantled in advance.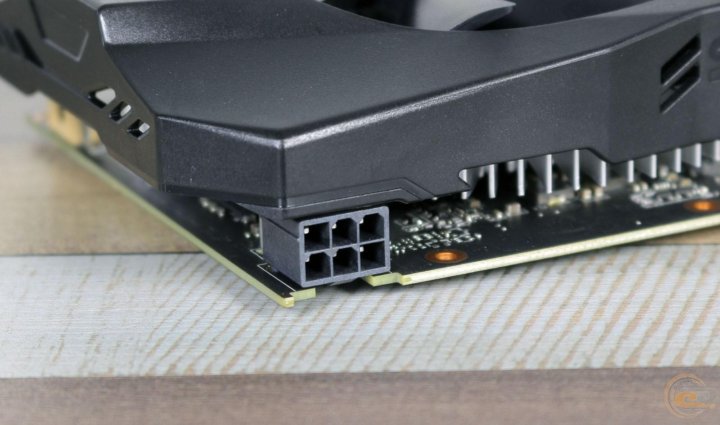
The final step in installing the video card is to connect cables from the power supply to it.
⇡#Step #6. First start-up and cosmetic work
All connectors are connected, and in fact the system unit is ready to start. I advise you to connect a cable from the monitor to it and make the first start. If the computer «wound up» when you press the button on the case, all the fans rotate, and the splash screen of the motherboard appears on the screen, then all the wires and connectors are connected correctly. You can turn off the PC and tidy up the appearance of the system unit. If the system does not start at all, namely, after pressing the power button, the fan blades do not rotate, then first of all we check whether the external cable is connected to the power supply, and whether the PSU toggle switch is in the “On” position. Next, we look at the 24-pin connector connected to the motherboard. It may not be fully inserted into the motherboard port. Finally, we check the correct connection of the body button itself.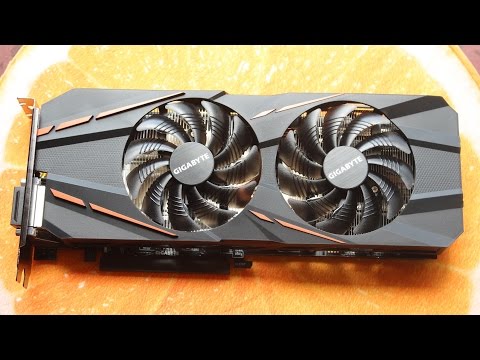 It may be faulty — in this case, you can start the system by closing the Power_SW contacts on the motherboard with a screwdriver or scissors. If this does not help, then it is necessary to look for the «hero of the occasion.» It’s worth starting with the power supply, namely, take another, 100% working model (for example, ask a friend) and try to start the system with it.
If, according to all external signs, the PC starts up, but there is no image on the screen, then in the course of self-diagnosis, we first check whether we connected the power connectors of the central processor and video card correctly. Sometimes systems that have compatibility problems with RAM behave this way. Also, the black screen may be due to an outdated BIOS version of the motherboard, which does not recognize the new processor. For example, this is possible when buying an Intel Kaby Lake generation chip and a motherboard based on some 100th series chipset. However, as I said, compatibility issues of components must be addressed even before purchasing all devices.
Some motherboards have special indicators that indicate what stage of boot the computer is in. This may be a screen displaying POST signals. The decoding of these signals can be found on the Internet. MSI X370 GAMING PRO CARBON has an EZ Debug LED block, which clearly demonstrates at what stage the system is loading — at the stage of initializing the processor, RAM, video card or drive.
Cooler Master MasterBox 5 MSI Edition is good because it has a lot of space for wiring, as well as a large number of lugs to which nylon ties are attached. The task of the assembler is to lay all the wires in such a way that they do not stick out and do not spoil the appearance of the system unit, and also that nothing interferes with the closing of the side wall. In addition, neat cable management contributes to better air circulation inside the case and less dust accumulation.
It is interesting that even some eminent assemblers are not so careful about laying wires. In less high-quality cases (especially in those where the power supply is mounted on top and there is absolutely no free space behind the dividing wall), it will not always be possible to lay wires beautifully and neatly. Especially when using a power supply with non-detachable wires. In such a situation, try to free up as much space as possible for unhindered air circulation inside the case.
When all the cables are laid and assembled, once again make sure that all the wires are connected and you can close both covers.
Many new Full-Tower, Midi-Tower and Mini-Tower models are equipped with a visor that covers the power supply. A very attractive thing, as it helps to remove an unused pile of wires out of sight.
When selecting components for a new computer, it is very important to choose the right power supply (PSU), since insufficient power will lead to unstable PC operation. On the other hand, buying a PSU with a large margin is also not a good idea, as this will hit the budget hard and will not allow you to assemble the optimal configuration. In this article, we will tell you which power supply is needed for NV > 9 video cards.0003
Power supply for GEFORCE GTX 1060
In order to determine which power supply is needed for the NV video card, this video card consumes 120 watts of electricity. At the same time, this indicator is the same for both the version with 3 GB of video memory and for the version with 6 GB of video memory.
Also NV > Recommended power supply is 400W.
Check the PSU wattage recommended by NV > MSI calculator recommends 400W.
Considering the above data from NV > for the normal operation of the NVIDIA GEFORCE GTX 1060 video card, a 400 W power supply is required. If you want to play it safe or have a margin for upgrading components in the future, then you can purchase a PSU with some margin. For example, you can take a model that provides 100 watts more. Thus, for the GTX 1060, the power supply with a margin will be 500 watts.
Power Supply for GEFORCE GTX 1070 and GTX 1070 Ti
In order to find out which power supply is suitable for the NV video card > this video card consumes 150-180 watts of power. Moreover, this indicator is the same for both the regular version and the improved version with the prefix Ti.
Also in the characteristics of the video card company NV > the recommended PSU power is 500 W.
Check the recommended PSU wattage indicated by NV > MSI’s calculator recommends a little over 450W.
In this case, MSI’s calculator produced a result 50W less than NVIDIA recommends. Therefore, for maximum reliability, you need to focus on a larger value.
Thus, we can conclude that for the regular operation of the NVIDIA GEFORCE GTX 1070 or 1070 Ti video card, a 500 W power supply is needed. If you want to leave room for an upgrade or just want to play it safe, then you can install the PSU with some headroom. For example, you can purchase a model that will give out 100 watts more. Thus, for the GTX 1070 and GTX 1070 Ti, the PSU power with a margin will be 600 watts.
Power Supply for GEFORCE GTX 1080 and GTX 1080 Ti
In order to decide which PSU is suitable for NV graphics cards, >GTX 1080 consumes 180W and GTX 1080 Ti consumes 250W.
Also in the official specifications, the company indicates the recommended power supply. In this case, the recommended power for the GTX 1080 was 500W, and for the GTX 1080 Ti it was 600W.
You can check the power of the power supply, which is indicated in the specifications, using the online PSU calculator. Such calculators allow you to make an approximate estimate of the power of the power supply based on the specified components. For verification, we will use the calculator from MSI.
First, let’s check the values for the GEFORCE GTX 1080. Let’s specify an Intel Core i9 9900KF, one GEFORCE GTX 1080 graphics card, 2 hard drives, 4 RAM modules, 4 fans, 4 additional PCI express cards and 1 DVD drive. The result of a calculator with such components is a little more than 450 watts (the same as for the 1070 and 1070 ti).
To check the GEFORCE GTX 1080 Ti value, we will use the same components. The result of the GTX 1080 Ti is 525W.
In the case of the GTX 1080 and GTX 1080 Ti video cards, MSI’s calculator gives values that are noticeably lower than those recommended by NVIDIA. Therefore, when choosing a PSU, you should first of all focus on the official values \u200b\u200bfrom NVIDIA.
From this we can conclude that the GTX 1080 needs a 500W PSU, and the GTX 1080 Ti 600W. If you want to play it safe or leave a margin for a future upgrade, then you can take a 100 W model more. Thus, the power supply with a margin for the GTX 1080 will be 600 watts, and for the GTX 1080 Ti — 700 watts.
What power supply is needed for GTX 1060, 1070, 1080. What power supply is needed for 1080 ti
By CS Gamer Reading 9 min Views 5 Published
MHz on the GPU and 1500 MHz (12000 MHz effective) on the memory chip. However, the 330W power limit was not enough, and the core clocks continued to drop.
Mining on Geforce GTX 1060: selection, settings, hashrate table
This six-core processor from Intel is considered one of the best processors for GTX1060 and similar in terms of performance.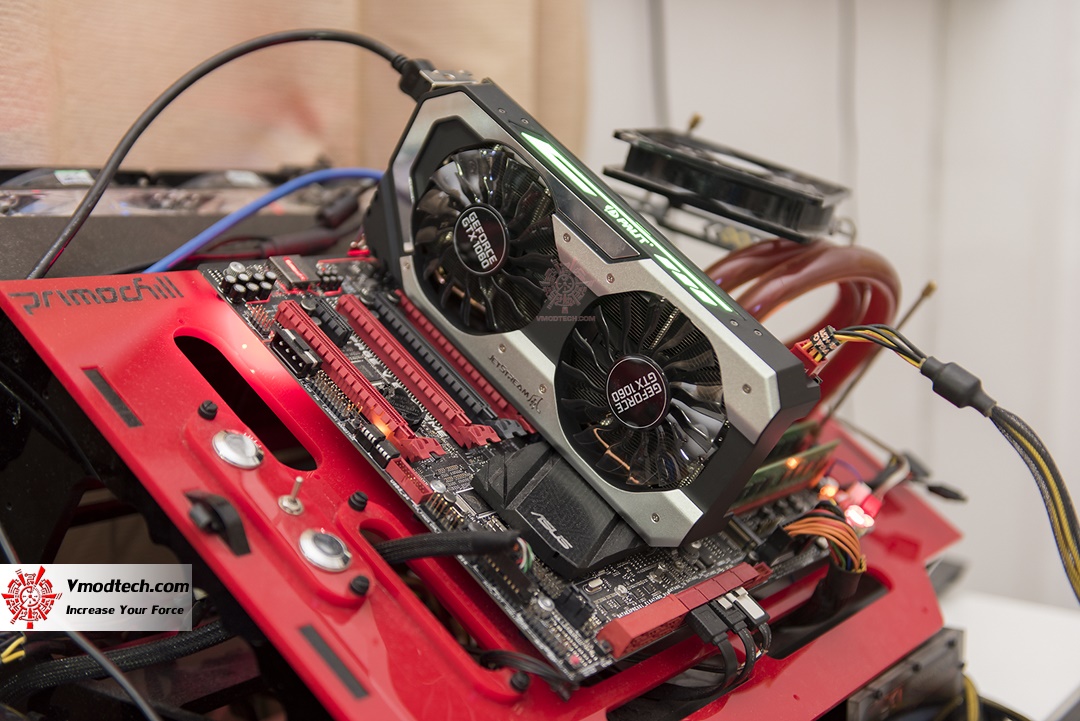 There is no point in buying a more powerful processor, since there is no way to increase the performance of the graphics accelerator pedal. And this processor provides maximum FPS at any quality settings.
This «gem» has a locked multiplier, but in Turbo Boost mode, the clock speed can be increased from 2.8 GHz to 4 GHz. When using this bundle on a motherboard with a B360 chipset, you get the best option for this price. Performance in this case is 10% higher than in the previous version.
How much does the Nvidia GeForce GTX 1080ti
The last variant tested was the flagship GTX1080ti graphics card. Its main trump card is 11 GB of memory, which allows you to mine any cryptocurrency. The coins were selected using the 2CryptoCalc program.
What to mine with GTX1080ti
For 1080ti, the 2CryptoCalc calculator recommended mining Grin with the Cuckatoo-31 algorithm.
Source: 2CryptoCalc
Green exchange rate
At the beginning of the experiment, the cryptocurrency was valued at $4.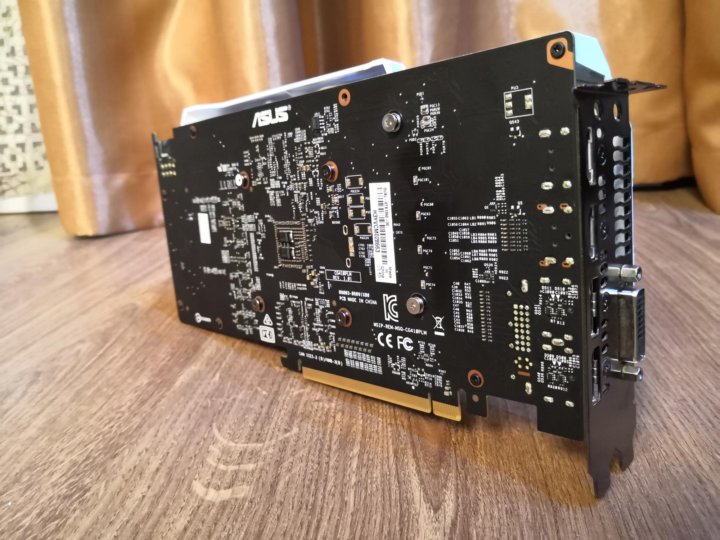 82 per coin.
Source: CoinMarketCap
A week later, the rate fell to $4.21. As a result, of the three selected cryptocurrencies, Grin lost the most. In seven days, the cryptocurrency exchange rate fell by 12%.
Estimated GTX1080ti Mining Profit
Calculator predicts that Grin on Cuckatoo-31 can generate about $15 per week.
Source: 2CryptoCalc
Profitability of mining on a real GTX 1080ti
The GTX 1080ti video card earned 2.47248 greens or $10.4. The expected return at the beginning of the experiment was 3.4136 coins. This means almost 1 GREEN less than planned.
Source: 2Miners.
And here the complexity took its toll. This figure rose to 3.88G, which is 1.5 times more than at the beginning of the week.
Source: 2Miners.
GTX 1080ti energy costs
One hour of computer use on the GTX 1080ti consumes 300 watts, or 50.4 kWh per week. It will cost you 201. 6 rubles, or $3.17 for electricity.
The total net profit from mining Grin on the GeForce GTX 1080 ti is $7.23 ($10.40 — $3.17).
That’s almost $29/month or $347/year. For example, you can buy an Apple Watch. Alternatively, there is enough capacity in the RTX2070 Super.
Selection of a power supply for a computer according to the parameters
Power is calculated. Let’s move on to the next priority characteristics of the power supply.
- Size
- Manufacturer ;
- Efficiency
- PFC;
- Serenity
- Line current distribution ;
- Availability of necessary protection ;
- Modularity ;
- Various power connectors.
Form factor.
A power supply is installed for the PC. Depending on the size, there are two main standards — ATX and SFX. The first is used in traditional system units and is more common. If you’re using a compact desktop system, only the small form factor is sufficient. Refer to the PC chassis manual for the supported power supply types.
The ATX format means that it is designed for installation in PSU coolers with a diameter of up to 14 cm. Previously, the SFX type was equipped with an 80 mm fan. Today, compact power supplies for computers are equipped with 12 cm coolers, which has a positive effect on the noise level.
Manufacturers of computer power supplies
Each company can create both successful orders and failures. There are consumables from different manufacturers on the market, but they are all produced by the same company.
The only thing left of the brand are super flowers, which are very expensive. Their quality is extremely high. These power supplies are useful for heating and retrieval systems with 24/7 workloads.
He’s a proud runner-up for the season, but has already started to run into noisy cases of cracking.
Enermax started outsourcing the production of a new brand to TWT.
Quiet! They have the best cooling system, the actual PSU manufacturer is HEC, and it falls short of «average».
Recently, its performance has been reduced as it is preferable not to buy Chieftec models, and the cost has remained the same.
Aerocool VX Power Stump is noisy at maximum and is of average quality, while KCA is quiet and can quickly find faults and send it back to the store.
Corsair unstable — CX series is the worst, RM is accurate but better.
The XFX power supply is good value for money as it is quiet and is responsible for seasonal filling. These power supplies are cheaper because they are not assembled at the main brand’s central factory.
Power supplies differ in the quality of power transfer from the socket to the computer, i.e. according to the degree of loss. To formalize these parameters, the 80 Plus certificate was issued. This right is granted to power plants with an energy efficiency of at least 80% and a power factor of at least 0.9.
This rating directly affects the amount of money spent on electricity. A higher level of certification results in less noise from the power supply as the fan removes heat. The higher the performance of the power supply, the higher its cost. That is why we chose the 80 Plus Gold program. In this case, at 230 volts, at 50% load, the power loss is only 8%, while 92% is sent to the computer.
Let’s start with the nutritional requirements themselves. When assembling a computer, each accessory consumes a certain amount of power provided by the power supply. The largest in this regard are the graphics card and processor, followed by the motherboard.
Which power supply is needed for the GTX 1060, 1070, 1080
Choosing the right power supply (PSU) is important when choosing accessories for a new computer, as insufficient power can cause the computer to become unstable. On the other hand, overbuying is also not a good idea, as it will seriously affect your budget and prevent you from creating an optimal configuration. In this article, you will need the power supply needed for the Nvidia Geforce GTX 1060, 1070, 1070 TI, 1080, and 1080 TI graphics cards.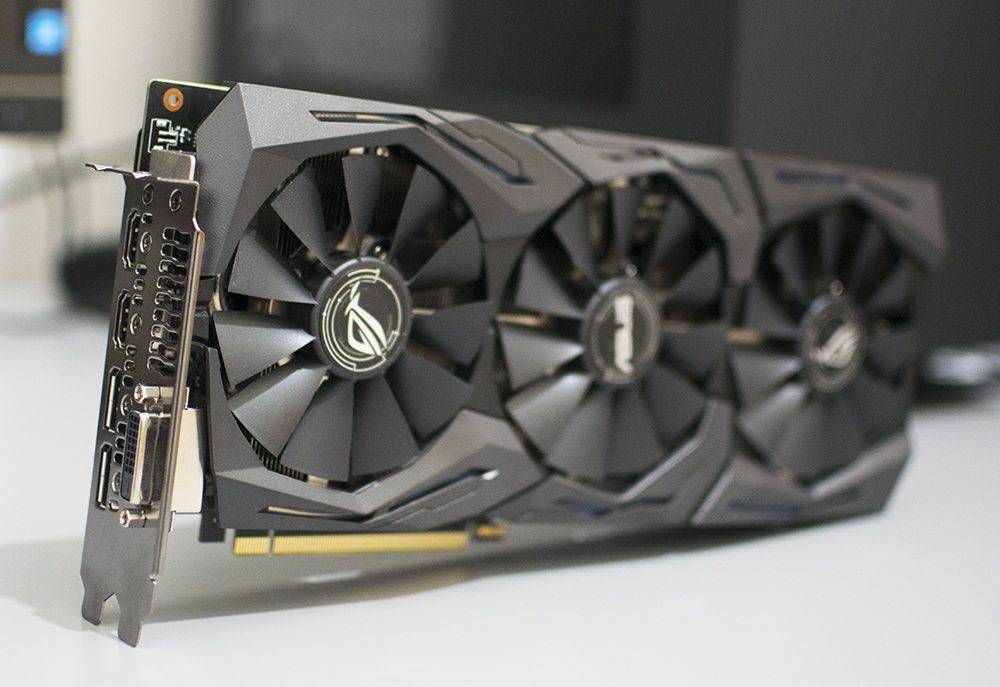
To select the power supply required for NVIDIA GeForce GTX 1060, first check the specifications on the manufacturer’s official website. According to official figures, this video card consumes 120 watts. In this case, this percentage is the same for both the 3 GB VRAM version and the 6 GB VRAM version.
Nvidia itself determines the recommended power. In this case, for both versions of the GTX 1060, the recommended power supply is 400W.
You can use the online power supplies to check NVIDIA’s recommended power. They allow you to select the accessories you will use with your computer and roughly determine the type of power source that your computer needs to operate. In this case, use the MSI calculator. If you choose Intel Core I9 9900KF processor, GeForce GTX 1060 graphics card, two hard drives, four RAM, four fans, four PCI Express cards and one DVD box, MSI computer recommends 400W. Recommended.
Based on the above information from NVIDIA and MSI, we can conclude that the NVIDIA GeForce GTX 1060 graphics card will require a 400W power supply to operate properly. If you want to provide extra power for future accessory upgrades, you can purchase power supplies with extra power. For example, you can choose a model that provides an additional 100 watts. So, for the GTX 1060, the reserve power of the power supply is 500 watts.
Power supply for GEFORCE GTX 1070 and GTX 1070 Ti
To find the right power supply for NVIDIA GeForce GTX 1070 and GTX 1070 TI graphics cards, you should check the specifications on the NVIDIA website. According to the official specifications, these video cards consume 150-180 watts. This is the same as the standard version, plus an improved version with the TI prefix.
Nvidia also makes recommendations regarding the power supply in the graphics card specifications. In this case, for both versions of the GTX 1070, the recommended power supply is 500W.
You can use the online power supply computers to check the recommended power supply wattage listed by NVIDIA. These computers allow you to roughly determine the capacity of a power supply based on the components used. In our case, we use MSI power supplies. Intel Core I9 9900KF processor, GeForce GTX 1070 TI graphics card, two hard drives, four RAM blocks, four fans, four additional PCI Express cards, and one DVD block. With these components, the power of the MSI computer exceeds 450W.
In this case, the MSI computer is rated for 50W less than NVIDIA recommends. Therefore, to be as reliable as possible, you should choose the best price.
Thus, we can conclude that the NVIDIA GeForce GTX 1070 or 1070 TI video card requires a 500 W power supply to work properly. If you want to leave room for upgrades or insure, you can install an additional power supply. For example, you can purchase a model that provides an additional 100 watts. Thus, for the GTX 1070 and GTX 1070 Ti, the power headroom is 600 watts.
Power supply for GEFORCE GTX 1080 and GTX 1080 Ti
To determine the correct power supply for NVIDIA GeForce GTX 1080 and GTX 1080 TI cards, please refer to the official specifications on the NVIDIA website.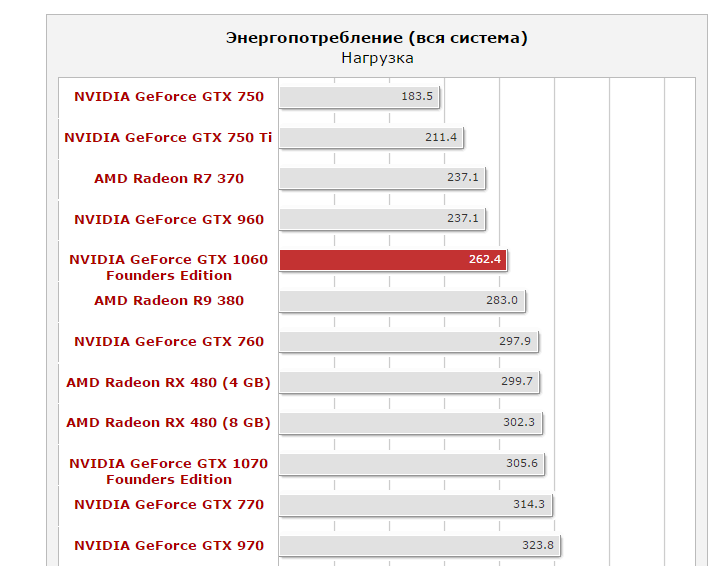 According to official information, GTX 1080 graphics cards consume 180 watts, while GTX 1080 TI graphics cards consume 250 watts.
The official specifications also list our recommended PSU wattage. In this case, the GTX 1080 has a recommended wattage of 500W, while the GTX 1080 Ti has a recommended wattage of 600W.
You can use the online power supply computers to check the power supply capacity specified in the specifications. These computers allow you to roughly estimate the power supply capacity based on the specified components. To check this, use MSI Power Computer.
Start by checking the price of the GTX 1080 GeForce. Results for computers with these components exceed 450 watts (similar to the 1070 and 1070 TI).
Use the same accessories to check the price of the GeForce GTX 1080 TI. The result for the GTX 1080 Ti is 525W.
For the GTX 1080 and GTX 1080 TI cards, MSI Computer offers prices well below NVIDIA’s recommended prices. Therefore, when choosing a power supply, you should first of all focus on the official price of NVIDIA.
From this we can deduce that the GTX 1080 requires a 500W PSU, while the GTX 1080 TI requires a 600W PSU. If you want to test a future upgrade or have extra power, you can choose the 100W model. This increases PSU standby power to 600W on the GTX 1080 and charging power to 700W on the GTX 1080 Ti.
90,000 budget gamers are dedicated to GECID.com. Page 1
::>Video cards
>2018
> ASUS PH-GTX1060-3G
13-02-2018
Page 1
Page 2
One page
Despite modern realities, when the prices for more or less productive video cards are significantly inflated, there is no escape from the need to buy a card for home use and comfortable Full HD gaming. Of course, you can always consider purchasing a used video card at a more affordable price as an option, but now the risk of running into a model that has worked 24/7 for miners for several months is very high.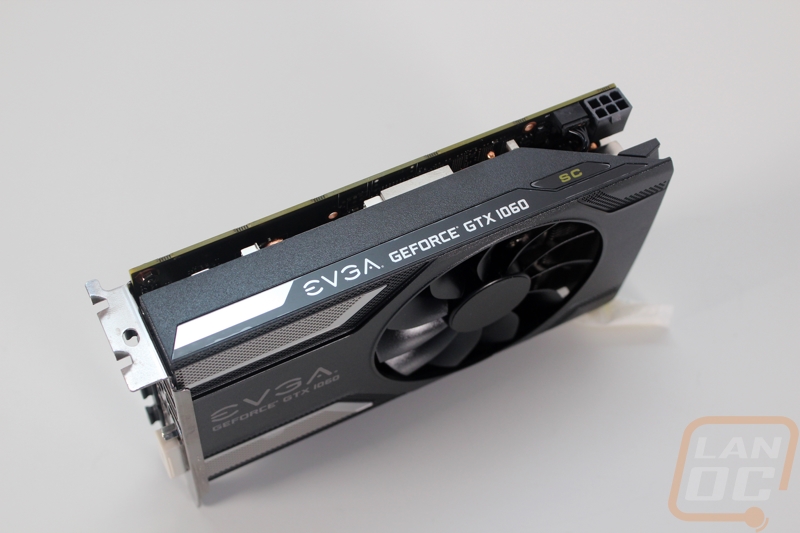
When it comes to buying a new graphics card, NVIDIA GeForce GTX 1050 Ti and NVIDIA GeForce GTX 1060 with 3 GB of memory are currently attracting the most attention. This review will focus on one of the most affordable modifications of the NVIDIA GeForce GTX 1060 from a well-known manufacturer, namely ASUS Phoenix GeForce GTX 1060 3GB , which stands out from other versions with its compact dimensions. If you wish, you can find it for less than 10,000 hryvnias ($365), but the average price on the market is about $396. True, back in the summer of 2017, its average price tag was at the level of $250.
Specification
|
Model |
ASUS Phoenix GeForce GTX 1060 3GB (ASUS PH-GTX1060-3G) |
|
GPU |
NVIDIA GP106-300 |
|
Microarchitecture |
NVIDIA Pascal |
|
Technical process, nm |
16 (FinFET) |
|
Number of CUDA cores |
1152 |
|
Number of texture units |
72 |
|
Number of raster blocks |
48 |
|
Rated / dynamic frequency of the graphics core, MHz |
1506 / 1708 |
|
Effective memory frequency, MHz |
8008 |
|
Memory size, GB |
3 |
|
Memory type |
GDDR5 |
|
Memory bus width, bit |
192 |
|
Memory bandwidth, GB/s |
192. |
|
Tire type |
PCI Express 3.0 x16 |
|
Image output interfaces |
1 x DVI-D |
|
Minimum power supply unit, W |
300 |
|
Optional PCIe power connector |
1 x 6-pin |
|
Dimensions from the official website (measured in our test lab), mm |
183 x 121 x 38 (194 x 121) |
|
Drivers |
Latest drivers can be downloaded from the ASUS website or the GPU manufacturer’s website |
|
Manufacturer website |
ASUS |
 2
2 All prices for Asus%2BGeForce%2BGTX%2B1060%2BPH-GTX1060-3G
Packing and contents
On the front side you can see the adapter itself, and on the back there is a description of its key advantages.
The list of system requirements for the computer in which the video accelerator is planned to be installed is located on one of the sides of the box. Based on the recommendations, the power supply should be at least 300W and support one 6-pin PCIe power cable.
ASUS PH-GTX1060-3G comes with a quick start guide and a CD with drivers and utilities.
A modified set of interfaces is used to display an image on the tested adapter:
- 1 x DVI-D;
- 2 x HDMI 2.0b;
- 2 x DisplayPort 1.4.
Recall that the reference version assumes the presence of one DVI-D port, one HDMI and three DisplayPort. In this case, ASUS decided to meet the needs of the owners of VR devices by providing them with two HDMI ports. Simultaneous monitor connection is limited to four video outputs with a maximum resolution of 7680 x 4320 at 60Hz.
Appearance and element base
ASUS Phoenix GeForce GTX 1060 3GB compares favorably with its compact dimensions.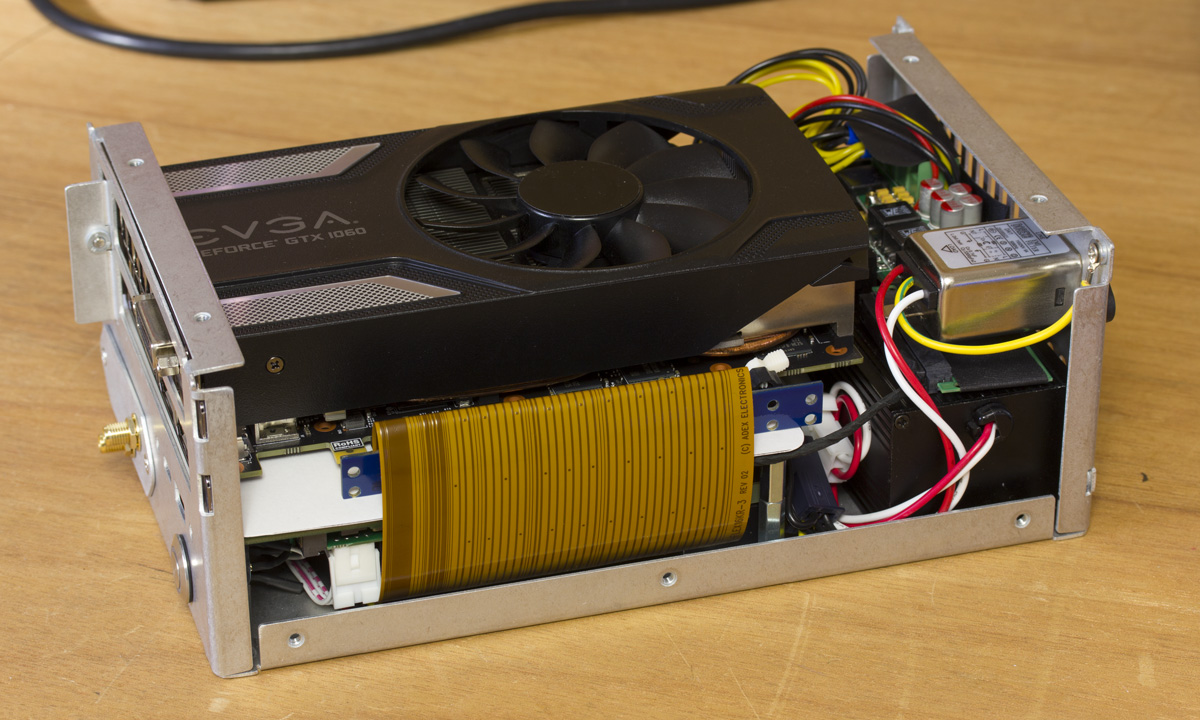 As for the design, it is quite simple: the casing is made in black and decorated with a white stripe.
One of the interesting features is the use of a fully automatic production process ASUS AUTO-EXTREME Technology and a reliable element base Super Alloy Power II. It includes solid-state and tantalum-polymer capacitors, as well as chokes with a ferrite core. All this is done with the aim of lowering operating temperatures, improving energy efficiency and increasing service life.
The tested graphics adapter is powered by a PCI Express 3.0 x16 slot and one 6-pin PCIe connector. We note its good location, thanks to which the cooler does not make it difficult to disconnect the PCIe cable.
The reverse side of the PCB is notable for some electrical components, including the tantalum polymer capacitors mentioned above, and cooling system mounting screws. One of them is covered with a warranty sticker, so you won’t be able to remove the heatsink without voiding the warranty.
The ASUS PH-GTX1060-3G is based on the NVIDIA GP106-300 graphics chip, which is manufactured using a 16nm process technology. It consists of 1152 CUDA cores, 72 texture units and 48 raster units. The GPU frequency corresponds to the recommended 1506 MHz in nominal mode and 1708 MHz with NVIDIA GPU Boost 3.0 technology.
Assists the GPU with 3 GB of GDDR5 memory sampled from Sk Hynix chips and running at a reference effective clock speed of 8008 MHz. Data exchange between the graphics core and memory is carried out through 192-bit bus, which is capable of passing 192.2 GB of information per second.
Cooling system
ASUS Phoenix GeForce GTX 1060 3GB (PH-GTX1060-3G) graphics card with installed cooling system occupies two expansion slots and has a total length of 183 mm according to the official website (194 mm according to our measurements). test lab).
The cooler has a very simple design and consists of a small one-piece heatsink with fins and one fan with an impeller diameter of 86 mm, mounted on a plastic casing. The manufacturer reports that the propeller is based on a double ball bearing, which is more reliable and durable than plain bearings.
When the fan blades were automatically controlled in the maximum load mode, the graphics core heated up to 82°C, while the cooler worked at 60% of its maximum power. According to subjective sensations, the noise was at a low level and did not interfere with work at all.
For comparison, let’s recall that the 2-fan cooler of the ASUS DUAL-GTX1060-O3G video card, whose design includes a larger heatsink and even a pair of heat pipes, kept the GPU temperature at 71°C. A score of 9 is considered critical.4°C. In addition, the dynamic frequency of the GPU rose to 1860 MHz (although there is also the contribution of factory overclocking), while the speed of the tested version only slightly exceeded the declared figure (1721 versus 1708 MHz).
In the maximum fan speed mode, the temperature of the GPU dropped to 77°C. At the same time, the noise exceeded the average level and became not very comfortable for constant use.
With a dual-fan cooler, you can count on a temperature drop of up to 53°C with the same mode of operation of the cooling system. And, of course, with more efficient cooling, the dynamic frequency of the GPU increases.
In the absence of load, the frequencies of the graphics core and memory were automatically reduced, allowing to reduce power consumption and heat dissipation of the video accelerator as a whole. In this mode, the GPU temperature did not exceed 28°C. Note that even when idle, the fan does not stop rotating — its speed is at the level of 25% of the maximum, so it works almost silently.
The results obtained are quite worthy for such a modest size of the radiator and only one fan. And in automatic mode, the cooling system will not disturb the acoustic comfort. No extraneous sounds in the form of a whistle of throttles were noticed during the testing process. That is, the cooling system copes with its task, but if it were more efficient, then we could count on a higher dynamic frequency of the GPU.