How to Build Your Own Raspberry Pi KVM
A KVM (keyboard, video, mouse) switch allows users to remotely access their systems or computers, even if they can’t boot. While you can always grab a pre-built KVM, you can also build your own KVM using a Raspberry Pi that will save you hundreds of dollars. By putting together a few parts with Raspberry Pi, we can quickly build a Pi KVM unit and access it over the internet to control computers and servers remotely.
Why Is a Pi KVM Different?
Unlike VPN or remote access apps such as TeamViewer that require the OS to work, a KVM or Pi KVM (KVM running on Raspberry Pi) runs independently of the system’s operating system and allows you to remotely power on the system, access the BIOS, install an operating system, reboot, etc.
Things You’ll Need to Build a DIY Pi KVM
You’ll need the following hardware components to build your Raspberry Pi KVM:
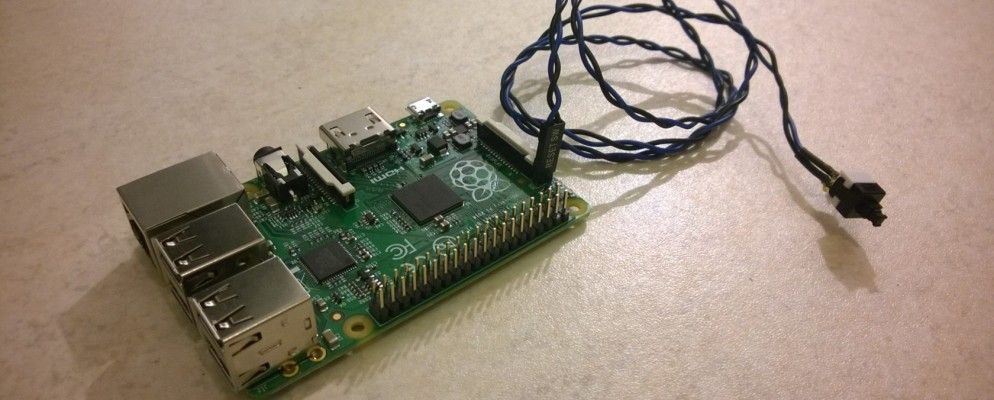
- A Raspberry Pi 3, 4, or Zero 2 W with a power supply.
- 16GB or larger microSD card.
- 2 x USB Type A male to Type A female cables.
- A USB Type C cable—if you are using a Raspberry Pi 4.
- A micro USB cable—if you are going to use a Raspberry Pi 3 or Zero 2 W.
If you can’t find the splitter cable, you can also build your own by splicing and connecting a pair of Type A male-to-female USB cables.
Also, the Pi KVM captures the snapshots from the HDMI output of your system and displays them in real time. There are two different ways to capture the video when you choose to build your own Pi KVM. You can choose either, based on the available Raspberry Pi board.
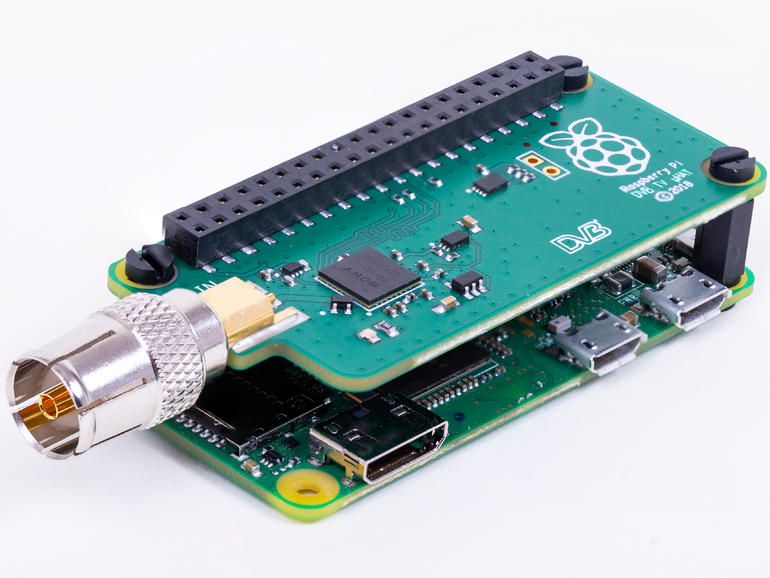
- HDMI to CSI adapter: works with all Raspberry Pis, including Raspberry Pi Zero W and 2 W. It’s also much faster, with extra low latency (MJPEG and H.264/WebRTC stream).
- HDMI to USB video capture card: works with Raspberry Pi 2, 3, 4. It’s comparatively slower than the CSI, with high latency, but works well.
Below, you will learn the steps to build a Pi KVM with a Raspberry 4 or Raspberry Pi Zero 2 W, using an HDMI to USB video capture card or CSI to HDMI adapter and a DIY USB splitter cable.
Flash Pi KVM Disk Image on the MicroSD Card
To get started, download the latest readymade Pi KVM image for your Raspberry Pi. There are a few different images available for the Raspberry Pi based on the model and the HDMI adapter (HDMI to CSI adapter or HDMI to USB dongle) you are going to use for this build.
Then follow these steps to flash the microSD card with the Pi KVM OS image.
- Connect the microSD card to your system.
- Download and launch the Raspberry Pi Imager tool.
- Select Choose OS > Use Custom and then browse to the location where the downloaded Pi KVM image is stored.
- Click Open.
- Click Choose Storage and select your microSD card.

- Click Write. Click Yes to confirm. This will take a while to finish.
If you are going to use a Raspberry Pi Zero W or 2 W or Wi-Fi for network connection, you need to mount the PIBOOT (FAT32) partition and edit the pikvm.txt file. Open the file in Notepad and paste the following lines below the FIRST_BOOT=1 line and replace the Wi-Fi SSID and password.
WIFI_ESSID="MyWiFiName"
WIFI_PASSWD="Password"
Connect the Raspberry Pi to Power and HDMI Adapter
After the microSD card is flashed, connect the Raspberry Pi to the HDMI to USB or HDMI to CSI adapter.
- Insert the microSD card into the Raspberry Pi.
- Take the USB splitter cable and insulate the +5V pin in one of the USB Type A male ports in the splitter cable using tape. This Type A port with non-insulated +5V pin is connected to the USB port of the computer/server that you want to manage remotely.
 If you don’t disable this pin, you may damage the USB port on the computer or server.
 - If you are building a DIY splitter cable as we did, you can keep the red wire of one of the USB Type A male cables unconnected. Refer to the following wiring diagram for details.
- Take a USB Type A to Type C cable and connect it to the female Type A port in the splitter cable and the Type C port on the Raspberry Pi power input.
- If you are using the HDMI to the USB dongle, connect it to one of Raspberry Pi 4’s USB 2.0 ports, as shown below.
- If you are going to use the HDMI to CSI bridge, connect the ribbon cable to the Camera port on the Raspberry Pi 4 or Raspberry Pi Zero 2 W.
- Connect the LAN cable to the Raspberry Pi 4 and router. Raspberry Pi Zero 2 W users need to enter the Wi-Fi details manually after flashing the microSD card with the Pi KVM OS image by mounting the PIBOOT partition.
- Lastly, connect the Type A port to the 5V/3A power supply to turn on and boot Raspberry Pi 4 or Zero 2 W.
Set Up the Pi KVM
The first boot process will take longer to complete. Once it is complete, open your router configuration and go to the DHCP settings. Find the IP address of the connected Raspberry Pi or Pi KVM. You may also use the Fing app on your smartphone to scan your network and find the IP address.
Once found, you can open the IP address in a web browser, such as Chrome or Safari. This will load the Pi KVM login page. Enter «admin» for both username and password, then click Login.
Click Terminal and then follow these steps to enable read/write permissions and update the Pi KVM.
Log in as a superuser (root user). The password is “root” by default.
su
Enable the read/write permissions:
rw
Then enter the following command to check and update the Pi KVM:
pacman -Syu
This will check and install the updates. It can take several minutes to complete. After the updates, make the file system read-only by running the following command:
ro
Next, go back to the homepage and click on the KVM option. This should immediately load the screen of your server or computer to which the HDMI to CSI or HDMI to USB capture card is connected. You can now access the PC or the server remotely.
There are also several other options available that you can use to adjust the streamed image quality, FPS, size, mount ISO, etc.
We are using a 32GB microSD card which provides us with more free space to host multiple OS images on the Pi. You can use a larger microSD card to store multiple OS images so that you can install a different OS on the server as and when required.
You can also hook up and enable ATX control to turn ON/OFF or reset the PC or server.
Expose the Pi KVM to the Internet for Remote Access
To enable remote access to your Raspberry Pi or Pi KVM, you can use the DuckDNS and Port Forwarding in your router. You may also set up a Cloudflare Tunnel to remotely access your Pi KVM and control your PC or server with a secure HTTPS connection.
Alternatively, you may also install and use the Tailscale VPN to access your Pi KVM from anywhere. TailScale is a free-to-use tool for private purposes that you can set up in Pi KVM and on your remote Windows, macOS, Linux, Android, or iOS device that you will be using to access the Pi KVM over the internet.
To install and set up Tailscale, run the following commands in the Terminal app.
su
rw
pacman -Syu tailscale-pikvmsystemctl enable --now tailscaled
This will install Tailscale and enable auto-start for it if the Pi KVM reboots.
tailscale up
This will display a URL. Copy the URL to the web browser and authorize. After authorization, enter the following command to restart the Pi KVM:
reboot
You can now access the server or computer connected to the Pi KVM from any system. You just need to install the Tailscale VPN on the device, visit the admin page to view the available VPN networks, and then use the displayed Tailscale URL of the Pi KVM to access and control your server or computer remotely. To learn more, you can visit the Pi KVM GitHub page.
Most Affordable KVM Over IP
This DIY Pi KVM is one of the most affordable KVM switch that you can use to have full control over your servers or machines remotely, even if they fail to boot, or crash, or encounter software or OS-related errors. You can quickly mount the operating system ISO, install it, and restore the backup to get the server and services back online.
You may also use a Raspberry Pi Zero 2 W to reduce the overall build cost and footprint. However, you should expect fewer frames and a bit more latency than the Raspberry Pi 4 we used in this tutorial.
Open and inexpensive DIY IP-KVM on Raspberry Pi
PiKVM — Open and inexpensive DIY IP-KVM on Raspberry Pi
| A very simple and fully functional Raspberry Pi-based KVM over IP that you can make with your own hands without any soldering! This device helps to manage servers or workstations remotely, regardless of the health of the It only costs between $30 and $100 for DIY depending on the features desired. |

We are launching a new line of our hardware on Kickstarter: PiKVM V4!
|

PiKVM V4 on Kickstarter right now!
|
We also made our own ready-made PiKVM V3 on Raspberry Pi 4. Watch the video! This device has all the features of the DIY version, including:
|
|

Buy PiKVM V3 right now!
|
Great project review by Linus Tech Tips |
| Easy and powerful | The widest hardware support | Production features |
|
Just a few cheap parts and half an hour of assembly and you will have the device that supports Full HD video, Mass Storage Drive, keyboard & mouse, control the ATX power and much more. 
|
There are many ways to build a PiKVM. Raspberry Pi models 2, 3, 4, or ZeroW may be used. Video capture devices can be attached using the CSI-2 or USB interfaces. |
Access via Web UI and VNC, IPMI BMC/SoL and Redfish support, Wake-on-LAN server, advanced authorization and HTTPS out of the box. This is just a short list of what PiKVM can do out of the box. |
DIY Getting Started
Fully-featured and modern IP-KVM
- Easy to build
A ready-to-use OS images and friendly build environment. The hardware can be made in half an hour and without soldering. - Very low video latency
~100 milliseconds of video latency. This is the smallest delay of all existing solutions. - Extra lightweight Web UI and VNC
No weird proprietary clients. No ugly applets. Just use your favorite browser to connect to the PiKVM.
No flash plugins either! Ah, and VNC is also supported. - Keyboard & mouse
Mouse usage works directly in the browser. The keyboard emulator supports displaying the state of the keyboard LEDs. - Mass Storage Drive
On the Raspberry Pi 4 and ZeroW, PiKVM can emulate a virtual CD-ROM or Flash Drive.
A live image can be uploaded to boot the attached server. - ATX power management
With a very simple circuit that can be assembled on a breadboard, the power button of the attached server
can be controlled using the ATX button headers on the motherboard. - Security
PiKVM can be opened to the Internet and no one will get access without the authorization.
SSL is used to protect traffic from being intercepted by third parties.
- Local monitoring
PiKVM monitors the health of the Raspberry Pi board and will warn you if it’s too hot
or is not receiving enough power. - GPIO management
You can control GPIO and USB relays via the web interface.
The extensible interface allows you to make anything out of it.
Production-ready
- Linux-based embedded OS
The PiKVM OS is based on
Arch Linux ARM
and can be customized for any needs. Thousands of pre-built binary packages are at your service
and can be updated with a single command! - Read-only filesystem
By default the OS runs in read-only mode, as an embedded system should. This prevents damage
to the memory card due to a sudden power outage. - VNC server
The managed server and its BIOS can be accessed using a regular VNC client which supports JPEG compression.
- IPMI BMC/SoL and Redfish
Use ipmitool, ipmiutil or any existing network infrastructure that supports IPMI
to manage the server’s power and access to serial port via LAN. Redfish and redfishtool supported too. - Wake-on-LAN
PiKVM can be configured to power up a managed server using WoL. This will be available in the Web menu. - Extensible authorization methods
Multiple PiKVMs can be configured to use a common authorization service.
PAM and its rich authorization mechanisms can also be used to integrate PiKVM into your existing
authentication infrastructure. - Macro scripts
If repetitive actions must be performed on the attached server (or on several different servers),
a macro can be recorded with keyboard & mouse actions and can be played back multiple times.
Open Source
- Open & free
PiKVM is Free and Open Source Software released under the GPLv3. - Community & support
PiKVM has a large community. Join the Discord chat
if you have any questions. - Extensible
PiKVM was designed as a set of microservices with a plug-in architecture. It’s very easy to modify and maintain. - Comprehensive API
Everything that can be done via the user interface can also be done via a powerful HTTP API. - Know-how
We created our very own MJPG video server
written in C with multi-threading support and GPU video encoding — the fastest streaming solution available
to provide the best video quality for PiKVM. We also tested a lot of hardware configurations
so that you can be sure devices you assemble will work reliably.
|
Buy PiKVM V3 right now! |
DIY Getting Started |
KVM Over IP using Raspberry Pi / Habr
On Habré, it is hardly worth talking about remote PC access programs, like TeamViewer. But all this works only in the operating system environment. But there is no access to the BIOS, the possibility of installing, reinstalling and other operations with the operating system. There are other solutions for all of this. One of the most affordable is KVM Over IP.
Of course, if you buy a branded system, it will be expensive. But there is another solution — creating your own system based on the «raspberry». This solution was proposed by the developer Maxim Devaev. He’s going to start selling this system for $130. But you can assemble all this yourself — the main thing is to stock up on your own components. Under the cut is a description of how to do this. nine0005
Pi-KVM prototype without case
Required components
- Raspberry Pi 4 or Raspberry Pi Zero
- 16 GB microSD memory card.
- HDMI-to-CSI adapter.
- USB female to dual male Type-A splitter.
- Cable
- USB C to Type-A
- Power supply 5V, 3A with USB Type-A port.
SD card setup for Raspberry Pi KVM Over IP
Everything you need to configure can be downloaded from the network in the form of a disk image and then burn this image to a card. You can do this using Raspberry Pi or balenaEtcher (there are other options).
- Download the Pi-KVM disk image. Here’s a link. There are several versions of images on the source resource — for different versions of Pi. In addition, you need to choose based on what you are using — HDMI-to-CSI or HDMI-to-USB.
 nine0019
- Unpacking the image.
- Launch Raspberry Pi Imager.
- Now you need to select the option “Choose OS” → “Use Custom” and use the image accordingly. You also need to determine the SD card using the not-so-complicated “Choose SD Card” option.
- Write — flashing.
Building and configuring Raspberry Pi for KVM Over IP
Now you can start assembling the hardware. Here, too, everything is simple.
- Connect the CSI cable of our HDMI-to-CSI-2 bridge to the Raspberry Camera port. To make sure everything is connected correctly, it is better to look at the photo. If you are using HDMI-to-USB, simply plug the connector into the USB connector. Well, or in the case of Pi Zero, we connect microUSB to USB Type-A.
- It is necessary to insulate the 5V pin on the USB Type-A connector of the splitter. The easiest way to do this is with a thin insulating material. You can simply remove the contacts that lead to these pins, but it’s still safer and easier to just insulate the connector.
 If this is not done, the computer’s USB port may be damaged. nine0019
- Connect USB C-to-A to Type-A cable
- We connect the USB-C cable to the USB-C port of the «raspberry».
- Connect the Type-A connector to power.
- Connect USB Type-A connector and HDMI PC to be controlled.
- Finally, insert the memory card and turn on the «raspberry».
Pi-KVM software setup
Now we can get started with Pi-KVM. The first boot will be quite long, so you have to wait. But in the end, everything will start, after which you can start setting up. nine0005
1. Determine the IP of the «raspberries». Actually, it is hardly necessary to tell on Habré how to do this, but just in case, you can do this using a router, in the panel of which the IP of all connected devices are displayed.
Alternatively, you can open a Windows command prompt and run the “arp -a” command. After that, you will see all the addresses of devices connected to the local network. Any device whose address starts with b8:27:eb: or dc:a6:32: is a Raspberry Pi.
2. Enter the IP in the browser of the client PC, after which the login page opens.
3. The default login values are admin and admin.
4. Click on the KVM icon.
The screen should now load, as shown in the screenshot below. It provides access to a remote PC using the menu. You can get more menus than shown in the picture, here is a link that tells how to do it.
The larger your SD card, the more ISO images you can download and use in the future, expanding the functionality of the system. nine0003
If everything is properly connected and configured, the management tools should already be available.
An HDMI 4 connection can be used to expand the functionality of the system, such as using additional displays.
And here is a prototype of our system without a case and a 4-port KVM switch.
Pi-KVM update to the latest version
Pi-KVM gets updates frequently, so try to keep it up to date. To update you need:
- Select the console icon in the Pi-KVM main menu, after which the console starts.
- We enter «su» and we get the superuser. Password — root
- Enter «rw» and open the system for writing.
- We are updated by sequentially entering the commands “pacman -Syu” and “Y”.
Remote control
Your best bet is to use a tool like Tailscale. It’s convenient, it’s free for regular users, and it’s easy to set up a small VPN network. nine0003
- Register with Tailscale by choosing the free Solo Plan for private use.
- Click on the console icon in the Pi-KVM main menu
- Become superuser with «su» and password «root»
- Opening the system for writing.

- We enter the command “pacman -S tailscale-pikvm” to start the VPN service on our system.
- Enter «reboot» to reboot.
- After that, you need to access the system again, repeat steps 1-4. nine0019
- Type “systemctl enable —now tailscaled” to enable the service.
- We initialize the start of work by entering “tailscale up”.
- Authorize everything.
- If everything went well, you will see the message «Success» in the console.
- We follow this link to see the IP assigned to our VPN.
Client side
Now let’s set up tailscale on the client. Tailscale supports most operating systems including windows, mac and linux. nine0003
- Download the version for your OS using this link.
- Follow this link to display VPN IP.
- Enter the IP in the browser line, which allows you to connect to PI-KVM.
In general, that’s all. Thanks to this instruction, we get an inexpensive, fast and easy-to-use KVM over IP service. If you need additional details, they are available at this link.
Pi-KVM: Raspberry Pi 9 KVM switch project0001
Pi-KVM is a set of software and instructions to convert a Raspberry Pi to a full featured IP KVM switch. The board connects to the HDMI / VGA and USB ports of the server for remote control regardless of the operating system.
This can turn on, shut down or restart the server, set up the BIOS and even completely reinstall the operating system from a booted image plus the Pi-KVM can emulate a virtual CD-ROM and flash drive. nine0166
Index
- 1 About Pi-KVM
- 1.1 Additional information
El Operating system Pi-KVM is based on Arc Linux and can be adapted to any need.
While system files are read-only by default. And the operating system runs in read-only mode, just like an embedded system should. This prevents damage to the memory card due to a sudden power outage. nine0003
In addition, provides access to the server via the web interface from a regular browser or VNC client (no Java applets or flash plugins) with low video latency (about 100 milliseconds) and high FPS. For this, uses ΜStreamer (written in C and using MJPG-HTTP).
On the other hand, full keyboard and mouse emulation (including LED and touchpad scrolling/scrolling), CD-ROM and Flash emulation allows everything to be handled, plus multiple images can be loaded and connected as needed. nine0003
The server’s power is controlled using the ATX pins on the motherboard or via Wake-on-LAN.
It also has extensible authorization mechanisms: from a simple password to the ability to use a single authorization server and PAM.
Of the main characteristics that stand out:
- Cheaper but better than commercial solutions.
- Easy to Build: With a ready-to-use operating system that can be built by simply running make buildde install on the make install SD card. Hardware can be made in half an hour and without welding. nine0019
- Widest hardware support
- Very low latency
- Very light and elegant web interface
- Keyboard and mouse
- Mass storage unit
- ATX Power Management
- Security
- Local monitoring
- Compatible with IPMI BMC for integration into existing network infrastructure.
- Broad hardware support: Raspberry Pi 2, 3, 4 or ZeroW, as well as various video capture devices. nine0019
En pocas palabras, we can summarize Pi-KVM as a simple toolkit and friendly that allows you to build and install an operating system on a Raspbery Pi memory card with just a couple of commands.
Its creator describes it like this:
Pi-KVM is a very simple and fully featured IP-KVM on Raspberry Pi that you can make yourself. This device helps to manage servers or workstations remotely, regardless of the state of the operating system or whether it is installed. You can fix any issues, tweak the BIOS, or even reinstall the operating system using the included CD or flash drive emulation. nine0251
Additional information
Those who are interested in this project should know that the number of parts required , in addition to the Raspberry Pi, is minimal, which allows you to assemble it in just half an hour and the total cost will be from 30 to 100 dollars (this depends on even the most expensive configuration), while many proprietary IP-KVMs with less functionality will cost $500 and up.
The Pi-KVM specific packages and the kvmd daemon are written in Python and licensed under GPLv3.