tinyticker · PyPI
A tiny Raspberry Pi powered ePaper ticker.
Project description
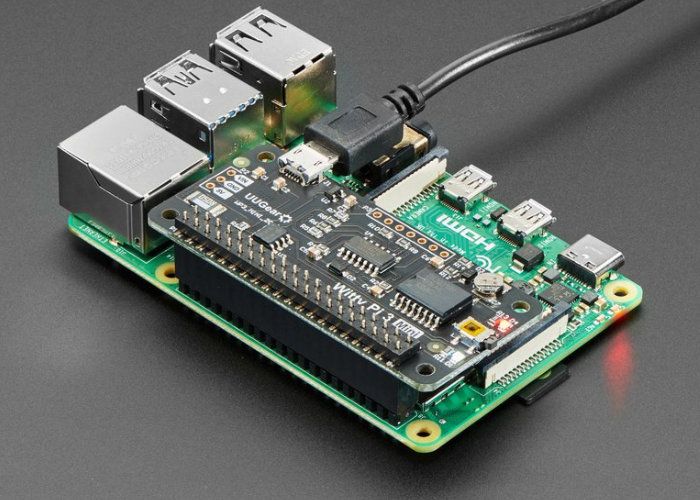
tinyticker uses a Raspberry Pi zero W and a small ePaper display to periodically display a stock or crypto chart.
A flask web interface is created to set the ticker options and control the Raspberry Pi.
tinyticker uses the cryptocompare API to query the crypto price information, you’ll need to get yourself a free API key. As well as the yfinance package to get the stock financial data.
🛒 Hardware
Shopping list:
- Raspberry Pi Zero WH
- One of these ePaper displays:
- Waveshare ePaper 2.13in Black & White
- Waveshare ePaper 2.13in Black, White & Red
- Waveshare ePaper 2.13in Black, White & Yellow
- A micro sd card
📦 Installation
Recommended setup
Flash the tinyticker image onto a SD card and you should be good to go.
Manual setup
I highly recommend using comitup to setup the networking on your RPi.
- Write the
comitupimage to your sd card - Boot up the RPi and setup the networking
- ssh into your RPi, you’ll probably want to change the password while you’re at it
- Enable the SPI interface
- (Optional) rename the hostname of your RPi by editing the
/etc/hostnameand/etc/hostsfile - (Optional) rename the Wifi AP name by editing the
/etc/comitup.conffile - Install the
BCM2835driver:curl http://www.airspayce.com/mikem/bcm2835/bcm2835-1.60.tar.gz | tar xzv cd bcm2835-1.60/ ./configure make make install
- Install
pip:sudo apt install python3-pip
- Install dependency requirements:
sudo apt install libatlas-base-dev libopenjp2-7 libtiff5 libxml2-dev libxslt1-dev
- Install
tinyticker(theCFLAGSvariable is required forRPi.to install): GPIO
GPIOpip install tinyticker
- To setup
tinytickerto start on boot, copy over thesystemdunit files and enable them. - On boot, a qrcode linking to the
flaskapp will be flashed on the display - Leave a star, reboot and HODL !
Note: the Raspberry Pi zero isn’t very fast so be patient 🙂
Project details
This version
0.4.3
0.4.2
0. 4.1
4.1
0.4.0
0.3.14
0.3.13
0. 3.12
3.12
0.3.11
0.3.10
0.3. 9
9
0.3.8
0.3.7
0.3.6
0. 3.5
3.5
0.3.4
0.3.3
0.3. 2
2
0.3.1
0.3.0
0.2.1
0. 2.0
2.0
0.1.9
0.1.8
0.1. 7
7
0.1.6
0.1.5
0.1.4
0. 1.3
1.3
0.1.2
0.1.1
0.1. 0
0
Download files
Download the file for your platform. If you’re not sure which to choose, learn more about installing packages.
Source Distribution
tinyticker-0.4.3.tar.gz
(137.7 kB
view hashes)
Uploaded source
Built Distribution
tinyticker-0.4.3-py3-none-any.whl
(149.3 kB
view hashes)
Uploaded py3
Close
Hashes for tinyticker-0.
 4.3.tar.gz
| Algorithm | Hash digest | |
|---|---|---|
| SHA256 | aaf0d95dbc264a2b97f6c4adc8414366002edb112141294489fccd56e9f325df |
|
| MD5 | 5f225adbd05a32fd31b68c2e253ca6b0 |
|
| BLAKE2b-256 | 1d728ae133f9c78ea996e41e146a56c267091e59da7bdb6e53bf75ca44195809 |
Close
Hashes for tinyticker-0.
 4.3-py3-none-any.whl
| Algorithm | Hash digest | |
|---|---|---|
| SHA256 | c9a667804982b65575df22d1b2fd7bc69de78372c2b170c0aac052cfaca381e9 |
|
| MD5 | 1aaec28e74a845fd63ab9a4c615d92cb |
|
| BLAKE2b-256 | 86262f6f3f99a277c6e483c6b94e8b325a80d6118797f0ae9b2a2bbca0f343d3 |
Build a Cryptocurrency Price Ticker Using a Raspberry Pi
Whether you’re a full time trader or a first time cryptocurrency investor, chances are that you’re looking to keep track of the market’s performance from time to time. In this article, find out how you can do just that—by making a cryptocurrency price ticker for only around $100 in parts!
Why You Might Want a Cryptocurrency Price Ticker
The digital currency market can be extremely volatile—sometimes moving 20% within a single day. And unlike the stock market, trades are executed 24×7 and 365 days a year. All of this means that keeping track of market momentum can be extremely important.
While you could download an app on your smartphone or visit various websites to check a particular cryptocurrency’s price, neither equal the convenience of an always on display. With a live ticker, price checks become as easy as glancing at a wristwatch or wall clock.
To build such a cryptocurrency price ticker, all you’ll need is a Raspberry Pi along with a small LCD display. The Pi is a surprisingly powerful computer that sips power and outputs virtually no heat or noise—perfect for our application.
The Pi is so versatile, in fact, that we recently put together a list of awesome uses for the Raspberry Pi.
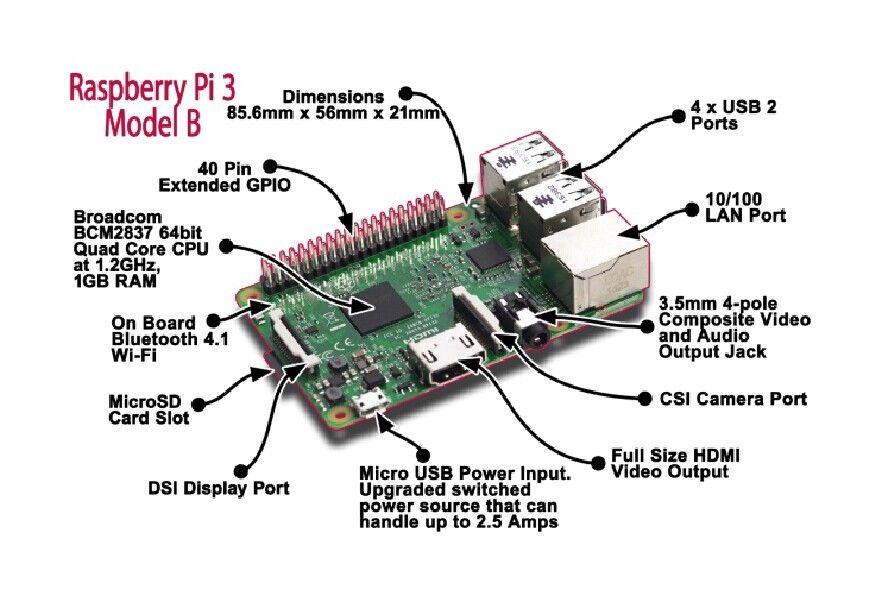
The Raspberry Pi: Which Model Should You Get?
A brand-new Raspberry Pi 4 will set you back a mere $35. If you don’t plan on running any other applications on it in the future, you could even get away with purchasing the Pi 3 for this guide. While you will sacrifice some performance overhead, the previous generation device can usually be picked up for less.
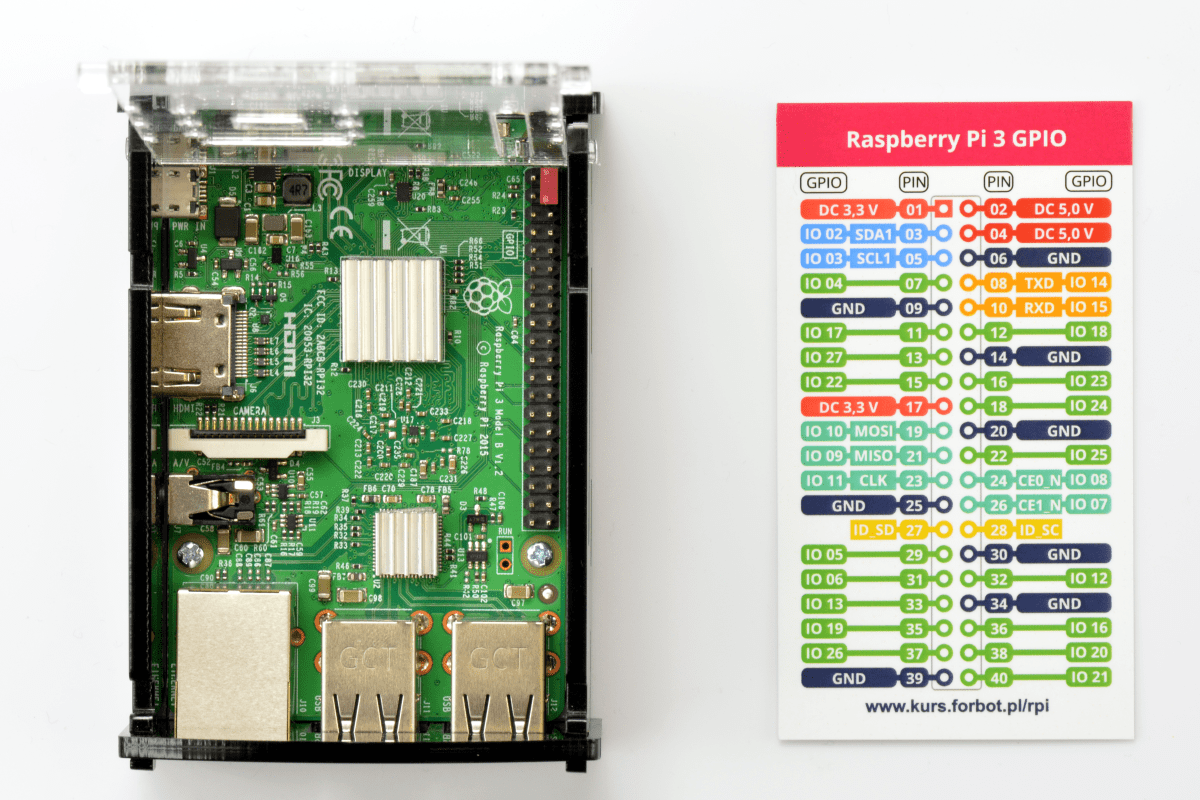
What cannot be used, however, is the Raspberry Pi Zero. As you’ll see in later sections of this guide, the ticker involves hooking up an external LCD display to the Pi via a serial interface. Most Pi Zero devices are not sold with pre-installed GPIO headers, so even just connecting the LCD display will require some tinkering and soldering first.
For maximum compatibility and the least amount of hassle, go with either the Raspberry Pi 3 or 4 models.
What You Will Need to Build a Crypto Price Ticker
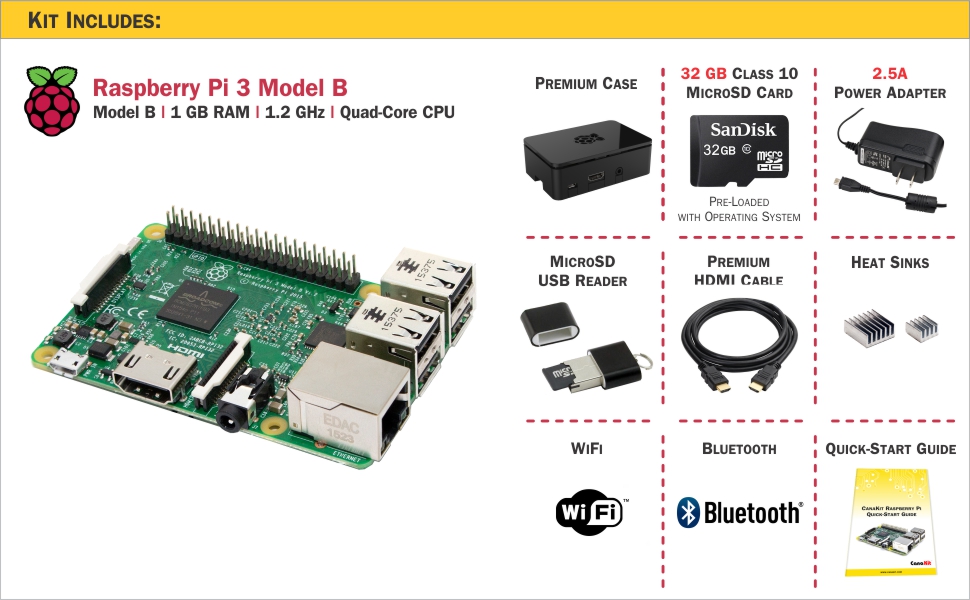
Here’s a list of all the hardware you will need to complete this project:
- A Raspberry Pi 4 or 3 B
- A USB-C power supply, as recommended by the Raspberry Pi Foundation
- 16GB MicroSD card for the operating system
- A keyboard, mouse, and screen to interact with the system
- A 3.
 5-inch screen and case combo that connects to the Pi via the SPI interface. We recommend this 3.5-inch TFT Raspberry Pi display for the Pi 3 or this 3.5-inch Raspberry Pi 4 display for the Pi 4.
Before configuring the Raspberry Pi to display a price ticker, an operating system must be loaded onto it.
Since the Pi is sold at a razor thin margin, you’re expected to install your own storage device. That’s exactly where the microSD card you purchased earlier comes into play.
Related: Install an Operating System on Raspberry Pi
With your Pi unplugged from the wall, insert the flashed SD card into it. Also connect a keyboard, mouse, and screen to the Pi’s USB and HDMI ports.
Finally, power on the device through its USB type-C port. The first boot may take a few minutes to complete but you will eventually be presented with the following welcome screen.
After completing the initial set up process, make sure the Pi is properly connected to your Wi-Fi network and displays the correct time in the top right hand corner. If either of these settings are configured incorrectly, delve into the Settings app and make the requisite changes. When you’re ready, shut down the Pi.
Disconnect the Pi from your monitor and connect it to the aforementioned 3.5 inch display instead. Since every screen is different, follow the manufacturer’s instructions on how to do this. It should just be a matter of lining up the pins on the screen and the Pi’s GPIO header.
Plug the Pi back in; this time, it should output to the newly attached display.
Getting the Cryptocurrency Price Ticker to Run on System Boot
Once the Pi has booted, click on the black rectangular icon to the top left of your screen. This will open up a terminal window where you can perform administrative tasks such as installing software and updating the system.
To install the cryptocurrency price ticker software, copy and paste the following command into the terminal window and hit Enter.
wget -O TICKER-INSTALL.bash https://git.io/JU6dw;chmod +x TICKER-INSTALL.bash;sudo ./TICKER-INSTALL.bash
The above command will automatically begin the installation process.
Agree to continue at each step. Press 1 and then Enter.
At the end, the installer will prompt you to reboot the Pi. The command to reboot is simple:
sudo reboot
Upon rebooting, your Pi should automatically load the ticker software. From this point on, the prices and other relevant data for various cryptocurrencies will be displayed on-screen. To exit the program, all you need to do is hit Alt+F4 on a keyboard connected to the Pi.
Additional Configuration
By default, the ticker will only display a handful of the most popular cryptocurrencies currently being traded. Luckily, adding or removing cryptocurrencies from your new ticker is pretty straightforward.
On the Pi—either via a remote SSH connection or a terminal window—enter:
nano /home/pi/dfd-crypto-ticker/config.js
This will open a text file that holds all of the configuration values for the ticker program. Each setting within this file has a short description alongside it—so making changes should be pretty easy.
Once you’ve made your changes, press Ctrl+X and then Y to save and exit. Then, the following command will refresh the ticker:
~/reload
And that’s it! Your crypto price ticker is ready to deploy anywhere you need.
The price ticker software you’ve installed is open source and open to community feedback. If you’d like to report any issues, feel free to reach out to the project’s developers on GitHub.
Raspberry Pi as a Website Hosting Server / Sudo Null IT News It is well suited for the role of a platform on the basis of which devices are created that must be constantly turned on. Among the many ways to use the Raspberry Pi is to use this computer as a web server. And, in fact, hosting websites on the Raspberry Pi is very simple.
 If you calculate the cost of the services of a regular hosting provider, it turns out that they are not so cheap. An alternative to such services can be your own hosting on Raspberry Pi, the maintenance of which costs almost nothing. In addition, the Raspberry Pi platform is constantly evolving, so those who decide to use it do not have to worry about having to work with outdated hardware and software in the future.
Strengths of Raspberry Pi Hosting
Hosting websites on Raspberry Pi has many advantages over using traditional servers for this purpose. Here are some of them:
- Regular hosting is expensive.
- Raspberry Pi is very energy efficient.
- Raspberry Pi is easy to transport.
- Running a regular server 24/7 means a lot of power consumption.
The
The
Among other things, you can organize hosting on Raspberry Pi in a matter of minutes. Any version of Raspberry Pi will work. As a result, it turns out that someone who has a Raspberry Pi and a good Internet connection can easily host their own website and not worry about anything.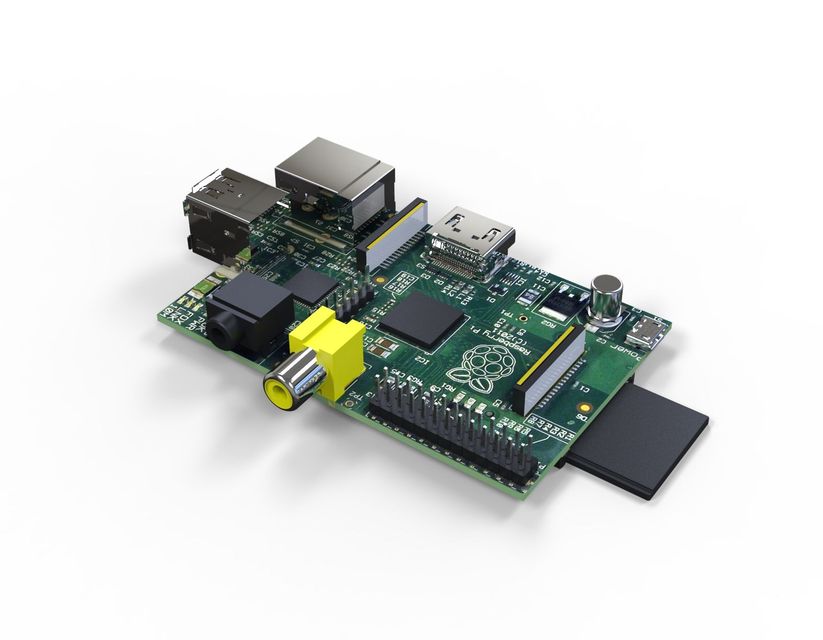
Raspberry Pi website hosting
In this article, I will provide a step-by-step guide to organizing website hosting on the Raspberry Pi. If you need such hosting, it is recommended to read this material without missing anything, and immediately do what is being said. And before you start, review the article — this will give you a general idea of what you will need to do and what you will need to do this.
Hardware
To host a Raspberry Pi, you will need the following:
- Raspberry Pi. I guess it goes without saying that you will need a Raspberry Pi before starting this project. But still, I’ll say it. At the same time, try to get the most modern version of the Raspberry Pi — it will provide better performance.
- Router or modem. They are needed to connect the Raspberry Pi to the Internet. Sometimes ISPs give users a device that allows a limited number of user devices to connect to the Internet. In such a situation, in order to simplify the connection to the Internet of many devices, a router will come in handy.

- Ethernet cable. The best way to connect your Raspberry Pi to the internet is with a cable. In this way, a higher quality connection can be achieved. But you can also use a Wi-Fi adapter — built-in or external.
Step 1: Set up the operating system on the Raspberry Pi
Connect the microSD card to your computer and format it. Download NOOBS (New Out Of Box Software). This is an operating system installer designed for beginners. Once the archive has finished downloading, unpack it and copy the files to a freshly formatted microSD card.
Insert the card into the Raspberry Pi, connect the power supply, keyboard, monitor and mouse to the board. The Raspberry Pi will start to boot, you will see a screen to select the operating system you want to install. If something went wrong at this stage, most likely the power supply or HDMI cable is not connected securely enough. Therefore, check the cable connections to the Raspberry Pi.
If you have no experience with the Raspberry Pi, then on the operating system selection screen, I recommend choosing Raspbian. Another good option is Adafruit. The installation of the operating system will take some time. Make sure that during this time the Raspberry Pi does not turn off.
Operating system selection screen
After you see the message Image applied successfully , you can click the Return button and the Raspberry Pi will reboot. After the reboot is complete, you will see the GUI of the installed OS.
Step 2: Communicating with the Raspberry Pi Server via SSH
In this step, we will set up an SSH connection to the Raspberry Pi server. The SSH protocol allows you to establish a secure connection between the computer and the Raspberry Pi, used for data transfer. With this connection, you can also use command line tools to control your Raspberry Pi.
Now that you have the Raspbian OS installed using the latest version of NOOBS, you probably have everything you need to work with SSH installed. In order to establish a connection between the computer and the Raspberry Pi, you will need to find out the IP address of the board. To do this, use the following command:
sudo ifconfig
What you need can be found at the top of the screen. If you connected your Raspberry Pi to the internet using an ethernet cable, the block containing the address you need will start with eth0 . If you are using Wi-Fi, then there will be wlan0 . In both cases, what we need comes after inet addr: . It is this address that can be used to connect to the Raspberry Pi from a computer.
Finding the IP address of the Raspberry Pi
If your computer is running Windows, you will need an SSH client. For example — PuTTY. To configure the connection, you will need to specify the IP address in the Host Name field, leaving 9 in the field0054 Port 22. If you press Enter , PuTTY will open a terminal window that will ask you for a username (default is pi ) and a password (default is raspberry ) to connect to your Raspberry Pi. Enter them and you are ready to work remotely with your new server.
SSH connection setup window
If you use a Mac or some Linux distribution, then you probably already have everything you need to organize an SSH connection. You, to connect to the Raspberry Pi, just run the following command in the terminal:
ssh pi@IP ADDRESS
If the board’s IP address looks like 192.167.2.2 , you will need to modify this command to:
ssh [email protected]
Then you will be asked for a password. The default password ( raspberry ) can be changed to something more secure.
Step 3: Update Raspberry Pi Software
Once you have connected to your Raspberry Pi from a computer via SSH, you need to bring the system up to date before installing Apache. To do this, you can use the following commands:
 sudo apt-get update
sudo apt-get upgrade
The system will update and you will be ready to install Apache.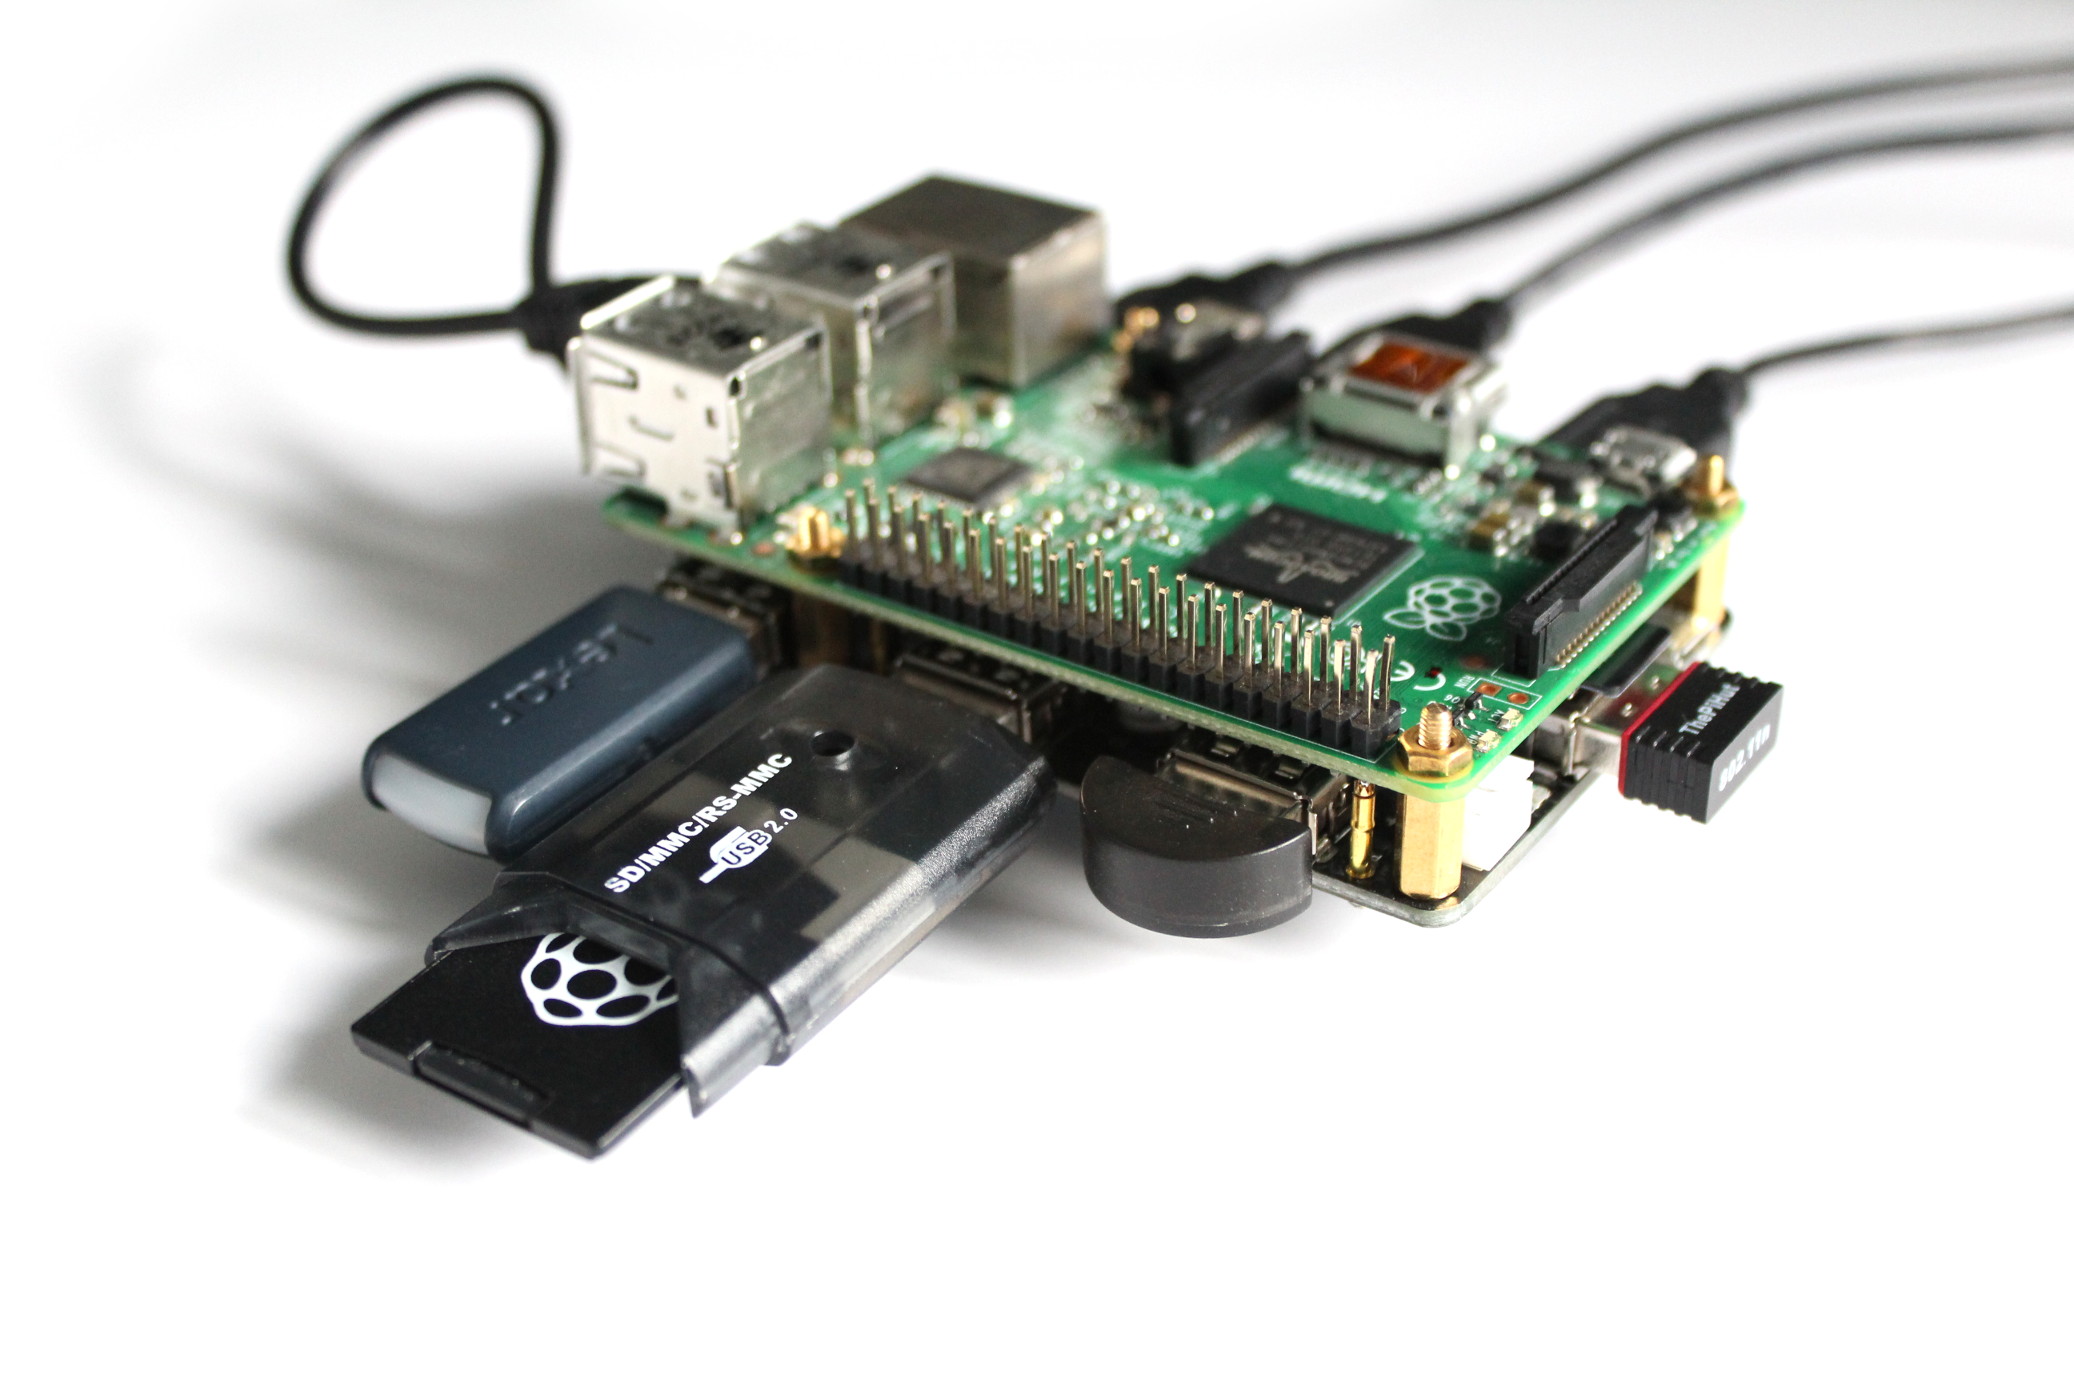
Step 4: Install Apache
If you’re trying to turn your Raspberry Pi into something that can host websites, then you’ll need custom software. For example, Apache. This is an open source and completely free HTTP server, which will allow you to make a web server out of Raspberry Pi.
After downloading the Apache installation files, just one command is enough to install it:
sudo apt-get install apache2 php5 libapache2-mod-php5
This command, however, installs not only Apache. She is responsible for installing some other packages, like PHP and the PHP library for Apache. We may need PHP capabilities, for example, to organize a site connection to a database.
Successful installation of Apache
After the installation is completed, you need to restart the program using the following command to activate the program:
sudo service apache2 restart
Then, to make sure Apache is working properly, you can use this command:
sudo service apache2 status
Verifying that Apache is running correctly
If the output of the above command has the green text active (running) , it means that everything is working as it should. If the server is turned off for some reason, you can start it again like this:
sudo service apache2 start
After that, you will be able to access your Raspberry Pi from your computer. For example, you can open a browser and navigate to this address (which contains the board’s previously found IP address that was used to connect to it via SSH):
http:// 192.167.2.2
A page will be displayed in the browser indicating the successful installation of Apache.
Step 5: Create a simple website
After Apache is installed on the Raspberry Pi, the server will issue a simple standard HTML page when accessed, indicating that the server is running.
Simple page
If you want to change this page to something of your own, go to the /var/www/ folder and add your code to index.html . You can do this in the terminal like this:
 cd /var/www/
sudo nano index.html
You can check what happened, as before, by accessing the server from the browser.
Step 6: FTP setup
You most likely already have a website that you want to host on your Raspberry Pi. It only needs to be transferred to the server. For this, it is convenient to use FTP. Install vsftpd (Very Secure FTP Daemon):
 sudo chown -R pi /var/www
sudo apt install vsftpd
After installing vsftpd , some configuration needs to be done.
Open configuration file vsftpd :
sudo nano /etc/vsftpd.conf
First you need to change the value of setting anonymous_enable from YES to NO . Then uncomment the following lines:
 #local_enable=YES
#write_enable=YES
Add the following to the end of the file:
force_dot_files=YES
This will allow you to see files whose names start with a dot, like .htaccess .
Configuring vsftpd
After editing the file vsftpd.conf , press CTRL+X to save the file and exit the terminal.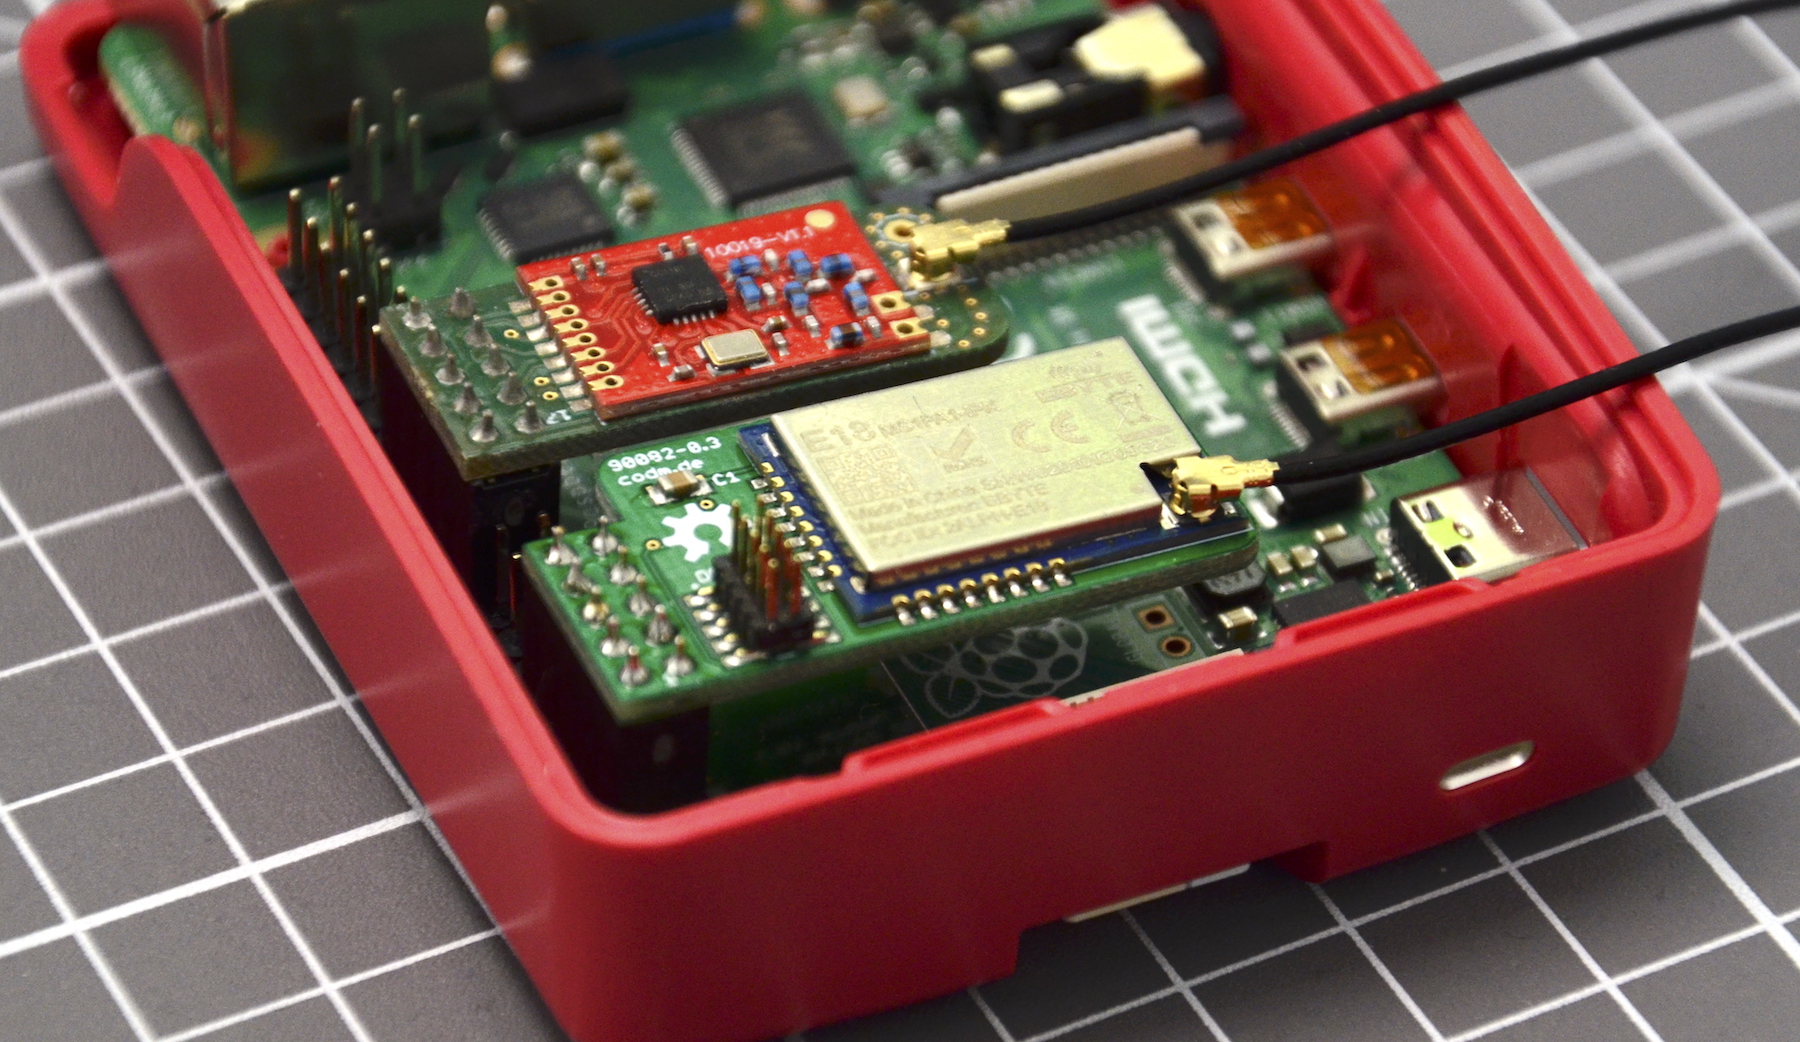 You can confirm the operation by entering
 Y and pressing Enter . As a result, you need to restart vsftpd :
sudo service vsftpd restart
Now it will be possible to connect to the Raspberry Pi and upload site materials to the server, to the directory /var/www/html .
Step 7: Get a domain name
Now you can upload your site materials to the server and access the site from the local network. But your site is not available to anyone else yet. In order for Internet users to access the site, one more thing needs to be done. Next, we will talk about one of the most important steps in setting up a Raspberry Pi server.
In order for Internet users to access your site, the server must have an external IP address. But suggesting that everyone access the site by IP address is not entirely professional. People prefer to go to sites using their addresses, written not in numbers, but in letters, understandable words. There are many services that allow you to set up a correspondence between an IP address and a domain name for free. They are usually very easy to work with.
If you don’t have a static IP address and your ISP keeps changing your IP address, you can use the No-IP service, which will automatically update the association between your domain name and your current IP address. In order to use this service, you need to create a free account on it and register a domain name, like rspi.no-ip.org . After that, you need to install some programs on the Raspberry Pi:
 cd /usr/local/src/
sudo wget http://www.no-ip.com/client/linux/noip-duc-linux.tar.gz
tar xf noip-duc-linux.tar.gz
sudo rm noip-duc-linux.tar.gz
cd noip-2.1.9-1/
sudo make install
After that, you will be asked for a username and password, then the installation will begin. Next, you need to make sure that the No-IP client starts automatically when you turn on the Raspberry Pi. To do this, edit file rc. :  local
local
 cd /etc/
sudo nano rc.local
You need to add the following line to it:
sudo noip2
Save and close the file. Then reboot your Raspberry Pi with sudo reboot .
Step 8: visit the website
After the connection between the IP address and the domain name of the site is configured, you can enter it by entering its domain name in the address bar of the browser. When using the No-IP service, the operation of the system can be checked with the following command:
sudo noip2 -S
Check noip2
If you manage to get a valid PID, it means that everything is working fine.
Step 9: Improve performance and security
Raspberry Pi hosting is pretty easy, but Raspberry Pi is not the best server in terms of performance. If you lack the performance of your server, you can try to improve it.
One way to improve the performance of the Raspberry Pi server is to use a USB drive instead of an SD card to host site content. With this approach, the time required to access the data will be reduced.
In general, it can be noted that it is best to host simple static sites on a Raspberry Pi server.
If we talk about security, it is recommended to change the default password to something more secure. To change the password, you can use the command passwd . This will increase the security of the system.
Organization of LAMP hosting
If you think that a static HTML site is too easy for you and that you need something more advanced, then a LAMP server might be for you. Such a server supports PHP and MySQL, which allows you to provide interactive websites. If you want to use this system, install the Apache server first and then MySQL. To install MySQL and related PHP components, run the following command:
sudo apt install mysql-server php-mysql -y
After that restart Apache:
sudo service apache2 restart
Next, you need to install PHP:
sudo apt install php -y
LAMP server
Once the installation is complete, restart Apache again using the above command.