Some system components cannot be hooked right now
If you often encounter a message from RivatunerStatisticsServer, MSI AfterBurner, Direct3D9, etc. stating Some system components cannot be hooked right now, It is strongly recommended to restart the application then this post may help you. In short, this error prevents the user from monitoring the performance of different hardware components. With this error, one cannot observe the performances of RAM, GPU, or CPU on the MSI Afterburner. The issue is related to the RivatunerStatisticsServer and has been plaguing users for quite some time. In this post, we will share how you can fix the problem.
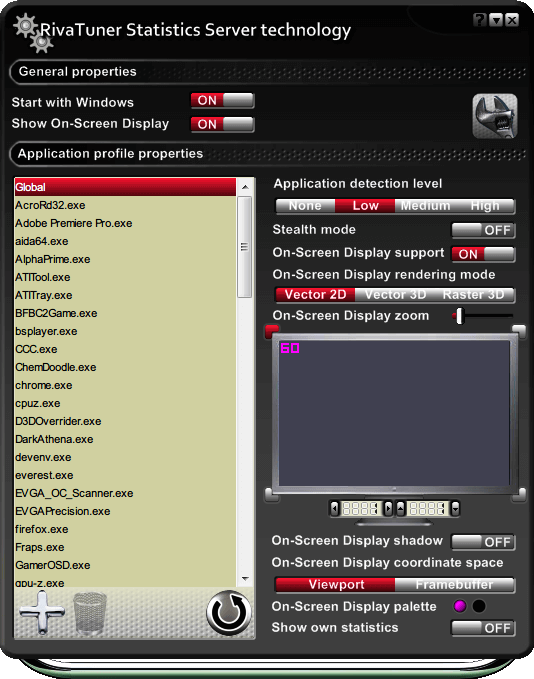
What is the Rivatuner Statistics Server?
What is the Rivatuner Statistics Server is a well-known FPS limiter. With this small utility, one can monitor frame rates and limit FPS with ease. It is also one of the best top-performance video capturing servers for a majority of graphic cards.
The Rivatuner Statistics Server also enables the user to monitor and overclock the NVIDIA graphics card. That plays a significant role in PC gaming.
Though the popping up of this message can be frustrating, there are some ways to resolve the problem. Take a look at the methods you can use to fix the error
- Restart Application
- Reinstall or Update Software
- Rollback recent Windows Update
You will need admin permission to resolve this
1] Restart Application
One of the simplest ways to resolve the RivatunerStatisticsServer error is to restart the application. By restarting the application, you are basically resetting the checking sequences associated with it. That way, it can fix the error. Moreover, if there has been any new hardware installation, restarting will help.
Restarting the application will reset it, ensuring that the error is resolved. Keep in mind that closing the application by clicking on the top-right corner will simply minimize it. That is not the way to restart it. However, to restart, you must use the Task Manager.
- Use Control + Shift + Esc to launch the Task Manager
- Locate the RivatunerStatisticsServer (RTSS.exe) in the Processes list
- Right-click on it and select End Task
- Launch the application again from the Start Menu application list and check if the issue still exists.
Read: System doesn’t have any USB boot option
2] Reinstall or Update Software from which you are getting this error
In some cases, files fail to be downloaded fully while the application gets installed. However, this is one of the rare reasons contributing to this problem. Still, this might lead to an error. Thus, you need to re-install the application and make sure that the files are downloaded completely.
Moreover, installing the recent version is relatively easy. You need to click on the link to the latest version. After that, you must download the application. Make sure that you first uninstall the application, and then install it again.
You will need to uninstall the RivaTuner app which you can find in Settings > Apps.
Another way to resolve this error is to update the software. Keep in mind that the developers may have recently fixed the issue. You need to install the latest MSI Afterburn to get rid of this problem. Since RivaTuner and MSI Afterburner are integrated, it may help.
Read: Windows could not finish configuring the system
3] Rollback recent Windows Update
Windows updates are an excellent way to remove bugs and glitches from the system. That is the main reason why people seem eager to install the latest updates on their PC. However, there is a downside to this too. Windows updates can interfere with the working of different applications.
One such application that can be affected is the MSI Afterburner. Several users have reported this error after installing the latest Windows update. Here, the only solution is to delete the latest update. You need to revert the changes you have made to the system. Undoing them will help in resolving the error.
- Open Windows Settings using Win + I
- Navigate to Windows Update > Update History
- Scroll to the end to locate Uninstall updates settings.
- Click to open and then find out the most recent update
- Select and then choose to uninstall.
Ensure you do not do this for any of the old updates, but only for the recent ones after which the problem started happening.
Conclusion
MSI Afterburner and Rivatuner Statistics Server is an excellent combination to monitor the performances of hardware pieces. That is why you must assess why the “Some System Components Cannot be Hooked Right Now” error keeps popping up. Luckily, there are multiple ways to handle the problem.
Does MSI Afterburner need RivaTuner?
It is true that RivaTuner is integrated with MSI Afterburner. But, MSI Afterburner does not need RivaTuner for functioning. RivaTuner is a freeware overclocking and hardware monitoring program for Nvidia video cards.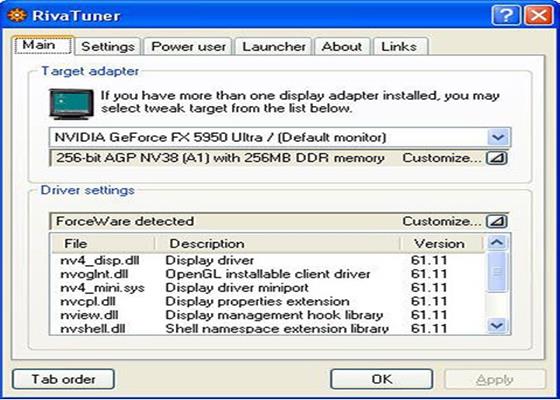
Does RivaTuner reduce FPS?
RivaTuner offers FPS capping, thus reducing FPS. Moreover, it also enhances CPU usage. It is essential to note that the impact it has on FPS is not much, it is instead 5-10%.
How do I show FPS on RivaTuner?
In order to show FPS on RivaTuner, you need to use the Standalone Rivatuner Statistics Server. There, you must enable the “Show own statistics” settings. This will lead to the on-screen display of FPS. You can then move it anywhere you want on the screen with ease.
Una nuova revision per Rivatuner
E’ disponibile per il download una nuova versione di Rivatuner, release 15.4. Rivatuner un popolare tool per l’ottimizzazione e il tweaking delle schede video, sia ATI che NVIDIA, che tra le varie funzionalit permette anche di effettuare overclock manuali.
Il download disponibile in locale dalla sezione software di Hardware Upgrade, a questo indirizzo.
Di seguito le note fornite a corredo con quetsa nuova revision:
Minor bugfixes:
- Fixed crash on dual-head display adapters with display connected to the secondary RAMDAC
under Windows 2000.
- Duty cycle is no longer rounded improperly when trying to apply a fan speed matching
with the current one. - Daylight saving time correction is no longer applied when viewing .hml files.
- Minor UI fixes.
What’s new:
- Added ForceWare 75.xx driver family support.
- Updated databases for Detonator and ForceWare driver families. Added databases for
ForceWare 67.66, 71.22, 71.24, 71.25, 71.40, 71.50, 71.80, 71.81, 71.84, 71.90 and 75.90
drivers. - Added Catalyst 5.1 and 5.2 detection.
- Updated Catalyst 5.1 and 5.2 certified SoftR9x00, ATIOverclockingAntiprotection and
ATIOverclockingAntiprotectionRuntime patch scripts. - Added NV4x-compatible driver-level overlay color correction.
- Added «OpenGL version string override» option to the «Compatibility»
tab of «OpenGL tweaks» dialog for the Detonator 27. xx and newer drivers. This
option is useful for troubleshooting and can be used to solve problems with some
incorrectly written OpenGL application, expecting harcoded OpenGL version string. For
example, this option can be used to launch «The Chronicles of Riddick — Escape from
Butcher Bay», which expects OpenGL 1.3 and doesn’t work properly on OpenGL 2.0
drivers like ForceWare 75.90. - Now the list of application profiles for the ForceWare 56.xx and newer drivers in the
main tab and the list of profiles accessible via the «Scan registry for existing
profiles» button are sorted in ascending order. - Now RivaTuner displays / adjusts internal model ID instead of hardwired PCI DeviceID in
the NVStrap driver configuration tab when custom graphics adapter identification mode is
selected on display adapters with BR02 PCI-E to AGP or AGP to PCI-E bridge. - Added %RT% and %RTFolder% macro names support to RivaTuner’s launcher tab.
 These macro
names can be specified to launch RivaTuner itself or to specify path to RivaTuner’s
folder. - Updated ATI and NVIDIA graphics processors’ PCI DeviceID database.
- Added an ability of starting RivaTuner’s launcher items via the command line by the name
instead of GUID. The syntax is: RivaTuner.exe /L:»<name>», where
<name> is a name of the item you want to launch. Take a note that this syntax is
ambiguous, as it is allowed to create multiple items with the same name, so use it with
caution. - Improved low-level graphics subsystem diagnostic module:
- Added PCI-E bus type detection.
- Added maximum / current PCI-E link width detection for PCI-E display adapters.
- Internal «NVIDIA CK804» codename is replaced with «NVIDIA nForce4
series» in RivaTuner’s northbridges database.
- Considering that some competing developers started bad practice of cloning RivaTuner’s
hardware monitoring module concepts, features and even visual appearance, this version
introduces bunches of hardware monitoring related user interface enhancement and new
features to leave clonemakers back in the dust. The list of enhancements includes:
- Added experimental fan voltage level monitoring for reference design NV30, NV35, NV38
and NV40-based display adapters. This graph is helpful for understanding driver-level fan
speed adjustment system. Take a note than this graph is trustworthy only when the fan is
physically connected to the PCB’s fan voltage control circuit. So don’t rely on this graph
if you have a boards with non-reference cooling system with no software voltage-based fan
speed adjustment capability (e.g. ASUS or MSI 6800 series). - Added monitoring thresholds support. Now you can define unlimited count of thresholds
for each monitoring data source and setup each threshold to launch any external
application on upward / downward threshold crossing event. The primary aim of this feature
was to give users an ability of performing emergency system shutdown when a temperature
exceeds the threshold. However, considering that you may use a threshold’s command line to
access to RivaTuner itself, the threshold can be configured to execute any of RivaTuner’s
launcher items, so you may implement temperature based overclocking etc via newly
introduced thresholds technology. - Considering that the graphs with multiple defined thresholds usually require more
detailed Y-axis than the graphs with the rest monitored parameters (e.g. clock
frequencies), now each graph can use either the previously available automatic height
scaling mode to fit in the entire window or fixed size height mode. Fixed graph height
mode can be activated either visually by dragging its’ upper / lower sizing border or
manually by entering desired height in the graph’s properties window. - Added button to the bottom-right corner of fixed height graph for quick switching
it to automatic height mode.
- Added button to the top-right corner of the graph for quick closing a graph window.
Take a note that this button is available only when two or more graphs are displayed
simultaneously. - Added framerate monitoring graph. Take a note that framerate monitoring can be
implemented via API hooking only, and I treat this technology as potentially troublesome
and virus-styled, affecting whole operating system and all running applications. That is
why I continue «no API hooks in RivaTuner» politics, so framerate statistics
collecting is performed via external RivaTunerStatisticsServer application, which must be
loaded simultaneously with RivaTuner in order to monitor framerate via RivaTuner’s
hardware monitoring module. Take a note that RivaTuner’s installer creates a shortcut for
RivaTunerStatisticsServer in the Start menu. RivaTunerStatisticsServer can be also started
via launcher by specifying %RTSS% macro as the path to the application.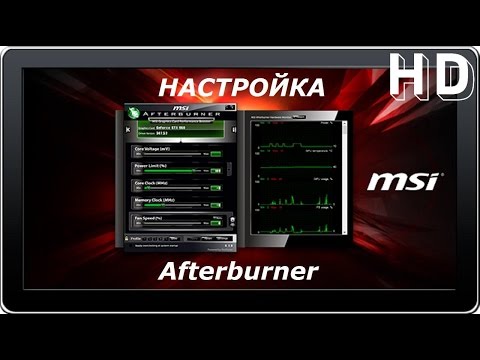
RivaTunerStatisticsServer v1.0 provides the following features:- Framerate statistics collecting for fullscreen Direct3D8 / Direct3D9 applications (for
Windows XP only). RivaTunerStatisticsServer uses original OS GDI thunk hooking approach,
which is not used in any of currently existing framerate monitoring software and greatly
simplifies DirectX framerate monitoring implementation. - Framerate statistics collecting for both windowed and fullscreen OpenGL applications.
Known limitations: currently total FPS is monitored when multiple windowed OpenGL
applications are running simultaneously. - Ability to unload currently loaded RivaTunerStatisticsServer via launching new
RivaTunerStatisticsServer instance with «-u» command line switch. - Even considering that performance impact of RivaTunerStatisticsServer is rather low
(above 1%), there is still room for optimization left, so the performance impact can be
and will be reduced in the future versions.
- An ability of using RivaTunerStatisticsServer’s statistics in any other application via
named shared memory. The sample code is available upon e-mail request, sample application
will be included in SDK in the next version.
- Framerate statistics collecting for fullscreen Direct3D8 / Direct3D9 applications (for
- Added range selection operations support. Now you can hold <Shift> when pressing
left mouse button on the first position on the graph, then move mouse cursor to the second
position and release left mouse button to select this range. As soon as the range is
selected, you may see its’ statistics (minimum, average and maximum values) and perform
some selection-specific operations (discussed above). This feature was added special for
simplifying framerate statistics analysis. - Added asynchronous operations support. Now all tracking markers related operations (e.g.
manual tracking marker setting, «Mark minimum . ..» / «Mark maximum
…» / «Remove all markers» commands) and all selection related operations
can be applied to all graphs simultaneously as well as to the focused graph only.
<Ctrl> modifier is reserved for asynchronous operations now, for example left mouse
button click synchronously sets tracking markers on all graphs, but <Ctrl> + left
mouse button click sets tracking marker on the focused graph only. - Added «Select all» / «Deselect» and «Select range»
commands to the graph’s context menu. The last command is only active when two tracking
markers are set in the graph and allows you to select a range between these markers. - Added monitoring statistics filtering functions, available via «Filter … over
maximum limit» / «Filter … under minimum limit» commands from the graph’s
context menu. These functions force RivaTuner to process statistics and to clean up the
values, which lie outside the range specified with vertical scaling sliders. These
These
functions were added for framerate statistics analysis simplification and they allow you
to remove abnormally high or abnormally low values from it (e.g. abnormally high framerate
caused by splash screen rendering between the tests in 3DMark, or 0 framerate during level
loading in Quake III). - Now all the commands depending on hardware monitoring statistics (e.g. «Mark
minimum …» / «Mark maximum …» / «Scale to fit» etc) are
applied to selected range only, or to whole statistics when there is no range selected. - Changed tracking marker removal approach. Now existing marker can be removed by
double-click instead of <Ctrl> + click, which is reserved for different purposes. - Optimized graph rendering code (up to 10 times faster under certain conditions).
- Monitoring graph’s statistics is no longer reset when graphs’ list is changed or
reordered.
- Monitoring window can be maximized now by double clicking its’ caption.
- It is no longer necessary to close RivaTuner in order to save the states of monitoring
window control buttons (e.g. «Enable background monitoring»). - Added monitoring log file size limiting option.
- Removed obsolette «Fan duty cycle» option from the data sources list in
hardware monitoring setup window for RV360 based display adapters. - Added negative temperatures monitoring support for LM63-capable ATI display adapters.
- Added clipping for above 100% duty cycle values displayed on the monitoring graphs for
LM63-capable ATI display adapters. - Added fan duty cycle monitoring for F75373S-capable ATI display adapters.
- Added experimental fan voltage level monitoring for reference design NV30, NV35, NV38
- Updated SDK / RTHMSharedMemorySample application to display statistics for sources
supplying no data (e.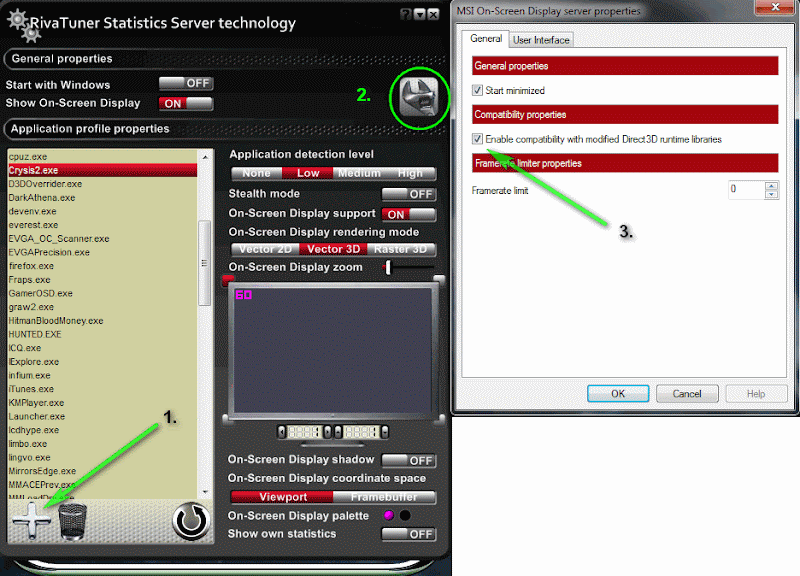 g. framerate source when no Direct3D / OpenGL applications are
running) correctly. - Improved low-level graphics subsystem diagnostic report module:
- Changed undocumented NVIDIA registers naming scheme. Revised the list of dumped NVIDIA
GPU registers, added some new registers, removed some obsolete ones. - Revised the list of dumped ATI VPU registers.
- Changed undocumented NVIDIA registers naming scheme. Revised the list of dumped NVIDIA
- Improved fan control manager for LM63-based ATI display adapters:
- Added option for restoring fan speed after resuming from suspended mode.
- Added fan control for R430 and R480 based display adapters.
- Minimum duty cycle guardband limit (25%) can be customized via the registry now.
- Easter eggs updates:
- New drivers support for some scripts.
- Updated I2C dumping utility.
- Added additional unlocking routines for some NVIDIA display adapters with locked I2C
bus.
- Added additional delays in NVIDIA I2C access routines to minimize the risk of
collisions.
- Added additional unlocking routines for some NVIDIA display adapters with locked I2C
- Added command line based access to NVIDIA CRTC registers (Read, Write, AND, OR and
XOR-styled commands).
Riva Tuner Update Server Hatası
-
Sık Sorulan Sorular
JavaScript devre dışı bırakılmış. Daha iyi bir deneyim için tarayıcı ayarlarından JavaScript’i etkinleştiriniz.
-
Konuyu başlatan
VΣNOM -
Başlangıç Tarihi
VΣNOM
Hectopat
-
-
#1
Riva Tuner yazılımı ilk açıldığında hep bu hatayla karşılaşıyorum. Bu hatayı nasıl düzeltebilirim ? Yardımcı olursanız sevinirim.
Clock tuner for Ryzen nasıl kullanılır?
- ardags35
- Masaüstü Bilgisayarlar
23
- Mesaj
- 28
- Görüntüleme
- 4B
yaschares
Çözüldü
BIOS Update — Ortam Bulunamadı hatası
- Prof Striker
- Masaüstü Bilgisayarlar
- Mesaj
- 5
- Görüntüleme
- 3B
Prof Striker
Galaxy Ekran Kartı Overclock Programı — Xtreme Tuner HD
- Recep Baltaş14 Mart 2011
- Masaüstü Bilgisayarlar
- Mesaj
- 0
- Görüntüleme
- 2B
Recep Baltaş
Windows Update 0xc8003FA Hatası
- Discovery.volkan
- Masaüstü Bilgisayarlar
- Mesaj
- 0
- Görüntüleme
- 389
Discovery. volkan
Galax WTF Xtreme tuner ekran kartı programı
- Gaviria
- Masaüstü Bilgisayarlar
- Mesaj
- 3
- Görüntüleme
- 544
Sylveon
Paylaş:
Facebook
Twitter
Reddit
Pinterest
Tumblr
WhatsApp
E-posta
Paylaş
Link
-
Ubuntu Dual boot yapma
- Kedü
- Mesaj: 0
Ubuntu
-
En güçlü Yasuo Build’i nedir?
- Yasuo5
- Mesaj: 0
MOBA: LoL, Dota 2, HoTS ve Diğerleri
-
Valorant Van -1 hatası
- TellMeHow_ff
- Mesaj: 0
Oyun Teknik Destek
-
Elektronik ViewSonic 23.
 8″ Vx2418 1ms 165hz 2300 TL!
- Klosie
- Mesaj: 0
İndirim Köşesi
-
0xc000000f hatası sonrası ekran gelmiyor
- Lusyz
- Mesaj: 0
Windows 10
-
Lenovo Ideapad Gaming 3 alınır mı?
- UmutSerkanSönmez
- Mesaj: 0
Gaming Laptop
-
Bilek güreşi sonrası çıkan ağrılar
- ibrahimcancl
- Mesaj: 0
Sağlık
-
D
Monitörde oluşan yatay çizgiler
- dravenemin
- Mesaj: 3
Teknik Destek
-
Xeon X3440 sistem Minecraft’ta kasıyor
- denizcetinkaya
- Mesaj: 0
Oyun Performansı
-
Elektronik HyperX Pulsefire Haste Siyah 499 TL
- Hazar Çavuşoğlu
- Mesaj: 0
İndirim Köşesi
-
Minecraft 1.
 19 sürüm için Android shader mevcut mu?
- Scott Cawthon
- Mesaj: 0
Mobil Oyunlar
-
A
Unity konsol tepki vermiyor
- astee
- Mesaj: 0
Oyun Programlama
-
Y
Superonline stabil olmayan internet
- YagizG8
- Mesaj: 0
İnternet Erişimi
-
Bilgisayardan garip ses geliyor
- Baran Halhallı
- Mesaj: 1
Teknik Destek
-
7000 TL sistem önerisi
- Emirhan5445
- Mesaj: 0
Bilgisayar Toplama
-
Minecraft oynayacak var mı?
- Adam_55
Online Oyunlar
-
Template lisansı nedir?
- RaSGooL
Web Programlama
-
Xiaomi Redmi yazısında takılı kaldı
- Umut Nas
Xiaomi
-
Secret Neighbor alınılır mı?
- Heisenburger
Oyun Tavsiyeleri
-
Ubuntu Dual boot yapma
- Kedü
Ubuntu
-
14 yaşında birisi dava açabilir mi?
- mrht1234
Konu Dışı
-
M
Securityhealthsystray.
 exe virüs mü?
- mustafa535331
Güvenlik
-
A
Sistem sürekli uygulama hatası veriyor
- Axolty
Teknik Destek
-
En güçlü Yasuo Build’i nedir?
- Yasuo5
MOBA: LoL, Dota 2, HoTS ve Diğerleri
-
Valorant Van -1 hatası
- TellMeHow_ff
Oyun Teknik Destek
-
Marvel karakterlerini barındıran oyun tavsiyesi
- Heisenburger
Oyun Tavsiyeleri
-
Monitörde oluşan yatay çizgiler
- yasuomainn
Teknik Destek
-
HP ProDesk bilgisayar F1’e basarak açılıyor
- maykıraft
Masaüstü Bilgisayarlar
-
iPhone 7 telefona Jailbreak nasıl atılır?
- Okoztrkmn
Diğer iPhone Modelleri
-
Elektronik ViewSonic 23.
 8″ Vx2418 1ms 165hz 2300 TL!
- Klosie
İndirim Köşesi
Yukarı
Setting up MSI Afterburner: [Settings guide] (2019)
After Riva Tuner was discontinued, MSI Afterburner was released based on it.
Its functions include: overclocking GPUs by increasing the voltage of key elements, increasing the frequency of the memory and graphics chip, controlling the speed of the cooler and monitoring the current state of the graphics card.
How to use MSI Afterburner, and what it is, we will consider below.
The utility monitors the temperature dynamics of the device and can display warnings about exceeding the critical temperature value (set by the user) of the graphics chip.
Contents:
Install MSI Afterburner
MSI Afterburner is downloaded from our website at this link, you can also download it from the Russian version of its official support resource located at the link.
- After clicking on it, click «Download Afterburner» and wait for the archive with the installer to load.
Fig. 1 — Download program
- Unpack the compressed file using an archiver or file manager.
Fig. 2 — Unpacking the archive through 7Z
- Specify the interface language and click OK.
Fig. 3 — Selecting the interface language
- In the remaining windows, click «Next», specifying the path to install the program.
Fig. 4 — Specify the installation path
- After copying and registering files, start Afterburner.
Fig. 5 — Launching Afterburner after installing
It is recommended to restart the computer afterward to correctly determine the operating parameters of the graphics adapter.
After starting the program, its interface with the main data will appear on the display: the current parameters of the graphic processor and its state.
back to content ↑
Stylish Afterburner
The default skin for the program is not very convenient to use, so many users immediately change it to be more friendly.
To do this, call «Settings» by clicking on the gear icon in the center of the window.
Fig. 6 — Button for calling application settings
Then go to the tab «Interface» and in the third subsection «Properties of skins …» choose a more suitable type of application design.
It also indicates its language, temperature format (Celsius / Fahrenheit) and time.
In the «Basic» tab, select the graphics processor to be configured if a pair of video cards is used or, in addition to the integrated one, a discrete one is also installed.
If there are two identical devices working in conjunction, check the option to synchronize their settings.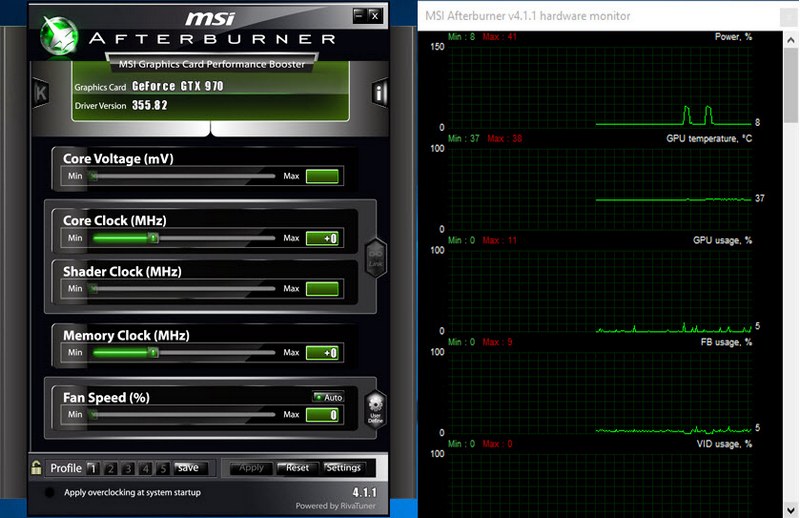
Fig.7 — Selecting the default video card
The left panel contains data with numbers about the current value of the frequency of the graphics processor and video memory.
To the right, the current temperature and voltage are displayed.
Fig. 8 — Information panel
The central part of the interface is occupied by a frame with sliders, with the help of which the regulation is carried out:
- core voltage;
- power limit;
- boundary temperature;
- graphics core frequency;
- memory frequency;
- the number of revolutions of the cooler.
Fig. 9 — Frame for overclocking video card
Under the frame, next to the button for calling the settings window, there is a button for resetting the settings to factory settings.
Fig. 10 — Button for resetting settings
The lower part of the MSI Afterburner interface is occupied by a monitoring window with graphs of temperature and other operating parameters of the graphics card.
Fig. 11 — Key indicators monitoring window
The last important element of the interface is the panel for managing overclocking profiles and switching between them.
Fig. 12 — Preset Management
back to content ↑
Simple Voltage Control Rules
The program allows you to adjust the voltage on the master graphics adapter.
Depending on its microarchitecture and the chip used, the parameter may be displayed in millivolts or percentage of the original value.
By default, the option is disabled on all devices, except branded ones (by MSI). To activate it, you need to go to the main settings of the application and enable the corresponding option.
Several modes are available here: for reference chips, for chips from MSI and third-party graphics adapters.
Fig. 13 — Unlocking the voltage control function
If, after enabling the setting, it is still inactive (greyed out), refer to the GPU manual.
Most likely, Afterburner does not support the programmable microcontroller installed on the device, even if it supports voltage control.
Increase the value of the parameter gradually, by a few percent each time, and closely monitor the temperature and stability of the video card after each change in value.
With a significant increase, the device will overheat faster and make more miscalculations, which will most likely lead to failures in the entire system, the appearance of artifacts, etc.
After reprogramming the controller, which is done by clicking on the button with a check mark, it is best to stress test the video card, for example, using the Kombuster proprietary utility.
If no deviations are noticed for a couple of hours, the indicator can be increased by a few more percent or tens of units.
Fig. 14 — Applying the new configuration
If after saving the core voltage value changes to the standard one, try to go to the settings and select a different voltage control method, but most likely it will not be possible to adjust the value through MSI Afterburner.
back to content ↑
Changing peak power consumption
The option is not active on all devices, it works only if the graphics adapter implements the technology of power consumption management.
Fig. 15 — Slider for changing the energy limit
back to content ↑
Core and video memory clock
Core Clock will help you change the maximum operating frequency of the GPU. The higher it is, the more information is processed in one cycle.
Memory Clock — a parameter that provides access to programming the video memory frequency.
Depending on the device, the values can be presented explicitly or as a percentage of the original.
It costs a few percent or a couple of tens of units to increase / decrease the parameters at each step, conducting stress tests after each saving the settings or starting a «heavy» game.
In the second case, it is recommended to run RTSS, the installation of which is offered after Afterburner.
The program in the overlay (overlay) mode visualizes the current number of frames generated by the video card in the game.
Fig. 16 — Adjusting the frequency of the graphics core
back to content ↑
Efficient Cooling
To activate the manual change of the variable, click on the gear icon next to the Fan Speed slider.
Fig. 17 — Enabling manual control of the cooler speed
If you want the system to automatically adjust the fan speed based on the current temperature of the video card, switch to automatic adjustment of the value by clicking the Auto icon.
Fig. 18 — Activate automatic fan speed control
In the «Cooler» settings section, you can specify the refresh rate of the parameter and achieve maximum cooling efficiency, minimizing fan bounce.
Fig. 19 — Changing the update period for data on the current fan speed
back to content ↑
Monitoring
In the Afterbuner settings tab of the same name, you can disable the visualization of unnecessary graphs and specify the peak values of all indicators that are read by the program from the sensors.
When the specified value is reached, the application will warn the user about reaching the upper limit, for example, temperature.
Fig. 20 — Remove unnecessary charts from the monitoring window
back to content ↑
Profiles
For various situations (modern games, video processing, graphics-intensive games, 2D graphics), MSI Afterburner can save five different overclocking options.
For games, for example, the indicators responsible for the performance of the device should be increased, and for watching movies, browsing the Internet and text editors, you can reduce the power consumption of the video card.
Remarkably, switching between profiles is carried out «on the fly» by clicking on a single icon or using the keys assigned to it.
To add a preset, change the required overclocking settings in the central window and click on the «Save» icon.
Fig. 21 — Saving new settings to a separate profile
Then click on one of the flashing numbers to assign the current configuration to the corresponding cell.
In the “Profiles” settings tab, the activation of each of the presets can be assigned to a combination of hot keys that are not used in the system.
Fig. 22 — Assigning a combination of hot keys to the activation of the list of settings
Previously, the application was equipped with functions for capturing screenshots and videos from 3D games and supported various profiles for working in 3D and 2D modes, which allowed saving electricity, but in the latest versions, the developers abandoned these functions.
This guide on the topic: «How to use MSI Afterburner» can end.
And remember: overclocking a video card not only increases the risk of its premature failure, but also reduces its working life (accelerates wear).
How to set up RivaTuner and MSI Afterburner for PC monitoring
If you want to know if you can speed up your PC then RivaTuner is the perfect application for that. Thanks to this, you will be able to know the performance of your system in real time while you play.
Contents
- What is RivaTuner?
- Install MSI Afterburner before RivaTuner
- How to use MSI Afterburner
- Menu in MSI Afterburner
- Settings menu in MSI Afterburner
- Hardware Monitor in MSI Afterburner
- Installing and configuring RivaTuner
What is RivaTuner?
This is an open source application used to monitor the performance and overclocking of NVIDIA graphics cards. Its name is mainly associated with the line of NVIDIA cards released before GeForce in the late 90s of the 20th century, but this is a product not directly related to NVIDIA.
Today, this application is integrated into most overclocking applications supplied by various graphics card manufacturers. Thus, we can find it in ASUS GPU Tweak, EVGA Precision X and MSI Afterburner. Of the three tools, only one from EVGA and MSI can be downloaded from their websites.
We have selected the MSI to be installed for use with RivaTuner.
Install MSI Afterburner before RivaTuner
The first thing we need to do is download MSI Afterburner, which is distributed as a zip file, unzip it, and you will see an installation file called msiafterburnersetupxyy, where x is the name version and yy is the subversion. title.
Double-click the file to start the installation, accept the typical legal terms of each installation, and ensure that the RivaTuner Statistics Server check box is checked.
From there, you just have to click Next and wait for it to install, which will happen in a very short time as it is a very lightweight program.
How to use MSI Afterburner
The MSI Afterburner window is very easy to use, we have a main window with two columns of options on the left and right. For now we will focus on the central part where we can see the following options:
At the back of the window we have real time information about the GPU, its clock speed, memory clock speed, voltage and temperature. They are delivered in real time by the telemetry systems of the GPU itself.
However, at the bottom it is divided into three different sections:
- The first section is used to control the voltage, which is expressed in millivolts, from here you can do step-down and over-voltage exercises.
- The second section allows us to control the GPU clock speed and VRAM interface. This section also tells you which GPU is used in our system and the version of the driver installed.
- The third section is for controlling the fan speed, temperature and power consumption of the graphics card.
- We have a section where we can save the profile we have created. If we click on the floppy disk icon, we will see the numbers in the panel on the right light up, select one and there you can save the specified profile.
Menu in MSI Afterburner
As for the menu on the left, we have the following options:
- The first option on the menu on the left activates the help, which takes us to the MSI page, so for the moment we are not going to pay attention to this Attention, having help on hand is not always a bad thing.

- The second option is the info icon, which will give us more detailed information about our system, but not much more complete than the DXDiag console.
- The third option is the settings we will discuss in the next section.
On the other hand, the menu on the right is used to directly select profiles, the padlock icon if selected prevents selection of options such as starting MSI Afterburner when Windows starts or saves profiles, the other four options refer to the selection of each of them. one of 4 profiles.
Settings menu in MSI Afterburner
We have a total of four tabs, the first of which allows us to choose whether we want the tool to run on Windows startup or not, and also we can choose the way the program manages graphics card voltage as well as control of the same where we can deactivate voltage control and even set a constant voltage to avoid speed drops.
The second tab is the monitoring tab where we can choose how we want the information to be presented to us, you can add and remove fields, set the font type and even the color to make the information easy to read.
In it we can select a number of options such as information update period where we can select every few milliseconds so that the monitoring graph is updated, this will affect the x-axis and therefore the time of the monitoring graph.
As for the properties of the graph, if we have selected the option display information on the screen (OSD) then you can consider it as an additional hub in games without the need for a second window, use it if you do not have a second monitor, but especially to know whether the game overloads the graphics or, otherwise, there is room to increase the clock speed. You can also make it appear on the Windows taskbar by selecting show in system tray and even some integrated MSI LCD keypads if we select the option to display information on the keypad LCD of the unit.
The third tab corresponds to profiles from which we can create keyboard shortcuts to be able to switch from one profile to another, this is a tab that has no more secrets and no more complexity.
The fourth and last interface menu tab, here you can choose which type of interface for MSI Afterburner is more practical, as well as the way information is presented.
Hardware Monitor in MSI Afterburner
If we select the menu icon where you see the graphics monitor, the one at the bottom, we will see the window that controls the GPU opens, giving us the following information:
- GPU1 workload, in case you have a gaming laptop it will be dedicated graphics that takes up that space, if your computer has an integrated GPU you will also see a series of equivalent graphics.
- There are a number of graphs for monitoring the GPU: GPU FB refers to memory channel usage with its VRAM, GPU VID usage monitors dedicated voltage GPU/GPU PCI Express bus usage that links the CPU to the dedicated GPU, this chart does not exist for dedicated charts.
- GPU1 and GPU2 memory usage reports to us how much VRAM they use, not to be confused with memory bus usage.

- Main clock indicates the speed of each of the two GPUs, while the memory clock does the same but with that of VRAM.
- Regarding the GPU health status, the information graphic is as follows: GPU Power monitors the GPU power consumption, GPU Temp the temperature at any time, GPU power limit indicates the time when the GPU has approached your power limit. Instead of GPU Voltage Limit refers to when the GPU is close to its voltage limit.
- The graph also gives us information about the temperatures and usage of each of the CPU cores, as well as clock speeds.
Once this is done, we only need to play around with RivaTuner a bit, but for that we need to install it first.
Installing and configuring RivaTuner
The process is the same as in MSI Afterburner, the download will be in the form of a zip file that you will need to unzip once you double click on the RTSSSSetupXYY. exe file which is the installer. Once you launch it, choose your language and start the installation, which is simple and doesn’t involve any additional complications.
Once you have installed it run it, unfortunately the installer does not launch the application directly and you will have to look for it in the start menu. When you launch it, it will be placed on the system tray on the right.
If you click its icon, the main window will appear, now you can use the application. If you want to add a specific application for use with RivaTuner, you just need to click the «Add» button, find its executable and add it. This allows you to create different profiles for each game.
As for the options on the right, the first one is Application detection level, this helps us to more or less automatically activate RivaTuner when opening the application. If you leave it low, it will be activated when you include one of the executables assigned in the application’s database, and if high, it will do so in almost all applications. We recommend adding apps one at a time, regardless of activation.
If you activate stealth mode, the application will try to change the settings that have blocked RivaTuner, as it is disabled by default for Custom Direct3D. Frame Rate Limit allows us to cut or set the frame rate, which is ideal for preventing some games from running so fast that they cannot be played due to their high speed, Scanline Sync allows us to adjust the graph to control the beginning of V-Sync, which is a way to activate adaptive sync and eliminate annoying image tearing.
If you select On Screen Display, you can see RivaTuner information while you play, which is ideal if you’re doing benchmarks and want to monitor things like temperature, clock speed, and power consumption.
[Translation] How to fix frame tearing and input lag in gamesThompson sampling consoles?
13:03
AMD refused to limit the possibilities for mining on their video cards
12:33
[Translation] How to get rid of frame tearing and input lag in games
12:18
Abel Prize 2021 goes to Laszlo Lovas and Avi Wigderson, the pioneers who linked mathematics and computer science
12:18
[Translation] Creating the Mona Lisa in the Game of Life
12:04
Video card for Nvidia CMP 30HX miners is on sale.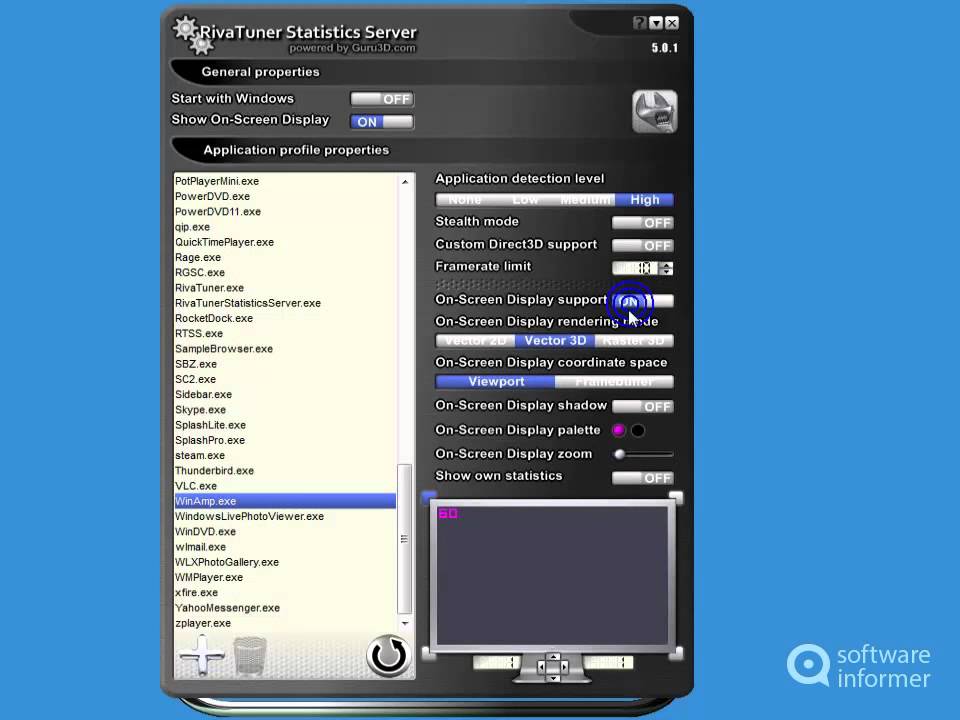 But this does not change anything in terms of deficit
12:04
ML in testing, TestOps, workshops: Heisenbug conference program
11:34
Written exam in ShAD: problem conditions and analysis. Part One — Warm Up
Screen tear or input lag? Should I use vsync? For a very long time in the world of PC games, it was a matter of either-or. You can achieve either a tear-free picture or low input lag. But it is impossible to get both. Or is it possible?
The answer to this question is ambiguous. If you already have a modern gaming monitor that supports variable refresh rates (FreeSync or G-Sync), then you don’t need this article at all. But if you have a regular monitor with a constant refresh rate, or if you like to play games on your TV, then this article will help you reduce frame tearing and input lag.
Using the millisecond frame limit in RTSS (Rivatuner Statistics Server), low latency vsync can be achieved. What will we get as a result? Clear picture without frame breaks and 50ms less input lag than regular vsync.
This is one of the few PC enhancements that can greatly improve your gaming experience with minimal compromise and completely free. What is it? And how to achieve this? In this article, we will tell you everything in detail and step by step.
Terrible frame tearing with vsync disabled
What is input lag?
Before starting to solve the problem, it would be nice to understand what exactly we are going to do. Low latency Vsync is a technique to reduce input latency. What does this mean? When you type on the keyboard or move the mouse, there is a small, almost imperceptible delay between your action and the screen output. This delay is so small that it is measured in milliseconds. If you are using your computer to read the Internet or play casual games, this does not affect the process in a tangible way.
However, in tense situations like eSports shooters, every millisecond counts. A few milliseconds of input lag can decide the fate of a headshot or the death of your hero.
All monitors (and TVs) have a certain amount of input lag added by default. It usually depends on the type of panel being used. Default high refresh rate IPS and TN panels provide the lowest input lag. For some monitors, it is as low as 0.5 ms. VA panels typically have higher input lag, many reaching 8-10ms. TVs (which often use VA panels) tend to perform the worst, with some up to 30ms latency or more.
When vsync is disabled, the computer’s GPU sends rendered frames to the display as fast as possible. Since the frame rate on the display is limited (on 60 Hz displays it is one frame every 16.66 ms), frame tearing occurs when a new frame arrives before the previous one has disappeared from the screen.
When traditional vsync is enabled, the GPU can no longer replace the contents of the monitor buffer with a new frame before the old frame has had its 16. 66ms of glory. This means that each frame can be displayed in full and frame tearing is eliminated. However, this forces the GPU to queue up frames instead of sending them as fast as possible.
Due to queuing, traditional vsync can add up to 50ms of latency on top of the standard display latency. This is where low latency vsync comes into play.
With low-lag vsync, we are essentially limiting the frame rate (the rate at which the GPU transmits frames) to a number slightly below the monitor’s refresh rate. This prevents the GPU from sending new frames before the monitor is ready to display them. What will we get as a result? Game without frame breaks and almost the same latency as with disabled vsync. Now let’s talk about how to achieve this…
What we need
Before you start, you need to download the latest version of Rivatuner Statistics Server (RTSS). You will also need an Internet connection to go to these two pages to run the tests:
Your computer’s BIOS must have HPET (High Precision Event Timer) enabled. If for some reason you turned it off, then turn it on.
Getting Started
The first thing we need to do is determine the monitor’s true refresh rate. If you have a 60Hz display, then it’s probably very close to 60, but different by a few hundredths of a second. Use either UFO Refresh Rate Test or vsync Tester. If you have free time, then run both and check if the values match.
To test your monitor’s refresh rate, close all other browser tabs and all background processes, and then wait between 30 seconds and 1 minute. The test page will show your display refresh rate to a few decimal places. For the next step, round them up to three digits.
Using UFO Test to determine the true update rate
Installing and running Rivatuner
After installing Rivatuner, run the program with administrator rights. Then click on the green «Add» button in the lower left corner. Navigate to the folder where the desired game is installed. (Note that you can also set the options globally, but we prefer to set them individually for each game.)
Select the game executable and then add it to Rivatuner.
Adding a new game to RTSS
Calculating the frame cap
Take the refresh rate to three decimal places and subtract 0.01 from it. For example, if your refresh rate is 60.001, then the frame limit will be 59.991.
Select a game on the left side of the Rivatuner interface. Then enter a frame rate limit value in the box next to Frame rate limit. So we limited the frame rate of the game to a value below the refresh rate of the monitor. You may need to experiment a bit with this value. Some games are more sensitive to frame capping than others: if you notice a lot of judder, then try increasing the frame rate cap in 0.002 increments.
Enable vsync and launch
Launch the game and then enable vsync in its settings. If you can’t do this, then enable forced vsync at the driver level from the AMD or Nvidia control panel. That’s all!
After enabling vsync with low latency, you will get significantly better input lag without frame tearing. However, there are subtleties that are worth paying attention to. Low latency Vsync works best if your system is capable of sustainably running above your monitor’s frame rate. If it only reaches the 60 FPS mark, then enabling this feature may cause additional jerks when the frame rate decreases.
Scanline sync: An even more convenient alternative
If you don’t want to experiment with fractional frame rate limits, then RTSS has an alternative: scanline sync. Scanline sync allows you to control where on the screen frame breaks occur with vsync disabled.
How will this help? The frame break is displayed as a single line that we can move to the edge of the screen, to the very top or bottom, where it will essentially disappear. To enable scanline sync, you need to disable the frame rate limit by setting Framerate limit to 0 in RTSS and disabling in-game or driver vsync.
Now let’s decide where we want to place the scan line. You can experiment with this, but ideally you should take the vertical resolution of the monitor (1440 if it’s a 1440p monitor) and then subtract 10-20. Enter this number in the Scanline Sync field. S-Sync often provides even lower input latency than low latency vsync.
However, you will need a powerful system (or a game that is not very demanding) for optimal performance. In games where the GPU load is constantly above 80 percent, S-Sync does not have enough performance to hold the breakline in one place, which can cause significant stuttering.
Rule of thumb: use S-Sync for games that are not very demanding and can have average frame rates well above 60 FPS. Low latency Vsync should be used in games that run close to 60 FPS.
Trouble-Free Tuning
Some ways of tuning PC performance may have a placebo effect or overhead, such as resolution scaling.