RivaTuner System Components Cannot Be Hooked Right Now
Home > Windows Tutorials > RivaTuner System Components Cannot Be Hooked Right Now
by ComputerSluggish
In this guide, we will be taking a look at how to fix the RivaTuner “Some system components cannot be hooked right now” error or the RivaTuner “Direct3d9 components cannot be hooked right now” error on your PC.
RivaTuner is a fantastic program that can be installed with MSI Afterburner. Both of these are a great combo and handy tools to have on your Windows PC or laptop, and can really help you get the most out of your Nvidia GPU.
Unfortunately, there can be a couple of issues with the program; The first being an issue with not being able to download MSI Afterburner from their website. The second issue is what we will be taking a look at in this guide, which is a RivaTuner error message.
The Rivatuner error message will pop up on your screen displaying a warning saying something like:
“RivaTunerStatisticsServer. Some system components cannot be hooked right now. It is strongly recommended to restart application.”
Or you may also get a warning saying something like “Direct3d9 components cannot be hooked right now“.
Page Contents
Have you just installed Rivatuner in Windows along with MSI Afterburner, but not actually used it yet because you are getting this frustrating error? Basically, the Rivatuner Statistics Server allows you to monitor and tune or overclock your NVIDIA graphics card. So it is very handy for PC gaming!
Why is RivaTuner not working?
There can be many reasons why you get errors with Rivatuner on your Windows PC or laptop. The most likely reason for this error could be a recent Windows update that you have installed.
It is always important to make sure your Windows system is up to date however, occasionally an update can also cause bugs or errors with apps and programs such as MSI and Rivatuner. You can always install older versions of Windows updates if needed.
Related: How to fix MSI Afterburner won’t download
How to hide the Rivatuner error
You can hide or cover up the components cannot be hooked error, but this will not fix the issue and it will only hide the fact that Rivatuner is not running correctly. Below are the steps on how to hide it.
1. Make sure you have completely closed MSI Afterburner and Rivatuner
2. Go to the location where you installed Rivatuner on your PC (the default directory is C:\Program Files (x86)\RivaTuner Statistics Server)
3. Open the folder called ProfileTemplates > Find the Config file then right-click and Open with notepad
4. Find the line that says “Silent” and change it from 0 to 1 > Press Save (If you are having issues opening or saving the config file then make sure you are signed as an admin)
5. The error window should now be hidden and not pop up
How to fix “Some System Components Cannot Be Hooked” in RivaTuner
There is only one way to properly fix this error and that is by installing the latest version of Rivatuner.
1. Click on the following RivaTuner link
2. Once you are on the Rivatuner website you now need to download the latest version available
3. Once the download is complete you now need to make sure MSI Afterburner & RivaTuner are closed
4. Then run the install and make sure you install it to the same directory as your current install of RivaTuner
5. Restart your system and the error should be gone
That’s how easy it is to fix the System Components error in Rivatuner on your Windows PC or laptop. Hopefully, you can now launch the program and everything should now be working as normal again.
If this guide did help you out then you can check out our other Windows guides here.
Check out our YouTube video here on How To Properly FIX RivaTuner System Components Cannot Be Hooked if you are getting stuck.
Check out our latest guides:
ComputerSluggish
ComputerSluggish is our small team of authors here to give you guides on everything Windows, games, consoles, and other tech guides!
Riva Tuner «Some System components cannot be hooked right Now» hatası
Hielah
Kilopat
-
-
#2
Bu hata benim de başıma geldi, yabancı bir forumda çözümünü anlatmışlardı ama şimdi bulamadım linki.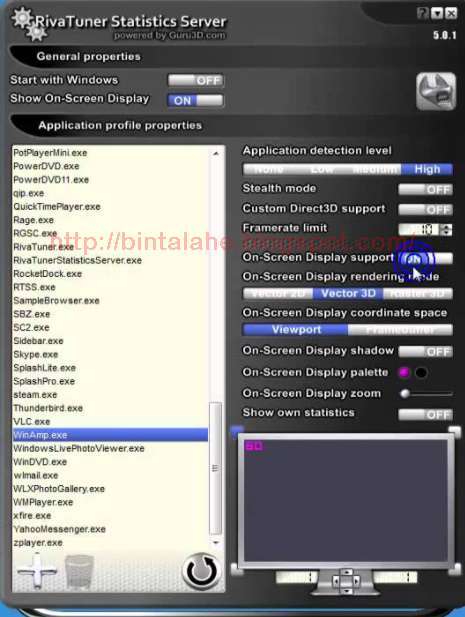
Bu videoda nasıl yapıldığı anlatılmış, adımları tek tek uygulayın.
Artı
-1
Eksi
atiince
Decapat
-
-
#3
Hielah dedi:
Bu hata benim de başıma geldi, yabancı bir forumda çözümünü anlatmışlardı ama şimdi bulamadım linki.
Bu videoda nasıl yapıldığı anlatılmış, adımları tek tek uygulayın.
Genişletmek için tıkla.
..
Hatanın çözümü bu değildir. Bu sadece hata mesajını görmenizi engeller. Oyun içinde herhangi bir değer göremezsiniz.
Artı
0
Eksi
f0ril
Decapat
-
-
#4
Aynı şekilde windows güncellemesinden sonra bu hatayla karşılaştım, çözümünü bulabildiniz mi acaba?
Artı
0
Eksi
atiince
Decapat
-
-
#5
Çözüm: Rivaturner ve MSI Ab’yi silin. Ayarların korunup korunmayacağına hayır basın. Ayarlar silinmeli. Bilgisayarınızı yeniden başlatın. MSI Ab’yi yeniden kurun. Bilgisayarınızı tekrardan yeniden başlatın. Sorun çözülecek. Ancak CS:GO’da (sanırsam) üçlü arabelleklemeden dolayı program bozuluyor.
Artı
0
Eksi
Jabbatheturk
Decapat
-
-
#6
Benim de başıma geldi. Afterburnerı açtıktan sonra bu hatayı veriyordu. Tamama basıp sadece RivaTuner uygulamasını arama kısmında aratıp yeniden başkattım, sorun çözüldü.
Artı
0
Eksi
trans_women
Hectopat
-
-
#7
Ben Afterburner ve Riva tuner’ı silip, onlarla ilgili herşeyi silip tekrar yüklemiştim ama aynı sorun yine devam ediyor.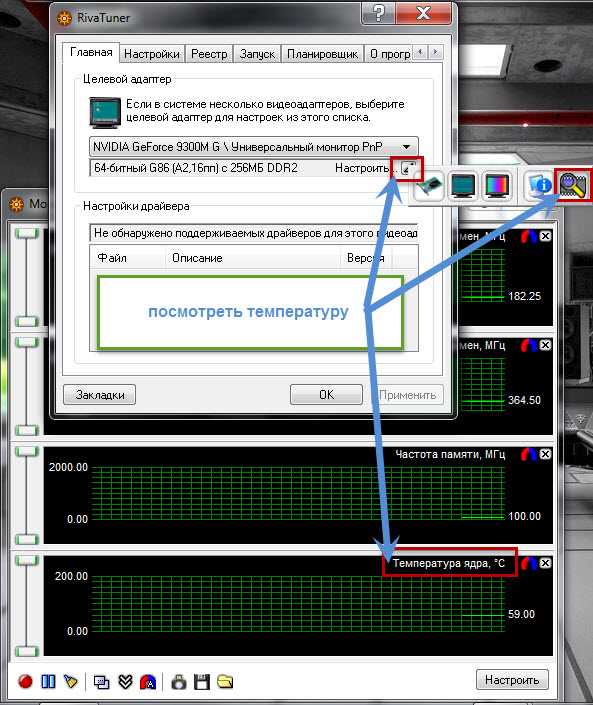
Artı
0
Eksi
Hielah
Kilopat
-
-
#8
atiince dedi:
Hatanın çözümü bu değildir. Bu sadece hata mesajını görmenizi engeller. Oyun içinde herhangi bir değer göremezsiniz.
Genişletmek için tıkla…
Hatanın çözümü budur. Oyun içi değerleri de görüyorum. Ayrıca bu hata gelse bile yine oyun içi değerleri görebiliyorsun, sadece bu uyarı sürekli karşına çıkmıyor.
Artı
0
Eksi
7EOM4N
Femtopat
-
-
#9
Programın sitesine git. 7.3.0 beta sürümünü kur, düzelir.
Artı
0
Eksi
trans_women
Hectopat
-
-
#10
7.3.0 sürümünü yükledim ve sorun yok.
Artı
0
Eksi
Msi afterburner and rivatuner how to disable?
Method 1. MSI Afterburner
Afterburner is currently the only free FPS program available. Many people recommend Fraps, which is a bit simpler, but not completely free and contains a lot of ads.
If you are interested in investing in cryptocurrency and want to protect yourself from frequent mistakes and loss of money, I recommend taking a FREE 3-day Crypto Investment Marathon from the School of Practical Investing.
At the marathon, you will learn the latest strategies and tools for investing in crypto!
- Download MSI Afterburner
- Install. During installation, DO NOT disable the RivaTuner Statistics component. Nothing will work without it.
- Launch MSI Afterburner.
- Go to Settings => Monitoring
- Find “Frame Rate” and enable “Show in Overlay OSD”.
- Enter the RivaTuner Statistics program through the system tray. And check that the “Show On Screen Display” property is set to “ON”.
- We go into the game and see the FPS in the left corner.
If desired, you can change the position, size and color of statistics in the RivaTuner settings. And in the Afterburner settings, in addition to FPS, you can turn on the display of the temperature of the processor, video card, and much more.
If you need statistics all the time, it’s better to enable the «Run with Windows» option in Afterburner. The program hangs in the tray and does not interfere at all.
Method 3. Enable built-in game settings
In popular cs go, dota 2, and other games from Steam, you can watch FPS without third-party programs. To do this, in settings Steam
, in the «IN GAME» tab, enable the «Steam Overlay in Game» option and select where the frame counter is displayed.
In Overwatch, WOW, Starcraft, Diablo and other games from Blizzard
, the FPS display is enabled by pressing CTRL+SHIFT+R or the «enable performance data» option.
What affects FPS?
FPS primarily depends on the capabilities of the video card and to a lesser extent on the processor and RAM. Also, FPS is limited by the monitor frequency, so on most laptops it is impossible to see more than 60 FPS.
FPS is also affected by monitor resolution and image detail settings in the game. The higher the image quality, the lower the smoothness and speed of the game.
MSI Afterburner is a utility designed for GPU overclocking. She replaced the Riva Tuner. In addition to increasing the performance of video memory, the application allows you to monitor the temperature of the processor and has many other functions.
Important RivaTuner 9 settings0031
There are several important settings, the purpose of which you just need to know:
overclocking and tuning of nVIDIA video cards .
 As you know, there are a large number of similar programs, the purpose of which is to configure both the video card itself and its drivers. They not only duplicate the capabilities of the built-in nVIDIA applet nvqtwk.dll, but also provide access to hidden or undocumented registry keys, and also allow you to adjust the horizontal scanning frequencies in various video modes, overclock the chip and memory, switch the AGP controller operating modes, etc.
Are such utilities really needed? Are the nVIDIA developers so stupid (or cunning?) that they can’t or won’t realize the full potential of their own designs? Why are they hiding some keys? Yes, everything is obvious. NVIDIA takes software development very seriously: a large team of developers-programmers (much more than hardware specialists) continuously refines and tests drivers, the company even has special stands where tests of various Detonators are running around the clock. Those features that turned out to be useful and at the same time did not cause any complaints during testing are included in new versions, while dangerous or incomplete ones are disabled. If you wish, you can dig deeper into the bowels of the driver and find those keys that are checked during initialization, and try to turn them on manually. This is what many developers of tweaker utilities do. They decrypt undocumented keys and add them to the database of their programs.
Is it possible, using a tweaker, to significantly increase the performance of a video card? Yes, you can, but in the general case, this will be done at the cost of reducing the quality and / or stability of the work. Rather, as a result of experiments, you can get the opposite result — slow down the video card by turning on any unfinished or specific modes.
Is there any benefit from a tweaker in this case? Yes, there is:
1) Overclocking. The built-in driver applet of the Detonator series also allows you to overclock the video card, but its range is limited to more or less safe values. And if you have a «special video card» with a cool cooler and/or fast memory (such things are produced by Gainward, SUMA and other manufacturers), then you simply cannot do without a tweaker.
2) Information about the video card. «Noname» crafts most often have non-standard parameters, and it is impossible to distinguish a more or less high-quality thing from a hack without checking the frequencies.
3) There are some important parameters that affect performance (for example, VSync), which the standard applet hides from inexperienced users.
So, we decided that the tweaker utility is still needed. Why do I recommend RivaTuner? There are good reasons for that.
First, no extra options. Usually tweakers have a hundred or two keys, and it’s not immediately clear which ones are important and which don’t work at all. There are few of them in RivaTuner, they are clearly grouped, there are hints and recommendations for all of them. If you still want to experiment, the utility allows you to download the full database of hidden keys for a specific driver version.
Secondly, this utility very accurately determines the clock speeds, memory size and memory bus width, and also allows you to easily tune and overclock the video card, operating at a low level.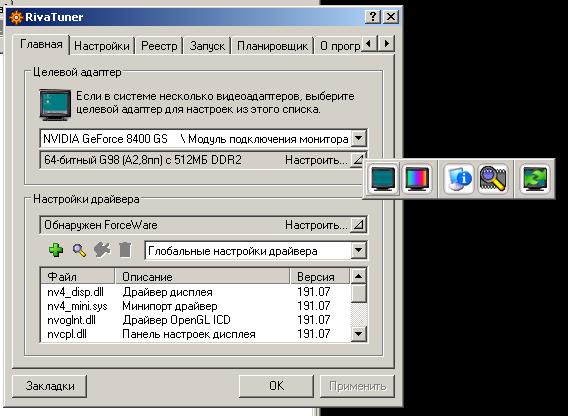
Thirdly, and not least, it has a pleasant and understandable interface that does not cause the usual irritation in such cases and wishes the author to get his hands out you know where.
So, I will briefly describe the interface and how the utility works.
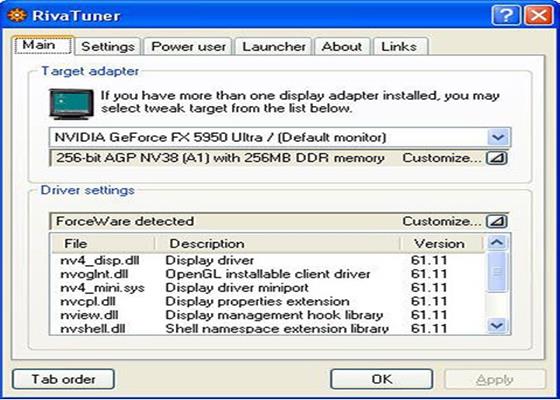
The main window of RivaTuner looks like a set of pages organized as tabs. Oddly enough, only the first and second pages are related to setting up the video card, and all the rest are only for setting up the program and displaying information about it.
The main page shows the video card type and driver version. In principle, you can work with non-nVIDIA video cards, but most of the settings will not work.
To access the settings, you need to find two small buttons. In order not to inadvertently miss them, please note that they blink when you first start the utility. The first button opens the low-level settings of the video card, the second — the driver settings.
Video card settings include: overclocking, setting AGP-interface modes, setting sweep and gamma frequencies, as well as report generation. Overclocking RivaTuner performs hardware, with a little preliminary testing. However, testing only checks for an immediate freeze, and actual overclocking testing should be done in games. I will come back to this issue, but for now I will talk about the capabilities of the special NVStrap driver. It can be installed into the system using RivaTuner and thus gain access to important AGP modes — SideBand Addressing (SBA) and FastWrites. The first mode provides for the transfer of the address not on a common data bus, but on a separate bus, thereby eliminating unnecessary delays in data exchange. FastWrites mode allows the video card to receive data not only from memory, but also from processor registers. However, in most video cards, these modes are disabled, as they caused serious problems on older boards. If you are sure that you cannot do without SBA and FW, then instead of the dangerous operation of hacking and replacing VideoBIOS, you can use RivaTuner. And its driver can also be used to turn a regular video card into a Quadro and thereby gain a boost in professional OpenGL applications.
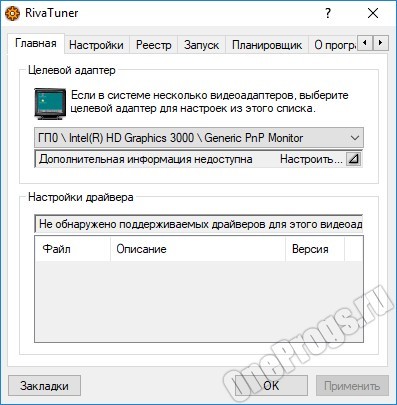
RivaTuner has a video card report aimed at low level experimenters. It is customizable, with the ability to display video adapter and chipset registers, DirectX component parameters, and compare two reports. I explain why the last option is needed: I corrected, for example, a key in the registry and see how the state of the graphics controller has changed after that, whether support for new features has been enabled, etc.
Let’s move on to the driver settings. These include both standard settings (Anti-Aliasing, fog, CPU instructions, etc.) and very useful, but closed in many versions options (anisotropy, VSync, Z-buffer format). In addition, it is possible to set the desired frame rates for all resolutions, thereby solving the well-known problem of Win2000 and WinXP, enable some options for compatibility, and also remove all changes from the registry in one fell swoop if something went wrong.
Like other utilities, RivaTuner has a large set of various presets for games and graphic applications, and they are sorted by driver versions and video card types. If you mainly drive one game or program, you can skip the manual settings and load one of the presets. In addition to them, RivaTuner has several patches that fix known problems with drivers, as well as the already mentioned extensive database of hidden keys specific to a particular driver version.
The settings of the utility itself include: setting up the interface, creating a launch list (the ability to switch settings, which is standard for similar utilities, depending on the program being launched), manually changing the program’s configuration keys.
In conclusion of the theoretical part, it remains to add that the author of the program is Alexei Nikolaychuk aka Unwinder. The program itself is distributed free of charge, «weighs» about 0.5 Mb in the archive (in the installed form, though — more than 8 Mb), is updated quite regularly. The latest version of RivaTuner can always be found on the nVIDIA World website (www.nvworld.ru).
Let’s move on to the practice of overclocking.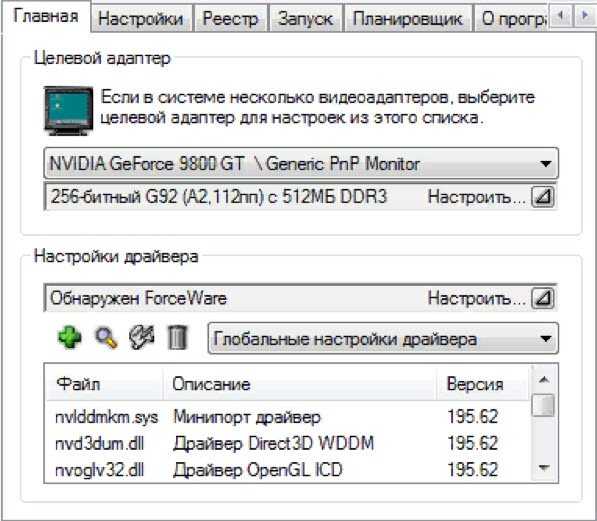 As with processors, overclocking graphics cards means increasing the clock speed to achieve higher performance. At the same time, it makes sense for a video card to overclock not only the graphics processor itself, which is responsible for building three-dimensional scenes, but also the video memory, which is responsible for the timely supply of data. Which component makes more sense to overclock depends on the specific video card. Thus, the popular budget GeForce2 MX suffer from a lack of memory bandwidth. For them, it makes sense to raise the frequency of the memory. With this approach, overclocking rests on two things: the maximum achievable frequency characteristics of microcircuits and the layout of the board. Overheating, especially if heatsinks are installed on the chips, has no effect, but reduces the life of the memory. One bad chip can also limit overclocking. When choosing a graphics card, you cannot prevent this factor, but you can take into account the fact that, as a rule, Samsung memory is less resistant to overclocking than Hyundai / Hynix, Ascend or Micron, while EliteMT and EtronTech overclock even better.
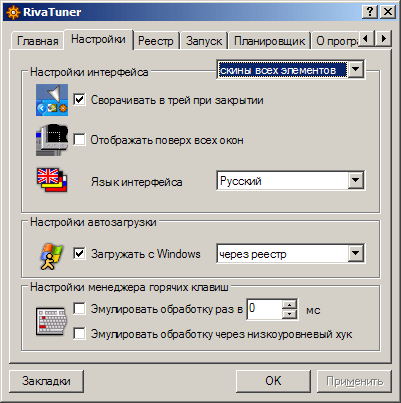
For some video cards it will be useful to properly overclock the graphics chip as well — this is true for the GeForce3 Ti200, GeForce4 MX and Titanium, as well as the Radeon family. Typically, the maximum frequency is limited either by technological standards, or by too intense heating. The latter can be dealt with by installing a fan, if it is not there — by adding or carefully applying thermal paste, replacing a cooler, providing additional cooling for the video card.
Overclocking Hi-end (that is, the most expensive in the line) video cards does not make much sense. They, as a rule, work at the limit of their capabilities anyway, and it is better not to touch them without additional cooling. But the younger models in the family, such as GF4 MX420, GF3 Ti200, GF4 Ti4200, it is only useful to overclock, since they are initially «slowed down» to reduce the price.
So, why overclock — it’s clear what to overclock, I hope, too. We will figure out how to overclock and, most importantly, how to check overclocking. RivaTuner has a special overclocking panel, to activate which you need to check the box in the upper left corner. The utility will ask if you need to reboot or if you can immediately determine the current frequencies («Detect Now»). By selecting the latter, we will get access to the sliders, one of which is responsible for the chip frequency, the other for the memory frequency. The selected values will actually be rounded to the nearest valid frequencies, since the clock generator has its own divisors and ranges hidden from the user. However, if you press the «More» button, you can turn on the more accurate clock generator programming mode (which may fail on some video cards, but I have not encountered this). All that remains for us is to set frequencies higher than now, and …
Here comes the most crucial moment — the selection of safe frequencies at which the video card will work stably. I recommend this strategy.
If you don’t yet have enough experience to determine potentially achievable frequencies based on memory labeling and cooler configuration, start with +20%. First select the memory frequency, then the graphics chip. Set the frequencies, press the «Test» button. After that, the «Apply» button will become available. Press it and check the performance of the video card in 2D mode. To do this, follow simple steps: if you have dragging the entire window, and not just the frame, enabled in your Windows settings, grab a larger window with the mouse and move it around the desktop as quickly as possible for a few seconds.
In this case, the graphics chip and memory will be loaded with the BLT operation, and if the overclock is too high, some bits will be transmitted with an error. Examine the screen — if colored or flashing dots appear on it, you need to urgently remove overclocking until the system freezes («Defaults» button).
The second stage of verification is the test run. I will say right away that the popular 3DMark2001 is not suitable here, just like Quake, Unreal and other games. They need to be driven too long to see the artifacts.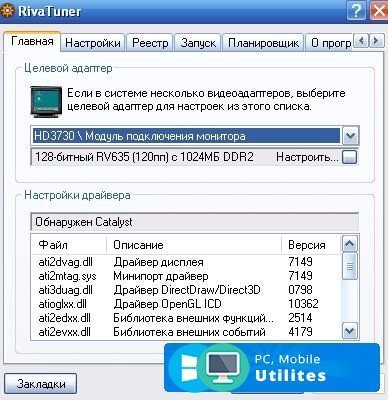 I use the GLMark benchmark (www.vulpine.de). True, it «weighs» a lot (about 50 MB), but it detects glitches very quickly. They appear as flashing triangles and lines. If artifacts are not noticeable, and the test worked for the allotted time (3 minutes is enough for GLMark), the frequency should be increased further, for example, add 10 MHz. As soon as the test starts to fail, the frequency must be returned one step back.
The next step is to check the operation of the video card. Let’s say you find the memory frequency and chip frequency at which the quick test doesn’t fail. Drop it down another 5-10 MHz and run some game that puts the maximum load on the video card (Quake3 won’t work, obviously, something like Serious Sam, Unreal 2003, or another game released no more than a year ago). Drive it for several hours without a break. If the overclock is too high, the game will freeze in half an hour or an hour. We’ll have to lower the frequencies by a few more megahertz and continue testing.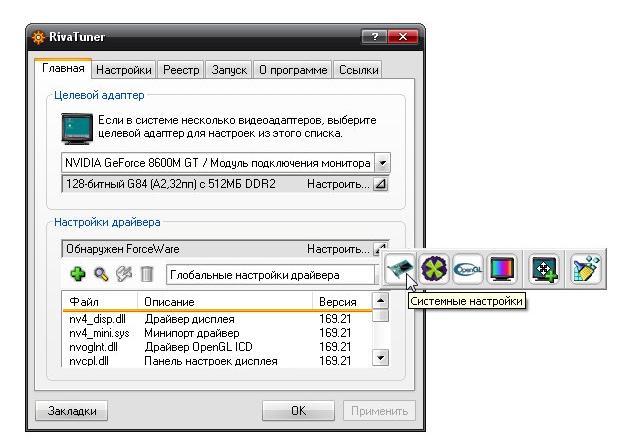 The likelihood that something will burn is low, unless, of course, your case cooling is properly arranged.
When you make sure that overclocking is successful, you can set RivaTuner to automatically correct frequencies when Windows boots. To do this, check the box «Apply overclocking at Windows startup».
And finally, a few examples of successful overclocking. Gainward Pro/450 video card based on GeForce4 MX420 chip, Samsung 5 ns memory. The products of this company are traditionally famous for overclocking optimization. The default frequencies are 250 MHz for the chip and 200 MHz (400 DDR) for the memory. With the help of RivaTuner, they were able to raise them to 250 and 276 (552 DDR), respectively. The resulting increase in 1024x768x32bit resolution ranged from 15% (Max Payne, Giants) to 35% (Quake3, Serious Sam), the GF4 MX440 level is almost reached. At the same time, the graphics chip did not overheat at all, despite the absence of a fan. This is due to the fact that the GeForce4 MX was designed to operate at frequencies above 250 MHz and with high-speed DDR memory on a 128-bit bus.