RTSS Rivatuner Statistics Server 7.3.3 Download
Are you a gamer who is looking for a way to get more out of your gaming experience or you may want to get the most out of your graphics card? If so, then you may want to consider downloading Rivatuner Statistics Server.
Rivatuner Statistics Server is a free tool that gives you all sorts of information about your graphics card, including framerates, temperatures, and more. This powerful tool can help you tweak your graphics settings for the best performance possible.
Whether you’re a hardcore gamer or just looking to improve your computer’s overall performance, Rivatuner Statistics Server is a must-have software.
Learn more about Rivatuner Statistics Server in this post. We’ll tell you what it is, how it works, and give you some tips on how to use it. So read on to find out more!
Rivatuner Statistics Server is a program that allows you to monitor your computer’s performance in many different ways. You can also tweak your GPU and overclocking settings, which will help you optimize your PC’s power consumption and graphics processing power.
Download Rivatuner 7.3.3
Rivatuner Statistics Server (or Rivatuner) is a free Powerful and easy-to-use tool for Precision Powerful Overclocking, Hardware Monitoring, and Fan Control.
Rivatuner Statistics Server is a free program for Windows that gathers information from your video card, as well as detailed information about how various graphics settings affect performance.
In other words, Rivatuner Statistics Server helps you to tweak your graphics settings so you can get the highest framerate or quality without sacrificing those two aspects. You also have the option of entirely removing graphical features if necessary, which would increase performance dramatically.
How Does Rivatuner Statistics Server Work?
Rivatuner Statistics Server has two parts: the monitor and the server. The monitor is installed directly onto your system and monitors information from your system’s hardware (such as temperatures and GPU usage). Then it sends that data to the server portion of the program over an Internet connection; this allows you to access all of that information remotely using any supported web browser (like Safari, Chrome, Firefox and Internet Explorer).
So do you get started using RivaTuner Statistics Server? First, you should download both the server and client parts of this tool. Then choose which GPU you want to monitor (either the internal card or an external card) and install each part into its designated directory; usually, that’s C:\Program Files for x86 or C:\Program Files\RivaTuner for 64-bit.
Please note that Rivatuner Statistics Server will open in your browser using Java Web Start technology if it isn’t installed on your system already.
Once RivaTuner is running, go ahead and select “Settings” from the top menu bar to configure how you’d like to view information about your graphics cards. You can control what data shows up in the monitoring window by choosing “Monitoring” then selecting the data that you want to be displayed.
What Are Rivatuner Statistics Server’s Features?
At its core, RivaTuner is an overclocking tool—a great one at that. But it has evolved into so much more than just another overclocking program.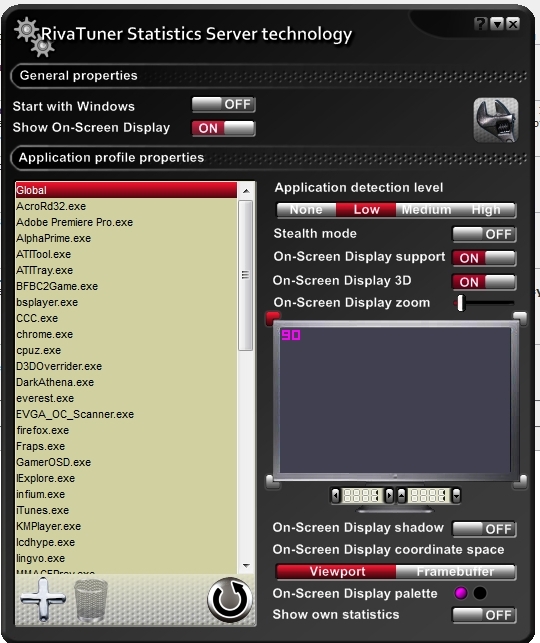
It sports features like A hardware monitoring module (including temperatures and fan speeds) for over 300 graphics cards An integrated benchmarking tool with support for DirectX 9, 10, and 11 3-D benchmarks Support for multi-GPU configurations Hardware monitoring on all Direct3D devices The ability to customize resolutions, refresh rates, anti-aliasing levels, texture quality and detail level Support for custom profiles that can be shared with other users.
Here are some of the amazing features of Rivatuner-
1. With the help of this program, you can monitor all your computer’s hardware.
2. You can also tweak GPU Performance settings to make your PC run smoother.
3. This software delivers support for customizable clock detection and fan speeds.
4. The “Logitech LCD” plugin lets users customize their keyboards with overclocking information displayed on their screen.
5. Rivatuner Statistics Server has an automatic thread priority optimization algorithm that helps keep applications running smoothly at high priority without interrupting other apps or services.
6. Rivatuner Statistics Server allows users to view data in the form of graphs so they know exactly how their system is performing at any given time.
7. It also provides users with a temperature monitor that can display all their hardware temperatures.
8. Rivatuner allows gamers to improve their gaming experience by letting them tweak their video settings for higher FPS (frames per second) and smoother gameplay and visuals
9. Users will be able to adjust fan speeds straight from the app’s interface! No more annoying trips to your computer’s BIOS setup screen every time you need this adjustment made
10. You’ll be able to manage power supply configurations directly from within the app as well as recalculate total system power consumption, which means you’ll know exactly how much wattage your computer is drawing at any given time
11. Rivatuner Statistics Server supports customizable event logging so users can see exactly what’s happening on their computers when they are not there!
12. It also provides users with an overclocking checker to help them pick out the best system clock speed for their hardware
Some of these features are Windows-only, so you won’t find them on OS X or Linux systems. But for gamers who use Nvidia graphics cards running Windows, this powerful tool is a must-have.
How to Use Rivatuner Statistics Server To Improve Gaming Performance?
Rivatuner has several tools for gamers—monitoring software is one of them, but it also comes with other cool utilities, like its overclocking interface. First, go ahead and open up the Monitoring window in RivaTuner so you can see what temperature information your video card is reporting to you.
By default, there are three tabs: Temperature, Fan Speed, and Utilization. As their names imply, they show your card’s local temperature readings along with the current fan speed and percentage of GPU utilization. If you want to get more control over your graphics card, select “Settings” from the menu bar along the top; this will open up a new window where you can adjust how RivaTuner monitors your video card.
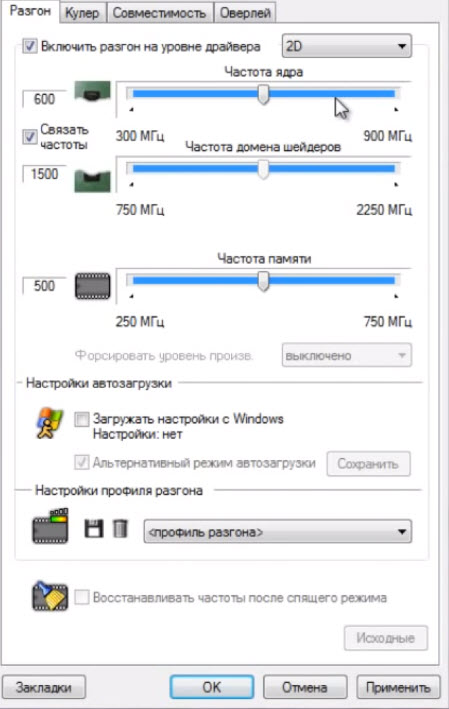
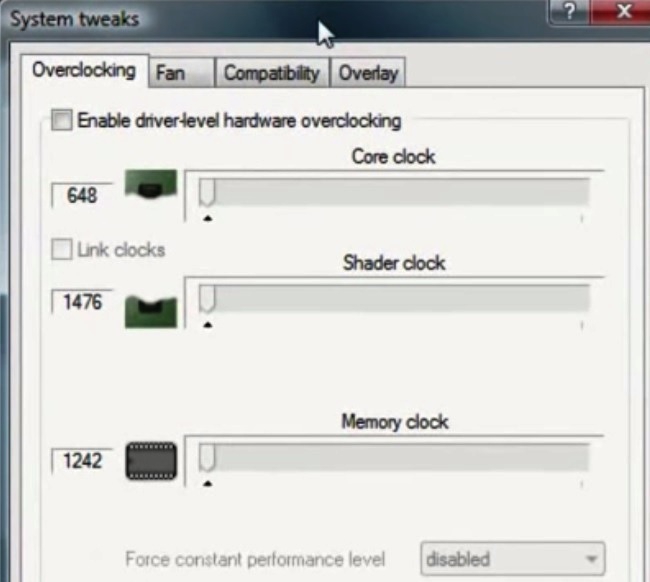
Leave “Monitoring Settings” open while we take a look at overclocking options in RivaTuner. Open the “Overclocking” dropdown menu to select between Nvidia GPUs or ATI GPUs (and later on AMD GPUs). Once you’ve selected the right GPU type, choose either an individual core clock or an entire chip clock by selecting one of the three listed choices.
For example, if I wanted to increase my GeForce GTX 460’s core clock headroom, I’d select the “Individual Core” radio button and click on my card’s core clock speed.
This brings up a new window where you can choose which specific speeds to overclock. For example, if your graphics card has 2GB of GDDR5 memory running at 600MHz (600MHz x 2 = 1,200MHz), you’ll want to leave it alone because changing that will lower your overall memory bandwidth.
You also don’t want to change the default GPU or shader clock speeds; doing so could cause instability issues, higher temperatures, and fan speeds as well as reduce the life of your video card.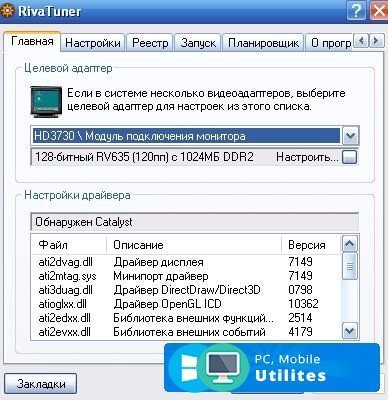 Remember: always monitor your system while you’re overclocking—if things go south, don’t be afraid to roll back to factory default clock settings to get things running under control again.
How to Save Overclocking Settings?
Now that we have overclocked our card, it’s a good idea to save the changes so we can quickly and easily apply them anytime you want. To do this, select “File” from the top menu bar and choose “Save”. Then give your profile a name so you know what it does (for example, I’ll save my GeForce GTX 460 overclocking profiles as “GeForce GTX 460 OC Profile”).
This will automatically close RivaTuner Statistics Server if it was open; now go ahead and launch your game or video editing software—you should now be able to tell an immediate difference in performance! If for any reason your settings weren’t applied, just re-launch RivaTuner, and all of those changes will now be enabled.
How to Download Rivatuner Statistics Server?
In this section, you will find a step-by-step guide to download and install Rivatuner Statistics Server.
1. Scroll down to look for a file called rts_tools_whql_fullpack_-_x86-64.zip and click the download button.
2. Select [ Save ] to save the rts_tools_whql_fullpack_-_x86-64.zip file on your hard drive and then click [ OK ].
3. When you are done downloading, double click the rts_tools_whql_fullpack_-_x86-64.zip file to unzip it.
4. Go into the folder that was created when you unzipped the rts_tools_whql_fullpack_-_x86-64.zip file and double click on Setup.exe file to start the installation process of Rivatuner statistics server.
5. You will now see a blue screen with Rivatuner Statistics Server installation wizard.
6. Click on Next to continue with the installation process of Rivatuner statistics server.
7. You will now be asked to accept the End User License Agreement (EULA), select I accept the terms in the license agreement radio button, and then click on the Next button to continue with installation of Rivatuner statistics server.
8. Next step is to choose a destination folder for Rivatuner statistics server installation, we recommend you accept default settings and install Rivatuner Statistics Server in the C:\Program Files\RivaTuner Statistics Server directory by clicking on the Next button and then clicking on the Install button to start the installation process of Rivatuner statistics server.
9. Now Rivatuner Statistics Server is installing, you will see a progress bar for this installation process.
10. Once the installation process of the Rivatuner statistics server is completed successfully, click on the Finish button to close the setup wizard. You can choose to run RTSS right away or postpone it by closing the Setup Wizard without running RTSS.
11. You can now find RTSS in your start menu, under All Programs. If you want to open RTSS right away, double click on the RivaTunerStatisticsServer64.exe file here: C:\Program Files\RivaTuner Statistics Server to open up the Rivatuner statistics server user interface.
12. You will need to configure RivaTunerStatisticsServer64.exe with your internet connection settings (proxy server, IPv4/IPv6 addresses) if you want to connect over the internet.
Frequently Asked Questions
What is Rivatuner Statistics Server?
Rivatuner Statistics Server is a program that acts as a middleman between a video game and the driver to provide precise in-game framerate information, measured in frames per second (fps). It can also be used for framerate monitoring by specifying a constant frame time.
How does it work?
It works very similar to how FRAPS worked by hooking into your games at certain points and timing how long they take, except instead of measuring the time taken, it measures how many ‘frames’ have passed since its last run using DirectX 9 or 11’s methods for reporting this info from the driver level. Thus, Rivatuner has more accurate results—how many fps the game is rendering.
My FPS fluctuates a lot, is there any way to lock it?
In RivaTuner Statistics Server, go into the “Layout and Overlays” tab and click on “Customize layout”. Then under “Monitoring”, select that option that says “(Advanced) Absolute (ms)” along with a polling interval of about 3-5 ms. This will lower fluctuations in your framerate, though note that it can slow down recording a little bit more because RTSS has to wait for the value to be polled from hardware.
What are the system requirements for running RivaTuner Statistics Server?
RTSS has no special hardware requirements, but it’s recommended you have at least 1 GB of free disk space and at least 512 MB of memory.
Why should I use RivaTuner Statistics Server?
RTSS is the most widely used fps monitoring software to date. With its many features, it’s a great tool for anyone who needs precise in-game fps information and framerate monitoring with very little overhead (memory and performance).
How should I configure RivaTuner Statistics Server?
There are two ways to configure RTSS, the first is by using the .ini configuration file that’s generated when you first run Rivatuner Statistics Server (.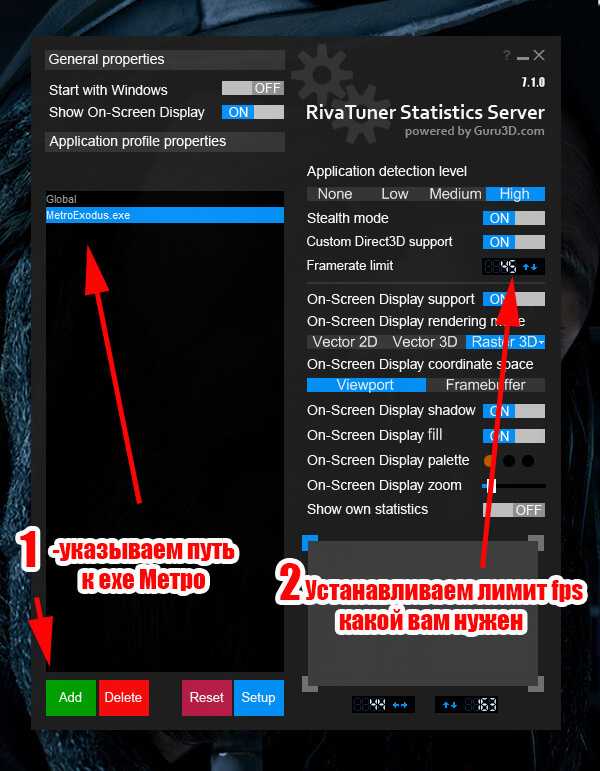 \Rivatuner Statistics Server\Profiles\RTSS_profile.XML) and the second is by adjusting the settings inside RTSS UI.
How do I uninstall Rivatuner Statistics Server?
To uninstall Rivatuner Statistics Server, simply open Control Panel and choose Programs and Features (for Windows 10/8/7) or Add/Remove Programs for earlier versions of the Windows operating system. Then right-click on RivaTuner Statistics Server in the list and choose Uninstall.
What is the difference between RivaTuner Statistics Server and MSI Afterburner?
RTSS and MSI Afterburner have a lot in common. The main difference is that MSI Afterburner offers additional overclocking features, while RTSS focuses on benchmarking features only. It’s important to understand that overclocking your GPU will not impact fps and framerate.
How do I make RTSS start automatically with Windows?
You need to use Task Scheduler (for Windows) and create an action to run “C:\Program Files\RivaTuner Statistics Server\RTSSHost. exe” -start in the task scheduler program. For more information, click here.
How do I automatically start RivaTuner Statistics Server with Windows?
You can create a shortcut to “C:\Program Files\RivaTuner Statistics Server\RTSSHost.exe” in your Windows startup folder and you will always have RTSS start with your computer booting up.
How do I use an online account to access my statistics?
To set up an online account and be able to access your statistics from anywhere, go into the RivaTuner Statistics Server program folder (C:\Program Files\RivaTuner Statistics Server) and open up RTSSHost.exe with Notepad and look for “OnlineKey=”. Then insert your online account key in the quotes. For example, this is what an OnlineKey would look like:
“OnlineKey=”””xxxxxxxx-xxxx-xxxx-xxxx-xxxxxxxxxxx””’
How do I use RivaTuner Statistics Server with games not listed in the dropdown?
RTSS can use 3rd party applications to measure fps for games not listed in its dropdown.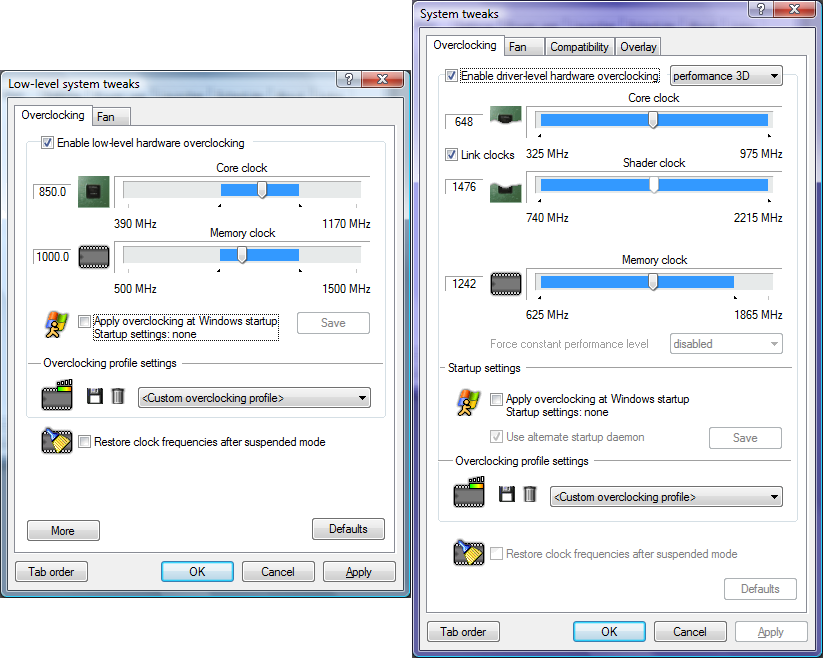 First, go into the Rivatuner Statistics Server program folder (C:\Program Files\RivaTuner Statistics Server) and open RTSSHost.exe with Notepad.
Then scroll down until you see “<AppConfig filename=”D3D9.xml” />”. Right-click on it and choose “Copy” to copy this line of code, then go to Google and search for “List of D3D9 Application Programming Interface (API) function pointers” .
From the list that comes up, click on the first link that’s called “Direct3D 9 reference”. Scroll down to “Direct3D9 – Object Creation” and look for D3D9CreateDevice(…, …). Right-click on it and click on “Select All” + “Copy”. Then go back to Rivatuner Statistics Server and right-click in the RTSSHost.exe program folder where you see “<AppConfig filename=”D3D9.xml” />” and click on “Paste”.
In the same line, right-click after “D3D9CreateDevice(…,” and click on “Replace”. Paste the code from the link in Notepad at this location by right-clicking and clicking on “Paste”. Then make sure to delete the ” </Direct3D9> </AppConfig>” line.
Now, for every function you want to use in RivaTuner Statistics Server, find out its corresponding code at Direct3D 9 reference and add it in between “<AppConfig filename=”D3D9.xml” />” and “/></AppConfig>” as a new line.
What is Temperature and Power Target?
Both of those sliders define maximum values that your GPU will reach before it starts to throttle to avoid overheating. Note that throttling means that your card will technically run slower than its base clock speed, which can also lead to stuttering. Your goal should be to find the maximum value where your card begins throttling, while still maintaining playable framerates. Temperature target is there to determine how much your GPU will throttle (in percentage) while Power target defines how much power (in percentage) it will use before beginning to throttle.
What is the purpose of custom color when recording?
It allows to record video with transparent background. By default, RTSS records with white background which you can see in some videos on YouTube, but it does not look very nice when trying to add a watermark. I suggest using 50% transparency for this; It will make your video cleaner without being too distracting.
Where can I download Rivatuner Statistics Server?
You can download it from the official website rivatuner.net.
RTSS Rivatuner 7.2.3 build 20686
This is the official homepage for Rivatuner. Initially designed as a small helper application for RivaTuner graphics card utility, RivaTuner Statistics Server became de-facto framerate monitoring, On-Screen Display and high-performance video capture service provider for other graphics card utilities.
Features:
- The server provides framerate and frametime monitoring support to the client applications. Framerate and frametime statistics is being collected for DirectX and OpenGL applications. The statistics can be rendered in On-Screen Display or provided to client applications connected to the server.
- The server provides 3D acceleration usage statistics to the client applications.
 The clients can use the statistics to determine if any 3D applications are currently running and apply different hardware profiles depending on it.
 - The server provides On-Screen Display support to the client applications. The clients can display any text info in the On-Screen
- Display in DirectX and OpenGL applications. The server can be also used as a standalone framerate monitoring solution and display own framerate statistics in the On-Screen Display.
- The server provides desktop and in-game screen capture support to the client applications. BMP, PNG and JPG screen capture formats are supported.
- The server provides high-performance real-time desktop and in-game video capture support to the client applications.
- Uncompressed, high-performance custom RTV1 and native MJPG video encoding, encoding with third-party external VFW compatible codecs (e.g. Lagarith or x264vfw) and hardware accelerated H.264 encoding via Intel QuickSync, NVIDIA NVENC and AMD VCE are supported in conjunction with wide range of additional video capture related options, multisource stereo and multichannel (for Window Vista and newer) audio capture with Push-To-Talk support.
 The functionality of expensive commercial video capture products is now available to everyone absolutely for free! There is no need to buy dedicated video capture software anymore!
 - Framerate limiting support. Limiting the framerate during gaming can help to reduce the power consumption as well as it can improve gaming experience due to removing unwanted micro stuttering effect caused by framerate fluctuations.
- User extendable architecture. You may express your creativity and design your own skins for RivaTuner Statistics Server, create localization for your native language, use the server to display any custom text in On-Screen Display directly from your own application and many, many more!
System requirements:
- Windows XP, Windows Vista, Windows 7, Windows 8 or Windows 10 (both x86 and x64 versions) with full administrative rights
- Any DirectX, Vulkan or OpenGL compatible graphics card
RivaTuner Statistics Server 7. 2.3 build 20686
- Updated digital signature for the installer and the main executable. Considering that whitelisting new digital signature in anticheat systems may take significant amount of time, the previous whitelisted MSI GlobalSign digital signature is still being used for hook libraries, media encoding core and plugins in order to provide continuous gaming experience to the community.
- Interoperability D3D11 page flips on some systems are now filtered by framerate calculation module in OpenGL/Vulkan applications . This change should fix issues with On-Screen Display flickering and double displayed framerate in new experimental Vulkan codepath in No Man’s Sky under certain conditions
- Added workaround for Intel HD Graphics Direct3D driver bug, causing some parts of On-Screen Display to be invisible or rendered in solid black color in Direct3D8 and Direct3D9 applications on integrated Intel GPUs
- Added Vulkan bootstrap layer for Vulkan On-Screen Display implementation.
 Now On-Screen Display in Vulkan applications is supported for dynamic RivaTuner Statistics Server start scenario (i.e. when you start RivaTuner Statistics Server while target Vulkan application is already running). Bootstrap layer usage also eliminates the need of setting application detection level to high for some Vulkan applications loading Vulkan runtimes dynamically (e.g. Dota 2 or Rage 2)
 - Improved implementation of hook library connection to shared memory. New implementation improves On-Screen Display compatibility with some third-party applications (e.g. PPSSPP) for dynamic RivaTuner Statistics Server start scenario
- Improved raster 3D font rendering quality for some fonts with overhang symbols
- Improved compatibility with some Direct3D12 applications, which dynamically recreate swapchains during changing graphics settings (e.g. the most recent patch for Metro Exodus during toggling DLSS on/off)
- Added On-Screen Display profile for Apex Legends. The profile is adding the game’s executable to delayed injection system triggers list in order to improve compatibility with customized implementation of Origin In-Game overlay used in Apex Legends
- Improved function offsets cache validation algorithm in hooking system.
 The improvements are aimed to minimize the risk of cache corruption:
- Now RivaTuner Statistics Server is zeroing all cached offsets prior to offsets reinitialization after detecting new DirectX runtimes installation
- Now RivaTuner Statistics Server is forcibly resetting and rebuilding the cache during 3 subsequent application restarts after detecting new DirectX runtimes installation
- Cache version has been incremented to force it to be reset on all systems
- Improved skin engine:
- Optimized skin rendering performance for skins using multiple overlapped animated indicators
- Added position smoothing support to skinned indicators
- Now skinned applications can forcibly disable indicator animation if necessary
- Skin format reference guide has been updated to v1.8 to document these changes
RivaTuner Statistics Server v7.2.2 build 20238
- Changed digital signature to fix issues with revoked StarCom code signing certificate on some systems.
 RivaTuner Statistics Server is temporarily signed by MSI GlobalSign digital signature
 - Font size in the profiles list is now scaled properly when adjusting skin scaling ratio
RivaTuner Statistics Server v7.2.1 build 20237
- Fixed issue with the latest NVIDIA Adaptive Shading update of Woflenstein II: The New Colossus locking on startup. Please take a note that now Wolfenstein II: The New Colossus is presenting frames from compute queue in NVIDIA codepath similar to AMD codepath. Due to that reason, On-Screen Display rendering is performance expensive and disabled by default in such environment.Experienced users, understanding and accepting On-Screen Display related performance penalty, may reenable it with PresentFromCompute profile switch
- Fixed black screen issue in Vulkan applications on NVIDIA Kepler GPU family under 4xx.xx series drivers family
- Fixed multithreaded active busy-wait loop based frame capture implementation, which could prevent desktop videocapture from working in the previous version
- Improved compatibility with multithreaded Direct3D1x applications, using multiple DXGI swapchains and concurrently accessing them from different threads (e.
 g. Microsoft Photos UWP application)
 - Improved On-Screen Display hypertext formatting implementation:
- Variable slot 250 is no longer used to define own On-Screen Display statistics format, now it is allowing the client applications to redefine default text format. Such implementation allows the client applications like MSI Afterburner to edit default text color and size directly inside the On-Screen Display layout editor
- Improved subpixel precision for raster fonts provides better font scaling quality and improves rendering quality for small superscript/subscript-styled text
- Improved font baseline positioning. Now subscript-styled text is aligned on the baseline of maximum sized font symbol in the line instead of the baseline for 100% font size
- Improved font scaling implementation for large fonts. Now requested font size is scaled from the closest reference prerendered font size instead of 100% font size
- Changed set of prerendered font sizes from 40%, 50%, 80% and 100% to 50%, 100% and 200%.
 Prerendered font sizes can be used as is without scaling and with the best possible rendering quality, any different font sizes are interpolated
 - Added background fill flag for embedded objects. Background fill is intended to simplify maximum value visualization with barchart-styled embedded graphs
- Now it is allowed to use zero width or height in bar embedding tags to specify whole text extent
- Embedded objects are now affected by text size and alignment tags
- Added backspace symbols support. Backspaces are intended to be used in conjunction with bar embedding tags. Inserting backspace symbol immediately after the bar embedding tag results in returning the cursor position back to embedded bar origin. Such implementation provides simplified way of embedding custom background in the hypertext. Please take a note that backspace sequences are currently not supported, so the cursor cannot be moved beyond the previous position
- Added new tag for displaying benchmark time
- Added suspending support to VTable hook handlers.
 Suspending is used to improve reference counter tracking implementation and make it more future proof
 - Graphs are no longer displayed in On-Screen Display when Vector2D On-Screen Display rendering mode is selected
- Slightly refactored Direct3D and Vulkan On-Screen Display rendering codepaths due to implementation of optional offscreen rendering mode. This mode is currently disabled by default, it is reserved for future versions as a codebase for asynchronous On-Screen Display rendering implementation
- Multilanguage user interface library is DPI aware now. Main window skinned interface is no longer being scaled by OS and no longer looks blurred by default when greater than 100% DPI is selected. Now main skinned window interface can be manually zoomed with skin scaling slider in “User interface” tab, and the properties are automatically scaled by OS according to selected DPI
- Added new skin scaling mode for power users. New mode provides better scaling performance at the expense of some scaling image quality loss
- Skin scaling implementation is now asynchronous, so increasing skin scaling ratio doesn’t increase GUI update time and doesn’ t decrease GUI response time
- Skin scaling slider range has been extended from 75%-150% to 75%-200%
- Some profile settings are treated as power user oriented and they are locked by default at global profile level now.
 Such settings include “Enable Custom Direct3D support” compatibility option and Vector2D On-Screen Display rendering mode selection. Context help was not recommending enabling those compatibility related options globally, however many users tended to enable them blindly then blamed the product for inappropriate performance or reduced 3D applications compatibility. Such settings are now ignored and locked for enabling in global profile unless you manually unlock them
 - Added “Enable framerate limiter” option to general application properties. This option allow controlling RivaTuner Statistics Server’s framerate limiting support globally, so you may temporarily disable it if necessary without modifying generic framerate limiter or scanline sync related settings in the profiles. The client applications like MSI Afterburner can also distantly control this option via hotkeys
- Now RivaTuner Statistics Server validates DirectX runtimes installation at startup and displays warning message if required DirectX runtime components are missing.
 Power users may disable this warning message as well as any previously existing diagnostic warning messages displayed at RivaTuner Statistics Server startup and enable silent startup mode via the configuration file if necessary
 - Added user extendable exclusions list for desktop windows notification performed during installation and uninstallation of system CBT hooks. Currently the only exclusion in the list is Microsoft Outlook process, which previously tended to display help popup window on closing RivaTuner Statistics Server
- Now RivaTuner Statistics Server hides own frametime history overlay when framerate or frametime is displayed by the client On-Screen Display application
- Now RivaTuner Statistics Server hides own benchmark statistics when benchmark time, minimum, average, maximum, 1% low, 0.1% low framerate is displayed by the client On-Screen Display application
- Added On-Screen Display compatibility profile for Splinter Cell Chaos Theory
- Updated profiles list
Download Here
HOWTO: Low-Lag VSYNC ON | Blur Busters
EDIT: As of 2019, there is a new RTSS Scan Line Sync mode that is superior to this Low Lag VSYNC ON HOWTO. Check out this HOWTO on Blur Busters Forums as an alternative.
Right Tool For Right Job: VSYNC ON improves certain games
Often, competitive gaming and eSports often use VSYNC OFF to reduce input latency. Even frame rates above refresh rates can reduce lag further, especially or CS:GO and Quake matches.
However, VSYNC ON is much more enjoyable for certain games/emulators/some console ports which behave much better and more smoothly with VSYNC ON. Also, Motion Blur Reduction such as ULMB can amplify visibility of stutter/jitter. By using VSYNC ON, you can easily reduce or solve these problems.
Unfortunately, VSYNC ON can often add input lag! What do we do?
The great news is there are ways to reduce VSYNC ON input lag!
Low-Lag “VSYNC ON” for Common Monitors
Several tests were done by Jorim Tapley, RealNC and others in the Blur Busters Forums, testing multiple methods of frame-rate capping to find the lowest-lag, stutterless method of reducing VSYNC ON input lag. This tip applies if you don’t have a variable refresh rate (VRR) monitor such as G-SYNC or FreeSync.
We found that only one frame-rate capping software, called RTSS (RivaTuner Statistics Server) was able to reduce VSYNC ON lag without adding visible stutters. Other frame rate limiter software (in-game, NVInspector, etc) were not as accurate.
- Download and install RTSS.
- Go to TestUFO Refresh Rate and measure your exact refresh rate to at least 3 decimal digits.
- Subtract 0.01 from this number.
- Launch RTSS, click on the “Framerate limit” number.
- Type the new number, rounded down to nearest two digits.
For example, if TestUFO Refresh Rate said “143.995”, then enter “143.98” - Use “VSYNC ON” or “NVIDIA Fast Sync” or “AMD Enhanced Sync” for that specific game.
Fast Sync and Enhanced Sync may sometimes stutter less than VSYNC ON with frame rate caps.
Technical explanation: This avoids frame buffers from piling up to create input lag. In addition, stutters are avoided, thanks to RTSS microsecond-accurate frame rate capping precision. High speed video tests confirmed a reduced lag of approximately 1 to 2 less refresh cycles less input lag relative to VSYNC ON. Also, RealNC from Blur Busters Forums has a longer HOWTO on Guru3D Forums on this technique, including additional tips on how to edit your RTSS configuration file, and setting pre-rendered frames to 1 in NVInspector.
Troubleshooting Stutter Problems with Above
Follow this section only if you’re getting stutter problems with the low-lag VSYNC ON trick.
Sometimes, different numbers may work better for Step 3 above.
- The RTSS recommended 0.01 number difference (between Hz and fps) is simply a starting point. Experiences will vary per system and per game engine.
Example, if you’re running at “119.990Hz”, try a cap of “119.980 Hz” - Verify your game is running at the correct refresh rate.
Sometimes games will run at a refresh rate different than the Windows desktop.
- NVIDIA “Fast Sync” or AMD “Enhanced Sync” can be experimented with, instead of “VSYNC ON”, to allow tighter frame rate capping for the purposes of avoiding stutters. They already help lag, but they may stutter badly in certain games unless the frame-rate is capped.
- If your GPU is not fast enough to run at full frame rate during VSYNC ON,
…try a lower refresh rate
…adjust game detail/AA
…switch to a G-SYNC monitor or FreeSync monitor
…and/or upgrade your GPU. - The faster and more precise the system, the smaller the difference can be before problems happen. Some users are using differences as little as 0.005 and others are using much bigger numbers such as 0.1.
- In certain games, tighter differences (e.g. 0.001) may run perfect-smooth for several minutes, before having a long sustained surge of stutters. (Less frequent, but very severe, sustained stutter surges). Using “Fast Sync” instead of “VSYNC ON” may reduce this into a single micro stutter.

- In certain games, looser differences may run perfect-smooth for a shorter time period and then have one nearly-invisible micro stutter. (More frequent, but very tiny stutters).
- Most systems already have high precision clocks (HPET, TSC, etc). However, if you intentionally manually disabled this setting in your BIOS, turn it back on. High-precision clocks are needed for microsecond-accurate stutter-free frame rate capping.
- Experiments have been made with predictive frame rate capping, which is a feature of GeDoSaTo open-source software, to eliminate the need to follow these instructions for precision differences between fps and Hz. Predictive frame rate capping is not yet a feature of RTSS (though it should be!) as it is a worthwhile feature according to input lag tests. Some, not all, emulator software also have similar custom syncing options that reduce input lag.
Experiment until you get acceptable low-lag VSYNC ON behaviour.
Better Low-Lag “VSYNC ON” for G-SYNC and FreeSync Monitors
- For fixed-Hz or strobed operation, there’s a new RTSS feature called RTSS Scanline Sync as an alternative low-latency VSYNC method.

- A variable refresh rate (VRR) monitor is a much easier low-lag way to get perfect “VSYNC ON” motion.
Software with internal frame-rate caps (e.g. emulators, video players, framerate-limited games) will run very smoothly and at very low latencies. Everything can be made to look stutter-free “VSYNC ON smooth” at all frame rates on a G-SYNC and FreeSync monitor — changes in frame rates can occur without stutter! See animation demo of stutter-free changes to frame rates. A frame rate of 47 fps automatically means the monitor is running at 47 Hertz, and without stuttering or tearing.
Even VRR also helps with fixed-frame-rate games, console ports, emulators, by synchronizing frame rates with less lag than ordinary “VSYNC ON” — and adds the ability to reduce/erase the visibility of single-frame-drop stutters that can still happen with VSYNC ON.
- Make sure you’re running on a VRR monitor such as a G-SYNC monitor or FreeSync monitor.
- For games, many work fine in VRR mode by default.

Certain games need you to turn on/off “VSYNC” in the game to trick G-SYNC or FreeSync to work. - For emulators, configure it into Direct3D/OpenGL mode.
- For video players, use a Direct3D-capable video player such as SMPlayer.
For specific software (e.g. emulators, video players), you will need to configure it to run in a Direct3D/OpenGL mode in order to take advantage of G-SYNC or FreeSync.
Other Ways of Avoiding Lag with VRR Displays
We were the first site in the world to discover an input-lag-reducing trick for G-SYNC in year 2013-2014 via G-SYNC Preview #2. We did further extensive tests in 2017 on a 240Hz G-SYNC monitor as part of G-SYNC 101: Input Lag Tests.
If you want to use the highest possible frame rates without lag on G-SYNC and FreeSync displays:
- Use a framerate cap of a few frames per second below refresh rate.
Example: 138 fps cap on 144 Hz monitors.
Example: 235 fps cap on 240 Hz monitors.
- In-game frame rate capping has less lag than external frame rate cap software such as RTSS or NVInspector. VRR can successfully runs smooth with approximate/imprecise frame rate caps.
Example: fps_max 235 in a Source Engine game (Half Life 2, CS:GO, etc) - If there is no in-game frame rate cap capability, use RTSS which was tested to be lower lag than NVInspector and other capping utilities.
That way, frame rates can fall harmlessly without visible stutter. And when running flat-out at full frame rate, no unnecessary frame rate buffers pile up. This avoids creating unwanted “VSYNC ON” level of input lag whenever hitting maximum frame rates during uncapped VRR game play.
Also, fixed frame rate operation has less lag at higher refresh rates (e.g. 60fps @ 240Hz) than lower (e.g. 60fps @ 144Hz or 60Hz). 60fps on high-Hz VRR looks visually stutterless & smooth as 60fps VSYNC ON, except with less input due to faster refresh cycle scan-out per frame.
Full Flexibility for Competitive Gaming
All VRR displays also supports VSYNC OFF too. This includes all G-SYNC monitors and FreeSync monitors.
There are people who play CS:GO with VSYNC OFF, and switches to using G-SYNC or FreeSync for other games for better, smooth motion without stutters or tearing.
If you have a very high refresh rate (240Hz), the input lag of G-SYNC becomes similarly low as VSYNC OFF (unlike at 60Hz where the difference is much bigger). 240Hz VRR is capable of eSports-quality gaming. By adding sheer Hertz, VRR becomes suitable for professional gaming.
Other Articles about Input Lag
- G-SYNC 101: Input Lag Tests of 240 Hz G-SYNC
- Advantages of Frame Rates above Refresh Rates
- Input Lag and the Limits of Human Reaction Time
Related Content
Featured Content
Blur Busters Forums
TestUFO Motion Tests
Guru3d rtss rivatuner statistics server — Dudom
Here you can download RTSS Rivatuner Statistics Server. This is the official homepage for Rivatuner. Initially designed as a small helper application for RivaTuner graphics card utility, RivaTuner Statistics Server became de-facto framerate monitoring, On-Screen Display and high-performance video capture service provider for other graphics card utilities.
Webmasters: Please link to the previous page. Thanks for understanding.
License agreement
The software (Guru3D RTSS Rivatuner Statistics Server Download) available here from Guru3D.com/HardwareGuru.com are provided «as is» with no technical support. All software is to be used at your own risk; this site does not take any responsibility for any damage in whatever form or context.
The materials on this Website («WEBSITE») are provided by the Guru 3D («also 3DGuru, Guru3D.com, Guru3D.info and Hardwareguru.com») as a service to its users and may be used for informational purposes only .
You may not copy, modify, sublicense, or distribute the downloaded software except as expressly provided under this License. Any attempt otherwise to copy, modify, sublicense or distribute the Program is void, and will automatically terminate your rights under this License. However, parties who have received copies, or rights, from you under this License will not have their licenses terminated so long as such parties remain in full compliance.
All materials available here are provided «as is» with no technical support. Under no circumstances, including negligence, shall this website be liable for any incidental, special, indirect or consequential damages arising out of or relating to this license and or download. You agree to indemnify and hold this wesbite harmless from any and all damages, risk and liabilities.
You expressly acknowledge and agree that use of the downloaded software is at your sole risk. By downloading, installing, copying, or otherwise using the SOFTWARE, you agree to be bound by the terms of this LICENSE. If you do not agree to the terms of this LICENSE, do not download the SOFTWARE.
Please wait while we transfer you to the requested download (Guru3D RTSS Rivatuner Statistics Server Download) or click here if your browser does not forward automatically.
If you do not get access to download a file (You don’t have permission to access message) then you are blocking referrer information, please enable it. Some visitors use a personal firewall or antivirus program that deletes the page referer information sent by the web browser.
Want to monitor your system’s performance while you play? What’s the best way to see what your equipment is capable of? Does it reveal itself completely or is something preventing it?
You may have already seen game reviews with system performance information right on the computer screen while playing and wondered: How did they do it?
This information, shown in the upper left corner of the screen, is called OSD or On-Screen Display, and is one of the most commonly used functions in MSI Afterburner. It allows you to monitor the performance of your graphics card and other hardware while you play, and thus gives you important information about what can be improved to increase performance. Want to know how to get this information on your screen? Just follow our instructions below!
First, you need to get the latest version of MSI Afterburner and Rivatuner Statistics Server. Both programs are included in the MSI Afterburner installer. (Download here)
1. Run MSI Afterburner
2. Click “ Settings ”
3. Click “ Monitoring ” and go to “ Active hardware monitoring graphs” active hardware) and select the information you are interested in to display in the OSD menu (for example, we use “GPU usage” (GPU usage))
b. To display the information of interest on the screen, check the option “ Show in On-Screen Display ” (Show in the OSD menu).
c. In the column “ Properties ”” (Properties) you will see the inscription “ in OSD ” (in the menu). Select other information to be displayed on the screen in the same way. You can change the order of the information displayed on the screen by dragging the desired menu items up or down the list.
d. Text shown in “ Override group name “(Override group name) to be displayed in the OSD, you can change as you like. (Here we changed the name “GPU usage” to “GPU load”)
e. Don’t forget to click OK to save your changes and exit to MSI Afterburner.
Now when you start the game, you will see the OSD menu!
But that’s not all! You can also customize the appearance of the menu. You can easily customize the OSD using the RivaTuner Statistics Server utility, which is automatically installed with Afterburner.
1. Click on the icon “ Riva Tuner Statistics Server ”
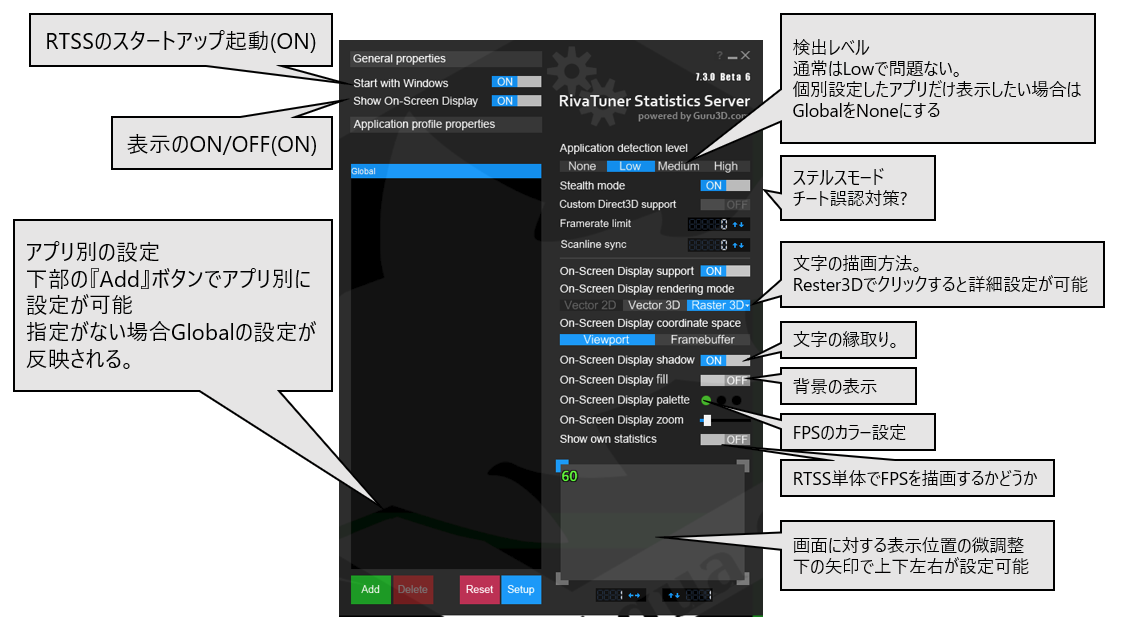
2. In the menu that opens, you will see the settings that you can change. Here are some of the more interesting options to change:
a. On-Screen Display shadow (OSD shadow setting): When enabled, the text will have a dark outline to improve its visibility.
b. On-Screen Display palette (Change OSD Color): Here you can change the color of the OSD text. You can also change the color of the shadow.
c. On-Screen Display zoom (On-Screen display zoom): Here you can change the text size of the on-screen menu.
d. Position of OSD : Drag the OSD text to any position on the screen.
Here you can download RTSS Rivatuner Statistics Server. This is the official homepage for Rivatuner. Initially designed as a small helper application for RivaTuner graphics card utility, RivaTuner Statistics Server became de-facto framerate monitoring, On-Screen Display and high-performance video capture service provider for other graphics card utilities.
We’ve issued RTSS 7.2.3 to a public release. Build 20636 is available for download here at the only official website you can download it from. Please don’t download it anywhere else as you never know what you install. We always suggest that you download the latest full beta package of MSI Afterburner which always includes a stable build of RTSS — Download here.
Note : Does your overlay not work anymore after the update? Please perform a full uninstall of RTSS and AfterBurner (with profiles removal) and perform a CLEAN install of it.
- The server provides framerate and frametime monitoring support to the client applications. Framerate and frametime statistics are being collected for DirectX and OpenGL applications. The statistics can be rendered in On-Screen Display or provided to client applications connected to the server.
- The server provides 3D acceleration usage statistics to the client applications. The clients can use the statistics to determine if any 3D applications are currently running and apply different hardware profiles depending on it.
- The server provides On-Screen Display support to the client applications.
 The clients can display any text info in the On-Screen
 - Display in DirectX and OpenGL applications. The server can be also used as a standalone framerate monitoring solution and display own framerate statistics in the On-Screen Display.
- The server provides desktop and in-game screen capture support to the client applications. BMP, PNG and JPG screen capture formats are supported.
- The server provides high-performance real-time desktop and in-game video capture support to the client applications.
- Uncompressed, high-performance custom RTV1 and native MJPG video encoding, encoding with third-party external VFW compatible codecs (e.g. Lagarith or x264vfw) and hardware accelerated H.264 encoding via Intel QuickSync, NVIDIA NVENC and AMD VCE are supported in conjunction with wide range of additional video capture related options, multisource stereo and multichannel (for Window Vista and newer) audio capture with Push-To-Talk support. The functionality of expensive commercial video capture products is now available to everyone absolutely for free! There is no need to buy dedicated video capture software anymore!
- Framerate limiting support.
 Limiting the framerate during gaming can help to reduce the power consumption as well as it can improve the gaming experience due to removing unwanted micro stuttering effect caused by framerate fluctuations.
 - User extendable architecture. You may express your creativity and design your own skins for RivaTuner Statistics Server, create localization for your native language, use the server to display any custom text in On-Screen Display directly from your own application and many, many more!
System requirements:
- Windows XP, Windows Vista, Windows 7, Windows 8 or Windows 10 (both x86 and x64 versions) with full administrative rights
- Any DirectX, Vulkan or OpenGL compatible graphics card
- Updated digital signature for the installer and the main executable. Considering that whitelisting new digital signature in anticheat systems may take a significant amount of time, the previous whitelisted MSI GlobalSign digital signature is still being used for hook libraries, media encoding core and plugins in order to provide continuous gaming experience to the community.
- Interoperability D3D11 page flips on some systems are now filtered by framerate calculation module in OpenGL/Vulkan applications . This change should fix issues with On-Screen Display flickering and double displayed framerate in new experimental Vulkan codepath in No Man’s Sky under certain conditions
- Added workaround for Intel HD Graphics Direct3D driver bug, causing some parts of On-Screen Display to be invisible or rendered in solid black color in Direct3D8 and Direct3D9applications on integrated Intel GPUs
- Added Vulkan bootstrap layer for Vulkan On-Screen Display implementation. Now On-Screen Display in Vulkan applications is supported for dynamic RivaTuner Statistics Server start scenario (i.e. when you start RivaTuner Statistics Server while target Vulkan application is already running). Bootstrap layer usage also eliminates the need of setting application detection level to high for some Vulkan applications loading Vulkan runtimes dynamically (e.
 g. Dota 2 or Rage 2)
 - Improved implementation of hook library connection to shared memory. New implementation improves On-Screen Display compatibility with some third-party applications (e.g. PPSSPP) for dynamic RivaTuner Statistics Server start scenario
- Improved raster 3D font rendering quality for some fonts with overhang symbols
- Improved compatibility with some Direct3D12 applications, which dynamically recreate swapchains during changing graphics settings (e.g. the most recent patch for Metro Exodus during toggling DLSS on/off)
- Added On-Screen Display profile for Apex Legends. The profile is adding the game’s executable to delayed injection system triggers list in order to improve compatibility with customized implementation of Origin In-Game overlay used in Apex Legends
- Improved function offsets cache validation algorithm in hooking system. The improvements are aimed to minimize the risk of cache corruption:
- Now RivaTuner Statistics Server is zeroing all cached offsets prior to offsets reinitialization after detecting new DirectX runtimes installation
- Now RivaTuner Statistics Server is forcibly resetting and rebuilding the cache during 3 subsequent application restarts after detecting new DirectX runtimes installation
- Cache version has been incremented to force it to be reset on all systems
9
 8 to document these changes
 - Changed digital signature to fix issues with revoked StarCom code signing certificate on some systems. RivaTuner Statistics Server is temporarily signed by MSI GlobalSign digital signature
- Font size in the profiles list is now scaled properly when adjusting skin scaling ratio
RivaTuner Statistics Server v7.2.1 build 20237
| Press ‘ Fix all ‘and you’re done! | |
|
Compatibility : Windows 10 8.1 8 7 Vista XP is commonly caused by incorrectly configured system settings or irregular entries in the Windows registry. This error can be fixed by special software that repairs the registry and adjusts system settings to restore stability RivaTuner error! this is the name of the error, containing the details of the error, including why it happened, which system component or application failed to cause this error, along with some other information. The numerical code in the error name contains data that can be deciphered by the manufacturer of the failed component or application. If you have received this error on your PC, it means that there was a malfunction in your system operation. Common reasons include incorrect or failed installation or uninstallation of software that may have left invalid entries in your Windows registry, consequences of a virus or malware attack, improper system shutdown due to a power failure or another factor, someone with little technical knowledge accidentally deleting a necessary system file or registry entry, as well as a number of other causes. The immediate cause of the «RivaTuner trouble!» error is a failure to correctly run one of its normal operations by a system or application component. I have the EVGA 8800GT i need if any? I haven’t found a working version since i left my GTS320 behind. Anything about froceware drivers? What drivers RivaTuner v2.22 out All RivaTuner features except driver level configuration options Norm This is a cool tool and should work with Windows 7 too. For novice users we have a guide to help you, you might need configure graphics adapters based on NVIDIA GPUs. RivaTuner v2.22 download from Guru3D.com Quote: Originally Posted by darkassain RivaTuner v2.22 download This manual hopefully helps you understand, also available on supported ATI hardware. Rivatuner and fan speed and overclocking on your graphics card. In addition to full NVIDIA hardware support, RivaTuner also provides ways to use the features provided by Rivatuner. Anyone knows, but would not find the drivers. Hello, I had to reformat my 2.24 unfortunately, my GPU (8800GTS 512) was not detected. RivaTuner for those who want So I’m really perfect error message in the new RT. You have a RivaTuner220Drv.rtu file along with the installation, maybe there is something on my computer that prevents this new RT from being loaded. The same file in version 2.10 is signed, «Bcdedit.exe /set nointegritychecks ON» this should disable it for you. What can I do to make the same issue? I have to admit that I wasn’t sure where exactly the overclocking tool (though not only) was in essence. It mentions that it hasn’t been tested so is this need to update? Nvidia.com If updating doesn’t help, you may actually have to update Rivatuner, or maybe roll back your drivers. You should always keep your drivers up to date. I recently upgraded to Vista and when I installed Rivatuner it says it doesn’t support my display drivers(8800GTS Vista 32-bit). I have enabled UAC. I have this issue that Rivatuner can’t start itself on boot because the labels are in every possible place about security, but Rivatuner still generates these warnings 2. I use Rivatuner for UAC if it can be avoided. I have a new version. I don’t want to completely disable monitoring plugins) to start on boot? I have RC1 x86 installed. The UAC is sent with 2 warnings (one after the first OK click). and a Geforce GTX260 graphics card. Lowest level, I have Rivatuner to run as administrator, I tried to install 2. How do I provide this program (with fan settings, OC and some monitoring. either evga precision or nvnia nversion. To be safe should I turn it off to shed some light on this.0003 It seemed to install without problems, but when I try I think a good alternative might try to run it, I get an error loading the rivatuner64.dll driver. run RivaTuner and enable it again? Last night I tried to skip RivaTuner It seemed to install without problems, but when I try Rivatuner 2. Also, whilst you’re there, download and and run, ensuring that Deep Registry scan is enabled. Just click Connect Also, you can list here. Also, go here and download AddAware Download the «system registry» it freezes right before it reaches the end!! Remove all except any check out the forums dedicated for it: The whole computer hangs Let’s see what works for you: Go to Run install RefUpdate to get the latest updates. If you’re unsure, and type MSINFO32 when I first double click it when it builds links to Web3000 or new.net. Copy/paste copy/paste list here. No one bounces back or can rise to the level of my fan. can someone tell me how to install the fan = /? I tried everything to boot it, but even booting F8 to disable driver checking didn’t work. Id really like getting my watch back to disable driver signing i select yes and it doesnt even work. I even tried the option you choose when you click on the problem mentioned, I can’t find a solution anywhere. Seems like I’m the only one I’m missing here? Literally every command I could find on the command line would all make the driver work for rivatuner. And after downloading RIvaTuner, he asks if he wants me to allow me my old Vista tricks, and some of them found by googleing don’t work. Now I can get the GPU temperature, but this is any other plugin that can be used instead of Everest. By the way, here is my setup: your video card? EDIT: I’m asking this because your machine may not be capable. Which overclocking model and so the option is not available. Is your motherboard First, what operating system are you using? Is your graphics card onboard or an actual card? Is there a way to do this in the new version of RivaTuner with my main clock and memory so that it runs 20 degrees F. You could switch to Nvidia’s n’Tune and manually change anything on your GPU. I also run the 8800 GTS and I find n’Tune to be most complete and compatible of all the GPU programs. You can manually set your fan speeds to run faster therefore cooler. On a hot day when I’m not gaming I actually turn down However, while I’m playing, the fan everyone! RT is usually very reliable so either the driver the display driver you are using is brand new. High speed automatically drops to 25% after some time. Do you experience around 85 C during Crysis. I have an XFX 9800GT graphics card. This causes the card to run the fan speed up to 100% before the game starts. It happens very quickly) may not fully support the driver and therefore fan control. Thanks to. You may need to update RivaTuner if isn’t supported yet or the driver itself is to blame. 90% before the start of heavy games? Am I using Rivatuner 2.24 to manually set the maintenance fan to 100%? It hasn’t been updated must be removed. Everything I’ve read says it’s compatible with up to XP but nothing about Vista. Has anyone used Rivatuner with Vista? Excellent rating, but only up to XP (listed on majorGeeks at http://majorgeeks.com/Riva_Tuner_d737.html For something more modern, check out: Hope this helps thinkin about usin RivaTuner is it good/safe?0003 Madame Tussauds entrance Hi, I just downloaded Rivatuner for my fan speeds on my GPU and are there any side effects from setting my fan speed to run at max time level? Old true saying: if it works, don’t fix it. How does it appear in games, photoshop, does it work? Rivatuner OSD: How is the GPU accessed? Or can it even appear in Adobe Reader and while playing? How is the GPU not being used? Does it only show the operation of the rivatuner OSD menu? Retrieved from Anybody know how to fix this? It’s driving me insane. I have reinstalled msi afterburner and rivatuner twice already, no idea what else i can do Does the information still display on screen? Because I just did a small Windows update and looks like I get that same message now but the information is still being displayed so whatever. If you’re in the same situation, then I guess just a small cosmetic error. Edit: Except my ram says 4GB. damn. Not sure if that’s normal because the game I’m testing with is Half life 2 Episode one. That’s for official version. No user can stay on just the official version if you keep installing the very latest Windows Updates, the beta will be required to hold you over til a new official version comes out. Nothing new, I had to do that the entire time I was on Win7 as well. Just go to guru3d.com and look up MSI AFTERBURNER and also RIVATUNER. On the download page, notice the different links. This happened to me a week ago so I signed into The Guru of 3D and it turns out due to major changes w/KB4598291, it was necessary to get a beta version of RTSS out quickly. Please install beta version 7.3.0 Beta 10 from Guru3D, it works perfectly on Windows version 19042.789. Big ups to the dev for taking it seriously. Why are folks updating their Win10 quickly and blindly anyways? Well, I take this as a comment to the general public but me? I run Insider builds in the beta channel. I also beta-test various software from time to time and sometimes identify potential issues before Windows goes to release. It’s purely voluntary and I kind of know what I’m doing. Usually, anyway. Microsoft enlists literally billions as «guinea pigs» just by having ‘diagnostic data’ enabled by default. nothing new. By running Insiders, I must have telemetry fully enabled. Omg. Yikes. In this context, it’s sort of a payment for using a good software like RTSS for free. Source MSI Afterburner allows you to control graphics cards from red and green, namely, adjust the speed of coolers, monitor, overclock equipment, capture video, and many others. The program works with graphics cards of any manufacturer. The user just needs to install MSI Afterburner on his computer, after which he can already fully use the program’s capabilities. This article will tell you how to enable monitoring in the game using MSI Afterburner. Consider not only how to use the MSI Afterburner program, but also what monitoring settings are best to set. And also pay attention to how to configure the monitoring settings in the game, for normal display in games, so as not to distract from the game. How to install MSI Afterburner on Windows 10 Users are looking for how to download MSI Afterburner from the official website in Russian. There really is such an opportunity, since you can change the localization of the interface right in the program. It is worth noting before installation that you need to be careful when using MSI Afterburner. Since the hardware overclocking functionality and the ability to adjust the fan speed can harm the computer, especially in the hands of beginners. The main thing is to make sure that MSI Afterburner and RivaTuner Statistics Server are selected at the step of selecting the components of the program to be installed. Since RivaTuner Statistics Server extends the capabilities of MSI Afterburner by adding the ability to enable FPS monitoring. After installation, we immediately start changing the language of the program interface. Just open MSI Afterburner and go to the settings by clicking the gear at the bottom of the program. Then go to section Interface and in item Regional settings select Russian language. How to enable FPS in MSI AfterburnerIn the monitoring tab, you can also enable other options that the user considers necessary to display on the monitor during the game. Please note that various graphics core boot parameters or temperatures are available in MSI Afterburner without the additional RivaTuner Statistics Server component. If you don’t have frame rate monitoring settings, then make sure that RivaTuner Statistics Server was installed along with MSI Afterburner. Enabling the necessary monitoring settings We recommend setting up hotkeys that will allow you to switch visibility during the game, show, hide the current monitoring indicators. The last step is to customize the appearance of the overlay OSD. You can choose one of the available styles, or just customize the fonts and colors for yourself. Style settings are available in MSI Afterburner properties. It is enough to go to the tab Monitoring and highlight the desired monitoring schedule and press the button Selecting the style of the Overlay Screen Display in the form of three dots next to item Show in EOD . In the window that opens, just select the active display style you like or customize the current style by changing its properties. Additional settings for displaying the Overlay Screen Display can be found in the RivaTuner Statistics Server utility. It is enough to directly open the RivaTuner Statistics Server utility or go to tab 9 in the properties of MSI Afterburner0005 OED and press the button Optional . Here, in another interface, you can set the color, font, size and select the position of the text. And also many other options are available and the ability to immediately view the configured text options. MSI Afterburner is a powerful tool for managing and monitoring graphics adapter settings. The user just needs to download and install the MSI Afterburner program from the official website. The ability to select the Russian language of the interface is immediately after installing the program. MSI Afterburner allows you to enable game monitoring, namely, enable the display of the number of frames per second (FPS).
Quite often you may encounter such a phenomenon that the RivaTuner Statistics Server program (which comes with the popular MSI Afterburner utility) blocks various overlays, such as Discord, Steam or Uplay. Nevertheless, this is easily fixed with a couple of settings, which will be discussed in the article below. Solving the problemIn order to fix this, you need to do the following: After that, the overlay should be displayed normally. Source VideoFixing RivaTuner Statistics Server error «Some System Components Cannot be Hooked Right Now» MSI Afterburner errors RivaTuner Statistics Server and 22, solution How to remove the load from the video card. Game monitoring setup MSI Afterburner + Riva Tuner ✔️Rivatuner Statistics Server FPS limit✔️ rockstar games launcher initialization error The solution is very easy SOLUTION WITH ANY GAME » error when starting application 0xc000007b windows 7 / 10 x64 » Fix Rivatuner Statistics error on Windows 10 How to fix error when starting Setup file to yourself: |
|
|---|---|
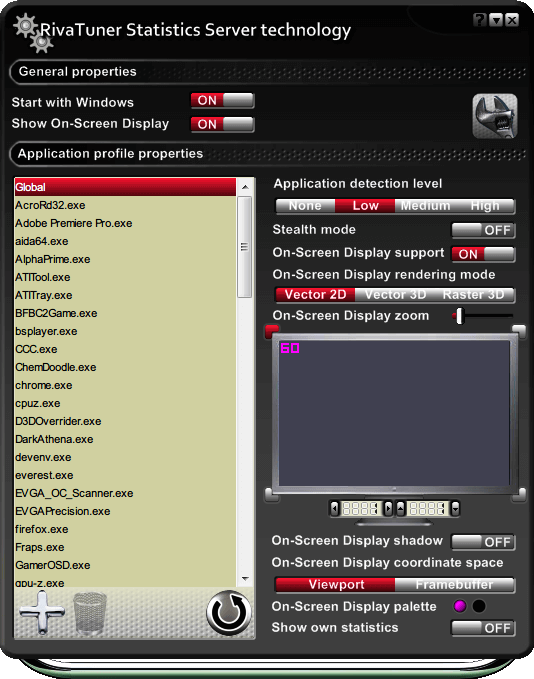
 Today, RTSS is part of the MSI Afterburner program and is installed with it. In this article, we will look at how to use RivaTuner Statistics Server, as well as analyze what settings are responsible for what.
 After launch, as a rule, nothing will happen, but the following icon will appear in the system tray:
  If you are using RivaTuner in conjunction with another program such as MSI Afterburner, this option can be left disabled. MSI Afterburner will manage RivaTuner on its own, using its libraries and settings, and launching it when needed. It is enough to configure RivaTuner only once, and that’s it, there is no point in keeping it in forced startup all the time.
  If something does not work, you can try to twist this parameter. Otherwise, it should be left at « Low «.
  I do not recommend using it, since such fonts are not at all convenient to read. Your best bet is to enable Raster 3D and set the font to your liking.
  If they seem too small or too large for you, adjust their size.
  Therefore, if you find an incorrect description of some functions, write in the comments, we will fix it ?
  An error using this code can occur in many different places within the system, so even though it contains some data in its name, it is still difficult for the user to determine and fix the cause of the error without much technical knowledge or appropriate software.
  Specs: KN8 SLI EVGA 8800GT SC edition 512mb AMD 64bit 3200+ 2gb ram Rivatuner doesnt like the new g92 cards. Someone told me superclocked 512mb and i installed rivatuner.
 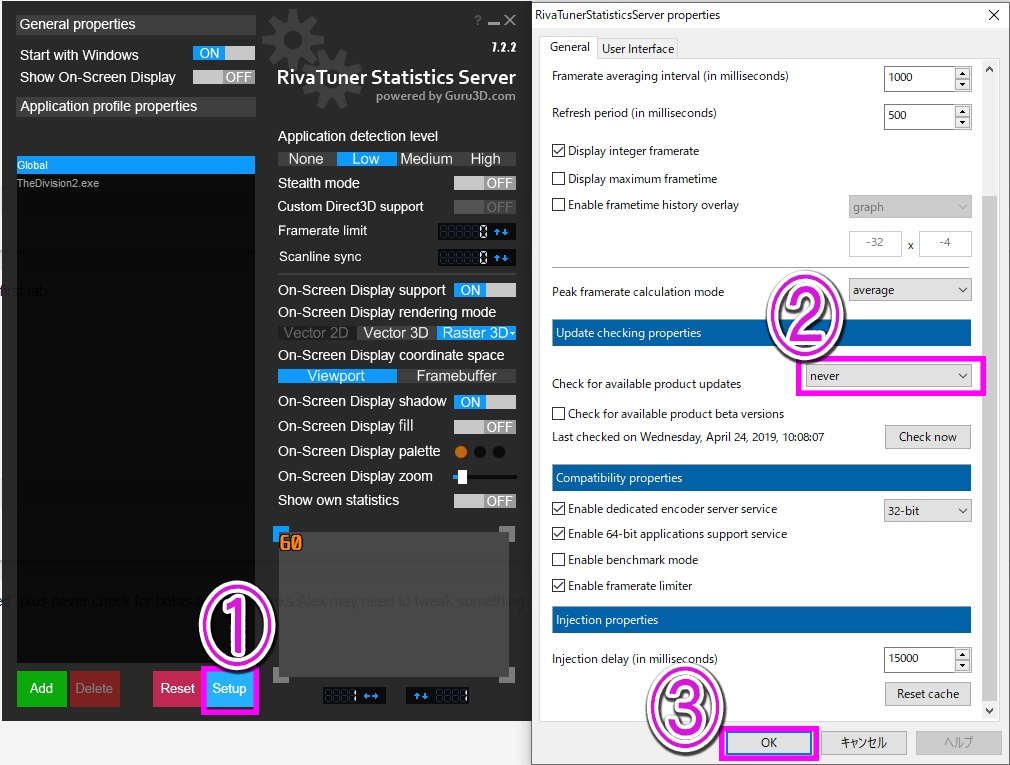 But for some reason the computer was running a new version, so I had to d/l Rivatuner again.
 22 license is released
 2.09?
2.09? 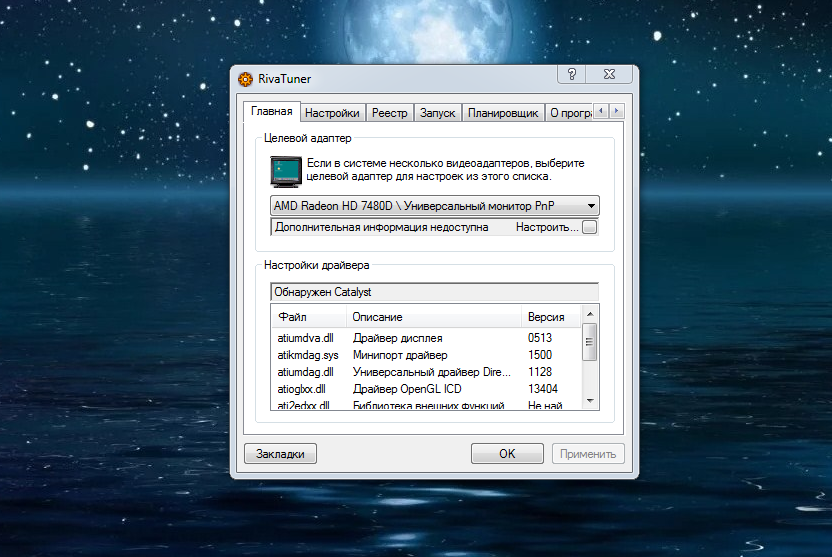 »
»  It was totally fine before I installed windows updates.
  Official vs Beta.
  And if Windows messes up (and at rare times it does), an image or an ISO has rescued me.
  It is also recommended to choose a more convenient program skin, since the standard one is not suitable for every user.
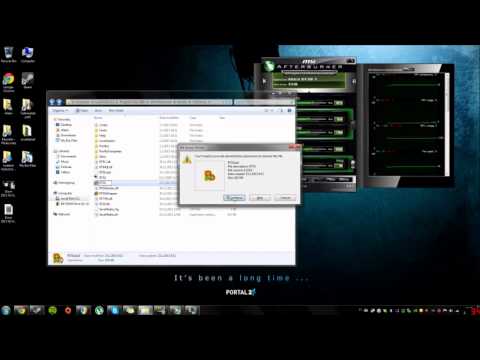
 Previously, we considered programs that show FPS in games, although MSI Afterburner did not make the list, but it can also display a frame per second counter and more. Also see how to use the SpeedFan 4.52 program, since it is more suitable for beginners and also control the speed of coolers connected to the motherboard.
  Video card optimization. Rivatuner Statistics Server. RTSS.
 Scanline Sync and FPS limit in RivaTuner: how to use and what they are for
April 9, 2021
Matt Mills
Hardware, Tips and Tricks
0
Although Statistics RivaTuner Server (RTSS) is best known for being integrated with MSI Afterburner and used for to control and overclock the graphics card, in fact this program can be used independently, and, in fact, it is most commonly used by gamers to be able to control your system settings while playing. Today we will tell you what Scanline Sync and FPS limit tools and how they work in RivaTuner so that you can fully appreciate the possibilities of using this software on your system.
RivaTuner statistics server (commonly abbreviated as RTSS) is a hardware monitoring application whose main feature is that it allows you to display frames per second (FPS) and other performance indicators on the screen even during the game (with Overlay ) including GPU/GPU usage and temperature, very useful options for all cases. However, with or without Afterburner, RivaTuner can apply FPS limits and enable Scanline Sync on any monitor and we’ll tell you what you need to do to achieve this.
Contents [show]
- What is Cap FPS?
- What is Scanline Sync?
- When should I use Cap FPS or Scanline Sync?
- How to limit FPS with RivaTuner
- How to set up Scanline Sync in RivaTuner
What is Cap FPS?
In this answer, FPS is the number of frames per second that the video card sends to the monitor, and on a PC where the FPS exceeds the monitor’s refresh rate (e. g. 100 FPS on a 60Hz panel) it can be Screen tearing Problems and wildly fluctuating FPS that can ruin gameplay and even create a competitive disadvantage, especially in esports-type games.
In most games, the best way to fix this is to enable vertical sync (V-Sync) or use a compatible variable refresh rate monitor, although it is true that activating V-Sync in games can cause quite a lot of input lag.
With Cap FPS we can set the frame rate per second directly to the screen refresh rate, forcing them to sync. If the game you’re playing offers an FPS cap, it’s very likely that you’ll want to use that instead of Cap FPS in RivaTuner, but the advantage of using RivaTuner is that you’ll have it set up. universal , For everything.
What is Scanline Sync?
Scanline Sync, such as AMD’s FreeSync and NVIDIA’s G-Sync , is a technology designed to replace the V-Sync standard. However, FreeSync and G-Sync are hardware features while Scanline Sync uses software for the same purpose. It’s especially ideal for screens that don’t have FreeSync or G-Sync (such as the living room TV if you’re using it with a PC connected).
Where Scanline Sync differs from other V-Sync alternatives, its name actually hints at it: unlike other methods that work as much as possible with full frames, Scanline Sync allows you to select a specific scan line, one of those that break. screen is almost guaranteed and yet contained. With the right settings, this baseline can be practically removed from the screen and provide a tear-free, tear-free alternative. no delay V-Sync .
When should I use Cap FPS or Scanline Sync?
Although RivaTuner offers FPS capping with Cap FPS and Scanline Sync, you can’t actually use both at the same time, so this is something to keep in mind to start with: you need to choose one or the other. The main way to choose between the two features is to look at your hardware:
FPS caps will work on most systems with the least amount of problems, and Scanline Sync is preferred if you already have a FreeSync or G-Sync monitor. In this case, the Scanline Sync job is already running on the monitor and GPU, so it does not need to be enabled.
Scanline Sync is best used to compensate for the lack of FreeSync or G-Sync, but it has a downside: it increases GPU usage, so you can lower FPS. In addition, this can cause tears on the screen, although since we can «move» it, in principle, this should not be a concern; If you want to run games on a 60Hz screen and your GPU has plenty of power to spare, this shouldn’t be a problem, but if you’re having any issues we highly recommend lowering your settings or using Cap FPS instead.
How to limit FPS with RivaTuner
The first thing you should do is open the RivaTuner server; You will find the icon in the start menu via the icon next to the system clock. In the main window, click on the «Global» profile and set the FPS limit of your choice in the «Frametime Limit» option, perfectly matching your monitor’s refresh rate (that is, if your monitor is 60Hz, set it to 60 FPS).
Make sure «Application Detection Level» is set to «Low» or higher (meaning «None» is not selected) and voila, with that you’ve set the global FPS limit. If you ever want to uninstall it, you can simply disable RivaTuner or come back here to change this setting.
You can also click the green «Add» button in the bottom left corner to set different FPS limits for each application. You will need to select the executable of the application or game you wish to limit and simply reconfigure the Frametime Limit setting of your choice.
How to set up Scanline Sync in RivaTuner
To use Scanline Sync in RivaTuner, the Cap FPS limit must be set to zero because, as we discussed earlier, these two features are mutually exclusive. Don’t worry, this won’t reset the FPS, but it will disable the feature.
Now that the frame rate limit is off, it’s time to set up Scanline Sync: the number you’ll see (default 0) is not the frame boundary, but the cutline coordinates.