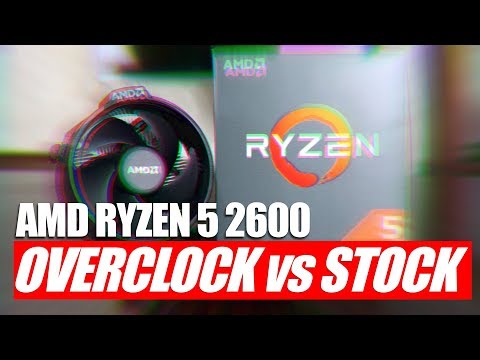
Ryzen 5 overclocking the 2600. — Evil’s Personal Palace — HisEvilness
This is a comprehensive and easy to use guide with illustrations to overclock the Ryzen 5 2600 CPU from AMD. This guide will cover the whole manual overclocking process and a quick guide for Precision Boost Overdrive 2.0 an auto overclock feature.
Introduction and components.
This will be the overclocking process for an AMD Ryzen 5 2600 on an ASUS X370 motherboard. This guide mainly covers the manual overclocking process as using AMD Precision Boost 2.0 yielded little results. AMD PBO 2.0 is covered in this guide for those unwilling to manually overclock their Ryzen 2600. When using a motherboard from a different manufacturer the voltages, core frequency and settings remain the same but might be found under a different naming convention. Depending on the quality of the board not all options might be present so mileage may vary in that regard.
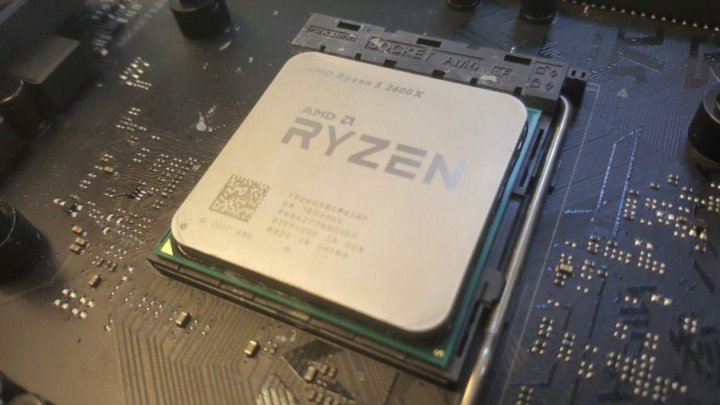
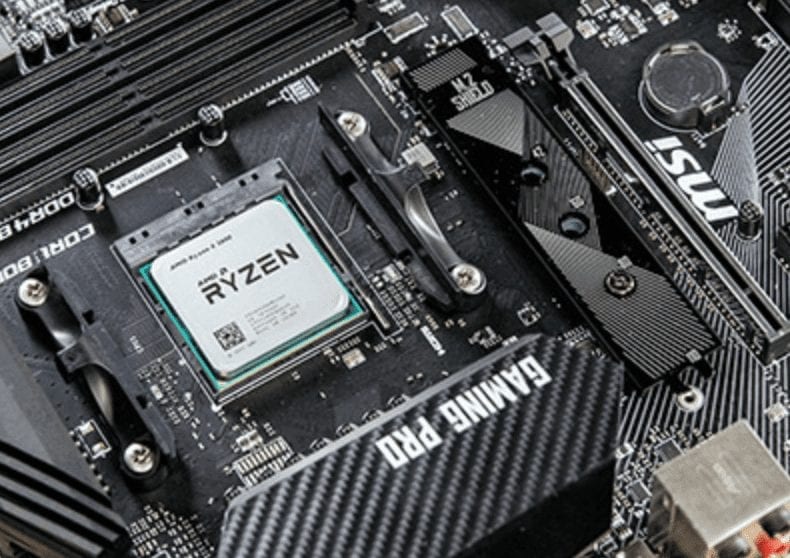
- CPU: AMD Ryzen 5 2600.
- Cooler: Gelid Phantom Black
- Motherboard: ASUS X370-F Gaming.
- RAM: G.SKill F4-3200C14D-16GTRS, 3200Mhz 12-12-12-28.
- GPU: ASUS Strix RX 570.
- EVGA G2 SuperNova 750.
Getting Started with overclocking the AMD Ryzen 5 2600.
Make sure you have the latest chipset drivers and other drivers for your current setup, Using outdated drivers may cause instabilities not related to your overclocking. Consider running a synthetic benchmark with stock settings to measure your gains. As well as if you intend to do any gaming have a baseline of FPS so you can see the increase.
You also want to download the following programs for stress testing your overclock. These are a vital tool for stress testing and monitoring if you already have tools you can use those but these programs I highly recommend and were used while writing this overclocking guide.
- HWiNFO64: HWiNFO64 monitoring tool download section
- Prime 95: Prime 95 stress test download section
- Linpack Xtreme: Linpack Xtreme stress test download section
BIOS Settings.

Zen + is a great improvement over the Zen 1 architecture so running DDR4 can be done with a QVL XMP profile. The ASUS ROG Strix X370-F Gaming is only validated for 3200 MHz but a good kit of 3466 MHz with Samsung B-die, Micron E-die or Hynix C-die(CJR) should be no problem. Important to note here that it is the Infinity Fabric that is unstable not the actual memory kit. However, higher speed kits might not run at the rated XMP speed it is therefore wise to test out any RAM kit first before applying any CPU overclock. If you can not run the rated speed, set a base speed of 2133 MHz. In the case of doubt stick to the QVL for your motherboard, a list of validated RAM kits can be found on the website for your motherboard vendor.
Ryzen 2600 and Precision Boost Overdrive 2.0.
This is an AMD automatic overclocking feature while this did not return the results hoped for it was included in this guide to make it complete. For the best results ensure you have a 3rd party cooler and good case airflow.
There some settings in the BIOS that can be adjusted to use AMD’s Precision Boost Overdrive 2.0 to gain the best results some tweaks are needed for a longer boost duration and overriding some limitation from within the BIOS.
- Precision Boost Overdrive: Set to manual to adjust settings.
- PPT Limit: The maximum for your motherboard by simple entering 99999 it will autocorrect to the maximum value for your particular motherboard.
- TDC Limit: The maximum for your motherboard by simple entering 99999 it will autocorrect to the maximum value for your particular motherboard.
- EDC Limit: The maximum for your motherboard by simple entering 99999 it will autocorrect to the maximum value for your particular motherboard.
- Precision Boost Overdrive Scalar: Increase the maximum boost voltage and time when using that particular boost value. For this motherboard Scalar 1 ~ 7 used a save voltage
- Custom Precision Boost Overdrive Scalar: Scalar multiplier use a value of 7 or less.
- Max CPU Boost Clock Override: Maximum value for Core Boost use the highest setting.
- Platform Thermal Throttle Limit: Set to Manual.
- Platform Thermal Throttle Limit*: Set to thermal value in Celcius, use 80 ~ 90.
DIGI+ VRM Settings Ryzen 2600.
These setting are important when preparing for overclocking your CPU and RAM. For this guide, only the CPU settings are important but there is a short run down for the SoC domain for memory overclocking. One important note here that Load Line Calibration(LLC) is set to level 4 with a max of level 5. This means there is a slight Vdroop under load with level 4, level 3 and lower will generate an even bigger Vdroop for this particular VRM.
- VDDCR CPU Load Line Calibration set to level 4, lower resulted in instability in my case yours could be different.
- VDDCR CPU Current Capability to 130%, in short, how much power it can draw over the baseline of 100% to 130%.
- VDDCR CPU Switching Frequency to 300, a higher frequency tends to be a waste of power.
- VDDCR CPU Power Duty Control set to extreme.
- VDDCR CPU Power Phase Control set to extreme.
- VDDCR SoC Load Line Calibration set to Auto unless you want to or are using an FCLK or MCLK overclock.
- VDDCR SoC Current Capability set to Auto unless overclocking FCLK or MCLK then this can be set to 120%.
- VDDCR SoC Switching Frequency set to Auto unless overclocking FCLK or MCLK a value of 300 can be entered.
- VDDCR SoC Power Phase Control set to Auto unless overclocking FCLK or MCLK then it can be set to extreme.
AMD CBS & Precision Boost Overdrive.
There are 2 sections with some settings that will need to be turned off. These settings will hamper any manual overclock and may cause instabilities. Unless you want to use the AMD Precision Boost Overdrive feature as described in the above section.
- Core Performance Boost: Off
- Global C-State: Off
- Precision Boost Overdrive: Off
Under AMD CBS turn off Core Performance Boost and Global C-State Control as shown in the image below.
Then go to Precision Boost Overdrive and turn that off as shown below in the image.
Ryzen 2600 VDDCR Core Volts.
This is the overclocking part and the same voltage can be used to overclock both the 2600 and 2600X. Make sure you use save voltages for daily use in this case the consensus online is 1.38v for the CPU voltage. This used to be 1.40v however some Reddit users have commented on their CPU’s degrading with voltages exceeding 1.38v. Higher voltages can be used for short term use with proper cooling for benchmarking and records.
- AMD Recommended Voltage: 1.300 to 1.350 volts.
- Community Recommended Voltage: 1.350 to 1.400 volts.
- Absolute max and not recommended: 1.
 400 to 1.500 volts.
There are 2 settings here that will be used the CPU Voltage(VDDCR CPU Voltage) and the CPU Core Ratio. For the core, voltage either use a Manual or Offset Mode voltage. Manual is easier to use and will be used for this guide. Offset Mode offers better granular control over voltage ensure however you keep withing save voltage limits.
SoC voltage does not apply with CPU overclocking it is used for FCLK(Infinity Fabric clock speed) and MCLK(Memory clock speed). If you experience instability from memory or infinity fabric tweaking this voltage can be helpful. A more in-depth guide for memory overclocking covering AMD and Intel systems link here: DDR RAM Overclocking Terminology FAQ & Overclocking Guide for DDR4 RAM. If you have QVL or none QVL memory and have instability issues with running the XMP profile reference this guide: How to stabilize DDR4 with Infinity Fabric
Since no PC build is the same start off with the highest recommend CPU voltage by AMD of 1.![]() 350v. This will also work for the AMD stock cooler but expect more fan noise then over more robust cooling like the Gelid Phantom Black used when writing this guide. Next is the CPU Core Ratio an easy overclock would be 4.0Ghz to achieve that fill in 40.00 in the CPU Core Ratio section. Save and exit and boot into Window. Now to confirm the overclock is stable either run Prime95 or Linpack Xtreme. For Prime95 use Small FFTs and have it run for at least 10 minutes. Linpack Xtreme you want to use the Stress test, use half the of the total capacity of your RAM using all cores and threads with at least 3 stress test runs. While doing so keep an eye on HWiNFO64 on core voltages and temperatures.
350v. This will also work for the AMD stock cooler but expect more fan noise then over more robust cooling like the Gelid Phantom Black used when writing this guide. Next is the CPU Core Ratio an easy overclock would be 4.0Ghz to achieve that fill in 40.00 in the CPU Core Ratio section. Save and exit and boot into Window. Now to confirm the overclock is stable either run Prime95 or Linpack Xtreme. For Prime95 use Small FFTs and have it run for at least 10 minutes. Linpack Xtreme you want to use the Stress test, use half the of the total capacity of your RAM using all cores and threads with at least 3 stress test runs. While doing so keep an eye on HWiNFO64 on core voltages and temperatures.
This should have passed either test you can now decide to keep the overclock at 4.0Ghz and tune the CPU voltage. The overclock of 4.0Ghz used in this guide used 1.269v with Load Line Calibration 4. If you want to go higher and go for 4.1Ghz then boot back into the BIOS and adjust the CPU Voltage to 1.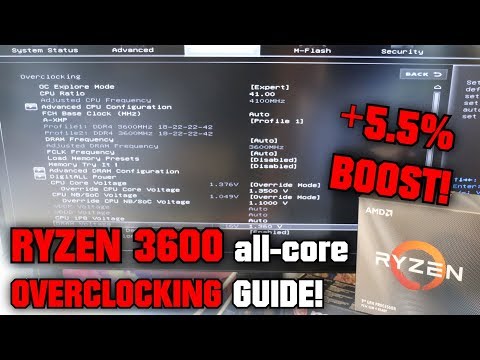 38v with a CPU Core Ration of 41. This particular 2600 did not reach 4.1Ghz with a save voltage while it passed Prime95 it did not pass the Linpack Xtreme stress test so is not deemed 100% stable. In this case. the overclock was tuned the voltage for 4.05Ghz for daily use. And passed Prime95 and Linpack Xtreme stress testing.
Stability Testing.
Once you have set on a overclock for daily use and make sure it does not exceed 1.38v ~ 1.4v for daily use you want to do a final stability test. This is the final test to ensure you are 100% stable on the CPU overclock before moving on to for instance memory overclocking.
- Prime95: Complete a 2 hour Small FFTs or Custom 8K FFTs(synthetic gaming load)
- Linpack Xtreme: Complete at least 10 stress test runs with half of the total RAM capacity using all cores and threads.
Ryzen 2600 Voltage Curve.
This is the voltage curve for this AMD Ryzen 2600 and it will be different per CPU.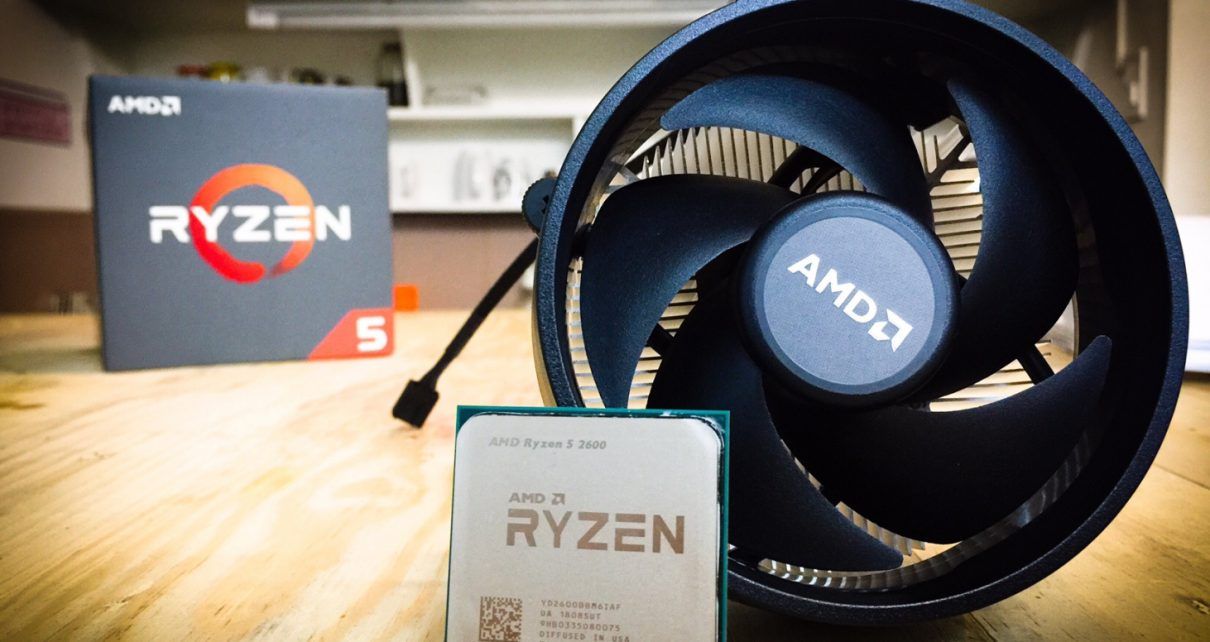 The main take away is that with the Ryzen 5 2600 the voltage wall is around 4.1 GHz. Important to note here again that more than 1.4 voltage is on the limit for Zen+ daily used and more then 1.38v is not advised.
2600 @ 3.95 GHz.
- 39.50 Core Ratio.
- VDDCR @ 1.212v
- CPU LLC 4
- SOC LLC Auto
- Validation with P95 Small FFT’s and Custom 8K FFT’s.
2600 @ 4.00 GHz.
- 40.00 Core Ratio.
- VDDCR @ 1.269v
- CPU LLC 4
- SOC LLC Auto
- Validation with P95 Small FFT’s and Custom 8K FFT’s.
2600 @ 4.05 GHz.
- 40.05 Core Ratio.
- VDDCR @ 1.369v
- CPU LLC 4
- SOC LLC Auto
- Validation with P95 Small FFT’s and Custom 8K FFT’s.
2600 @ 4.10 GHz.
- 41.00 Core Ratio.
- VDDCR @ 1.463v
- CPU LLC 4
- SOC LLC Auto
- Validation with P95 Small FFT’s and Custom 8K FFT’s.
— Paul «HisEvilness» Ripmeester
Overclocking & Test Setup — AMD Ryzen 5 2600 CPU Review: Efficient And Affordable
Skip to main content
When you purchase through links on our site, we may earn an affiliate commission. Here’s how it works.
6 cores for a budget price
Why you can trust Tom’s Hardware
Our expert reviewers spend hours testing and comparing products and services so you can choose the best for you. Find out more about how we test.
Overclocking
So far, all of the Ryzen 2000-series CPUs we’ve tested offer similar overclocking capabilities, albeit with slightly different voltage requirements. We pushed AMD’s Ryzen 5 2600 to 4.2 GHz using 1.4V Vcore, 1.2V SoC, and automatic Loadline Calibration (LLC) settings. The bundled heat sink and fan are capable enough if you’re only gunning for a moderate overclock. However, it struggled to maintain 4 GHz at 95°C. If you want to match our best effort, top the 2600 with a capable closed-loop liquid cooler.
Like the other Ryzen 2000-series CPUs we’ve reviewed, we overclocked this platform’s memory (DDR4-3466 at 14-14-14-34 timings) with minimal effort.
Precision Boost Overdrive
- AMD Ryzen 5 2600 (AMD Ryzen 5) at Newegg for $79.30
AMD isn’t giving us much detail about its Precision Boost Overdrive feature, though we know it increases maximum boost voltage and boost duration. Nevertheless, we know that Precision Boost Overdrive is an AMD-sanctioned feature. Because this is a standard capability for Ryzen 2000-series processors, we leave it enabled. Conversely, we disable the Multi-Core Enhancement BIOS option found in many Intel-based motherboards because it overclocks beyond the company’s specifications.
MSI X470 Gaming M7 AC
Our MSI X470 Gaming M7 AC has a PCI Express 3.0 slot with a x16 link, a slot with a x8 connection, and another PCI Express 2.0 slot with a four-lane link for graphics cards. Its four RAM slots support DDR4-2933 and scale quite a bit higher through overclocking.
The motherboard also provides two M.2 slots with PCIe connectivity. The I/O panel has a USB 3.1 Type C connector. The USB 3.1 and USB 3.1 Gen 2 ports support fast charging for smartphones and tablets. If RGB is your thing, MSI has you covered. The integrated RGB Mystic lighting allows customizable effects with several software-controlled zones.
Comparison Products
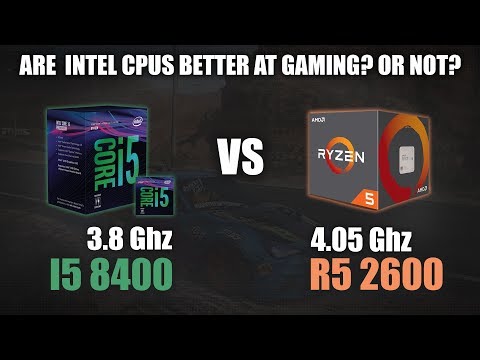
Intel Core i5-8400
Intel Core i5-8600K
Intel Core i7-8700K
Test Systems
Swipe to scroll horizontally
| Test System & Configuration | |
| Hardware | AMD Socket AM4 (400-Series)AMD Ryzen 7 2700, Ryzen 7 2700X, Ryzen 5 2600X, Ryzen 5 2600 MSI X470 Gaming M7 AC2x 8GB G.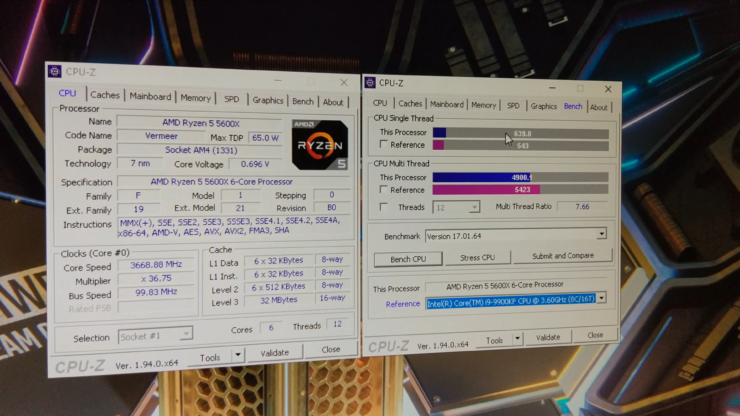 Skill FlareX DDR4-3200 @ DDR4-2933, DDR4-3466Intel LGA 1151 (Z370):Intel Core i7-8700K, i5-8600K, Core i5-8400MSI Z370 Gaming Pro Carbon AC2x 8GB G.Skill FlareX DDR4-3200 @ DDR4-2400, DDR4-2667, DDR4-3466AMD Socket AM4 (300-Series)Ryzen 5 1600X, Ryzen 7 1600 MSI X370 Xpower Gaming Titanium2x 8GB G.Skill FlareX DDR4-3200 @ DDR4-2667, DDR4-3200All EVGA GeForce GTX 1080 FE 1TB Samsung PM863 SilverStone ST1500-TI, 1500W Windows 10 Creators Update Version 1703 — All Spectre and Meltdown mitigations Skill FlareX DDR4-3200 @ DDR4-2933, DDR4-3466Intel LGA 1151 (Z370):Intel Core i7-8700K, i5-8600K, Core i5-8400MSI Z370 Gaming Pro Carbon AC2x 8GB G.Skill FlareX DDR4-3200 @ DDR4-2400, DDR4-2667, DDR4-3466AMD Socket AM4 (300-Series)Ryzen 5 1600X, Ryzen 7 1600 MSI X370 Xpower Gaming Titanium2x 8GB G.Skill FlareX DDR4-3200 @ DDR4-2667, DDR4-3200All EVGA GeForce GTX 1080 FE 1TB Samsung PM863 SilverStone ST1500-TI, 1500W Windows 10 Creators Update Version 1703 — All Spectre and Meltdown mitigations |
| Cooling | Corsair h215i |
MORE: Best CPUs
MORE: Intel & AMD Processor Hierarchy
MORE: All CPUs Content
Current page:
Overclocking & Test Setup
Prev Page Six Cores and 65W for $200
Next Page VRMark, 3DMark & AotS: Escalation
Paul Alcorn is the Deputy Managing Editor for Tom’s Hardware US.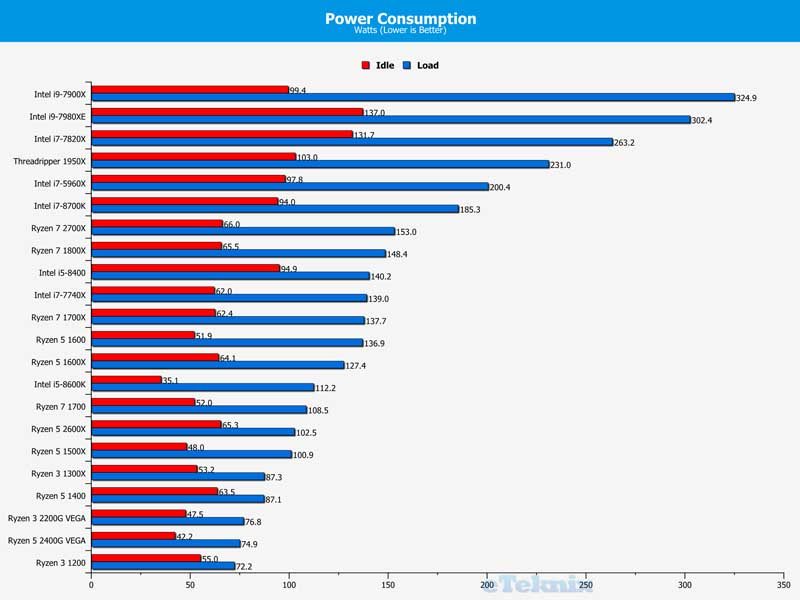 He writes news and reviews on CPUs, storage and enterprise hardware.
Tom’s Hardware is part of Future US Inc, an international media group and leading digital publisher. Visit our corporate site .
©
Future US, Inc. Full 7th Floor, 130 West 42nd Street,
New York,
NY 10036.
How to overclock amd ryzen 5 2600
This is a comprehensive and easy-to-follow illustrated guide for overclocking AMD’s Ryzen 5 2600 processor.
This guide will cover the entire manual overdrive process and a quick guide to Precision Boost Overdrive 2.0.
Introduction and Components
This is the overclocking process for AMD Ryzen 5 2600 on ASUS X370 motherboard. This guide mainly focuses on the manual overclocking process, as using AMD Precision Boost 2.0 did not give much results. AMD PBO 2.0 is covered in this guide for those who don’t want to manually overclock their Ryzen 2600. When using a motherboard from a different manufacturer, the voltages, core clock and settings remain the same, but can be found under a different naming convention. Depending on the quality of the board, not all options may be present, so mileage may vary in this regard.
- Processor: AMD Ryzen 5 2600.
- Cooler: Gelid Phantom Black
- Motherboard: ASUS X370-F Gaming.
- RAM: G.SKill F4-3200C14D-16GTRS, 3200Mhz 12-12-12-28.
- GPU: ASUS Strix RX 570.
- EVGA G2 SuperNova 750.
Getting Started with Overclocking AMD Ryzen 5 2600
Make sure you have the latest chipset and other drivers for your current setup. Using outdated drivers may cause instability unrelated to overclocking. Consider doing a synthetic test with stock settings to measure your profits. If you are going to play any game, have a base FPS so you can see the increase.
You also want to download the following overclocking stress test programs. It’s a vital tool for stress testing and monitoring if you already have the tools you can use, but these are the programs I highly recommend that were used in writing this overclocking guide.
- HWiNFO64: HWiNFO64 monitoring tool download section
- Prime 95: Prime 95 stress test download section
- Linpack Xtreme: Linpack Xtreme 9 stress test download section0012
BIOS settings.
Zen+ is a big improvement over the Zen 1 architecture, so running DDR4 can be done with the QVL XMP profile. The ASUS ROG Strix X370-F Gaming is only certified for 3200MHz, but a good 3466MHz kit with a Samsung B-die, Micron E-die, or Hynix C-die (CJR) shouldn’t be a problem. It is important to note here that it is Infinity Fabric that is unstable, not the memory kit itself. However, higher speed kits may not run at rated XMP speed, so it’s wise to test any RAM kit first before applying any CPU overclock. If you cannot run the nominal speed, set the base frequency to 2133MHz. When in doubt, stick to the QVL for your motherboard, a list of verified RAM kits can be found on your motherboard supplier’s website.
Ryzen 2600 and Precision Boost Overdrive 2.
 0.
0.
This is AMD’s auto overclocking feature, although it did not produce the results that I would have liked to have included in this guide for completion. For best results, make sure you have a third party cooler and good airflow.
There are some settings in the BIOS that can be configured to use AMD Precision Boost Overdrive 2.0 for best results. Some settings are needed to increase the duration of the acceleration and remove some restrictions from the BIOS.
- Precision Boost Overdrive: Set to manual to adjust settings.
- PPT Limit: The maximum value for your motherboard, by simply entering 99999 it will automatically correct the maximum value for your particular motherboard.
- TDC Limit: Maximum for your motherboard, simply entering 99999 will automatically correct the maximum value for your specific motherboard.
- EDC Limit: Maximum for your motherboard by simply entering 99999, it will automatically fix the maximum value for your particular motherboard.
- Precision Boost Overdrive Scalar: Increase the maximum voltage and boost time when using this particular boost value. For this Scalar 1~7 motherboard used save voltage
- Custom Precision Boost Overdrive Scalar: Scalar multiplier is set to 7 or less.
- Max CPU Boost Clock Override: Max value for Core Boost uses the maximum value.
- Platform thermal throttling limit: set to manual.
- Platform thermal throttling limit *: Set the temperature value in Celsius, use 80 ~ 90.
Ryzen 2600 DIGI + VRM settings.
These settings are important when preparing to overclock your CPU and RAM. For this guide, only the CPU settings are important, but there is little mileage for the SoC domain for memory overclocking. One important note here is that Load Line Calibration (LLC) is set to level 4 with a maximum level of 5. This means that there is a small Vdroop under load with level 4, level 3 and below will create an even larger Vdroop for that particular VRM. .
.
- VDDCR CPU Load Line Calibration is set to level 4, a lower one resulted in instability, in my case yours may be different.
- VDDCR CPU Current Capability up to 130%, in short, how much power it can consume compared to the baseline from 100% to 130%.
- VDDCR CPU Switching Frequency up to 300, higher frequency tends to waste power.
- VDDCR CPU Power Duty Control is set to extreme.
- VDDCR CPU Power Phase Control is set to extreme.
- VDDCR SoC Load Line Calibration set to Auto if you don’t want or use FCLK or MCLK overclocking.
- VDDCR SoC Current Capability is set to Auto if no FCLK or MCLK overclock is performed, then it can be set to 120%.
- VDDCR SoC Switching Frequency is set to Auto if 300 cannot be entered when overclocking FCLK or MCLK.
- VDDCR SoC Power Phase Control is set to Auto if not overclocking FCLK or MCLK then it can be set to extreme.
AMD CBS and Precision Boost Overdrive.
There are 2 sections with some settings that will need to be disabled. These settings will make any manual overclocking difficult and may cause instability. If you do not wish to use the AMD Precision Boost Overdrive feature as described in the previous section.
- Kernel Performance Boost: Disabled
- Global state C: disabled
- Precision Boost Overdrive Off
In AMD CBS, disable Core Performance Boost and Global C-State Control as shown in the image below.
Then go to Precision Boost Overdrive and turn it off as shown in the image below.
Ryzen 2600 VDDCR Core Volts.
This is part of the overclock and the same voltage can be used to overclock both the 2600 and 2600X. Make sure you are using economy voltage for everyday use, in this case the online agreed value is 1.38V for CPU voltage. It used to be 1.40V, however some Reddit users have commented on CPU degradation at voltages above 1.38V. Higher voltages can be used for short term use with proper cooling for testing and writing.
- AMD recommended voltage: 1.300 to 1.350 V.
- Community recommended voltage: 1.350 to 1.400 volts.
- Absolute maximum and not recommended: 1.400 to 1.500 volts.
There are 2 settings here that will be used: CPU voltage (VDDCR CPU voltage) and CPU core ratio. For core voltage, use either manual mode voltage or bias voltage. The guide is easier to use and will be used throughout this guide. Bias mode offers better granular control over voltage, however you keep voltage limits.
SoC voltage is not applied during CPU overclocking, it is used for FCLK (Infinity Fabric clock) and MCLK (Memory clock). If you are experiencing instability due to memory or endless tissue tuning, this tension can be helpful. A more detailed memory overclocking guide covering both AMD and Intel systems can be found here: DDR RAM Overclocking Terminology FAQ and DDR4 RAM Overclocking Guide. If you have QVL or no QVL and have stability issues with the XMP profile, please refer to this guide: How to Stabilize DDR4 with Infinity Fabric
Since no PC build is the same, start with AMD’s highest recommended CPU voltage of 1.350V. This will also work for a stock AMD cooler, but expect more fan noise than more robust cooling such as the Gelid Phantom Black used during writing this guide. Next comes the ratio of CPU cores. An easy overclock will be 4.0 GHz to reach 40.00 in the «CPU Core Ratio» section. Save, exit and boot into Window. Now, to make sure the overclock is stable, run Prime95 or Linpack Xtreme. For Prime95, use small FFTs and let it run for at least 10 minutes. Linpack Xtreme, if you want to stress test, use half of your total RAM capacity using all cores and threads with at least 3 stress test runs. Keep an eye on HWiNFO64 for core voltage and temperature.
It should have passed any test, now you can decide to leave the overclock at 4.0 GHz and tweak the CPU voltage. The 4.0 GHz overclock used in this guide used 1.269V with load line calibration 4. If you want to go higher and go to 4.1 GHz, boot back into the BIOS and adjust the CPU voltage to 1.38 V with a CPU core ratio of 41. This particular 2600 did not reach 4.1 GHz while maintaining voltage, while it passed Prime95, it did not pass the Linpack Xtreme stress test, so is not considered 100% stable. In this case. when overclocked, the voltage was set to 4.05 GHz for everyday use. And stress tested Prime95 and Linpack Xtreme.
Stability testing.
After you have set the overclock for daily use and make sure it does not exceed 1.38~1.4V for daily use, you want to do a final stability test. This is the last test to make sure you are 100% stable when overclocking the CPU before moving on to memory overclocking for example.
- Prime95: complete 2 hours of small FFTs or custom 8K FFTs (synthetic game load)
- Linpack Xtreme: Run at least 10 stress test runs with half the total RAM using all cores and threads.
Downclocking Ryzen 5 2600 — trying to score exactly 5000 points in Cinebench R23
This material was written by a website visitor and has been rewarded.
Before starting the article, I must indicate that everything written below does not contain any useful information. And of course, you do all the manipulations in Bios at your own peril and risk. It’s all just an experiment that was interesting to me personally. These actions have practically nothing to do with overclocking, but I hope you will be interested in reading about what happened to me.
I think everyone on this site understands perfectly well that for high-quality overclocking of the processor, quite a few conditions must be met. A successful processor, a good overclocking motherboard with a powerful power supply system, a powerful PSU, good cooling that can remove a lot of heat from the processor. And most importantly — direct hands and a wealth of knowledge necessary to overclock the processor to impressive values.
recommendations
So what about those users who want to feel at least a little overclocking excitement, but do not have many of the above points, or none at all. After all, it is absolutely uninteresting to simply run benchmarks on a stock processor, except for the utilitarian purpose — to find out the performance of your stone. Household overclocking for those processors for which it is available is already a more interesting exercise, but here at least some of the listed conditions must be met, otherwise the risk of burning a piece of iron dear to the heart is very high. Especially if an inexperienced user is engaged in this, who, even with all the necessary hardware, will either not achieve a good result, or burn the PC in an attempt to squeeze out more.
So, what am I all about? Having neither straight arms nor a good motherboard, I still tried to achieve interesting results in the Cinebench R23 benchmark, namely 5000 points in a multi-threaded test. Knowing the repeatability of the results in this test, I set myself the limits of success in advance. This is 5000 +- 50 points. That is, everything that fell within the range from 4950 to 5050 was considered an acceptable result. Owners of the Ryzen 2600 running this benchmark will probably be surprised, because this is much less than even a stock processor can give out. But this is where my idea lies. I do not have to drive the processor, and accordingly the hardware with which this can be done can be the dullest of what this processor generally supports. So, it’s time to get acquainted with the test config. 9Ol000 it makes no sense to enumerate, because they will not have any effect on the test. Even the frequency of RAM in Cinebench almost does not affect anything, so we will see exactly the computational performance of the processor. In summary, we have a very budget motherboard not based on a top chipset and with a weak VRM, budget tower cooling with three heat pipes, which, however, can easily cope with a not very hot six-core processor, memory at a not very high frequency, and a normal power supply that easy to assemble.
For good overclocking, we would need a completely different motherboard, as well as much more powerful processor cooling, but for our purposes all this does not matter. The main thing is that it is AMD, which means that even on the most budget motherboard, we can control all the overclocking options. I must say right away that we will not change the voltage in principle, except for the last test, because there is not much point in this and it will remain on Auto. This will not affect performance, and we will not get heating as such.
First we need to find out what the AMD Ryzen 5 2600 can do in absolute stock with auto overclocking enabled and all power saving features. We do not touch anything either in Bios or anywhere else. We just run the benchmark.
After trying a couple of times, I got such a beautiful number, and decided to stop there, taking this result as the base one. From him we will dance. And this result made me think that we can get by with the usual disabling of the kernels through msconfig, without even going into the BIOS. And I tried.
There were 12 threads, now 8. This is what we see in the task manager after a reboot.
We run Cinebench R23:
And the result turned out to be quite close to the desired 5000, and by overclocking the processor core a little, I would have achieved an acceptable result, but I agreed not to overclock the processor for myself, so let’s try other options.
We return everything as it was:
Well, now we finally go to BIOS.
Go to advanced frequency settings. We set the processor multiplier to 30.
We go into the advanced settings of the CPU core.
We disable Core Performance Boost and Global C-state Control here so that the processor frequency is always constant and does not boost or reset itself. If this is not done, then regardless of the set base frequency during the benchmark, the processor will operate at the boost frequency.
Press F10 and boot.
As we can see, the frequency is 3 GHz and it is constant, so we can run Cinebench.
The result is above the 5000 we need, we will have to reset the frequency again. First, let’s reset it immediately by 500 MHz to 2.5 GHz.
F10 again and boot into Windows.
We have fallen below the set bar, we will have to increase the frequency. Although I had a suspicion that the test was not entirely correct and the result is too low for such a frequency. Later, this suspicion was indirectly confirmed by other tests, but it was at this frequency that I did not test again. Again we go into the BIOS and set something between 3 GHz and 2.5 GHz. I chose 2.65 GHz.
Now the result is higher than necessary, a slight increase in frequency gave a serious increase in points, which means that the test at 2.5 GHz was really not quite correct. Now let’s try to take the average between the last two runs. This is 2.575 GHz.
Finally, we get an acceptable result within the boundaries that we indicated at the beginning. But our result is almost equal to the upper acceptable limit. Perhaps we need to make one more frequency change in order to get closer to the coveted 5000. Let’s reduce the frequency by only 25 MHz.
Now, although we are below 5000 points, we are much closer to them. I think that this can be stopped. It was possible, of course, to twist the system bus values further, but I decided that enough was enough for me. An acceptable result was obtained twice. The funny thing is that we got the only beautiful number randomly at the very beginning on the stock system — 6666. That is, all these multiplier settings did not lead to the desired result. Does everything I’ve done make any sense? I doubt. But still, it was an interesting experience. And now about the only exception, which I mentioned at the beginning of the article. After all these manipulations, I decided to recall the results of my Ryzen in a small overclock, which I sat on for several months. Having reproduced the voltage values from memory, I set a multiplier of 39and received a processor frequency of 3.9 GHz. And here are the results I got in Cinebench R23 this time.
This is far from the maximum overclocking, and even on my motherboard you can achieve great results, but it is stable and allows you not to raise the voltage on the processor. And in order for the VRM zone to warm up a little less, I even once fanned the VRM radiator with two 40 mm fans.
Looks funny or scary, but it works. But in general, I do not recommend strongly driving the processor on motherboards like mine, and if you have enough performance, then it’s better to undervolt and sit at lower temperatures. This procedure will make much more sense than downclocking, which can only be applied with a strong reduction in voltage.
Naturally, I do not recommend doing as I did in this article, but if you get bored and want to experiment, then this option is possible.