File sharing over a network in Windows
Note: This article focuses on how to share files or folders over a Local Area Network (or LAN), such as connected computers within your home or workplace. If you are trying to find out how to share a file over the Internet, for example with a friend or family member, OneDrive provides easy ways to accomplish this. For more details, see Share OneDrive files and folders.
Here are some answers to common questions about changes to file and folder sharing in Windows 11:
To share a file or folder over a network in File Explorer, do the following:
-
Right-click (or long-press) a file, and then select Show more options > Give access to > Specific people.
-
Update Windows. Ensuring all machines are as updated as they can be is key to making sure you aren’t missing out on any driver or Windows updates.
Open Windows Update -
If you’re on a Wi-Fi network, set it to Private. To find out how, read Make a Wi-Fi network public or private in Windows.
-
Turn on network discovery and file and printer sharing, and turn off password protected sharing.
-
Select the Start button, then select Settings .

-
In the Find a setting search bar, type manage advanced sharing settings and select Manage advanced sharing settings from the suggested results.
-
In the Advanced sharing settings window that appears, under Private, select Turn on Network discovery and Turn on file and printer sharing.
-
Under All Networks, select Turn off password protected sharing.
-
-
Press the Windows logo key + R.
-
In the Run dialog box, type services.msc, and then select OK.
-
Right-click each of the following services, select Properties, if they’re not running, select Start, and next to Startup type, select Automatic:
Related topics
-
Share files in File Explorer -
Make a Wi-Fi network public or private in Windows -
Fix network connection issues in Windows
In Windows 10, some features of file and folder sharing over a network have changed, including the removal of HomeGroup. Read on for answers to common questions about other changes to file and folder sharing in Windows 10.
To share a file or folder in File Explorer, do one of the following:
-
Right-click or press a file, select Give access to > Specific people.
-
Select a file, select the Share tab at the top of File Explorer, and then in the Share with section select Specific people.
Select a user on the network to share the file with, or select Everyone to give all network users access to the file.
If you select multiple files at once, you can share them all in the same way. It works for folders, too—share a folder, and all files in it will be shared.
To stop sharing in File Explorer, do one of the following:
-
Right-click or press a file or folder, then select Give access to > Remove access.
-
Select a file or folder, select the Share tab at the top of File Explorer, and then in the Share with section select Remove access.
File Explorer shows the Remove access option («Stop sharing» in older versions of Windows 10) for all files, even those that aren’t being shared over a network.
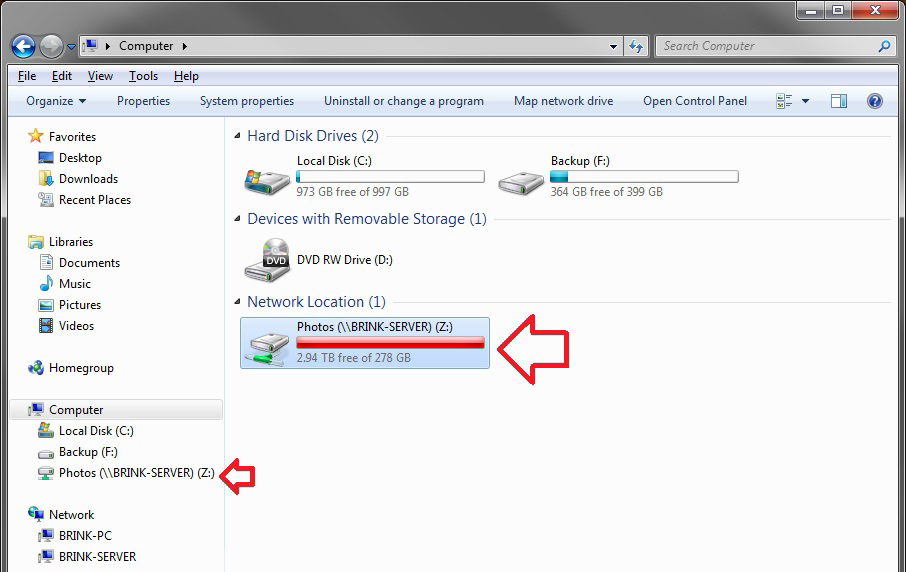
Open File Explorer, then type \\localhost into the address bar.
Note: When you’ve shared a file from a folder in your user profile and you go to \\localhost, you’ll see your user profile and all its files there. This doesn’t mean that all of your files are shared—just that you have access to all your own files.
If you open File Explorer, go to Network, and see an error message («Network discovery is turned off….»), you’ll need to turn on network discovery to see devices on the network that are sharing files. To turn it on, select the Network discovery is turned off banner, then select Turn on network discovery and file sharing.
To troubleshoot problems with sharing files or folders, follow the steps below on all computers from which you’re trying to share.
-
Make sure the computers are on the same network. For example, if your computers connect to the internet through a wireless router, make sure they all connect through the same wireless router.
-
If you’re on a Wi-Fi network, set it to Private. To find out how, read Make a Wi-Fi network public or private in Windows.
-
Select the Start button, then select Settings > Network & internet , and on the right side, select Sharing options.
-
Under Private, select Turn on Network discovery and Turn on file and printer sharing.
-
Under All Networks, select Turn off password protected sharing.

-
Make sharing services start automatically.
-
Press the Windows logo key + R.
-
In the Run dialog box, type services.msc, and then select OK.
-
Right-click each of the following services, select Properties, if they’re not running, select Start, and next to Startup type, select Automatic:
-
Related topics
-
Share files in File Explorer -
Make a Wi-Fi network public or private in Windows -
Fix network connection issues in Windows
How To Share Drives Between Windows PCs With Windows Network Drives
If you’re an old-school PC user like us, then chances are good that you’ll have a huge amount of media, such as pictures, music, and movies, stored in local hard drives. If that’s the case, then you’ll also likely find yourself wanting to access your hard drives from computers other than the one they’re attached to. For example, all your hard drives may be at your main desktop, but you also have a PC attached to your home theater and also a laptop. In this article, we’ll review how you can share your desktop’s hard drives over the network to your other Windows PCs.
We’ll go into all the steps in detail, but they can be roughly summarized as follows.
Choose the drives on your computer that you want to share, and expose them to the network using Windows Advanced Sharing.Connect your other computers to the shared drives using Windows’ “Map Network Drive” function.Add an exception in Windows Internet Options to prevent Windows from warning you when you move data to and from the network drives.
There is one thing to note before we get started: The methods described in this article require that the Windows account on the computer that your shared drive is physically attached to must be both an admin account and password protected. If your account is not password protected, you will still receive prompts to enter a password when connecting to the drive over the network. Because you cannot enter a blank password, you will be effectively gated from connecting to the drive. Sharing a drive without password protection is possible, but it can be finicky. The easiest method is to have a password on the account of the computer hosting the shared drive.
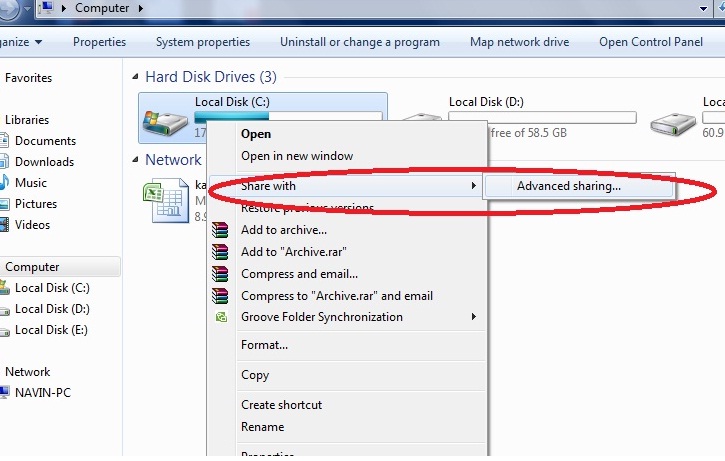
1. Share A Drive With Windows Advanced Sharing
Image 1 of 3
On the computer that the drive you want to share is attached to:
- Right click on the drive that you want to share and select “Give access to” > “Advanced Sharing…”.
- Enter a name to identify the drive over the network.
- If you want to be able to both read and write to the drives from your other computers, select “Permissions” and check “Allow” for “Full Control.”
2. Map A Network Drive
We suggest using IP address to reference the computer that the drive you want to share is attached to. Often times, computers on your network will appear automatically under their device name. Device names can be used in mapping network drives, but we find that using an IP address is less likely to cause issues, especially when sharing drives across Windows 10 and Windows 7. Instructions for finding the IP address of Windows 10 and Windows 7 computers can be found here and here .
Image 1 of 4
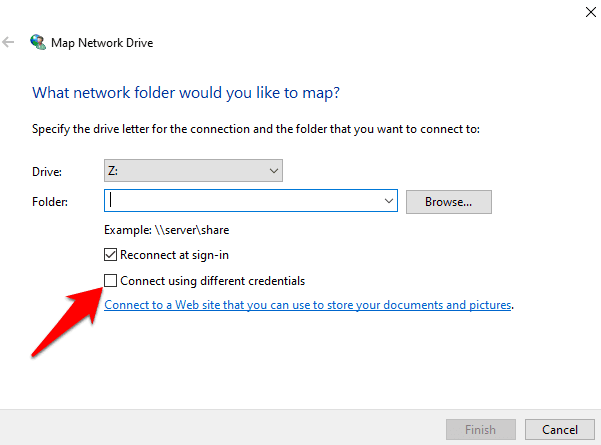
On the computer that you want to access the drive from:
- Select “Map network drive” from the ribbon menu.
- For “Drive,” select the letter that you want to give to the shared drive. For “folder,” enter “\\IP_address\drive_name,” where IP_address is the IP address of the computer that the drive is attached to, and drive_name is the name that you entered to identify the drive in 1. Share A Drive With Windows Advanced Sharing. Ensure “Reconnect at sign-in” and “Connect using different credentials” is selected.
- You will be prompted for the login credentials of the computer that the shared drive is attached to.
 For the username, enter “IP_address\username,” where IP_address is the same as the one above, and username is your login on the computer that the shared drive is attached to. For the password, enter the password of the login of the computer that your shared drive is attached to.
3. Add Exception To Windows’ Internet Options
When you map a network drive through IP address, you may receive the above prompt when you try to move data to and from the network drive. To remove the prompt, add an exception to Windows’ Internet Options as follows.
Image 1 of 3
On the computer that has the network drive mapped:
- Access the Control Panel and enter Internet Options.
- Enter the “Security” tab and select “Sites.”
- Select “Advanced” and enter IP_address from 2. Map A Network Drive. Select “Add” to create an exception for all network drives from the computer of that IP address.
To Remove Shared Access To A Network Drive
To remove access to a shared drive on a specific computer, on that computer:
- Right click on the network drive and select “Disconnect.
 ”
”
Image 1 of 2
To stop sharing a drive with all computers that currently have access, on the computer that the shared drive is attached to:
- Right click on the drive and select “Properties.
- Enter the “Sharing” tab and select “Advanced Sharing.”
- Uncheck the box labelled “Share this folder.”
To Modify The Login Credentials Of Your Network Drives
If you change the login information on the computer that your shared drive is attached to, you may need new login credentials when you try to access the shared drive on other computers. A prompt may occur when you log in and Windows finds that it can no longer access the network drive. The prompt may be inconsistent, so you can always manually change login credentials for network drives as follows.
Image 1 of 3
On a computer that has the network drive mapped:
- Access the Control Panel and enter the Credential Manager.
- Select “Windows Credentials” to view the login credentials of all the Windows computers on your network that your current computer has remembered.

- Expand the entry for the IP address that is equal to IP_address from 2. Map A Network Drive. Select “Edit” to update the login the credentials.
Alternatively, you can always disconnect the network drive and re-map it using the new credentials.
Considerations For Sharing Drives Between Windows 10 And Windows 7
This article’s examples use Windows 10, but the process of using Advanced Sharing and Map Network Drive is similar in Windows 7. Sharing drives across Windows 10 and 7 using the above method works, but you may encounter the following issue when sharing a drive on a Windows 10 computer to a Windows 7 computer.
Image 1 of 5
On the Windows 7 computer you want to access the drive from:
- Select “Map network drive” from the toolbar menu.
- Proceed as in 2. Map A Network Drive.
- When you select “Finish,” you may receive the above error message. If the IP address, drive name, and login credentials were all correct, the network drive will be mapped correctly and appear when you close the error message and the “Map network drive” window.
 If the network drive does not appear, try the proceeding steps.
 - Enter the Credentials Manager (its appearance in Windows 7 is similar to what is shown in To Modify The Login Credentials Of Your Network Drives) and remove the stored credentials that you entered while mapping the network drive.
- Attempt to map the network drive again, ensuring all details and credentials are correct.
Get instant access to breaking news, in-depth reviews and helpful tips.
Contact me with news and offers from other Future brandsReceive email from us on behalf of our trusted partners or sponsors
how to create, open and configure
Sharing folders is a necessary procedure for creating a local network. If you need to organize data exchange between several computers, this is indispensable. The task is not difficult, but novice users often have difficulties.
In today’s guide, I’ll walk you through how to create, configure, and share a folder in Windows 10.
Set up sharing in Windows 10
Before moving on to setting up sharing, first we need to set up a private network profile — in this case, the computer will be visible to other devices and can be opened for file sharing.
Change the network profile:
- Open the Start menu and go to the Settings section.
- The next step is to open the «Network and Internet» subsection.
- Go to the properties of the connected network.
nine0021 Change the value of the network profile to «Private».
Now we can safely move on to setting up sharing.
Method No. 1
Open access to the folder:
- Select the folder that you want to open for other computers, and right-click on it. In the menu that appears, select «Give access to» -\u003e «Individual people …».
- It remains to click «Share», but wait — in this case, access to the folder will be granted, but you can enter it only using the login and password of the current computer.
 If you don’t want anyone to know your details, you need to create a new user. How to do this, read the next paragraph. nine0016
- Let’s open a command prompt as an administrator — to do this, go to the Start menu and enter the appropriate request. Then right-click on the application and select «Run as administrator».
- As a result, we get into the console window — that’s what we need. Enter the request net user Username Password /add . We press «Enter» and we get information that the command was completed successfully.
- Now we perform the action under the first item again. We see that no new users have been added, and this is normal, since they need to be added to the window itself. To do this, open the drop-down menu at the top and select the desired user, then click «Add». nine0016
- It remains to select a user and click on the «Share» button. You can also assign a permission level to the right of the name.

- If everything went well, you will see something like the following window:
The shared folder is open and can now be accessed from another computer connected to the same LAN.
Method #2
This method is suitable not only for sharing folders, but also disks. For example, you can grant access to the local drive C. You can do this in the following way:
- Open the This PC folder and select the drive you want to share. Right click on it and go to its properties.
- Next, open the «Access» subsection and select «Advanced settings …».
- Check the box «Share this folder». You can also configure permissions — for this we will open the appropriate window.
- In the window that appears, we can set up various rights. Options such as full control, modification, and read are available. By default, the Everyone group should be displayed. If it is not there, then select «Add .
 ..». nine0016
- In the bottom field, enter «All» without any quotes and click «OK».
- Now we can set the permissions. It is enough to select a group and mark the necessary items at the bottom.
- After that, we save all the changes made with the «OK» button. As a result, the properties of the local disk will indicate that the shared access has been granted.
Similarly, you can grant access to any other drive or folder.
Community is now in Telegram
Subscribe and stay up to date with the latest IT news
Subscribe
How to connect to a shared folder in Windows 10
It’s easy — start the computer from the local network and go to the shared folder with just a few clicks. Do not forget that this PC must also use the private network, which I mentioned at the beginning.
Connect to a shared folder:
- Open any folder and open the Network item on the left side.

- Enter the username and password of the user that we successfully created in the previous step.
nine0017 As a result, all computers connected to the public network should be displayed. We select the one where we previously opened access to the folder.
On a successful attempt, we will connect to another computer and see all the files we have shared.
How to enable anonymous access without entering data
Previously, we got access to the folder through authorization — we entered the login and password. Sometimes such manipulations are not necessary, and they can be avoided. Unfortunately, this method only works on Windows 10 Pro and Enterprise. If you have a home version on your computer, then you will not be able to activate anonymous access. nine0003
Enable anonymous access:
- Let’s move on to sharing the folder again, as we did at the very beginning. Add a new user — now it will be the «Everyone» group.
- The next step is to go to the local group policy editor — to do this, hold down the key combination «WIN + R» on the keyboard and enter the query gpedit.msc .
- Go to «Computer Configuration» -> «Security Settings» -> «Local Policies» -> «Security Options». Then we find the line «Network access: allow «For everyone» to anonymous users» and double-click on it. nine0016
- Select «Enabled» and click «OK».
- We return to our folder and go to its properties — there we go to the «Access» section and at the bottom click on the «Network and Sharing Center» button.
- We expand the item «All networks» and at the very bottom we mark the item «Turn off sharing with password protection». Then click «Save Changes».
That’s it. Now we can safely access the folder from another computer without entering a username and password. nine0003
In the case of a disk, everything is a little different:
- Go to the properties of the local disk and open the «Security» section.
 Then click «Change…».
 - Click «Add …».
- Adding a new group «Everyone».
This is how we can grant access to a local drive without a username and password. Be sure to apply the changes at the end, optionally add the necessary permissions. Setting up the Group Policy Editor is similar to what we did above. nine0003
Troubleshooting sharing settings
In some cases, Windows 10 may warn you that a network resource is unavailable, or simply “swear” at the settings. All this can be fixed in the «Network and Sharing Center». The settings should be checked on the computer you are trying to connect to. They should look like this:
- First, let’s go to the desired window through the folder properties.
- Guest or public item:
- Item «All networks».
 I already talked about the last block — you can enable or disable the password.
nine0015 Open the first item «Private (current profile)». The settings must be set as shown in the screenshot below:
Now you can connect to the folder again — everything should work. In some cases, you may need to restart your device.
Conclusion
Sharing a folder or drive is a simple task, but it comes with its own nuances. It is important that both devices are connected to the same network — it can be either a wired connection or through a Wi-Fi router. If everything is taken into account, but errors still do not allow you to connect, then you should disable the anti-virus tool or use the above instructions. nine0003
how to connect, share a folder over a local network on windows of different versions, including 7, 10
A network drive is a convenient way to store information. This solution is often used in offices, but it can also be used in a home LAN.
Contents
-
1 What is a network drive
-
2 How to map a network drive
-
2.
 1 Windows 10, 8
 -
2.2 Windows 7
-
2.3 Windows XP
-
2.4 Connecting using the command line
-
2.5 What to do if the network drive does not mount
-
-
3 How to share a folder
-
4 How to disable a network drive
What is a network drive
A network drive is a designated logical drive. It is a storage device that can be accessed by different members of the local network. It stores files that are most often called «shared» (in slang — «shared», from English to share — «share»). A network member who has access to this device can add files to it, edit existing ones, or delete them, depending on the configured rights. nine0003
An ordinary user may not notice the difference in using a regular or network drive. However, the latter will transfer data at a slower rate, which is determined by the speed of the LAN connection.

A network drive in the workplace is most often used to share and store important files and data that many people need in their work and that need to be updated and replenished regularly. At home, this device can be used to not store the same files on different computers and run them freely. nine0003
For example, my family had a network drive set up where my parents stored movies and series. We could run them in any room, on any device.
How to map a network drive
How to map a network drive depends on the operating system version.
Windows 10, 8
To map a network drive on Windows 10 or 8, follow these steps:
- Open Explorer, select This PC. Click «Computer» in the bar at the top, then «Map Network Drive» (Windows 10) or «Network Drive Card» (Windows 8). nine0230
Another option is to right-click on «This PC» and select «Map network drive…» from the pop-up menu.
If there is no top panel, then right-click on «File», and then uncheck the box next to «Collapse Ribbon»
- You will see a dialog box in which you need to select a drive letter (any free one) and the path to it.

If you already have a link to the folder you need, just paste it into the «Folder» field
- Click Browse and select the desired folder as the network drive. Click OK.
At this stage, the computer may ask you to enter the login information (login and password) of the computer you are trying to connect to. Enter them yourself or contact the owner of the device.
In the overview window you will see all devices connected to the network and allowing access
- If you want the drive to automatically mount every time you turn on your computer, check the Reconnect at logon box. By default, this option is enabled. nine0016
Windows 7
The dialog box for adding a network drive in Windows 7 is exactly the same as in Windows 10. Only the location of its button is different. «Map Network Drive» is located in the top bar of Explorer when you select «Computer».
To open the dialog box for connecting a network drive, log into your computer from Explorer
Windows XP
Mapping a network drive on Windows XP looks like this:
- Go to the Start menu and right-click on My Computer.
 Select «Map Network Drive» from the pop-up menu.
The look of the Start menu may vary depending on the skin you choose
- A dialog box will appear asking you to select a network drive letter (any unused one) and a path to it. Click «Browse» and select the desired folder, or paste the path to it in the «Folder» field.
- Click Finish. The network drive will appear in Explorer. nine0016
Connect using the command line
You can map a network drive in any version of Windows using the NET USE command:
- Press the Win+R key combination. You will see the «Run» window. Type «cmd».
With this window we will get access to the command line
- A command prompt will open. For a complete guide to the syntax of the net use command, type net help use.
Help contains all input parameters and their description
- The syntax of the command we are interested in is:
net use [driveletter:] \\ComputerName\ShareName[\volume] [password | *] [/USER:[domainname\]username] [/PERSISTENT:{YES | NO}]
- Usage example:
net use z: \\NextComputer\Share /user:ADMIN 12345
In this example, we have mounted a network drive under the letter Z.
 The path to the folder we are interested in is \\NextComputer\Share. Username ADMIN, password 12345.
 - If the command is successfully executed, the program will issue a notification «Command completed successfully». If something went wrong, the command line will describe the problem.
If the drive letter that we specified in the command is already in use by the computer, the program will generate an error «Local device name is already in use»
What to do if the network drive does not mount
The network drive may not mount for several reasons:
How to share a folder
If you want to open a folder on your computer so that other devices on the network can connect to it as a network drive, you need to share it. This procedure is the same for all versions of Windows. Follow these steps:
- Open File Explorer and find the folder you are interested in.
- Right-click on it and select «Properties».
You will see the «Properties» dialog box
- Select the «Access» tab and click «Advanced setup».

nine0002 On Windows 7 and later, this operation will require administrator rights - Check the box next to «Share this folder».
In this window, you can set the network name of the folder if desired
- Click Permissions. In the pop-up dialog box, set the access rights for all or individual users. If you don’t want anyone to be able to modify the contents of this folder, select Read only for the Everyone group. When done, click Apply and then OK.
nine0002 You can set general access rights for all users or individual for each - Done! Now other users of the local network can see your folder.
How to disable a network drive
Disabling a network drive can be done quickly through the context menu. Right-click on the drive in File Explorer and then click Disable. This method works in all versions of Windows OS.
You can disable a network drive in just two clicks
You can also disable access using the net use command:
- Call the command line.