How To Reinstall Graphics Drivers in Windows 10
Skip to content
Windows 10 is the latest and greatest OS offering from Microsoft, and is possibly one of the software giant’s most popular operating systems.
Along with a new appearance and touch-screen support, Windows 10 brings many additional features:
- Enhanced memory management
- Speed – Windows 10 is the fastest-performing Windows system on the market
- Support for an ever-increasing array of devices and applications
- Technical support – WIN 10 is the only officially supported Windows version for consumers
- Security – enhanced security features and continuous updates will be introduced only in Windows 10
Of course, along with such a major system upgrade, there is always the possibility that previously-supported devices or software may experience troublesome issues, or may stop functioning altogether.
Let’s discuss how to reinstall graphics driver in Windows 10, starting with how to recognize graphics issues.
Recognizing Windows 10 Graphics Problems
When you’ve installed Windows 10, or performed an upgrade, and your system performance goes down the proverbial tubes, there could be several causes, but one of the guilty culprits may very well be your graphics driver.
Especially for serious gamers with high-powered graphics cards, keeping drivers up-to-date can be an important part of system maintenance to maximize the gaming experience.
Display problems can often be tied to faulty graphics cards, but may also be symptoms of corrupted or outdated drivers:
- PC Monitors are not presenting images as they used to, or images are not presented properly
- Screen is not being recognized, or displays a black or blue screen
- Mouse and keyboard actions are not being recognized on the display
Even leading graphics card manufacturers strive to provide the best software to accompany their technology.
Companies such as Nvidia and AMD introduce updated drivers for their products regularly not only to update software and fix bugs, but also to improve performance, or expand compatibility.
Besides starting with a fresh install of Windows 10, keeping your graphics driver current can keep your system running more smoothly and enhance your gaming experience.
How to Reinstall Your Drivers
When you’ve determined that your graphics driver may be an issue with your system, you can update the driver using two simple steps:
Uninstall and Reinstall Graphics Drivers
Uninstalling your graphics driver is a reasonably straight-forward process:
- Access the Device Manager from the Control Panel, or start Device Manager by pressing the Windows key and letter R at the same time to open the Run window.
- In the program to run, key devmgmt.msc, which will initiate the Device Manager.
- Locate the Display adapters, and double-click that icon to expand the devices included in that category.
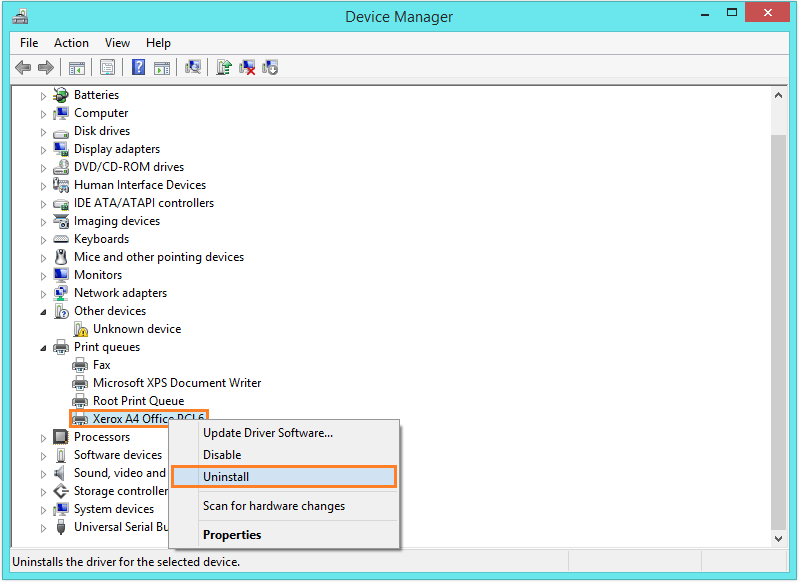
- Right-click the device you want to uninstall the driver for, and use the option to Uninstall device. You will get a confirmation box for the uninstall option.
- Check the Delete driver software option, then check the uninstall function. This may prompt you to delete the driver package. If not, just select the uninstall function for the driver.
Reinstall Drivers
Now you’re ready to search your computer or graphics card manufacturer’s website for the driver you need. To proceed, you will need:
- The make, model, and possibly serial number of your computer
- Your Windows 10 version (to find this, use the Windows + R key combination to start the command box, and key program “winver” in the text box. This will display a screen that contains your OS registration and build information
- The manufacturer of your graphics card, including model and version
Armed with this information you’re ready to browse the internet to find your latest driver. Once you locate the driver that matches your device, it’s a simple matter to download it to your system and install the new driver.
These sites will provide prompts for that phase of reinstalling your graphics driver.
Windows 10 Graphics Driver
Another option for reinstalling your graphics driver in Windows 10 is to let Windows do it. Once you’ve uninstalled your driver, reboot your system.
Windows will examine your system for the missing driver using Windows Update, allowing you to search for and install a new driver.
The problem with this solution is that Windows Update may not locate and provide the most recent version of the driver for your graphics adapter.
It may also get you a generic driver that works, but not to the extent that your device is supposed to.
That leads you back to the option of searching internet websites for the updated driver what will restore your system performance.
Reinstall Graphics Driver the Easy Way
Keep your PC Devices Up-to-Date and Improve Online Safety
For only $9. 99 a month Driver Support | ONE can help you save time and frustration dealing with common Windows device issues as well as added optimization and safety features.
Give Driver Support a Try Today
Besides graphics cards, your audio devices, mice, keyboards, printers, cameras, and internal components also can have issues caused by outdated or uninstalled drivers.
Many computer users are not technically savvy or comfortable enough to dive into the preceding methods of reinstalling graphics drivers. Fortunately, there is an easy, more reliable way.
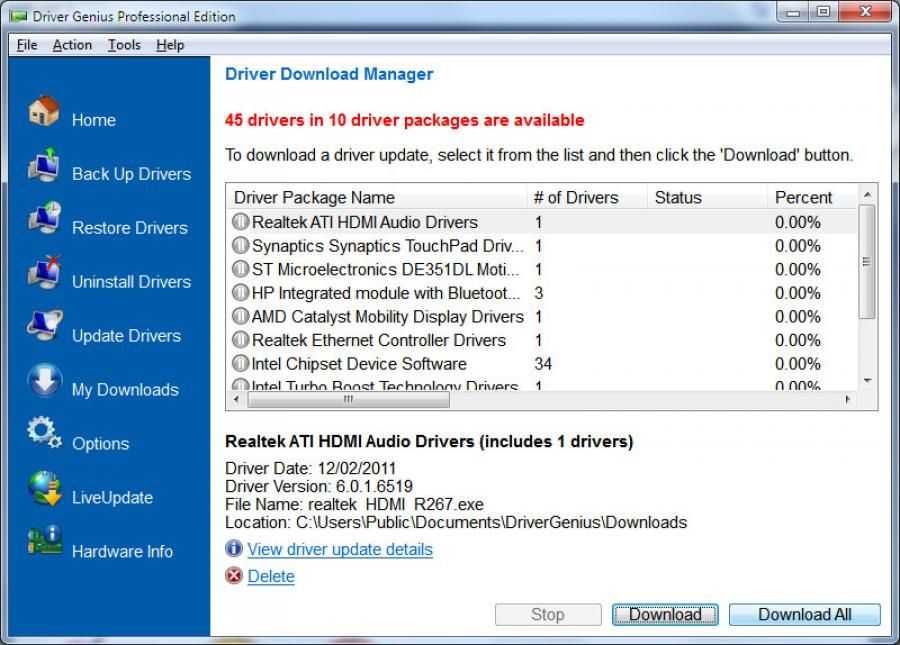
Driver update software and solutions are available that will analyze your system for all drivers:
- Display
- Graphics
- Sound
- Printers and more
Using one of these tools, you can be sure your system will be updated securely, and with drivers that match your devices exactly.
A full-featured driver update package will perform several functions for you:
- Scan your system when you need it, or on demand, identifying all devices and existing drivers
- Access the internet for the most recent drivers for every component of your system
- Download the drivers securely to your computer without manual intervention on your part
- Install the updates to your system
Driver Support simplifies the entire process of updating drivers on your Windows 10 computer. Give Driver Support | ONE a try today! today to keep your system running smoothly with the latest graphics drivers for your system.
Page load link
What Happens if You Uninstall a Graphics Driver? (Explained)
Disclaimer: This post may contain affiliate links, meaning we get a small commission if you make a purchase through our links, at no cost to you. For more information, please visit our Disclaimer Page.
Graphical displays might be one of the most noticeable ways in which computers have improved over the years. Developers have made many other things better over the years, but the displays and their complexities are things that are easy for even the average user to notice right away.
Part of how these things have managed such drastic leaps ahead is through the use of new graphics cards and drivers. A graphics driver is responsible for controlling how any of the hardware or software related to displays can work within your computer.
Because these drivers have such a noticeable function, some users might wonder if they could cause problems for their systems if they uninstall them.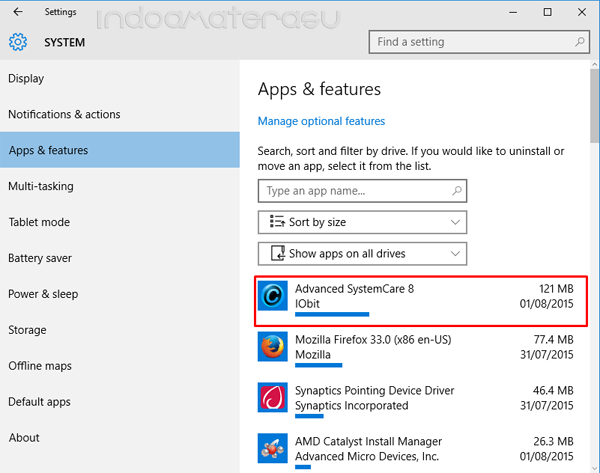 In addition, some files that govern drivers can be quite large.
We will discuss why you might want to uninstall some of these drivers, how safe it is, how long it might take, and why some drivers you come across might have such large file sizes.
Table of Contents
Can You Use Your Phone if Disconnec…
Please enable JavaScript
Is Uninstalling Graphics Drivers Safe?
In most cases, it should be safe to uninstall graphics drivers. As with many things in the tech world, such things come with a few caveats. If you have only native graphics drivers on your system, you may notice that some things with the display seem messed up.
These glitches may be fairly constant until you update your system with new graphics drivers. They should not cause it to be too difficult to use your system, but it is best to get new drivers as soon as you can to ensure smooth operations.
If you decide to remove these drivers, you may not wish to do so solely through the OS itself. If you do it this way, there is the possibility that it will leave residual files on the system. Leaving such files as they are could cause display conflicts once you add the new drivers of your choice.
It is not a given that doing the uninstall in this way will cause conflicts, though. If you notice no changes, then you’re good to go. You should notice any differences fairly soon after you do the uninstall of the drivers. If there are problems, you may want to consider using third-party applications to remove old files completely.
What Happens if You Uninstall a Graphics Driver?
If you need to uninstall your graphics driver for any reason, your operating system should revert to some basic drivers that still allow the computer to handle video output. The system does this so that you can still see what you are doing and have access to a basic display from which to make other changes or install new drivers.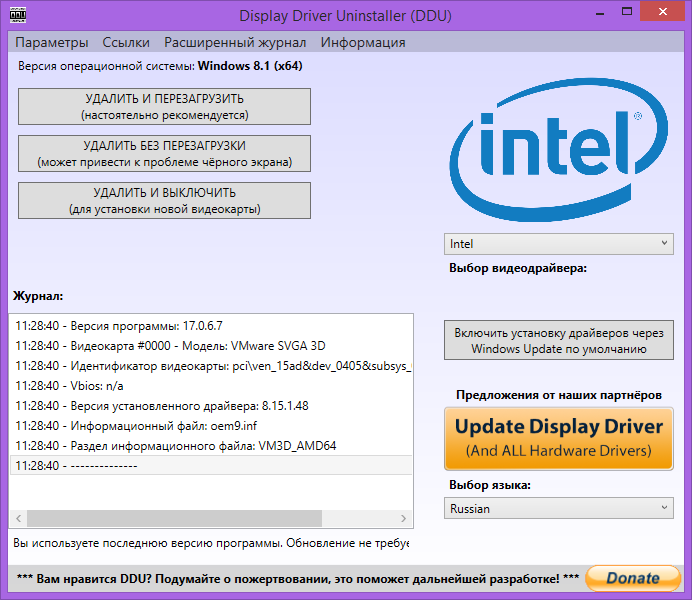
As such, everything should still be usable and visible to you, but you might notice some changes in how the operating system displays things.
The more telling aspects of uninstalling a graphics driver like this will come about when you want to run programs. This is particularly true of resource-intense applications or games that might run on high specifications. There may be some basic word processors or other things you can run once you revert to basic graphics drivers.
These things don’t need complex software in order to render on your display, so they should mostly run the same way that they might if you had different graphics drivers installed. Similarly, some older games or very simple ones may run fine without your preferred graphics drivers installed.
However, you may find a couple of problematic things occur when you try to run anything else once you’ve taken these drivers offline. The first is that some programs might load and seem fine once you get started.
After some time, you may notice significant dips in the frame rates that reduce performance dramatically. This can make it hard to play resource-intense games, and it would be nearly impossible to be effective in any sort of cooperative or competitive online play with such lags.
Even if you had a high-speed connection, the frames on the game itself would render your experience subpar.
For more modern or complex games, you may not be able to start anything at all. Here, your operating system will probably give you an error message. If this happens, the appropriate message will display something such as “only fallback graphics driver detected. Please install a dedicated driver for your card”.
The wording may be slightly different, but this is a situation in which the computer has detected that the graphics card of your choice is still present on your system, but that its drivers are missing.
The game or other program that you want to run is expecting to find the drivers it needs because the hardware it would like to use is present. Since it cannot, the game will refuse to even start up.
Why Are Graphics Drivers So Big?
Some users might notice that their graphics drivers are several hundred megabytes in size. This is relatively large for files of this type, and there could be some confusion on whether it is strictly necessary to have everything in there.
There are a few reasons why some graphics drivers are big, but not every reason may apply to all drivers from every manufacturer. We will take you through some of the most likely reasons in our list here:
1. Some drivers often have bundles of files that make different features usable for the graphics card of your choice. Because of these updates, the file sizes can seem quite large.
2. Some drivers contain various updates or improvements that are meant to work with specific games that the card supports. As the library of games like this increases, so too does the chance of more updates to accommodate more titles. Each one will take up some space.
3. Often, the driver itself is small, but it comes as part of the package that we mentioned earlier.
4. Graphics drivers may include several updates or additions to other things you can tweak for your GPU. These might include 3D acceleration or an entire library of options for different kinds of physics engines you might use in some of your games.
How Long Does It Take To Install Graphics Driver?
The time it takes to install graphics drivers can vary based on your setup and the kinds of drivers you are installing. If you’re running a fast rig, it may only take a few minutes to install new drivers for your GPU. In other scenarios, you may be looking at half an hour or more to get the drivers to finish. We can’t really pin down an exact time, but it is true that it can take what seems like a while.
If you are dealing with an install time that seems to take longer than you expected, you might check the installer. Much like installing or uninstalling a new program, it is possible that the graphics driver installation can get stuck on a particular process. You should use caution when deciding whether to try to restart this process, however.
Your computer should still be able to default to basic graphics drivers for you to use, but interrupting this process could still cause some problems with your display. This may be your only option if things seem stuck, but it might be best to use it as a last resort.
There may be no good way to speed this process up. Much of it depends on how good or fast your central processing unit is, and it will also depend on how fast your hard drive can read and write data.
While there are things you might be able to do to get these components to run above their recommended values, you would have to decide if that is worth it just to save some time installing some graphics drivers.
Do I Need To Uninstall Old Graphics Drivers Before Installing a New Driver?
Technically, you may not need to uninstall old drivers before you ask the system to put the new ones in place. This is because most modern drivers will initiate clean installs of the new driver profiles you expect to use and ignore old ones.
This is true in theory, but it is also possible that some old drivers can leave remnants behind even after a fresh install of new ones. If this is the case, those old files can cause conflicts. For best results, it may be a good idea to go ahead and uninstall old drivers as the first step.
Even if you don’t do this before putting the new ones in, you have the option to use a display driver uninstaller to get rid of the old ones later.
Conclusion
Graphics drivers are an integral part of how your computer’s display shows you things. More than that, their build and quality, combined with the GPU of your choice, are all determining factors in how your rig might be able to run games or other programs that require either high graphics settings or features that the basic drivers simply do not support.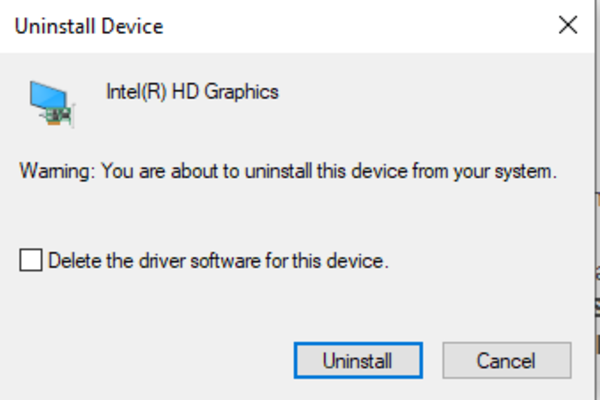
They can be extensive files that may take some time to install, but some of the things that are bundled with them could be of use to you when you run specific programs.
Related posts:
How to Use DDU (Display Driver Uninstaller) on Windows 10/11
Use an expert driver remover tool to eliminate any remnants in one go.
by Milan Stanojevic
Milan Stanojevic
Windows & Software Expert
Milan has been enthusiastic about PCs ever since his childhood days, and this led him to take interest in all PC-related technologies. Before joining WindowsReport, he worked as… read more
Updated on
Reviewed by
Vlad Turiceanu
Vlad Turiceanu
Editor-in-Chief
Passionate about technology, Windows, and everything that has a power button, he spent most of his time developing new skills and learning more about the tech world.![]() Coming… read more
Coming… read more
Affiliate Disclosure
- Display Driver Uninstaller or DDU is a useful tool dedicated to updating graphics card drivers.
- In this article, we explain how to use this little software and its features.
- It’s recommended to perform the actions while operating the system in Safe Mode.
- The program is compatible with older versions of Windows for both 32-bit and 64-bit systems.
XINSTALL BY CLICKING THE DOWNLOAD FILE
To fix various PC problems, we recommend DriverFix:
This software will keep your drivers up and running, thus keeping you safe from common computer errors and hardware failure. Check all your drivers now in 3 easy steps:
- Download DriverFix (verified download file).
- Click Start Scan to find all problematic drivers.
- Click Update Drivers to get new versions and avoid system malfunctionings.
- DriverFix has been downloaded by 0 readers this month.
Having the latest drivers installed on your Windows 10 PC is crucial if you want to ensure maximum performance and stability.
However, sometimes issues with drivers can emerge, and you might have to remove certain drivers from your PC.
If you’re having problems with your graphics card and you need to remove its drivers, you might be interested in a tool called DDU: Display Driver Uninstaller.
Is DDU available for download?
Yes, this software is available for download, and you can use it if you need to uninstall Nvidia drivers completely from your PC. The software will remove the drivers and all their traces from your computer.
It’s also possible to use this software if you want to roll back NVIDIA drivers to the older version if the current one is giving you issues.
It’s important to mention that you can use this tool to uninstall AMD drivers and any other type of GPU drivers, so be sure to give it a try.
Display Driver Uninstaller is a great tool and, in this article, we’re going to cover the following issues:
- Uninstall Nvidia drivers Windows 10 – If you have problems with your Nvidia drivers, you should be able to completely uninstall them using this tool.
- How to use DDU – Display Driver Uninstaller is a simple to use a tool, and in this article, we’ll show you how to use it properly.
- Display Driver Uninstaller AMD, Intel, Nvidia – DDU can remove almost any graphics card driver from your PC. The tool fully works with AMD, Nvidia and Intel drivers.
- Display Driver Uninstaller Safe Mode – Sometimes in order to remove a certain driver, it’s advised that you remove it from Safe Mode. Display Driver Uninstaller can automatically enter Safe Mode and remove the problematic driver from your PC.
- Nvidia display driver deletion of old versions – If you want to completely delete old versions of Nvidia drivers, DDU might be the perfect tool for you.
- Display Driver Uninstaller portable – Display Driver Uninstaller is a fully portable application and you don’t have to install it in order to run it.
- AMD display driver uninstall clean – If you’re having any problems with the AMD display driver and you want to completely remove it from your PC, DDU is the perfect tool for you.
What is Display Driver Uninstaller and how to use it?
Display Driver Uninstaller is a freeware third-party application designed to remove your graphics card drivers.
Sometimes you might experience issues with your graphics card. In order to fix those issues, you might have to reinstall the graphics card drivers.
What does DDU do?
You can always remove the graphics card driver from Device Manager or by using its dedicated uninstaller.
However, the Display Driver Uninstaller allows you to thoroughly remove the driver from your PC. As you might have noticed, certain drivers can leave installation packages or registry entries once you uninstall them.
The Display Driver Uninstaller will remove all files associated with your graphics card including the installation packages and registry entries.
Sometimes it can occur that you can’t uninstall the graphics card driver due to a certain error in Windows 10, and this is why tools such as DDU can be helpful.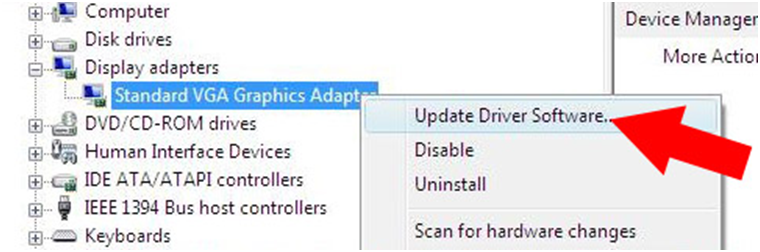
If you’re worried that the currently installed driver is causing any issues on your system, you can completely remove it from your PC by using this tool.
Since this is such a powerful tool, it’s recommended that you create a System Restore point before using it.
In case anything goes wrong while removing the driver you can easily restore your system by using the System Restore point.
If you’re interested in more info on how to create a restore point and how would that help you, take a look at this simple article to find out everything you need to know.
It’s also recommended that you add DDU to the list of exclusions in your antivirus software so it can have full control over your system while removing the driver.
How to use DDU
In order to remove drivers using DDU, all you have to do is download and install the app. Then, select the desired removal option.
Display Driver Uninstaller works with Nvidia, AMD, and Intel drivers.
1. Download the latest version of Display Driver Uninstaller.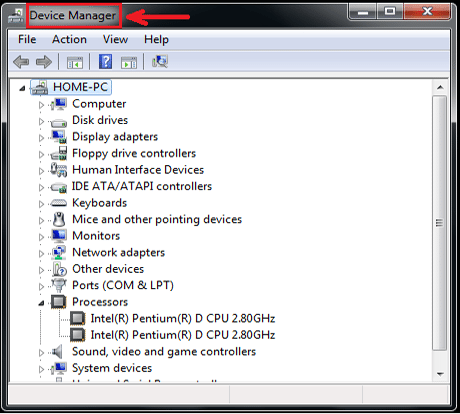
2. The installer tool for DDU will be downloaded as a 7zip archive. Locate the downloaded file and double-click it.
Expert Tip: Some PC issues are hard to tackle, especially when it comes to corrupted repositories or missing Windows files. If you are having troubles fixing an error, your system may be partially broken. We recommend installing Restoro, a tool that will scan your machine and identify what the fault is.
Click here to download and start repairing.
3. Now you’ll be asked to extract the tool. Choose the extract location and click Extract.
4. After the tool is extracted, double click the Display Driver Uninstaller icon to start it.
5. You should see a warning message saying that it’s recommended to use this tool in Safe Mode. You can boot to Safe Mode simply by choosing the Safe Mode option from the Launch option menu.
6. After selecting Safe Mode click the Reboot button. You can also run the application without using the Safe Mode simply by choosing the Normal option from the Launch option menu.
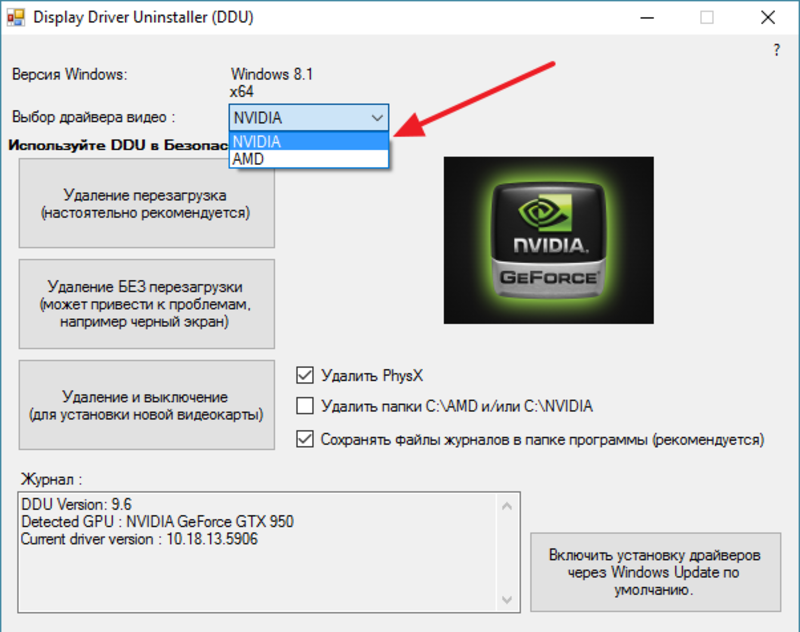
7. When Display Driver Uninstaller opens, the log will show you the information regarding your graphics card. You can also choose the graphics card driver from the menu on the right, but in most cases, Display Driver Uninstaller should automatically detect your graphics card driver.
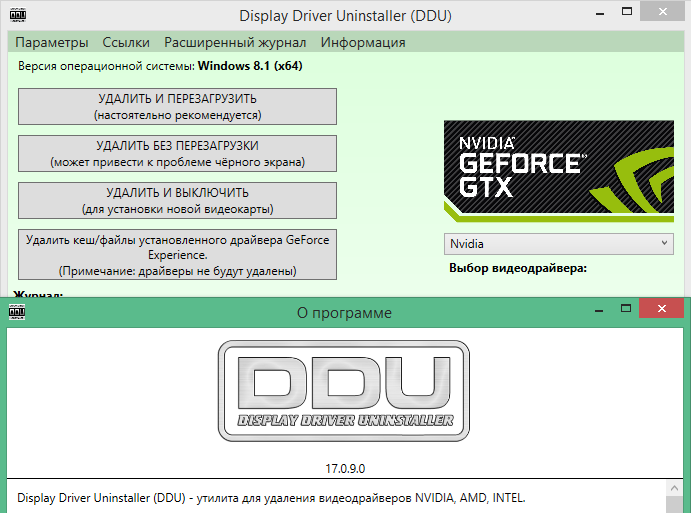
8. You’ll see three buttons available on the left side. If you’re installing a new driver for your graphics card, simply select Clean and restart button.
9. If you’re installing a new graphics card, you can use Clean and shutdown button to remove the driver and turn off the PC.
10. There’s also an option to clean the driver without a system restart, but this option can sometimes cause some minor issues with your PC.
11. After selecting the desired option, wait while Display Driver Uninstaller removes the driver.
After the PC restarts, your display driver will be completely removed, and all driver-related issues with your graphics card will be resolved.
Now you just need to install a new driver for your graphics card and check if the problem is resolved.
⇒ Get Display Driver Uninstaller
Remove your graphics card drivers from Safe Mode
- Click the Start button, hold the Shift key and click the Power button. While holding the Shift key select the Restart option.
- When your PC restarts select Troubleshoot, select Advanced options, choose Startup Settings and click the Restart button.
- You’ll see a list of options. Select any version of Safe Mode by pressing the appropriate number on your keyboard.
- After Safe Mode starts, run Display Driver Uninstaller and follow the instructions above to delete your display driver.
If you don’t manage to access Safe Mode from Display Driver Uninstaller, you can run the tool directly from Safe Mode by performing the steps above.
And if Windows won’t boot into Safe Mode from the first try, don’t panic. We will help you overcome any booting problems that might come along.
As you can see, the Display Driver Uninstaller is a simple yet powerful tool. You don’t even need to install it on your PC to make the most of it.
Needless to say, this means that you can easily run the tool on any PC.
As far as compatibility is concerned, Display Driver Uninstaller will seamlessly work with older versions of Windows, plus it supports both 32-bit and 64-bit systems.
We also have to mention that this tool has support for multiple languages, so it’s quite possible that your native language is available in the list of translations.
Lastly, DDU is more on the lightweight side, and it doesn’t use much of your computer resources. As such, you can run it on almost any computer without problems.
DDU is an extremely useful tool, especially if you have problems with your graphics card and you need to remove all traces of your old display drivers.
Alternatively, you can go for an even better-equipped program such as expert driver removal software to get the job done.
Simple, yet highly effective, DDU will be useful to both advanced and rookie-level users. So, make sure you give it a go.
If you have any other questions about DDU, feel free to leave them in the comments section below.
Was this page helpful?
Start a conversation
Share
Copy link
Newsletter
Software deals
Friday round-up
I agree with the Privacy Policy regarding my personal data
How to Uninstall NVIDIA Drivers in Windows 10
Here you will learn about well-known gaming driver NVIDIA Drivers and explore multiple methods to Uninstall NVIDIA Drivers in Windows 10:
Drivers are essential software that plays an important role in providing the interface to the hardware devices and help them work smoothly on your computer.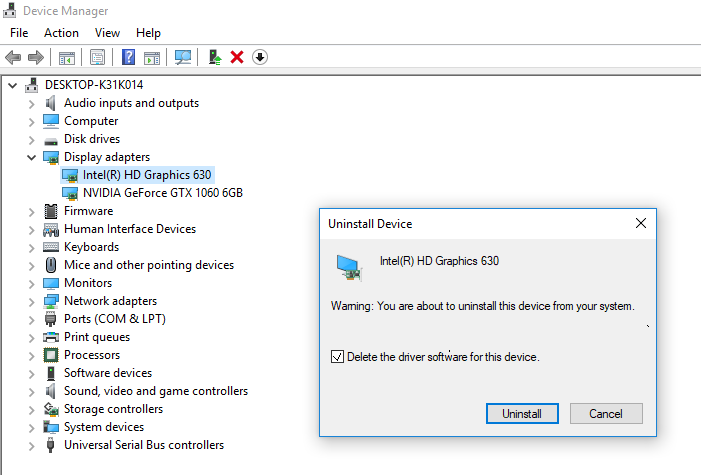 Specifically, drivers hold utmost importance for the gamers, as high-end graphics cards are required to play games efficiently and smoothly on your system.
In this article, we will discuss a well-known gaming driver from leading hardware and graphic drivers manufacturer NVIDIA. Also, we will discuss how to uninstall NVIDIA drivers.
What You Will Learn:
- What Are NVIDIA Drivers
- Why Uninstall NVIDIA Drivers
- Boot System In Safe Mode
- Various Ways To Uninstall NVIDIA Drivers
- Using Control Panel
- From Device Manager
- Deleting Registry Keys
- Frequently Asked Questions
- Conclusion
- Recommended Reading
What Are NVIDIA Drivers
NVIDIA is a leading graphic driver company that focuses on developing advanced and efficient graphic drivers and hardware for games. NVIDIA has enhanced the gaming experience of the gamers and has made it much easier for them to enjoy playing games with in-depth graphics detail.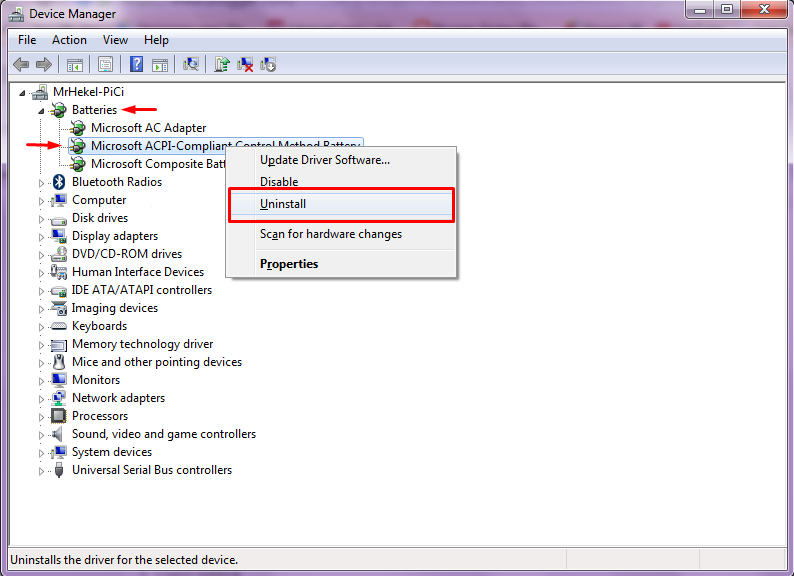
Why Uninstall NVIDIA Drivers
There aren’t any major concerns or system bugs that would make you uninstall NVIDIA drivers from your system, but there are numerous other reasons for which you might need to uninstall these drivers from your system.
We list these reasons below:
- Does not work smoothly on your system: If your system configurations are not equivalent to the minimum requirements for the software, then you will notice that the driver won’t work in the best possible way, which will ultimately result in lagging or slowing down of the system.
- Switching to other drivers: If you are willing to switch to some other drivers, then you will have to uninstall your previous NVIDIA drivers.
- Reinstalling Drivers: Sometimes the drivers might not work properly, and in such conditions, it is best to uninstall the drivers and reinstall them again.
Boot System In Safe Mode
Before uninstalling NVIDIA drivers from a PC, you must boot your system in safe mode.![]() This is required because if some NVIDIA program is already in use while you are trying to uninstall the drivers in Normal mode, the driver won’t uninstall from your system.
This is required because if some NVIDIA program is already in use while you are trying to uninstall the drivers in Normal mode, the driver won’t uninstall from your system.
Follow the steps listed below to boot your system in safe mode:
#1) Open Settings, and click on “Update & Security” as displayed in the image below.
#2) Now, click on “Recovery,” and under the heading ”Advanced startup”. Click on “Restart now,” as projected in the image below.
#3) A system will restart, and a blue screen will be displayed. Click on “Troubleshoot”.
#4) Now click on “Advanced Option” as shown below.
#5) Further click on “Startup Settings“.
#6) Further click on “Restart” as displayed below.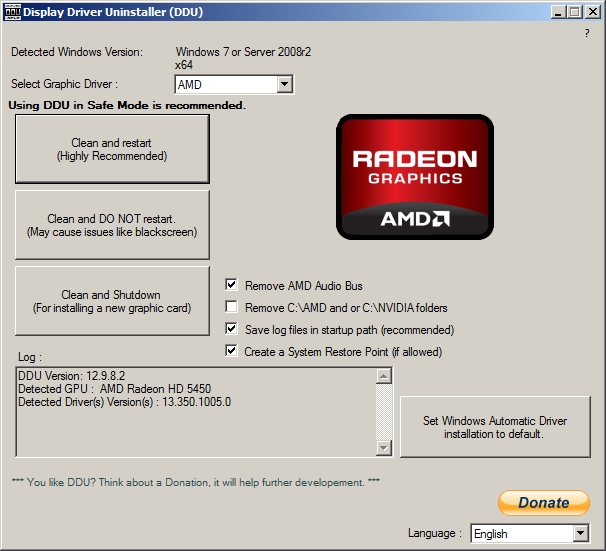
[image source]
#7) Press “F4” from your keyboard, and your system will restart in Safe Mode.
Various Ways To Uninstall NVIDIA Drivers
Once you have booted up your system in safe mode, then follow any of the methods listed below for understanding how to uninstall NVIDIA drivers.
Note: The methods and steps mentioned below are dummy steps that need to be followed in the same way to remove NVIDIA drivers.
Using Control Panel
Control Manager allows users to easily control and manage the various process on the system. These processes include managing devices and uninstalling programs entirely from the system.
Follow the steps listed below to learn how to uninstall NVIDIA drivers using Control Panel:
#1) Press the ‘’Windows’’ button and search for “Control Panel“.
#2) A window will open. Click on “Programs”.
#3) Click on the NVIDIA driver (Scilab is displayed as dummy) and further click on “Uninstall” to uninstall the driver.
Then an uninstall wizard will appear; complete the wizard to uninstall all the driver files from your system.
From Device Manager
Device Manager is a feature of Windows that provides users with direct access to the drivers. It allows the hardware to sync with the system, and in case of any emergency, it even allows the users to uninstall the drivers.
Follow the steps listed below to learn how to uninstall NVIDIA drivers from Device Manager:
#1) Press Windows + R from the keyboard and search for “devmgmt. msc,”. Click on “OK” as displayed in the image below.
#2) Click on “Display adapters” and right-click on the driver. Then click on “Uninstall Device”.
Now restart the system in normal mode and locate if all the driver’s files are deleted.
Deleting Registry Keys
Note: This method is only for advanced users who know the Registry keys and also hold a strong knowledge of their system.
Follow the steps listed below to Delete Registry keys:
#1) Press the Windows button and search for ” Registry Editor”. Click on “Open” as displayed in the image below.
#2) A window will open as displayed below, click on “HKEY_CURRENT_USER” and then further click on “SOFTWARE” and right-click on the NVIDIA folder and then finally click on “Delete” to delete the files.
#3) Now click on “HKEY_USERS” and then click on. “DEFAULT”. Further, click on “Software” and right-click on it, and then click on “Delete” to delete driver registry keys.![]()
Now follow the same steps for all HKEY user folders and delete NVIDIA driver folders from them and restart your system in normal mode.
Frequently Asked Questions
Q #1) How do I uninstall NVIDIA drivers?
Answer: Various ways to remove NVIDIA drivers are listed below:
- Uninstalling drivers using Control Panel.
- Using third-party uninstallers.
- By deleting registry keys of NVIDIA drivers.
- Delete drivers from Device Manager.
Q #2) What happens if you uninstall NVIDIA drivers?
Answer: There will be no error or issue, but your system will switch to default system display drivers.
Q #3) How do I delete all graphic drivers?
Answer: The most efficient and effective way to delete all graphic drivers is by using Device Manager, which allows you to directly delete the driver.
Q #4) Do I need to uninstall old NVIDIA graphic drivers?
Answer: It completely depends on your requirements and hardware configurations that whether you should uninstall old NVIDIA graphic drivers because maybe if the new update shows some issues, then you can roll back to the previous versions.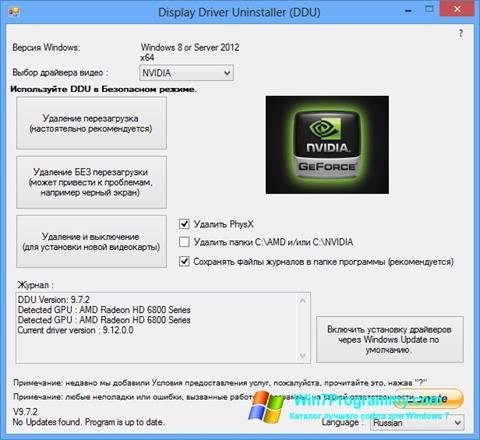
Q #5) What happens if you uninstall the core driver?
Answer: If you uninstall the core driver of your system, then your system might crash or be no longer usable. But mostly, when the user tries to do something like this, then a warning pop-up is displayed on the screen.
Q #6) What happens if I disable my graphic driver?
Answer: If you uninstall your system’s main graphic driver and other installed drivers, too, then your screen will instantly go black.
Conclusion
Using highly configured CPUs, graphic cards, and graphic drivers has drastically enhanced the gaming experience of the users. But sometimes, these drivers may not configure well with your system, so it is best suited to uninstall these drivers.
Therefore, in this article, we have discussed various ways to uninstall NVIDIA drivers from your system.
Recommended Reading
Do You Need to Uninstall Your Old Graphics Drivers Before Installing a New GPU?
If you’re in the fortunate position of swapping your graphics card for a newer, more powerful unit, then you’ll want to make sure you have the appropriate software to support it.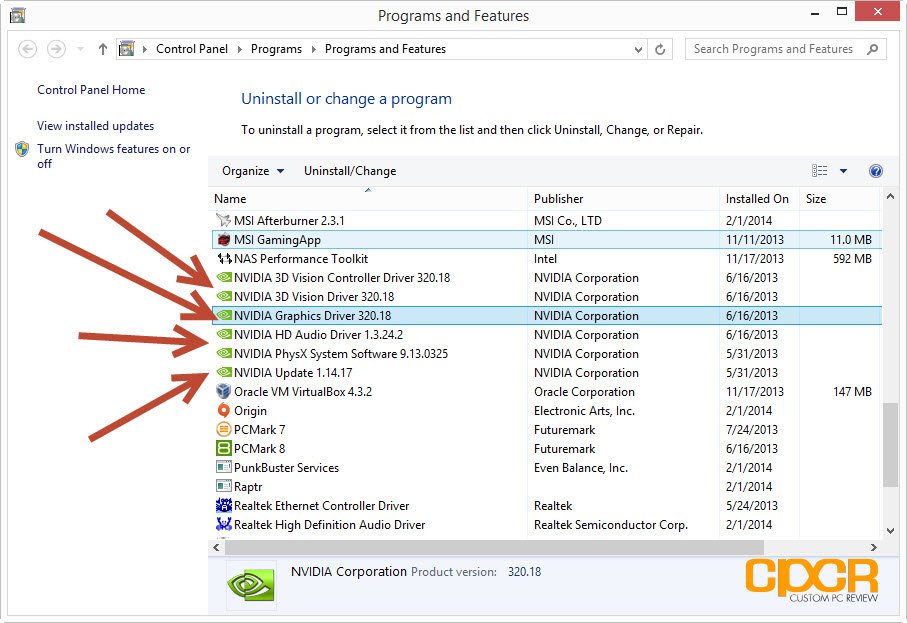
When it comes to graphics cards, this means having the proper, up-to-date drivers installed.
It is only then that your GPU (be it either pro or consumer-grade) can work to its full potential and provide you with the performance output you desire.
In this article, we will answer all questions that relate to updating drivers – and getting rid of old ones – when switching to a new graphics card.
If you’ve already gone ahead and plugged in your new GPU and are experiencing issues due to conflicting drivers, worry not; as we will cover troubleshooting steps for that as well.
What is a GPU Driver
In order to properly recognize and use any piece of hardware equipment, your operating system (OS) needs to have access to that component’s inherent drivers.
In the case of GPUs, the driver is the mediator between the OS and your graphics card.
Not having the necessary GPU software for any PC unit can cause anything from crashes, to screen flickering, stuttering, frame drops, or even artifacts appearing on your monitor.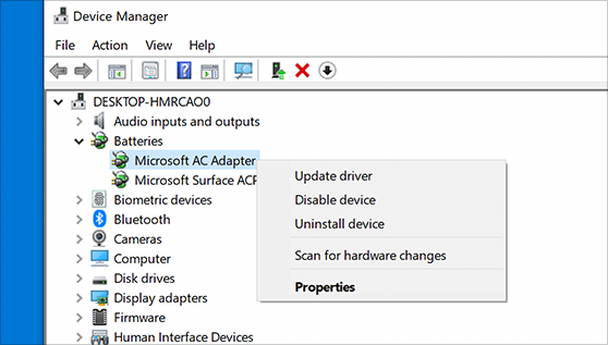
What if You’ve Already Installed Your GPU?
If you’ve already installed your new GPU and are experiencing any of the aforementioned issues, it will – most likely – be caused by the drivers. The best way to alleviate any such issue is by checking to see that your drivers are up-to-date and that there are no conflicts present.
Here are some preliminary methods to help you locate the root cause of the error.
Check For the Latest Driver Updates
The very first step you want to do is check to see that you have the latest drivers installed.
For Nvidia drivers, you can simply open Nvidia’s GeForce Experience software, which will automatically check if your drivers are up to date. This is the same software used to enable other Nvidia features like RTX and Voice.
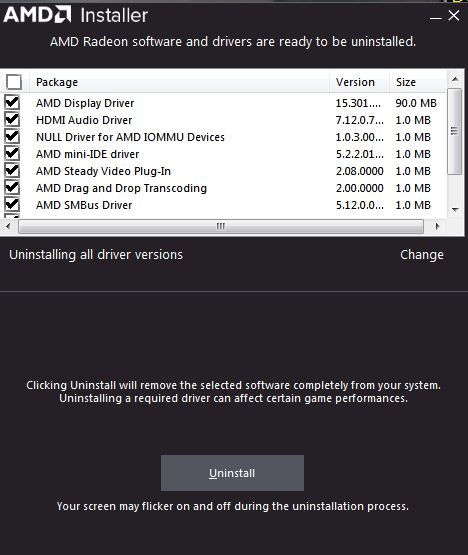
AMD also offers similar functionality via their AMD Radeon Graphics driver installer. This software will auto-detect your current drivers, and only install the software components your device currently needs.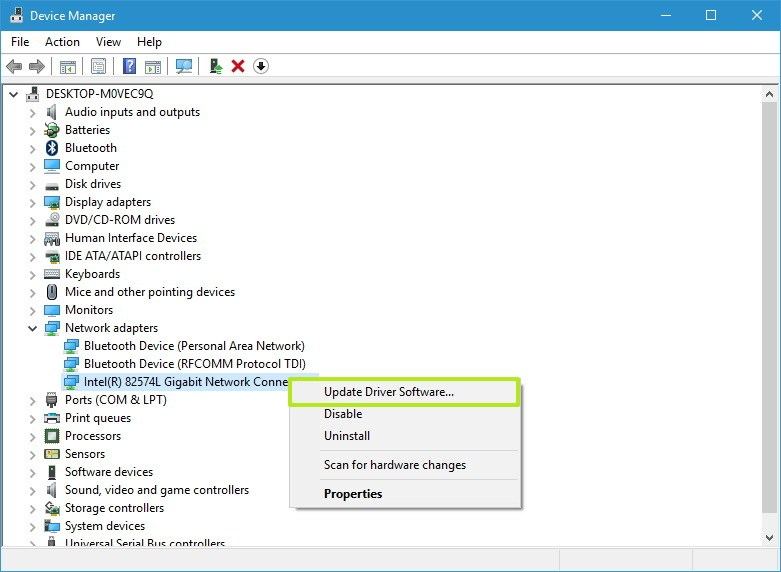
Check For Driver Conflicts (Windows)
If installing the latest driver doesn’t fix the issue, then you may have a driver conflict.
This is usually caused by either a corrupt file or residual components from an uninstalled driver that is interfering with the current ones.
Luckily, Windows will allow you to check for any recent software changes, and automatically examine whether or not a conflict exists.
To reach this functionality, click on the magnifying glass (or use the Windows search function) and type “Device Manager”.
Next, click the “Screen Adapter” drop-down arrow and right-click on your GPU to select: “Scan for Hardware Changes”.
Image-Credit: Drivers.com
If any potential issue is found, a yellow icon (with an exclamation point) will appear, giving you the option to “Troubleshoot”.
To alleviate this conflict, you will need to uninstall all current drivers (the process of which is detailed below) and proceed with a clean installation.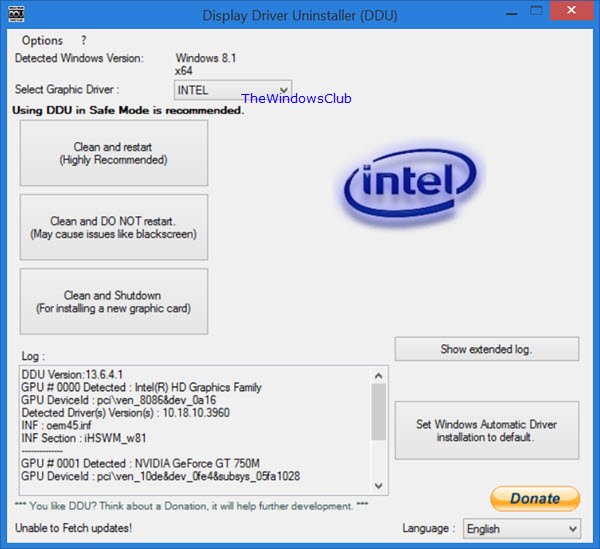
When Should You Uninstall Older Drivers Beforehand?
For those that are yet to plug in their GPU, you may be wondering whether or not to uninstall the older drivers prior to the installation. The main factor which will determine whether or not this will be necessary is the brand of the older GPU, compared to the newer graphics card.
Same Brand GPU Swap
Graphics drivers of the same brand will hardly conflict with each other, as the driver package is similar; whereas only an update may be needed.
Put simply, if the GPUs you will be swapping are AMD to AMD or Nvidia to Nvidia, you will not need to uninstall the previous drivers prior to plugging in the new graphics card.
Different Brand GPU Swap
Older drivers can become problematic when they originate from a different manufacturer than the newer ones.
That is, if your old GPU is AMD, while the new GPU is Nvidia (or vice versa), you will want to fully uninstall all older drivers prior to installing the new graphics card.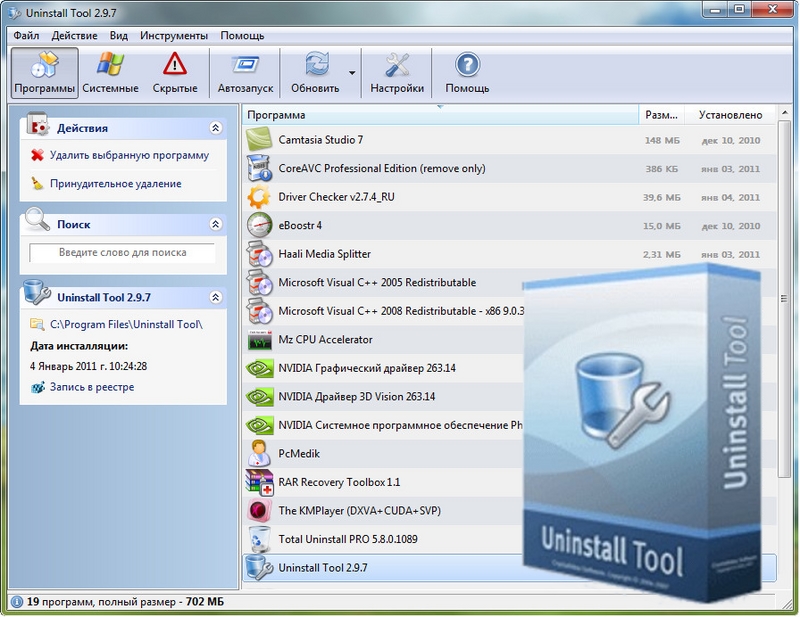 If this is not completed successfully, conflicts may arise that can put your GPU’s performance in jeopardy.
How to Uninstall Older Drivers
So, now that we have an idea of when it is best to uninstall any currently installed drivers on your PC, let’s look at how you can successfully accomplish the task.
Note that it is always best to proceed with the steps below via Windows’s Safe Mode, in order to avoid any unwanted blue screens, crashes, or stuttering that can interrupt the process.
Uninstalling Through Windows
It is generally not recommended to uninstall GPU drivers solely through the operating system, as the process may leave some residual files and folders that can still cause conflicts.
That being said, many will prefer to uninstall the drive through Windows, and then also remove any additional elements via third-party software.
Through Device Manager
To uninstall your GPU’s drivers from Windows, you will want to reach your “Device Manager” via the search function in your toolbar.![]() Afterwards navigate to the “Screen Adapter”, click on the downwards arrow, and double click on your GPU.
Afterwards navigate to the “Screen Adapter”, click on the downwards arrow, and double click on your GPU.
Next, go to the “Driver” tab and click on the final option named “Uninstall”. You can also right-click on your GPU under the Screen Adapter option and select Uninstall from the drop-down menu.
Image-Credit: Drivereasy.com
Through Apps & Features
You can also find the particular driver you’d like to uninstall by navigating to the “Apps & Features” window in your Control Panel.
From here, scroll down until you find the driver in question, click on it (so that it is highlighted), and then select “Uninstall”. In Windows 7, this option will be under “Programs and Features”.
Third-Party Applications
Now, if you wish to provide your PC with a full, clean uninstallation, you’ll want to make use of a third-party application; in order to ensure the process has been carried out sufficiently.
Display Driver Uninstaller
Perhaps the best-known application for the task is DDU (Display Driver Uninstaller), which can be downloaded from their Guru3D website.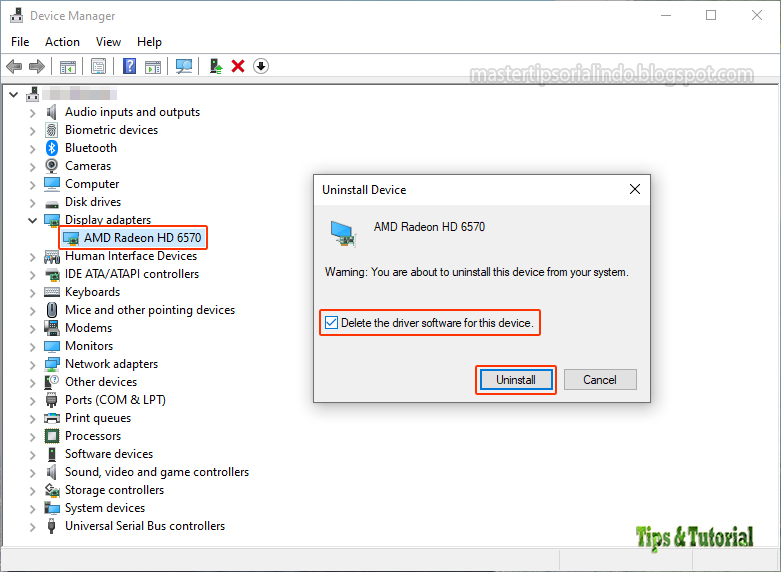
On this same page, you will find extensive AMD & Nvidia support threads, as well as instructions on how to properly utilize the application.
AMD Cleanup Utility Tool
AMD also has an equivalent program for removing unwanted drivers, called the Cleanup Utility.
It removes all graphics drivers, audio drivers, accompanying software, and registries. It is important to note that this application only works for removing AMD drivers, as it will not interfere with Nvidia’s software.
Only use the Cleanup Utility Tool if you are upgrading from an older AMD graphics card to a newer AMD or Nvidia GPU.
Conclusion
To return to the question of the title, the answer is: it depends.
If you are installing a new GPU that is of a different brand than your current GPU, then yes, you will need to uninstall the old drivers with one of the methods above.
Additionally, if you’ve already installed the new GPU and are experiencing issues, again it is best to do a clean install by removing the previous unwanted drivers and registries.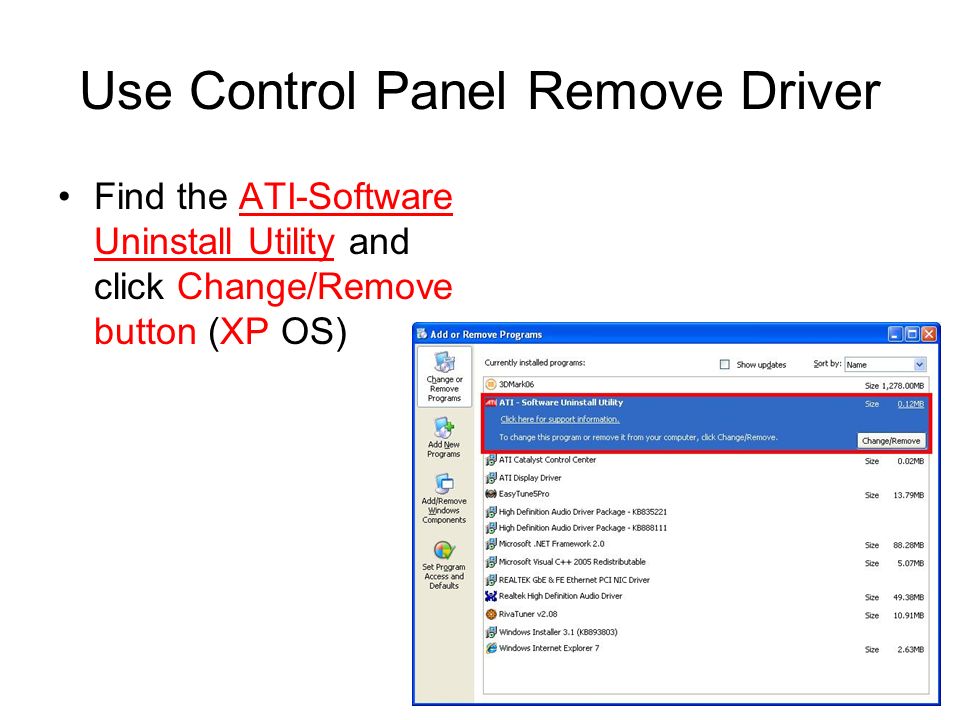
The process might be a bit cumbersome, but it is definitely rewarding, as afterwards you can then enjoy your new GPU’s full performance capabilities for several years to come.
Over to you
Are you looking to add a new hardware component, like a GPU, and are unsure of any precautionary actions you should take?
Have you run into any issues with driver deletions or installations?
Let us know in the comments below! If you need additional help, you can also check our expert forum, where you will find a plethora of users that can help you directly with the particular issue you are facing.
CGDirector is Reader-supported. When you buy through our links, we may earn an affiliate commission.
How to uninstall your current display drivers
| Video card information |
|---|
|
Last updated: March 16, 2008
How to uninstall your current display drivers
Sorry, but no Vista info yet
Unfortunately, Microsoft changed things in Vista and I’m not currently
running it. So, I have no experience uninstalling display drivers under
Vista. But from what I’ve read, the «Add/Remove
Programs» process described below has changed a bit. There’s more than
one way to start the Vista version of add/remove but the one which works for
everyone (apparently) is to open «My Computer» and then click the «Uninstall
or change a program» item which appears towards the top of the window. That
should bring up the new version of the add/remove window. Then click the
display driver to select it as described below in
«Uninstalling with Add/Remove Programs» and then
click the «Uninstall button».
Why you should uninstall
You should always uninstall your current display drivers before installing new
display drivers. If you install new drivers over the old ones, parts of
the old drivers can be left around and cause problems. You can usually
install new ones over old ones without getting into trouble. But when things
go wrong, it may not be the least bit obvious what is causing the problem.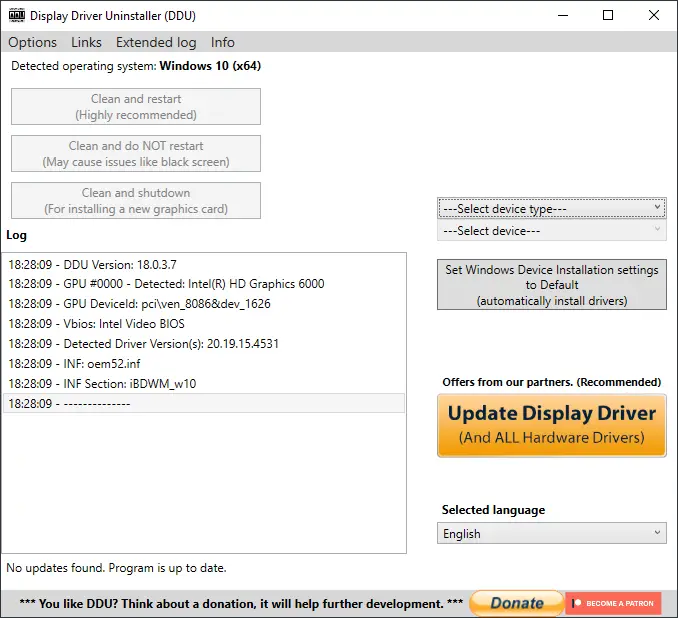 It
It
causes misery often enough that there are specialized programs like
Driver
Sweeper and ATI’s Catalyst
uninstaller which try to eliminate all vestiges of any leftover display
drivers.
Before starting the process of changing display drivers, it’s a good idea to
create a restore point as described
here. That way, if something goes
wrong you can undo the changes you just made. You should always have
administrator privileges before uninstalling drivers (instructions
here).
Uninstalling with Add/Remove Programs
The easiest and most reliable way to uninstall display drivers is with the
«Add/Remove Programs» window. This should always be the first method you try.
All but the most ancient drivers from NVIDIA and ATI can be removed this way.
Most other recent display drivers can also be uninstalled in «Add/Remove
Programs».
To use the add/remove approach, open the «Control Panel» and then
double-click «Add/Remove Programs». In Windows 95, 98, and ME, select the
«Install/Uninstall» tab. Then for all versions of Windows, find the entry
for your display drivers and click it. The entry is usually the name of the
manufacturer of the GPU on
your display adapter followed by «graphics
driver» or «display driver». Then just follow the prompts and remove the
driver. You will then be asked to restart Windows.
If your display driver doesn’t support «Add/Remove Programs» then
you have to use one of the other approaches: if you’re running Windows 95,
98, or ME, then you install the standard
driver; or if you’re running Windows 2000, or Windows XP, you
uninstall the driver in the «Device Manager».
Uninstalling NVIDIA drivers with Add/Remove Programs
If you see an entry which says «NVIDIA Graphics Drivers» or «NVIDIA Display
Drivers» then select it and remove it. But sometimes NVIDIA display drivers
appear as «NVIDIA Drivers» as seen above. This version appears because NVIDIA
makes more than just display adapters.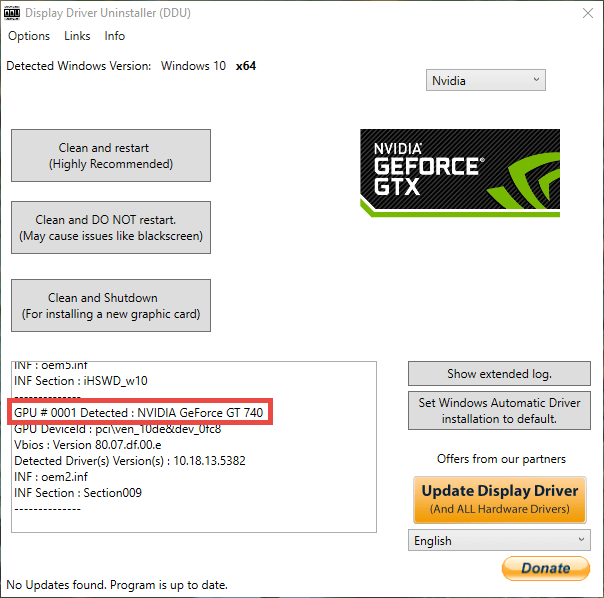 They also make motherboard chipsets which means that
there is more than one kind of NVIDIA driver which can be removed in
«Add/Remove Programs». If you see something like «NVIDIA nForce Drivers»,
don’t remove them. Those are motherboard chipset drivers. In the case shown
above, just select «NVIDIA Drivers» and click the «Change/Remove» button.
If the only NVIDIA driver installed is a display driver, then it will ask you
to verify if you want to remove your display driver.
If there is more than one NVIDIA driver, then it will allow you to select
which drivers to remove. Click «Remove only the following» and then make sure
that only «NVIDIA Display Driver» has a check to the left of it. Click
«Remove» and then it will uninstall your display driver and leave the rest of
the NVIDIA drivers installed.
If you have more than one NVIDIA display adapter installed in your computer,
removing the display driver will remove the drivers for all display adapters
which are using it.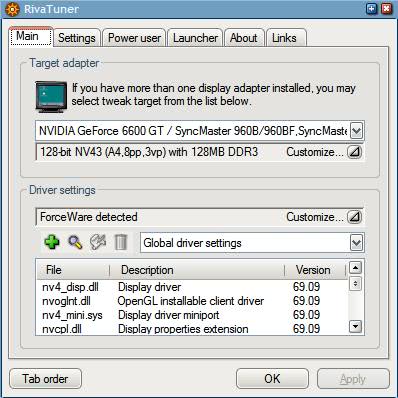
Uninstalling ATI drivers with Add/Remove Programs
When uninstalling ATI drivers using «Add/Remove Programs», you may have an
entry for «ATI — Software Uninstall Utility». The uninstall utility removes
the ATI control panel or ATI catalyst control center, the ATI display driver,
any ATI demos, and the uninstall utility itself. This utility is the easiest
way to uninstall the ATI software. Just select the uninstall utility, click
the button, follow the prompts, and then reboot.
If you don’t have the uninstall utility then you should have the «ATI Display
Driver». You probably also have either the «ATI Control Panel» or the «ATI
Catalyst Control Center». First uninstall the «ATI Control Panel» or the «ATI
Catalyst Control Center» if you have either of those. You will be prompted to
restart the computer but you can cancel out of that. Then uninstall the «ATI
Display Driver».
If you have more than one ATI driver installed, then a window will ask you to
select which driver to uninstall. In this example, both drivers are installed
for a single Radeon 9700 Pro video card. The «Radeon 9700 PRO» entry is the
output for the main monitor and «Radeon 9700 PRO — Secondary» is the output
for the secondary monitor. Both drivers are listed even if you’re only using
one monitor. You should uninstall both of them. If you have any other ATI
display adapters in the computer then they will appear in this list as well.
Put a check to the left of all of the display drivers and then click «OK» and
follow the prompts and reboot.
If you have Catalyst drivers installed but for some reason you cannot remove
them in «Add/Remove Programs», you can download a copy of the ATI Catalyst
uninstaller utility from ATI’s support site.
Unfortunately I can’t give you a direct link to the utility anymore because
the morons at ATI decided to prevent links into their support site. You’ll
just have to navigate their labarynthine website on your own. Start
here and click the «Customer Care»
link at the top of the page.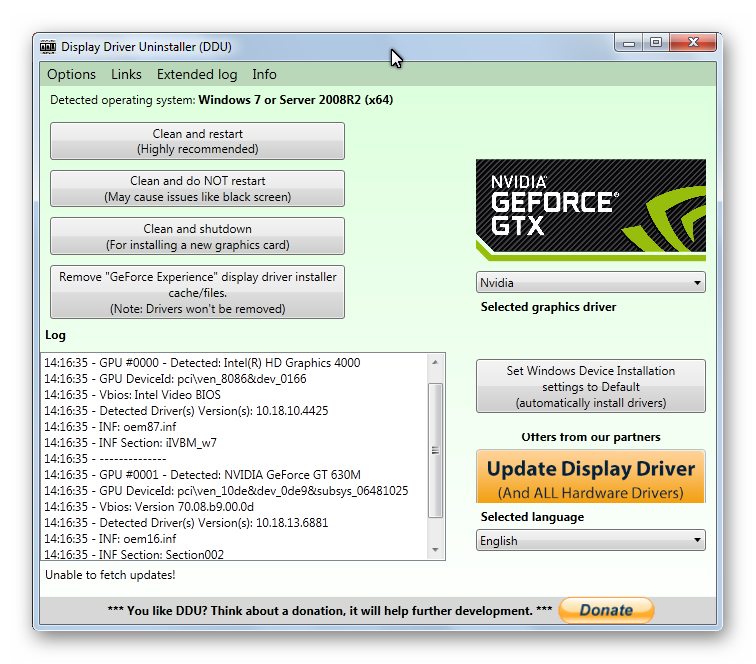 If a drop-down menu appears when you move the
mouse over «Customer Care» then just ignore it and click «Customer Care» at
the top. Type «catalyst maintenance utilities» into the search box in the
upper left part of the window and then click the «GO» button. Look in the
search results for the «CATALYST — ATI Maintenance Utilities» link and then
click it. Click the «cat-uninstaller.exe» link to download the utility.
The only difference between this utility and the «ATI — Software Uninstall
Utility» in «Add/Remove Programs» is that the downloaded version does not
uninstall itself.
Uninstall in the Device Manager in Windows 2000 or XP
Windows 2000 and XP display drivers are normally removed in the «Add/Remove
Programs» window but some drivers may not work that way. You can also have
damaged installations which should appear in «Add/Remove Programs» but do
not. In cases like that, you can uninstall the driver in the «Device
Manager». This approach only uninstalls the display driver itself and not any
supporting programs like control panels, so it should only be used if you
can’t do it in «Add/Remove Programs». To use this method, open the «Control
Panel» and then double-click «System». Select the «Hardware» tab and click
«Device Manager». Then click the «+» to the left of «Display Adapters» to
show the installed display adapters.
In both examples above, the installed drivers are actually drivers provided
by Microsoft. This kind of display driver does not need to be uninstalled
like a normal one. It doesn’t hurt to uninstall it, but it isn’t necessary.
If you’re not sure whether it’s a Microsoft display driver then just go ahead
and uninstall it. To uninstall the driver, right-click it and then select
«Uninstall». The Radeon 9700 Pro shown above has two monitor outputs. The
«Radeon 9700 PRO Family» driver is the main monitor output and the «Radeon
9700 PRO SEC Family» driver is for the second monitor output. You should
uninstall the driver for both outputs.
Change to the standard driver in Windows 95, 98, or ME
If you can’t use the «Add/Remove Programs» method in Windows 95, 98, or ME,
then you have to uninstall your current display driver by installing a
default driver to replace it.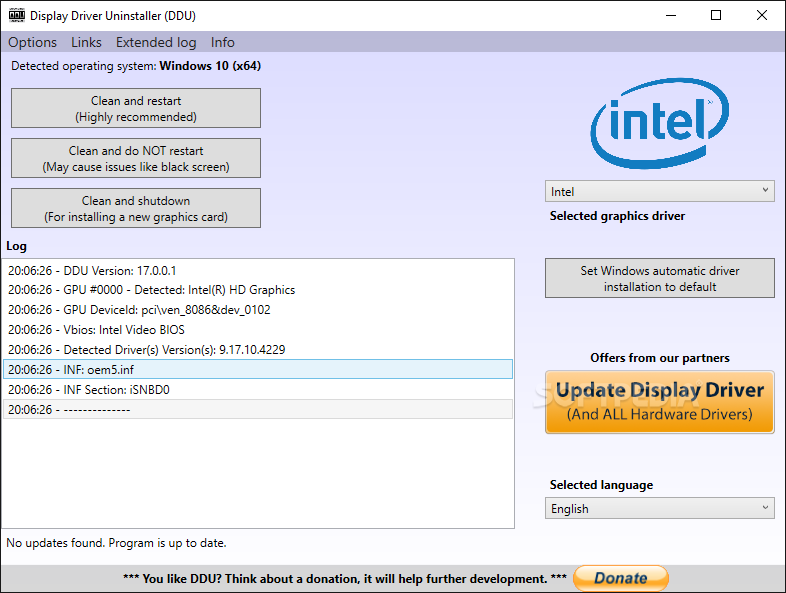 Open the «Control Panel» and then double-click
«Display» to bring up the «Display Properties» window. Select the «Settings»
tab, click «Advanced», and then select the «Adapter» tab.
That displays the information about your current display adapter. Click
«Change» to start the «Update device driver wizard».
Click «Next», select «Display a list of all drivers in a specific
location…», and then click «Next» again.
Select «Show all hardware» and then click on «(Standard display types)» which
is at the top of the list on the left. Then click «Standard PCI Graphics
Adapter (VGA)» in the list on the right unless you’re using a REALLY
old computer with an ancient ISA video card in which case you should select
«Standard Display Adapter (VGA)» (and run out and buy a new computer). This
tells Windows to load up a generic display driver which also unloads your
current driver.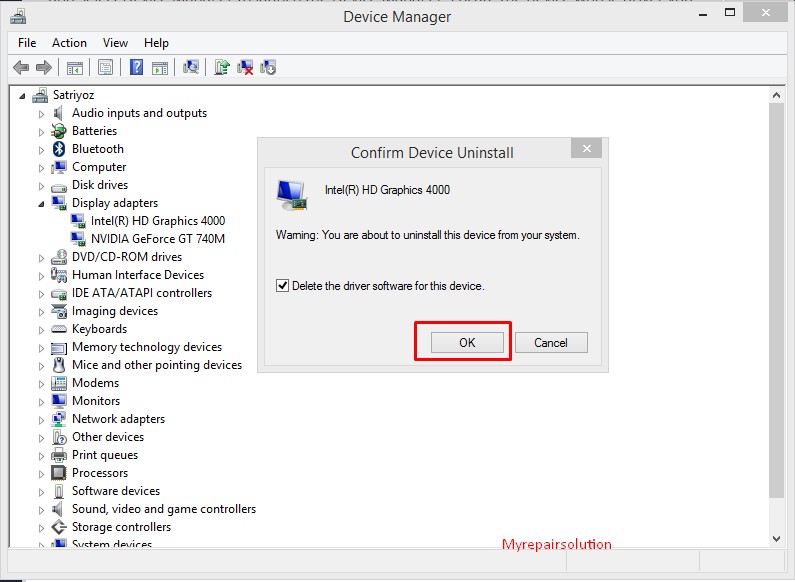 Click «Next» twice and then «Finish» and then reboot Windows.
Once Windows has rebooted, you should be operating with a generic display
driver.
Dealing with uninstall problems
It’s a good idea to be thorough when you’re uninstalling display drivers
before changing video cards or before updating your drivers. Unfortunately,
sometimes things go wrong. Perhaps you forgot to uninstall your old drivers
before installing new ones, or maybe your computer crashed while changing
drivers. Whatever the cause, you may have parts of leftover display drivers
in your computer which are difficult to get rid of. You can use a program
called
Driver
Sweeper to try to clean out leftover drivers. It’s a free program which
can clean up ATI and NVIDIA display drivers for Windows 2000, Windows XP, and
Windows Vista.
If «Add/Remove Programs» successfully uninstalled your display drivers, then
you don’t need to run Driver Sweeper unless you like to be extremely
thorough. Most people don’t run this kind of program unless they are having
problems with their display drivers. You should always uninstall your display
drivers using one of the methods above before running Driver Sweeper. It is
not a full uninstaller. It just gets rid of things which may be left over
from a regular uninstall. What follows is a general description of how to use
Driver Sweeper. The program contains help information which you should read
before using Driver Sweeper to clean things up. The help information may
contain instructions which apply to your specific situation.
To uninstall a display driver using Driver Sweeper, the first step is to
uninstall the display drivers using one of the methods described above. Try
«Add/Remove Programs» first. If you can’t uninstall
that way then try to use one of the other methods. But when your system
restarts, boot in safe mode (instructions
here) rather than booting normally.
At that point a «Found New Hardware» window may try to install new display
drivers. Cancel out of that if you’re given the choice. If you can’t cancel
out and it installs a display driver, then uninstall that display driver in
the «Device Manager» as explained above except
uninstall the driver even if it’s a Microsoft driver and don’t allow it to
reboot. The goal here is to get into safe mode with only the default VGA
driver installed. Windows 2000, XP, and Vista sometimes install drivers for you anyway so you need
to try to stop them. Once you are in safe mode disable any anti-virus scanner
you have running and run Driver Sweeper.
Go to the «select» box on the left and click on the driver you want to sweep.
Select «ATI — Display» for ATI video cards or select «NVIDIA — Display» for
NVIDIA video cards. Don’t select «NVIDIA — Chipset» because it’s designed to
sweep chipset drivers for motherboards with NVIDIA chipsets. Once you’ve clicked on the
driver to sweep, click on the «>» button. Then the selected driver will show
up in the «Remove» box on the right.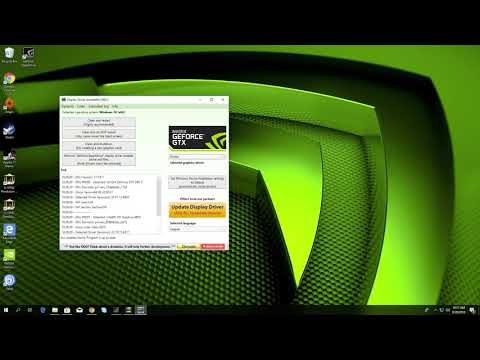 If you’ve selected the wrong one then
click the »
If the uninstall which you did just before rebooting into safe mode was
succesful, then reboot and you’re done. But if that uninstall had problems or
you couldn’t do it, then you may have a little tidying up to do. If you had
an uninstall problem, then when you reboot you should go look in «Add/Remove
Programs» and see if any things related to your display drivers are still in
the list. There probably won’t be anything but if there is, then try to
remove them one last time. You should also go into the «Device Manager» and
look for display drivers. After Driver Sweeper runs they may show up as
disabled. Uninstall them as described above. There may
be one or more reboots to go through this tidying up process. Your goal is to
eliminate any signs of the old display drivers or supporting programs like
control panels.
| Power supply information |
|---|
|
| Useful technical information |
|---|
|
| Random stuff |
|---|
|
How to completely remove a driver from Windows 7/8/10 ?
It’s no secret that before installing new drivers, it is advisable to remove the old ones.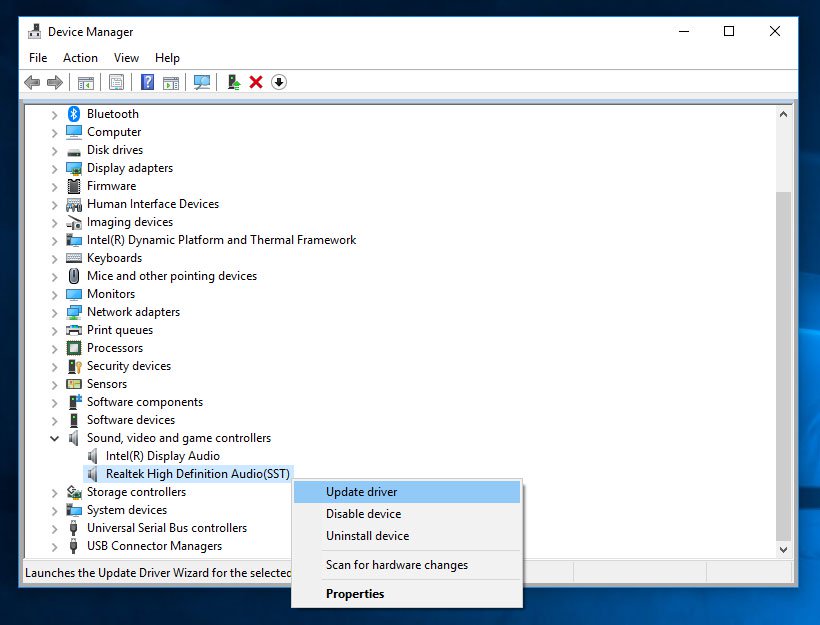 Modern installer programs, in principle, do everything themselves, but still sometimes there are situations when the new driver does not work correctly. If you remove and reinstall the video card driver, then at first glance everything works fine, but in games or in graphic applications there may be brakes, glitches, artifacts in the image, or everything hangs in general.
It especially makes sense to clean up information about old drivers when changing from one video card to another.
Contents
Standard way to uninstall drivers
Important! Before making any changes, create a system restore point!
This method is not original, everything is the same as when removing any program. For example, I will remove the drivers from the NVidia video card. Go to «Control Panel -> Add or Remove Programs» or find through the search in the «Start» menu
and delete everything related to NVidia (in my case) by double clicking on the positions.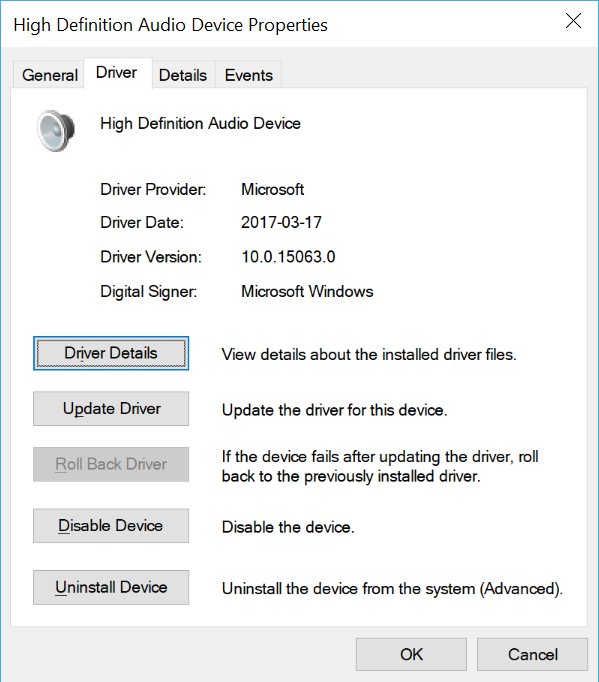
Follow the wizard and reboot. If your device was not found in the control panel, then you need to remove the driver manually:
- Go to the Device Manager (press «Win + Pause» and select «Device Manager» on the left)
- Finding the right device
- Go to the «Driver» tab
- Click «Delete».
Programs for removing unnecessary drivers
But the standard wizard does not clean up all files and registry keys, so third-party developers are often resorted to for complete removal. I have prepared an overview of three such programs for you:
- Driver Sweeper — free, but outdated
- Driver Fusion — there is a paid and free version of
- Driver Cleaner — paid program
IMPORTANT! Do not remove drivers from the system if it is not necessary!
Some users install these programs to “clean up the system of junk” and improve its performance, and as a result they have to restore or reinstall Windows for a long time.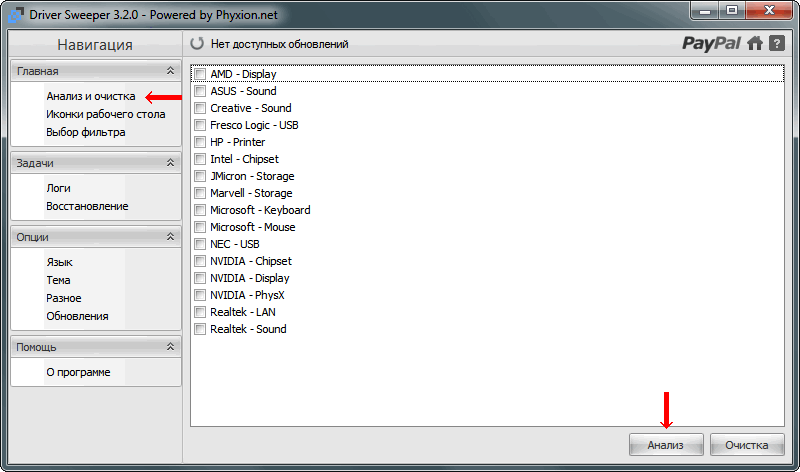 In fact, there will be no performance improvement due to the removal of unnecessary drivers. After all, Windows simply does not load them. It may speed up the process of installing new devices and free up some space on the C: drive and nothing more!
The general algorithm for removing drivers using any program is as follows:
- Program installation
- Standard removal via control panel
- Booting Windows in Safe Mode
- Program start, device selection from list, analysis
- Cleaning drivers
- Reboot
I specifically highlighted booting in safe mode, because. this is a very important point. If this is not done, then outwardly everything will work out, but in fact, important system files and registry keys will not be cleaned up.
Driver Sweeper
A popular and free program, but the developers stopped supporting it, so every year it becomes more and more outdated. But thanks to the availability and reliability of Driver Sweeper, it is constantly used.
Download Driver Sweeper
After the first launch, I advise you to immediately change the interface language to Russian. To do this, click on the “Language” item and select “Russian” from the drop-down list.
We go to the topmost item «Home — Analysis and Cleaning» and select the drivers you want to remove on the right. For example, to remove the NVidia video adapter, I checked «NVidia — Display» and «NVidia — PhysX». To remove the AMD Radeon driver, you must check the very first item «AMD — Display». If your device is not in the list, then this program is not suitable.
Next, click «Analyze» and wait until the program analyzes the files on the disk, the keys in the registry. After that, a list of what the program can remove will appear. By default, all the checkboxes are already checked, so just click the «Clear» button.
Reboot and voila! The system has been cleared. Particularly inquisitive will run the program again and find that it again found registry keys to remove. Yes, it will be so no matter how many times you run it while the video card is installed in the computer. After all, the operating system will create new entries every time in order to work with the video card at a minimum level. Pay no attention to it.
This program has a cool feature — it saves all deleted files and registry keys, and if you wish, everything can be returned to normal. To do this, go to the «Tasks -> Recovery» section, select the date / time the driver was removed and click «Restore».
The driver will be restored to its previous state. The beauty of this feature is that it restores all the files and folders that it has deleted. Unlike a system restore point, which can only restore the registry and some files from the Windows system folder.
There is one more feature in Driver Sweeper: the ability to add your own filter. Those. if you know which files and registry keys you need to delete, you can list them in the menu «Home -> Filter Selection» and save to automate the manual cleaning process. You can also add new entries to existing filters. Maybe someone will need this functionality.
Treexy Driver Fusion
I mentioned above that Driver Sweeper is no longer being updated, but that’s because the developers are now working on a new product — Treexy Driver Fusion. This is an improved version, but unfortunately the main functionality of the program is available only in the paid Premium version. However, the features of the free version may be enough.
Download Driver Fusion
The program interface is simple, but in order to use all the functionality, you will be asked to purchase a paid version. The free version only finds drivers for popular devices. So, go to «Driver Cleaner -> Device Type -> Manufacturer». The program will analyze the system for the presence of this type of driver and display a list. It remains to click the «Clear» button and restart the computer:
Driver Fusion, although limited in functionality, should be aware of the latest versions of drivers for video cards, sound cards, controllers, printers, monitors, etc. , and the nuances of removing them. The developers report that in addition to numerous additional features, the paid version can delete protected files and registry keys.
Driver Cleaner
For a snack left a paid product Driver Cleaner. Today, this program can be easily downloaded from torrents or file sharing services on the Internet, and take advantage of all the charms of a paid product. When you first start the program, I recommend immediately updating the databases. They contain information on how to properly uninstall the most recent drivers. Kind of like antivirus. It’s funny, but the version downloaded from torrents is updated correctly and doesn’t swear ?
Go to the menu «Tools -> Software Update»
In the update window, click «Next», I found 8 files that contained information about AMD and NVidia drivers. Click «Finish» to download updates and restart the program.
Next, as usual, select the drivers from the list. To select everything related to NVidia or AMD, respectively, select these items (that is, it is not necessary to select each of the sub-items and add them to the list). If you need to select several items, then check the box «Several filters at the same time» and add them to the list using the arrow button.
To be able to select individual files and registry keys after analysis, which will be cleaned, do not forget to check «Use Advanced cleaning». And click «Scan» or «Start». I note that this program has the largest list of supported devices, and after the analysis, the largest number of files and keys to be deleted was found.
After the analysis, which took me much longer than previous programs, a list appears in which you need to select all the items and click «Clean».
Everything left to reboot! As you can see, each program has its own advantages and disadvantages. You can use all three at once in turn, it will not be worse.
UPDATE: There is one official Display Driver Uninstaller utility that appeared on the Radeon website after the article was written. You can get acquainted with the functionality and download it here http://radeon.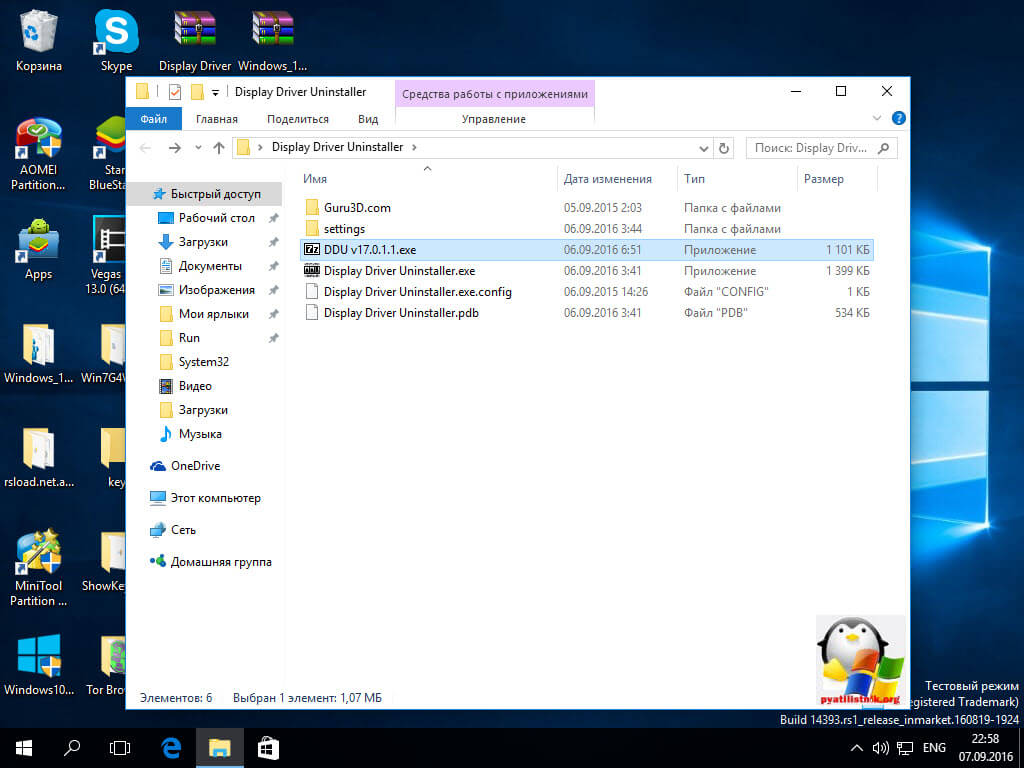 ru/downloads/utils/ddu/. Suitable for AMD, NVidia and Intel.
I hope you don’t have any questions, and if you have something left or something to add, then you are welcome in the comments.
And here is a video with an analysis of the three programs I described.
Watch this video on YouTube
How to uninstall or reinstall a driver in Windows 10
You probably know that the components of all modern computers need so-called «drivers». This is software that kind of explains to the operating system the operation of the connected device (video card, for example) and ensures its full and stable operation. Without the correct driver, the component either works incorrectly or does not work at all. Installing the driver is a very simple matter. Modern versions of Windows 10 are able to download drivers automatically from the update center, eliminating the need for the user to download something manually. Others prefer to install them on their own, but this business also does not require special skills or knowledge.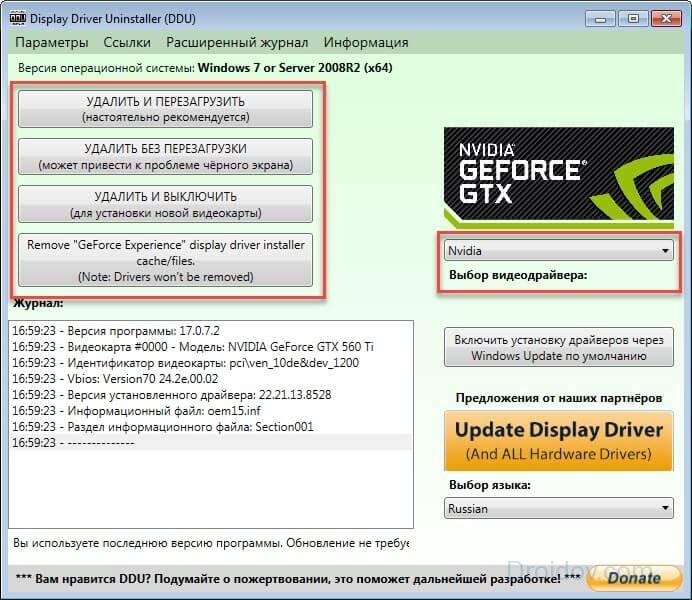 Problems can start when you need to reinstall or uninstall the driver. This guide will tell you how to uninstall a driver in Windows 10 and then revert it back.
Why reinstall a driver
Reinstalling drivers (rolling them back or removing them completely) often resolves a large number of potential problems. A software bug, incorrect driver, buggy version, or other driver problems are almost 100% likely to cause problems with the device for which this driver was created. For example, the video card may not give out the maximum of its capabilities, the network card stops working, the card reader turns off, or the computer completely reboots or falls into the blue screen of death. It is at such a moment that it becomes necessary to uninstall the driver in Windows 10 and reinstall it.
How to uninstall a driver in Windows 10
There are several ways to perform this procedure. The first is performed through the Device Manager — a special section of the operating system, which contains a list of all connected devices to your computer.
FYI : To uninstall a driver on Windows 10, you need an Administrator account or password.
For reference : Removing the drivers will automatically disable the device. If you uninstall the graphics card driver, the screen resolution will automatically drop to very low. When you uninstall the Bluetooth drivers, all connected peripherals will automatically turn off, and uninstalling the network card driver will lead to the disappearance of the Internet connection, and so on. Keep this in mind.
- Click Win+X and select Device Manager from the menu that appears. This is the fastest way to open this section, although links to Device Manager can be found elsewhere in the system.
- For the convenience of the user, the devices are divided into categories. This makes it easier to find the right component. For example, you want to uninstall a video card driver. To do this, expand the item Video adapters , right-click on the video card that appears and select Properties .
- In the new window, go to the tab Driver and click Uninstall device . Confirm your action and wait for the procedure to complete.
The second method for uninstalling drivers is through the Applications and Features interface in Settings or Control Panel. This method is not suitable for all devices, since not all drivers are displayed in the list of installed applications. If you cannot find the driver you need in the Applications & features section, use the first method.
- Press Win + I and go to Applications — Applications and Features .
- Find your hardware driver in the list of installed applications, click on it, and then click Uninstall . Keep in mind that some devices (video card, for example) may have multiple applications included in the driver package. You need to remove everything that can slightly complicate the task.
Optionally, you can use the classic Control Panel interface.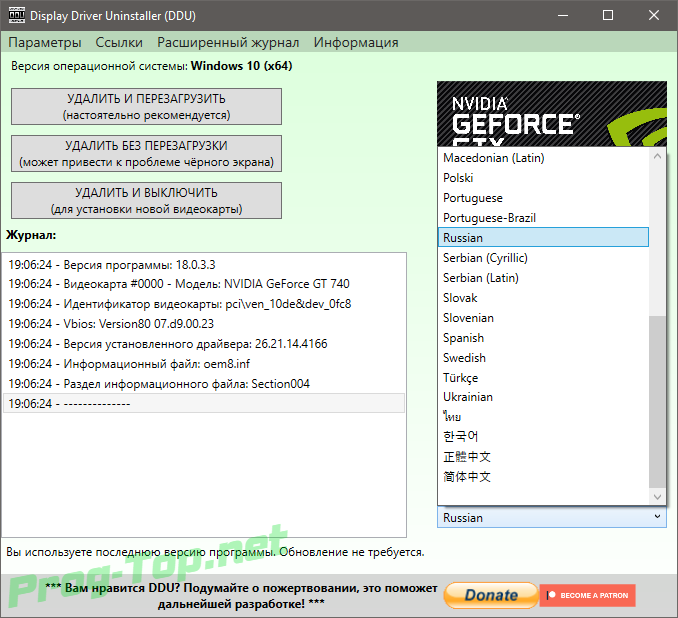 The essence is the same, just the interfaces are a little more familiar for those who have only recently switched to Windows 10, and before that they “sat” on Windows 8.1 / 7 and older.
- Press Win + R and type Control .
- In the Control Panel window that appears, click Uninstall a program .
- Find the driver you need in the list and uninstall it.
There is also a third way to uninstall and reinstall drivers. It involves the use of so-called «driver managers». These are applications that scan the system and its drivers, check for new versions, and prompt you to update them. There are paid and free versions, but the quality and reliability of their work is an endless source of debate among Windows enthusiasts. In our instructions, we talk about the methods built into the system and rarely touch on third-party applications. Of course, driver managers in some sense can make life easier for the user, but we recommend that you learn how to figure out the process of installing or uninstalling drivers yourself.
How to reinstall the driver in Windows 10
After uninstalling the driver, there is a logical need to reinstall it. Again, there are several ways to do this.
The first and most reliable is to download the driver from the manufacturer’s website. There you can always find the latest and most up-to-date drivers for supported operating systems. Also, manufacturers often offer previous versions of the software. This is necessary so that in the event of a buggy update, users can download the previous stable version and wait for the corrected driver to be released. Go to the official website of the manufacturer, find your device, download the driver installation file and install it. The matter is very simple and not as scary as it might seem to a novice user.
The second way is for lazy people. You can let the system do everything for you. After uninstalling the driver, go to Windows Update and check for updates. Windows should find the missing driver, download it, and install it.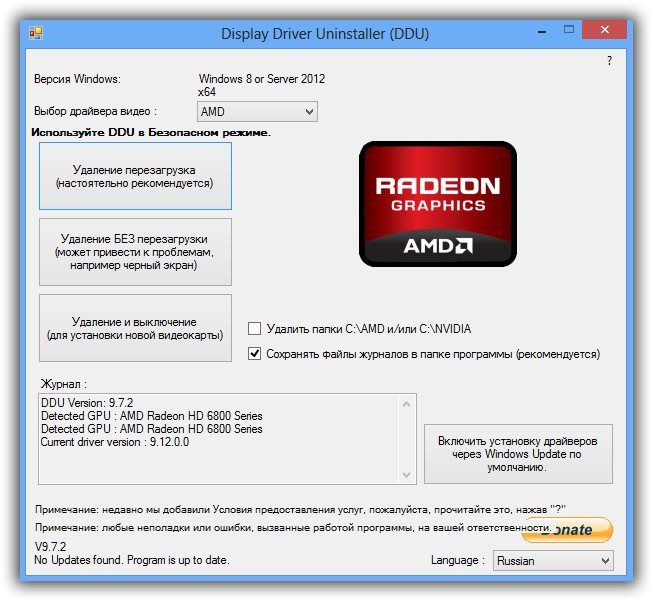
Keep in mind that not all manufacturers publish their software on Windows Update. Also, the latest version of the driver is not always available there. This method is well suited for those who do not have the time or desire to surf the Internet in search of the right driver. If the search through the update center did not return any results, go to the manufacturer’s website and manually download the driver you need.
The third way is the same driver managers. They can scan the system for driver updates or devices that do not have software installed. There is nothing shameful in using such software, but true users always do everything manually.
How to update a driver on Windows 10
Modern computer components are designed in such a way that their drivers come with utilities that can automatically update drivers. These utilities can download updates without user intervention at all. If you want to check for driver updates, check out these utilities first.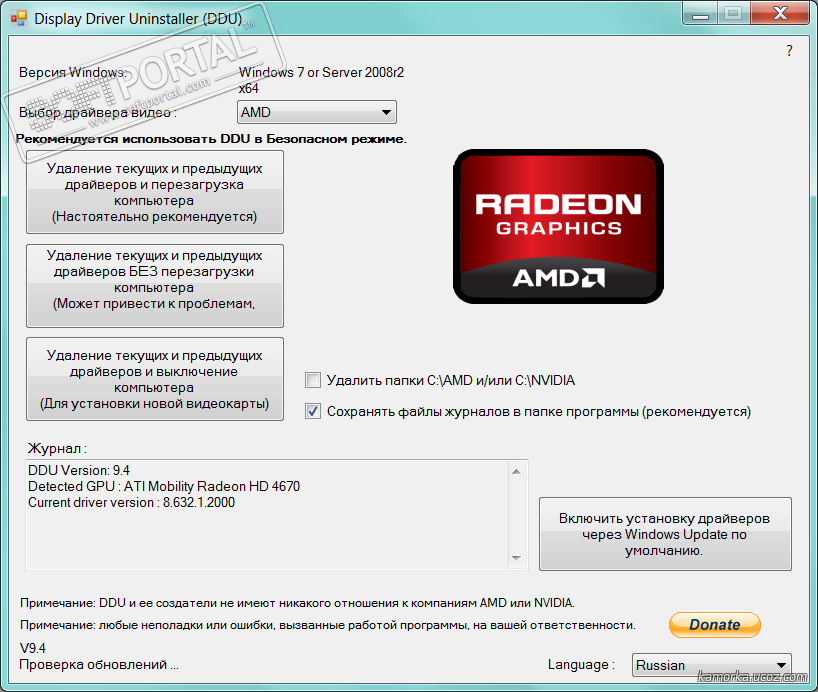 You can also download and install the latest drivers from the manufacturer’s official website. When installed, the driver will do all the updating work for the user.
You can also update the driver the old fashioned way from the Device Manager.
- Download the new version of the driver and extract (if the driver is archived) to the folder you need.
- Click Win + X and select Device Manager .
- In the list of devices, find the one you need and right-click on it. Select Properties .
- Go to tab Driver and click Update Driver .
- You can select Automatically search for updated drivers or Search for drivers on this computer . In the first case, the system itself will try to find the right driver on the Internet and Windows Update. If you downloaded the driver manually before, choose the second option.
 Sometimes the automatic search for drivers on the Internet does not work, so it is best to use the last option of manually specifying the location of the new driver.
 - Specify the folder where the new driver files are located and click Next . Wait for the system to complete the update.
FYI : Driver signature error can sometimes occur when manually installing drivers. In this case, you need to disable driver digital signature verification in Windows, and then reinstall the driver.
How to roll back to a previous driver version in Windows 10
Roll back a driver to diagnose problems with your hardware or work around a bug in a new driver version. For example, you notice hardware problems and are trying to find the source of them, or you experience stability or performance problems immediately after updating a driver. Rolling back a driver is similar to uninstalling it.
- Press Win + X and select Device Manager .
- Find the category you need in the list of devices, expand it and select the required component. For example, a video card.
- Right click on the device and select Properties . Go to the Driver tab and click Roll Back . Here you may encounter the fact that the rollback button will not be available. This means that the previous versions of the drivers are not saved in the system. Some drivers are designed in such a way that they automatically remove previous versions after updates. If you are faced with such a situation, then the only option for you is to uninstall the driver, download the previous version of the driver from the manufacturer’s website and then install it. Also keep in mind that Windows only stores one previous version of a driver. In other words, the system does not archive all installed drivers.
- If the button Rollback is available, feel free to click on it, confirm the action and wait for the procedure to complete.

After the rollback is complete, restart the computer.
How to uninstall video card drivers on Windows and why is it needed?
- Why uninstall the graphics card driver?
- Standard driver uninstallation
- Uninstalling the driver from Device Manager
- Uninstalling the driver using Display Driver Uninstaller (DDU)
- Manual removal of the driver
Uninstalling drivers for any devices, including video cards, is carried out in the same way. The main difference between the graphics driver is that it consists of a fairly large number of files and auxiliary system programs. The task of the user when uninstalling the video card driver is to get rid of all these files (including the files of executable programs). Otherwise, the next time you install a new version of the software, you may experience various problems with the device.
Let’s look at all the main ways to uninstall video card drivers, including manual «clean» removal (ie all driver files stored on the hard drive).
Why uninstall the video card driver?
Main reasons:
- There are problems with the video card or programs using it (3D games do not start/crash/slow down, the monitor turns off/blinks spontaneously, high-quality video does not play/slows down, colors are displayed incorrectly on the computer display, and much more ).
- Another video card was connected to the computer, and the driver from the previous card must now be removed to avoid problems.
- The new version of the driver is not installed and gives an error that the computer already has video card software (i.e. the driver cannot be updated).
There may be other reasons. Whatever it is, let’s get started.
Standard driver removal method
This method may not work if the driver was not installed using the official installer (ie using one of the driver installation utilities).
- Open the Windows Control Panel from the Start/Start menu. Click on the item «Uninstall a program» or «Programs and Features» (depending on the settings for displaying the elements of the «Control Panel»).
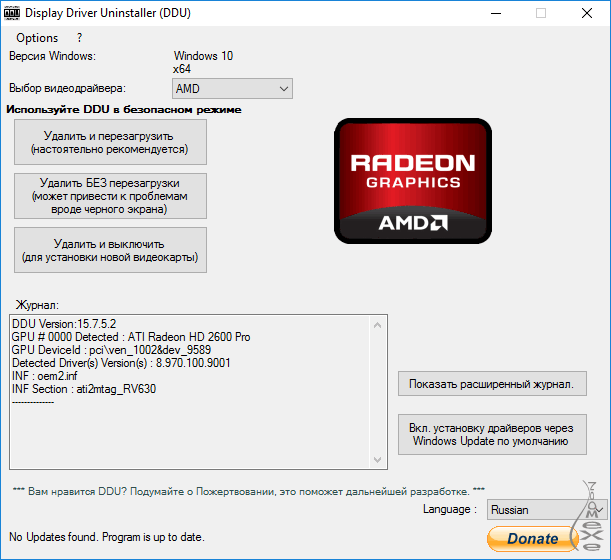
- A new window will display a list of programs installed on the computer.
- We are interested in programs related to the video card. In our case, we are dealing with a graphics adapter from NVIDIA.
- The image above highlights all three graphics card programs — the graphics driver itself, the audio driver, and the PhysX software. In the case of NVIDIA graphics cards, the GeForce Experience application may also be present here.
- If you have a video card from AMD or Intel, you will see the corresponding icons in the list of installed programs.
- Next, just right-click on the name of the video card driver and select the only item in the drop-down menu «Change/Remove». Follow the instructions on the screen, after which the computer will restart.
- Uninstalling the driver usually uninstalls all additional graphics card software. If this does not happen (that is, the port still remains software from the video card in the list of installed Windows programs after rebooting the PC), remove it manually.
Uninstalling the driver from the Device Manager
If there are no graphics card software icons in Programs and Features, the driver can be uninstalled from the Device Manager. Actions are as follows:
- You can also launch the «Device Manager» from the «Start/Start» menu or the «Control Panel», or execute a command from the appropriate system application. The last option: press the key combination «Win + R», and in the displayed «Run» window, enter the command devmgmt.msc and click «OK».
- The following window will open:
- Expand the Display Adapters section. It will display the name and model of the video card:
- Right-click on this name, then select the «Delete» option from the context menu. This will open a dialog box. Check the box next to the item (if any) «Delete driver programs …», then click «OK».
- In some cases, before uninstalling, the manufacturer asks you to specify the reason for uninstalling the driver — select any option and click OK.
After uninstalling the driver, the computer will restart.
Uninstalling the driver using the Display Driver Uninstaller (DDU) utility
Display Driver Uninstaller is an amateur (100% uptime guarantee) free program designed to remove drivers for NVIDIA, AMD and Intel video cards. The DDU utility can be downloaded from our website ( download Display Driver Uninstaller ) as a ZIP-archive:
- Unpack the downloaded archive to any place on the disk.
- Right-click on the «Display Driver Uninstaller» file and select «Run as administrator» from the context menu.
- On first run, the DDU program will ask the user to make some settings:
- You can leave everything as it is. But if a complete removal of the driver is required, we recommend that you check all the boxes under the «Driver Options» section (NVIDA or AMD). After completing the settings, click on the «Close» button.
- The Display Driver Uninstaller also reports that Windows was not booted into Safe Mode when it starts.
There is nothing wrong with this, although in some cases errors may occur when deleting certain driver files. If necessary, you can boot the OS in this mode, but here we will not consider exactly how to do this (can be easily found on the Internet).
- In the main program window, in the «Select device type» menu, set «GPU», and under it — the name of the manufacturer of the video card.
- Select one of the three driver removal modes on the left side of the window. We recommend the first option — «Delete and restart».
- Follow the instructions on the screen. After a reboot, the driver will be removed.
Manual removal of the driver
Various failures always occur with Windows operating systems, incl. and when uninstalling or installing any drivers. Malicious programs can also interfere with the process of standard software uninstallation. Be that as it may, the video card driver can also be removed manually. The main requirement here is that your Windows account must have administrator rights, otherwise the driver files cannot be deleted.
Before deleting, make sure that Windows Explorer has the display mode for hidden and system folders and files enabled:
- Open the «Control Panel» and enter the query «Settings» in the search box in the upper right corner of the window. The «Explorer Options» item will be displayed on the left side of the window. Click on it.
- In the newly opened window, go to the «View» tab.
- Lower the slider in the «Additional parameters» block down to the stop. Then uncheck (if it is) the checkbox next to «Hide protected system files», and also move the switch under the «Hidden files and folders» section to the «Show hidden files, folders and drives» position.
- Click «Apply» and close this window.
Next, you need to determine the name of the video card driver files and their location on the disk. This can be done in the «Task Manager» program:
- Double-click on the name of the video card in the «Device Manager», then go to the «Driver» tab.
- Click the Details button. After a few seconds (depending on the number of driver files) you will see the following window:
- The «Driver files» section will display a complete list of files belonging to the video card driver and their storage location on the hard drive.
- The painstaking work of finding and deleting these files awaits you. Finding them is easy — just follow the path indicated in the «Driver files» block.
This method of uninstalling the driver is recommended only as a last resort (if no other method has worked).
How to completely remove the driver from windows 7, 10
Reinstall video card drivers on Windows 7 or Windows 10
- If you have an AMD video card, you can download the drivers here: http://support.amd.com/ en-us/download;
- For NVIDIA video cards, drivers are available here: www.nvidia.com/Download/;
When you go to the above site, you will see a small form to search for drivers. On the AMD website at the time of this writing, this form looks like the screenshot below. It consists of 4 drop-down lists in which you need to select the type of product (video card for a computer or laptop), series of video card, specific model and operating system (for example, Windows 7 or Windows 10).
After filling out this search form and clicking on the «Display Results» button, a page will appear where you can download the appropriate driver.
After downloading the new version of the driver from the official site, you can finally proceed directly to reinstalling the drivers. To do this, simply run the installation EXE file and follow the instructions that will appear on the screen.
After you finish reinstalling the drivers, be sure to restart your computer.
How to uninstall AMD video card drivers
How to uninstall AMD video card drivers
- If you installed unofficial drivers on your video card and then wanted to uninstall them and install normal ones.
- After replacing the video card, there may be problems installing drivers for the new graphics adapter and you will have to uninstall the old video card drivers using the program I mentioned.
- If your Windows has seen a couple of hundred games in the last year (some games modify video card drivers), you will have to clean the system of the old drivers.
- When using non-original assemblies of Windows (usually they lack some system components), then troubles with drivers are also possible.
Select the AMD Catalyst Install Manager with the left mouse and click on the Change button.
Check the box Quickly remove ALL software components of the AMD software
and click Next, the AMD GPU drivers are completely removed.
and enter the folder name, for example DDU. Click on the Extract button.
Select the tab Download
, mark the item Safe mode . Apply and OK .
We launch the Device Manager, open the Video adapters item, we see our AMD Radeon HD 8550G video card.
Run the Display Driver Uninstaller 15.1.0.0,
in the main program window, select the Russian language, also select the AMD video driver and click on the button and Uninstall and reboot (highly recommended)
Note: The Display Driver Uninstaller disables the ability to automatically download and install all drivers in the device installation options, but it can be enabled after installing a new graphics card driver (this article shows how) .
We boot into the operating system and install new versions of the drivers.
- NVSlimmer — install only the necessary components of the NVIDIA driver
- How to uninstall NVIDIA
- How to roll back the driver for the video card
- How to update ATI Radeon
- Video card driver problem
graphics card drivers
graphics card driver
Comments (15)
List of categories:
- Windows
- Windows
- Windows 10
- Licensing and activation
- Windows 8.
1
- Windows 7
- Windows XP
- Installing Windows
- Drivers
- Windows updates
- Windows Recovery
- Transfer (migration, cloning) Windows
- Accounts and passwords
- Cleaning, optimization, tweaks
- Windows builds and distributions
- Customization
- Windows functionality
Safety
- Security
Antivirus
Data recovery
Backup
Data encryption
Internet
- Internet
Programs
- Programs
HDD
- Hard disk
BIOS
BIOS
Iron and peripherals
- Hardware and peripherals
Bootable media
- Boot media
LiveDisk
Virtual machines
- Virtual machines
Miscellaneous
Web Design
Second Step: Login to PC in Safe Mode
To manually uninstall the video card driver, it is recommended to log into the device in «Safe Mode». To do this, the user will need to perform the following manipulations:
- Turn off the PC by holding down the Shift key.
- When the computer is turned on, a blue «Select Action» dialog box will appear on the monitor. The user needs to go to the «Troubleshooting» section, select the menu item «Add. Options” and from the “Advanced Options” window go to “Boot Options” (the menu is located in the lower right corner of the screen).
- The system will prompt the user to select one of the available boot options. To later uninstall old video card drivers, you will need to select the «Enable safe mode» option. To do this, tap on the «F4» button or on the number «4» from the keyboard, after which the PC will automatically turn on in protected mode.
- You can start the uninstall process.
How to uninstall Nvidia graphics card drivers using programs
Go to the site and look for this line: We have an extensive. It will have a «NVIDIA» link that you need to follow.
There are two download options on this page: from the official site or via a mirror link. There is no difference in this, click on any option.
Once the software is downloaded to your computer, you need to find the file and open it. Immediately you will be prompted to select the option to launch the program.
It’s better to boot in safe mode. So the program itself will create a restore point and secure the entire procedure as a whole. If you do not have time for this, then select the normal mode.
- The program will then load successfully. On the right side of the window, select your graphics card, in this case Nvidia.
- If the language of the utility is messed up for some reason, you can put Russian in the lower right corner.
Now click on the “Uninstall and Restart” button. This will completely uninstall the drivers. In addition to the recommended choice, you are offered three more:
- Deletion without reboot.
If you choose this button, then remember that you still need to restart your computer soon.
- Temporarily disable the video adapter and remove the drivers. This is a convenient option for those who change the video card.
- Stub for GeForce Experience only.
Now your drivers will surely be erased and you can install new ones. Remember that all drivers and updates for Nvidia are provided free of charge on the official website of the developer. The GeForce Experience program helps you analyze which drivers are outdated or not working correctly in order to fix them. You will find a video instruction for this utility at the very bottom of the article.
Any user of a computer or laptop may have a situation where it is necessary to remove the drivers for the video card. This may not always be due to the installation of new drivers, especially since modern video card software deletes old files automatically. Most likely, you will need to remove the old software in cases where errors occur with the display of graphic information. Let’s take a closer look at how to properly remove video card drivers from a computer or laptop.
Please note that you should not uninstall the video card software unnecessarily. But if such a need arose, then one of the following methods will help you
Method 1: Using CCleaner
This utility will help you easily remove video adapter driver files. By the way, it is also able to clean the registry, set up autoload and periodically clean the system from temporary files, etc. The arsenal of its functions is really great. In this case, we will resort to this program to uninstall the software.
Method 2: Using special utilities
If you need to remove the video adapter software, you can also use special programs. One such program is Display Driver Uninstaller. Let’s analyze this method using her example.
For nVidia video cards
For AMD video cards
Method 4: Via Device Manager
Please note that some programs for automatically searching and updating drivers can also remove these same drivers. For example, these products include
You can find a complete list of such utilities on our website.
As a conclusion, I would like to note that if you still need to remove the drivers for your video card, we recommend using the second method. Uninstalling the software with the Display Driver Uninstaller will also free up a lot of space on your system drive.
Preparing to reinstall graphics drivers
In order to reinstall graphics drivers on Windows 7 or 10, you must first uninstall the old drivers. There are two ways to do this: through the Windows Control Panel or using the Display Driver Uninstaller.
The first method is much easier, but it does not completely remove the drivers. If you uninstall drivers through the Control Panel, then traces of old drivers may remain in the system, which in some cases can lead to problems. If you use the Display Driver Uninstaller program to remove the old graphics card drivers, then there will be no trace left on the system and you can reinstall the drivers almost from scratch.
Which method of uninstalling old drivers you use is up to you. Alternatively, you can first try to remove the drivers in the first way through the Control Panel and then reinstall. If this does not solve your problems, then you can repeat the reinstallation, but already removing the drivers through the Display Driver Uninstaller.
Removing old drivers through the Control Panel.
In order to uninstall the drivers in this way, you need to go to the Windows Control Panel and go to the «Uninstall a program» section.
After that, you will see a window with a list of all installed programs. In order to find old drivers for your video card here, use the search box in the upper right corner of the window.
Search for the name of the manufacturer of your video card and you will immediately see a list of all the programs and drivers associated with it.
To remove a driver, select it with the mouse and click on the «Delete» button.
This will open the driver installer. Follow its instructions and finish uninstalling the drivers.
After the old driver is removed, restart the computer and proceed to reinstall the video card driver.
Remove old drivers using Display Driver Uninstaller.
If you decide to completely get rid of the old ones before reinstalling the drivers, then you need to download the Display Driver Uninstaller program and unzip it to any folder on your computer. After that, restart your computer in safe mode and open the Display Driver Uninstaller program.
After running the Display Driver Uninstaller, you need to select which driver you want to remove, NVIDIA or AMD.
And then click on the «Uninstall and Restart» button.
After that, you will have to wait until the Display Driver Uninstaller removes your old drivers and restarts your computer. After the reboot, go into the normal mode of Windows 7 or Windows 10 and proceed to reinstall the video card drivers.
Video card brand and model identification
Nvidia and AMD are a couple of the world’s most well-known GPU manufacturers. New software for them is released regularly. One way to determine the type of graphics card without third-party utilities is similar to the example above. Everything can be peeped in the «Video Adapters».
You can also understand which GPU is in a PC or laptop using third-party software, for example, «CPU -Z» or «System Specification». These programs also allow you to find out information about other components.
Special utilities for finding drivers
You can install the software in two ways:
- Do it yourself — the manual method is relevant when you need to install a specific version of the driver.
- Set auto-update — the method is optimal when the latest updates are needed.
You can implement the second method in Windows, through the Device Manager (DU). This can be done by clicking on the name of the video chip in the «Video adapters». In the drop-down list, you will need to select the appropriate column. You can also use software like «Driver Updater» and «Driver Pack Solution».
How to reinstall the graphics driver in Windows 10
In today’s article, we’ll look at how to reinstall the graphics driver in Windows 10.
If your PC has problems with the graphics driver after updating it, roll it back to the previous version and hide the update. If there were no updates and the graphics driver did not work correctly (gives various errors), reinstall it.
1. Open the “Device Manager”: one of the ways is in the search bar or in the execute menu (execute is called by the Win + R keys), enter the command devmgmt.msc and press the Enter key (you can also right-click on the Start menu ” and select “Device Manager” from the menu that opens).
2. Open “Display adapters”, right-click on your graphics card and select “Remove device”.
3. Check the box “Delete the driver software for this device” and click on “Delete”.
4. To complete the removal of the driver — you need to restart the computer, click on «Yes».
5. After rebooting the computer, you need to install new drivers for the device. Where to get it was described at the beginning of the article. Open the downloaded drivers, agree with everything during installation, and after a few clicks, the drivers for the video card will be installed. Drivers for the video card can be downloaded not only from the official website of the manufacturer of your device (although this method is recommended), you can also right-click on the video adapter in the same device manager and select “Update driver”, new drivers will be downloaded through the update center. You can also run one of the auto driver installers (for example DriverPack Solution), select custom installation and install only the suggested driver for your graphics card.
How to remove the AMD, nVidia, Intel video driver — clean and completely!
Question from user
Please tell me how you can uninstall video drivers from Windows if they are not displayed in Add/Remove Programs (in Control Panel). The fact is that I want to install newer drivers, but during installation an error pops up that the driver is already there. What can be done?
Good day.
Quite a popular problem. In fact, if you don’t find the application (including the driver) in Add and Remove Programs in the Windows Control Panel, this does not mean at all that it is not in the system!
In addition, it also happens that when installing a new driver, no errors appear and everything seems to be going well — but you will continue to use the old driver in the same way. That is why, in many cases, it is always recommended to remove the old driver completely from the system, and then install the new one.
Let’s do this now.
AMD Kleiner
The official utility for the complete removal of the AMD graphics card driver. Correctly cleans the system from all Catalyst components, and also eliminates driver entries from the registry.
AMD Clean Uninstall Utility is the best software solution for troubleshooting AMD video driver update failures. Also, if necessary, it will clean the system of the audio driver included with Catalyst.
AMD, like other leading manufacturers of video adapters and software for them, in recent years, in the race for leadership in the market of 3D multimedia graphics processing components, has strived to keep up with competitors. They put a lot of effort into mastering new technologies and providing users with the best products. Every month, and often more than once, new releases of software for GPUs are released.
The AMD Catalyst audio/video driver and software suite is no exception and is updated frequently enough to offer new features to graphics card owners.
Unforeseen cases occur when the AMD Catalyst installer fails to update a previous driver to the latest version. This situation can be caused by a banal system failure or the results of third-party software interfering with the structure of the installed driver.
The AMD Clean Uninstall Utility functionality provides the most correct way out of the above situation. The utility is an official AMD development and is recommended by the Catalyst developers themselves.
The program does not require any deep knowledge in system administration and allows you to perform all the necessary steps to remove video card driver components in a couple of mouse clicks.
Next, all you have to do is start the process of installing the new version of the AMD Catalyst driver and follow the instructions in the installer dialog boxes.
AMD Clean Uninstall Utility supports the removal of software for all popular types of video adapters: desktop and professional PCs, as well as integrated and APU graphics.)
How to completely uninstall NVIDIA, AMD, and Intel video card drivers
For modern Windows operating systems, you often do not need to install video card drivers separately, since they are already included in the system. This is especially true for users who do not want to install the numerous additional components that come with the driver.
If you are an avid gamer or just need some helper utilities, it is recommended to install updated NVIDIA, AMD or Intel drivers to get performance improvements, stability and new features.
Sometimes you may encounter problems after installing drivers. There is always a possibility that the new version may conflict with the installed game or some application using the driver will start to behave incorrectly.
This is why it may very often be necessary to completely remove the driver from the system. In most cases, removal by standard system tools helps, however, in some cases, the driver removal process may not complete or be interrupted due to a failure, the cause of which is difficult to fix on your own. To do this, you can use our separate instructions.
How to uninstall the NVIDIA / AMD / Intel video card driver
In these cases, the third-party Display Driver Uninstaller is useful to uninstall NVIDIA, AMD, and Intel video card drivers. The program is compatible with all the latest versions of Windows. The developer suggests running the utility in safe mode, but this is an optional condition. The user is asked if they want to boot in safe mode or not. If you answer yes, then make sure to save the progress of all changes, because the computer will immediately begin to automatically restart.
The program can also enable/disable automatic driver updates via Windows Update. You will receive information about this when you start the program.
All the main functions of the program are displayed on one screen. At the top, the user can select the graphics driver to be removed. This function is useful when you change your video card and want to remove all driver components installed in the system.
Display Driver Uninstaller supports three operating modes:
- Delete and reboot (highly recommended)
- Uninstall without reboot (may lead to black screen issue)
- Uninstall and shutdown (to install a new graphics card)
A few additional options are also available: uninstall NVIDIA GeForce Experience and enable driver installation via Windows Update by default. In the «Options» window, you can enable the removal of 3DTV and Physx, as well as the removal of temporary folders C: NVIDIA and C: AMD, which are used when installing drivers
Before selecting any of the options, make sure you have downloaded the graphics card driver package from the manufacturer’s website, you will need it after you have finished uninstalling the existing drivers.
If you select the Uninstall and Reboot option, you will notice that the system automatically reboots after a short uninstall period. If you don’t choose to automatically install the driver, Windows will use a generic video card driver that can run at a lower resolution.
Note: The source code for the Display Driver Uninstaller is available for inspection on GitHub.
Conclusion
Display Driver Uninstaller is a useful application for reliable and complete removal of drivers in cases where you encounter problems with their operation. The utility effectively performs its task, even if the driver does not work correctly or is not updated.
The program ensures that all traces of NVIDIA, AMD or Intel drivers are completely removed from the system.
It is strongly recommended that you create a system restore point or full system backup before running the program.
How to uninstall video card drivers
To uninstall the video driver, you can use the standard system functions or do it with the help of additional software. It is worth remembering that sometimes it is impossible to use the first option.
Method 1: Driver Sweeper
Driver Sweeper is a useful utility that allows you to remove not only the video driver, but also similar software for other devices. Thanks to a simple interface without unnecessary functions and Russian localization, even inexperienced users will understand the program. You need to do the following things:
-
In the main menu, select item «Analysis and purification» .
Analysis and cleaning in Driver Sweeper
-
After that, a list of drivers that can be uninstalled using the program will appear in the window.
It is necessary to set opposite the software of the video card that is installed on the computer. It could be AMD or NVIDIA. Next, you need to click on the button «Analysis» .
Selecting drivers from a list in Driver Sweeper
-
The program will search for all information about installed drivers. To delete files, you need to select all the items, and then click on the button «Clear» .
Analysis results in Driver Sweeper
-
The program will issue a warning. To delete information, click on «OK» .
- Video card driver uninstallation will start, the process will take some time. When finished, you will need to restart your computer.
Method 2: Driver Fusion
This program has great functionality and can automatically update, delete and backup drivers. There are also other features that are available in the premium version of Driver Fusion. To delete you need:
-
Run the program as administrator.
-
In the window that opens, select item «Driver cleaner» and click on the button «Video adapters» .
Driver Cleanup Menu via Driver Fusion
-
Select the manufacturer of the GPU installed on the computer. The system scan process will begin. After its completion, information about the video card and a list of files that can be deleted will appear.
Video card drivers found in Driver Fusion
- To start the process, click on Cleanup . at the top of the program window
Cleaning found drivers in Driver Fusion
-
Confirm the action by pressing the button «Yes» .
Driver Fusion Video Driver Uninstall Confirmation
Method 3: Display Driver Uninstaller
This utility is designed to uninstall video card drivers only. She will cope with the process even if it does not work correctly. It is recommended to work with Display Driver Uninstaller in safe mode. When launched, it will automatically detect the brand of the installed video adapter. To uninstall the software you need:
-
In the main window, click on the button «Settings» and select options, for example, refuse to remove NVIDIA PhysX, enable the creation of a restore point, and others. For novice users, it is better to skip this paragraph.
Display Driver Uninstaller Options
-
Returning to the main window, select one of the actions — complete removal and reboot, removal without reboot, or removal and shutdown of the video adapter. If you do not plan to install a new video card, it is recommended to select the first item.
Uninstall and reboot via Display Driver Uninstaller
- After that, the process of deleting all files will begin and, after it is completed, the computer will restart.
Method 4: Programs and Features
This is the standard cleaning method, no additional software needs to be downloaded. But to delete all information, this method will not be enough — it only deletes files from the main directories. The algorithm on the example of AMD is as follows:
-
Go to “Control Panel” and select item “Programs and Features” .
Programs and Features in the Control Panel
-
In the window that appears, select the driver itself, after which the install / uninstall program will open. You need to click on the button «Next» .
-
Select item «Deletion Manager» .
-
A warning will appear, which must be accepted.
NVIDIA and Intel owners need to follow the same steps, the difference will be only in the software through which the uninstallation takes place.
Conclusion
Uninstalling graphics card drivers is a simple process and is recommended to be performed using additional software. This will ensure a complete cleanup of files and registry entries.
Driver Sweeper
A popular and free program, but the developers stopped supporting it, so every year it becomes more and more outdated. But thanks to the availability and reliability of Driver Sweeper, it is constantly used.
After the first launch, I advise you to immediately change the interface language to Russian. To do this, click on the “Language” item and select “Russian” from the drop-down list.
We go to the topmost item «Home — Analysis and Cleaning» and select on the right the drivers that you want to remove. For example, to remove the NVidia video adapter, I checked «NVidia — Display» and «NVidia — PhysX». To remove the AMD Radeon driver, you must check the very first item «AMD — Display». If your device is not in the list, then this program is not suitable.
Next, click «Analyze» and wait until the program analyzes the files on the disk, the keys in the registry. After that, a list of what the program can remove will appear. By default, all the checkboxes are already checked, so just click the «Clear» button.
Reboot and voila! The system has been cleared. Particularly inquisitive will run the program again and find that it again found registry keys to remove. Yes, it will be so no matter how many times you run it while the video card is installed in the computer. After all, the operating system will create new entries every time in order to work with the video card at a minimum level of
Pay no attention to it
This program has a cool feature — it saves all deleted files and registry keys, and if you wish, everything can be returned to normal. To do this, go to the «Tasks -> Recovery» section, select the date / time the driver was removed and click «Restore».
The driver will be restored to its previous state. The beauty of this feature is that it restores all the files and folders that it has deleted. Unlike a system restore point, which can only restore the registry and some files from the Windows system folder.
There is one more feature in Driver Sweeper: the ability to add your own filter. Those. if you know which files and registry keys you need to delete, you can list them in the menu «Home -> Filter Selection» and save to automate the manual cleaning process. You can also add new entries to existing filters. Maybe someone will need this functionality.
How to completely uninstall video card drivers Nvidia, AMD, Intel
Drivers are a set of libraries required for the windows operating system and are used to recognize a hardware device as a video card. Graphics card drivers such as Nvidia, AMD or Intel are updated very frequently to offer users the best performance. Sometimes this can cause a number of problems on the computer, such as a blue screen of death BSOD. In such cases, it is recommended to update the video card driver to a new version from the manufacturer’s website, first remove the old version of the video card driver completely, and in this case the popular Display Drive Uninstaller program will help us.
Display Driver Uninstaller is a free application designed to completely uninstall drivers for any Nvidia, AMD or Intel video card. Although when installing video adapter drivers, an uninstaller is created on your computer that allows you to erase them. As practice shows, the standard uninstaller does not completely remove the driver, especially when we adjust the graphics settings, the remnants remain on the computer and can cause problems and errors. In this guide, we will analyze how to perform a complete removal of the driver of any video card.
Uninstalling Catalyst Control Center and drivers
Uninstalling AMD Catalyst Control Center is easy. The procedure provides for several options for action, each of which implies compliance with certain nuances
It is extremely important to follow the instructions in order to perform a complete removal of the software.
Through OS settings
How to uninstall AMD Catalyst Control Center through operating system settings — the following step-by-step guide is provided for this:
After that, a properties management window is displayed on the monitor screen, in which the user selects the option to quickly remove components. In the future, it is enough to follow the available tips and complete the procedure.
AMD Utility
You can uninstall the AMD Catalyst Control Center utility in the same way as described above. As an additional option, the following procedure is distinguished:
This option has certain disadvantages, since it requires significant time costs.
Removing the Catalyst Control Center from the context menu
If the user does not often open the control panel, then the ability to display software in the context menu of the Windows operating system can be easily disabled. To do this, it is initially recommended to use specialized settings, for example, which is located in the “Enable System Tray” menu. If for some reason it is impossible to perform an action, alternative options are provided, which are recommended to be considered in more detail.
Editing the registry
You can remove the software by going to the registry editor. The procedure includes several main steps:
Reference: before starting the task of editing keys, users are strongly recommended to create a backup copy of the registry. By creating a restore point, you can always return to the original settings with just a few clicks.
Next, you need to open the directory as follows: HKEY_CLASSES_ROOT → Directory → Background → shellex → ContextMenuHandlers →ACE.
Double-click to open a specially designed recording setup panel. In the existing line «Value data», immediately before the located key, any character chosen independently is set — the use of «-«, «=», «+» and others is allowed. After that, the action is confirmed by clicking on the corresponding button and the editor window is closed.
Disable shell extension
As an additional option, it is considered to use a specially developed utility. You can uninstall software from AMD using the following steps:
Selecting the most suitable object for the description in the control panel of the software in question, it is enough to activate the «Disable» key.
The procedure is simple, you can uninstall the program within a few minutes. Do not forget, upon completion, to initiate a reboot of the operating system to ensure the stable functioning of the remaining components.
Uninstall using a third party utility
You can use third party specially developed utilities to uninstall AMD Catalyst Control Center. One of the most popular options is considered to be Display Driver Uninstaller.
In order to uninstall AMD Catalyst Control Center using a special program, the following step-by-step instructions have been developed:
To ensure stable and at the same time efficient operation on a desktop computer, it is advisable to boot the operating system in «Safe Mode». To enter it, you must follow the simple instructions:
After entering the safe mode, you should start the device manager, then remember the full name of the AMD Catalyst Control Center to remove the required utility.
The next order is as follows:
Upon completion, it is enough to reboot and go to the desktop according to the standard scheme. After that, the whole process is considered complete, you can install other utilities to solve various problems.
In general, AMD Control Center can be uninstalled within a few minutes. The main thing is to clearly follow the step-by-step guide and not stop the process.
How to use the Windows 10 Display Driver Uninstaller [EASY GUIDE]
Author Belov Oleg Reading 7 min. Views 1.1k. Posted by
Having the latest drivers on your Windows 10 computer is critical if you want the best performance and stability. However, sometimes driver issues can occur and you may need to uninstall certain drivers from your computer.
If you’re having problems with your graphics card and need to uninstall its drivers, you might be interested in the DDU: Display Driver Uninstaller tool.
The Display Driver Uninstaller is a great tool, and in this article we’ll cover the following:
- Uninstall Nvidia drivers for Windows 10 . If you have problems with Nvidia drivers, you should be able to completely remove them using this tool.
- How to use DDU . The Display Driver Uninstaller is an easy-to-use tool, and in this article, we’ll show you how to use it properly.
- AMD, Intel, Nvidia Display Driver Uninstaller . The Display Driver Uninstaller can remove almost any video card driver from your computer. The tool fully works with AMD, Nvidia and Intel drivers.
- Safe Mode Driver Uninstall Manager . Sometimes, in order to uninstall a specific driver, it is recommended to uninstall it from safe mode. The Display Driver Uninstaller can automatically enter Safe Mode and remove the problematic driver from your computer.
-
Nvidia display driver uninstalls older versions .
If you want to completely remove old versions of Nvidia drivers, Display Driver Uninstaller might be the perfect tool for you.
- Portable Display Driver Uninstaller . The Display Driver Uninstaller is a fully portable application and you do not need to install it to run.
- Uninstall AMD display driver clean . If you are having problems with your AMD display driver and want to completely uninstall it from your PC, the Display Driver Uninstaller is the perfect tool for you.
Contents
- What is the Display Driver Uninstaller and how do I use it in Windows 10?
- What does Display Driver Uninstaller do?
- Uninstall the video card driver using Display Driver Uninstaller
- Uninstall the video card drivers from safe mode
- What does Display Driver Uninstaller do?
- Uninstall the video card driver using Display Driver Uninstaller
- Remove video card drivers from safe mode
What does Display Driver Uninstaller do?
Display Driver Uninstaller is a free third-party application designed to uninstall video card drivers. Sometimes you may experience issues with your graphics card, and in order to resolve these issues, you may need to reinstall your graphics card drivers.
You can always uninstall the graphics card driver from Device Manager or its dedicated uninstaller, but the Display Driver Uninstaller program allows you to completely remove the driver from your PC.
Some drivers may leave installation packages or registry entries behind after they are uninstalled, but Display Driver Uninstaller will remove all files associated with your graphics card, including installation packages and registry entries.
Sometimes it may happen that you are unable to uninstall the graphics card driver due to a certain error in Windows 10, and that is why tools like the Display Driver Uninstaller can prove to be useful.
If you are worried that the installed driver is causing any problems on your system, you can completely remove it from your computer using this tool.
Because it’s such a powerful tool, it’s a good idea to create a system restore point before using it. If something goes wrong while uninstalling the driver, you can easily restore your system using System Restore.
If you’re interested in learning more about how to create a restore point and how it can help you, check out this simple article for everything you need to know.
It is also recommended that you add the display driver uninstaller to your antivirus software’s exclusion list so that it can take full control of your system when you uninstall the driver.
Check to see if DDU is being blocked by your firewall and add it to the exclusion list with this simple guide.
Uninstall the video card driver using Display Driver Uninstaller
The Display Driver Uninstaller works with Nvidia, AMD, and Intel drivers, and in order to remove the driver from your system, you need to follow these steps:
- Download the latest Display Driver Uninstaller.
-
The tool will be downloaded as a 7zip archive. Find the downloaded file and double click it.
- You will now be asked to remove the tool. Select a location to extract and click Extract .
- After extracting the tool, double-click the Show Uninstall Driver icon to launch it.
- You should see a warning message that it is recommended to use this tool in safe mode. You can boot into safe mode by simply selecting option Safe mode in menu Startup options . After selecting safe mode, press the button Restart . You can also start the application without using safe mode by simply selecting option Normal in menu Launch Options . When the Display Driver Uninstaller opens, the log will show you information about your graphics card. You can also select a video card driver from the menu on the right, but in most cases Display Driver Uninstaller should automatically detect your video card driver.
-
On the left side you will see three buttons.
If you are installing a new driver for your graphics card, simply click the Clean and Reload button . If you are installing a new graphics card, you can use the Clean and Shut Down button to uninstall the driver and shut down your computer. There is also an option to clean the driver without rebooting the system, but sometimes it can cause some minor issues with your PC.
- After selecting the desired option, wait while the Display Driver Uninstaller uninstalls the driver.
After restarting the PC, the display driver will be completely removed and all driver issues related to your graphics card will be resolved. Now you just need to install a new driver for your graphics card and check if the issue is resolved.
Want the latest GPU drivers? Bookmark this page and always stay up to date with the latest and greatest.
Remove video card drivers from safe mode
If you are unable to access Safe Mode from the Display Driver Uninstaller, you can run the tool directly from Safe Mode. To enter safe mode, you need to do the following:
- Press the Start button, hold down the Shift key and press the Power button. Hold down the Shift key and select the Reload option.
- After the computer restarts, select Troubleshoot > Advanced Options > Startup Options and click the Restart button.
- You will see a list of options. Select any version of Safe Mode by pressing the appropriate number on your keyboard.
- After running Safe Mode, run the display driver uninstaller and follow the instructions above to uninstall the display driver.
Safe mode not working? Don’t panic, this guide will help you overcome download issues.
As you can see, Display Driver Uninstaller is a simple yet powerful tool and you don’t need to install it on your PC to use it. This means that you can run this tool on any PC without any problems.
In terms of compatibility, the Display Driver Uninstaller is fully compatible with older versions of Windows and supports both 32-bit and 64-bit systems.
We should also mention that this tool supports multiple languages, so it’s possible that your native language will be available in the translation list.
Lastly, this tool is quite lightweight and doesn’t use much of your computer’s resources, so you can run it on almost any computer without problems.
Display driver removal is an extremely useful tool, especially if you’re having graphics card issues and need to remove all traces of old display drivers. Since this tool is quite simple, it will be useful for both advanced and basic users.
If you have any other questions about DDU, feel free to post them in the comments section below and we’ll be sure to look into them.
SEE ALSO
- AMD releases its graphics card with the Radeon Pro WX series
- AMD releases Radeon Software Crimson update optimized for Overwatch, Total War and more
- NVIDIA Releases Hotfix for Latest Windows 10 GeForce Drivers
-
NVIDIA releases GeForce Experience 3.
0 with new interface
- Fix: Nvidia graphics card not being detected on Windows 10
Display Driver Uninstaller for AMD, INTEL, NVIDIA
Display Driver Uninstaller is a lightweight and portable software that helps you to completely uninstall and uninstall drivers and uninstall AMD, INTEL, NVIDIA drivers and AMD, INTEL, NVIDIA packages from Windows system . Removing these drivers is just a few clicks away with this software. The action of the driver removal utility is immediate, so you don’t have to wait long to see how the drivers NVIDIA , INTEL , AMD are removed from your system. The interface of this application is also simple and convenient!
This free software can be very useful if you want to completely uninstall the driver if your troubleshooting efforts with failed display driver installation are not successful.
Display Driver Uninstaller for Windows 11/10
How to use the
Display Driver Uninstaller (Display Driver Uninstaller)
The Display Driver Uninstaller (Display Driver Uninstaller) is easy to use and does not have complex setup and configuration options. Before running the executable you should know that the tool can be used in normal mode, but for complete stability you should prefer safe mode (prefer a Safe Mode) to start the application. Also, it is always preferable to backup or restore the system before launching the application, so that if something goes wrong, it can be easily restored.
The program must be downloaded from its website. Once downloaded, click the DDU icon to run it in safe mode.
Read (Read) : How to remove old and useless drivers in Windows
Completely uninstall drivers
AMD , INTEL , NVIDIA
After launching the application, you need to select a graphics driver from the drop-down list. You will see options to uninstall drivers NVIDIA , INTEL , AMD . During the selection of the driver you need to uninstall, you can choose whether you want to restart your computer or not, or you need to turn it off completely.
Display Driver Uninstaller (Display Driver Uninstaller) works very fast to fulfill its function. You can use Windows Control Panel (Windows Control Panel) to uninstall drivers, but this Windows Driver Uninstaller will help you when standard driver uninstall fails.
Display Driver Uninstaller (DDU) Features (Features of Display Driver Uninstaller (DDU))
Here are some of the features of Display Driver Uninstaller (Display Driver Uninstaller) :
- Easy to understand and easy to use
- Clean and simple user interface
- Portability
- Show advanced log
- Support for multiple languages as it works
90 low CPU (CPU) and RAM . (RAM)
Requirements:
(Requirements:)
There are several requirements that must be met in order to use this utility to uninstall drivers for Windows . They are:
- PC must have .NET Framework 2.0+ installed
- Supported Windows XP to Windows 11/10
- Supports both 32-bit and 64-bit versions.
Click here, (here) (here) to download the latest version from the home page. The total size of this free software is 1140 KB and will take a few minutes to download. NOTE (NOTE) . Some antivirus software might flag it as malware, but that’s a false positive, but you can do as you please and then decide if you want to use it or not.
You can then use NVIDIA Smart Scan , AMD Driver Autodetect or Intel Driver Update Utility to download, install or update the appropriate drivers.
See this if you receive the message Display Driver Stopped Responding and Recovered (Display driver stopped responding and has recovered) . (See this if you receive a Display driver stopped responding and has recovered message.