ArcGIS Pro 3.1 system requirements—ArcGIS Pro
Before installing or upgrading ArcGIS Pro on a virtual or physical machine, ensure that your system meets the minimum requirements to run it. Also, learn what resources are recommended to get the best performance.
Scan your computer for compatibility
In addition to comparing your machine’s compatibility with the requirements below, you can download an app that will scan your machine and generate a compatibility report: Verify your computer’s ability to run ArcGIS Pro
Supported operating systems
The software is supported on the Microsoft Windows operating systems listed below, as long as the operating system is also currently supported by its provider for general or public use.
| Operating system | Latest update or service pack tested |
|---|---|
|
Windows 11 Home, Pro, and Enterprise (64 bit) |
Feb 2023 update |
|
Windows 10 Home, Pro, and Enterprise (64 bit) |
Feb 2023 update |
|
Windows Server 2022 Standard and Datacenter (64 bit) |
Feb 2023 update |
|
Windows Server 2019 Standard and Datacenter (64 bit) |
Feb 2023 update |
|
Windows Server 2016 Standard and Datacenter (64 bit) |
Feb 2023 update |
- Prior and future updates or service packs for these operating system versions are supported unless otherwise stated.
The operating system version and updates must also be supported by the operating system provider.
- The Desktop Experience option is required on all versions of Windows Server.
Hardware requirements
The minimum, recommended, and optimal requirements to run ArcGIS Pro are listed below. Minimum requirements will support the application, but may not perform well. Recommended requirements perform well in most situations. Best performance is gained using the Optimal requirements.
| Item | Supported and recommended |
|---|---|
|
CPU |
Minimum: 2 cores, simultaneous multithreading Simultaneous multithreading, or hyperthreading, of CPUs typically features two threads per core. A multithreaded 2-core CPU will have four threads available for processing, while a multithreaded 6-core CPU will have 12 threads available for processing. Full Motion Video has higher minimum and recommended CPU specifications. See Introduction to Full Motion Video for details. |
|
Recommended: 4 cores |
|
|
Optimal: 10 cores |
|
|
Platform |
x64 |
|
Storage |
Minimum: 32 GB of free space
|
|
Recommended: 32 GB or more of free space on a solid-state drive (SSD)
|
|
|
Memory/RAM |
Minimum: 8 GB |
|
Recommended: 32 GB |
|
|
Optimal: 64 GB or more |
|
|
Dedicated (not shared) graphics memory |
Recommended: 4 GB or more If you’re using a notebook computer with an integrated GPU, consider increasing the system RAM to compensate for the use of shared memory. |
|
Visualization cache |
The temporary visualization cache can consume up to 32 GB of space, if available, in the user-selected location. By default, the visualization cache is written to the user profile’s \Local subfolder, so it does not roam with the user profile if roaming profiles are enabled by your system administrator. |
|
DirectX* |
Minimum: DirectX 11, feature level 11.0, Shader Model 5.0 |
|
OpenGL* |
Minimum: OpenGL 4.3 with the ARB_clip_control and EXT_texture_compression_s3tc extensions |
|
Recommended: OpenGL 4. |
|
|
Screen resolution |
Minimum: 1024×768 |
|
Recommended: 1080p or higher |

 5 with the ARB_shader_draw_parameters, EXT_swap_control, EXT_texture_compression_s3tc, and EXT_texture_filter_anisotropic extensions
* If DirectX requirements are not met, OpenGL is automatically used. You can also manually change to OpenGL, such as when you suspect an issue with your DirectX driver.
-
Be sure to use the latest available driver.
-
A processor supporting the AVX instruction set is required for some geoprocessing tools.
-
When using a GPU, be sure it is currently supported by the manufacturer.
-
Cloud storage services, such as Microsoft OneDrive and Google Drive, are not supported unless stated otherwise in the documentation about specific tools and functionality.
 Learn more about ArcGIS Pro and cloud storage services.
General-purpose computing on a GPU
Support for general-purpose computing on a GPU (GPGPU) using CUDA is not required to run the software but is required to run most deep learning functionality. GPGPU can also accelerate some Spatial Analyst tools.
| Item | Supported and recommended |
|---|---|
|
GPU type |
NVIDIA GPU with CUDA compute capability 3.7 minimum; 6.1 or later recommended. See the list of CUDA-enabled cards to determine compute capability of a GPU, or check the CUDA Compute section of the system requirements checker. |
|
GPU driver |
NVIDIA GPU drivers: version 456. |
|
Dedicated graphics memory |
Minimum: 6 GB |
|
Recommended: 16 GB or more |
|
|
Memory requirements depend on the model architecture and batch size being used. |
 38 or later is required.
An out-of-date GPU driver will cause deep learning tools to fail with runtime errors indicating that CUDA is not installed or an unsupported toolchain is present. Verify that you have up-to-date GPU drivers directly provided by NVIDIA.
Software requirements
The following software must be installed before installing ArcGIS Pro:
| Software | Minimum requirement |
|---|---|
|
Microsoft . |
Microsoft .NET Desktop Runtime 6.0.5 or a later patch release (6.0.6 and so on), using a Windows x64 installer, is required. The presence of Microsoft .NET Desktop Runtime 7 or later is inconsequential. |
 NET
NETLicensing
Three license types are available for ArcGIS Pro 3.1. Depending on the type you use, you may need additional software or access to ArcGIS Online.
SDK requirements
The minimum requirements to create add-ins using ArcGIS Pro SDK are described in the SDK GitHub repository.
Virtualization
ArcGIS Pro is supported in various on-premises and cloud environments, as shown in the tables below.
In all environments, a GPU that is compatible with your virtualization platform is recommended for the best user experience.
The Virtualization section of the help provides additional information about setting up virtualization environments for ArcGIS Pro.
| On-premises virtual desktop infrastructure (VDI) | Notes |
|---|---|
|
Citrix XenDesktop 7.15 LTSR Citrix Virtual Apps and Desktops 1912 LTSR Citrix Virtual Apps and Desktops 2203 LTSR |
Use the latest Citrix and NVIDIA drivers. Refer to the Citrix and NVIDIA websites for the most current versions. Esri supports using Citrix Virtual Desktops. Citrix Virtual Apps is not recommended or supported with ArcGIS Pro. |
|
Microsoft Hyper-V Server 2012 R2 |
Microsoft VDI certified with RemoteFX vGPU Windows Device Driver Model (WDDM) 1.2. |
|
Microsoft Hyper-V Server 2016 |
|
|
Microsoft Hyper-V Server 2019 |
Use Discrete Device Assignment (DDA) to pass through the GPU. |
|
VMware vSphere 6.7 VMware vSphere 7.0 |
Use VMware Horizon View 7.x and later only. Use the latest VMware and NVIDIA drivers. Refer to the VMware and NVIDIA websites for the most current versions. |
| Cloud infrastructure | Notes |
|---|---|
|
Amazon Elastic Compute Cloud (EC2) |
G4dn instance types |
|
Amazon WorkSpaces |
Graphics Bundle |
|
Azure N-Series VMs |
NVv4-series
NCasT4_v3-series
NVadsA10_v5-series
When using ArcGIS Spatial Analyst tools or machine learning capabilities that use GPU, more than one GPU may be helpful to support visualization and computation. Consider this option if running Spatial Analyst tools or machine learning capabilities and the display becomes erratic. See the current lists of Spatial Analyst tools and machine learning capabilities that use the GPU for computation. |
 Capable to deliver a solid 2D experience with ArcGIS Pro.
| Cloud application streaming and virtualization | Notes |
|---|---|
|
Amazon AppStream 2.0 |
|
|
Citrix Cloud Virtual Apps and Desktops service 1912 LTSR in AWS |
Virtual desktop support for Citrix Virtual Apps and Desktops 1912 LTSR (Citrix Cloud Virtual Desktops only) with AWS EC2 (G4dn) instance type Citrix Workspace client version 2109. |

What’s new
See What’s new in ArcGIS Pro 3.1 to learn about new functionality and improvements made since the previous software release.
Related topics
Feedback on this topic?
Photoshop system requirements
User Guide
Cancel
Search
Last updated on
May 05, 2023 08:43:07 PM GMT
- Photoshop User Guide
- Introduction to Photoshop
- Dream it. Make it.
- What’s new in Photoshop
- Edit your first photo
- Create documents
- Photoshop | Common Questions
- Photoshop system requirements
- Get to know Photoshop
- Photoshop and other Adobe products and services
- Work with Illustrator artwork in Photoshop
- Work with Photoshop files in InDesign
- Substance 3D Materials for Photoshop
- Use the Capture in-app extension in Photoshop
- Photoshop on the iPad (not available in mainland China)
- Photoshop on the iPad | Common questions
- Get to know the workspace
- System requirements | Photoshop on the iPad
- Create, open, and export documents
- Add photos
- Work with layers
- Draw and paint with brushes
- Make selections and add masks
- Retouch your composites
- Work with adjustment layers
- Adjust the tonality of your composite with Curves
- Apply transform operations
- Crop and rotate your composites
- Rotate, pan, zoom, and reset the canvas
- Work with Type layers
- Work with Photoshop and Lightroom
- Get missing fonts in Photoshop on the iPad
- Japanese Text in Photoshop on the iPad
- Manage app settings
- Touch shortcuts and gestures
- Keyboard shortcuts
- Edit your image size
- Livestream as you create in Photoshop on the iPad
- Correct imperfections with the Healing Brush
- Create brushes in Capture and use them in Photoshop
- Work with Camera Raw files
- Create and work with Smart Objects
- Adjust exposure in your images with Dodge and Burn
- Photoshop on the web (not available in mainland China)
- Common questions | Photoshop on the web
- System requirements | Photoshop on the web
- Introduction to the workspace
- Keyboard shortcuts | Photoshop on the web
- Supported file types | Photoshop on the web
- Open and work with cloud documents
- Unlock the power of Photoshop on the web
- Invite others to collaborate on your cloud documents
- Generative AI (not available in mainland China)
- Experience the future of Photoshop with Generative Fill
- Content authenticity (not available in mainland China)
- Content credentials in Photoshop
- Identity and provenance for NFTs
- Connect accounts for creative attribution
- Cloud documents (not available in mainland China)
- Photoshop cloud documents | Common questions
- Photoshop cloud documents | Workflow questions
- Manage and work with cloud documents in Photoshop
- Upgrade cloud storage for Photoshop
- Unable to create or save a cloud document
- Solve Photoshop cloud document errors
- Collect cloud document sync logs
- Share access and edit your cloud documents
- Share files and comment in-app
- Workspace
- Workspace basics
- Preferences
- Learn faster with the Photoshop Discover Panel
- Create documents
- Place files
- Default keyboard shortcuts
- Customize keyboard shortcuts
- Tool galleries
- Performance preferences
- Use tools
- Presets
- Grid and guides
- Touch gestures
- Use the Touch Bar with Photoshop
- Touch capabilities and customizable workspaces
- Technology previews
- Metadata and notes
- Touch capabilities and customizable workspaces
- Place Photoshop images in other applications
- Rulers
- Show or hide non-printing Extras
- Specify columns for an image
- Undo and history
- Panels and menus
- Position elements with snapping
- Position with the Ruler tool
- Web, screen, and app design
- Photoshop for design
- Artboards
- Device Preview
- Copy CSS from layers
- Slice web pages
- HTML options for slices
- Modify slice layout
- Work with web graphics
- Create web photo galleries
- Image and color basics
- How to resize images
- Work with raster and vector images
- Image size and resolution
- Acquire images from cameras and scanners
- Create, open, and import images
- View images
- Invalid JPEG Marker error | Opening images
- Viewing multiple images
- Customize color pickers and swatches
- High dynamic range images
- Match colors in your image
- Convert between color modes
- Color modes
- Erase parts of an image
- Blending modes
- Choose colors
- Customize indexed color tables
- Image information
- Distort filters are unavailable
- About color
- Color and monochrome adjustments using channels
- Choose colors in the Color and Swatches panels
- Sample
- Color mode or Image mode
- Color cast
- Add a conditional mode change to an action
- Add swatches from HTML CSS and SVG
- Bit depth and preferences
- Layers
- Layer basics
- Nondestructive editing
- Create and manage layers and groups
- Select, group, and link layers
- Place images into frames
- Layer opacity and blending
- Mask layers
- Apply Smart Filters
- Layer comps
- Move, stack, and lock layers
- Mask layers with vector masks
- Manage layers and groups
- Layer effects and styles
- Edit layer masks
- Extract assets
- Reveal layers with clipping masks
- Generate image assets from layers
- Work with Smart Objects
- Blending modes
- Combine multiple images into a group portrait
- Combine images with Auto-Blend Layers
- Align and distribute layers
- Copy CSS from layers
- Load selections from a layer or layer mask’s boundaries
- Knockout to reveal content from other layers
- Selections
- Get started with selections
- Make selections in your composite
- Select and Mask workspace
- Select with the marquee tools
- Select with the lasso tools
- Adjust pixel selections
- Move, copy, and delete selected pixels
- Create a temporary quick mask
- Select a color range in an image
- Convert between paths and selection borders
- Channel basics
- Save selections and alpha channel masks
- Select the image areas in focus
- Duplicate, split, and merge channels
- Channel calculations
- Image adjustments
- Replace object colors
- Perspective warp
- Reduce camera shake blurring
- Healing brush examples
- Export color lookup tables
- Adjust image sharpness and blur
- Understand color adjustments
- Apply a Brightness/Contrast adjustment
- Adjust shadow and highlight detail
- Levels adjustment
- Adjust hue and saturation
- Adjust vibrance
- Adjust color saturation in image areas
- Make quick tonal adjustments
- Apply special color effects to images
- Enhance your image with color balance adjustments
- High dynamic range images
- View histograms and pixel values
- Match colors in your image
- Crop and straighten photos
- Convert a color image to black and white
- Adjustment and fill layers
- Curves adjustment
- Blending modes
- Target images for press
- Adjust color and tone with Levels and Curves eyedroppers
- Adjust HDR exposure and toning
- Dodge or burn image areas
- Make selective color adjustments
- Adobe Camera Raw
- Camera Raw system requirements
- What’s new in Camera Raw
- Introduction to Camera Raw
- Create panoramas
- Supported lenses
- Vignette, grain, and dehaze effects in Camera Raw
- Default keyboard shortcuts
- Automatic perspective correction in Camera Raw
- Radial Filter in Camera Raw
- Manage Camera Raw settings
- Open, process, and save images in Camera Raw
- Repair images with the Enhanced Spot Removal tool in Camera Raw
- Rotate, crop, and adjust images
- Adjust color rendering in Camera Raw
- Process versions in Camera Raw
- Make local adjustments in Camera Raw
- Image repair and restoration
- Remove objects from your photos with Content-Aware Fill
- Content-Aware Patch and Move
- Retouch and repair photos
- Correct image distortion and noise
- Basic troubleshooting steps to fix most issues
- Image enhancement and transformation
- Replace sky in your images
- Transform objects
- Adjust crop, rotation, and canvas size
- How to crop and straighten photos
- Create and edit panoramic images
- Warp images, shapes, and paths
- Vanishing Point
- Content-aware scaling
- Transform images, shapes, and paths
- Drawing and painting
- Paint symmetrical patterns
- Draw rectangles and modify stroke options
- About drawing
- Draw and edit shapes
- Painting tools
- Create and modify brushes
- Blending modes
- Add color to paths
- Edit paths
- Paint with the Mixer Brush
- Brush presets
- Gradients
- Gradient interpolation
- Fill and stroke selections, layers, and paths
- Draw with the Pen tools
- Create patterns
- Generate a pattern using the Pattern Maker
- Manage paths
- Manage pattern libraries and presets
- Draw or paint with a graphics tablet
- Create textured brushes
- Add dynamic elements to brushes
- Gradient
- Paint stylized strokes with the Art History Brush
- Paint with a pattern
- Sync presets on multiple devices
- Migrate presets, actions, and settings
- Text
- Add and edit the text
- Unified Text Engine
- Work with OpenType SVG fonts
- Format characters
- Format paragraphs
- How to create type effects
- Edit text
- Line and character spacing
- Arabic and Hebrew type
- Fonts
- Troubleshoot fonts
- Asian type
- Create type
- Filters and effects
- Use the Liquify filter
- Use the Blur Gallery
- Filter basics
- Filter effects reference
- Add Lighting Effects
- Use the Adaptive Wide Angle filter
- Use the Oil Paint filter
- Use the Liquify filter
- Layer effects and styles
- Apply specific filters
- Smudge image areas
- Saving and exporting
- Save your files in Photoshop
- Export your files in Photoshop
- Supported file formats
- Save files in graphics formats
- Move designs between Photoshop and Illustrator
- Save and export video and animations
- Save PDF files
- Digimarc copyright protection
- Color Management
- Understanding color management
- Keeping colors consistent
- Color settings
- Duotones
- Work with color profiles
- Color-managing documents for online viewing
- Color-managing documents when printing
- Color-managing imported images
- Proofing colors
- Web, screen, and app design
- Photoshop for design
- Artboards
- Device Preview
- Copy CSS from layers
- Slice web pages
- HTML options for slices
- Modify slice layout
- Work with web graphics
- Create web photo galleries
- Video and animation
- Video editing in Photoshop
- Edit video and animation layers
- Video and animation overview
- Preview video and animations
- Paint frames in video layers
- Import video files and image sequences
- Create frame animations
- Creative Cloud 3D Animation (Preview)
- Create timeline animations
- Create images for video
- Printing
- Print 3D objects
- Print from Photoshop
- Print with color management
- Contact Sheets and PDF Presentations
- Print photos in a picture package layout
- Print spot colors
- Print images to a commercial printing press
- Improve color prints from Photoshop
- Troubleshoot printing problems | Photoshop
- Automation
- Creating actions
- Create data-driven graphics
- Scripting
- Process a batch of files
- Play and manage actions
- Add conditional actions
- About actions and the Actions panel
- Record tools in actions
- Add a conditional mode change to an action
- Photoshop UI toolkit for plug-ins and scripts
- Photoshop 3D
- Photoshop 3D | Common questions around discontinued 3D features
Your computer must meet the minimum technical specifications outlined below to run and use Photoshop.
Applicable for
October 2022 release (version 24.0) and later
System requirements for earlier releases
Photoshop system requirements | earlier releases
Minimum and recommended system requirements for Photoshop
Windows
| Minimum | Recommended | |
|---|---|---|
| Processor | Multicore Intel® or AMD processor (2 GHz or faster processor with SSE 4.2 or later) with 64-bit support | |
| Operating system | Windows 10 64-bit (version 20h3) or later; LTSC versions are not supported | |
| RAM | 8 GB | 16 GB or more |
| Graphics card |
|
|
| See the Photoshop graphics processor (GPU) card FAQ | ||
| Monitor resolution | 1280 x 800 display at 100% UI scaling | 1920 x 1080 display or greater at 100% UI scaling |
| Hard disk space |
20 GB of available hard-disk space |
50 GB of available hard-disk space
|
| Internet | Internet connection and registration are necessary for required software activation, validation of subscriptions, and access to online services † | |
 Currently, we don’t support testing on GPUs older than 7 years
| Minimum | Recommended | |
|---|---|---|
| Processor | ARM processor | |
| Operating system |
Windows 10 ARM device running Windows 10 64-bit (version 20h3) or later |
|
| RAM | 8 GB | 16 GB or more |
| Graphics card | 4 GB of GPU memory | |
| All the other aspects for ARM are the same as Intel | ||
| Minimum | Recommended | |
|---|---|---|
| Processor | Multicore Intel® processor (2 GHz or faster processor with SSE 4. 2 or later) with 64-bit support 2 or later) with 64-bit support |
|
| Operating system | macOS Big Sur (version 11.0) or later | macOS Big Sur (version 11) Installation is blocked on v10.15.x |
| RAM | 8 GB | 16 GB or more |
| Graphics card |
|
|
|
To find out if your computer supports Metal, see Mac computers that support Metal See the Photoshop graphics processor (GPU) card FAQ |
||
| Monitor resolution | 1280 x 800 display at 100% UI scaling | 1920 x 1080 display or greater at 100% UI scaling |
| Hard disk space | 20 GB of available hard-disk space |
50 GB of available hard-disk space
|
| Photoshop will not install on a volume that uses a case-sensitive file system | ||
| Internet | Internet connection and registration are necessary for required software activation, membership validation, and access to online services † | |
| Minimum | Recommended | |
|---|---|---|
| Processor | ARM-based Apple Silicon processor | |
| Operating system | macOS Big Sur (version 11. 2.2) or later 2.2) or later |
|
| RAM | 8 GB | 16 GB or more |
| All the other aspects for Apple Silicon are the same as Intel | ||
† NOTICE TO USERS. Internet connection, Adobe ID, and acceptance of license agreement required to activate and use this product. This product may integrate with or allow access to certain Adobe or third-party hosted online services. Adobe services are available only to users 13 and older and require agreement to additional terms of use and Adobe’s online privacy policy. Applications and Services may not be available in all countries or languages and may be subject to change or discontinuation without notice. Additional fees or membership charges may apply.
Windows and macOS
Photoshop is available in the following languages:
* Arabic and Hebrew supported in a Middle Eastern version with full right-to-left language support, Arabic/Hebrew features, and an English interface; also in a North African French (Français*) version with full right-to-left language support, Arabic/Hebrew features, and a French interface.
The Adobe Camera Raw plug-in gives you ability to import and work with raw images, as well as JPEG and TIFF, in Photoshop.
Your computer may need to meet additional system requirements to work efficiently with Adobe Camera Raw.
See Adobe Camera Raw | System requirements for details.
More like this
- System requirements | Photoshop on mobile
- System requirements | Photoshop on web
- Photoshop system requirements | Earlier releases
Buy Adobe Photoshop or start a Free Trial.
Sign in to your account
Sign in
Manage account
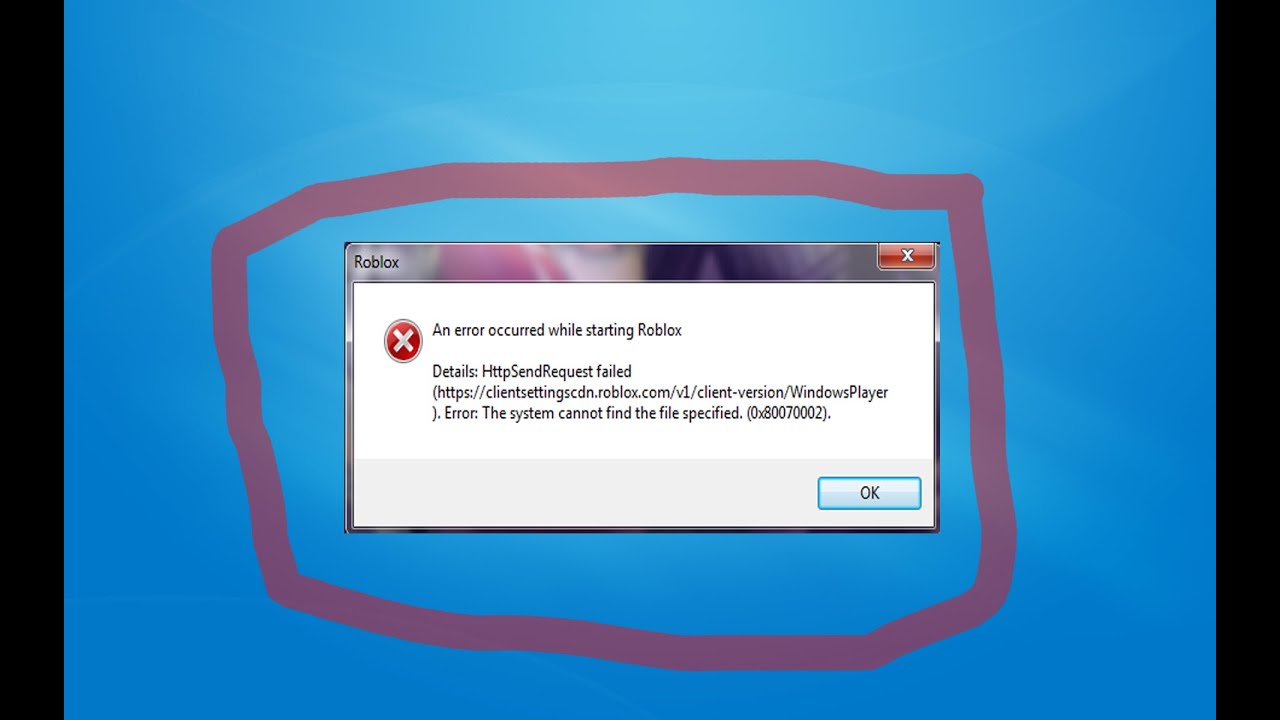
A computer capable of running a desktop thread was not found
Problems
Failed to start desktop thread with error code ‘NoCandidateMachine’ or error details ‘No machine found capable of running desktop thread’.
Cause
If there are no computers available, Power Automate creates a queue that contains desktop threads waiting to run. Once the computer is available, the next desktop launch will be selected based on the priority and timing of the request. If the computer is unavailable after three hours from the time of the request, the desktop will time out and fail with a NoCandidateMachine error.
As mentioned in the error message, this error indicates that the orchestrator could not find an available computer to run the desktop. This error occurs before the desktop execution starts. This occurs when the desktop thread has been queued for more than the timeout limit (3 hours), which can happen for several reasons.
Solution
This error code usually comes with a nested error code. Below are solutions for the most common options:
-
SessionExistsForTheUserWhenUnattended — This means that you are trying to start an automatic desktop thread on the target computer where the user used in the desktop thread connection is logging on.
 The session must be completed (a locked session will result in this error). Make sure you are not signed in with the same user on the computer.
 -
NoUnlockedActiveSessionForAttended — The most common way to get this error is when you try to start a desktop thread with participation on the target computer that is locked or the user is not signed in. This error can also occur if the Windows user you are logged in with on the target computer does not match the user entered in the connection. The respective desktop threads can only run if the computer is unlocked in a session where the current user matches the desktop connection thread. Check the credentials used in the connection and make sure they are used in the unlock session.
-
UIFlowAlreadyRunning — This occurs when the auto desktop thread starts.
 This error occurs when the computer has reached its active session limit or when it tries to open a session for a user who is already logged on.
If no nested error code is specified, several checks will be required.
-
The computer or all computers in the computer group are offline. Start your computer and verify that Power Automate Desktop is properly installed and can communicate with the Internet.
-
Computer group is empty. Make sure the computer group contains at least one computer before assigning it to run a desktop thread.
-
The computer or all computers in the computer group are constantly busy.
 Computers picked up the desktop thread at the wrong time. This is most likely because the dedicated computer resources do not scale well enough to meet the needs of the workflow. Adding more computers will help spread the workload.
 -
Unable to communicate with the computer due to network problems (including proxy or firewall). Contact your IT administrator to ensure that computers are properly accessible.
-
The problem is temporary. Changing the retry policy in the action settings might help.
-
The computer or all computers in the computer group cannot connect to the desktop stream.
 Verify that you are not trying to start an automatic flow in a group that has all computers in it, or that you are not trying to start a flow that is in a group where all computers are checked out.
 -
The computer is no longer available for use. Add a new computer, and then update Desktop Flow connections in Cloud Streams to use the new computer.
If you have a backup of desktop threads in the run queue for one of the above reasons, you can bulk cancel the execution of the desktop thread by canceling the execution of the parent cloud thread using the action Cancel the execution of the parent thread thread on the Start worker thread page table. Once the problem with your computer is fixed, you can restart these cloud streams.
My Computer icon to the Windows 10 desktop
The question of how to return the My Computer (This PC) icon to the Windows 10 desktop has been asked on this site more than any other question related to the new OS since the release of the system and it has a very simple answer.
In this tutorial, there are several ways to get the computer icon back in Windows 10 — using the system icon settings, which can be accessed by various methods, as well as using the registry editor. I note that you should not create a simple shortcut «My Computer» on the desktop — compared to the system icon, it has limited functionality and is not equivalent to it.
- Enable the My Computer icon in Windows 10 settings
- Video instruction
- How to return the computer icon through the registry
How to enable the My Computer icon in Windows 10 settings
Windows 10 has the same Control Panel applet as before to display desktop icons (This PC, Recycle Bin, Network, and User Folder) , however it is launched from a different location. The steps to enable the desktop computer icon are as follows:
- Right-click anywhere on your desktop, select Personalization, and then open Themes on the left.
- In the «Related Settings» section, you will find the required item «Desktop Icon Settings», related options can be displayed at the bottom of the list or on the right side of the window (if the options window is wide).

- By opening this item, you can specify which icons to display and which not. Including enable «My Computer» (This PC) on the desktop or remove the trash from it, do the same with other icons and, if necessary, change the appearance of the computer icon or other icons.
There are other ways to quickly get into the same settings to return the computer icon to the desktop, which are suitable not only for Windows 10, but for all the latest versions of the system.
- You can open a window with options for displaying desktop icons for one of two commands launched from the Run window, which can be accessed by pressing the Windows + R keys (Windows is the Windows logo key). Commands: desk.cpl ,5 (space before comma required) or Rundll32 shell32.dll,Control_RunDLL desk.cpl,5
- In earlier versions of Windows 10, you could type «Icons» in the search box at the top right of the Control Panel, and the results would show «Show or hide common icons on the desktop.