Enabling XMP — DDR4 Haswell-E Scaling Review: 2133 to 3200 with G.Skill, Corsair, ADATA and Crucial
by Ian Cutresson February 5, 2015 10:10 AM EST
- Posted in
- Memory
- G.Skill
- Corsair
- Crucial
- ADATA
- DDR4
- Haswell-E
- DRAM
120 Comments
|
120 Comments
DDR4 Haswell-E Scaling ReviewTesting The Kits and The MarketsEnabling XMPMemory Scaling on Haswell-E: CPU Real WorldMemory Scaling on Haswell: Professional PerformanceMemory Scaling on Haswell: Single GTX 770 GamingMemory Scaling on Haswell: 2x GTX 770 SLI GamingComparing DDR3 to DDR4The Future of DDR4Conclusions on Haswell-E DDR4 Scaling
By default, memory should adhere to specifications set by JEDEC (formerly known as the Joint Electron Device Engineering Council). These specifications state what information should be stored in the memory EEPROM, such as manufacturer information, serial number, and other useful information. Part of this is the memory specifications for standard memory speedswhich a system will adhere to in the event of other information not being available. For DDR4, this means DDR4-2133 15-15-15 at 1.20 volts.
An XMP, or (Intel-developed) Extreme Memory Profile, is an additional set of values stored in the EEPROM which can be detected by SPD in the BIOS. Most DRAM has space for two additional SPD profiles, sometimes referred to as an ‘enthusiast’ and an ‘extreme’ profile; however most consumer oriented modules may only have one XMP profile. The XMP profile is typically the one advertised on the memory kit – if the capability of the memory deviates in any way from specified JEDEC timings, a manufacturer must use an XMP profile.
Thus it is important that the user enables such a profile! It is not plug and play!
As I have stated since reviewing memory, at big computing events and gaming LANs there are plenty of enthusiasts who boast about buying the best hardware for their system. If you ask what memory they are running, then actually probe the system (by using CPU-Z), more often than not the user after buying this expensive memory has not enabled XMP. It sounds like a joke story, but this happened several times at my last iSeries LAN in the UK – people boasting about high performance memory, but because they did not enable it in the BIOS, were still running at DDR3-1333 MHz C9.
So enable XMP with your memory!
Here is how for most motherboards except the ASUS X99-Deluxe, which uses an onboard XMP switch:
Step 1: Enter the BIOS
This is typically done by pressing DEL or F2 during POST/startup. Users who have enabled fast booting under Windows 8 will have to use motherboard vendor software to enable ‘Go2BIOS’ or a similar feature.
Step 2: Enable XMP
Depending on your motherboard manufacturer, this will be different. I have taken images from the major four motherboard manufacturers to show where the setting is on some of the latest X99 motherboard models.
On any ASUS X99 board, the setting is on the EZ-Mode screen. Where it says ‘XMP’ on the left, click on this button and navigate to ‘Profile 1’:
If you do not get an EZ mode (some ROG boards go straight to advanced mode), then the option is under the AI Tweaker tab, in the AI Overclock Tuner option, or you can navigate back to EZ mode.
For ASRock motherboards, depending on which model you have, navigate to OC Tweaker and scroll down to the DRAM Timing Configuration. Adjust the ‘Load XMP Setting’ option to Profile 1.
For GIGABYTE motherboards, press F2 to switch to classic mode and navigate to the MIT tab. From here, select Advanced Frequency Settings.
In this menu will be an option to enable XMP where this arrow is pointing:
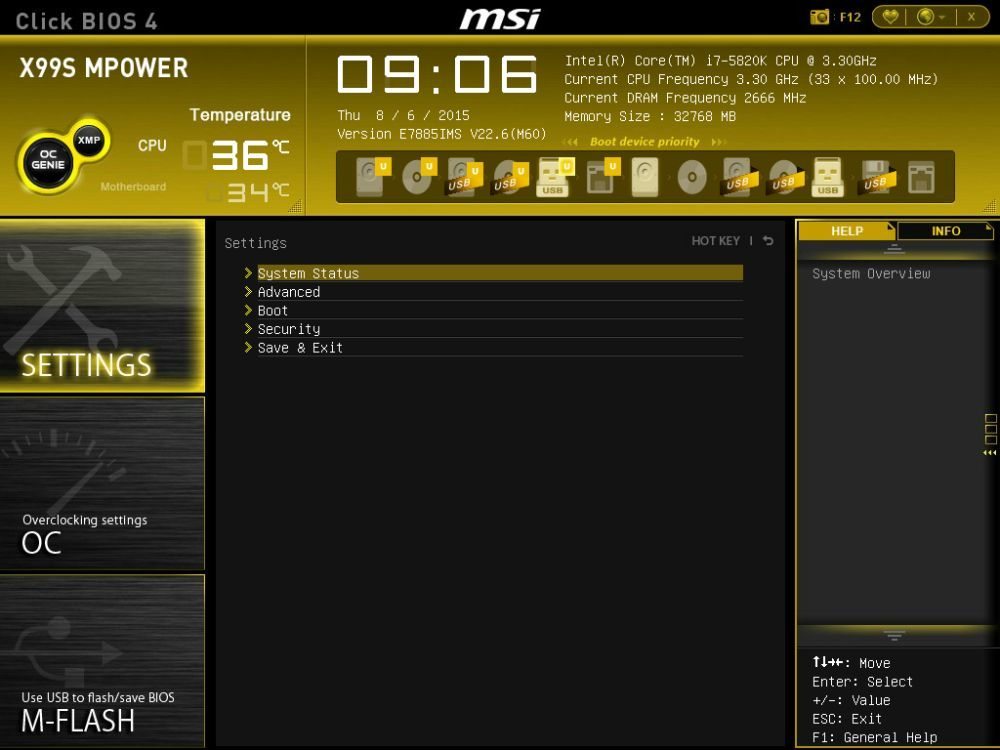
Finally on MSI motherboards, we get a button right next to the OC Genie in the BIOS to enable XMP:
I understand that setting XMP may seem trivial to most of AnandTech’s regular readers, however for completeness (and the lack of XMP being enabled at events it seems) I wanted to include this mini-guide. Of course different BIOS versions on different motherboards may have moved the options around a little – either head to enthusiast forums, or if it is a motherboard I have reviewed, I tend to post up all the screenshots of the BIOS I tested with as a guide.
Testing The Kits and The Markets
Memory Scaling on Haswell-E: CPU Real World
DDR4 Haswell-E Scaling ReviewTesting The Kits and The MarketsEnabling XMPMemory Scaling on Haswell-E: CPU Real WorldMemory Scaling on Haswell: Professional PerformanceMemory Scaling on Haswell: Single GTX 770 GamingMemory Scaling on Haswell: 2x GTX 770 SLI GamingComparing DDR3 to DDR4The Future of DDR4Conclusions on Haswell-E DDR4 Scaling
Tweet
PRINT THIS ARTICLE
User Review — Asus X99-A review | TechEnclave
JavaScript is disabled. For a better experience, please enable JavaScript in your browser before proceeding.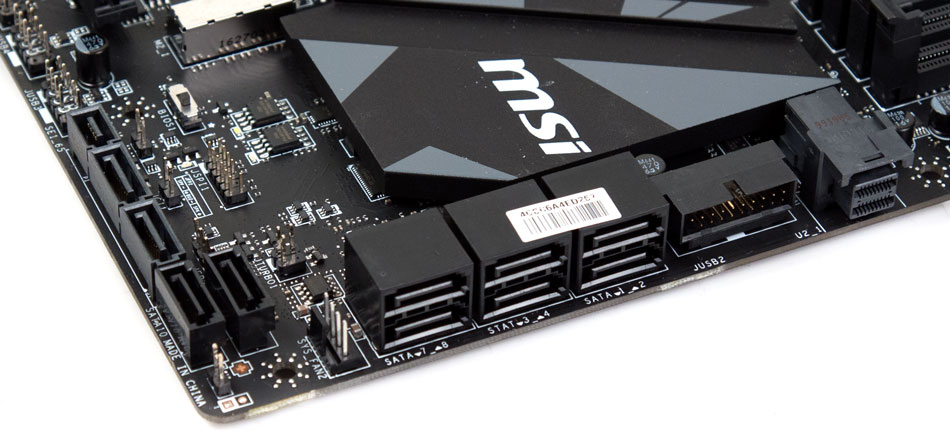
-
Thread starter
sumonpathak -
Start date
From the inception of Intels X99 chipset there’s been a constant battle between the motherbaord manufacturers to bring out more boards than the other by mixing and matching different criteria. While other companies at times have a very confusing lineup Asus has their X99 motherboard lineup neatly lined up, they have
- X99-A for the entry level bare bone DDR4 setup.
- X99-Pro for the user who wants a bit more in the connectivity department,hence the addition of 802.11ac WiFi and Bluetooth adapter.
- X99-Deluxe for the user who wants to have everything including 3×3 802.11ac WiFi among other things.
- Rampage V Extreme for the extreme performance junkies.
- X99-WS for those users who wants to have the ultimate desktop workstations
We already got our first taste of the Asus X99 setup with the X99-Deluxe, today we will be checking out its younger brother X99-A.
Overview and Specifications
The X99-A is targeted towards those user who just want to get their feet wet with Intel’s HDET platform without burning a massive hole in their pocket.
One interesting inclusion from the the X99 Deluxe is the EZ XMP switch which allows to run XMP timings without even touching the BIOS. Gaming or PCIe Coprocessor wise this board is armed with full PCIe 3.0 x16/x16/x8 configuration.Storage wise we have 10 SATA ports from the PCH — six of which are RAID capable, the remaining 4 are from a secondary controller so they don’t have the RAID capability.Adding to the sata ports we have one Sata express port with RST enabled and a M.2 x4 Gen 3.0 port. The SATA Express shares bandwidth with the PCIe 2.0 x4 slot whereas the M.2 is switched with the final PCIe slot.Coming to USB side of things we have 10 USB 3.0 ports among them 5 comes from the PCH,three from an ASMedia hub and two from the ASMedia controller.Exclusion of multicore turbo is a bit of a downer but that can be easily fixed by flicking the TPU switch for a 3.9GHz overclock.The Audio remains the same with the Crystal Sound 2 whihc is pretty powerful for an on-board solution. And lastly we have Asus Software and Bios implementation which is undoubtedly better than the competitors as of now.
Specifications
Visual Analysis
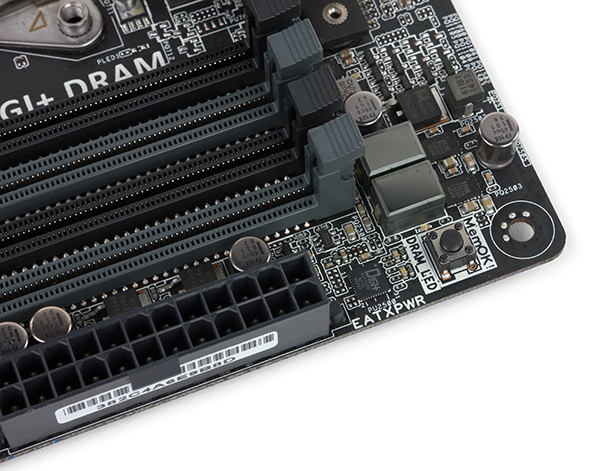
The X99-A retains the white and silver livery form the Deluxe although the effect is somewhat limited since the board has three separate small heat-sinks. The X99-A has a different PCB and a reconfigured slot layout than its bigger sibling.The electrical components seem to be the same, but their placement is different. For starters the m.2 has been relocated to a more convenient place in the bottom left.Coming to the CPU area we see a pretty busy state of affairs, the CPU has access to five of the fan headers – two 4-pin CPU headers in the top right, two chassis headers to the bottom left of the left DRAM slots, and another just below the 24-pin ATX header, the final fan header is just below the sata ports near the TPU switch. The board also has a FAN_EXT header for fan extension cards on the bottom of the board.Along side the Dram on the right hand side we have the MemOK button whihc takes care of and memory related problems during POST. Below this is the 24 pin ATX power connector and a fan header followed by 2x sata 6GBPS ports these followed by the next four in gray are RAID/RST compatible, while the last four black ports are from the secondary AHCI controller and theyare not RAID/RST compatible.
 The middle grey sata ports doubles up as sata express connectors.
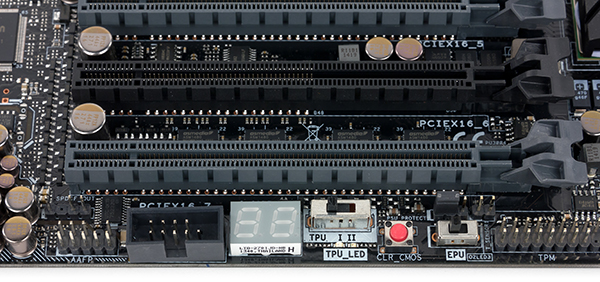
Coming to the lower right corner we find the X99 PCH underneath a white heatsink. Below the heatsink is a M.2 x4 Gen 3.0 slot, supporting 2242 to 22110 sized drives. Below that is the EZ XMP switch, EPU and two stage TPU switch.
Coming to the bottom of the board we see the front panel header, two USB 2.0 headers, a USB 3.0 header, a TPM header, the two-digit Q LED, power and reset buttons, a COM header, the fan extension header and the front panel audio.
Coming to the audio side of things we have Asus’s Crystal Sound 2 audio solution whihc is an upgraded ALC1150 solution featuring PCB separation,EMI shield and filter caps for the front panel audio.
Coming to PCIe arrangements we have PCIe 3.0 x16, 2.0 x1, 2.0 x4, 3.0 x16, 2.0 x1 and a 3.0 x8 layout. This gives x16/x16/x8 for 40 lanes CPU like 5960x and 5930K or x16/x8/x4 when a 28-lane CPU like 5820K is used. Unfortunately this means Tri SLI will not be possible with a 5820K on this board.
The IO panel consists of the bios flashback button, a combination PS/2 port, four USB 2.0 ports, one Intel I218-V network port, six USB 3.0 ports and the audio jacks. The USB 3.0 are splits quite nicely; the two under the network port is form the controller, the next two are form the asmedia hub and the next two are split between the PCH and the controller.
In the Box
the box content is pretty modest in X99-AWe get the following
Driver CD
User Manuals
Rear Panel
Four SATA Cables
Q-Connectors
Flexi SLI Bridge
Test Setup
- Core i7 5930K
- Kingston HyperX Fury DDR4 2666 C12
- Kingston VNow 300 SSD
- Coolermaster Nepton 240M AIO.
- Coolermaster V1000 PSU.
- HIS R9 270X GPU
We started with a small overclock of 3. 9GHz and gradually worked our way to 4.4GHz after which keeping the system stable became somewhat of a problem for our test suite.3.9GHz validation
4.4Ghz validation
Performance Results
CPU Performance
Point Calculations – 3D Movement Algorithm Test
The algorithms in 3DPM employ both uniform random number generation or normal distribution random number generation, and vary in various amounts of trigonometric operations, conditional statements, generation and rejection, fused operations, etc. The benchmark runs through six algorithms for a specified number of particles and steps, and calculates the speed of each algorithm, then sums them all for a final score. This is an example of a real world situation that a computational scientist may find themselves in, rather than a pure synthetic benchmark. The benchmark is also parallel between particles simulated, and we test the single thread performance as well as the multi-threaded performance.
Cinebench
CINEBENCH is a real-world cross platform test suite that evaluates your computer’s performance capabilities. CINEBENCH is based on MAXON’s award-winning animation software CINEMA 4D.
X264 FHD
This benchmark encodes a full HD (1080p) video into a high quality x264 video. This is especially CPU intensive and prefers more cores.
WPrime v 1.55
wPrime uses a recursive call of Newton’s method for estimating functions, with f(x)=x2-k, where k is the number we’re sqrting, until Sgn(f(x)/f'(x)) does not equal that of the previous iteration, starting with an estimation of k/2. It then uses an iterative calling of the estimation method a set amount of times to increase the accuracy of the results. It then confirms that n(k)2=k to ensure the calculation was correct. It repeats this for all numbers from 1 to the requested maximum.
Super PI XS Mod 1.5
Super PI is a single threaded benchmark that calculates pi to a specific number of digits.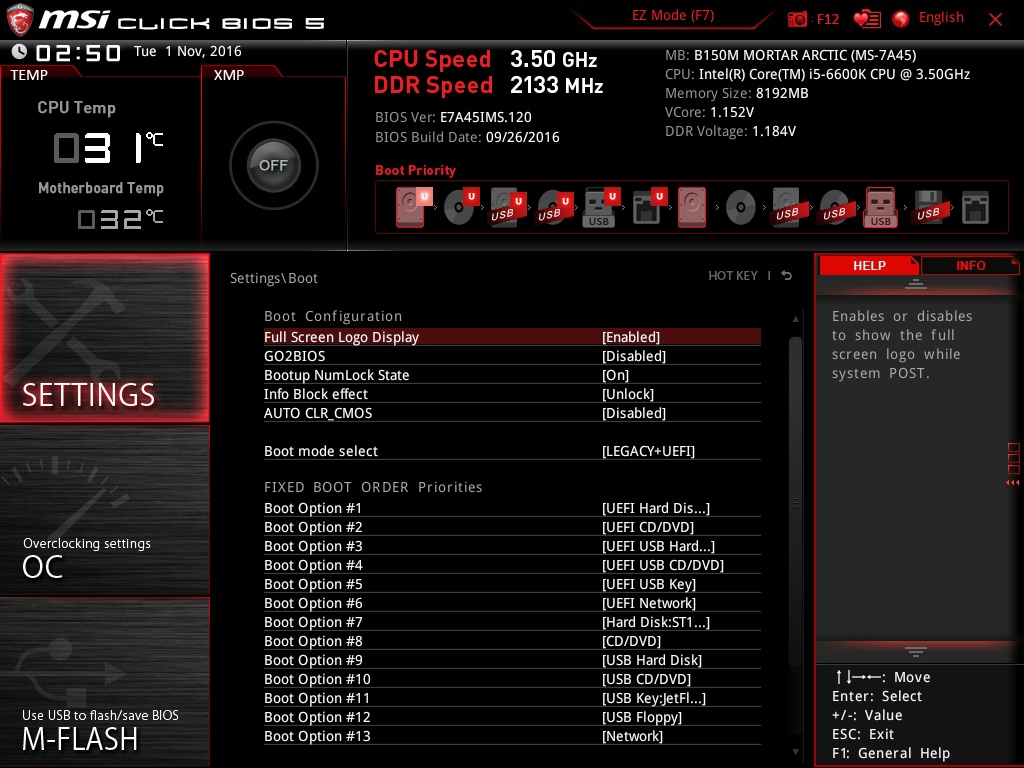 It uses the Gauss-Legendre algorithm and is a Windows port of a program used by Yasumasa Kanada in 1995 to compute pi to 232 digits.
POVRAY
The Persistence of Vision RayTracer, or PovRay, is a freeware package for as the name suggests, ray tracing. It is a pure renderer, but the latest beta version contains a handy benchmark for stressing all processing threads on a platform.
3DMARK 11
Developed by Futuremark 3DMark is a mainly used for gpu benchmarking however 3DMark 11 scales pretty good with cpu speed hence it is a very good indicator of CPU performance.
PCMark 7
PCMark is a computer benchmark tool developed by Futuremark to test the performance of a PC at the system and component level. In most cases the tests in PCMark are designed to represent typical home/workstation user workloads.
Final Words
The term «budget» is very subjective, for an HTPC user it might mean a entry level cpu with integrated gpu, for a gamer it might mean a pairing of core i3 with a budget GPU.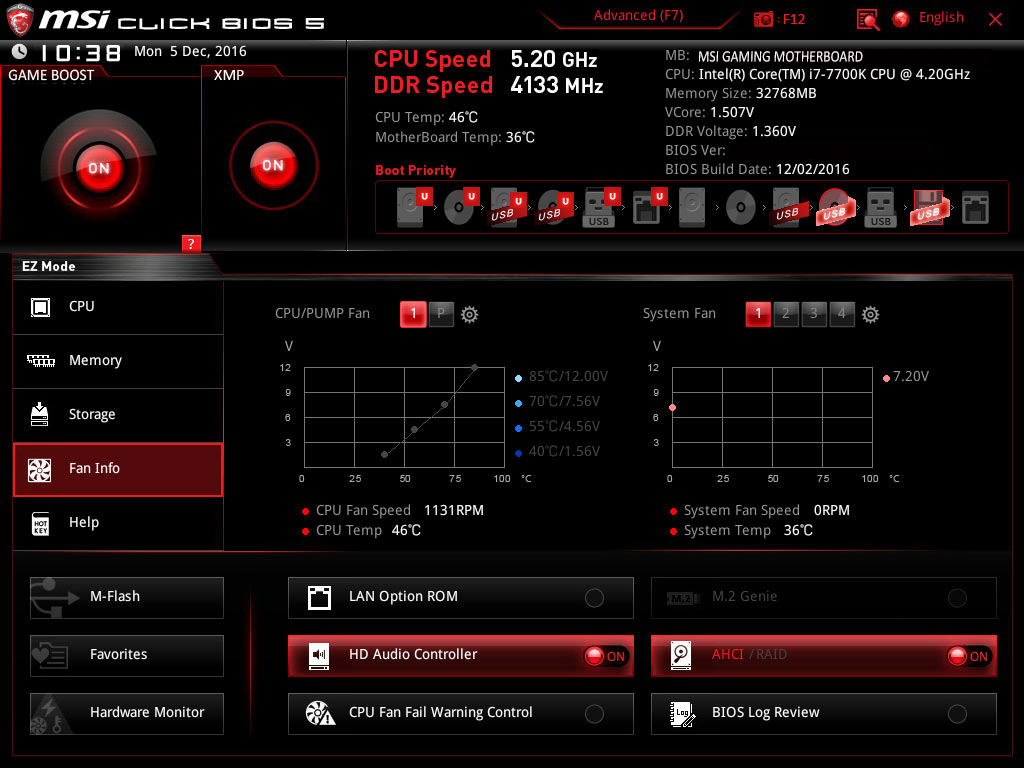 For an X99 user however the term is very hard to define since there is no «budget board» for this niche. the platform already has a lot of features to play with so the end result is already a bit expensive.In X99 niche therefore budget means sub 25K range motherboard paired with a sub 30K Core i7 5820K along with 8/16GB DDR4. Almost every manufacturer has some board aimed at that range and likewise Asus has the X99-A.Now if we take a look at the X99-A, we have a board which has 10 SATA ports, 10 USB 3.0 ports,three way PCIe at x16/x8/x4,M.2 Sata running form PCIe and sata express along with a somewhat beefy 8 Phase VRM for a stable overclock. Add to that a decent Audio subsystem and an Intel Lan and we have a complete package with the EZ XMP button. And we shouldn’t forget Asus’s exceptionally good BIOS and Software which makes it an all round easy to use system.For someone who is trying to build a no frills X99 system the X99-A is the board to go. The only competition comes to X99-A comes form the X99-Pro which adds a few more connectivity options.
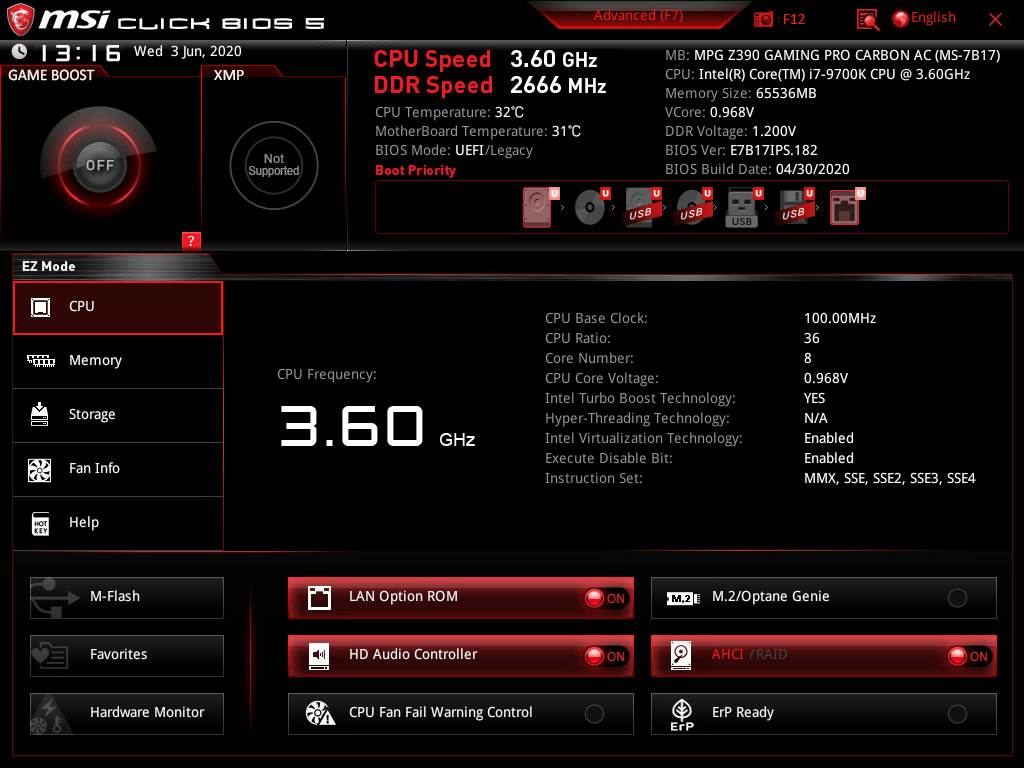 So at the end of the day its a matter of choosing between what you want and how much can you shell out.
the X99-A gets an overall rating of 8/10 from us.A damn good board for its price.
Click to expand…
Written by
sumonpathak
knocking on heavens door. · 33 · From Kolkata
-
- Messages
- 649
-
- Reaction score
- 48
-
- Points
- 93
Share:
Facebook
Twitter
Reddit
Pinterest
Tumblr
WhatsApp
Email
Share
Link
Top
0003
Optimized for the latest Intel X99/100 Series motherboards, the DDR4 form factor provides higher frequency, higher bandwidth, and lower power consumption than DDR3 modules. To ensure consistently high performance, Vengeance LPX DDR4 modules are tested for compatibility on X99/100 Series motherboards. There is support for XMP 2.0 for easy overclocking in automatic mode. In addition, the modules are available in a variety of colors to match your motherboard, other components, or just your mood. nine0003
Characteristics
- Purpose: for system unit
- Type of delivery: one module 1x16GB
- Type of memory: DDR4
- Form-Forms: Dimm 288-Connection
- MHz
- ECC support: no
- Buffered: no
- Latency: CL15
- Timings: 16-18-18-35
- Backlight: no
- : Single module capacity: 16 GB
- 1 piece
- Total memory: 16 GB
- Supply voltage: 1.2 V
9000 with
Specifications of the product may differ from those indicated on the site, check the technical characteristics of the product at the time of purchase and payment. All information on the site about the goods is for reference only and is not a public offer in accordance with paragraph 2 of Article 437 of the Civil Code of the Russian Federation. We kindly ask you to check the availability of the desired functions and characteristics when purchasing.
Was online: Yesterday
Seller Alianza.kz — Complex distribution
7 years on Satu.kz
- Seller catalog
- Reviews Seller Alianza.kz — Complex distribution
Was online: Yesterday
Code: CMK16GX4M1A2666C16
Available
83 000 Tg.
-
Satu protects
Delivery
Payment and guarantees
Accessories for mobile phones
Table dishes
Information carriers
cartridges, photobarabans
Accessories for photo, video cameras
Large household appliances for the kitchen
Players
kitchen supplies
9000 2 body. Accessories for TVs and projectors
Internal and external hard drives, hdd, ssd
Air conditioning
kitchen dishes
Engine power system
Women’s perfumes
Silver jewelry
TOP Tags
Alimentador 12V hynix ddr4 4gb ram
Hp proliant gen 8
Hyperx fury ddr5
RAM Corsair DDR4 16Gb 2666MHz pc-21300 Vengeance LPX Black (CMK16GX4M1A2666C16) in Kazakhstan0023
RAM Corsair DDR4 16Gb 2666MHz pc-21300 Vengeance LPX Black (CMK16GX4M1A2666C16) and other products in the Memory modules category are available in the Satu kz online store catalog in Kazakhstan at low prices.
 There are more than 12 million products from thousands of sellers in the satu.kz catalog. On the site you will find advantageous offers, check out
with detailed specifications and descriptions, as well as
reviews of this product in order to make the right
selection and order goods online. Buy items such as Corsair DDR4 16Gb 2666MHz pc-21300 Vengeance LPX Black (CMK16GX4M1A2666C16) RAM in the Satu Kz online store, after checking their availability with the seller. You can receive the goods in Kazakhstan in a way convenient for you, for this, read the delivery information and
pickup at checkout. Also, satu.kz provides a Buyer Protection Program, which provides an opportunity to receive compensation in the amount of up to 50,000 tenge for buyers whose orders were paid for but not shipped by the seller. nine0003How comfortable is
on satu?Asus X99-E-10G WS Motherboard: Top Workstation Solution with Dual 10 Gigabit Network Ports
Asus Workstation Motherboard Family Expands with Asus X99-E-10G WS on Intel X99 Chipset .

Package Contents
The Asus X99-E-10G WS board comes in a fairly compact black box with the name of the board and logos of supported technologies printed on it by lamination. nine0003
In addition to the board itself, the package includes a user manual (only in English), a DVD with software and drivers, ten SATA cables (all connectors are latched, four cables have an angled connector on one side), SLI bridges on two, three and four video cards, a blank for the back panel of the board, a traditional Asus Q-connector to facilitate the connection of wires from the power button, reset, etc., as well as a die for two USB 2.0 ports and a die for a COM port. There is also a special adapter cable for connecting an RGB tape to the board — an almost mandatory attribute of workstations. nine0003
Configuration and features of the board
The summary table of characteristics of the Asus X99-E-10G WS board is given below, and further in the text we will consider all its features and functionality.
Supported processors Intel Core i7 (Haswell-E, Broadwell-E), Intel Xeon E5 1600/2600 v3/v4
Processor socket LGA 2011-v3
Chipset nine0002 Intel X99 Memory 8 × DDR4 (up to 128 GB)
Audio subsystem Realtek ALC1150
Network Controller Intel X550-AT2 (10Gb/s)
Expansion slots 4 × PCI Express 3.0×16 slots
3 × PCI Express 3.0×8 slots (in PCI Express x16 form factor)
1 × M.2 (PCIe 3.0×4, frame size 2260/2280)
1×U.2 (PCIe 3.0×4)SATA connectors 10 x SATA 6Gb/s
USB ports 1 x USB 3.1 (Type-C)
1 x USB 3.1 (Type-A)
8 x USB 3.0
4 x USB 2.0Rear connectors 1 × USB 3.
 1 (Type-C)
1 × USB 3.1 (Type-A)
4 × USB 3.0
2 × RJ-45
1 × S/PDIF (optical, output)
5 × audio minijackInternal connectors EATX 24-pin power connector
2 × 8-pin EPS12V power connectors
EATX 12V 6-pin power connector
10 × SATA 6 Gb/s
1 × M.2
1 × U.2
5 connectors for connection 4-pin fans
1 thermal sensor connector
1 COM port connector
1 Aura RGB Strip connector
2 USB 3.0 connectors
2 USB 2.0 connectorsForm factor E-ATX (305x267mm)
Form factor
Asus X99-E-10G WS board is made in CEB (305x267mm) form factor. It’s slightly larger than a standard ATX (305x244mm), but nine standard holes are provided for mounting the board.
Chipset and processor socket
The Asus X99-E-10G WS board is based on the top Intel X99 chipset and supports Haswell-E and Broadwell-E processors with LGA 2011-v3 socket, as well as Intel Xeon E5 1600 family processors /2600 v3 and Intel Xeon E5 1600/2600 v4.
 nine0003
 The LGA2011-v3 connector implemented on the Asus X99-E-10G WS board is exactly the same as on other Asus boards with the Intel X99 chipset. Recall that Asus motherboards with the Intel X99 chipset use the proprietary Asus O.C. A socket that differs from a regular LGA 2011-v3 socket by having additional pins. Additional pins in the connector allow you to use undocumented (reserved for debugging purposes) processor pins. Some of these undocumented pins are additional processor power lines. And if you use them, then you can improve the stability of the supply voltage on the processor and eliminate its subsidence during stressful loading. nine0003
Memory
The Asus X99-E-10G WS board has eight DIMM slots for installing memory modules, which allows you to install two DDR4 modules for each of the four memory channels with a maximum capacity of up to 128 GB (when using 16 GB memory modules).
Conventional DDR4 memory, which is unbuffered non-ECC memory, is supported with Intel Core i7 family processors.
Registered (RDIMM) and unregistered (UDIMM) memory with ECC is supported with Intel Xeon E5 family processors. nine0003
Note also that the board supports memory with XMP profiles.
Expansion slots, M.2 and U.2 connectors
The Asus X99-E-10G WS motherboard has seven PCI Express x16 form factor slots for installing graphics cards or expansion cards. Moreover, the board supports the ability to combine up to four Nvidia video cards in SLI mode and up to four AMD video cards in CrossFireX mode.
All slots with PCI Express x16 form factor are implemented on the basis of PCIe 3.0 processor lines, and the first (from the processor socket) slot always works in x16 mode, the second, fourth and sixth slots work only at x8 speed (these are PCI Express 3.0 slots ×8 in PCI Express x16 form factor), and the third, fifth and seventh slots are switchable and can operate at x16 or x8 speeds. nine0003
The documentation for the board indicates that when installing video cards, the operating modes of PCI Express x16 slots can be as follows: x16/-/-/-/-/-/-, x16/-/-/-/x16/-/-, x16/-/x16/-/x16/-/-, x16/-/x16/-/x16/-/x16, x16/x8/x8/x8/x8/x8/x8.
 Moreover, there is no mention of the processor installed on the board. Recall that Haswell-E and Broadwell-E processors exist in variants with 40 and 28 lines of PCIe 3.0 lanes. However, the x16/-/x16/-/x16/-/x16 and x16/x8/x8/x8/x8/x8/x8 variants require 64 PCIe 3.0 lanes. In addition, the board also has M.2, U.2 connectors and two 10-gigabit network ports based on the Intel X550 AT2 controller. nine0003
 The fact is that M.2 and U.2 connectors require 4 PCIe 3.0 processor lines each, and the Intel X550 AT2 controller is also connected via PCIe 3.0 processor lines. That is, to implement all the slots, connectors and ports, 76 PCIe 3.0 processor lines will be required. Naturally, the question arises: how is this possible?
The answer is simple. To increase the number of PCIe 3.0 lanes, the board uses two five-port 48-lane PCIe 3.0 PLX PEX 8747 switches. In this case, each of the PLX PEX 8747 switches is connected to 16 PCIe 3.0 processor lanes, and each of the controllers outputs 32 PCIe 3.
 0 lanes. As a result, using two PLX PEX 8747 switches, we get 64 PCIe 3.0 lanes, which are used for seven PCI Express 3.0×16 slots. nine0003
 The remaining eight PCIe 3.0 processor lanes are used as follows: 4 lanes for connecting the Intel X550 AT2 controller, and 4 more lanes for the M.2 and U.2 connectors, which are shared with each other, that is, if an M.2 connector is used , then the U.2 connector is not available, and vice versa, if the U.2 connector is used, then the M.2 connector is not available.
Slots and connectors for a processor with 40 PCIe 3.0 lanes are shown in the figure.
As you can see, in the processor variant with 40 PCIe 3.0 lanes, x16/-/-/-/-/-/-, x16/-/-/-/x16/-/-, x16/-/ x16/-/x16/-/-, x16/-/x16/-/x16/-/x16, x16/x8/x8/x8/x8/x8/x8. In addition, 10 Gigabit network ports and one of the M.2 or U.2 connectors are available. nine0003
If a processor with 28 PCIe 3.0 lanes is installed, then the first PLX PEX 8747 switch is connected to 16 PCIe 3.
 0 processor lanes. This switch outputs 32 PCIe 3.0 lanes, which are grouped into three ports (x16, x8, x8). Based on these lines, the first three PCI Express x16 slots are formed.
 Second PLX PEX 8747 switch connected to 8 PCIe 3.0 processor lanes. This switch outputs 32 PCIe 3.0 lanes, which are grouped into four ports (x8, x8, x8, x8). Based on these lines, four more PCI Express x16 slots are formed. As you can see, even when using a processor with 28 PCIe 3.0 lanes, out of 24 lanes, 64 lanes are obtained. And in this case, slot operation modes are available, as in the processor variant with 40 PCIe 3.0 lanes. nine0003
The remaining 4 PCIe 3.0 lanes are used to connect the Intel X550 AT2 network controller. But the M.2 and U.2 connectors in the processor version with 28 PCIe 3.0 lanes will no longer be available.
The diagram for connecting slots and connectors to a processor with 28 PCIe 3.0 lanes is shown in the figure.
SATA ports and connectors SATA Express
The board provides ten SATA 6 Gb/s ports for connecting drives or optical drives.

-