How to enable G-Sync on a FreeSync monitor
When you purchase through links on our site, we may earn an affiliate commission. Here’s how it works.
Welcome to our guide on how to enable G-Sync on a FreeSync monitor. For the better part of the decade, PC gamers have had a tough call to make to get smooth frames without screen tearing in their games.
V-sync offers one route to smooth out rendering, but can introduce stutter and input lag. Meanwhile, Nvidia’s G-Sync and AMD’s FreeSync have been two walled gardens, requiring specific hardware to take advantage of.
Make sure you check out our pick of the best FreeSync monitors for G-Sync in 2019.
The issue was that there needed to be support across multiple devices to get the adaptive sync features working, and crossing brand lines between Nvidia and AMD made it impossible. To use the adaptive refresh rates of a FreeSync monitor, you needed an AMD graphic processor that supported FreeSync. And, to use G-sync, you needed both an expensive G-Sync monitor and an Nvidia graphics card at least Maxwell (i.e. the GTX 960) or newer.
Pairing Nvidia graphics with a FreeSync monitor, and vice versa, left the technology sitting idle. But, Nvidia has made a huge shift to that dynamic. Now, recent Nvidia graphics cards will support adaptive sync on previously unsupported monitors, including FreeSync models.
If you’re looking to start gaming with G-Sync on a FreeSync monitor, here’s what you need to know and what you can expect.
What exactly is G-Sync?
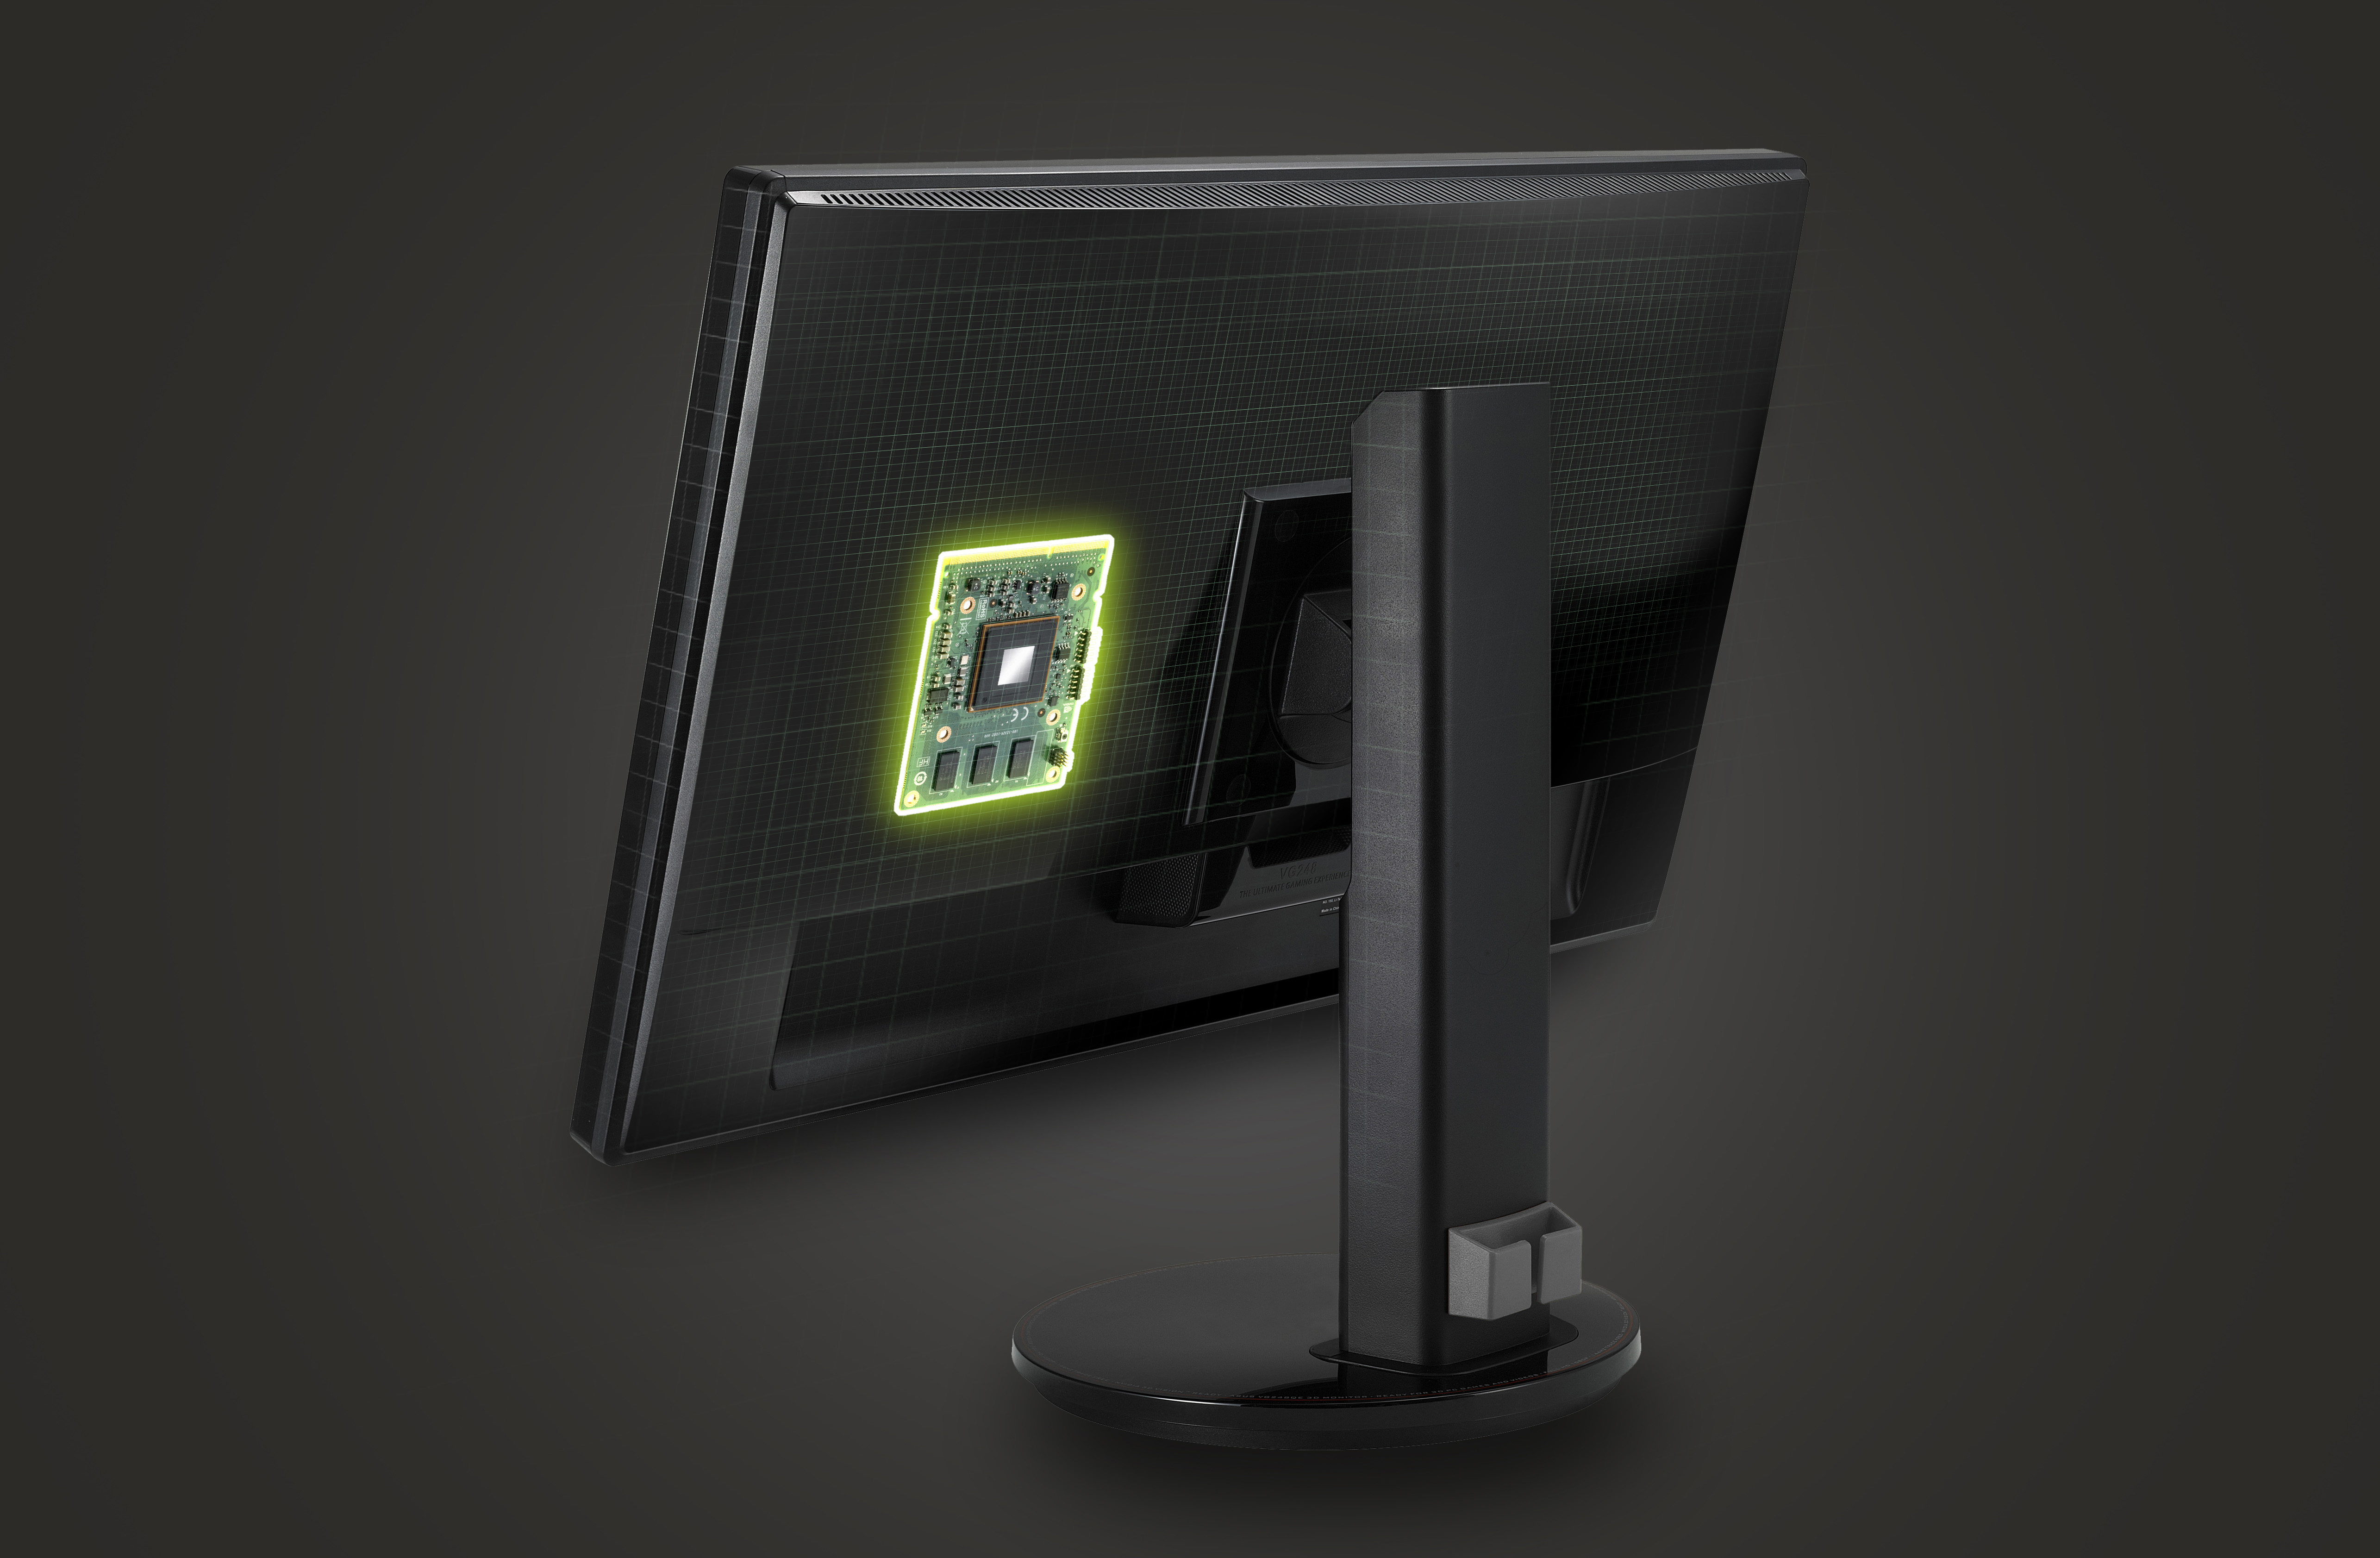
G-Sync is simply Nvidia’s technology for matching the refresh rate of a gaming monitor to the frame rate of a video game.
Since video games can have wildly varying demands on hardware from moment to moment, graphics cards rarely maintain a perfectly consistent frame rate. You may see a GPU deliver 100fps only to quickly dive down to 40fps when a bunch of action kicks off.
And, when the frame rate running on your PC differs from the monitor’s refresh rate, issues emerge. There may be tearing as the monitor displays parts of two different frames or stutter when the monitor repeats frames while waiting for new frame data. G-Sync prevents visual issues like these by ensuring the monitor doesn’t refresh faster or slower than the game’s frame rate.
Which GPUs are supported?
Nvidia is enabling G-Sync for variable refresh rate monitors on GTX 10-Series and RTX 20-Series graphics cards. If you’re running an older GPU, you’re out of luck. Your graphics card will also need to connect to your monitor via DisplayPort. So, if you have a gaming laptop with only an HDMI output, you may also be left out.
Which variable refresh monitors support G-Sync?
Nvidia claims to have tested 400 monitors with variable refresh rates to ensure gamers know which will work effectively with G-Sync. Out of this group only 12 have passed so far, and Nvidia has labeled the best performing monitors as “G-Sync Compatible.”
Monitors that have received this designation passed tests ensuring they offered large variable refresh rate ranges greater than 2. 4:1 (with most offering at least 48-144Hz), so the window is wide enough between the lowest and highest refresh rate for gamers to benefit. They also ensure the monitors don’t blank, pulse, flicker, ghost or present other artifacts with G-Sync enabled.
At this time, 12 monitors have the G-Sync Compatible designation:
- Acer XFA240
- Acer XG270HU
- Acer XV273K
- Acer XZ321Q
- AOC Agon AG241QG4
- AOC G2590FX
- Asus MG278Q
- Asus VG258Q
- Asus VG278Q
- Asus XG248
- Asus XG258
- BenQ XL2740
However, even if your variable refresh rate monitor isn’t listed, you can still enable G-Sync. There may be issues, but you have the option of testing it out and deciding for yourself whether the benefits are worthwhile.
How do I use G-Sync on a FreeSync monitor?
To start, you need to make sure you’ve updated your Nvidia drivers to at least Version 417.71. Support was enabled on January 15, 2019, so drivers dated before this will not work with FreeSync monitors.
You’ll also need to ensure your Nvidia graphics card and monitor are connected via DisplayPort. Also, check your monitor’s settings to confirm variable refresh rates are enabled.
If your monitor is one of the G-Sync Compatible models, then G-Sync should automatically enable itself, as should variable refresh rates. If not, you can manually enable G-Sync using the following steps:
- Open Nvidia Control Panel
- Got to “Display: Set up G-SYNC”
- Check “Enable G-SYNC G-SYNC Compatible” and select your preferred options
- Select your monitor
- Check “Enable settings for the selected display model”
- Apply settings
You can find more details on enabling G-Sync here.
How well does it work?
Just how well G-Sync works is largely going to come down to what settings you’re using in your games and what monitor you’re using it with. Our experience has been generally positive with G-Sync enabled on a G-Sync Compatible monitor.
If you’re playing a game at such high settings that you can’t consistently keep your frame rate within the monitors variable refresh rate range, then the experience won’t be positive. If your game does run within that variable refresh rate range, though, it should be a smooth experience without stutter or tearing.
Gaming with too high of a frame rate can also cause issues. So, it’s best to keep your game’s frame rate limited slightly below the maximum refresh rate of your monitor. You can see the variable refresh rates of G-Sync and G-Sync Compatible monitors at Nvidia here.
As G-Sync is similar to V-Sync in some ways, gamers may be concerned about introducing input lag. However, YouTuber Battle(non)sense has done thorough testing of input lag for G-Sync on a compatible monitor, and found that limiting the max frame rate while V-Sync and G-Sync were enabled did not introduce input latency – curiously, latency was actually reduced.
- Trying to play PC games on the big screen? Here’s how to connect your PC to a 4K TV
Sign up to receive daily breaking news, reviews, opinion, analysis, deals and more from the world of tech.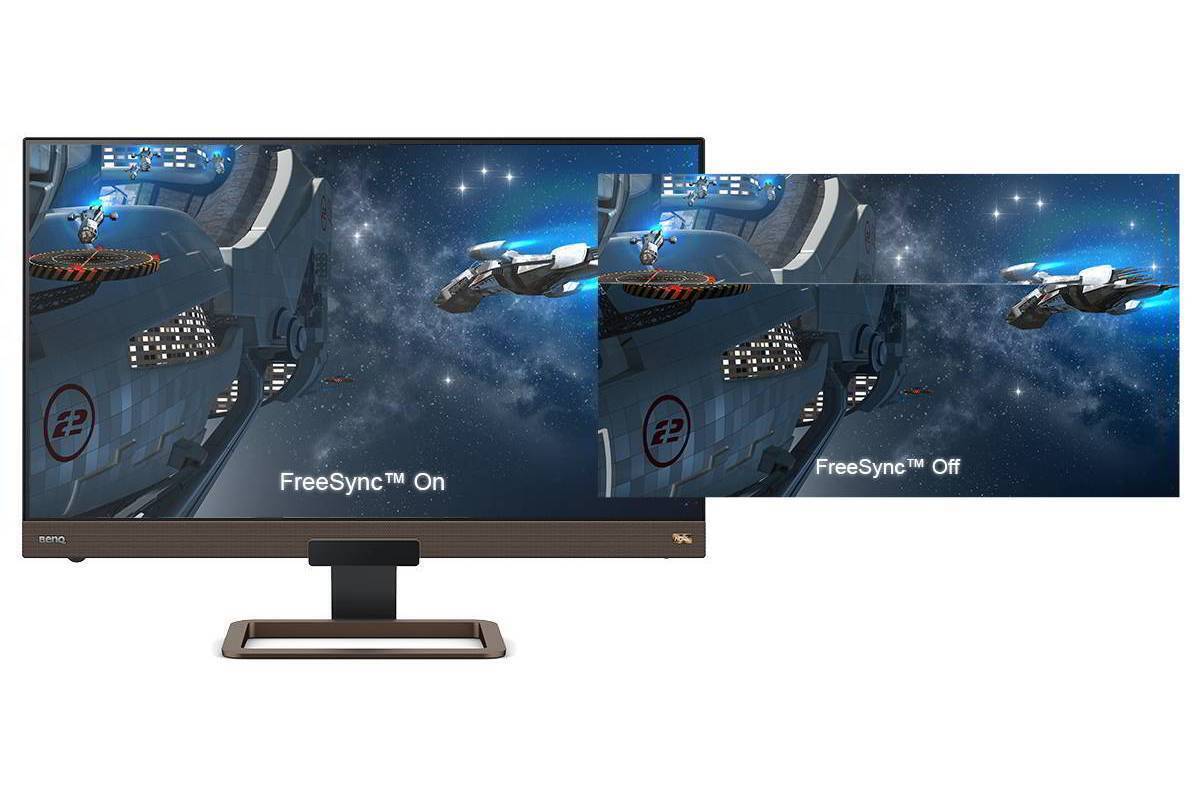
Contact me with news and offers from other Future brandsReceive email from us on behalf of our trusted partners or sponsors
Over the last several years, Mark has been tasked as a writer, an editor, and a manager, interacting with published content from all angles. He is intimately familiar with the editorial process from the inception of an article idea, through the iterative process, past publishing, and down the road into performance analysis.
How to Use G-Sync on a FreeSync Monitor
Two of the most common issues with PC gaming are screen tearing and stuttering. Each time your GPU renders a frame, it’s sent to the display, which updates the picture at a certain interval depending on the refresh rate (a 144Hz, display, for example, will refresh the image up to 144 times in a second). Screen tearing or stuttering happens when these two steps misalign, either with your GPU holding a frame your monitor isn’t ready for or your monitor trying to refresh with a frame that doesn’t exist.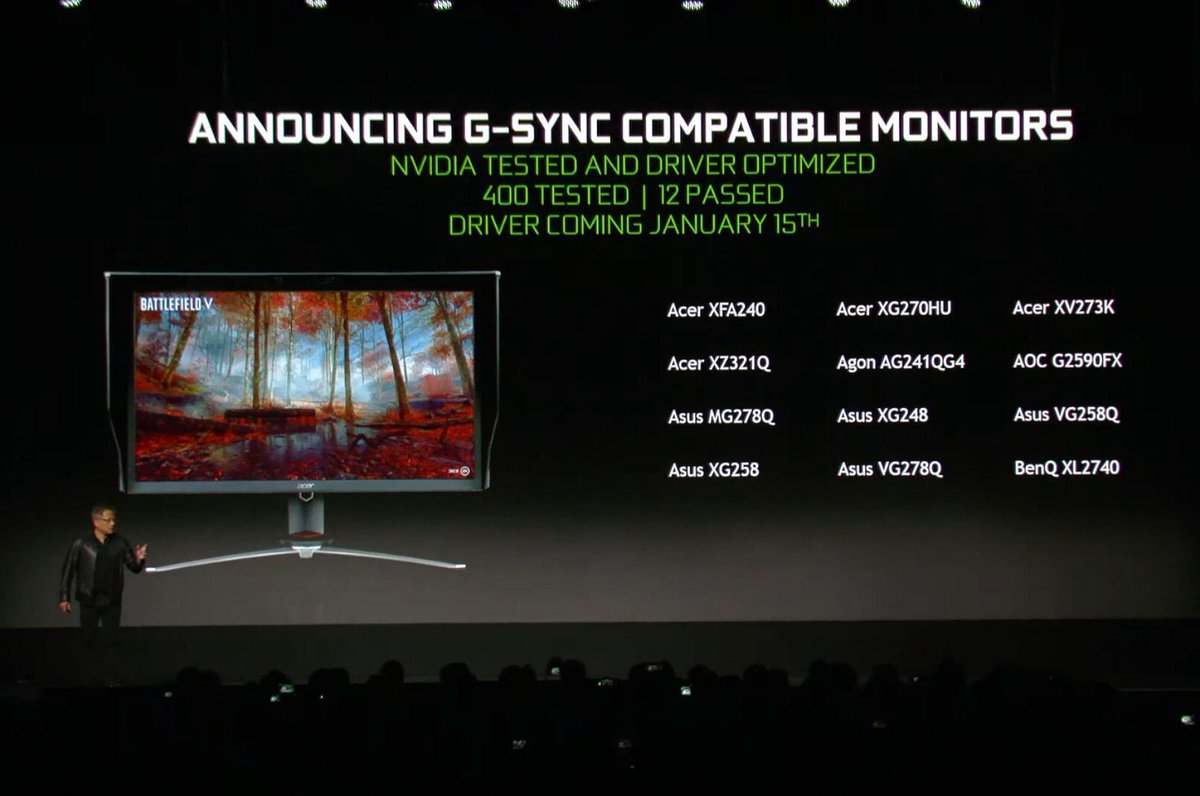
Contents
- Before getting started
- How to enable G-Sync on a FreeSync monitor
G-Sync solves that problem by aligning your monitor’s refresh rate to your GPU’s frame render rate, offering smooth gameplay even as frame rates change. For years, G-Sync was a proprietary Nvidia technology that only worked with certain, very expensive displays with a Nvidia-branded module inside. In 2019, though, Nvidia opened its G-Sync technology to some compatible FreeSync displays, offering an adaptive refresh rate to not only a lot more displays, but a lot of cheaper ones, too.
Although there are now displays with the G-Sync Compatible badge on the shelves, they aren’t set to work with G-Sync by default. Here’s how to use G-Sync on a FreeSync monitor.
Further reading
- Best gaming monitors
- What is G-Sync?
- Best G-Sync monitors
Before getting started
Rich Shibley/Digital Trends
First, you need to make sure that your hardware setup is going to support G-Sync, or this process isn’t going to work very well. Your monitor needs to be ready, and that requires three important things.
The first thing you need is a compatible monitor. You will want to consult the GeForce list of G-Sync compatible gaming monitors, which are monitors where G-Sync isn’t built-in but is expected to perform quite well. Recent displays from Dell, BenQ, Asus, Acer, LG, Samsung, and more are mostly supported, though you’ll still need to consult Nvidia’s list.
Secondly, you’ll need a GTX 10-series graphics card or better. RTX 20-series and its Super variants work, as do RTX 30-series GPUs. Similarly, the 1660 Super, 1660 Ti, and 1660 work, too. Lastly, you’ll need a DisplayPort connection from this graphics card to your monitor for most displays, though there are some LG models that require HDMI.
Finally, you’ll need to update your GPU drivers. Driver 417.71 brought support for G-Sync in 2019, so you’ll need at least that version, though layer versions are preferable for their improved overall performance and support.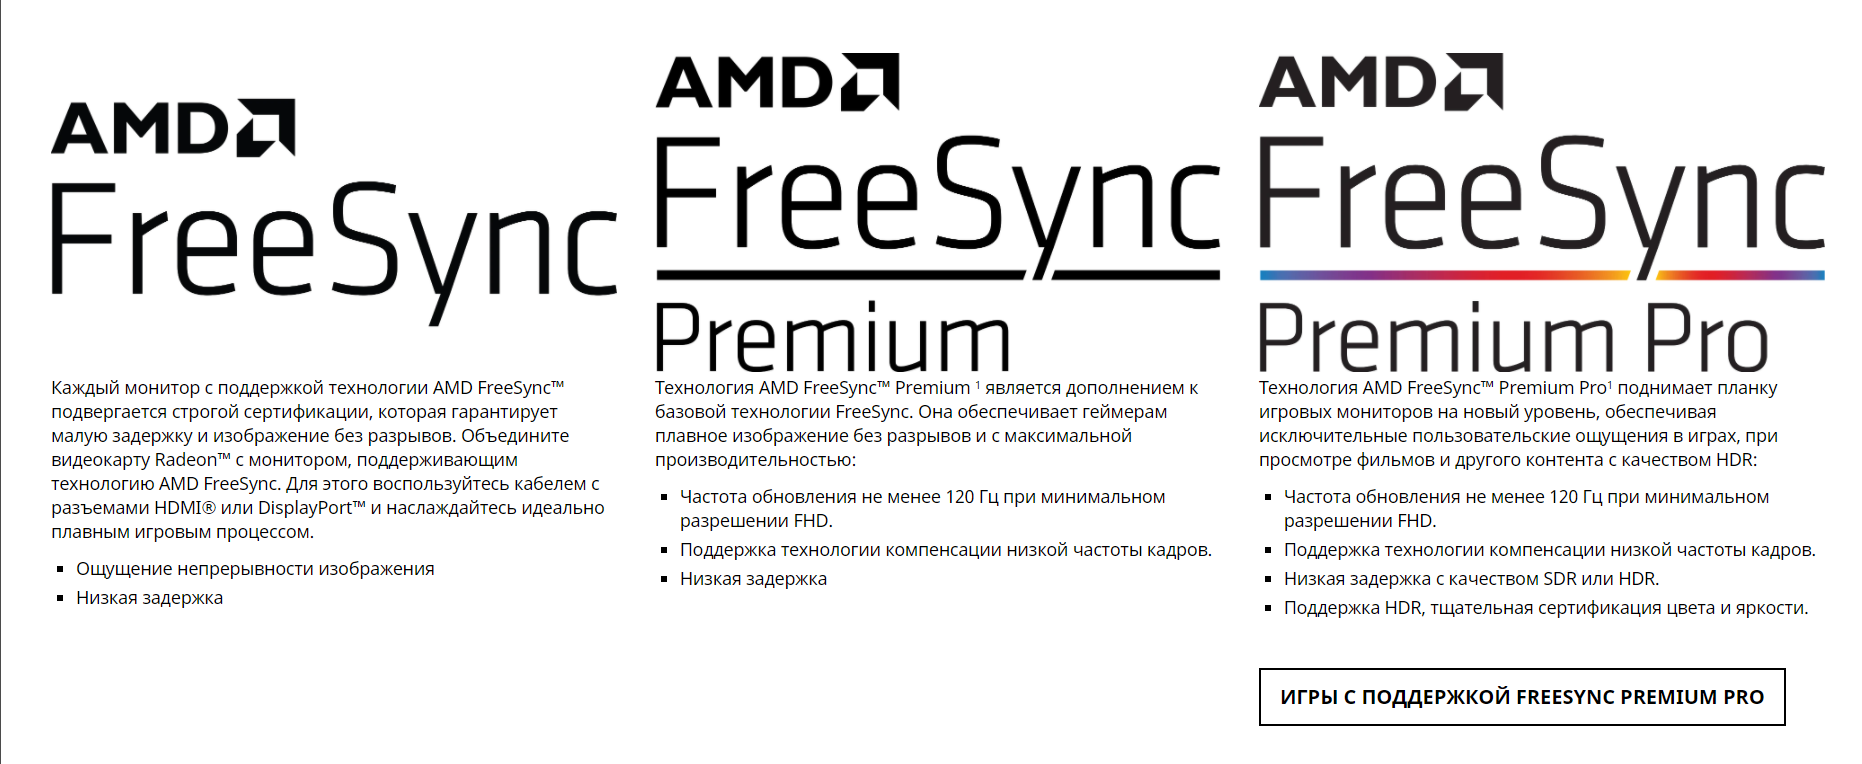
With a compatible monitor at the ready, head into your monitor settings and make sure that FreeSync (or Adaptive Sync) is turned on. This is necessary for the following steps to work.
How to enable G-Sync on a FreeSync monitor
With your Nvidia graphics card plugged in and recent drivers installed, you should have access to the Nvidia Control Panel app on your PC. Open it now. Once open, look at the left-hand menu for the Display section. Here, select the option to Set up G-SYNC.
This will open up a new window where you can enable various G-Sync features. Here’s what you need to do here:
- First, make sure the box for Enable G-SYNC, G-SYNC Compatible is checked
- Make sure that Enable For Full-Screen Mode is selected. G-Sync may have problems trying to work with windowed games.
- Select your display. There’s probably only one display to pick here, so this isn’t usually a problem unless you have an odd sort of multi-monitor display plan and need to make sure the changes apply to the right monitor.
- Make sure the box for Enable Settings for the Selected Display is checked
Once finished, select Apply to get G-Sync started. Your monitor will black out for a few moments after applying settings.
Confirm your compatibility
Perhaps your current monitor is new and upgraded enough to support G-Sync, in which case there is little you need to tweak or correct so that it functions smoothly. As an extra precaution, we recommend executing a graphics test to be positive that you have the desired visuals, at which point you’re free to use it as you see fit. You should note that other monitors may still not enable G-Sync properly. This is common, and you may just have to make one additional adjustment to help your monitor get along properly.
You will use the same Nvidia Control Panel, to access the option for 3D Settings located in the left-hand menu. From here, select Manage 3D Settings, and go to the Global tab.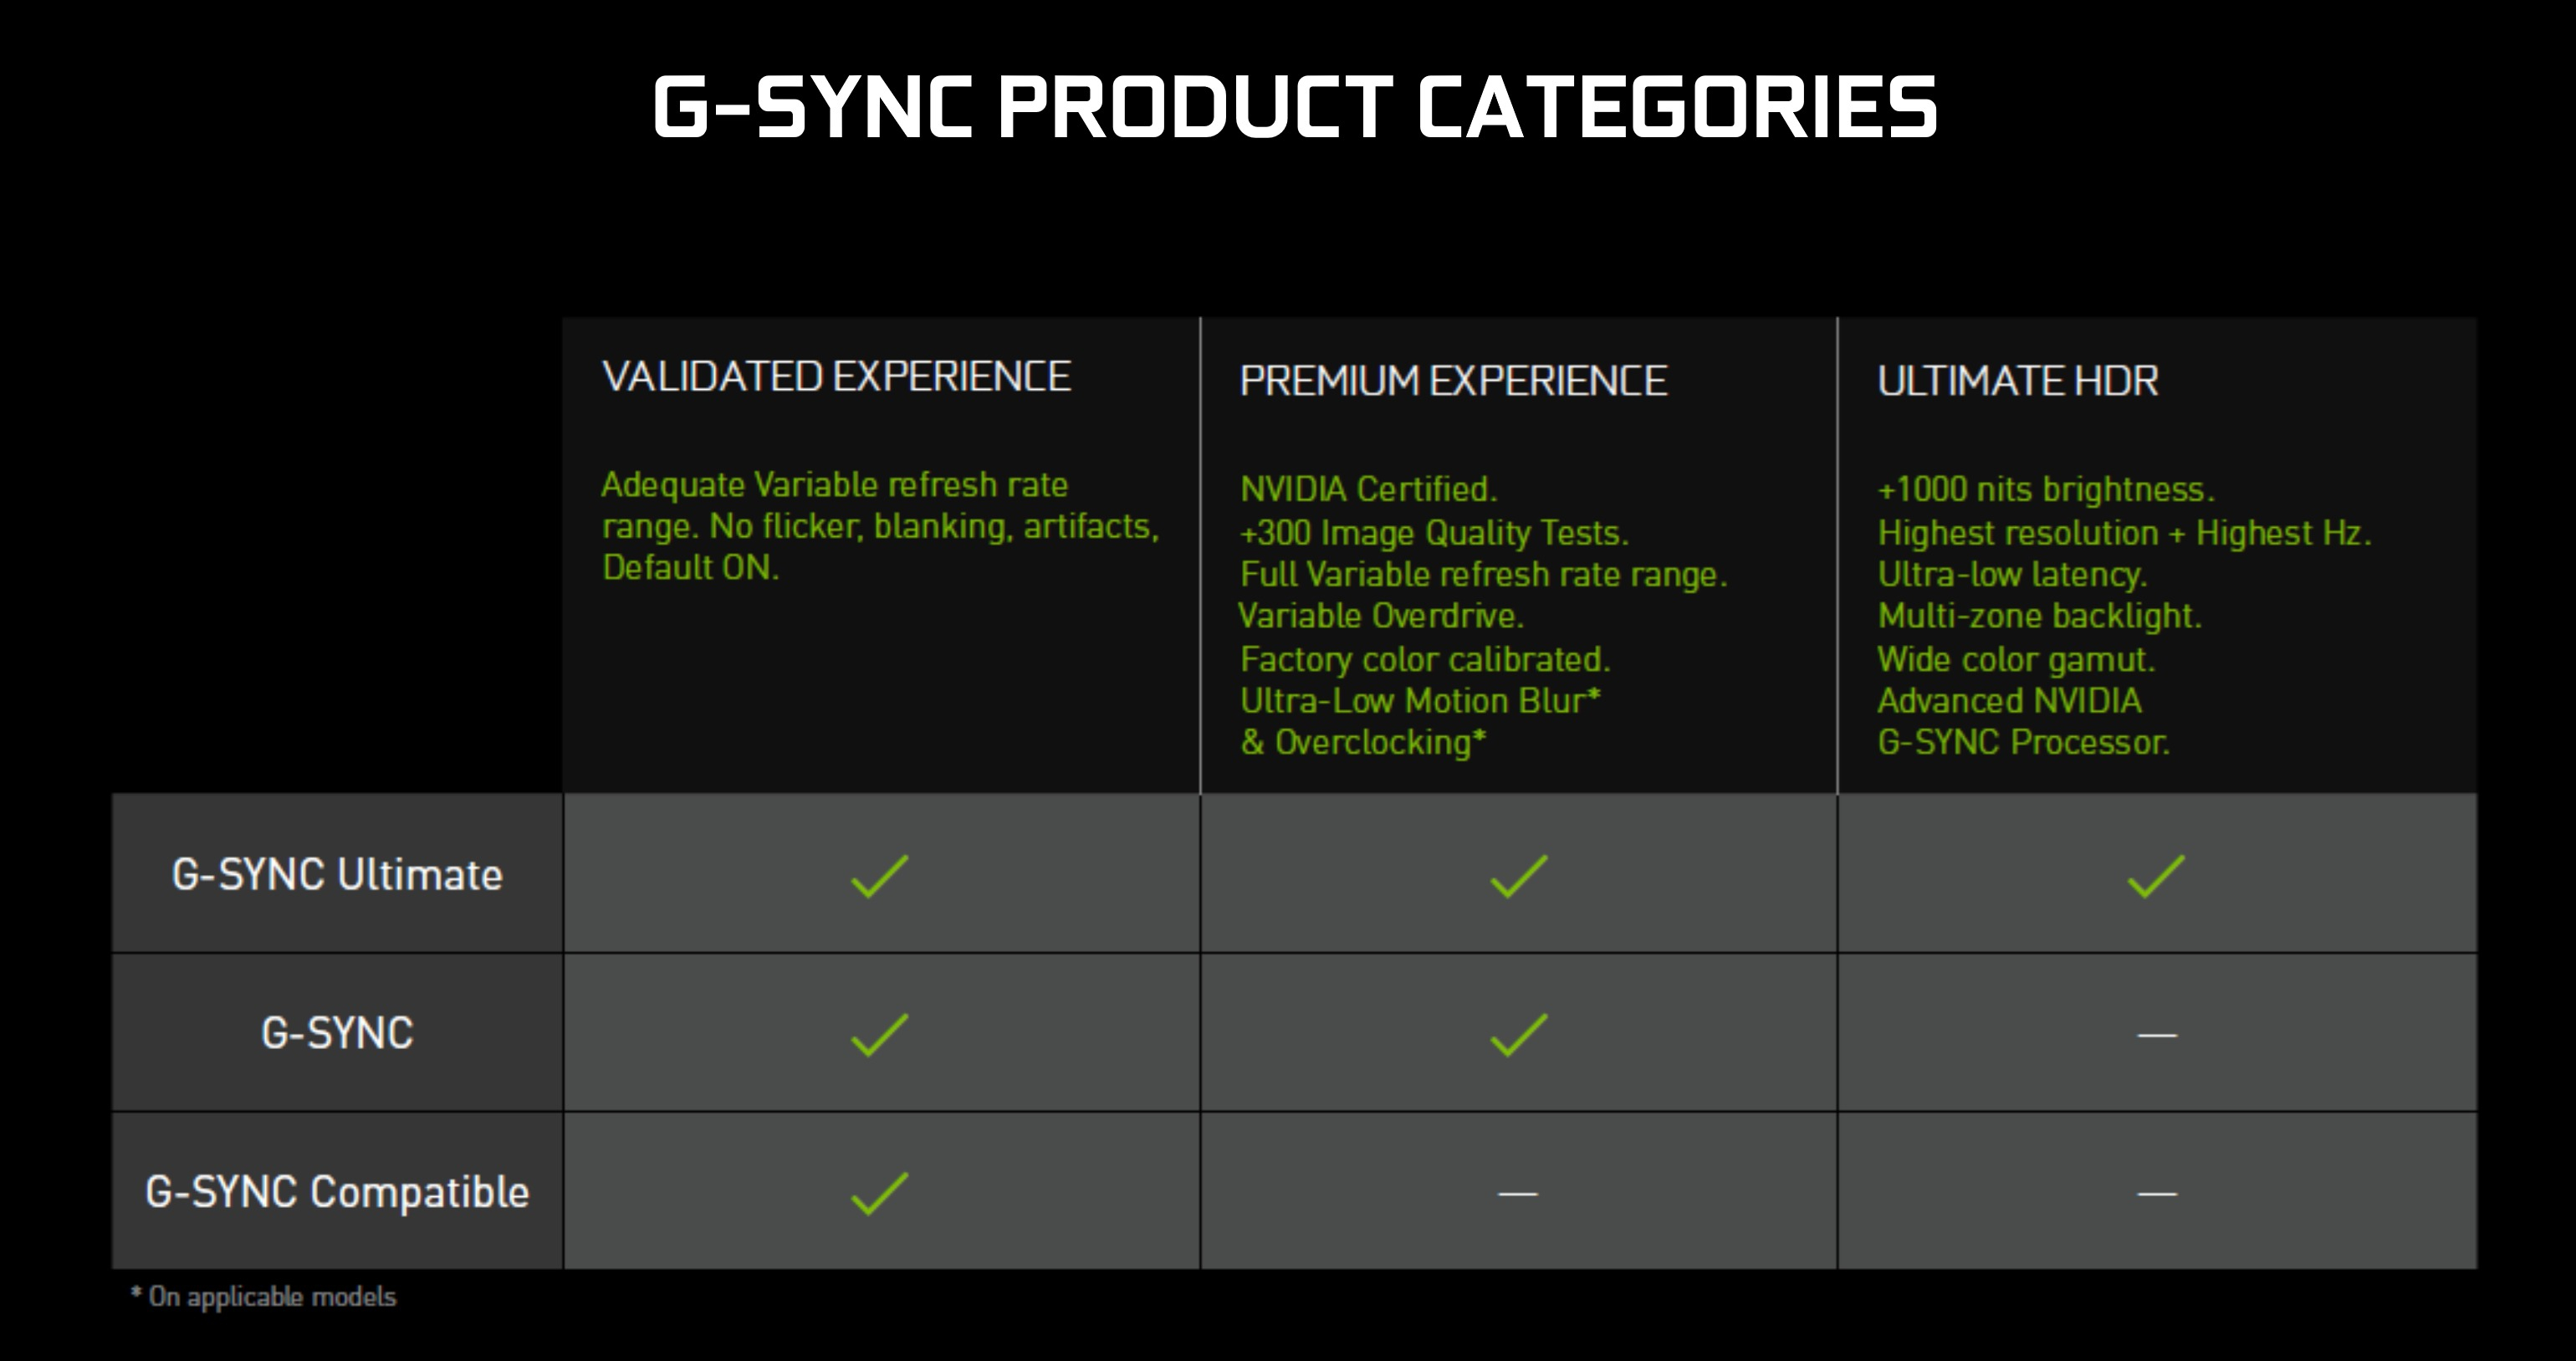 Look for the setting called Monitor Technology, and make sure it is set to the G-Sync compatibility setting.
You don’t have to employ G-Sync for every game, as you can always decide to take it one game at a time. You will want to access Program Settings rather than Global. This allows for some added customization if you prefer certain games on G-Sync and certain games otherwise.
Editors’ Recommendations
-
The best free parental control software for PC, Mac, iOS, and Android
-
The best ultrawide monitors for 2023
-
Alienware’s second QD-OLED monitor is even cheaper than the original
-
The best HDR monitors for gaming, content creation, and more
-
The best free music players for MacOS
How to run G-Sync on a FreeSync monitor
Benefits of Nvidia G-Sync on an AMD FreeSync
Monitor
In January 2019, Nvidia began announcing a range of AMD FreeSync monitors that the company officially certified as capable of running rival G-Sync adaptive sync technology, and also released a software version of G-Sync.
Since then, some have been able to find additional FreeSync monitors capable of G-Sync. But for our purposes, we’ll only focus on panels tested and approved by Nvidia.
Where to start
To see the full list of monitors that are compatible with G-Sync, as Nvidia calls them, you need to go to the Nvidia website, where at the bottom you will see a group of monitors labeled «G-Sync Compatible». Users report using G-Sync on some uncertified FreeSync monitors, but Nvidia lists the full group of tested and validated monitors that can successfully run G-Sync.
You will also need an Nvidia GeForce GTX 10-series or higher graphics card.
Connect a monitor via DisplayPort. HDMI is not suitable for this task. (For more on the difference between the two and how they affect game quality, see our analysis of DisplayPort vs. HDMI.)
Next, download the Nvidia Game Ready driver. Support for this little trick started at 417.71, but we managed to get it done with 419. 35 on March 5, 2019.
After installing the new drivers, restart Windows and enable the FreeSync option in your display screen (OSD) menu.
Now in the Nvidia Control Panel , the box « G-Sync Setting » should appear.
If after following the above steps, the «G-Sync Setup» option does not appear, go to the «3D Settings» field and click «Global». Scroll down to Monitor Technology and select « G-Sync Compatible «.
That’s all! Now you can run G-Sync on your FreeSync monitor.
Warnings
Of course, it is impossible not to warn about some problems. The Acer Nitro XV273K is a 4K HDR monitor. We have found that enabling HDR removes the «G-Sync Setting» option from the Nvidia Control Panel. You will not be able to use G-Sync and HDR at the same time on a FreeSync monitor. And that’s a bit of a shame, since adaptive sync and HDR together are one of the key benefits of AMD’s latest FreeSync 2 HDR technology.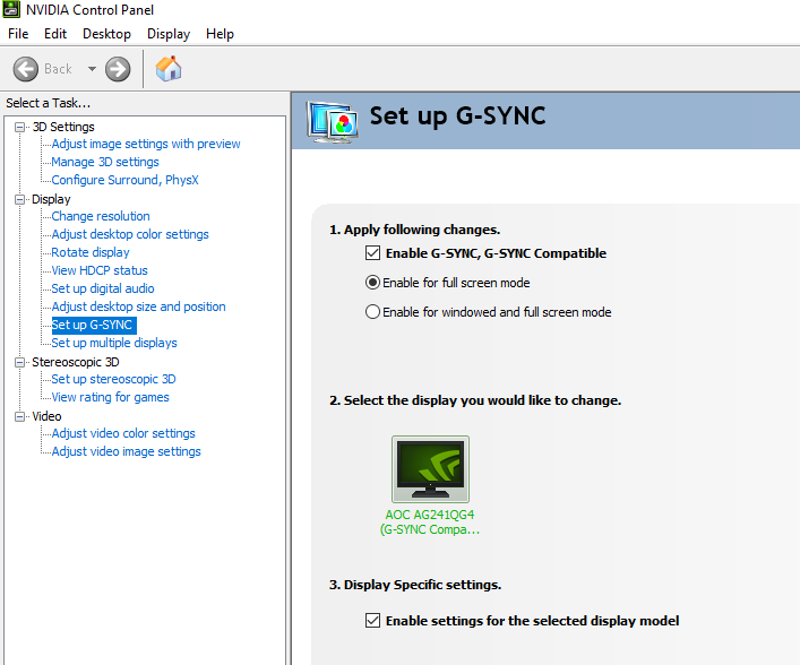 So if you have such a monitor, you can switch to an AMD card. Otherwise, you won’t get the full FreeSync 2 HDR screen experience.
Second, none of the Nvidia-approved monitors support variable refresh rate overdrive. So when the frame rate drops below 100 frames per second (fps), you may see some motion blur.
You may also run into issues when running G-Sync in windowed mode. We noticed frequent flickering when we tried the Nvidia Pendulum demo, which should showcase the benefits of G-Sync. By the way, this is the best way to test your new configuration. If you see flickering or other artifacts, try lowering the refresh rate. Nvidia-certified monitors will run G-Sync at maximum speed, while others won’t, especially if they’re overclocked. When working in full screen mode, most of the problems will disappear.
To learn more about the downsides and what Nvidia and monitor vendors think about running G-Sync on non-Nvidia-certified monitors, check out our article Should You Care If Your Monitor Is Certified for G-Sync Compatibility? ?
Summing up
You can successfully run G-Sync on a FreeSync monitor if it is on the list of Nvidia-approved monitors.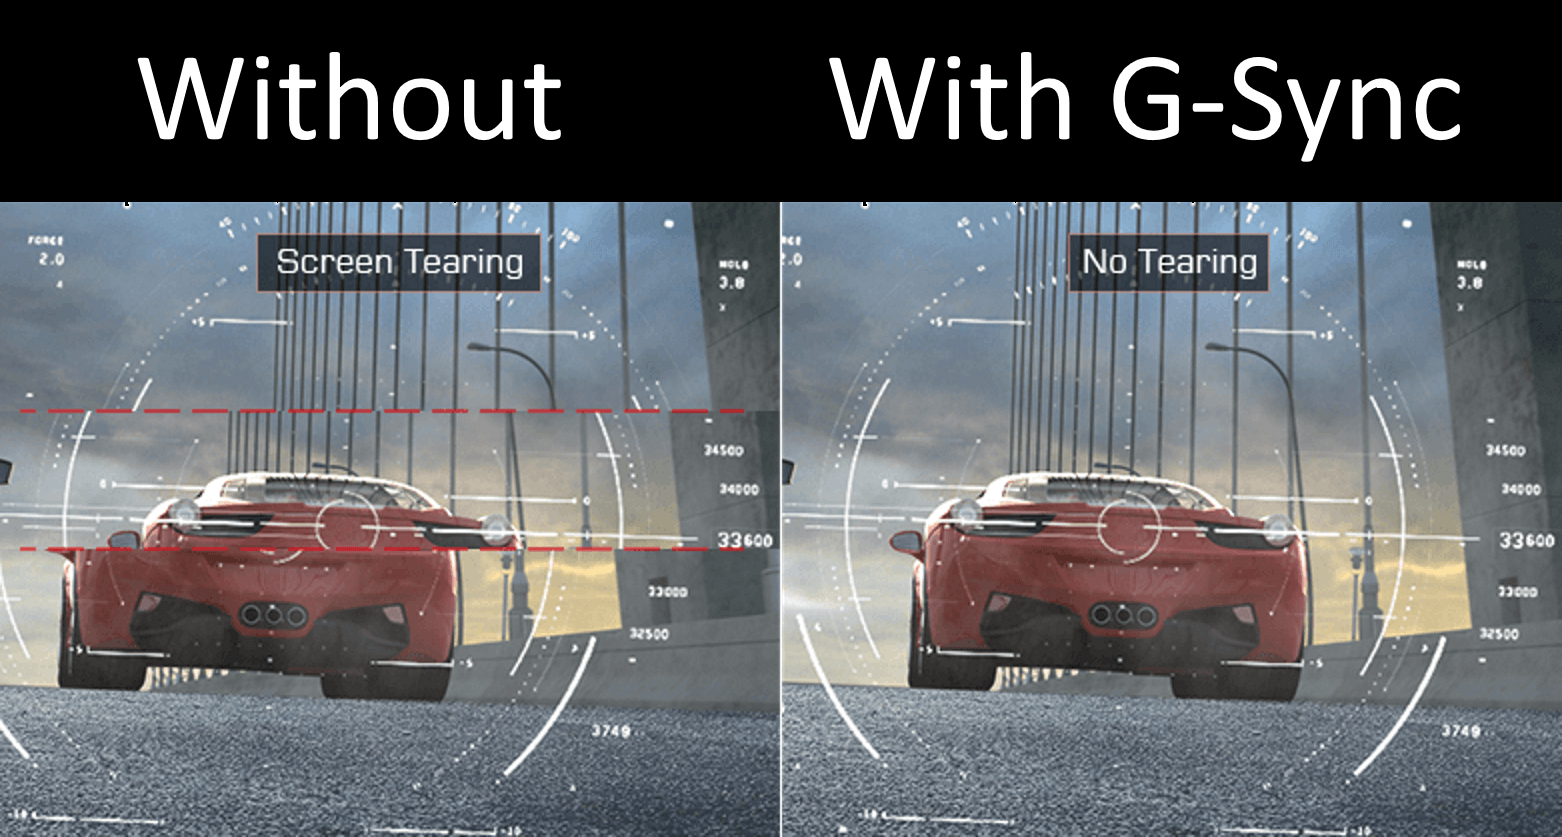 You’ll have to drop HDR and overdrive for that, but other than that, everything works fine. We had no problems during testing. With two different monitors, the Acer Nitro XV273K and the AOC Agon AG241QX, the game looked the same in both G-Sync and FreeSync modes.
If you want to save some money and connect a FreeSync monitor to your Nvidia-based gaming system, you can check out the list of Nvidia FreeSync monitors approved for G-Sync support and try one of the approved monitors.
AMD freesync what is it ☑️ How to run G-Sync on a FreeSync monitor ☑️ Artline.ua overview -Sync
- Pluses
- Cons
- Where to buy quality monitors?
G-Sync details
V-Sync, or vertical sync, was the first to minimize on-screen performance loss. It worked like this: the frame rate of the monitor was limited to such a level as to match the output power of the GPU. The only problem is that even if it decreases, you will still feel small freezes. Later came the G-Sync technology, which was originally designed to be used with V-Sync. However, Nvidia later allowed users to disable this option. The G-Sync module provides a dynamic refresh rate that matches the GPU output (virtually the same as V-Sync), but takes into account the reductions in this rate. That is, G-Sync is an advanced V-Sync. This technology improves the quality of the game at times, so gamers try to buy a gaming PC in Ukraine with a powerful video card from Nvidia that supports G-Sync.
The technology in question updates the screen exactly when the frame is finished and requires the graphics processor to display it. The refresh rate is the maximum frame rate used by the G-Sync module. Thanks to this technology, there will be no delays. The reason for sync is to reduce the refresh rate on both your monitor and graphics card. In this case, the monitor runs at a fixed refresh rate that fluctuates, which often leads to loss of screen performance.
So the bottom line is that if your GPU creates frames at a lower frame rate than your monitor’s refresh rate, you will experience some «stuttering» (in other words, glitches). If the processor is running faster, it may show the next frame too quickly, which leads to freezes. G-Sync just removes this effect.
Pros
Unlike V-Sync, which limits the frame rate to match the monitor’s refresh rate, G-Sync allows the monitor to run at a variable refresh rate to match the GPU. Ultimately, this eliminates the possibility of gaps and delays, since the technology takes into account the difference in frequencies.
Let’s illustrate this with a real life example. You play a demanding game with G-Sync enabled and hit 100 fps. Your monitor’s real-time refresh rate matches this frame rate. Let’s say you come to a part of the game that is even more demanding on the GPU and you’re seeing a much lower FPS. G-Sync will make sure that the frame rate matches the module again and you don’t see any glitches.
Cons
The G-Sync module is proprietary technology, so it can be considered an expensive luxury since the G-Sync scaler replaces the standard one in the monitor. Other synchronization technologies such as Freesync are also software-hardware solutions and are usually the cheaper option due to the fact that the scaler is made by several different companies.
Adding G-Sync can sometimes add hundreds of dollars to the cost of a monitor. But since 2020, Nvidia has started releasing drivers that allow GPUs to work with certain adaptive sync and Freesync monitors. This makes G-Sync a more affordable option and is a brilliant move from Nvidia.
Another disadvantage of G-Sync is that it won’t work with most AMD graphics cards, so if you have such chips or plan to buy them, don’t buy a G-Sync monitor.
Now let’s move on to enabling the technology in question on FreeSync.
Technology Launch
The first thing you need is a monitor that supports AMD FreeSync or FreeSync. If you are not sure if your monitor supports it, visit the manufacturer’s website. Then check the On Screen Display (OSD) to make sure the FreeSync option is hidden in the menu. If so, turn it on. If you do not find this option, it does not necessarily mean that your monitor does not support FreeSync — some models (eg Acer XF270HU) do not display this option in the OSD menu.
Follow these steps to launch:
- To use G-Sync, you need an Nvidia GTX 10-series or higher graphics card. It must be connected to the monitor using a DisplayPort cable because the G-Sync controller does not support HDMI connections. For a complete list of G-Sync compatible displays, visit the Nvidia website. At the bottom you will see a group of monitors labeled «G-Sync Compatible».
 Again, users have reported using G-Sync on uncertified FreeSync monitors, but Nvidia’s listing shows the full group of monitors that the company has tested and confirmed can successfully run G-Sync.
 - Then download the Nvidia Game Ready driver. G-Sync support started with driver version 417.71, we have already taken 419.35 from March 5, 2019. After installing the new drivers, restart Windows and enable the FreeSync setting in the monitor’s On-Screen Display (OSD) menu.
- The «G-Sync Settings» field should now appear in the Nvidia Control Panel.
- If you don’t see the G-Sync Setup option after following the steps above, go to the 3D Settings field and click Global. Scroll down to «Monitor Technology» and select «G-Sync Compatible».
That’s it! Now you can run G-Sync on your FreeSync monitor.
Verify that G-Sync is working
Nvidia has developed a method that makes it very easy to confirm that G-Sync is working. In the Nvidia control panel display settings, you’ll find a «G-Sync Compatibility Indicator» checkbox. When enabled, a box labeled «G-Sync On» appears next to any full-screen (or windowed) applications using G-Sync.
If you don’t have a G-Sync-enabled game installed, you can test the technology with Nvidia’s free Pendulum demo. Download and install it, then open it, set the resolution and check the fullscreen option before running the demo. You can customize your sync settings using the checkboxes at the top of the screen. If everything is in order, you should see a G-Sync overlay, which will indicate that the technology is enabled.
Once you’ve verified that G-Sync is working, you’ll probably want to disable it in the Nvidia Control Panel as it can be intrusive in games.
Warnings
There are a few caveats here. For example, the Acer Nitro XV273K is a 4K and HDR monitor. We found that when HDR was enabled, the «G-Sync Setting» option was removed from the Nvidia Control Panel. It is not possible to use G-Sync and HDR at the same time on a FreeSync monitor. And that’s a bit of a shame, as adaptive sync and HDR together are one of the key selling points for AMD’s latest FreeSync 2 HDR technology. Therefore, if you have one of the monitors with these technologies, you can switch to an AMD card. Otherwise, you won’t be able to take full advantage of the FreeSync 2 HDR screen.
In addition, variable refresh rate acceleration is not supported on any of the Nvidia-approved monitors. As such, you may see slight motion blur when fps drops below 100 fps.
You may also experience problems running G-Sync in windowed mode. We saw a lot of flickering when we tried the Nvidia pendulum demo, which should showcase the benefits of G-Sync. By the way, this is the best way to test your new configuration. If you see flickering or other artifacts, try lowering the refresh rate. Nvidia-certified monitors will run G-Sync at maximum speed, but others won’t, especially if they’re overclocked. Most problems will disappear in full screen mode.
Problems with G-Sync on Windows
If your monitor is not listed by Nvidia, there is no guarantee that it will work with G-Sync. However, if you are experiencing flickering or signal loss, you can try a few simple steps. First, in the Nvidia Control Panel, click «Manage 3D Settings» (at the top of the list), then in the global panel, scroll down to find «Monitor Technology» and click to set it to «G-Sync Compatible.» Click Apply and check if the issues are resolved.
If this does not help, try lowering the screen resolution. Some users have reported that this fixed their issues, but you need to decide if you want to sacrifice detail for a smoother gaming experience.
Finally, some Reddit users have found that lowering the FreeSync range with CRU (Custom Resolution Utility) can fix G-Sync issues. This sounds pretty technical, but it’s not that difficult — you just need to adjust the range of refresh rates that are used by the driver. To do this, you need to manually add the «Extension Block» to the application and the FreeSync option in the «Data Blocks» section. Expand the range — for example, if your monitor supports a FreeSync range of 40Hz to 144Hz, try setting it to 30-144Hz.
G-Sync vs. FreeSync on a FreeSync monitor is there a difference
You might be wondering how well Nvidia G-Sync performs on a monitor designed for competing AMD FreeSync technology. To test this, we at Artline played Counter-Strike: Global Offensive for a while on an Acer Nitro XV273K — one of the first 12 monitors officially certified by Nvidia — with an XFX AMD RX590 Fatboy and an Nvidia GTX 1080.0005
Now we can say with certainty that there was no noticeable difference. You won’t be at a disadvantage when using an Nvidia card on a FreeSync monitor versus an AMD graphics card and display.
However, it’s worth noting that both FreeSync and G-Sync disable Overdrive on the Acer Nitro XV273K monitor. This makes it respond a little slower than with tech disabled and Overdrive set to Extreme. However, do not confuse this with input lag: G-Sync does not affect this.
Conclusions
So you can successfully run G-Sync on a FreeSync monitor if it is on Nvidia approved list. To do this, you will have to give up HDR and Overdrive, but otherwise the technology works fine. During testing, we had no problems. With two different monitors, the Acer Nitro XV273K and the AOC Agon AG241QX, games looked the same in both G-Sync and FreeSync modes.
If you’re planning to save a few bucks and connect a FreeSync monitor to an Nvidia-based gaming system, you might want to check out Nvidia’s list of G-Sync-approved FreeSync monitors and try one of the approved displays.
Where to buy quality monitors
We recommend using the Artline store. Here is the best selection of monitors, workstations, personal computers and other equipment at affordable prices.