Monitor Keeps Turning Off And On? 11 Way To Fix It
Whether you are on a laptop or a desktop PC, there are a lot of other components that need to function simultaneously to make something display on the monitor. Something as simple as a faulty HDMI port/cable or issue with the display adapter driver can cause the monitor to crash mid-session.
But, since the displaying function is pretty long and intricate, there are a lot of components that can malfunction, leading the monitor to crash randomly.
This article lists some well known issues that may cause random restarts of the monitor along with methods to fix the said complication.
Table of Contents
Why Does My Monitor Keep Turning Off and On?
If you are on a laptop. the issue is most likely on the graphics or the monitor driver.
But if you are on a desktop PC, it might be an issue with the power supply to the monitor, the display cable, insufficient power to the GPU, or sometimes the monitor itself.
Here are some common reasons your monitor keeps turning on and off.
- Faulty Cable
- Damaged monitor
- An issue with the power supply
- Loose Connection
- Faulty graphics card
- Monitor overheating
- Outdated graphics/monitor driver
- Broken cable
- Insufficient power supply to the GPU
How to Stop a Monitor From Turning On and Off?
Before we get into the solutions, disconnect and reconnect all the cables that go into the monitor. This includes all the cables connecting the monitor to the PC and the power cables.
Once you have reconnected the cables, follow the steps mentioned below to stop a monitor from turning on and off.
Replace Cable
Any internal or external damages to the wire may cause connectivity issues between a monitor and a CPU. Make sure that the wires are not broken.
If you see any part of the cable that is damaged, you may need to replace the cable. Check if the monitor works smoothly once you replace the cable.
Another thing you can try is to use another cable to connect the monitor. Sometimes, a cable may face internal damage. Meaning that there will be no sign of physical damage. So, if the monitor works smoothly with a different cable, there is a high possibility that the old cable has suffered from internal damage.
You will have two cables connecting to the monitor, the visual and the power cables. Visual cable is HDMI, DVI, or VGA cables. This transfers video data from the CPU to the monitor. And the other is the power cable. The power cable goes into the power socket. Make sure that both these cables are not loose.
Change Power Settings
When a computer’s power saving mode is set to Balanced, its display will turn off after a certain time if the PC stays inactive. However, the display screen will turn on once you move the mouse cursor.
Follow the steps mentioned below to set the configuration so that the PC does not turn off the display.
- Press the Windows + R key to open Run.
- Type
powercfg.cplto open Power options - On the selected power plan, click on Change plan settings.
- Here set Turn off the display time to the desired amount.
- Click on Save changes.
Disable Screen Saver
Just like the power saver setting, configuring the screensaver to black screen may seem like the screen turns off after some inactivity. To check this, you can disable the screen saver.
- Press the Windows + R key to open Run.
- Type
control desk.cpl,,@screensaverto open Screen Saver Settings. - Under Screen Saver, select None.
- Click on Apply, then OK.
Run the PC in Safe Mode
When the PC runs in safe mode, it restricts all the unnecessary drivers and only runs the PC on some basic drivers. It also stops any application from running on startup. You can run the PC in safe mode to troubleshoot the problem.
If the PC functions smoothly without the screen turning on and off, the issue is most likely with either a third-party application or corrupted drivers. Uninstall these applications and perform a driver update to fix the issue.
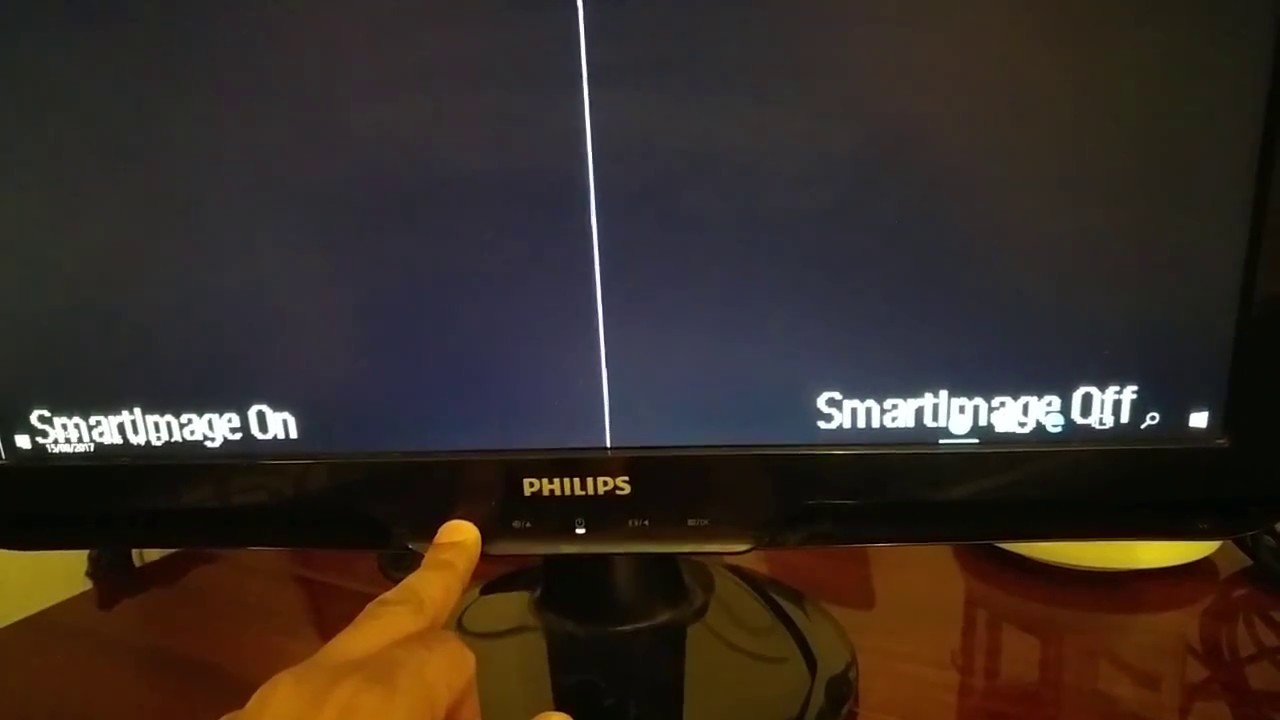
Check Resolution and Refresh Rate
When the OS runs on a certain resolution, but a full-screen application runs in a different resolution, the monitor may turn off and on. It happens because the system cannot adjust the two screen’s resolution switching time and again. This will result in screen flickering.
To fix this, change the full-screen application’s resolution to the resolution that the OS runs in.
Follow the steps mentioned below to change the OS resolution.
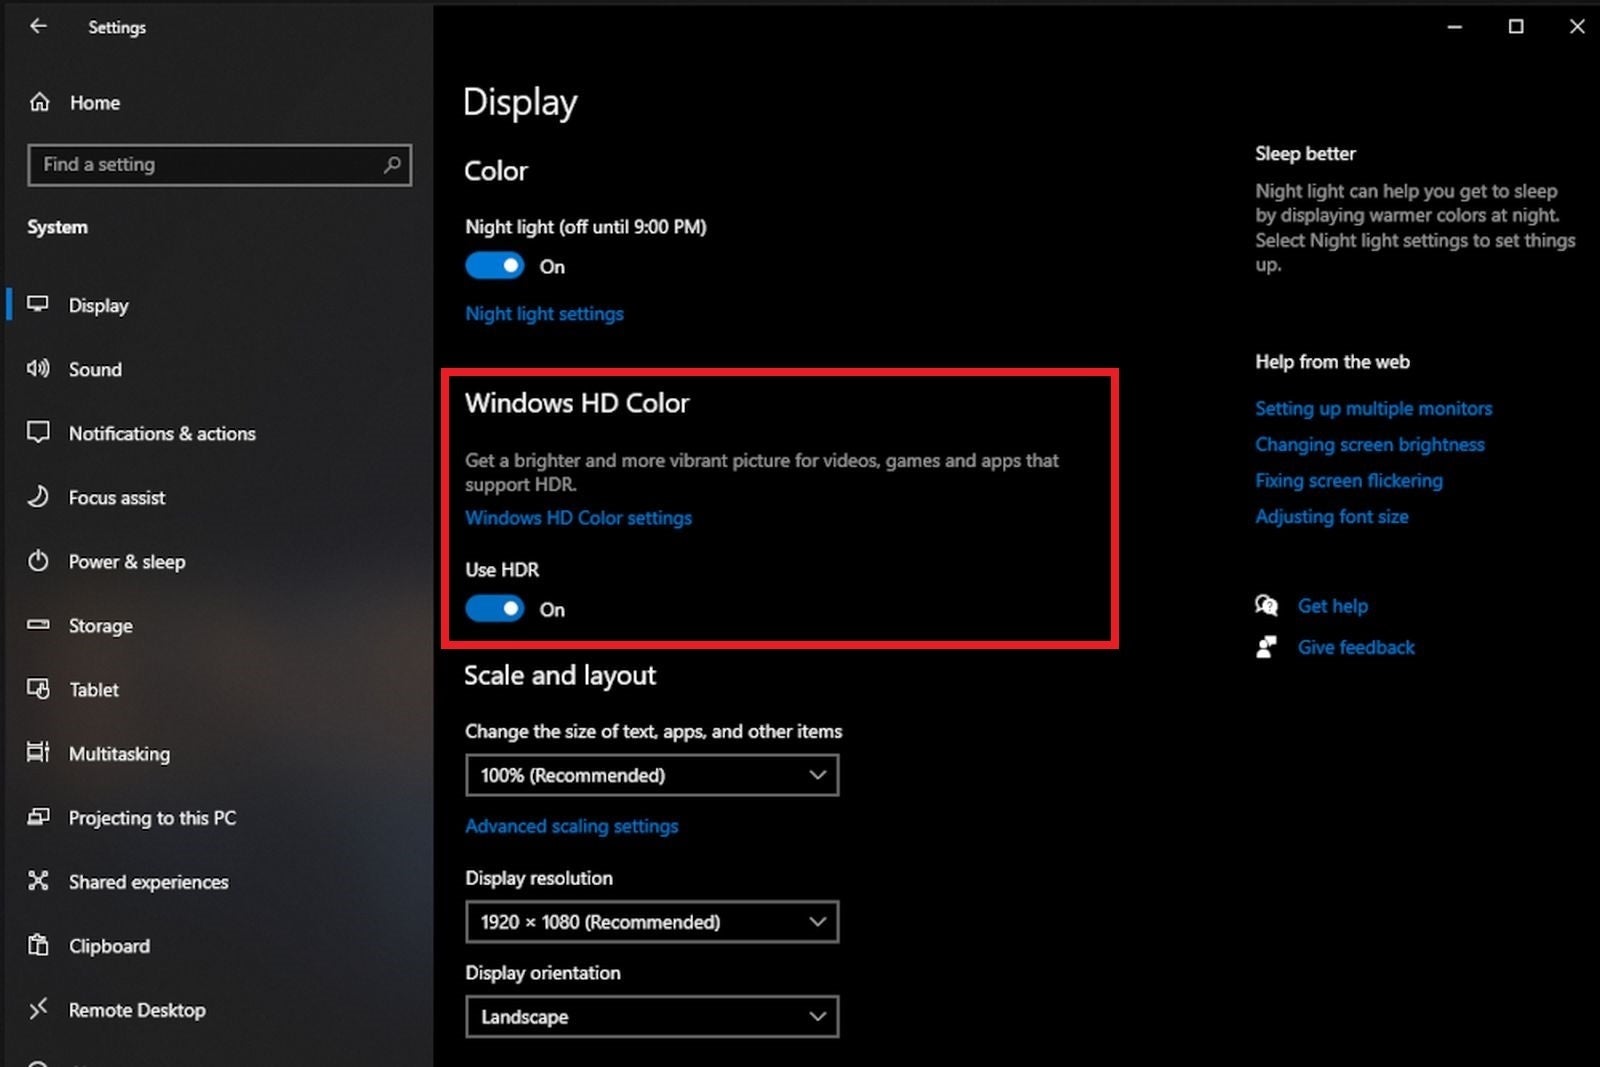
- Press the Windows + I key to open Settings.
- Go to System > Display.
- Scroll down to Scale & layout.
- Here you can check the resolution that Windows is currently running on.
To change the resolution on a full-screen application, go to its display setting and search for a setting named display resolution. Set it to the same resolution as the Windows display resolution.
Depending on your GPU, you need to enable max performance when plugged in through the GPU’s control panel. NVIDIA GPU has NVIDIA control panel, AMD has AMD catalyst control whereas, Intel GPU has Intel Graphics Control Panel
Change Graphics Card
Since the graphics card is responsible for anything related to display, internal issues with it might be the reason you have the monitor turning off issue. To check this, remove the cable that connects the monitor to the GPU and connect it to the motherboard’s display port.
If the monitor runs smoothly without screen turn-offs, the issue is probably with the GPU.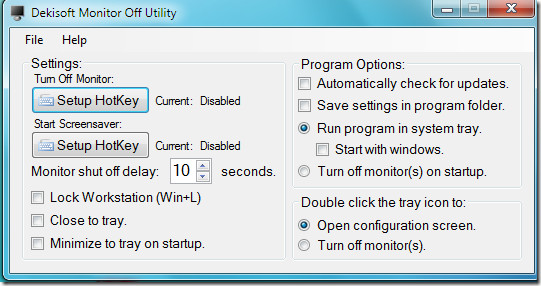 Try using a different GPU to see if the screen still malfunctions. If so, the PSU might not be supplying sufficient power to the GPU.
Change Power Supply
The power supply on your system must supply enough power to the entire hardware components. Failing to do so, the computer might suffer from random system crashes, or internal components may not perform as it is supposed to.
To check the recommended power for your system, you can refer to Coolermaster’s PSU calculator to check the recommended wattage for your system.
Update Display and Monitor Driver
An up-to-date driver communicates with the Operating System more efficiently and may even affect the overall device performance. Therefore, if an outdated device driver is causing the issue, you might want to update them immediately.
- Press the Windows + X and select Device Manager.
- Expand Display adapter.
- Right-click on any one of the display in use and select the Update driver.
- Update all the device drivers listed inside the Display adapter.
- Again, expand Monitors and update all the device drivers.
Update Windows
Sometimes an outdated Windows may have issues communicating with the hardware components connected to the PC. This may cause some parts to malfunction. In this case, the monitor’s screen may turn off and on. To fix this, try updating the Windows to the latest version.
- Press the Windows + I key to open Settings.
- Go to Windows update (Security & update > Windows update for Windows 10)
- Click on Check for updates or Install Updates.
- Once the download and installation are complete, restart your PC.
Change Monitor
If none of the above-mentioned solutions work and you cannot do anything due to the screen turning off and on, it might be due to the monitor itself being faulty. Any physical damage to the monitor or monitor is faulty on arrival may be why your monitor keeps turning off.
Try using a different monitor to check this theory. If the second monitor works, you might need to replace the damaged monitor.
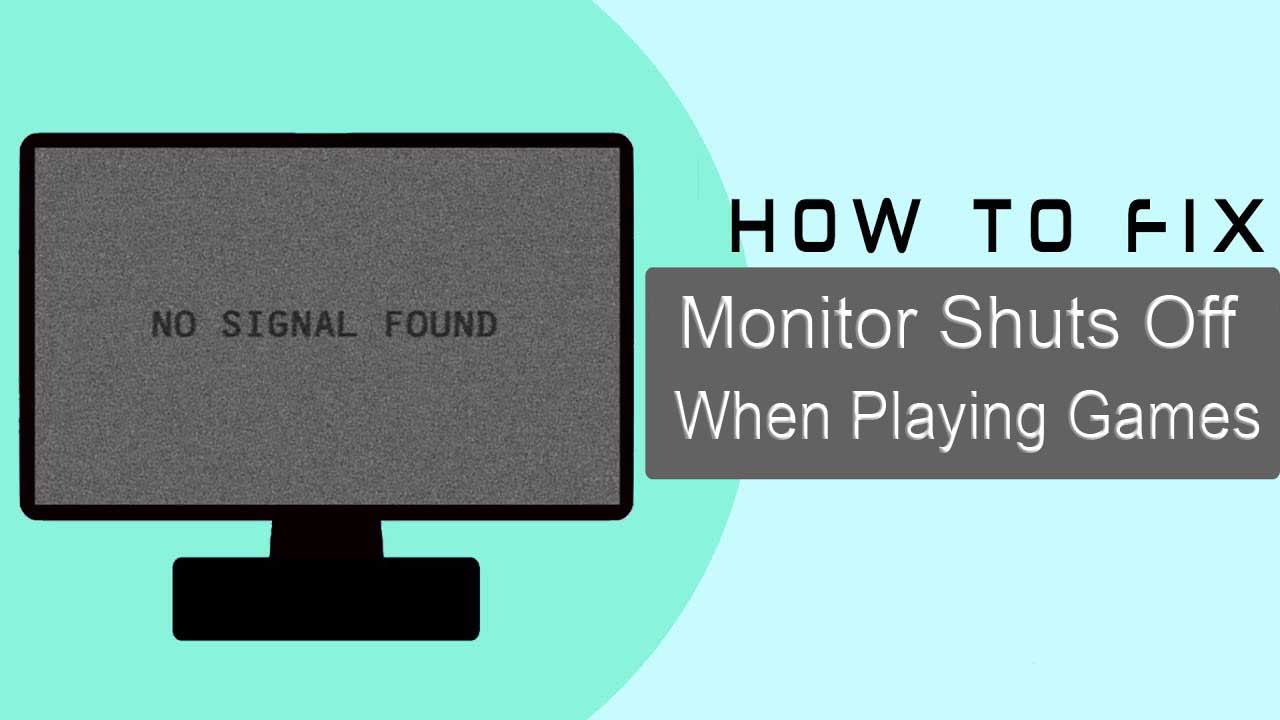
Monitor Turns Off or Goes Black Randomly: 3 Fixes to Use
Apply these easy steps to fix the random issue
by Claire Moraa
Claire Moraa
Author
Claire likes to think she’s got a knack for solving problems and improving the quality of life for those around her. Driven by the forces of rationality, curiosity,… read more
Updated on
Reviewed by
Alex Serban
Alex Serban
Windows Server & Networking Expert
After moving away from the corporate work-style, Alex has found rewards in a lifestyle of constant analysis, team coordination and pestering his colleagues. Holding an MCSA Windows Server… read more
Affiliate Disclosure
- Random monitor blackouts could be a result of loose connections or the internal energy-saving circuit.
- Sometimes it is a problem with the computer monitor, and you need to do advanced troubleshooting to continue with your work.
XINSTALL BY CLICKING THE DOWNLOAD FILE
To fix Windows PC system issues, you will need a dedicated tool
Fortect is a tool that does not simply cleans up your PC, but has a repository with several millions of Windows System files stored in their initial version. When your PC encounters a problem, Fortect will fix it for you, by replacing bad files with fresh versions. To fix your current PC issue, here are the steps you need to take:
- Download Fortect and install it on your PC.
- Start the tool’s scanning process to look for corrupt files that are the source of your problem
- Right-click on Start Repair so the tool could start the fixing algorythm
- Fortect has been downloaded by 0 readers this month.
You must have found this guide because your monitor turns off randomly. Often computers will have issues that aren’t serious but can be frustrating. Other times they might be a warning sign of underlying issues, like a significant hardware problem.
If your computer suddenly goes black, the first thing to check is whether the computer is set to enter sleep mode, which turns off the monitor.
It could be a problem with the hardware, or it could be a problem with the software. It could also be a problem with the internal wiring of the monitor or a problem with something connected to the monitor.
Why does my monitor keep turning off when my PC is still on?
This is a problem in which the display randomly turns off and on. The display can be on for a few seconds to several minutes, then turned back off.
There are many possible reasons for this. Some include:
- Screen issues – One of the most common problems is something wrong with the screen itself.
 If you notice that your screen turns off when it gets hot, then there’s likely an issue with the cooling system in your computer. It, therefore, shuts down to minimize the risk of damage.
 - Faulty power switch – Your monitor may turn off randomly because of a faulty power switch on the back of the monitor. In your computer’s case, the power supply unit could be failing to send enough power to the monitor, causing it to shut off.
- Loose connection – Another possible reason why your computer monitor randomly turns off could be due to a loose connection between the computer and the monitor.
- Faulty GPU – If your graphics card drivers are outdated, it can cause crashes, video playback and display issues, game performance problems, and other related issues.
Fixing this problem is not as difficult as you might think. You can often use simple troubleshooting steps to determine why your computer monitor randomly turns off and fix it.
How can I fix a monitor that turns off randomly?
Before going into any recommended solutions:
- Ensure that all cables are plugged in correctly. If you have doubts about whether a wire is connected correctly, unplug it and then plug it back in to see if it fixes anything.
- Also, you must determine if it comes from your computer or your monitor. It may be helpful to hook up another display to isolate the problem.
1. Update the graphic drivers
- Press the Windows key, type Device Manager in the search box, and click Open.
- Navigate to Display adapter and expand.
- Find your driver (in this case, Intel), right-click, and select Properties.
- On the Driver tab, select Update Driver.
- Check if the problem persists.
Expert tip:
SPONSORED
Some PC issues are hard to tackle, especially when it comes to missing or corrupted system files and repositories of your Windows.
Be sure to use a dedicated tool, such as Fortect, which will scan and replace your broken files with their fresh versions from its repository.
You will be able to solve this problem quickly and easily by following the instructions we have just provided. However, if you don’t want to go through all the steps manually, there is an alternative solution.
DriverFix is an excellent option since it has been proven more efficient in fixing such issues from finding, downloading, and installing missing drivers.
2. Turn off the energy-saving mode
- Hit the Windows + R keys simultaneously to open the Run window.
- Enter powercfg.cpl in the dialog box.
- Check Balanced or High performance under Power Options.
- Next, click Change plan settings.
- Select Never under Turn off the display and click Save changes.

3. Uninstall conflicting applications
3.1 Run the computer in safe mode
- Click the Start menu, press the Power icon, and hold Shift while you select Restart.
- On the Choose an option screen, select Troubleshoot, navigate Advanced options, Startup Settings, and click Restart.
- A menu will appear once your computer restarts. To start your computer in safe mode, press 4 or F4.
If the problem does not occur in safe mode, some conflicting software may be causing the monitor to turn off randomly, so go ahead to uninstall your recently added apps.
3.2 Uninstall applications
- Press Windows + R, type control, and hit Enter.
- Select Uninstall a program.
- Choose the program from the list, click on Uninstall, and then simply follow the wizard to complete the uninstallation.
As a safety precaution, you should also consider installing performance monitoring software on your PC to detect any problems early in advance and manage your system.
If you enjoy dual monitor setups, feel free to check out our guide on how to successfully set it up.
We hope that our solutions were able to help solve the annoying problem and that you can now carry on with your tasks uninterrupted.
In the comments section below, let us know what solution worked for you.
Still experiencing issues?
SPONSORED
If the above suggestions have not solved your problem, your computer may experience more severe Windows troubles. We suggest choosing an all-in-one solution like Fortect to fix problems efficiently. After installation, just click the View&Fix button and then press Start Repair.
Was this page helpful?
Start a conversation
Share
Copy link
Newsletter
Software deals
Friday round-up
I agree with the Privacy Policy regarding my personal data
AIDA64 — collecting information about the computer
Updated: Published:
| Download AIDA64 (Everest) from the official website of |
Description of
How to download to your computer
How to use
Installation
Disc test
System Stability Test
Temperature sensors
Video Card Information
Information about the motherboard
Similar (by some features) programs
Description
AIDA64 (formerly Everest, and even earlier AIDA32) is a program for collecting information about the computer and its status. It can show information about the manufacturer and model of the motherboard, the operating system, conduct a series of tests, and much more.
How to download
Follow the link above — the Lavasys website will open.
In the «AIDA64 Trial Packages» section, we are offered two options for download:
- AIDA64 Extreme Edition — for home computers. Collection of information about the computer.
- AIDA64 Business Edition — for corporate use. Inventory of computers over the network.
Click on Download version Extreme Edition :
On the next page, select the download source — site download.aida64.com:
The program will start downloading to the computer.
How to use the AIDA64 program
Let’s try to analyze the most used tests and indicators.
1. Installation
Download the program from the link above. We launch the downloaded file — the installation process of the program will begin, which does not have any subtleties. You must select the installation language (Russian is possible), accept the license agreement and answer a series of wizard questions by pressing button Next.
After installation, run the program. The first window will say that this is a trial version, which will expire in 30 days — click OK ;
2. Hard disk test
The program tests the read speed of the media. To start the test, click on Service — Disk test :
In the window that opens, we can perform tests in the following modes:
- Linear Read (linear reading).
- Random Read.
- Buffered Read.
- Average Read Access.
- Read Test Suite — a comprehensive test (makes checks in all of the above modes).
- Average Read Access.
Select the desired disk, if there are several in the system, select the mode and press Start:
3.
 System stability test
If your computer behaves strangely (runs slowly, randomly restarts, throws errors), you should perform a hardware test. The essence of the test is that a high load is created on the selected components, which makes them work to the limit. If the component is faulty, the test will end with an error or restart the PC, which will give us information about its instability.
Click Service — System stability test :
In the window that opens, put all the checkboxes or leave it as is:
and click Start .
If problems are found, red inscriptions with error messages will appear in the program window, or, as mentioned above, the computer may restart.
4. How to view the temperature
Go to sections Computer — Sensors0007
In the right window of the “Temperatures” subsection, you can see the current indicators:
5.
 How to recognize the video card
07
In the right window of the «Video adapter properties» subsection, you can see the manufacturer and model of the video card:
6. Find out the motherboard model
In the main window, find Motherboard and click on it. Then we find again Motherboard — click again:
In the «Motherboard» subsection, the motherboard model is displayed:
Below is a link to the manufacturer’s website and a page with drivers:
Please note that not all fields are available. to view in triana:
Programs with similar functions
- Speccy is a computer information program from Piriform.
- CPU-Z — Shows detailed information about the processor, motherboard model and video card.
- Speedfan — displays information about the temperature of the components.
Did this page help you?
Yes No
How to update the graphics card driver.
 Update NVIDIA and AMD Driver
Updated: Published:
What is a driver?
First, you need to determine the model of the video card.
a) in modern Windows systems (8 or 10), right-click on the start button — select Device Manager :
b) in older systems, right-click on «Computer» and select «Manage».
Go to the «Device Manager».
After you have opened the list of devices, open «Display adapters» and write down the model of the video card (in this example, GeForce 8500 GT).
There are several other ways to find out the video card model: look in the documentation, open advanced desktop settings, use the dxdiag command, use the Everest (AIDA) program. If the video card is built into the motherboard, you need to find out the model of the latter and download the video driver specifically for it.
This manual is universal and is suitable for both desktop and laptop computers. The list of supported operating systems is available on the manufacturer’s website when downloading the driver.
Update NVIDIA video card driver
1. Go to the NVIDIA website;
2. In the «Option 1: Manually find drivers for my NVIDIA products» section, select your video card (in this example, GeForce 8500 GT), operating system (for example, Windows 7) and click «SEARCH»;
3. In the next window, click «DOWNLOAD NOW»;
4. Accept the license agreement
and save the file to your computer;
5. Run the downloaded file and install the driver, answering «OK» and «Next»;
6. Perform a reboot.
Update AMD video card driver
1. Go to the AMD website;
2. In the «select your product from the list» section, select your video card and click on SUBMIT :
3. In the next window, find the operating system of your computer, open the details by clicking on the plus sign and click the «Download» button :
and save the file to your computer;
4.