What Does Sharpness Do On a Monitor? Here’s What You Need to Know
Monitor sharpness is one of the most important aspects of having a superb visual experience on your PC screen. A monitor, television, laptop, or even our mobile phone can provide a great graphical user experience when they have the optimum levels of screen sharpness. Similarly, inappropriate levels of sharpness can lead to an unsatisfactory experience regardless of what you decide to watch.
To answer in short – sharpness determines the clarity of the image on your monitor. Increasing the sharpness level on your monitor can improve any soft or blurry picture and make it more clear and crispier.
How to Adjust the Sharpness On Your Monitor?
Now that you know what sharpness does on a monitor, let’s see how to adjust it. Each monitor manufacturer offers a distinct user interface for making the necessary changes for not just sharpness but also brightness, contrast, and other display properties. Thus, there is no specific be-all and end-all guide to adjusting your sharpness. The best approach you can take is to look at your monitor’s user manual to see how you can customize those settings.
However, to assist you, we are providing a brief summary of the monitor sharpness adjustment process.
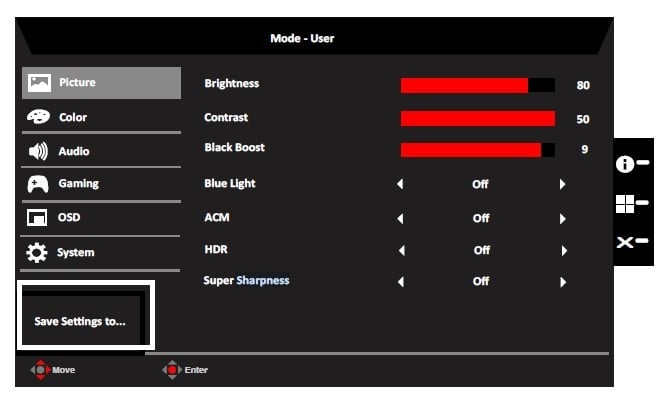
- Generally, all monitors come with a “Menu” button, which can be located on the sides of your monitor.
- After locating the Menu button, click on it and then go to the Sharpness option using its up or down button.
- In the monitor, you’ll also find the “+” or “-” button. Now, using these buttons, you can increase or decrease the sharpness of the monitor as per your need.
Is a High Sharpness Level Always Good?
Computer Screen Resolution Standard…
Please enable JavaScript
Computer Screen Resolution Standard Principles
The degree of sharpness will vary depending on what you are viewing on the screen. Having a display with the proper level of sharpness is essential for any type of computer use, including video editing, gaming, and watching videos.
Before changing the sharpness level to high, there are a few things you should bear in mind. High sharpness levels can affect or stress your eyesight and retina when seeing anything. Even though a high sharpness level can give you a crisper visual, setting it to maximum can also be overkill. Unless you need them on high for a specific reason, keeping them at a mid-to-low level is always preferable.
For normal viewing experiences like browsing the internet, you should always take care to make the sharpness levels appropriate for you. So, what is a good sharpness level? Depending on the monitor you have, it’s recommended to keep your sharpness level between 50% to 0%.
Does Resolution Effect the Sharpness of the Monitor?
To a certain extent, yes, the resolution does affect the sharpness of the monitor. But, more importantly, the pixel density of your display is what determines your monitor’s sharpness, not just resolution.
Resolution is the number of pixels displayed on a screen. When a screen displays more pixels, you get sharp, clearer, and more detailed visual quality.
However, as we all know, monitors come in different sizes and resolutions, hence, different sizes of monitors can have the same resolution or the same number of pixels and still have differences in their sharpness level. For example, let’s say a 24-inch monitor and a 32-inch monitor both have a screen resolution of 1920 x 1080. But the image quality on the smaller monitor will look sharper and more vivid than on the bigger monitor. And that’s because of its pixel density. The smaller screen will have a higher number of pixels per inch than the larger screen. Pixel density is measured in PPI, which is Pixels Per Inch. Therefore, the higher the PPI, the sharper the image you’re going to get. All in all, the sharpness of your monitor depends more on the pixel density rather than just the resolution.
How Can Monitor Sharpness Help in Gaming?
In terms of gaming, people emphasize more on having a nice visual experience rather than any other particular aspect. Who wouldn’t want to enjoy crisp and clear graphics during their gaming session? Thus, sharpness plays an important role in improving or spoiling anyone’s overall gaming experience.
Many people also wonder whether a high sharpness level is good for gaming or not. Well, if you keep the sharpness level high on a monitor that has a low pixel density, you may not enjoy its high-quality visuals. In fact, a low-pixel display will result in distorted images with excessive sharpness. But at the same time, if you set the sharpness too low, it could result in a blurry image. Therefore, you will need to experiment to find the option that works best for you.
How to Optimize the Monitor Sharpness in Gaming
The majority of displays come with the proper sharpness preset to prevent under or over-sharpening. In fact, in contrast to other displays, gaming monitors actually provide more customization options. But you can see if those options are present on your monitor. Here’s what you can do:
- Increasing the refresh rate:
Most displays have a minimum refresh rate of 60Hz. However, gaming displays operate at 144Hz, 240Hz, or even higher. Why does the refresh rate matter though? Well, when you increase the refresh rate, the blur decreases and make the visual sharp. Most modern monitors have a refresh rate adjustment feature.
- Turning off the motion blur setting:
Locate the motion blur feature in your game’s settings menu. After you have done so, you can either decrease the motion blur or turn it off completely. Some games also come with a depth of field, chromatic aberration, film grain, and bloom settings sliders. Changing these settings can help you get the visual quality you want.
display — What sense does it make for «sharpness» to be adjustable on a monitor?
Asked
Modified
5 years, 5 months ago
Viewed
69k times
Modern monitors often have a «sharpness» setting.
But I don’t really understand how it makes sense for such a setting to exist.
The software asks the monitor to display a particular pattern of 32-bit RGB values, right?
i.e. The OS might ask the monitor every frame to display a particular 1920×1080×32 bitmap.
But adjusting «sharpness» means letting nearby pixel values affect each other, which would seem to imply that the input is no longer being faithfully represented… meaning it would no longer be displaying what it is asked to display, which doesn’t make sense. So I just don’t see where this leaves any logical room for sharpness adjustment.
Where exactly does the degree of freedom for adjusting sharpness come from?
- display
- lcd
- rgb
12
Per https://www.cnet.com/uk/how-to/turn-down-your-tv-sharpness-control/ , «sharpness» on an LCD is part of the post-processing.
Even leaving out rescaling/upsampling (e.g. if you try to display an SD signal on an HD monitor), and the complexities of colour calibration, the monitor does not always display the image as given. This is an unfortunate side effect of marketing.
Monitor manufacturers like to distinguish their product from other products. From their point of view, if you feed the same signal to their monitor and a cheaper competitor, and it looks identical, this is bad. They want you to prefer their monitor. So there’s a bunch of tricks; usually out of the box the brightness and contrast are wound right up beyond what is sensible. The «sharpness» is another trick. How do you make your picture look sharper than a competitor that is displaying the picture exactly as sent? Cheat.
The «sharpness» filter is effectively that used in Photoshop and similar programs. It enhances the edges so they catch the eye.
13
Original Question: Where exactly does the degree of freedom for adjusting sharpness come from?
Sharpness is directly related to the type of signal and content you are viewing. Movies typically look better when sharpness is turned down and the pixels are allowed to blur together a bit. On the other hand, a computer display would want high sharpness for clear text and sharp images. Video games are another example where higher sharpness is better. Low quality TV signals also can be enhanced with sharpness controls.
Being monitors can be used for displaying a computer screen, or movie, or virtually any video source, sharpness is still a useful setting.
https://www.crutchfield.com/S-biPv1sIlyXG/learn/learningcenter/home/tv_signalquality.html
EDIT: The OP has indicated in comments that this does not answer the question.
OP: Where in the problem is there room for any adjustment? Like if
I tell you x = 1 and y = 2, and then say «oh, and I want x — y = 3».
That makes no sense.
The process of converting a live image/video to electrical analog/digital signals, transmitting over some medium, and recreating that image on a display device is NEVER a 1 to 1 process.
Signal noise, compression loss, manufacturing and equipment variations, cabling/signal type, and other factors come in to play. All the adjustments on a monitor are designed to work together to give the end user the highest quality viewing experience — according to the end user. The interpretation is entirely subjective.
OP: This answer does not answer the question of why have the viewer
adjust the sharpness when this is already defined by the content
creator (be it Spielberg or Excel).
If we are to follow this logic, then why do monitors need or have ANY adjustments at all? The answer is that what we see on the screen is not a 100% accurate representation of the original data.
25
The answer is that a pixel is not what you think it is. There is not a 1 to 1 correlation between digital pixels and physical pixels due to «Subpixel Rendering». The way colors are displayed is different in each monitor but most LCD monitors have distinct RED, GREEN, and BLUE elements arranged in a triangle. Some additionally have a white pixel making a quad of elements per «pixel».
Thus, not all layouts are created equal. Each particular layout may have a different «visual resolution», modulation transfer function limit (MTFL), defined as the highest number of black and white lines that may be simultaneously rendered without visible chromatic aliasing.
Monitor drivers allow renderers to correctly adjust their geometry transform matrices in order to correctly compute the values of each color plane, and take the best profit of subpixel rendering with the lowest chromatic aliasing.
The «sharpness» on your monitor reduces the natural blending algorithm used to make lines appear to be contiguous when they are not. Turning the sharpness up will increase chromatic aliasing while producing cleaner lines. Reducing the sharpness will give you better color blending and smooth the lines that fall between the subpixel dot pitch.
For more detailed information, see this article:
https://en.wikipedia.org/wiki/Subpixel_rendering
You are correct that for a perfect reproduction on the input, the monitor should simply present each pixel as it is delivered.
However, your eyes (and your brain) don’t see pixels as separate entities, they see a picture formed from pixels. Depending on what it represents, a picture looks ‘better’ (more attractive) if parameters are intentionally ‘falsified’.
Sharpness typically increases the contrast at color change edges, for example, a letter in this text is represented by rows of pixels, one line might look (simplified) 2-2-2-2-7-7-7-2-2-2-2 where 2 is light gray, and 7 is dark grey. Increasing the ‘sharpness’ increases the brightness falloff at the edge, so the last 2 before the first 7 becomes even lighter (= 1), and the first 7 after the last 2 becomes even darker (=8). repeat for the other edge, and you get 2-2-2-1-8-7-8-1-2-2-2. This will look a lot ‘sharper’ to your eyes.
This is done in both dimensions, and a bit more sophisticated, but that should explain you the base idea.
Edit: I thought I made that clear in my answer, but the OP claims he didn’t understand it:
OP Question: ‘what sense does it make’ -> Answer: it appears sharper to your brain.
Many people want that; if you don’t care for it, don’t use it.
3
You’re absolutely right that setting sharpness on your monitor somewhat «distorts» the image from the pixel-accurate data as sent by the computer (or whatever is attached to the other end of the video cable). However, it allows the user to improve their visual experience if the sharpness of the pixel-accurate data being sent does not correspond to their desired sharpness in the image they’re viewing.
So the monitor is in effect not doing this:
- Receive bitmap from cable
- Render bitmap
- Goto 1.
but this:
- Receive bitmap from cable
- Modify bitmap based on user’s preferences
- Render bitmap
- Goto 1.
So the degree of freedom for adjusting sharpness is explicitly added in by the monitor manufacturer, for the purpose of improving user experience.
1
The software asks the monitor to display a particular pattern of 32-bit RGB values, right?
i.e. The OS might ask the monitor every frame to display a particular 1920×1080×32 bitmap.
That’s not how VGA works at all. At the monitor level there are no pixels at all.
How displays traditionally worked before the age of LCD is this:
-
Software asks the device driver to display a bitmap image
-
Device driver splits the image into three waveforms for R, G and B. That’s right, waveforms! Exactly like audio waveforms. Now, these waveforms have a specific format because while audio is 1d pictures are 2d.
-
The analog signal for lines on the screen are sent to the monitor.
The monitor never sees a pixel, it only sees lines.
- The monitor spits out electrons moving at nearly light speed from three electron guns and the beam is deflected by controlling group of electromagnets causing them to paint the entire screen.
Here is where the sharpness control comes in.
Due to manufacturing tolerances the electron beams almost never converge correctly and produce blurry pictures right off the assembly line. In the really old days it is up to you, the person who bought the monitor, to adjust the sharpness at home. Later more modern of these ancient displays have automatic adjustment process at the factory but the sharpness adjustment must still be built in for the process to work.
So the answer is really simple. The sharpness adjustment is there to ensure the picture on the displays are sharp.
8
On a (digital) TV, sharpness controls a peaking filter that enhances edges. That is not so useful on a display if used as a computer monitor.
In the previous century, on a high-end analog CRT monitor, sharpness may have controlled the focus voltage of the electron gun. This affects the spot size with which the picture is drawn. Set the spot size too small (too sharp) and the line structure becomes too visible. Also there may be annoying «Moiré» interference with the structure of the shadow mask. The optimum setting depends on the resolution (sample rate) of the picture, as many CRT monitors were capable of multiple resolutions without scaling (multi-sync). Set it just sharp enough.
High-end CRT TVs had Scan Velocity Modulation, where the scanning beam is slowed down around a vertical edge, and also a horizontal and vertical peaking filters and perhaps a horizontal transient improvement circuit. Sharpness may have controlled any or all.
Sharpening in general enhances edges by making the dark side of the edge darker, the bright side brighter, and the middle of the edge steeper. A typical peaking filter calculates a 2nd order differential, in digital processing e.g. (-1,2,-1). Add a small amount of this peaking to the input signal. If you clip off the overshoots then it reduces to «transient improvement».
On some digital devices, the sharpness of a scaler may be controlled, e.g. in my digital satellite TV receivers. This sets the bandwidth of the polyphase filters of a scaler, which converts from a source resolution to the display resolution. Scaling cannot be perfect, it is always a compromise between artefacts and sharpness. Set it too sharp and annoying contouring and aliasing are visible.
This may be the most plausible answer to your question, but only if the monitor is scaling. It would do nothing for an unscaled 1:1 mode.
Source: 31 years of experience in signal processing for TV.
4
It doesn’t make sense. Or at least it doesn’t on most LCD monitors. You will almost always want your «sharpness» set to 0, depending on the monitor or TV (some will blur the signal at 0, so the real unfiltered setting might be somewhere in the middle), otherwise, it will apply an edge enhancement filter, which makes the darker side of an edge darker and the lighter side lighter. This is especially noticable on cartoons and text. Your mileage may vary, but I think it looks bad in nearly every case.
This is a lossy, irreversible filter that you will probably not want to be activated. Your computer is sending pixel-perfect data, so «sharpness» and blurring filters are generally undesirable.
Also note that the «sharpness» filter/setting is a misnomer. It is impossible to make an image sharper (i.e. having more detail), only less detailed. The only way to get a sharper image is to use a higher definition source image.
Sharpness settings exist on LCD panels because manufacturers think digital effects will sell more monitors and TV’s. Rather than faithfully represent the input from the computer, the manufacturer gives the user options to tweak the picture to suit personal tastes, however poor those tastes may be.
«Sharpness» is relevant for analog signals (like VGA) and for CRT displays, where the signal is represented by waveforms at some point. Because analog tends to be imprecise, sharpness settings allow calibration for tolerances and compensation for imperfections in analog display output and signal transmission.
Sharpness ought to be irrelevant on LCD panels using DVI, HDMI, and other «pixel-perfect» data sources with a 1:1 resolution mapping. Yes, sharpness distorts the picture in this scenario. Displays in boxes stores often have sharpness and other digital filters cranked to extremes to appear more dramatic than the surrounding displays. Some consumers might actually want these effects because they have grown accustomed to the filters’ effects or because they are trying to compensate for a poor-quality LCD panel that looks bad to the eye at native output. Sharpness might also be relevant when using a digital signal that must be resized because the source and display have different resolutions.
Overall, you probably want sharpness set to Off or 0 on a modern LCD display with a 1:1 digital signal.
http://hifi-writer.com/wpblog/?page_id=3517 and
https://forums.anandtech.com/threads/why-does-an-lcd-tv-with-hdmi-input-need-a-sharpness-control.2080809/
Many monitors can accept a video signal that doesn’t have the same resolution as the panel, and attempt to scale it as appropriate. If a monitor which is 1280 pixels wide is called upon to display an image which is 1024 pixels wide, and the source material consists of black and white stripes that are one pixel wide, the display would likely show a repeating 5-pixel pattern. On a scale of 0-4, the pattern would likely be 03214. If the black and white stripes in the original are «meaningful», showing them on as above may be helpful. On the other hand, the 5-pixel repeating pattern would be a distraction which isn’t present in the original. Adding some blur to the image would reduce the aliasing effects of scaling.
1
Different settings are good for differnt content. These settings could also be changed on the source, but I and probably many others don’t know where you can change the sharpness setting on a PC.
So there is an easy to access menu on the monitor, where sharpness can be changed.
Sign up or log in
Sign up using Google
Sign up using Facebook
Sign up using Email and Password
Post as a guest
Required, but never shown
Post as a guest
Email
Required, but never shown
By clicking “Post Your Answer”, you agree to our terms of service and acknowledge that you have read and understand our privacy policy and code of conduct.
3 ways to adjust monitor clarity
A blurry, blurry image on the monitor not only impairs the workflow, but also negatively affects vision. Therefore, such “picture defects” need to be eliminated, and the sooner the better. Fortunately, adjusting the clarity of the monitor is not difficult — just set the appropriate resolution and run ClearType in the settings of the Windows operating system.
“Clearness of the monitor” refers primarily to the sharpness and detail of the image. In addition, the quality of font display is important, because people working at a computer have to read and write a lot.
Therefore, «adjust the clarity of the monitor» means to set adequate sharpness, contrast, level of detail, and also improve the display of fonts. It is worth noting that the old CRT displays (if they still remain somewhere) are extremely difficult to adjust — and this is done in the parameters of the «kinescope» itself.
Let’s figure out how to adjust the clarity of the monitor in just a few clicks.
Setting the optimal screen resolution
Each LCD monitor has its actual resolution — its matrix is equipped with a certain number of pixels. And if the actual and set number of pixels in the picture do not match horizontally and vertically, the image quality may suffer.
You can find out the actual resolution of the monitor from the technical characteristics of the device — from the instructions, from the box, or simply by googling the model. Under it you need to adjust the installed. Only in this case, each program point will correspond to a physical pixel — and the image will become sharp and clear enough.
Instruction:
- Find out the actual resolution of your display. This information can be obtained from the instructions, from the box, or by searching the Internet for the characteristics of the model used.
 In some cases, this reference characteristic is indicated in the setup menu of the screen itself;
 - Right-click anywhere on the desktop and select «Display Options» from the menu that appears. Or type in the start menu «display permissions».
- Select the recommended resolution or set a value that matches the actual one.
If any item in the list of available pixel ratios is marked as «Recommended» — you should select it. Windows way to independently select the optimal display settings.
It is also worth noting that this instruction was written for the Windows 10 operating system. In older versions, however, the necessary parameters are in the same places, except that they may be called a little differently.
If, after setting the optimal resolution, the image has become too small, then in the same «Window» «Display», which opened after completing the second paragraph of the above instructions, scroll to the «Scaling» section and select 125%.
ClearType setting
ClearType is a special font smoothing system that allows you to set the most optimal display of text on displays with a high pixel density. However, on screens with medium or even low density, it can also be very useful. In any case, it is able to significantly increase clarity — and this is exactly what we are trying to achieve in this manual.
Instruction:
- Open Start and start typing «ClearType» on your keyboard. Most likely, after a few first letters, the desired option will be offered — “Setting the ClearType text”. Feel free to click on it with the left mouse button;
- In the window that appears, check the box next to «Enable ClearType» and click «Next»;
- If the selected screen is set to an inappropriate resolution, Windows will notify you during the next configuration step. If it is suitable, it will also inform you, but it will not allow you to change it. Feel free to click «Next» — and do so after each step;
- Next, there will be five steps to set the text display quality.
 Choose the best, in your opinion, option;
 - Click Finish. The display of text on the monitor will change slightly according to the items you select.
This stage allows you to quickly and accurately adjust the clarity of the monitor, since it affects not only texts, but also some elements of the system interface.
Setting the sharpness via the menu of the monitor itself
Some display models allow you to adjust the clarity directly through the menu of the device itself. But not all that is worth considering before you start looking for the appropriate buttons.
Procedure:
- Locate the Menu and Control keys. They are usually located on the bottom panel of the monitor or on the bottom left. This panel will be required for further setting of operation parameters;
- Press the actual «Menu» and scroll it in search of the item «Clearness». Then use the «Up-Down» or «Forward-Back» buttons to set the desired or most comfortable value.
- In the same parameters, you can «play» with other display settings. Set contrast, gamma, brightness, saturation and shift as needed. You can also increase or decrease clarity by setting other characteristics — so you can safely try until working with the display becomes the most comfortable.
|
Rate the article |
|
|
Total votes: 34, rating: 2.5 |
Adjusting the brightness, contrast and sharpness of the pattern
Excel for Microsoft 365 Word for Microsoft 365 Outlook for Microsoft 365 PowerPoint for Microsoft 365 Project Online Desktop Client Excel 2021 Word 2021 Outlook 2021 PowerPoint 2021 Project Professional 2021 Project Standard 2021 Excel 2019Word 2019 Outlook 2019 PowerPoint 2019 Project Professional 2019 Project Standard 2019 Excel 2016 Word 2016 Outlook 2016 PowerPoint 2016 Project Professional 2016 Project Standard 2016 Excel 2013 Word 2013 Outlook 2013 PowerPoint 2013 Project Professional 2013 Project Standard 2013 PowerPoint 2010 PowerPoint 200 7 More. ..Less
Change screen brightness
Adjust screen brightness ?
-
Windows 10 or 11 : Click Start button , select Settings and then System > display . Under Brightness and Color , move the slider Change Brightness to adjust the brightness. For more information, see Change screen brightness.
-
Windows 8 : Press Windows key + C. Select Settings and then — Change PC settings . Select Computer and Devices > Display . Enable parameter Adjust screen brightness automatically . For more information, see Adjust brightness and contrast.
For more information about adjusting pictures in Office applications, see this article.
You can change the brightness, contrast or sharpness of an image using the correction tools.
This video shows several ways to adjust the pattern:
(Once the video starts playing, you can click the resize arrow at the bottom right corner of the video frame to enlarge the video.)
Duration: 1:35
Brightness, sharpness or contrast adjustment
-
Click the picture whose brightness you want to change.
-
On the tab Picture Format , in the Edit group, select Fixes.
Depending on the screen size, the button Correction may look different.
If the Picture Format tab is not displayed, make sure you have selected a picture. You may need to double-click a picture to select it and make it appear as a tab.
-
Do one of the following.
-
In section Sharpness setting click the desired thumbnail. The thumbnails on the left show more fluidity, while the thumbnails on the right show more sharpness.
-
Under Brightness and Contrast , click the desired thumbnail. The thumbnails on the left show less brightness, and the thumbnails on the right show more.
 Thumbnails on the top show less contrast, and those on the bottom show more.
 Tip: When you hover your mouse pointer over an option in the Fixes gallery, the image on the slide changes to show the effect of the option you’re pointing to.
-
-
To fine-tune any setting, click the Picture Adjustment Options button and move the slider Sharpness , Brightness , or Contrast , or enter a number in the box next to this slider.
Note: If you are using PowerPoint, you can still keep the original version of the picture even if you have made corrections. This feature is not available in Word or Excel.
Changing the Office color scheme to increase contrast
Is the Office color scheme too bright for you? Is more contrast needed in Office applications? Cm . See Change the look and feel of Microsoft 365.
You can change the brightness, contrast or sharpness of an image using the correction tools.
Brightness, sharpness or contrast adjustment
-
Click the picture whose brightness you want to change.
-
On panel Picture Tools On the Format tab, in the Edit group, click Correction .
Depending on the screen size, the button Correction may look different.
If the Format tab or the Picture Tools panel is not visible, make sure the picture is selected. You may need to double-click a picture to select it and open tab Format .
-
Do one of the following.
-
Under Sharpen , click the desired thumbnail. The thumbnails on the left show more fluidity, while the thumbnails on the right show more sharpness.
-
Under Brightness and Contrast , click the desired thumbnail.
 The thumbnails on the left show less brightness, and the thumbnails on the right show more. Thumbnails on the top show less contrast, and those on the bottom show more.
 Tip: When you hover your mouse pointer over an option in the Fixes gallery, the image on the slide changes to show the effect of the option you’re pointing to.
-
-
To fine-tune any setting, click the Picture Adjustment Options button and move the slider Sharpness , Brightness , or Contrast , or enter a number in the box next to this slider.
Note: If you are using PowerPoint, you can still keep the original version of the picture even if you have made corrections.