Software to uninstall the drivers AMD/NVIDIA GPUs.
Display Driver Uninstaller (DDU): Software to uninstall the drivers AMD/NVIDIA GPUs.
Download
Display Driver Uninstaller (DDU)
Display Driver Uninstaller (DDU)
Display Driver Uninstaller – is a tool for removing video drivers. If you are still mining, then most likely you are faced with confusion with old and new versions of drivers. The solution was to boot in safe mode and manually remove the driver, hoping that after these frauds the new version will become normal and the card will work. These problems are most often obtained by those users whose video card works with different versions of drivers. But now the Display Driver Uninstaller (DDU) tool has appeared, which does this with one button, i.e. No need to boot in safe mode and uninstall drivers manually. Display Driver Uninstaller (DDU) is a driver removal tool that can help you completely remove AMD (ATI), NVIDIA and Intel graphics drivers, Realtek audio driver from your system, without leaving leftovers behind (such as registry keys, folders, files, driver store). Over time these leftover files can cause compatibility issues, such as drivers failing to install, reducing performance or system crashes/freezes. By using DDU you can remove these leftovers and solve many common issues related with GPU drivers.
Download Link: https://www.guru3d.com/files-details/display-driver-uninstaller-download.html
Display Driver Uninstaller (DDU) Tutorial/Guide
Step 1 – Have your GPU/Audio drivers ready
Before we go ahead and use DDU to remove our GPU drivers I highly recommend beforehand you head to your GPU manufacturers website and download the appropriate drivers for your GPU and OS configuration (I recommend you use the latest drivers available, however you can use older drivers if you want)
Here are the official download links for NVIDIA, AMD (ATI) and Intel drivers. Make sure you select the right options such as language, OS version and architecture etc.
- NVIDIA: www.nvidia.com/Download/index.aspx
- AMD (ATI): support.amd.com/en-us/download
- Intel: https://downloadcenter.intel.com/
Note: With some computers you may have to download your GPU/Audio drivers from the OEMs website (HP, Dell, Lenovo etc.) – some GPUs may have custom hardware IDs that only officially work with the OEM specific drivers; however this isn’t common.
Step 2 – Download DDU
After you’ve downloaded your GPU drivers we can now go ahead and download DDU, I recommend you download DDU from Wagnard’s official site.
- DDU Download: https://www.wagnardsoft.com/display-driver-uninstaller-ddu-
I always recommend you download the latest version of DDU, it gets updated quite regularly to keep up with the changes made to GPU drivers and Windows.
Step 2.5 – Disconnect from the Internet
If you’re using Windows 10, I recommend (if not mandatory) you disconnect your PC from the Internet, this will prevent Windows 10 from automatically downloading GPU drivers.
There is an alternative option in the option menu of DDU that you can select that should prevent the download of drivers from window update.
Step 3 – Extract and run DDU
Once you’ve download DDU, simply double click the exe and extract it wherever you want (except on a network drive, it must be on a local disk), I recommend you extract DDU to a ‘DDU’ folder on the desktop, for ease of access.
Once you’ve extracted DDU, open the DDU folder (or wherever you extracted it) and you should see several files, read the ‘Readme’ file, then launch ‘Display Driver Uninstaller’.
After you run ‘Display Driver Uninstaller’ you’ll be presented with a warning box, advising you to launch DDU in Safe Mode, I highly recommend you use DDU in Safe Mode to minimize any potential issues, however it’s optional. If you do not want to launch DDU in Safe Mode, just click ‘OK’ and proceed as normal.
If you do want to launch DDU in Safe Mode click the OK button, in the top left-hand corner select ‘Options’ and at the bottom click ‘Enable Safe Mode dialog’, exit out of DDU and relaunch it, upon relaunching select “Safe Mode (Recommended)” and click “Reboot to Safe Mode”. Your PC should reboot into Safe Mode and DDU will start.
*Note1: It is preferable to use the “Enable Safe Mode dialog” option only after you have at least tried once to go into safe mode the usual way or YOU MAY GET STUCK in safe mode.
*Note2: If you use DDU in normal mode I recommend you close down any background programs, such as games, browsers, media players etc…
After launching DDU you will be presented with this screen, instead of simply clicking one of the removal buttons I recommend you head to the options and tweak how DDU removes the drivers.
I recommend you select the C:\NVIDIA and C:\AMD folders
These folders are the default locations where the NVIDIA or AMD driver installation files are unpacked, once the driver is installed these folders can safely be deleted.
Once this has been done exit the options menu and now we can begin using DDU to remove our GPU drivers.
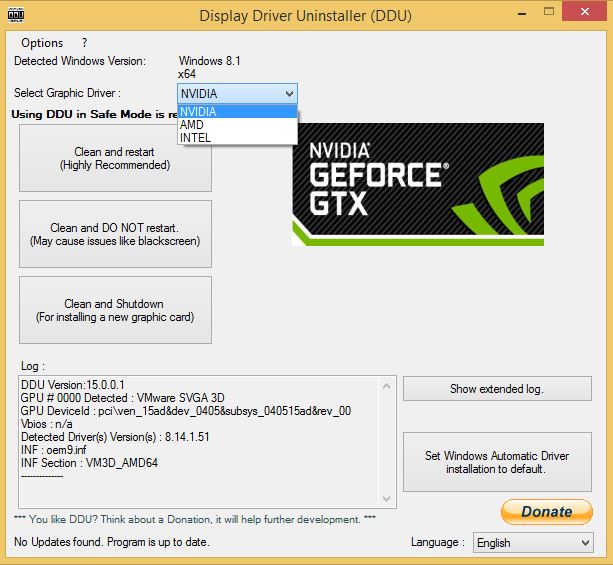
On the right side you’ll see a drop down box that allows you to select what GPU drivers you want to remove.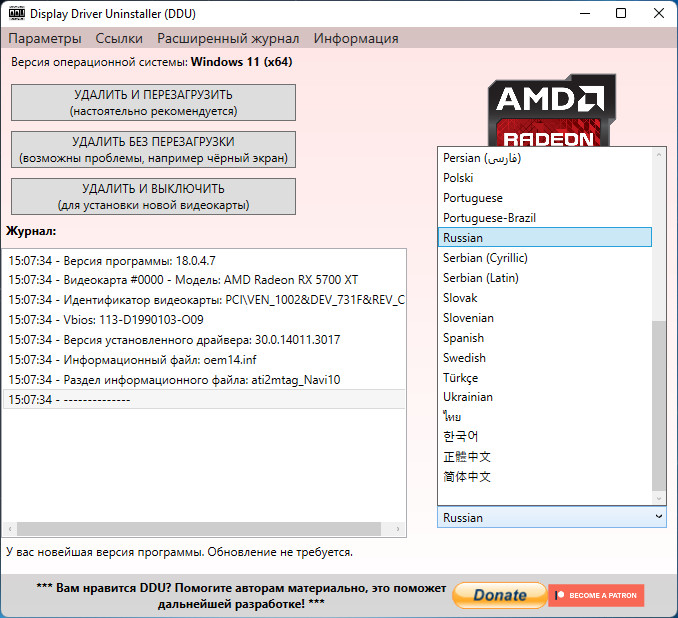
If you previously had an AMD (ATI) GPU in your system and then made the switch to NVIDIA (or vice versa) in the same Windows installation, you will want to remove the AMD drivers and then the NVIDIA drivers (or vice versa) to avoid any conflicts
Intel iGPU (HD, Iris graphics) drivers shouldn’t cause any conflicts between AMD or NVIDIA drivers. However, having assets of AMD drivers installed on an NVIDIA system, or vice versa can cause issues.
On the left side of the interface you’ll see three buttons, all are relatively quite simple but I’ll run through them quickly.
- Clean and restart
Will remove the current selected GPU drivers and reboot. This is great if you’ve only had a single GPU installed and you want to clean your drivers. It will reboot and you can start clean with the drivers you downloaded earlier
- Clean and do NOT restart
This is the option you’d want to select if you’ve had multiple GPUs installed in the past, remove the AMD (ATI) drivers, change it to NVIDIA and remove those drivers (or vice versa) This allows you to completely remove any GPU drivers from your system and start completely fresh.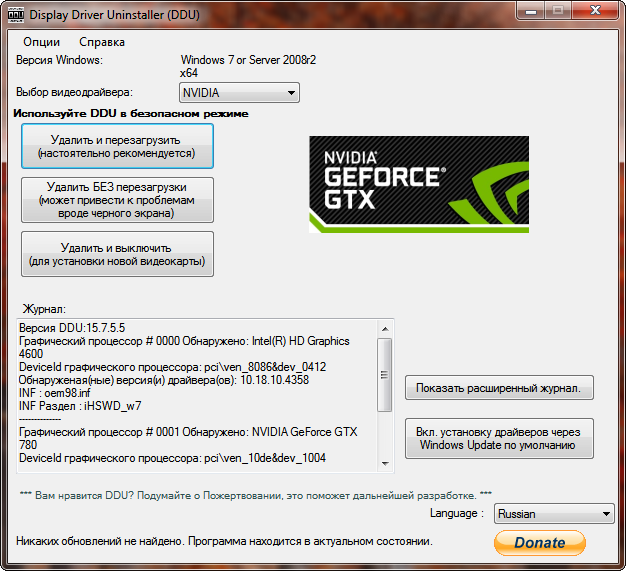
- Clean and shutdown
Will remove the currently selected GPU drivers and shutdown your system. This should be used if you intend to swap out your GPU
- Remove “GeForce Experience” display driver installer cache/files (NVIDIA only) (Older DDU version)
This will remove cache/temporary files that are created when installing NVIDIA drivers or the GeForce experience, this is intended for use after you’ve installed your NVIDIA drivers, it typically will remove 600MB or more
Now all we have left to do is remove our drivers, your screen may go black for a few seconds while DDU is removing the GPU drivers – this is perfectly normal and should only last a few seconds.
Select your GPU vendor
Select one of the removal options, I recommend you click ‘Clean and do NOT restart’ if you wish to look at the logs or by default, click ‘Clean and restart’.
DDU will now remove the selected GPU drivers from your system, this will vary depending on the speed of your system.
I just want to reiterate one more time, if you’ve had an AMD (ATI) or NVIDIA GPU in the same install of Windows I highly recommend you select and remove both GPU drivers to make sure there aren’t any conflicts. Once DDU has completed the removal of the selected GPU drivers you will be prompted with this message — Select ‘Yes’ to exit the program.
Now DDU will reboot your PC, from here you can install the GPU drivers you downloaded earlier, restart if applicable and then connect your PC back to the internet.
(NVIDIA only, OLD DDU VERSION) After you’ve installed your GPU drivers, you can go ahead and open up DDU (you don’t need to do this in Safe Mode) and remove temporary/cache NVIDIA driver/GFE installation files, for me it was around 1GB
As a side note I always recommend you update your GPU drivers using the official installer, programs like GeForce Experience can cause issues when updating drivers.
If you found DDU useful, please consider donating to Wagnard so he can continue improving DDU by adding new features and updating it when changes are made to Windows or the drivers themselves.
Hopefully this guide has helped you resolve any GPU driver related issues you may have encountered, although I realise this guide won’t help everyone. GPU drivers are incredibly complex pieces of software and this is merely one fix. Below I have other tutorials that may help you resolve any issues that are related to GPU drivers.
Be the first to know the news, read more about cryptocurrencies and mining on CRAZY-MINING.ORG. You enjoy reading articles like this and want to support me as an author, then subscribe to our Telegram channel https://t.me/cryptomineg
-
ATI Tray Tools for Windows 10 is a popular utility that allows you to manage video cards from a well-known manufacturer. ATI Tray Tools has a wide range of additional working tools that help distribute the load of the device. It controls the work of drivers from the internal system, supports profiles, configures hidden functions. The program improves anisotropic filtering, stabilizes three-line elements, creates mini-labels, configures the latest plugins.
 It offers a user-friendly interface, flexible configuration of components, and is available in many languages.
 -
MoreClockTool (MCT) we want to logically combine MorePowerTool (MPT) and Red BIOS Editor (RBE) and replace Wattman from AMD driver packages for easier overclocking. It also becomes clear that MCT can only be used for new AMD graphics cards. Even if at first glance our software seems quite manageable: all necessary features are still on board, but you can do without all the overhead if you really don’t need them.
-
New final version 1.3.8. MorePowerTool offers, in addition to new features, of course, a thoroughly redesigned engine that greatly simplifies the use of the tool. Although the file size has slightly increased as a result, direct implementation of various libraries directly in the tool also offers many advantages, which in general far outweigh the increased space requirements. Thus, some files that could also cause version conflicts or even be missing from the user’s system are now simply ignored.
 Later, we also added the Radeon RX6500 without bumping the version number again because of this (update 02/23/2022).
How To Uninstall AMD or NVidia GPU Drivers using DDU
Are you having trouble with your AMD or NVidia graphics card drivers? Do you want to get rid of them and start fresh with a clean installation? If so, then Display Driver Uninstaller (DDU) is just what you need. DDU is a powerful tool that will safely remove all files of installed GPU drivers from your system, allowing for easy and hassle-free driver reinstallation for your graphics card.
Let’s just jump straight on how to properly uninstall your AMD or NVidia graphics card drivers and install the latest one.
How To Uninstall AMD or NVidia GPU Drivers using DDU
Display Driver Uninstaller (DDU) is the tool we will be using in this guide.
DDU is a software utility designed to thoroughly remove any trace of AMD, NVIDIA, and Intel graphics card drivers from a system. It works in conjunction with the Windows Device Manager to help users perform clean uninstallation of their graphic driver, allowing them to avoid potential problems that can arise when installing new drivers.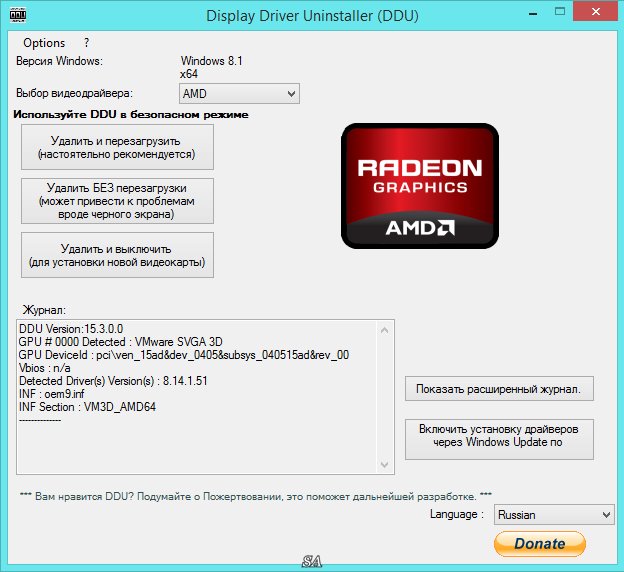
Let’s start!
What I want you to do is go ahead and download Display Driver Uninstaller and save it.
The next step is to download the graphics card driver. Depending on your GPU, navigate to either AMD or NVidia website and download the latest (recommend) driver.
Do not download the optional driver because sometimes they may not function as expected and cause issues later.
Now that you have both DDU and GPU drivers saved on your pc, I want you to go ahead and boot into safe mode.
To do that, follow the steps below:
Go to the search bar and type System Configuration, and click on it.
Navigate to the Boot tab, and tick the option Safe boot.
Open this guide on your phone, because you won’t have internet access in safe mode.
Click Apply, OK, and then Restart.
After the restart, you should be in a Safe Mode environment.
Go ahead and look for the Display Driver Uninstaller folder you previously downloaded, extract it, and run the file as administrator.
Once the program is up and running, go to the top left corner and click on Options, scroll down, and tick the option “Prevent downloads of drivers from “Windows Update”……..”.
You may notice that we already paused Windows updates on a previous step, but we are doing this just to ensure nothing goes wrong. So, once you tick that option, click OK and close.
On the right side, click on the option “Select Device Type” and choose GPU, and under that, select the manufacturer of your GPU(NVIDIA, AMD, INTEL).
Press “Clean and do not Restart“.
This process will take a few minutes to do its thing, and it will let you know when everything is done with a pop-up message.
Your screen might flash during the process, and you may notice that if you have more than one monitor, the second and so on may not be working, but that’s fine since it will get back to working in the next step.
Once you get the message that the uninstallation has been completed, press Yes to exit the program.
Now you want to boot back to normal mode, so you will have to revert to the previously changed setting. To do that, follow the steps below:
Go to the search bar and type System Configuration, and click on it.
Navigate to the Boot tab, and untick the option Safe boot.
Click Apply, OK, and then Restart.
Congratz, you’ve successfully uninstalled your graphics card drivers using DDU.
How To Install New AMD or NVidia Drivers
Your PC doesn’t have a driver installed right now, so let’s install the one you previously downloaded.
Go ahead, run the driver file you downloaded(Run as administrator), and follow the on-screen instructions. Make sure to tick the option “Perform a clean install“.
Installing NVidia Drivers
Unmark any feature you don’t need, and make sure to tick the option “Perform a clean installation” and click on Next.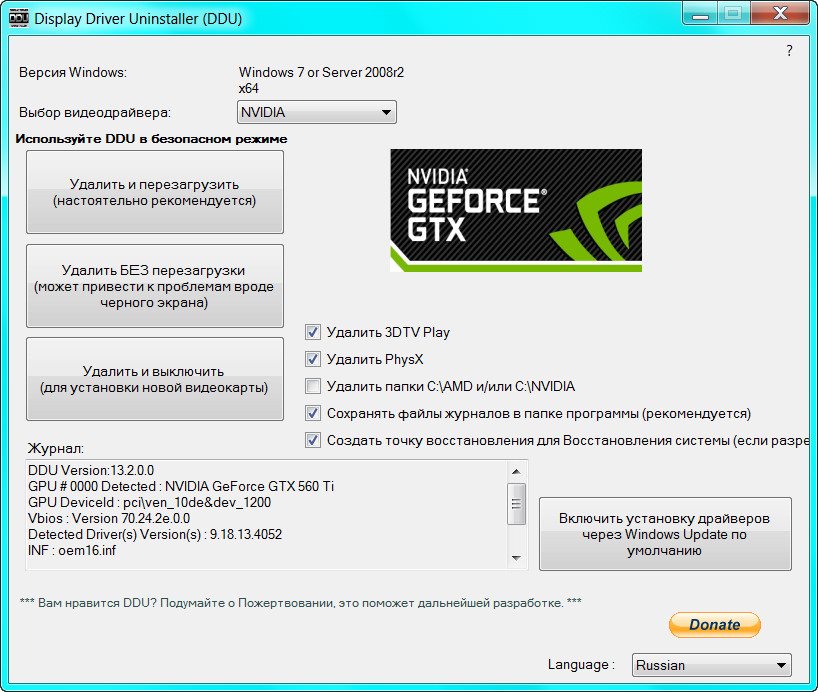
Now your screen may start flickering and going black for a few seconds. That’s normal, no worries. Once the installation is completed, restart your PC and come back to this post, so you start optimizing the Nvidia settings.
Installing AMD Drivers
Best AMD Driver Settings
Go ahead and optimize your AMD driver settings. You can either copy the settings from the photo below, or if you want a more in-depth guide, you can go ahead and read my guide on how to optimize AMD driver settings.
Here is a quick sum-up of what matters:
- Turn animations and effects off.
- Turn overlays off.
- Freesync is mostly a personal preference but if you are aiming for the lowest input lag and latency, then just turn it off. Freesync adds a tiny bit of input lag, and it’s useless if you are playing over your refresh rate. For example, if you got a 144hz monitor and you are playing on 200+ fps constantly, then freesync is useless for you, but on the other hand, if you got a 240hz monitor and you are playing on 140-200fps then it can make your whole experience smoother with the only disadvantage of adding a little bit(some times not even noticeable) input lag.

- Almost all of the settings are turned off and set to performance where applicable.
- Do some tests with the Anti-Lag option. I’ve found out that on high-end GPU’s you shouldn’t be using it, but on older ones, it really helps. So take like few minutes and do some tests with it.
- Set your resolution to your monitor’s native resolution.
- Set the refresh rate to the highest possible.
Next, go to the Tuning tab, apply any overclock or undervolt on your GPU, edit the fan curve and you are good to go.
If you are unsure how to overclock your AMD graphics card you can either follow a tutorial from Youtube or in case you are uncomfortable doing it by yourself, you can always hit me up and we can schedule an appointment and I will do it for you.
Best NVidia Driver Settings
Go ahead and optimize your Nvidia driver settings. You can either copy the settings from the photo below or if you want a more in-depth guide, you can go ahead and read my guide on how to optimize NVidia driver settings.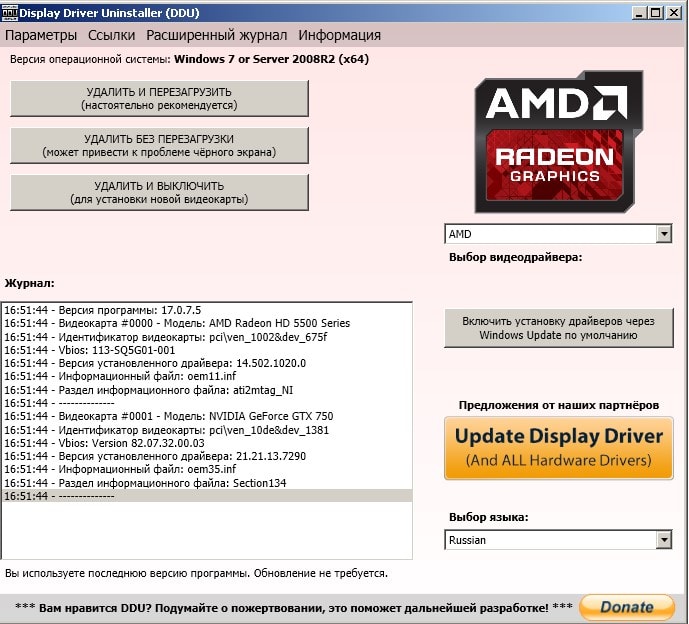
Here is a quick sum-up of what matters:
- Almost all of the settings are turned off and set to performance where applicable.
- Set the refresh rate to the highest possible.
- Set your resolution to your monitor’s native resolution.
- Choose No Scaling, unless you play on stretched resolutions.
- G-Sync is mostly a personal preference but if you are aiming for the lowest input lag and latency, then just turn it off. G-Sync adds a tiny bit of input lag, and it’s useless if you are playing over your refresh rate. For example, if you got a 144hz monitor and you are playing on 200+ fps constantly, then G-Sync is useless for you, but on the other hand, if you got a 240hz monitor and you are playing on 140-200fps, then it can make your whole experience smoother with the only disadvantage of adding a little bit(some times not even noticeable) input lag.
Download MSI Afterburner, edit your fan curve, and apply any overclocks and you should be good to go.
If you are unsure how to overclock your NVidia graphics card you can either follow a tutorial from Youtube or in case you are uncomfortable doing it by yourself, you can always hit me up and we can schedule an appointment and I will do it for you.
Radeon driver error can crash Windows
It takes time to reproduce errors and find solutions, especially rare ones. However, after weeks of investigation, AMD has finally found a solution for Radeon graphics card owners facing an Adrenalin driver bug that has corrupted their systems.
AMD Adrenalin Driver 23.2.1 provides users with significant performance improvements and new features. But unfortunately, the driver has also caused headaches for some users as it blocked their Windows installation.
The problem is not limited to the Adrenalin 23.2.1 driver. Brad Chakos, executive editor of PCWorld , encountered the same error even with the latest Adrenalin 23.2.2 driver that was released recently.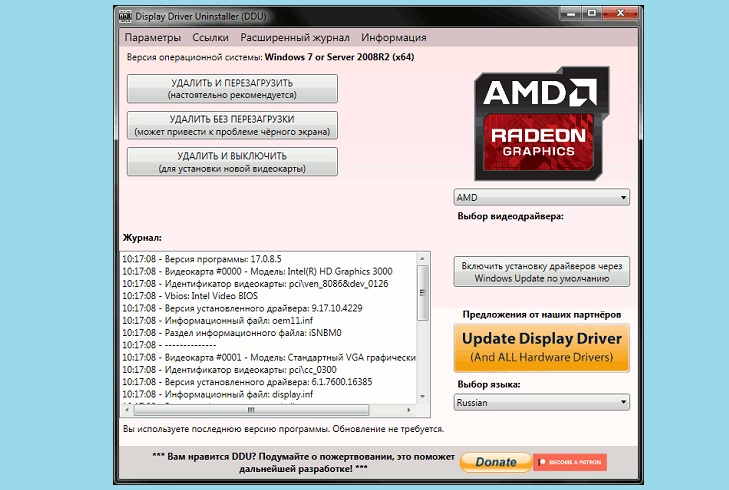 Chakos worked hand in hand with AMD engineers to identify the root cause of the problem and a temporary workaround.
According to AMD, there is a flaw in the software that conflicts with Windows Update. However, you might argue that this is a Windows bug, not an AMD bug. Windows should not update any driver if a current installation is in progress. This has been a problem with all sorts of other drivers for quite some time now. For this reason, some users disable automatic driver updates.
In the meantime, AMD has advised users not to use the Factory Reset option when installing Adrenalin drivers. The above option removes all traces of the previously installed driver, similar to what the popular third-party Display Driver Uninstaller (DDU) does, and requires a reboot. Their theory is that Windows Update installs the Adrenalin driver at the same time during the installation of the stock driver because the system momentarily lacks a display driver when it restarts.
It is recommended that you always perform a clean install of display drivers with every update. However, this feature is currently disabled in the AMD Adrenalin drivers, so heed the company’s advice and make sure you uncheck the Factory Reset feature before installing. Also, just in case, disable or pause Windows updates before installing Adrenalin drivers. AMD thinks this is a rare bug, but it’s not worth the risk until the chipmaker comes up with a definitive solution.
Windows Recovery Mode is the answer for those unfortunate users who have already taken this path. However, getting there can be tricky.
According to Chakos, AMD recommended pressing the power button to force Windows Automatic Repair to start. However, this is easier said than done. The trick is to press the power button right after the BIOS options disappear, but before Windows starts. Unfortunately, Chakos noted that pressing the power button during BIOS settings will shut down the system, and loading Windows will only result in a black screen. It took him 15 attempts to succeed, so persistence is the key to getting your system back on track.
recommendations
If you’re not the type to back up your data regularly, you should probably do so before installing the latest AMD Adrenalin drivers. This is a rare bug, and disabling «Factory Reset» seems to prevent it from happening, but are you willing to take the risk?
This material was written by a site visitor and has been rewarded.
How to find and fix AMD or ATI display drivers on Windows
ATI may be a thing of the past after AMD bought it in 2006, but their graphics cards are still used in older systems. If you have problems finding drivers or their work, we will help you.
Actually, the ATI branding was only officially retired about five years ago, so it’s not as uncommon as you might think to use ATI cards. However, even if you are using a more modern AMD card with , some of the tips below may be helpful.
Did you have driver problems with your ATI card? Please let us know how you managed to solve this problem in the comments after reading the article.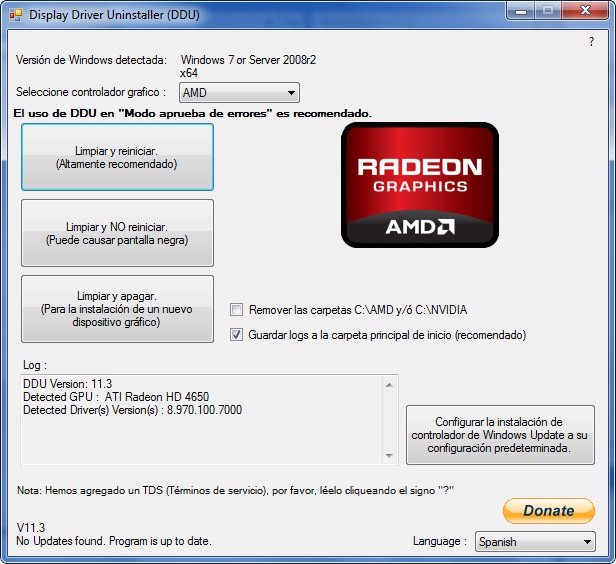
Determine your driver
If you want to know if your driver is up to date, or if you just want to know what works for you, you can easily find this information. First, do a system search for dxdiag and select the appropriate result. This will load the DirectX Diagnostic Tool and it will give you an overview of your system components.
Go to the Display tab and read the information provided in section Drivers » on the right. Version is your driver number, and Date is when that driver was published, not when you installed it. While it’s not necessary to update your drivers if you’re not having issues, you may find that newer versions have some performance improvements, especially for gaming.
Uninstall Driver
If you’ve jumped between graphics cards or installed multiple drivers, it might be worth uninstalling everything and starting from scratch to avoid clashing. This is especially recommended if you are really having display problems.
If you have AMD Catalyst Control Center installed, you can use this utility to remove the drivers. Search your system for the uninstallation of program and select the appropriate result. Now find AMD Catalyst Control Center from the list and click Change in the top bar of the list. In the wizard that opens, click Next, and then Express Uninstall All AMD Software. Follow the wizard to the end and it will remove all your display drivers and the software itself.
This is one way to do it, but for my money it’s not really the best, so don’t worry if you don’t have Control Center installed. Instead, check out a software called Display Driver Uninstaller. This works for NVIDIA. , but we will use it for AMD/ATI drivers. This program ensures that nothing remains on your system, such as random folders and registry keys.
First, download the latest software from the website, unpack the download and run the application. It will ask if you want to boot into safe mode, confirm what you are doing and your system will automatically reboot and download the Display Driver Uninstaller again. It should have detected that you are using AMD/ATI drivers, but if not then select it from the drop down list. When you’re ready to uninstall, click the Clean and restart» and let the program do its thing.
Your system will reboot and you will now be without video drivers installed. This means that we can install the latest and cleanest drivers on your system and possibly resolve any issues you may be experiencing.
Install your driver
When it comes to any driver, you should always go to the official source if you can, as they will be safe to download. Downloads In this case, go to the AMD website. You can download a utility that will automatically detect your driver, but we can also use the information we got earlier from the DirectX Diagnostic Tool to make a manual selection.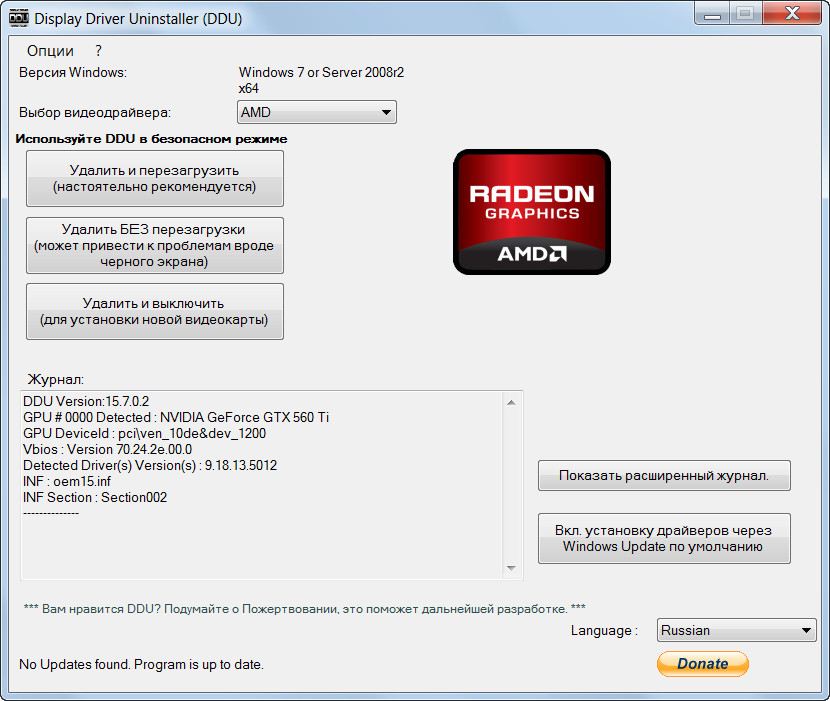
If you select manual selection, make sure you select the legacy ATI drivers and not the latest AMD drivers. You’ll find that XP is the most up-to-date operating system named in the OS dropdown, but these drivers should work up to Windows 7.
However, don’t worry if you can’t get them to work or if you have Windows 8 or higher . Install the driver independently, search the system for Device Manager, and then select the appropriate result.
Open Display Adapters, select « Properties» and go to « Driver » tab in the new window. Now click Update Driver and select Browse my computer for driver software. Now select « Let me choose» from the list of device drivers on my computer.
You will then be presented with a list of drivers. At this point, your choice will depend on your particular ATI graphics card, but ideally you should be able to select it without the Microsoft Corporation name.