8 Best Driver Uninstaller Software for Windows
What do you do when you want to get rid of software or programs on your laptop or personal computer? You delete it. But have you ever thought about why your PC or laptop still lags, is stuck, or hangs in between?
That specific software is not deleted correctly, and its cache file is still somewhere in your PC consuming space. Worry Not! We’ve brought the eight best free driver uninstaller software that you can easily download to remove unwanted software or programs from your PCs.
One can question what is a driver uninstaller and how to run it on personal computers or laptops? The answer is simple- a driver uninstaller is a software that you download to remove other driver software that is either corrupted or unresponsive in behavior, slows down your system, or crashes it.
Also Read: 6 Best Latency Checker Software for Windows
Table of Contents
Toggle
8 Best Free Driver Uninstaller Software for Windows
Driver uninstallers’ sole purpose is to delete unwanted software, but they also protect your devices by providing regular updates against malware or viruses.
Overall they enhance the user experience in many ways like smooth functioning of heavy software programs, better visual experience, fostering gaming performance, and better audio quality. Moreover, it solves lagging network problems.
So here is a list of the best free driver uninstaller software for Windows.
1. IObit Uninstaller
IObit uninstaller allows you to scan and remove software programs cluttering device space.
It is loaded with many features like the right-click menu integration system. You have to right-click on the program you want to delete, and the uninstaller automatically creates an option for you to remove it quickly.
Another bagged feature is that you can bring the Easy Uninstall feature to remove programs running in the background. You have to drag a green dot above the program then IObit will delete it on its own. After deletion, it also offers to scan the leftover data of files and cache. This is the best feature of the uninstaller.
Pros:
- It runs in Windows XP, Vista, 7, 8, 10, and 11.
- Provide numerous ways to delete unwanted programs.
- Delete programs in bulk.
- Double checks for leftover data to be removed.
- Detects bundleware.
Cons:
- Bundleware cannot be removed at once.
- Shows advertisements.
Get this driver uninstaller here.
Also Read: 8 Best Animal Identifier Apps [Find Animals in Picture]
Geek Uninstaller is another free, portable, feature-loaded software program uninstaller. This uninstaller can easily detect the file size and installation date. Thus it enables exporting installed software to HTML and allows viewing any program’s history in the registry entry.
It easily removes stubborn programs installed on your devices. Works well in Windows 11, 10, 8, 7, XP, and Vista.
Pros:
- Portable.
- No need to install it.

- Stubborn programs are easily removable.
Cons:
- The free version doesn’t support uninstalls.
Get this driver uninstaller here.
Also Read: 6 Best Fake Call Log Apps for Android
3. Wise Program Uninstaller
Wise Program Uninstaller easily removes the stored apps and software files by right-clicking on the context menu in file explorer. After deleting the program, it scans the remaining registry entries or files.
The most advanced feature in this uninstaller is- forced uninstall, where you can uninstall those programs or software that were not easy to remove without difficulty.
Enable uninstall programs in Windows 11,10,8,7, XP, and Vista.
Pros:
- The interface is easy to use.
- Easy uninstall from File Explorer.
- It can delete stubborn programs and software.
Cons:
- Visibility of ads.
- No options are available for backup after deletion.

Get this driver uninstaller here.
Also Read: 8 Best Maze Maker Software for Windows [Maze Generators]
4. Comodo Programs Manager
Comodo is a well-renowned company famous for its antivirus software, but what’s more intriguing is its Comodo Program Manager, where you can easily monitor installed programs and software.
It can remove Windows’ regular programs, software, drivers, and updates. You can also recover the same file or software from the Recycle Bin if deleted by mistake. It is available for windows 8, 7, Vista, and XP.
Pros:
- It helps to monitor uninstallation.
- Removes corrupt drivers and Windows files.
- Helps to restore deleted files.
Cons:
- Not compatible with Windows 10 and 11.
- Discontinued in the year 2011.
Get this driver uninstaller here.
Also Read: 10 Best Gerber Viewer Software for Windows
5.
 Advanced Uninstaller Pro
Next on the list of free driver uninstallers is Advanced Uninstaller Pro. It resembles the same functions of scanning, deletion, and searching for remnants of files or drivers in registry files and context menu integration.
Another feature added to its list is monitored installations. It takes screenshots and maintains reports of all the installed programs. Thus, it helps you find the software changes to other files.
Pros:
- It helps to delete remnant files.
- Monitors the whole installation program.
- The backup option is available for restoration.
Cons:
- Cluttered interface.
- Some tools are not free to use.
Get this driver uninstaller here.
Also Read: 8 Best Cabinet Design Software for Windows
6. Puran Uninstaller
Puran Uninstaller offers the same features as any other uninstaller from the list. It supports batch uninstalls, force uninstalls, quick searching of installed software, and helps remove program entries like any Driver Uninstaller.
If we talk about its intriguing features, it helps users verify whether the apps are trusted or not through code signing. The application’s signature should match the known signature of that program. Otherwise, it is suspicious.
Pros:
- Good at removing applications in bulk.
- The interface is handy.
- Easily recognizes malicious software.
Cons:
- Problems in batch uninstallation.
- Advertisements are visible.
Get this driver uninstaller here.
Also Read: 10 Best Custom Cursor Maker Software for Windows
7. Revo Uninstaller
Revo Uninstaller is both a portable and regular installer. It allows the user to uninstall software or program, open its folder and stop it from running in the background. It also contains the function of deleting the file system and registry remnants.
Pros:
- Unique in its way.
- Scans remnants to remove the program overall.
- Make a restore backup option.
- It is portable.
Cons:
- Not a batch uninstaller.
Get this driver uninstaller here.
Also Read: 10 Best Recipe Software for Windows
8. PC Decrapifier
It is a portable program that asks you to select what to delete and helps create a restoration option.
Pros:
- It helps to remove programs in bulk.
- Offers restoration after deletion.
- Portable enough.
Cons:
- Unable to uninstall programs file explorer.
Get this driver uninstaller here.
Also Read: 8 Best Network Mapping Software for Windows
Wrapping Up
There are other driver uninstallers in the market, but these were the eight best driver uninstaller software for Windows. I hope you have been through this article. It will help to choose a better option while considering optimum driver uninstallers for your laptops and PCs.
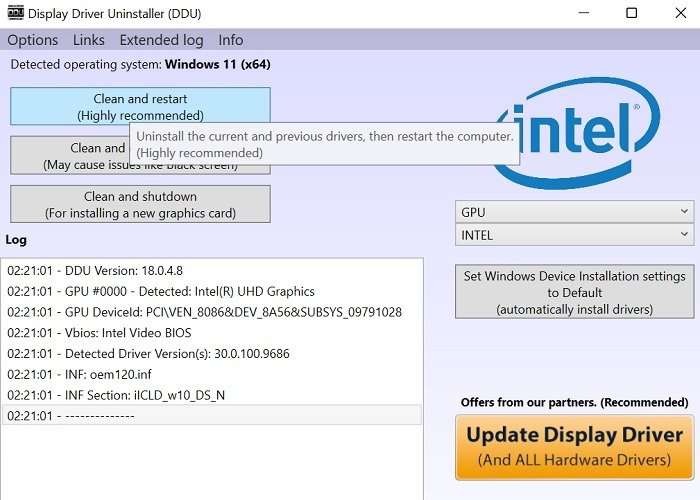
How to Uninstall Your Display Drivers on Windows 10 and 11
Quick Links
- Which Uninstall Method Should You Use?
- Use Settings to Delete Your Display Drivers
- Use Device Manager to Uninstall Display Drivers
Key Takeaways
If your display adapter has a driver uninstall tool, use it to uninstall the drivers. If not, uninstall the drivers by going to Device Manager > Display Adapters and selecting a driver from the list.
Uninstalling your display drivers allows you to fix driver issues or install your own. You can use your display adapter’s own tool to complete the process. Or, you can use your Settings or Windows Device Manager. We’ll show you how to do just that on Windows 10 and 11.
Related: How to Fix Screen Flickering in Windows 10
Which Uninstall Method Should You Use?
If your display adapter offers a driver uninstall tool, that tool should be your first choice for removing the installed drivers. If you don’t have such a tool, use Settings to remove your drivers.
If your drivers don’t appear in Settings, use Device Manager, as this tool allows you to remove your drivers regardless of whether you have an uninstall tool or not. This is a universal way to remove drivers for all your hardware devices, including display adapters.
Related: How to Uninstall and Block Updates and Drivers on Windows 10
Use Settings to Delete Your Display Drivers
Using the Windows Settings app is one way to get rid of your display drivers. In this method, you uninstall your drivers just like an app on your PC.
If you don’t find your drivers in the app list in this method, use the Device Manager method discussed below.
On Windows 10
Launch Settings by pressing Windows+i on your keyboard. Then, select «Apps.»
On the «Apps & Features» screen, click the «Search This List Box» and type the name of your display adapter’s manufacturer (Nvidia, for example). Alternatively, manually find your drivers on the list.
Select your drivers on the list and choose «Uninstall.»
Click «Uninstall» in the prompt.
Windows will begin to remove your selected drivers.
On Windows 11
Start by launching Settings using the Windows+i keyboard shortcut.
In Settings, from the left sidebar, select «Apps.» Then, on the right pane, click «Apps & Features.»
In the «Apps & Features» menu, find your display drivers. Then, next to these drivers, click the three-dot menu and choose «Uninstall.» Select «Uninstall» in the prompt to finish.
Use Device Manager to Uninstall Display Drivers
You can also get rid of drivers Using Device Manager on your Windows PC. The steps are the same whether you’re using a Windows 10 or 11 PC.
To start, launch Device Manager on your computer. You can do this by opening the «Start» menu, searching for «Device Manager,» and selecting the tool in the search results.
In Device Manager, next to «Display Adapters,» click the right-arrow icon to expand the menu.
In the expanded «Display Adapters» menu, right-click your display adapter and choose «Uninstall Device.»
In the «Uninstall Device» prompt, enable the «Delete the Driver Software for This Device» option, then click «Uninstall.»
Device Manager will begin removing your display drivers. You’re all set.
Now that your drivers are uninstalled, you can download fresh new drivers for your Nvidia or other display adapters.
Related: How to Find Official Windows Drivers for Any Device
How to uninstall drivers in Windows 10
Contents
- Method 1: Third party software
- Method 2: Device Manager menu
- Method 3: Application section
- Method 4: Print management application
- FAQ
9 0005 Method 5: Remove hidden devices
Over time, the operating system accumulates a huge number of different drivers for both built-in components and peripheral devices. Sometimes the need for such software simply disappears, or for some reason it does not function properly, which leads to the deletion of all files associated with this driver. Not all users know exactly how to uninstall such components, so today we want to acquaint you with all the available methods for achieving this goal in Windows 10.
Method 1: Third-Party Software
I would like to start by looking at third-party tools that allow you to clean the OS of unnecessary drivers. This method will be optimal for the most novice users who are not confident in their abilities or just want to simplify the uninstallation process as much as possible. There are many different applications whose functionality is focused on removing software. Unfortunately, we will not be able to consider them all, however, we suggest using the example of one program called Driver Fusion to analyze the general principles of uninstallation.
Download Driver Fusion
- Click on the link above to go to a detailed review of Driver Fusion and download the program from the official site. After the installation of the free or full version is completed, launch the software and through the left panel go to section «Driver Cleaner» .

- View the list of equipment categories here. Select the one that includes hardware with unnecessary or incorrect drivers.
- After selecting an accessory or individual device, you can view a list of installed files. To clear them, click on the dedicated button located in the center at the top of the window.
- Confirm the uninstallation by choosing «Yes» .
- When using the trial version, you will be notified that some of their files cannot be deleted. Getting rid of them will happen only after acquiring a premium assembly, which is the disadvantage of Driver Fusion.
If the shortcomings of the application discussed above are critical for you or it does not suit you for some other reason, we advise you to study the review of other popular thematic solutions on our website, where the author describes in detail the pros and cons of all representatives of such software. This review will help you choose the right software and quickly get rid of unnecessary drivers.
Read more: Driver uninstallers
Method 2: Device Manager menu
The following methods, described in today’s material, will involve using the built-in functionality of the operating system. Most often, users use the Device Manager menu to get rid of unnecessary drivers, so we’ll talk about it first.
- First, let’s pay attention to users who cannot log into Windows normally after an unsuccessful installation of drivers, which most often concerns graphics software. In this case, the removal can only be done through safe mode. In Windows 10, you enter it through a bootable USB flash drive or disk. Read more about this below.
Read more: Safe Mode in Windows 10
- After successfully entering the OS, right-click on «Start» and in the context menu that opens, go to «Device Manager» .
- Browse through the list of categories provided and expand the one to which the required equipment belongs.
- Click on the line with the RMB device and select item «Delete device» .
- Confirm its deletion in the warning window that appears.
- If in the same window there is an item «Delete driver programs for this device» , it should definitely be checked.
After that, the list of devices will be immediately updated, and you will only have to restart your computer for all changes to take effect. If you are in safe mode, exit it as shown in another instruction on our site, which can be accessed by clicking on the link below.
See also: How to disable «Safe Mode» on a Windows 9 computer0003
Method 3: Application section
In some cases, most often with graphics adapters and sound cards, software is installed on the computer, which is related to drivers, but may have a graphical interface and will be considered a full-fledged application displayed in the corresponding menu. Then, when it is removed, the drivers will also be cleaned, which allows you to achieve the desired goal. You can check the presence of such tools and uninstall them as follows:
- Open Start and go to menu Settings .
- In the new window, select the category Applications .
- Wait for the list to load and start searching. For example, in the screenshot below, you see software related to the NVIDIA driver, and removing it will cause the adapter to completely or partially stop working.
- Approximately the same applies to software from Realtek, which is associated with sound cards built into motherboards. Having found the desired line, just click on it with the left mouse button.
- Next, click on the appeared button «Delete» and wait for the loading of the branded uninstallation window.
Usually, in the uninstallation window that opens, simply follow the instructions and carefully read the various footnotes to know which components are being removed and where it will lead. When finished, remember to restart your computer to update the information. In most situations, this can be done directly from the uninstaller window.
Method 4: Print Management Application
The name of this method already suggests that it is only suitable for users who wish to remove printer drivers. Windows 10 has a separate classic application that allows you not only to view a list of all files associated with printing equipment, but also to delete unnecessary ones in just a few clicks. Sometimes this method is more effective than the previous ones, because it erases any mention of the printer in the system.
- To open the application Print Management expand «Start» and enter its name in the search.
- In the window that opens, in the left pane, expand the section Print Servers .
- Expand category Drivers .
- Review the list of available files and select the correct one.
- From the More Actions menu, select Remove Driver Package .
- Confirm your intentions to uninstall.
- Please wait for this process to finish. The screen will show the progress and all the necessary details.
- After the notification «Driver package removed» appears you can close the current window.

In the same way, any drivers associated with printing equipment and scanners that were connected to the computer with further installation of the corresponding software are cleared.
Method 5: Remove Hidden Devices
If you look at Method 2 , you will notice that you can only remove the drivers for the hardware that is currently connected to the computer through the Device Manager. As for disconnected devices, they are in a hidden state and many of them will never be connected to this PC again. There is a method that allows you to remove such hidden devices through the same menu, but for this you will have to perform one simple setup.
- Open «Start» and go to «Settings» by clicking on the designated gear button.
- In the window that opens, you are interested in section «System» .
- Go down to the very bottom of the left panel and go to «About» .
- In this window, find the line «System Information» and click on it with the left mouse button.

- A new menu will open «System» where you should click on the clickable inscription «Advanced system settings» .
- In «System Properties» on the first tab «Advanced» click on the button «Environment Variables» .
- The first block is called «User Environment Variables» . Below it is a button «Create» , click on it.
- Name the variable «devmgr_show_nonpresent_devices» and set its value to «1» then apply the changes.
- Check the current setting by looking for the created variable in the block.
- Now it only remains to display the hidden hardware and remove it. To do this, open the Device Manager in any convenient way.
- In pop-up menu «View» activate item «Show hidden devices» .
- All hidden devices will be highlighted in blue. Find the required one, click on the RMB line and click «Remove device» .

Now when you reconnect a remote device, the operating system will not recognize it and reinstallation will begin. If you no longer need to display hidden devices, you can disable this feature by unchecking the item discussed above.
As part of today’s article, we talked about five methods for removing drivers in Windows 10. You just have to choose the one you are interested in and, following simple instructions, quickly complete the task with a minimum amount of effort.
How to uninstall a device driver on Windows 10 and Windows 11
In this article, I will try to make a selection of all the current methods that will help you uninstall any device driver on Windows 10 and Windows 11. For many, this will be useful for spot-removing one driver in order to put another one in its place, and some just want to get rid of old and unnecessary drivers.
But if your case is beyond the scope of this article, please write a comment.
So you will help both us and other readers of this article on our cool portal WiFiGid.
Article for advanced users. For beginners: most likely, you do not need to remove old drivers, they do not take up much space and do not slow down the system. And even vice versa — removing some drivers can worsen the system. If you have a different opinion — welcome to the comments.
Contents
- Method 1 — Device Manager
- Method 2 — Uninstall Applications
- Method 3 — Driver Uninstaller
- Cleaning outdated drivers
- Hidden drivers
- Related videos
- Ask the author of the article
Method 1 — Device Manager
900 02 This method is a classic of the genre of any version of Windows. Everyone should know:
- Open the «Device Manager». You can find it through Windows search, or you can just right-click on the Start button and select Device Manager from the drop-down menu.

- In the list of devices we find the one for which we will remove the driver. Right-click on it and select «Remove device».
- We agree with everything, and in one of the following windows do not forget to check the box to remove the driver.
That’s it. After uninstalling, do not forget to restart your computer. Sometimes there are several drivers, and they try to pick up in turn, then it helps to repeat the procedure until the desired result is obtained, so all drivers will be removed.
The same effect can be achieved if you enter the “Properties” of the device from here, go to the “Driver” tab and try to “Roll Back” all drivers until the button is no longer available. But for me, the delete method works better for a simple user.
Method 2 — Uninstall applications
Another thing to remember is that some manufacturers install their own drivers along with the software package, for example, the same Nvidia (video driver) and Realtek (audio driver). So if you go through the «Settings» in the list of applications ( + I, and then select «Applications»), then in this list you can find our drivers. Here is an example with a video driver:
And here is our sound driver:
It is better to remove this from here. In general, removing Nvidia drivers is a separate detective story, so our website has a good long article on this topic.
Method 3 — Driver Uninstaller
The two methods above will be enough for almost any task of the average computer user, but if you need something specific, you can turn to other programs. Personally, I am not a supporter of this approach, but it can be very convenient for someone.
As an example, you can use the program Driver Fusion (we are looking for it ourselves). Among the functions there is a certain “Driver Cleaner”, in which you can already select the device you need and remove all the drivers that exist for it on your Windows at once.![]()
As an analogue, you can consider Driver Sweeper .
Perhaps this is where we will end the main ways to remove drivers. Next, I propose to move on to the nuances of the work.
Cleaning outdated drivers
Old and really unnecessary drivers can be cleaned through the standard Disk Cleanup. To do this, open «My Computer» (where the drives are located), right-click on the system drive, «Properties», «Disk Cleanup». I prefer to just open a quick command prompt and enter the command:
cleanmgr
After running the Disk Cleanup utility and searching for unnecessary junk, we find the item “Device driver packages” in the list. In my case, it is empty, but it may take up some space for you. Can be deleted:
Hidden drivers
You also need to understand that in the first main method with the Device Manager, only active visible devices are displayed, and all hidden and unconnected devices are invisible by default.