Back up and restore your PC
To learn how to back up and restore individual files on a Windows-based computer:
-
How to back up or transfer your data on a Windows-based computer
To learn how to back up and restore in Windows 10:
-
Backup and Restore in Windows 10
Back up
There are several ways to back up your PC.
-
Select the Start button, then select Control Panel > System and Maintenance > Backup and Restore.
-
Do one of the following:
-
If you’ve never used Windows Backup before, or recently upgraded your version of Windows, select Set up backup, and then follow the steps in the wizard.
-
If you’ve created a backup before, you can wait for your regularly scheduled backup to occur, or you can manually create a new backup by selecting Back up now.
-
If you’ve created a backup before, but want to make a new, full backup rather than updating the old one, select Create new, full backup, and then follow the steps in the wizard.
-
Note: Do not back up files to the same hard disk that Windows is installed on. For example, do not back up files to a recovery partition. Always store media used for backups (external hard disks, DVDs, or CDs) in a secure place to prevent unauthorized people from having access to your files; a fireproof location separate from your computer is recommended. You might also consider encrypting the data on your backup.
Create a system image
System images contain all of the info on your PC at a particular state.
-
Right-click the Start button, then select Control Panel > System and Maintenance > Backup and Restore.
-
Navigate to the location of the system image.
-
Copy the WindowsImageBackup folder to a new location.
Create a restore point
You can use a restore point to restore your computer’s system files to an earlier point in time.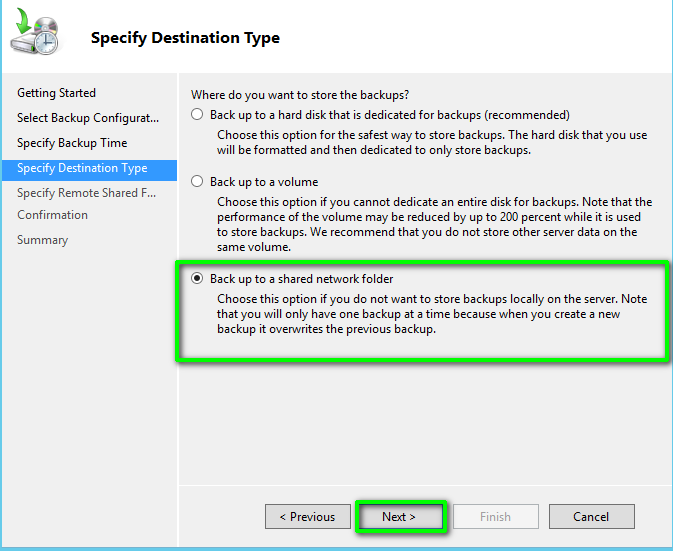 Restore points are automatically created each week by System Restore and when your PC detects change, like when you install an app or driver.
Here’s how to create a restore point.
-
Right-click the Start button, then select Control Panel > System and Maintenance > System.
-
In the left pane, select System protection.
-
Select the System Protection tab, and then select Create.
-
Right-click the Start button, then select Control Panel > System and Maintenance > Backup and Restore.
-
Do one of the following:
-
To restore your files, choose Restore my files.
-
Do one of the following:
-
To look through the contents of the backup, select Browse for files or Browse for folders. When you’re browsing for folders, you won’t be able to see the individual files in a folder. To view individual files, use the Browse for files option.
-
To search the contents of the backup, select Search, type all or part of a file name, and then select Search.
-
-
Tip: If you’re searching for files or folders associated with a specific user account, you can improve search results by typing the location of the file or folder in the Search for box. For example, to search for all JPG files that were backed up, type JPG in the Search for box. To only search for JPG files associated with the user Bill, type C:\Users\Bill\JPG in the Search for box. Use wildcard characters such as *.jpg to search for all JPG files that were backed up.
Restore a backup made on another computer
You can restore files from a backup that was created on another computer running Windows Vista or Windows 7.
-
Select the Start button, then select Control Panel > System and Maintenance > Backup and Restore.
-
Choose Select another backup to restore files from, and then follow the steps in the wizard. If you’re prompted for an administrator password or confirmation, type the password or provide confirmation.
Find files that were restored from a backup made on another computer
If you’re restoring files from a backup that was made on another computer, the files will be restored in a folder under the user name that was used to create the backup. If the user names are different, you’ll need to navigate to the folder where the files are restored. For example, if your user name was Molly on the computer that the backup was made on but your user name is MollyC on the computer that the backup is being restored on, the restored files will be saved in a folder labelled Molly.![]()
To find restored files:
-
Select the Start button, then select Computer.
-
Double-click the icon of the drive that the files are saved on, for example C:\.
-
Double-click the Users folder. You will see a folder for each user account.
-
Double-click the folder for the user name that was used to create the backup.
 The restored files will be in the various folders based on where they were located originally.
Restore files from a file backup after restoring your computer from a system image backup
After you restore your computer from a system image backup, there may be newer versions of some of your files in a file backup that you want to restore.
To restore files from a file backup that was created after the system image backup was created, follow these steps.
-
Select the Start button, then select Control Panel > System and Maintenance >Backup and Restore.
-
In Backup Period, select the date range of the backup that contains the files that you want to restore, and then follow the steps in the wizard.
Create a USB recovery drive
Windows 8.1 More…Less
Support for Windows 8.1 will end on January 10, 2023
Thank you for your loyalty. We want to help you prepare and recommend you move to a Windows 11 PC to stay supported and secure.
Learn more
If you run into problems with your PC running Windows, a USB recovery drive can help you troubleshoot and fix those problems, even if your PC won’t start.
Your PC might have come with a recovery image that’s used to refresh or reset your PC. The recovery image is stored on a dedicated recovery partition on your PC, and is typically 3 to 6 GB in size. To save space on your PC, you can delete the recovery image from your PC and use a recovery drive instead. Windows 8.1 includes a built-in tool to create a USB recovery drive. Windows will let you know how big the recovery partition is, and you’ll need a USB flash drive at least that big.
Warning: Creating a recovery drive will erase anything already stored on your USB flash drive. Use an empty USB flash drive or make sure to transfer any important data from your USB flash drive to another storage device before using it to create a USB recovery drive.
-
Enter recovery drive in the search box, and then select Create a recovery drive.
-
After the recovery drive tool opens, make sure the Copy the recovery partition from the PC to the recovery drive check box is selected, and then select Next.
Note: The check box is greyed out when your PC doesn’t have a recovery partition. The recovery drive will include only the recovery tools and a bootable image, but not a recovery image to use for refreshing or resetting your PC.
-
Insert a USB flash drive into your PC that’s at least as large as the size indicated on the screen.
-
Select the USB drive you’d like to use for your recovery drive, then select Next.
-
Select Create. The recovery image and necessary recovery tools will be copied to your USB flash drive, which will take a while, depending on your PC and the size of the recovery image.
-
When the process is done, do one of the following:
-
If you want to remove the recovery partition from your PC and free up disk space, select Delete the recovery partition. Then select Delete. This will free up the disk space used to store your recovery image. When the removal is done, select Finish.
Note: Some PCs don’t offer the option to remove a recovery partition. If you experience this, there isn’t a recovery partition on your PC that’s using additional disc space.
-
-
Remove the USB flash drive. This is now your Windows 8.1 recovery drive, and you’ll need it if you ever need to refresh or reset your PC.
 Keep it in a safe place and don’t use it to store other files or data.
Note: If your PC came with Windows 8 and you upgraded it to Windows 8.1, your recovery drive will include Windows 8, and you’ll need to upgrade to Windows 8.1after you refresh or reset your PC.
How to back up Windows 8 computers: a quick guide
To ensure that your data is not lost in the event of a system crash, it’s a good idea to create backups regularly. In Windows 8, you won’t have to install any additional software to backup important files. The operating system provides all the necessary backup features as standard. While Windows 7 included the option to create automatic backups at certain intervals, Windows 8 can also maintain a file history. This option acts like a mini backup, saving only the files in your libraries (documents, music, images, videos, and desktop).
Another option in Windows 8 is to manually create a system image. This ensures that the entire system and not only your personal files can be restored in case of a crash. We’ll show you how to use both options to create a Windows 8 backup.
Contents
- Windows 8 backups: how to configure the file history
- Windows 8: creating a backup of the entire system
- Automatic and regular Windows 8 backups using a cloud solution
- After a crash: recovering your Windows 8 backup
Windows 8 backups: how to configure the file history
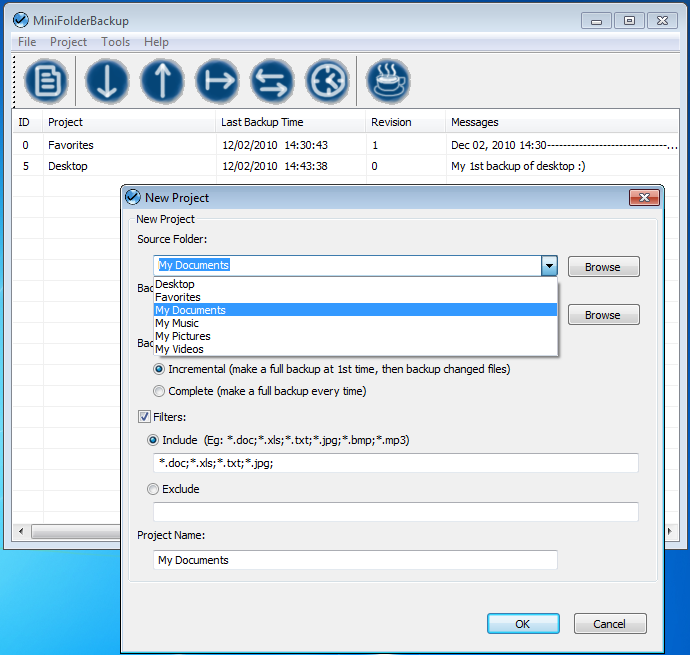
The easiest way to backup in Windows 8 backup is by making use of the automatic file history. Although this method only stores data from personal folders in the partition, Windows automatically saves the data in the background. The key steps to configuring the backup process are summarized below:
- Open the Control Panel by typing “control panel” in the Start menu search bar.
Search for “control panel” in Windows 8.
- Click on the “System and Security” section (this requires the category view).
You need to select “System and Security” in the Control Panel to access the Windows 8 backup options.
- Now, select the menu item “File History.”
You can configure the backup settings in Windows 8 under “File History.”
- Search and select a drive for your regular Windows 8 backups (“Select drive”). Make sure that the drive you intend to use is has enough storage capacity. Typically, it’s recommended to choose a drive with at least 32 gigabytes of available space.
Click on “Select drive” and then select the drive for your backups.
- If you’d like to exclude certain folders from the backup, click on “Exclude folders” in the left menu bar. You’ll be given the option to remove individual folders, such as “Images” or “Music” from your Windows 8 backup.
- Click on “Turn on.
 ” All the files in your personal folders will now be automatically saved on the selected drive in the background. If you wish to deactivate the file history process, click on “Turn off.”
Cloud backup from IONOS
Make costly downtime a thing of the past and back up your business the easy way!
Simple
Secure
Integrated
Windows 8: creating a backup of the entire system
As an alternative to file history, you have the option to create a backup of the entire Windows 8 system. This has a number of advantages. On the one hand, it allows you to quickly restore the backup on a second device following a system crash and return to your work. On the other hand, all the data on a system partition and all your system settings will be saved. This type of backup represents an exact image of your system and all the data stored on it. However, a system image needs to be created manually in Windows 8. You can do this as follows:
- Open the “Control Panel” and then the category “System and Security.”
- Click on “File History.”
- In the bottom left, click on “System Image Backup” (this requires administrator rights).
Click on the menu item “System Image Backup” in order to create a manual Windows 8 backup.
- Select a data medium where you wish to save the Windows 8 backup. You can save it to a CD or DVD and on a USB stick or (internal/external) hard drive.
Now, select a suitable drive for the data backup. Keep in mind that its storage capacity should be at least as large as the system partition.
- Click on “Start backup” to initiate the immediate backup of your Windows 8 installation. This can take a few minutes depending on the size of the system.
To begin with the Windows 8 backup, click on “Start backup. ”
”
Automatic and regular Windows 8 backups using a cloud solution
System integrated tools aren’t the only ways to perform regular backups. Nowadays, cloud backups such as the IONOS Cloud Backup provide a secure and extendable alternative. Cloud services allow you to create a Windows 8 backup at the touch of a button and can be accessed online at any time and whenever necessary. An even more convenient solution is the HiDrive Cloud Storage, which synchronizes your system via an app at regular intervals and stores your data online. You can then access this data at any time from any system.
After a crash: recovering your Windows 8 backup
The big advantage of a regular Windows 8 backup is the ability to restore important files when you need to. In Windows 8, open the “File History” option (via “System and Security” in the Control Panel) and click on “Restore personal files”. Select the data you wish to recover:
You can restore your personal data by clicking on the menu item “Restore personal files” in the left menu.
- Configuration
- Tutorials
- Security
- Windows
- Backup
Related articles
Resetting Windows 8 – it’s this easy
- Configuration
If your computer no longer works as it should, or if you want to give it away, it can make sense to reset Windows 8. In this article, we’ll show you how to go about this, what you need to do in order to keep your files or alternatively delete them – all in a few simple steps.
Resetting Windows 8 – it’s this easy
Data backups on Windows 7
- Configuration
What happens when all your data is suddenly lost? By regularly creating backups, you won’t have to worry about that. But many users underestimate the importance of this. At the same time, backups on Windows are straightforward. It’s also easy to create backups on Windows 7. You only need to change a few settings.
Data backups on Windows 7
How to find your Windows 8 product key
- Configuration
Missing your Windows 8 product key? Finding it sometimes sounds easier than it is, but if you know the right steps you’ll never miss it again. There are multiple options to find your Windows license product key – either by using an external utility program or a Windows tool. We’ll show you how to find it quickly.
How to find your Windows 8 product key
Booting Windows 8 in safe mode – how it works
- Configuration
In an emergency, safe mode in Windows 8 can prevent things from getting worse. Even with permanent blue screens and complete system failures, the special operating mode allows you to save important data and remove viruses, and may prevent the need to reinstall Windows. In this detailed tutorial, we’ll show you ways to boot Windows 8 in safe mode.
Booting Windows 8 in safe mode – how it works
Robocopy: A robust Windows tool for secure backups
- Tools
Robocopy is the most robust copy program in Windows 10, as it’s not affected by errors or other problems. Its high versatility is one reason for its popularity. Pretty much any backup project can be executed with the numerous options available in Robocopy. In addition to local backups, the command line tool also supports network and cloud backups.
Robocopy: A robust Windows tool for secure backups
How to back up and restore your computer system
How to back up and restore individual files on a Windows computer:
-
How to do it on a Windows based computer or transfer them
Windows 10 backup and restore instructions:
-
Select Start button, and then select Control Panel > System and Maintenance > Backup and Restore .
-
Do one of the following:
-
If you have never used Windows Backup or have recently upgraded your version of Windows, select Set up backup and then follow the steps in the wizard.
-
If you have already created a backup, you can wait until the scheduled backup or manually create a backup by selecting Back up .
-
If you have previously created a backup, but want to create a full backup instead of updating the old one, select Create , Full backup , and then follow the steps in the wizard.
-
-
Right-click the Start button, and then select Control Panel > System and Maintenance > Backup and Restore .
-
In the left pane, select Create system image and follow the steps in the wizard. If you are prompted for an administrator password or confirmation, enter the password or provide confirmation.
-
Copy the WindowsImageBackup folder to a new location.
-
Right-click the Start button , then select Control Panel > System and Maintenance > System .

-
Select System protection from the panel on the left.
-
Open tab System protection and then select Create .
-
In the System Protection dialog box, enter a description, and then select Create .
-
Right-click the Start button , then select Control Panel > System and Maintenance > Backup and restore .
-
Do one of the following:
-
To restore your files, select Restore my files .
-
To restore all users’ files, select Restore all users’ files .
-
-
Do one of the following:
-
To view the contents of the backup, select Browse files or Browse folders .
 When viewing folders, the individual files contained in them are not displayed. To view individual files, use command Browse files .
 -
To search for some content in the backup, select Search , enter all or part of the file name, and then select Search .
-
-
Click the Start button then click Control Panel > System and Maintenance > Backup and Restore .
-
Select Select another backup, to restore files from , and then follow the steps of the wizard. If you are prompted for an administrator password or confirmation, enter the password or provide confirmation.
-
Click the Start button and then select Computer .
-
Double-click the icon of the drive where the files were saved, such as drive C:\ .
-
Double-click the folder with the username that was used to create the backup. The recovered files will be located in different folders depending on their original location.
-
Select Choose another backup to restore files from . If you are prompted for an administrator password or confirmation, enter the password or provide confirmation.
-
In the Backup period field, select the date range for the backup that contains the files you want to restore, and then follow the steps in the wizard.
- Functionals of archiving Windows 8.1
- Creating an archive of Windows 8.1
Note: Do not back up files to a drive that has Windows installed. For example, do not back up files on the recovery partition. Always store the media used for backups (external hard drives, DVDs, or CDs) in a safe place to prevent unauthorized access to your files. We recommend that you store media in a fire-proof location away from your computer. In addition, you may need to encrypt the data stored in the backups.
Create a system image
System images contain all the data stored on your computer as of a specific point in time.
Note: To create a system image from a disk, the disk must be formatted for the NTFS file system.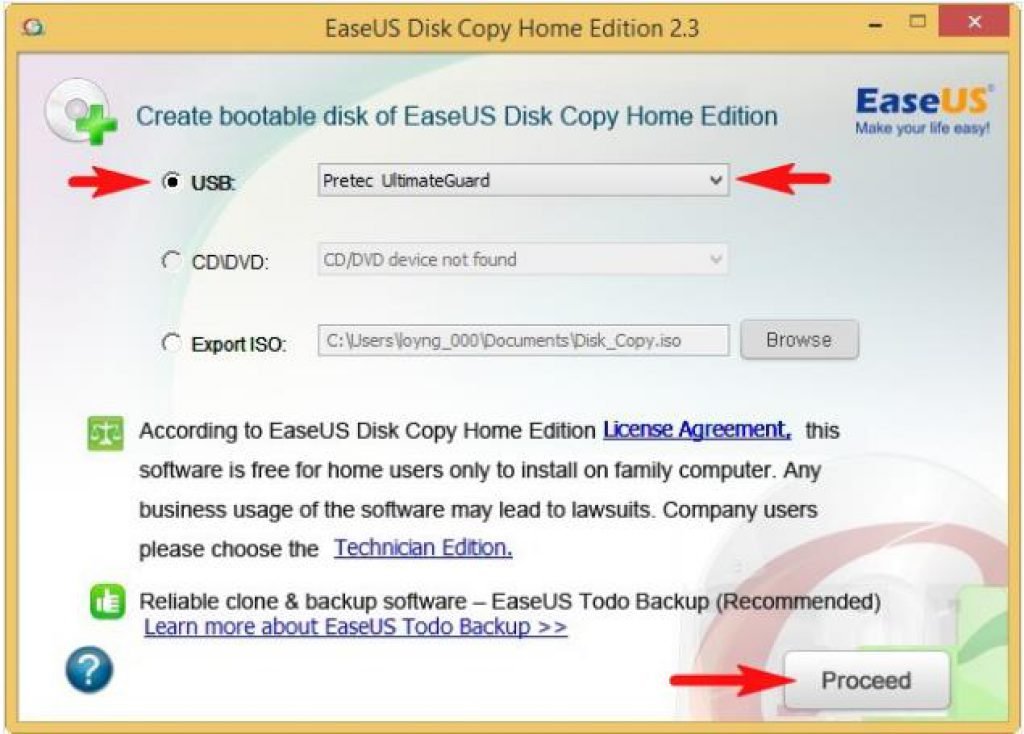 If you want to save a system image on a hard drive or USB flash drive, they must be formatted for the NTFS file system.
Storing different versions of system images
Multiple versions of system images can be stored. As space is exhausted on internal and external hard drives, the oldest system images will be deleted. To save disk space, delete old system images.
When you save system images to a network location, you can save only the most recent system images for each computer. System images are saved in the format «drive\WindowsImageBackup\ComputerName\». If you already have a system image for a computer and you create a new one for the same computer, the new system image will overwrite the old one.
If you want to keep the old system image, copy it to another location before creating the new system image, you can do the following:
Navigate to the location of the system image.
«Creating a restore point»
Using a restore point, you can restore your computer’s system files to the state they were at when the restore point was created. Restore points are automatically created every week by System Restore. They are also created when the computer detects changes, such as when an application or driver is installed.
Here’s how to create a restore point.
Recovery
Tip: If you’re searching for files or folders associated with a specific user account, you can improve your search results by specifying the location of the file or folder in field Search . For example, to search for all JPG files that are backed up, enter JPG in the Search field. To search for JPG files associated only with user Oleg, in the Search field, enter C:\Users\Oleg\JPG . Use wildcards such as *.jpg to search for all JPG files backed up.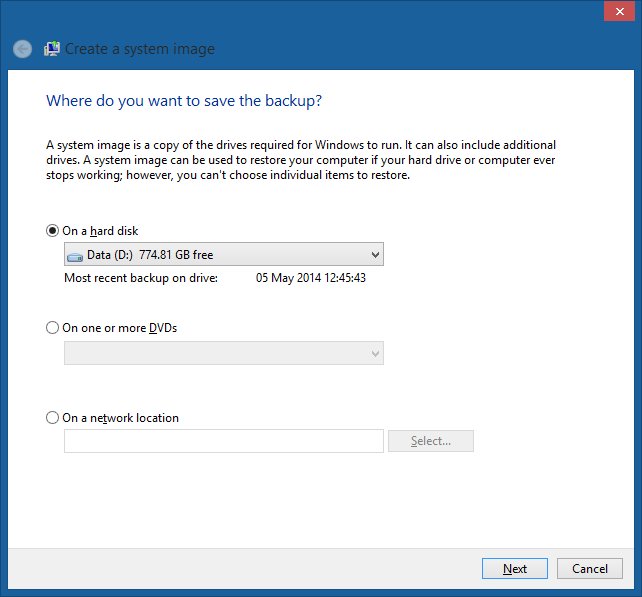
Restoring data from a backup created on another computer
You can restore files from a backup that was created on another computer running Windows Vista or Windows 7.
Finding files restored from a backup that was created on another computer
When restoring files from a backup created on another computer, they will be restored to the folder with the username that was used when the backup was created. If this username is different from the current username, you will need to navigate to the folder where the files were restored. For example, if the username 9 was used during archiving0025 Inna , and when restoring a backup on the computer using the username InnaO , the restored files will be placed in a folder named Inna .
Search for recovered files:
Restoring files from a file backup after restoring a computer from a system image backup
After restoring your computer from a system image backup, newer versions of some files may appear in the backup that you want to restore.
To restore files from a file backup created after a system image backup, follow the steps here.
How to back up Windows 8.1
Hello admin, the question is — How to back up Windows 8.1? Downloaded and installed on the computer a new operating system Windows 8. 1 for a comprehensive study. The very first thing I decided to do was to create a full backup of Windows 8.1. If something happens to her, I’ll just restore her from a backup.
I’m creating an image — everything is as written in your article Restoring Windows 8. Options-> Control Panel and I can’t find any tool to create a complete image of Windows 8.1. In plain Windows 8, there is a tool with the strange name «Windows 7 File Recovery», with which you can make a complete image of Windows 8, but in the new Windows 8.1 there is no such tool. How then to create a backup copy of the operating system? Use Acronis True Image 2013?
Hello friends! In the new Windows 8.1 operating system, you can back up your operating system using the GUI as well as using the command line.
Contents of the article:
How to back up Windows 8.1 using the operating system GUI and how to restore your computer from that backup.
How to back up Windows 8.1 using the command line.
Note: after reading the article, you can read more complete articles on this topic
1) How to create a backup image of Windows 8 using a regular backup tool on DVDs or on a portable USB hard drive and how to recover from these images
2) How to create a backup image of a Windows 8 laptop hard drive on DVD discs, as well as on a flash drive, in the Recovery program built into the laptop manufacturer.
3) How to create a backup image of Windows 8.1 using the well-known program Acronis True Image Home.
4) What problems can a Windows 8.1 backup image save you from?
Friends, I also offer you an overview of the program for backing up operating systems — AOMEI Backupper Standard, which is a direct and free competitor to Acronis True Image Home.
Back to our article. We create a Windows 8.1 backup of my computer, I have one hard drive divided into two partitions.
Move the mouse to the lower right corner and select «Search»,
then write in the «File History» input field, the result immediately appears, click on «File History»,
in the window that appears, select «System image backup.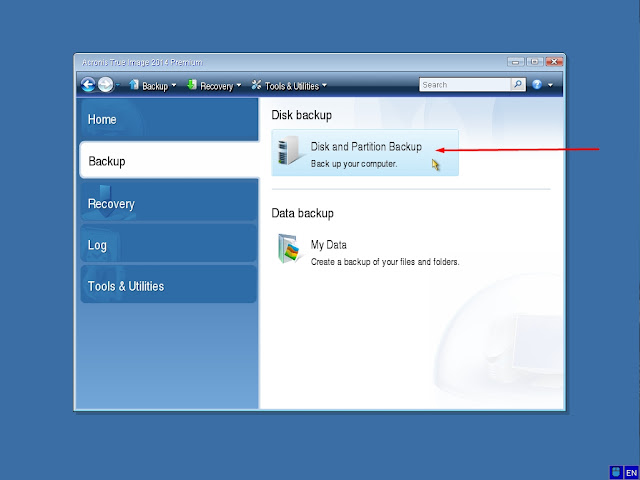 »
»
If you, like me, have one single hard disk installed in the system unit, divided into two partitions — C: and D:, then this window will appear in which the operating system will offer us to save a backup copy of the C: drive with the installed Windows 8.1 on drive D:. You can also select On DVDs. If your computer has a second hard drive or a connected USB portable hard drive, you can save a system backup to them. Choose Next.
Archive.
The Windows 8.1 backup process will begin.
And now imagine the situation, our Windows 8.1 is unstable for some reason, but we will not reinstall it, let’s do it easier, restore our computer from a backup. Change computer settings.
Update and restore.
Recovery. Special download options.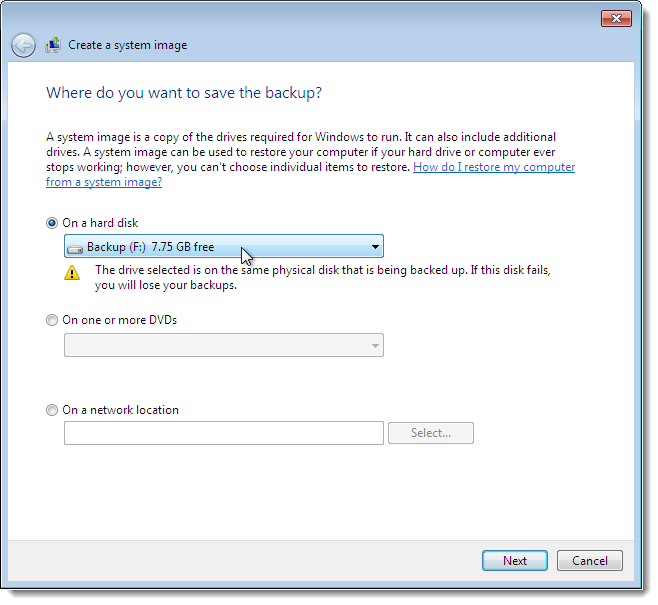 Reload now.
The computer restarts and Special boot options start. Diagnostics. Extra options.
Restoring a system image.
Use the latest available system image.
Next.
Done.
Friends, there is no need to be afraid of the command line, we only need to run one command. This method is suitable for Windows 7, Windows 8, Windows 8.1. The operating system is on my C: drive, I want to create a backup on the second drive D:
Right-click on the start menu and select Command Prompt (Admin),
enter the command:
wbAdmin start backup -backupTarget:D: -include:C: -allCritical
9006backTarget2 —
parameter responsible for the location of the Windows backup, in our case we want it to be created on drive D:
-include: C: — parameter indicating what exactly will be included in the archive backup, in our case, the disk installed operating system C:
-allCritical — parameter indicating that we have included a critical volume (containing operating system files) in the backup copy.
The hidden partition «Reserved by the system» will be archived (350 MB in size, it contains Windows 8 boot files) and drive C:
We agree Y and press Enter, archiving has begun.
Backup of volume (C:) completed successfully.
Go to drive D: and see the created backup WindowsImageBackUp .
Now another question. Imagine a situation, due to a system failure or a virus attack, you cannot boot your Windows 8.1 operating system. Then let’s restore it from a backup!
How to restore Windows 8.1 from a backup
Boot from the Windows 8.1 installation disc or recovery disc. Press any key to boot from CD or DVD, press Enter.
Next.
System restore.
Diagnosis.
Additional options.
Restoring a system image.
Use an available system image. If you have more than one, check the box — Select a system image. Further.
Next.
Done.
All data on the recovery disks will be replaced with data from the system image. Yes.
Restoring drive C: from a backup!
How to make a backup copy of Windows 8.1 • Teaching to a computer
Content
9050 it is a way to protect the operating system from unforeseen troubles. These may be a system failure, inexperienced or unfriendly actions of third parties, an attack of various viruses. There are many software solutions for Windows backup on the software market, but the system itself, among its arsenal, provides for the ability to create a backup and roll back to it. And this feature is the standard archiving function. Let’s see how it works in Windows 8.1.
Windows 8.1 backup functionality
So, Windows 8.1 has an archiving functionality with which you can create system backups, in the terminology of this function — archives. Archiving Windows 8.1 inherited from its predecessor Windows 7, but it inherited it significantly redesigned. As in Win7, in Win8.1, as part of the system backup operation, the different contents of the boot and system partitions are packed into separate virtual disks. But in Windows 8.1, these are already virtual disks of the new VHDX format, and not VHD, as it was in Windows 7.
In Windows 8.1, backup has lost the functionality of the scheduler, however, it returned in Windows 10. But it acquired the ability to store archives not only on the local disk of the computer and removable information devices, but also in network folders. Well, along with the recovery environment changed in Windows version 8.1, the method of restoring the system from previously created archives has also changed.
How to create a backup, ie. archive in Windows 8.1? And how do you restore from a backup?
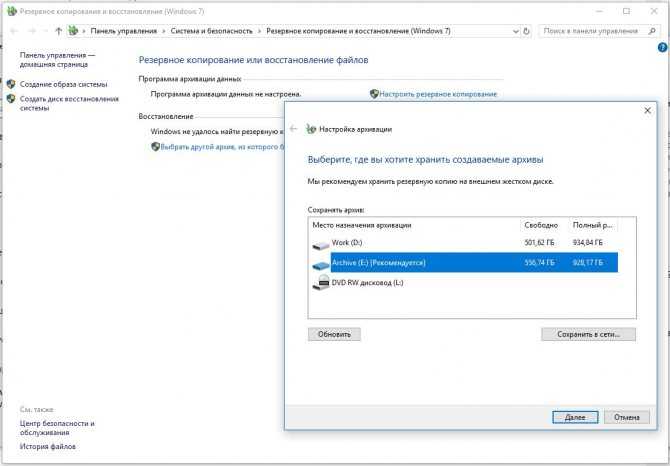
Creating a Windows 8.1 archive
In the control panel, open the « File history » section.
At the bottom of this section, click « System Image Backup «.
Select a storage for the archive, in our case it is a regular non-system partition of the internal disk.
And click « Archive «.
We are waiting for the archiving to complete.
The created archive will be contained in the location we specified as storage in the folder « WindowsImageBackup «. If we specified any partition of a local or external disk as storage, then this folder will be stored at the very root of the partition we selected.
Well, actually, that’s it. If Windows 8.1 is working properly, we can periodically create new archives so that if the question of using the archive suddenly arises, i.e. about the restoration of the system, it has undergone a rollback to its closest and most current state. Each new archive created in this way, if we do not change the storage, will overwrite the old archive, i.e. update it to the current state of Windows 8.1. Well, in order to store several archives of the system with its earlier or later state, you can simply specify different storages, for example, different disk partitions.
Restoring Windows 8.1 from the archive
If in case of problems we need to restore the system, we can do it from its recovery environment. This one starts from the current working system and on the installation media with Windows 8. 1 or 10. If the system works for us, we launch « Computer settings «. In it, go to the section « Update and recovery «, open the subsection « Recovery «. And here we need the block » Special download options «, in this block, click» Restart now «.
But what if there is a serious problem with the system if it does not start? Normally, the Recovery Environment starts up automatically in the event of system failures. But if it doesn’t start, you can use the installation flash drive or optical disc of Windows 8.1 or 10. Boot from a USB flash drive or optical disc, go through the first stage.
And click « System Restore «.
And now, in fact, by any of these methods we will get into the recovery environment. Here we need to select the item » Diagnostics «, then — » Additional parameters «.
Next — « System Image Recovery «.
In our case, we select the only Windows 8.1 installed on the computer as the target system.
The archive recovery wizard will start. If we have only one archive stored in one repository, then it will be selected by default as the last one available. Here just press « Further «.
Again « Next «.
And — « Done «.
We confirm the start of the Windows 8.1 restore operation from the archive.
We are waiting for the operation to complete. We restart the computer.
Well, with a new start, we will enter a working restored operating system.
Restoring individual system files
As already mentioned, the actual archive images of the system and boot partitions are contained in VHDX virtual disk files. Experienced users, if necessary, to replace individual system files with their earlier versions from the saved archive of Windows 8. 1, can connect the VHDX virtual disk file for display in the system. Well, copy everything you need from it.
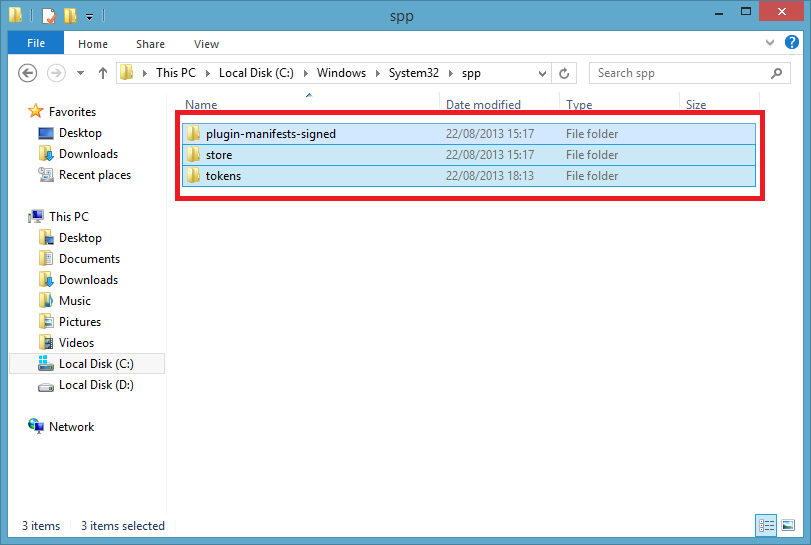
To do this, go to the archive storage folder » WindowsImageBackup «, then to the subfolder with the username and to the subfolder where the archive images are already stored directly in VHDX files, it will be called » Backup » with an addition as a date creating an archive and identifier. And in this folder we will have files in the VHDX format of the system and boot partition. By double-clicking, you can mount the VHDX file, for example, the system partition so that it is displayed in our Explorer.
If it doesn’t automatically get a drive letter, then go to disk management and manually assign a letter to the virtual drive.
And then in the explorer on the mounted virtual disk of the archive we can search for everything we need.
And when we no longer need the mounted virtual disk, then we simply disconnect it in disk management.