How to Open Ports on Windows 10 PCs
Firewall ports are closed by default
by Radu Tyrsina
Radu Tyrsina
CEO & Founder
Radu Tyrsina has been a Windows fan ever since he got his first PC, a Pentium III (a monster at that time). For most of the kids of… read more
Updated on
Reviewed by
Vlad Turiceanu
Vlad Turiceanu
Editor-in-Chief
Passionate about technology, Windows, and everything that has a power button, he spent most of his time developing new skills and learning more about the tech world. Coming… read more
Affiliate Disclosure
- Firewalls are meant to protect users from any viruses or threats that could compromise their PCs.
- The firewall’s ports can be manually opened by users.
- An open port allows programs and apps to communicate with the network.
- We will show you in our guide how to open ports on Windows 10.
If you’re looking for a simple solution for opening firewall ports in Windows 10, you’ll find all the necessary details in this article.
Opening Firewall ports allow apps and programs to communicate with the network. So, if some of your apps and programs fail to launch, opening firewall ports is one of the first troubleshooting solutions that you can use.
How can I open a port in Windows 10?
Users can manually allow a program to get access to the Internet by opening a firewall port. All you need to know is what port it uses and the protocol to make this function.
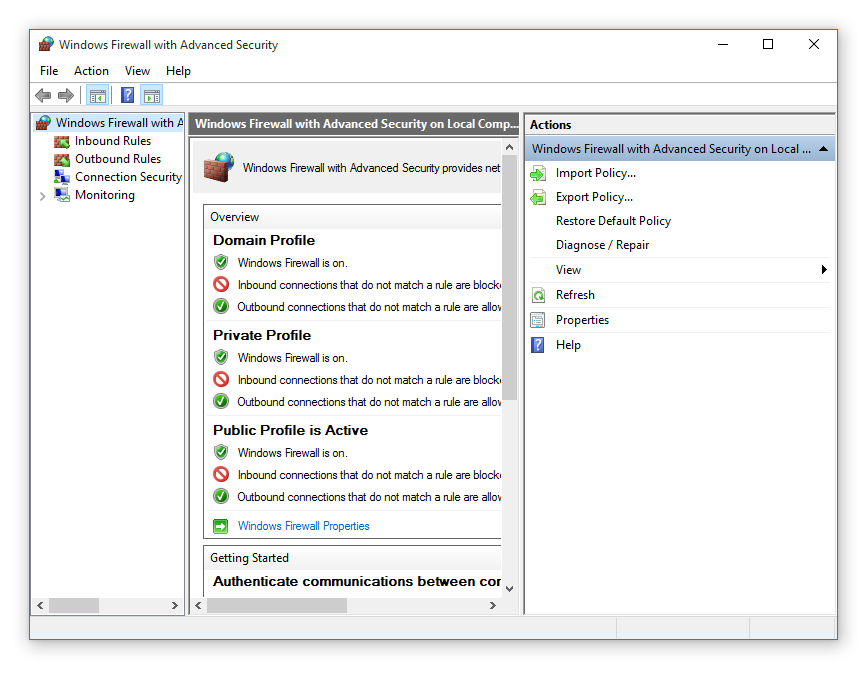
1. Navigate to Control Panel> System and Security > Windows Firewall.
2. Go to Advanced settings.
3. Right-click on Inbound Rules > select New Rule.
4. Add the port you want to open and then click Next.
5. Choose the TCP or UDP protocol and the port number, then click Next.
6. Select Allow the connection and then hit Next.
7. Choose the network type, then click Next.
8. Name the rule and press on Finish afterwards.
These are all the necessary steps for opening a port in Windows 10. Remember that you can also use this method for blocking programs or ports.
Why should I use a Firewall on my PC?
Firewalls are targeted at protecting your network from various threats coming from outside and trying to get in or threats coming from inside trying to get out. A threat does this by blocking network-enabled ports.
Every time a program tries to communicate through this port, the firewall verifies its database rules to check if it is allowed or not.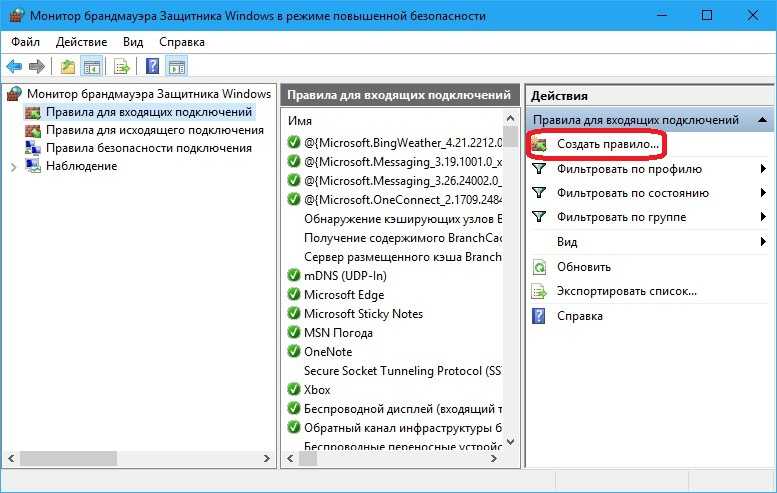 If it doesn’t know, it will ask the user and that’s why you sometimes see a prompt asking you if a certain program is allowed or not to access the Internet.
A firewall is an essential issue regarding computing and every PC must have one installed. This is the reason why Windows has a firewall bundled and active as standard.
Check out our articles on the best firewalls and the best network security antiviruses to use on Windows for more information.
Windows firewalls must occasionally be told to allow a program to communicate with the network and this is the point where opening ports step into the picture.
We hope that our article helped you open ports on Windows 10 devices. Let us know in the comments section below if you have any questions.
Was this page helpful?
Start a conversation
Share
Copy link
Newsletter
Software deals
Friday round-up
I agree with the Privacy Policy regarding my personal data
How to Check Which Ports Are Open on a Windows 10 PC
Maybe you’re troubleshooting a network connectivity issue for a specific program, and you need to check whether its port access is open. What if you need to confirm that your NAS device can communicate with your Windows 10 PC? Whatever reason you need to look for open ports, this article provides detailed steps to check them on Windows 10 using several available tools, either built-in or free to download and use.
There are a couple of handy tools to scan open ports in Windows. You’ll see how to do so on NetStat, PortQry.exe, and NirSoft CurrPorts.
Using NetStat to Check for Open Ports in Windows 10
One of the simplest ways to check for open ports is to use NetStat.exe. You can find this tool in the System32 folder on Windows 10. With NetStat, you can see open ports or ports that a specific host uses.
Netstat is short for network statistics. It shows protocol statistics and the current TCP and IP network connections. The two commands needed to identify open ports in netstat -ab and netstat -aon.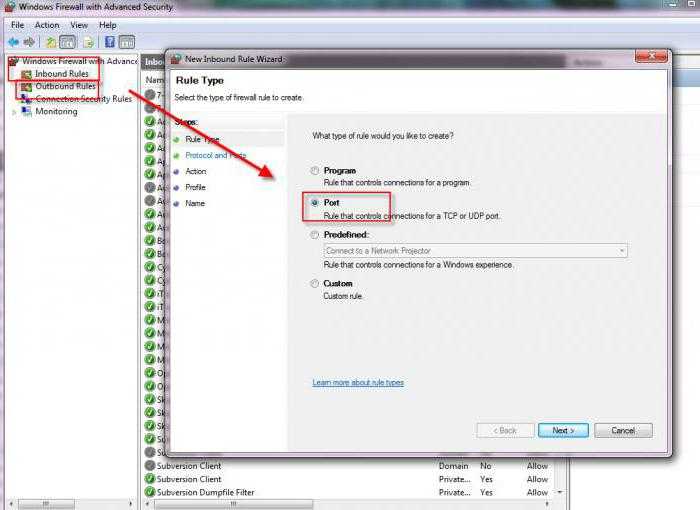
Here’s an explanation of what each letter from the commands means.
- “a” displays all connections and listening ports.
- “b” shows all executables involved in creating each listening port.
- “o” provides the owning process ID related to each of the connections.
- “n” shows the addresses and port numbers as numerals.
Two commands are helpful, depending on your needs. The second option (netstat -aon) additionally provides a process ID you can later search for in the Task Manager.
Using ‘netstat -ab’ to Identify Open Ports
The first option you’ll use (netstat -ab) lists all active ports and the process’s name that uses them.
- In the Cortana Search Bar, type the following:
cmdthen select Run as administrator. - Now, type
netstat -ab, then press Enter. - Wait for the results to load.
 Port names get listed next to each local IP address.
 - Look for the port number you need; if it says LISTENING in the State column, it means your port is open.
Using ‘
netstat -aon‘ to Identify Open Ports
The second option(netstat -aon) includes process IDs, which you’ll use to identify a task/application in the Task Manager. Some processes may be challenging to identify using netstat -ab, so netstat -aon gets used. As referenced above, “a” represents all connections and ports, “o” represents the owning process ID, and “n” represents the addresses and port numbers as numerals.
Using netstat -aon comes in handy when netstat -ab isn’t enough to identify what program has a specific port tied up. In that case, follow these steps:
- In the Cortana Search Bar, type the following :
cmdthen select Run as administrator if not already opened.
- Once inside, type the following command without quotes:
netstat -aonthen press Enter. - You will now see five columns: Protocols, Local Address, Foreign Address, State, and PID (Process ID). In the Local Address, you have a port number. For example: 0.0.0.0:135. Here, 135 is the port number.
- In the “State” column, you will see whether a specific port appears opened. For opened ports, it will say LISTENING.
- To verify which app uses a particular port, find the PID (the number from the last column) for a specific port.
- Open the Task Manager by pressing Ctrl + Shift + Esc.
- Go to the Details or Services tab to see all processes on your Windows 10 system. Sort them by the PID column to find the PID for the port you’re trying to troubleshoot.
 You can see which app uses the port in the Description section.
Checking for Open Ports with NirSoft CurrPorts
If you find the Command Prompt solution too tricky, a simpler alternative is to use NirSoft CurrPorts. This tool displays your currently opened ports (TCP, IP, and UDP). You’ll also see information about a specific process, such as name, path, version info, etc.
This tool has been around for quite a while and is available for Windows 10. You can find the NirSoft Currports download link at Nirsoft’s website towards the bottom.
Note: Ensure you download the correct version. They have 32-bit and 64-bit versions. The app is portable. Unzip the folder, then run the executable file.
Once you have CurrPorts running, perform the following steps:
- You’ll see a list of your computer processes. Sort them by Local Port to search through them more easily.
- Now, find and select the port you are troubleshooting.

- You can now see all the process’ details such as its Process Name, Process ID, State, etc.
Another way is to double-click on a process to see its details in a single window.
Checking for Open Ports Using PortQry.exe
PortQry.exe is another handy tool that lets you scan open ports. You download PortQry (scroll down to see the download) and extract it to run it through the Command Prompt. You can also download PortQryUI (more on that below) as an add-on if you don’t want to use the command line, which is a Graphical User Interface (GUI) for PortQry.
With portqry.exe, you insert specific parameters that you find in the executable’s folder.
How to Run PortQry.exe using Command Prompt
- Download PortQry, then unzip the files to your chosen location. The default is “C:\” but can be changed if desired.
- If in the default directory, type
cd c:\PortQryV2\in the Command Prompt to set the location of the executable file.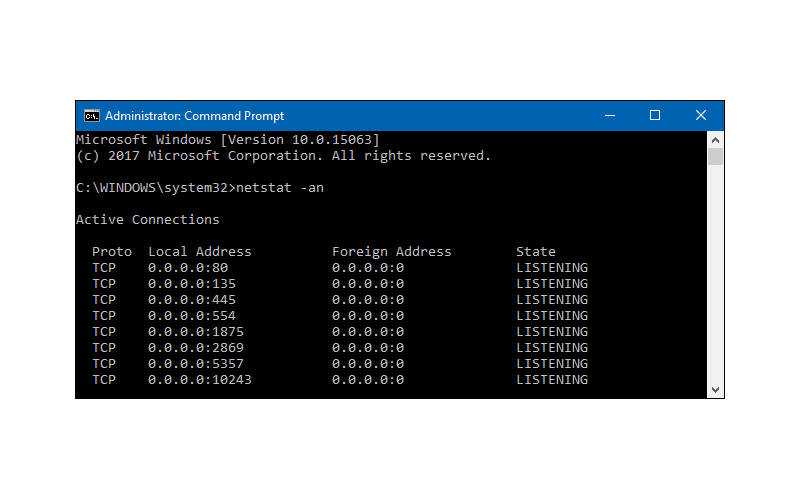
- If in a custom directory, type
cd [drive letter]:\[folder1]\[folder2]\but replace all content in the square brackets with actual names. Include all folders needed. - Type
portqry.exe -localto launch it. This command displays used TCP and UDP ports for the specified localhost. - In addition to all parameters that NetStat displays, Portqry also shows you several port mappings and the number of ports in each state.
- You can also check for open ports for a remote host. In the Command Prompt, just run portqry.exe -n [hostname/IP]. Ensure you replace the hostname and IP with the remote host’s name and IP address.
- If you want to look for a specific port, you can add -e [port_number] to the command line.
How to Run PortQry.exe using the UI Add-On
For those that prefer to use a graphical interface instead of commands when using PortQry.exe, Microsoft offers an add-on named PortQryUI.
The PortQryUI add-on already includes the necessary version of PortQry, so you don’t need both downloads to use it.
- Download PortQryUI, then unzip the files to your chosen location. The default is “C:\” but can be changed if desired.
- Launch Windows Explorer, navigate to the PortQryUI.exe file location, and click it to launch the UI.
- To view TCP and UDP ports for the localhost (your PC), leave the Destination IP as 127.0.0.1, so it passes through the network’s devices and configuration settings (network card, router’s config, etc.) and not just read from the local PC.
- To view all TCP and UDP ports, click on Manually input query ports, then type 1-65535 in the Ports to query section. Also, select TCP, UDP, or Both from the Protocol dropdown.
- To filter your TCP/UDP ports list, click on Query predefined service, then choose which service to query.
 You can only select one at a time.
 - You can also check a remote host by changing the FQDN or domain in the query box at the top.
- If you want to check a specific port, enter the number in Ports to query.
In closing, knowing how to check whether a specific port is open or not can come in handy if you’re troubleshooting a program’s network connection or need a port for a particular game. Luckily, it’s not as challenging to do as it looks.
Out of all the options listed above, Netstat is recommended as it’s built into the OS and usually gives you all the details you need. There might be a few extra steps required compared to CurrPorts, but you don’t have to download anything, and there’s nothing to screw up.
Windows 10 Open Ports FAQs
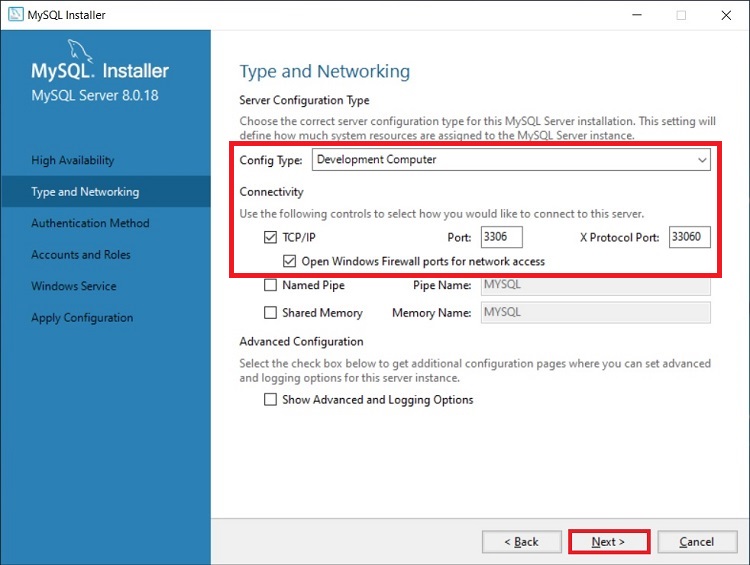
How do I check if Port 3306 is open in Windows 10?
To verify if port 3306 is open, you can use NetStat, CurrPorts, or PortQry.
We recommend NetStat, as you won’t have to download new software for this. Run the Command Prompt as administrator. Type the command: netstat -ab and hit Enter. Wait for the results to load. Port names will be listed next to the local IP address. Just look for port 3306. You can press Ctrl + F and type 3306 in the word box to search for it. If the port is open, it will show in the results as LISTENING.
To check if port 3306 is open via CurrPorts, just sort by Local Port, then find port 3306. If the port is available, it will show in the list.
To use PortQry.exe to find port 3306, use the Command Prompt. Type -e [3306], then press Enter.
What are Predefined Services in PortQueryUI?
Predefined Services offers details on a small handful of predefined services such as Domains and Trusts, Networking, Exchange Server, etc. The option queries all required ports for the specified services and displays them in the window of the UI.
For those who don’t know where Predefined Services resides, it is directly under the Help tab and in the UI. Both serve different needs.
The Help tab option immediately displays all predefined services without testing any ports. It is a quick reference to each port name, value, and protocol used for each listed service.
The UI option lets you specify what service you want to view and see port statuses.
How to open ports in Windows 10: step-by-step instructions
A huge amount of information is transferred from a computer to the Internet and vice versa. This is done with the help of a service in which network-dependent processes look for free TCP and UDP transport protocols, and through them they access the network. That is, the data is sent to remote ports at the destination or to the web resource to which the connection is being attempted, and then back to the local ports. They are used by all applications to communicate with the Internet.
The operating system manages the ports and ensures that traffic is routed through the «correct» ones so that those processes can connect to the ones they need.
Why might I need to open a port?
Windows Firewall protects your computer from threats (both network traffic and local applications that try to access it). When one device connects to another on the network, a port number is specified to let the receiving end know how to process the traffic. While an IP address tells traffic how to get to a particular device on the network, the port number tells the receiving end which program is receiving that traffic.
The firewall blocks all unnecessary network ports, and every time an application or service tries to communicate outside the device, it checks to see if there is a certain rule in the database that allows or denies access to the network. If it can’t find the rule, it’s prompted to define and grant or deny permission.
Most ports are closed by default to prevent intrusion by viruses or malware. However, the user may encounter some connection issues, especially when trying to set up a VPN on a computer or when using a game server. Therefore, it is necessary to allow limited traffic to be received/sent through the firewall. And for this you need to open the port.
System firewall
If you are using Microsoft Defender and your application, game, or server requires one or more ports to be open, follow these simple steps.
Important! You should check the application’s support documentation to see which ports and protocol type you need to open before proceeding. In addition, you can quickly confirm whether a port needs to be opened by temporarily disabling the firewall, and if the application is running with guard disabled, this means that a new rule needs to be created.
- Click on the start menu and select system settings (gear icon). Or just press the key combination Win + I.
- Open the Security section.
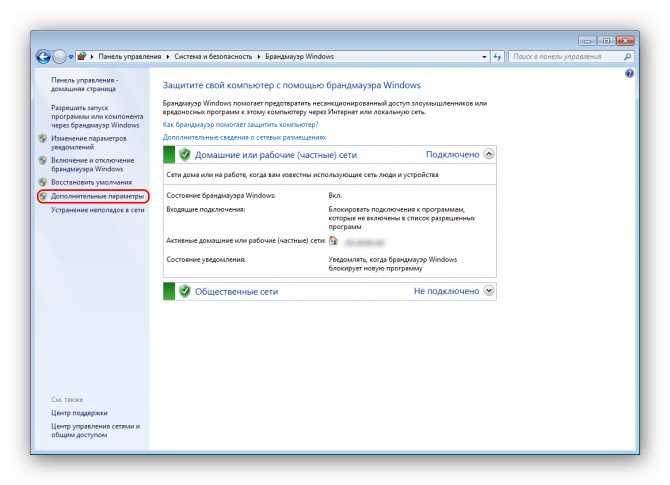
- Go to the Windows security tab. Click on «Firewall and Network Protection».
- Select additional settings.
- Left click on the rules for incoming connections on the left navigation bar.
- In the Actions section of the right pane, select the New Rule option.
- In the new window, click on the «Port» option. Press the «Next» button.
- Set the appropriate protocol (TCP or UDP) depending on the application. Usually this is TCP.
- Enter a number in the Specific Local Ports field. If the application requires opening several, you can enter as many as you need, provided that each of them is separated by a comma (4500, 4600, 5000). If you need to specify a range of ports, use a hyphen (3000-3100). Click «Next».
- Select the «Allow connection» option. Press the «Next» button.
- Specify the network type to apply the rule. Usually this setting is left with the default settings.
 Click «Next».
- Enter a name for the rule. Click on «Next».
- Click the Finish button.
After completing the above steps, incoming connections will be allowed to the application through the port opened in the firewall.
If the application requires a specific outgoing port, you can use the same instruction, but in step #5 select the rules settings for outgoing messages.
When the user does not know which port to use, it is necessary:
- After selecting the connection rules, check the «For the program» option. Click «Next».
- Specify the path to the program. Click on «Next».
- Repeat steps from point 10.
In the firewall of the router
The method is relevant if the user encounters a connection timeout in the game. This error often occurs in Minecraft.
You must first find out the IP address of the router:
- Click the «Start» button and select the «Settings» option in the context menu.

- In the window that opens, go to «Network and Internet» — «View network properties».
- Then look at the IP address next to the «Default Gateway» item.
Next, go to the router settings page:
- Open your preferred browser and enter the IP address in the address bar.
- Enter the username and password on the login page. The data is indicated on the box or the device itself.
- A list of partitions is displayed on the screen.
- Find among the options and go to Port Forwarding.
- Enable the option.
- Enter the following information here: name, type/service (TCP, UDP or both), incoming/start (port number; if greater than 1, enter the lowest number in the range), private/end (port number; if greater than 1 , enter the largest number in the range).
- Enter the computer’s IP address.
- Save settings.
When prompted, you may need to restart your router for the changes to take effect.
Important! If none of the methods solved the problem, it is recommended to use the Restoro Repair Tool, which can scan repositories to replace corrupted and missing files. This works in most cases where the issue occurs due to system corruption. Restoro also optimizes the system for maximum performance.
How to check open ports?
Windows 10 records the applications listening on the port, and this record can be checked by the user at any time. There are many ways to check. But below are two of the simplest methods that do not require the installation of any third-party utilities.
Using the AB command
The «AB» command is used to determine which application is listening on a particular port on a computer. The result will be the name of the executable that made the request. For this:
- Press the Win + R keys to open the Run window.
- Type cmd and press Shift+Ctrl+Enter to grant Administrator rights.
- Add the netstat -ab command and press Enter.

- Wait until the list is displayed. The name of the executable will appear below the port information.
Using the AON Command
There is another command that can be used to identify the process that is listening on a specific port. This command will show the PID number instead of the executable file name. For this:
- Press Win+R to open the dialog box.
- Type cmd and press Shift+Ctrl+Enter to give the tool Administrator rights.
- Add netstat -aon to the command line, press Enter to execute it.
- The list will be displayed with the PID number at the end.
Listening state — the system monitors and controls whether there are connection requests.
Established state — successfully used.
time_wait state — A timeout error has occurred.
Close wait state — connection is unstable and will close soon.
Now you need to write down the PID number in a notepad, and then
- Click on Win + X and select «Dispatcher» from the list.

- Click the Details tab to view all running executables.
- Match the PID number with the number in the list (ID), right-click on the executable file and open its location.
The folder will appear on the screen and you can see what application is listening on the port.
Open a port in the Windows 10 firewall
Today we will look at how to open a port in the Windows 10 firewall in various ways.
Open a port in the firewall through the control panel “Run” (run is called by the Win + R keys) write
firewall.cpl and press the Enter key.
2. On the left side, select “Advanced options”.
3. Do you open the port for incoming or outgoing connections? Outgoing refers to connections initiated by the local computer, incoming — initiated by a remote computer. If you need to open a port for outgoing connections, select “Rules for outgoing connections” on the left side and continue to do what is written below. If you need to open a port for incoming connections, select «Rules for incoming connections» on the left side. On the right side, click on «Create Rule».
4. Put a dot next to “For port” and click “Next”.
5. Next to «Specific local ports», enter the port you want to open and click «Next».
6. Put a dot next to «Allow the connection» and click «Next». If you want more settings for a given port, choose who to give access to, etc. — put a dot next to «Allow a secure connection.»
7. Select which network profiles to apply the rule to and click Next.
8. Give and write a name for the rule you created to make it easier to find in the future, you can also add a description, which is optional. When finished, click “Finish” and you can close the firewall, the rule has been created and is already working.
Open a port in the firewall using netsh
Netsh is a command line utility that allows you to change many network related settings.