How To Install Windows XP On An SSD
By
Marc Thomas
/ August 18, 2021 August 18, 2021 /
4 Comments / Computer Hardware, How-To, Microsoft Windows, PC Computer Hardware, Windows XP
Windows XP On SSD
Why on earth would anyone want to install Windows XP in this day and age, let alone on an SSD? My answer is — why not? If you’re a tech enthusiast and more particularly if you have an interest in retro PCs, then this should be right up your street. I have a couple of very old PCs, one of which I cobbled together a couple of months ago based on a Pentium 4 3.0 GHz socket 478 on an Intel D865GBF motherboard (March 2003) which just happens to have two SATA ports, making a Windows XP installation to SSD an easy task.
And by the way, don’t listen to all the naysayers who say it’s dangerous to install XP in 2021 and that the moment you connect to the Internet, hordes of demons will be unleashed unto the world. Frankly, it’s more dangerous crossing the road nowadays.
Windows XP Needs MBR
Without going into the finer details of MBR vs GPT, suffice to say that out of the two partition structures, Windows XP will only recognise your hard drive if it is initialised to MBR. So with that in mind and knowing that my Crucial SSD had been used in a modern machine with UEFI and set up as GPT, I connected it to a new PC running Windows 10 and opened a command prompt as administrator. These are the steps to follow and it’s important to ensure that the correct disk is selected, otherwise, you will end up in a world of pain.
Install SATA Drivers
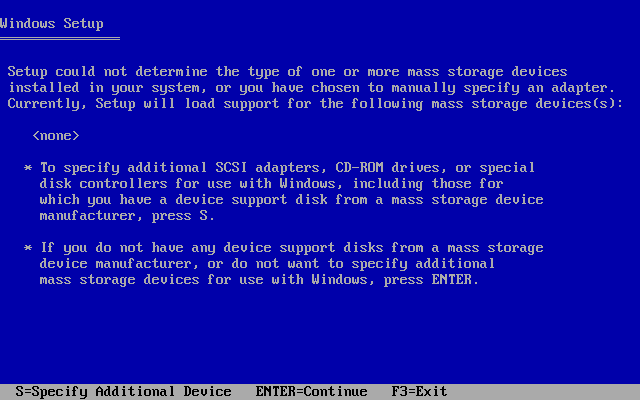
Windows XP doesn’t have native SATA/RAID drivers, so I downloaded the correct Intel drivers and copied them to a floppy disk. Once the Diskpart process had been completed, I then connected the SSD to the retro machine, inserted the Windows XP DVD, and set the boot order to CD ROM/DVD drive in the usual fashion. When the Windows XP setup began to load, I hit F6 very quickly to make sure that the drivers on the floppy could be found.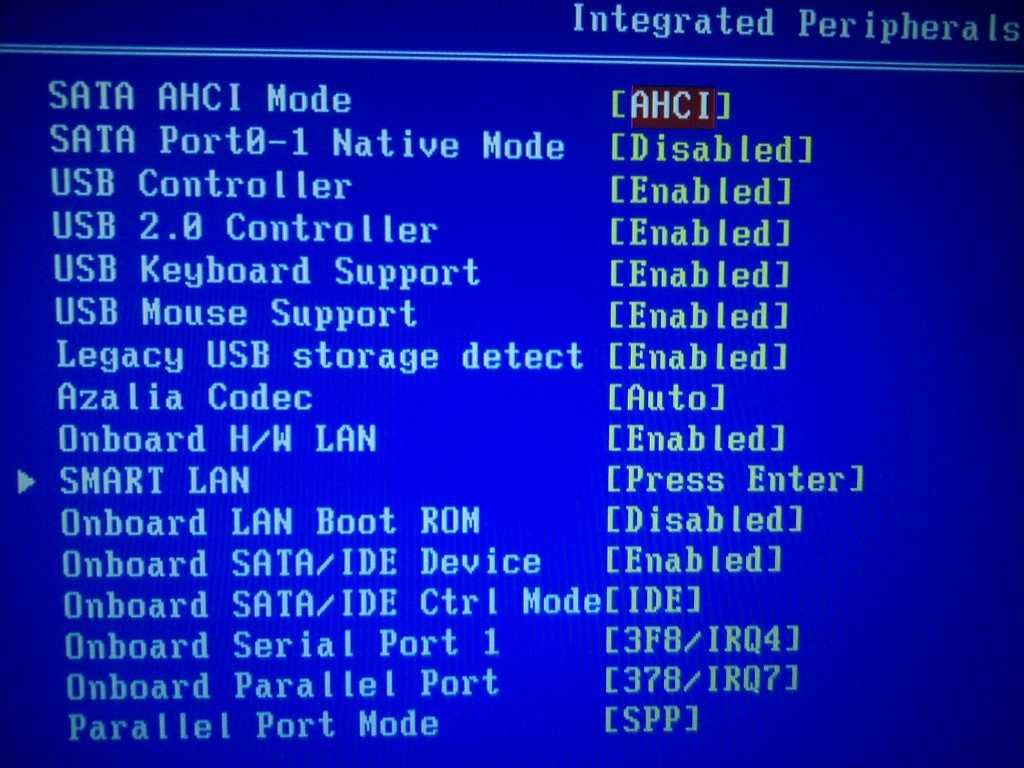
I then specified the additional drivers, Setup recognised the SSD and the install process began as normal.
Since the disk had been cleaned by Diskpart, a partition needed to be created and then formatted, so I chose the quick option and the rest of the Windows XP install completed without a hitch.
Windows XP On SSD Loads In Seconds
Whilst it’s fair to say that XP on a Pentium 4 and 2 GB of RAM on a conventional hard drive loads pretty fast anyway following a clean install, on an SSD the desktop arrives in a mere 25 seconds. It’s also worth pointing out that I don’t cram retro PCs with loads of different programs and mainly use them for retro gaming. And Windows XP is pretty slim anyway, not being burdened with the bloat we’ve all become accustomed to with Windows 10 and its crappy little apps all over the place.
To fine-tune XP a little more, I opened MSConfig and made sure that the start-up programs were limited to only one or two which shaved maybe a couple of seconds off load up. But who’s counting anyway when it loads that quickly?
So, if you have an older machine laying around, why not try an SSD for Windows XP? You may be pleasantly surprised!
—
Installing Windows Xp on SSD disk
Installing Windows Xp on SSD disk is possible and with some tweaks it runs quite smoothly. Here is the short guide how to achieve it.
Windows Xp is outdated nowadays and was not designed to install on SSD, but in some situations you may need to install it on SSD (solid-state drive). So before installing you need to choose if you want to install it using AHCI or IDE mode. Keep in mind that AHCI is recommended for SSDs, but you will need additional SATA drivers during the install. Windows Xp requires floppy disk to install additional drivers which is unacceptable nowadays, so you will need to slipstream it to installation media. Otherwise you will face the blue screen with 0x0000007b error.
Installing using IDE mode
This method is used when you are in hurry and don’t want to prepare your Windows Xp media with SATA drivers included.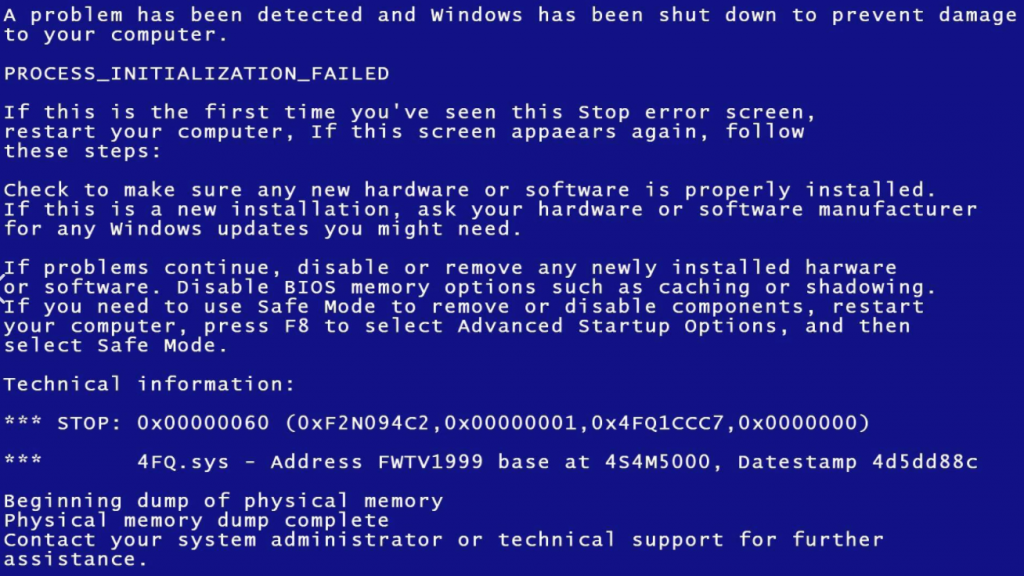 Remember, you may change HDD operating mode after install later using some registry tweaks.
- Enter your computer “BIOS” by pressing F1, F2 or Delete key immediately after system turning on (for some computers needed keys may differ).
- Navigate to Storage options (again it may differ depending on your actual motherboard, refer to your motherboard’s manual).
- Change Hard Disk Mode to “IDE” or “IDE Compatibility“, “Standard IDE” and similar settings.
- Save your settings and restart, it should let you install Windows Xp on SSD disk normally.
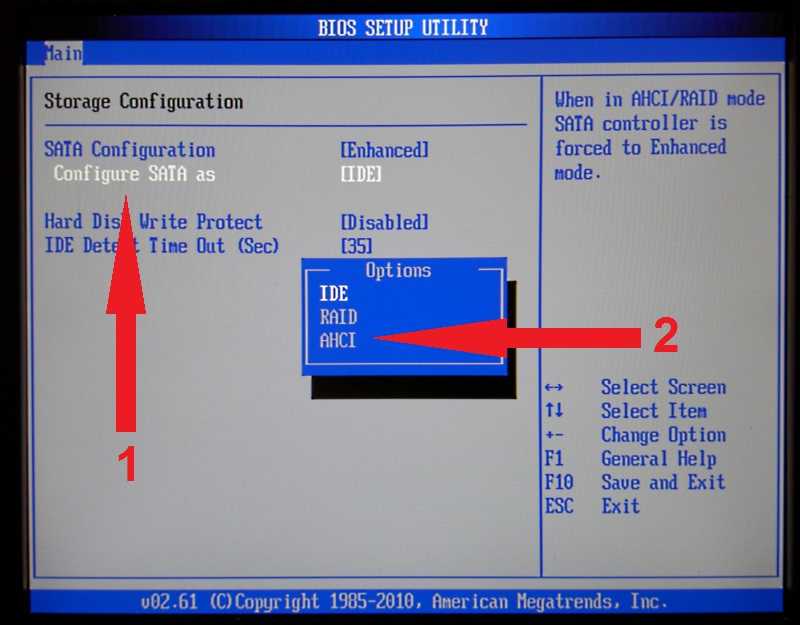
Installing using AHCI mode
First you need to prepare your Windows Xp instillation media. Refer to your motherboard’s manual and download your drivers from manufacturer website your SATA/AHCI/Floppy drivers. Than use nLite to include it to your setup. Just install the software, select your Windows Xp setup files location and select “Drivers” in “integrate” section.
nLite for Winodws Xp 1.4.9.3 – Download
nLite for Winodws 7, 8 and 10 1.3.1.5060 32-bit – Download
nLite for Winodws 7, 8 and 10 1.3.1.5060 64-bit – Download
If you can’t find appropriate driver for your motherboard, try using DriverPacks BASE, which includes all possible SATA/AHCI drivers.
DriverPacks BASE 10.06 – Download
Just run the program, it will extract to your desired location. Then download this “Mass Storage” pack and place it to extracted “DriverPacks” folder (no need to extract 7z file) and run the “DPs_BASE.exe”. Here is the full tutorial read more.
Mass Storage 12.09 32-bit – Download
Now we are ready to install the operating system.
- Enter your computer “BIOS” by pressing F1, F2 or Delete key immediately after system turning on (for some computers needed keys may differ).
- Navigate to Storage options (again it may differ depending on your actual motherboard, refer to your motherboard’s manual).
- Change Hard Disk Mode to “AHCI“.
- Save your settings and restart, it should let you install Windows Xp on SSD disk with additional SATA drivers.
Tweaks for SSD for Winodws Xp
The main SSD lifespan killer is integrated Windows defragmentation tool, in later Windows versions it detects and switches off automatically. This registry tweak disables automatic disk defragmentation, auto-layout, last access timestamps and prefetch.
Windows Xp registry tweak – Download
This should help you out installing Windows Xp on SSD disk. Have some suggestions? Leave a comment below.
How to install Windows XP on an SSD drive, what needs to be configured
Installing Windows XP on an SSD will by and large not differ much from installing a system on an HDD.
At the same time, there is still some incompatibility, so you will need to “conjure” a little before installing XP on an SSD.
Many users know that SSDs outperform traditional HDDs in many ways when used in computers. First, system performance is improved. This is especially noticeable when it comes to working with small files. However, SSD technology came to us relatively recently, which cannot be said about the Windows XP operating system. XP was a very popular system at one time, but that was so long ago that Microsoft has long since abandoned its support. But this does not negate the fact that some users are still «sitting» on the legendary Windows XP and do not want to get rid of it. However, these same users are willing to upgrade to faster SSDs to make their computer run faster. In general, today we will tell you how Windows XP is installed on an SSD and what features accompany this process. nine0004
Installing Windows XP on SSD
The problem with installing Windows XP on an SSD is a simple feature of the operating system — it does not support the TRIM command, which is so necessary for the SSD.
TRIM is a command that the system sends to the SSD to inform the drive that the disk blocks do not contain data so they can be removed from the SSD. In simple words, the TRIM command allows you to clean the SSD from garbage. Modern versions of Windows support this command, but XP does not, since at the moment when this operating system was created, no one even thought about SSD. nine0004
Due to the absence of the TRIM command in Windows XP, over time your SSD will fill up with all kinds of garbage and its performance will drop. Therefore, if it is possible to choose an SSD for XP, it is important to stop at drives controlled by Marvell controllers. In such drives, the absence of the TRIM command is not considered an error, since they have their own algorithm for controlling the internal operation of the SSD. If it is not possible to choose an SSD for Windows XP, then you will have to look for programs that organize TRIM support in XP, for example, O&O Defrag. nine0004
From all of the above, we can summarize the following: to install Windows XP on an SSD, the disk must contain a self-cleaning system.
If such a disk is used, then after installing the system, you must first disable the disk defragmentation function, since this can only harm the system.
How to install Windows XP on SSD
You need to go into the BIOS and enable AHCI mode. It is set to IDE mode by default. If you leave the IDE mode, then it will not be possible to feel the speed of the SSD, since it works very slowly in this mode. This is a preliminary preparation. If the mode is changed, then you can go further along the algorithm. nine0004
Next, insert a bootable USB flash drive and install Windows XP on your device. You should not have any problems with a bootable flash drive, but it is important to note that it is desirable to make a flash drive with a «naked» Windows XP, and not from author’s assemblies. Author’s assemblies can be very convenient, but in our case, the assembly can only harm and cause a conflict between the operating system and the SSD.
In general, installing Windows XP on an SSD at this step is no different from installing any other Windows on an SSD or HDD. Activate the bootable flash drive and follow the installation instructions. nine0004
Optimization after installation.
Let’s take a closer look at system optimization after installation. It is important to carry it out so that in the future there are no problems with the operation of the system. As we already wrote, Windows XP appeared much earlier than the SSD, so some of the functions aimed at working with disks in this system are simply not needed. If you do not perform optimization, then nothing critical will happen, but the risk of conflicts increases. Things to do:
Disable indexing. To do this, open «My Computer» and find the hard drive. Open its «Properties» and uncheck «Allow disk indexing for quick search».
Allow caching.
To do this, open the «Control Panel» and find the «System» item there. There you need to open the «Hardware» item and click the «Device Manager» button in it. Find your disk in «devices» and open its «Properties». In the «Policy» section, activate the «Allow disk write caching» item, do not forget to save the changes. nine0004
Disable defragmentation. Defragmentation is not needed in an SSD, especially if you have chosen a drive with a built-in self-cleaning system. By default, defragmentation is not enabled on a Windows XP machine and you do not need to enable it. In the future, when you install programs to clean up the system, they may contain the item «Activate defragmentation». In such programs, you will need to disable automatic defragmentation.
nine0018
Disable Prefetcher. This is a special technology in Windows XP to speed up hard disk loading. This technology is not needed to boot an SSD, so you can simply turn it off.
To do this, open the registry editor and find the «EnablePrefetcher» process there. Double click on it and the editing window will open. In this window, you need to set the value to «0» and save the settings.
If optimizing your Windows XP system seems difficult to you, then there is one simple solution. Immediately after the installation of Windows XP on a computer with an SSD is completed, install a small program «SSD Mini Tweaker XP». This program will help you quickly and easily configure the interaction between Windows XP and SSD. Thanks to this program, you will not need to delve into the system settings in order to optimize it. nine0004
Conclusion
Installing Windows XP on computers with an SSD is not much different from a normal Windows installation. The peculiarity of this process is that a little preparation is needed before installing the system, and it is also necessary to carry out a little optimization after installing the system.
If you take this process responsibly, then there will be no problems with running Windows XP on an SSD.
How to partition, format and install an SSD in Windows XP when the SSD is an additional drive in an existing system? nine0001
Welcome to Western Digital Support
Home
> Support
SOLUTION — When the SSD is an additional drive in an existing system
1. Please note, you must be registered as an administrator to perform the following steps
2. Turn off the computer and connect the SSD to it
3. Turn on the computer and log in BIOS settings (For more information about your system’s BIOS, see your computer’s documentation)
4. If the drive is not detected, you may need to enable SATA ports.
5. If your system has an AHCI driver installed, please enable SATA AHCI mode.
Partitioning and Formatting (information from Microsoft Support):
STEP 1 — Click Start, select Run, type compmgmt.msc and click OK.
STEP 2 — In the console tree, select Disk Management. The Disk Management window will appear. Your disks and volumes appear graphically and as a list. To customize how you view disks and volumes at the top and bottom of the window, point Up or Down on the View menu, and then select the View you want to use. nine0004
NOTE: Microsoft recommends that you create a full backup of your disk contents before making any changes to your disks or volumes.
STEP 3 — Create a new partition or a new logical drive:
To create a new partition or logical drive on a basic drive:
1. In the Disk Management window, do one of the following, and then continue:
— To create a new partition, right-click on the unallocated space on the main drive on which you want to create a partition, and then select Create Partition. nine0065 — To create a new logical drive on an extended partition, right-click on an empty space on the extended partition where you want to create the logical drive, and then click Create New Logical Drive.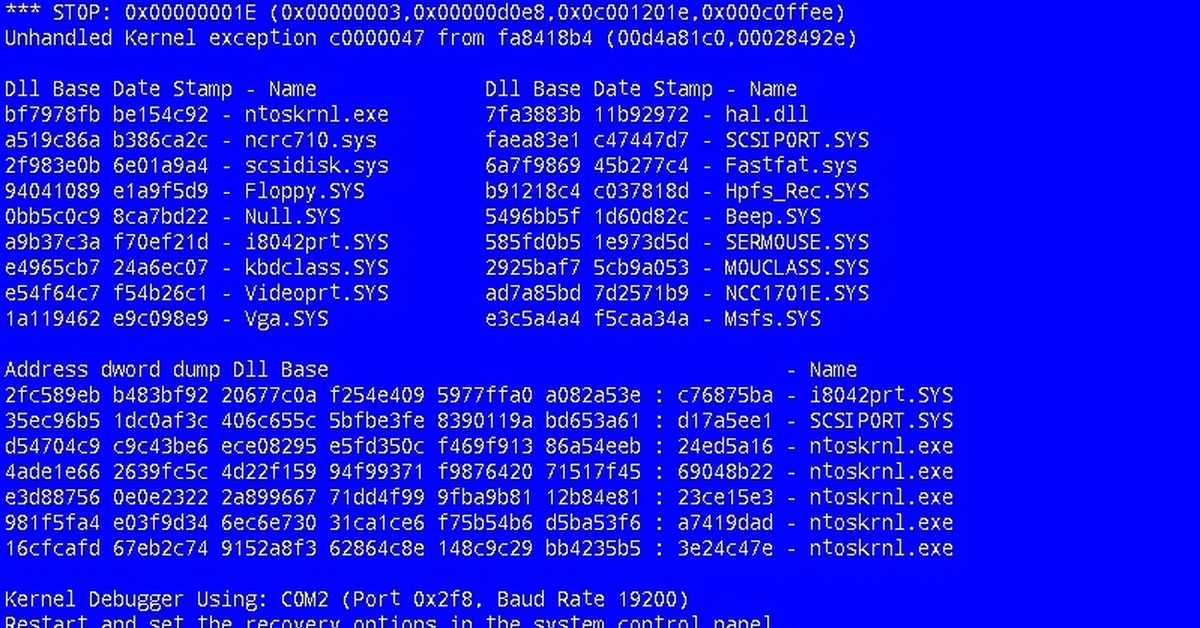
4. In the Partition Wizard, click Next.
5. Select the type of partition you want to create (either Primary Partition, Secondary Partition, or Logical Disk) and click Next.
6. Specify the partition size in the MB Partition Size section, and then click Next. nine0065 7. Decide whether to manually assign a drive letter, whether to set it automatically for the system, or not to assign a drive letter to the new partition or logical drive at all, and then click Next.
8. Set the formatting options you want to use using one of the following procedures:
— If you do not want to format the partition, select Do not format this partition, and then click Next.
— If you want to format a partition, click the Format this partition button with the following options, and then do the following in the Format dialog box:
— Enter a name for the volume in the Volume Label field. This is an optional step.
— Click on the file system you want to use in the File system field. You can change the disk cluster size and then specify whether to perform a quick format or enable file and folder compression on NTFS volumes.
10. Click Next.
11. Verify that the options are correct and click Finish.
A new partition or logical drive will be created and will appear as part of the corresponding base drive in the Disk Management window. If you chose to format the volume in step 8, the formatting process will begin. nine0004
STEP 4 — How to format the primary volume
To format a partition, logical drive, or primary volume:
Format.
2. In the Format dialog box, enter a name for the volume in the Volume Label field. This is an optional step.
3. Click on the file system you want to use in the File system field. If you like, you can also change the disk cluster size, specify whether you want to perform a quick format or enable file and folder compression on NTFS volumes. nine0065 4. Click OK.
5. Click OK when prompted to format the volume.