How to share files and printers without HomeGroup on Windows 10
Windows 10 share file and printer
(Image credit: Windows Central)
On Windows 10, HomeGroup was a feature to simplify the process of sharing resources across a small network with other users. However, since the feature has been removed, you now have to use different methods to share files, folders, and printers.
Some of these methods include Share and Nearby sharing, OneDrive, and the more advanced sharing options that offer virtually the same experience but using a different set of instructions.
In this Windows 10 guide, we’ll walk you through the steps to share files and printers inside the local network without HomeGroup.
- How to share files on Windows 10
- How to share printers on Windows 10
How to share files on Windows 10
Windows 10 offers several ways to share files and folders with other users, including using the Share feature, OneDrive, and setting up a more advanced configuration File Explorer.
Send files with Share
If you have to share one or more files with another user inside the home network, office, or across the world only one time, you can use the Share feature, which comes built into File Explorer and most modern apps.
To share files using the Share feature on Windows 10, use these steps:
- Open File Explorer.
- Browse to the folder location with the files.
- Select the files.
- Click on the Share tab.Quick tip: Alternatively, you can right-click the selection and choose the Share option in the context menu. Also, the Share option can be found in many apps that you acquire from the Microsoft Store.
- Click the Share button.
Source: Windows Central (Image credit: Source: Windows Central)
- Select the app, contact, or nearby sharing device.
Source: Windows Central (Image credit: Source: Windows Central)
- Continue with the on-screen directions to share the content.
Although this is a sharing feature, you’re technically sending the files to another destination. If you’re about to share files with a nearby device, note that «Nearby sharing» needs to be enabled on the source and destination computers to work correctly. You can learn more about nearby sharing, in this guide.
Share files with OneDrive
On Windows 10, you can also use OneDrive to share files or folders with family, friends, or colleagues.
Unlike sending files using the Share feature, OneDrive allows you to share virtually any file by creating a secure link that others can use to access the content, which you can also revoke at any time.
To share files with OneDrive, use these steps:
- Open File Explorer.
- Click the OneDrive folder from the left pane.
- Browse to the folder with the files.
- Right-click the file and select the Share option (blue icon).
Source: Windows Central (Image credit: Source: Windows Central)
- (Optional) Click the Anyone with the link can edit option.
- Clear the Allow editing option if you only want someone else to view the file.Quick tip: If you have a Microsoft 365 subscription or OneDrive plan, you can also set the expiration date and password for the link.
- Click the Apply button.
- Confirm the email address of the person you want to share the file. Or click the Copy Link option to copy the link to the clipboard.
Source: Windows Central (Image credit: Source: Windows Central)
- (Optional) Add a personalized message for the share.
- Click the Send button.
After you complete the steps, the recipient will receive the link to access the shared file, and depending on the settings, the recipient will be able to view or edit the file.
Stop file sharing
To stop sharing a file in OneDrive, use these steps:
- Open File Explorer.

- Click the OneDrive folder from the left pane.
- Browse to the folder with the share.
- Right-click the shared file and select the Share option (blue icon).
Source: Windows Central (Image credit: Source: Windows Central)
- Click the three-dotted button in the top-right corner.
- Select the Manage Access option.
Source: Windows Central (Image credit: Source: Windows Central)
- Click the Can edito button and select the Stop sharing option.
Source: Windows Central (Image credit: Source: Windows Central)
Once you complete the steps, the files will no longer be accessible by other people with the link.
Share files with File Explorer
When you have to share multiple files in the local network, you can use the File Explorer advanced sharing options.
Quick tip: When sharing a folder, usually, you want to share the folder by creating a folder in the root of the «C» drive or secondary drive or partition.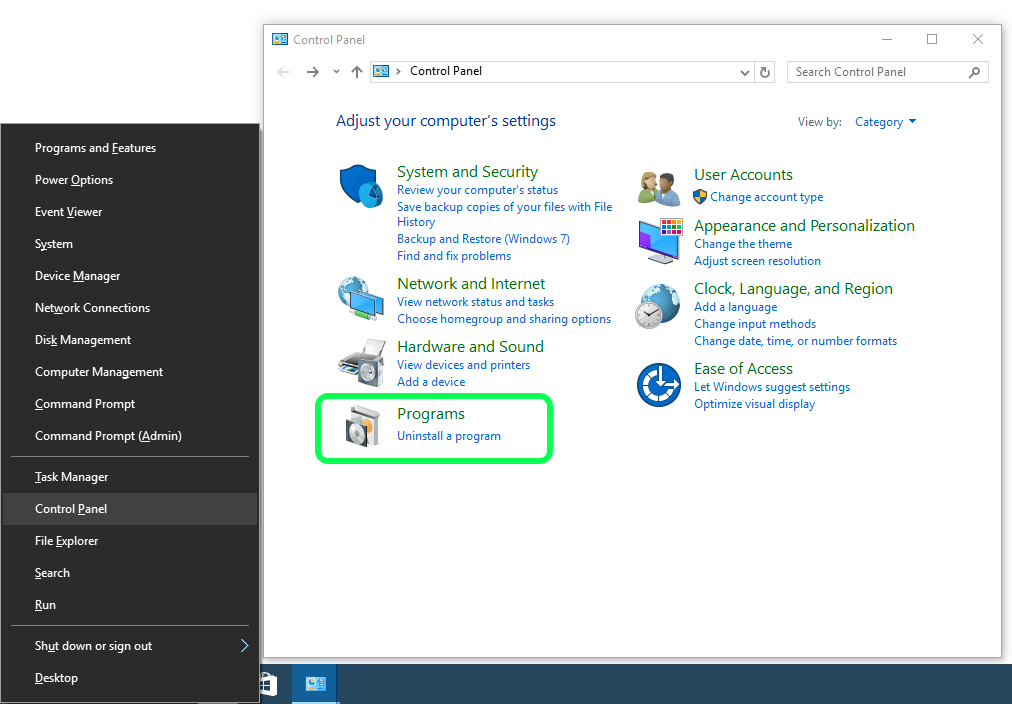 Always avoid sharing files from the system folders, including Desktop, Documents, Pictures, etc.
To create a basic folder share on Windows 10, use these steps:
- Open File Explorer.
- Browse to the folder with the content that you want to share.
- Right-click the folder, select the Give access to option, and click the Specific people option.
Source: Windows Central (Image credit: Source: Windows Central)
- Use the drop-down menu, and select the user or group to share the folder and its contents. Options available include:
- Local users — When you choose individual accounts, the user must provide username and password to access the files. If the user is signed in using the same credentials on their computer, then they may be able to access the data without any prompts.
- Everyone — Shares the contents with anyone in the network without entering a password to access the files.
Quick note: You may also find an option to create a new account, but it won’t be useful since Windows 10 no longer allows the creation of new accounts using Control Panel.
- Click the Add button.
Source: Windows Central (Image credit: Source: Windows Central)
- Under the «Permission Level» column, select the permissions that user will have to access the contents:
- Read — Gives network users the ability to list and open files, but they won’t be able to modify or delete existing files and folders. Also, they won’t be able to upload or create new folders or files.
- Read/Write — Allows users to list, open, modify, delete, upload, and create new files and folders.
- Remove — Blocks the specified user or group from accessing the folder.
- Click the Share button.
Source: Windows Central (Image credit: Source: Windows Central)
- Right-click the shared folder path and select the Copy Link option.
Source: Windows Central (Image credit: Source: Windows Central)
- Click the Close button.
After you complete the steps, you can share the link (which you copied to the clipboard on step No. 8) with users in the local network.
Connect to shared files over the network
To access a shared folder on Windows 10, use these steps:
- Open File Explorer.
- Right-click and paste the network path for the shared folder in the address bar and press Enter.
Source: Windows Central (Image credit: Source: Windows Central)
- Confirm your account credentials (if applicable).
- Upload, download, or modify files as necessary.
If you’re logged on using a username and password that matches the credentials on the device sharing the folder, you may not need to sign in again to access the shared folder. However, if you’re prompted to log in, you must enter the account credentials of an account located on the computer sharing the folder.
Alternatively, users can also use the «Network» page from the File Explorer from left pane to browse the computer and access the shared folder contents.
When sharing folders in the network, users will only be able to access the files if the computer sharing the folder is on and connected to the network.
Stop sharing files over the network
If you no longer wish to share files in the network, use these steps:
- Open File Explorer.
- Browse to the folder with the content that you want to share.
- Right-click the folder, select the Give access to option, and click the Remove access option.
Source: Windows Central (Image credit: Source: Windows Central)
- Click the Stop sharing button.
Source: Windows Central (Image credit: Source: Windows Central)
Once you complete the steps, the content will no longer be accessible through the network.
Troubleshoot access to shared files
When sharing a folder or printer, there’s a chance you won’t be able to access the resources because of a problem translating the computer name to a TCP/IP address, issues with the firewall, or network profile settings.
Use IP address instead of computer name
To determine the device network address to replace the computer name in the path to access the shared resources, use these steps:
- Open Settings.
- Click on Network & Internet.
- Click on Status.
- Click the Properties buttons for the current Ethernet or Wi-Fi connection.
Source: Windows Central (Image credit: Source: Windows Central)
- Under the «Properties» section, confirm the current IPv4 address.
Source: Windows Central (Image credit: Source: Windows Central)
- In the network path to the shared folder, replace the computer name with the IP address.
 For example, after editing the link, the unique path should look like this:
 //10.1.2.173/shareinstead of//homepc/share.
Source: Windows Central (Image credit: Source: Windows Central)
After you complete the steps, you should now be able to access the network content.
Change network profile to private
If the computer is using the public network profile, the folder or printer won’t be discoverable in the network. As a result, trying to access the resources will require to enter credentials. To avoid this issue, you must set the network profile to private on every computer.
To set the network profile to private, use these steps:
- Open Settings.
- Click on Network & Internet.
- Click on Status.
- Click the Properties buttons for the current Ethernet or Wi-Fi connection.
Source: Windows Central (Image credit: Source: Windows Central)
- Under the «Network profile» section, select the Private option.

Source: Windows Central (Image credit: Source: Windows Central)
Once you complete the steps, users should be able to access shared files and printers from any computer in the local network.
Configure access through firewall
You can temporarily disable the firewall on both devices to determine if that is the cause of the problem. If the firewall blocks access to the shared folder, you’ll need to open the corresponding ports.
Disable Microsoft Defender Firewall
To temporarily disable the firewall on Windows 10, use these steps:
- Open Windows Security.
- Click on Firewall & network protection.
- Click the Private network option.
Source: Windows Central (Image credit: Source: Windows Central)
- Turn off the Microsoft Defender Firewall toggle switch.Quick tip: after finding out the issue, make sure to turn the firewall back on.
Source: Windows Central (Image credit: Source: Windows Central)
After you complete the steps, repeat the steps on the device, and then try to access the shared folder. If it’s a firewall problem, then you’ll need to open the corresponding network port. Also, after resolving the issue, remember to re-enable the firewall using the same instructions outlined above, but on step No. 4, make sure to turn on the Microsoft Defender Firewall toggle switch.
Open Microsoft Defender Firewall ports
To allow file and printer sharing through the firewall, use these steps:
- Open Windows Security.
- Click on Firewall & network protection.
- Click the Allow app through firewall option.
Source: Windows Central (Image credit: Source: Windows Central)
- Click the Change settings button.
Source: Windows Central (Image credit: Source: Windows Central)
- Select the File and Printer Sharing option, and make sure to check the Private network option.

Source: Windows Central (Image credit: Source: Windows Central)
- Click the OK button.
Once you complete the steps, network users should be able to access the shared folder even with the firewall turned on.
If you’re using a third-party firewall solution, you’ll need to check your vendor support website for specific details on how to get around this problem.
How to share printers on Windows 10
In previous versions, the easiest method to share a printer was using HomeGroup, but now even without the feature, you can still share a USB printer with other users in the local network.
Important: If you have a printer with a built-in print server, it’s recommended to use that feature. You can refer to the printer manufacturer support website for instructions on connecting the device to the network. If you’re dealing with a print server, you only need to follow the steps below to share the printer and connect the computers.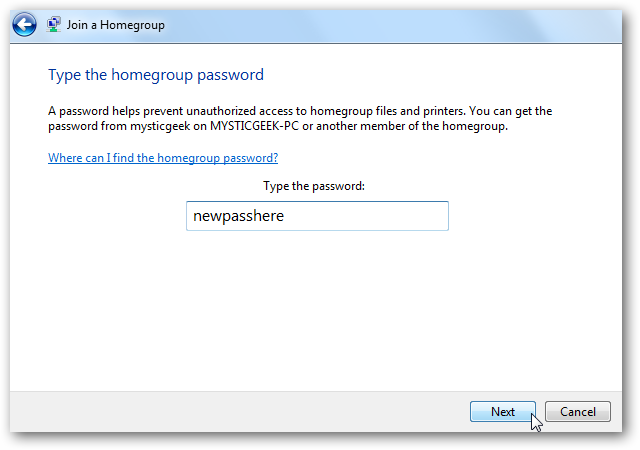
Share printer on Windows 10
To share a printer on Windows 10 (assuming it’s already installed), use these steps:
- Open Settings.
- Click on Devices.
- Click on Printers & scanners.
- Under the «Printer & scanners» section, select the printer that you want to share.
- Click the Manage button.
Source: Windows Central (Image credit: Source: Windows Central)
- Click the Printer properties option.
Source: Windows Central (Image credit: Source: Windows Central)
- Click the Sharing tab.
- Check the Share this printer option.
- In the «Share name» field, specify a new short and descriptive name. (If this is the only printer on the network, you can use the default name.)
Source: Windows Central (Image credit: Source: Windows Central)
- Click the Apply button.

- Click the OK button.
After you complete the steps, the printer will be available to network users, but only if the computer is on.
Connect computer to shared printer
To connect devices to the shared printer, use these steps:
- Open Settings.
- Click on Devices.
- Click on Printer & scanners.
- Click the Add a printer or scanner button.
- Select the printer from the list.
- (Optional) If the discovery feature doesn’t work, click The printer that I want isn’t listed option.
Source: Windows Central (Image credit: Source: Windows Central)
- Choose the Select a shared printer by name option.
- Type the path of the printer location:
\\xxx.xxx.xxx.xxx\PRINTER-SHARE-NAMEIn the command, make sure to change the «xxx.xxx.xxx.xxx» and «PRINTER-SHARE-NAME» for the IP address (or computer name) and name of the printer.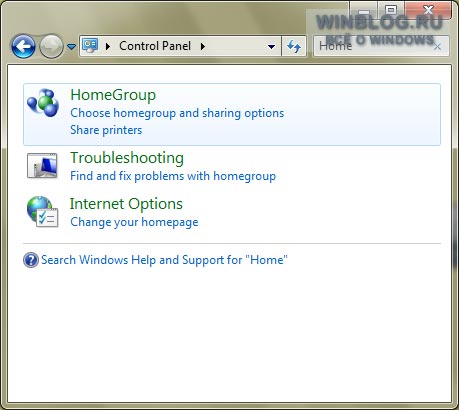 Quick tip: You can also click the Browse button to select the shared printer.
Source: Windows Central (Image credit: Source: Windows Central)
- Click the Next button.
- Click the Install driver button (if applicable).
- (Optional) Specify an name of the printer connection. For example, Network Printer.
Source: Windows Central (Image credit: Source: Windows Central)
- Click the Next button.
- Click the Finish button.
Once you complete the steps, you should be able to successfully send a print job to the network printer.
Connect old devices to shared printer
If you’re running an old version of Windows 10, Windows 8.1, or Windows 7, the steps to connect to the printer will be slightly different.
To connect an old computer to a network shared printer, use these steps:
- Open Control Panel.

- Click on Hardware and Sound.
- Click on the Devices and Printers option.
- Click the Add a printer button.
Source: Windows Central (Image credit: Source: Windows Central)
- Select the printer from the list.
- If the discovery feature doesn’t work, click The printer that I want isn’t listed option.
Source: Windows Central (Image credit: Source: Windows Central)
- Choose the Select a shared printer by name option.
- Type the path of the printer location:
\\xxx.xxx.xxx.xxx\PRINTER-SHARE-NAMEIn the command, make sure to change the «xxx.xxx.xxx.xxx» and «PRINTER-SHARE-NAME» for the IP address (or computer name) and share the name of the printer that you’re trying to connect.Quick tip: You can click the Browse button to locate and select the shared printer.
Source: Windows Central (Image credit: Source: Windows Central)
- Click the Next button.
- Click the Install driver button (if applicable).
- (Optional) Specify an name of the printer connection. For example, Network Printer.
Source: Windows Central (Image credit: Source: Windows Central)
- Click the Next button.
- Click the Finish button.
After you complete the steps, remember that users will only be able to print as long as the device sharing the printer is powered on and connected to the network. If the computer is sleeping, hibernating, or powered off, no one will be able to print.
Stop sharing printer on Windows 10
If there’s no need to share a printer over the network anymore, then use these steps:
- Open Settings.
- Click on Devices.
- Click on Printers & scanners.
- Under the «Printer & scanners» section, select the printer that you want to share.

- Click the Manage button.
Source: Windows Central (Image credit: Source: Windows Central)
- Click the Printer properties option.
Source: Windows Central (Image credit: Source: Windows Central)
- Click the Sharing tab.
- Clear the Share this printer option.
Source: Windows Central (Image credit: Source: Windows Central)
- Click the Apply button.
- Click the OK button.
Once you complete the steps, the printer will no longer be available for network users.
Wrapping things up
Windows 10 includes many features and advanced settings to share resources with network users, but in this guide, we’re focusing on using the essential configurations to help users coming from HomeGroup.
If you’re in an environment running different versions of Windows, you can still refer to this guide to share files and printers on older releases of Windows 10, Windows 8. 1, and even Windows 7.
Mauro Huculak is technical writer for WindowsCentral.com. His primary focus is to write comprehensive how-tos to help users get the most out of Windows 10 and its many related technologies. He has an IT background with professional certifications from Microsoft, Cisco, and CompTIA, and he’s a recognized member of the Microsoft MVP community.
HomeGroup removed from Windows 10 (Version 1803)
Windows 10 More…Less
HomeGroup has been removed from Windows 10 (Version 1803). However, even though it has been removed, you can still share printers and files by using features that are built into Windows 10.
-
To learn how to share printers in Windows 10, see Share your network printer.
-
To learn how to share files, see Share files in File Explorer.
Here’s more info about what’s changed and what hasn’t.
What’s changed?
After you update your PC to Windows 10 (Version 1803):
-
HomeGroup won’t appear in File Explorer.
-
HomeGroup won’t appear in Control Panel, which means that you can’t create, join, or leave a homegroup.
-
HomeGroup won’t appear on the Troubleshoot screen when you go to Settings > Update & Security > Troubleshoot .
-
Shared network folders will still be available. You can open them in File Explorer by typing the name of the PC and the shared folder name in this format: \\homePC\SharedFolderName
-
You can still get to any shared printers through the Print dialog box.
Homegroup removed from Windows 10 (version 1803)
Windows 10 More…Less
HomeGroup has been removed from Windows 10 (version 1803). However, despite its removal, you can still share printers and files using built-in Windows 10 features.
-
For instructions on sharing printers in Windows 10, see Share a network printer.
-
For instructions on sharing files, see Sharing files in File Explorer.
Below is more information about what has changed and what has remained the same.
What has changed?
After you upgrade your computer to Windows 10 (version 1803):
-
homegroup will not show up in explorer;
-
the homegroup will not be displayed in the control panel, that is, you will not be able to create or leave a homegroup, or join it;
-
HomeGroup does not appear on the troubleshooting screen when you navigate to Settings > Update & Security > Troubleshooting .
-
Shared network folders will remain available. They can be opened in File Explorer by entering the computer name and shared folder in the format \\HomeComputerName\SharedFolderName
-
You can still access shared printers through the Print dialog .
Homegroups in Windows 10
Home and small business networks typically do not have dedicated servers and each computer is managed independently. At the same time, resources (files, printers, etc.) located on one computer are not available to other computers on the network. Homegroups are a mechanism introduced in Window 7 to make it easier to set up sharing and data exchange between computers on the same local network.
And today we will look at the features of working with home groups in Windows 10. Let’s start by creating …
Creating a home group
To create a home group, we need a control panel snap-in with the ″original″ name «Homegroup». Finding it is easy, just type in the search bar the phrase Homegroup (Homegroup for the English edition).
You can also open Settings -> Network and Internet -> Status from the Start menu.
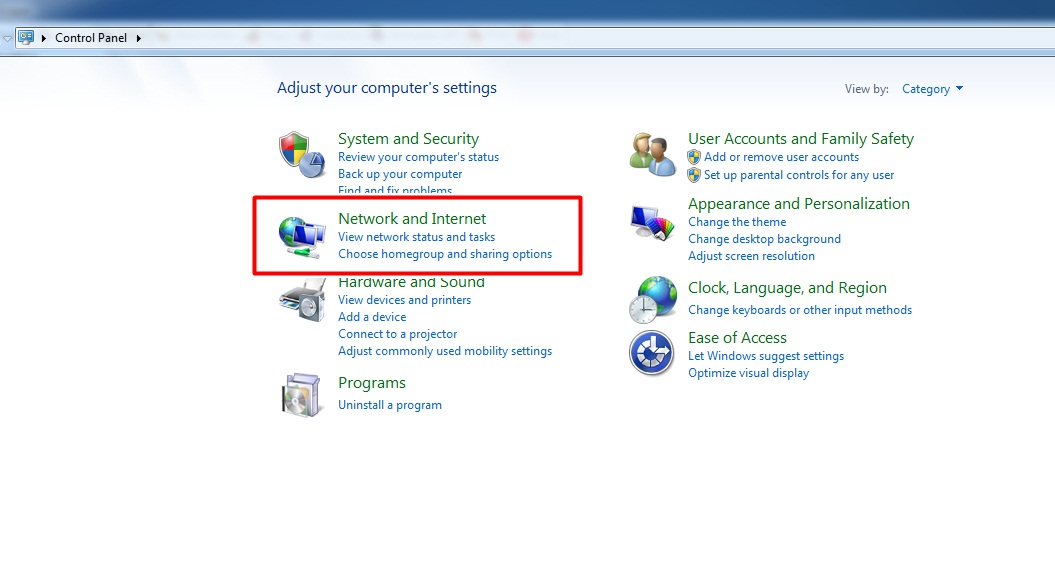
Or open the Control Panel and select the desired item in the «Network and Internet» section.
Well, those who consider themselves an advanced user can press Win + R and execute the following command:
control /name microsoft.homegroup
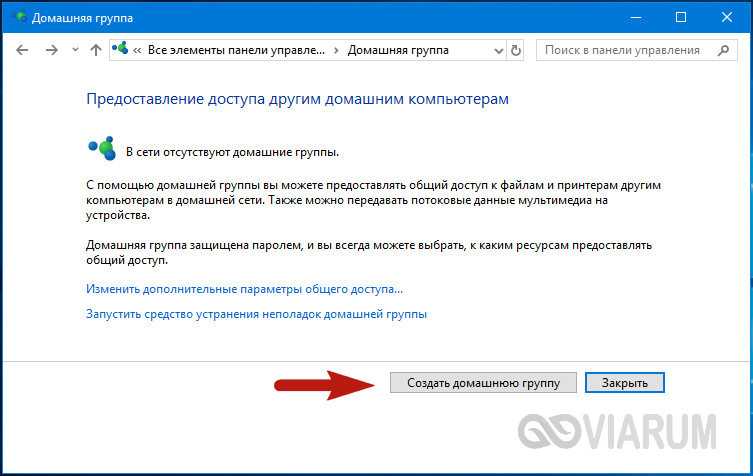
as a result, the desired snap-in will open. In the window that opens, click the «Create a homegroup» button
and confirm the creation of the group.
Then we select the resources to which the members of the group will be allowed access. Note that only the standard Windows libraries are available for selection, not specific folders or files. You can also ″share″ devices (printers, scanners, etc.) connected to your computer.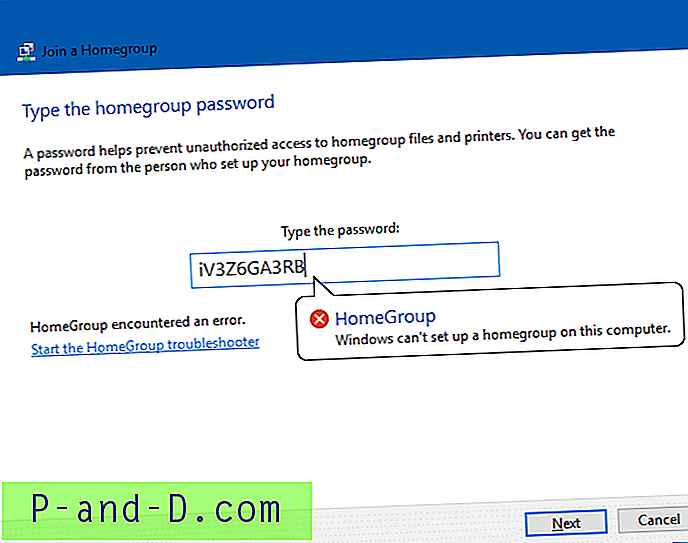
At the end of the creation of the homegroup, you will be given a password that you need to save. This password will be required when adding other computers to the group.
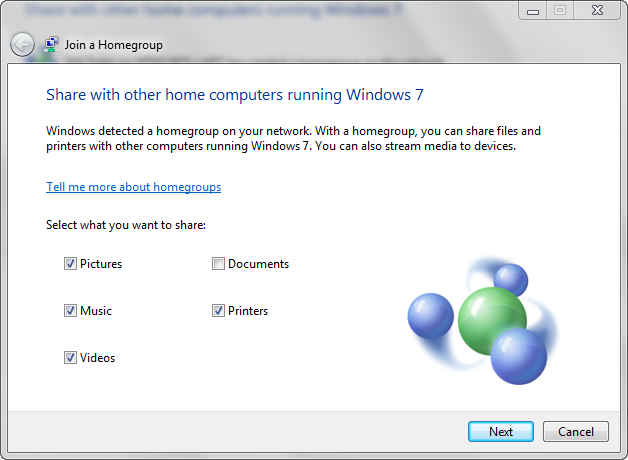
Joining a homegroup
The homegroup is ready, but so far it has only one computer. To add a computer to an existing group, you need to run the home group equipment and click the “join” button,
Confirm the connection,
Select local resources intended for general use
9000
and enter the password received when creating the group.
This completes the connection procedure.
And all computers and homegroup resources can be found in File Explorer.
Change access to resources
If you want to change the set of shared resources, open the HomeGroup snap-in and select Change the resources you share in your homegroup.
Here you need to select a component and share (or not share) it.
And confirm the changes.
The wizard can only change access to standard libraries and devices. If you need to provide access to an arbitrary folder, then there are two ways.
The first way is to simply add the folder to one of the standard libraries that are already shared. To do this, in Explorer, right-click on the desired folder, select «Add to Library» in the menu that opens and select the desired library.
The second way is to add the folder to the shares directly, without the help of libraries. To add, you need to select the «Share» item in the context menu and specify what kind of access will be granted to group members. You can give read-only access, or you can also change the contents of the folder.
Once added, the folder appears in the HomeGroup Shares. Depending on the selected method, they are displayed a little differently, but this does not affect file access.
If you need to remove shared access to a folder, then it all depends on how access was granted. If the folder is added to the library, then you need to select this library in the explorer, right-click on it and open its properties. Then select the folder and click the «Delete» button.
If the folder is added directly, then you need to open the folder properties in Explorer, go to the «Access» tab and click on the «Sharing» button.
In the window that opens, we see a list of users who have access to the folder. To disable access, select a homegroup and remove it from the list. Please note that this action will not stop sharing the folder, but will only prevent access to members of the homegroup.
To completely stop sharing, click on the «Advanced settings» button and uncheck the box «Share this folder».
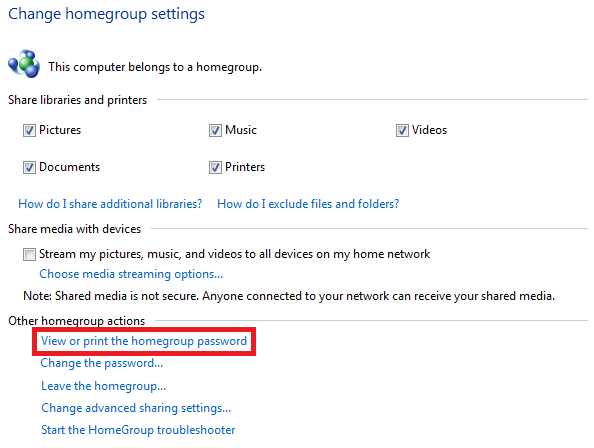
Changing the homegroup password
If you need to quickly deny access to shared resources to one or more members of the group, then the easiest way is to change the password. To do this, select the «Change password» item in the snap-in and confirm the change.
A new password will be generated automatically, but you can change it to any other if you wish.
The new password must be saved and shared with all members of the group.
After changing the password on one computer, all others will lose access to the homegroup
and in order to return it, you will need to enter a new password.
Thus, only the person who receives the new password will have access to the group’s resources, and the rest will remain out of work.
Leaving the homegroup
To completely stop access to your resources, you can leave the group, for which it is enough to select the “Exit homegroup” item in the snap-in and confirm the exit.
Advanced settings
Usually, no special knowledge is required to create a homegroup, since all settings are made automatically.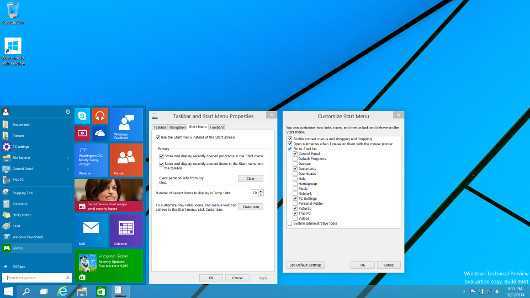 But sometimes you may need to check and change some settings. Consider the most important of them, which are necessary for the creation and functioning of the home group.
Basic sharing settings are located in the control panel, in the «Advanced sharing settings» section. The first thing to check is that a private network is selected as the current network profile. This is necessary to create a new group or connect to an existing one.
Network discovery must also be enabled in the current profile. Without this, computers on the network simply cannot find each other. Well, in order to provide group members with access to shared resources, file and printer sharing must be allowed.
A little about the network profile. Its choice is made at the first connection to the network and remains unchanged in the future.
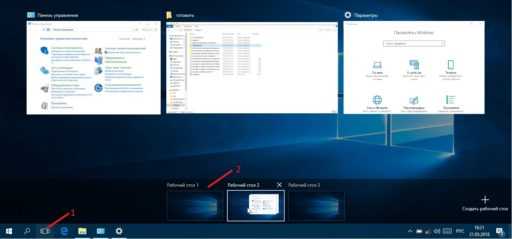
If the current network is specified as a guest or public network, then when creating a homegroup, the system itself will offer to change the network profile to a private one. You can also change the profile manually, for which you need to open the Start menu -> Settings -> Network and Internet -> Ethernet, select the current network connection by name (Network 2 in the example) and move the switch to the On position.
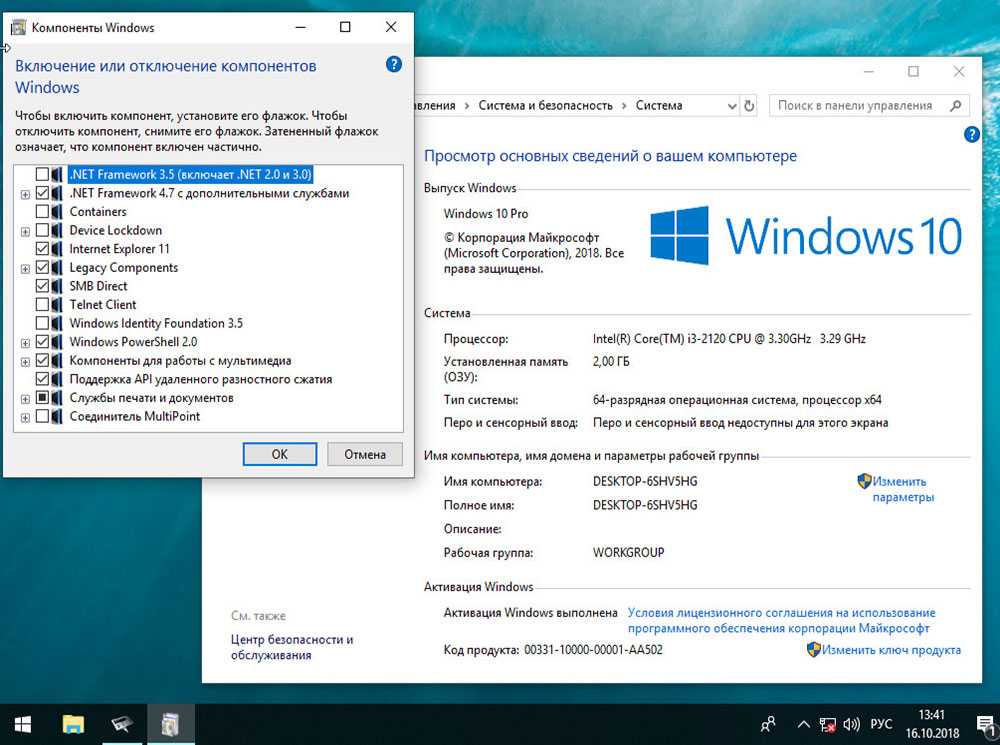
Also, to create a homegroup, IPv6 must be enabled on the network interface. To check, you need to open the properties of the network connection and check if there is a daw in front of item IP version 6 (TCP / IPv6) . With IPv6 disabled, creating a new homegroup or joining an existing one will fail, and an error will be thrown when trying.
Troubleshooting
If you have problems accessing group resources, you can use the troubleshooting wizard that you run from the Homegroup snap-in. The wizard checks the basic settings required for the group to work; additionally, it can be used to test the network operation.
Upon completion of the work, information about the problems found is displayed.