How to screen record in Windows 10 or Windows 11
Alissa Kumarova/Shutterstock
I sometimes need to record screen activity in Windows for a tutorial, demonstration, or online class. Whether you’re creating a presentation, devising a how-to video, or cooking up something for YouTube, you may also want to record certain screen activity in Windows.
See also
- How to improve your Windows laptop’s battery life
- How to replace your Windows 11 Start menu with a third-party app
- How to use the free PowerToys FancyZones in Windows and why you should
- How to manage your security questions for a local Windows account
- How to move the Windows 11 Start button back to where it belongs
A variety of third-party tools can handle that job — some free and some paid. But rather than download and install an external program, you can take advantage of a feature built right into Windows.
Available in Windows 10 and 11, the Xbox Game Bar video capture tool is designed to record gameplay on your PC. But it’s a versatile tool in that it will capture just about any other type of screen activity.
Also: How to downgrade from Windows 11 to Windows 10
With Xbox Game Bar, you can easily record your screen, turn on the microphone to grab your voice or other audio, and then save the recording to your PC. You’re then able to see and manage all the recorded clips within the Game Bar interface and play any specific video. The video itself is saved as an MP4 file, so you can easily modify or spruce it up using any video editor. Here’s how this works.
How to record your screen in Windows with Xbox Game Bar
Enable background recording for Xbox Game Bar.
Screenshot by Lance Whitney
Set maximum recording length.
Screenshot by Lance Whitney
Customize the audio.
Screenshot by Lance Whitney
Set the video quality.
Screenshot by Lance Whitney
View and customize the keyboard shortcuts.
Screenshot by Lance Whitney
Run Game Bar
Now, let’s display the Game Bar and activate it to record your screen activity. Set up the activity you wish to record. When ready, press Windows key+G. The top toolbar and the Capture pane for Game Bar should appear.
Also: How much RAM does your Windows 11 PC need?
The top toolbar lets you show or hide the different menus and panes for Game Bar, including Widget, Audio, Capture, Performance, Resources, and Xbox Social. At a minimum, you’ll want to see the Capture pane so you can start, control, and stop the capture. You may also want to see the Audio pane if you’re including audio in the capture and the Performance pane if the activity you’re performing is resource intensive.
View the Game Bar interface.
Screenshot by Lance Whitney
To start a recording, tap the Record button in the Capture pane.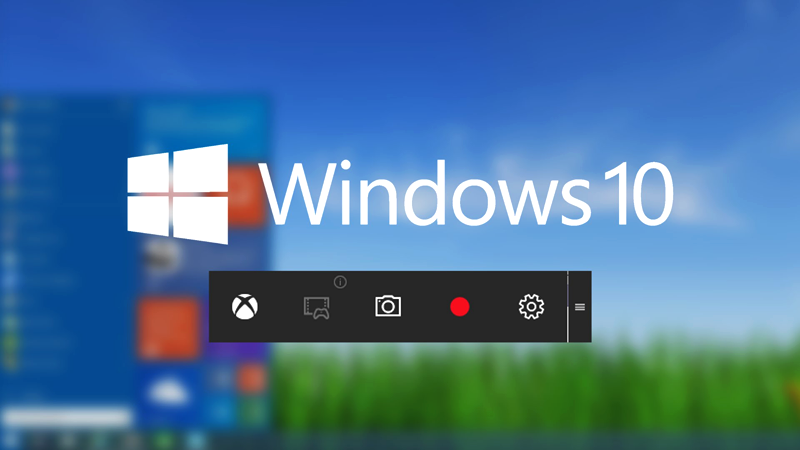 Then perform the screen activity you want to capture. A small recording panel appears on the screen.
Start a recording.
Screenshot by Lance Whitney
When you’ve completed the activity being captured, press the stop button on the small panel to stop the recording. A message pops up telling you that the game clip was recorded.
Stop the recording.
Screenshot by Lance Whitney
Click that message or press Windows key+G to return to the Game Bar interface. A Gallery window appears with the name, date, and time of the recording, and the video available for playback. Tap the Play button in the viewer.
Also: How to manage your Microsoft Windows 365 subscription in Windows 11
From there you can pause the video and raise or lower the volume.
Play the video.
Screenshot by Lance Whitney
To kick off a recording without launching Game Bar first, press Windows key+Alt+R. The small recording panel appears on the screen. Click the stop button when finished and then open Game Bar. Your new recording now appears in the Gallery window for you to play. If you need to capture the last 30 seconds of screen activity, press Windows key+ Alt+G.
Record the video though a keyboard shortcut.
Screenshot by Lance Whitney
To work with one of your recorded videos directly, go to c:\users\[username]\Videos\Captures. You’ll see your videos saved as MP4 files, which you can open in a video editor or other application to play or modify them.
Play or edit a video from File Explorer.
Screenshot by Lance Whitney
Finally, you can tweak several settings for Game Bar. Press Windows key+G. On the top toolbar, click the Settings icon. Here, you can view and change any of the shortcut keys, modify the visual theme of the Game Bar interface and the transparency of the menus and panes, and control how and when audio is recording as you capture your screen activity.
Tweak the settings for Xbox Game Bar.
Screenshot by Lance Whitney
Windows 10
How to record your screen in Windows 11
Skip to main content
When you purchase through links on our site, we may earn an affiliate commission. Here’s how it works.
(Image credit: Future)
Windows 11 comes with a handy Xbox Game Bar feature that allows you to record a video of your actions in nearly every Windows app on your desktop or laptop. Much like in Windows 10, the screen recording tool comes installed by default, meaning all it takes to start capturing what you’re doing is a few simple steps.
That’s not the only tool the Xbox Game Bar offers, as it allows users to capture the last 30 seconds, take screenshots, adjust audio, turn on their mic while recording, chat with friends, and more. Whether you’re looking to capture gameplay or make a quick tutorial on how to navigate through apps, Here’s how to record your screen in Windows 11.
- Windows 11 review: Is it better than Windows 10?
- How to customize the Windows 11 Start menu and taskbar
- Best laptop deals
While you can record just about everything using the Xbox Game Bar tool on Windows 11, note that you won’t be able to capture recordings on the Windows desktop or File Explorer. Once you’re in a suitable app, however, you can freely start recording, taking screenshots, and more.
The following method also works on laptops using Windows 10, but for a better look, check out how to record your screen in Windows 10.
(Image credit: Future)
- On your PC, open the app you want to record.
- Once open, press Windows key + G at the same time to open the the Xbox Game Bar tool.
(Image credit: Future)
- Click on the «Start recording» button (or Win + Alt + R) in the Capture menu. A stop icon will appear when it begins capturing video.
- Once you’ve finished recording, head back into the menu and click the recording button again (or press Win + Alt + R) to stop recording.
- A notification should pop up stating «Game clip recorded.»
(Image credit: Future)
There you have it. The video recordings will be saved under the Videos folder in a subfolder labeled Captures, which you can watch back or use for video editing. There are plenty of ways to use the Xbox Game Bar, but Windows 11 also has easy ways to take a screenshot and more. If you’re looking for more ways to take control of your Windows 11 laptop, check out how to change a theme or customize one on Windows 11, how to customize the Action Center in Windows 11, and how to check Windows 11 compatibility using Microsoft’s Health Check app.
Today’s best Gaming Laptops deals
10 Amazon customer reviews
☆☆☆☆☆
£679.99
View
Reduced Price
£791.89
£695.66
View
Reduced Price
£799
£699
View
Show More Deals
Get instant access to breaking news, the hottest reviews, great deals and helpful tips.
Contact me with news and offers from other Future brandsReceive email from us on behalf of our trusted partners or sponsors
Darragh Murphy is fascinated by all things bizarre, which usually leads to assorted coverage varying from washing machines designed for AirPods to the mischievous world of cyberattacks. Whether it’s connecting Scar from The Lion King to two-factor authentication or turning his love for gadgets into a fabricated rap battle from 8 Mile, he believes there’s always a quirky spin to be made. With a Master’s degree in Magazine Journalism from The University of Sheffield, along with short stints at Kerrang! and Exposed Magazine, Darragh started his career writing about the tech industry at Time Out Dubai and ShortList Dubai, covering everything from the latest iPhone models and Huawei laptops to massive Esports events in the Middle East. Now, he can be found proudly diving into gaming, gadgets, and letting readers know the joys of docking stations for Laptop Mag.
Laptop Mag is part of Future plc, an international media group and leading digital publisher. Visit our corporate site .
©
Future Publishing Limited Quay House, The Ambury,
Bath
BA1 1UA. All rights reserved. England and Wales company registration number 2008885.
Windows 11 Screen Recording with Sound — 3 Quick Ways
Video Recording with Game Bar
Windows 11 is Microsoft’s first operating system to target digital content creators as well as consumers. To do this, many interesting tools were added out of the box, including the Xbox Game Bar that supports Windows 11 screen recording. In it, without the help of third-party programs, you can record spectacular moments of the process of passing games, so that later you can share the video in player communities, on your pages on social networks and on any other suitable platforms. nine0003
To record Windows 11 screen video using Xbox Game Bar:
-
Launch the Xbox Game Bar app from the Start menu or press Win + G on your laptop or computer keyboard .

-
Enable recording by clicking on the corresponding button in the panel located in the upper left corner, or hold down on the keyboard Win + Alt + R . When recording starts, a floating panel will appear on the screen, including a button to turn audio capture on and off. nine0003
-
Click anywhere on the screen to collapse the game bar widgets, or navigate to a previously running game, application, browser tab that you want to capture on video.
-
When finished recording, stop capturing by clicking on Stop recording on the floating application bar, or use the keyboard shortcut Win + Alt + R .
-
Open the saved video from the panel by pressing Show all entries in widget with title Write . By default, video files are stored in the folder Videos → Clips .
The Xbox Game Bar has many settings that allow you to add a webcam image to the recording, allow the application to capture the voice from the connected microphone, save action scenes with the option to save the last 30 seconds of what is happening in the game as a clip on pressing Win + Alt + G — indispensable in case of an unexpected and very cool moment in the game. But with all the advantages of the Xbox Game Bar for streamers and the ability to do without third-party programs if this application is available in the OS, it would be better to use another tool to shoot a screencast instruction: with support for displaying clicks, pressing, drawing over video, and other things in this kind. Consider one of the options — Movavi Screen Recorder.
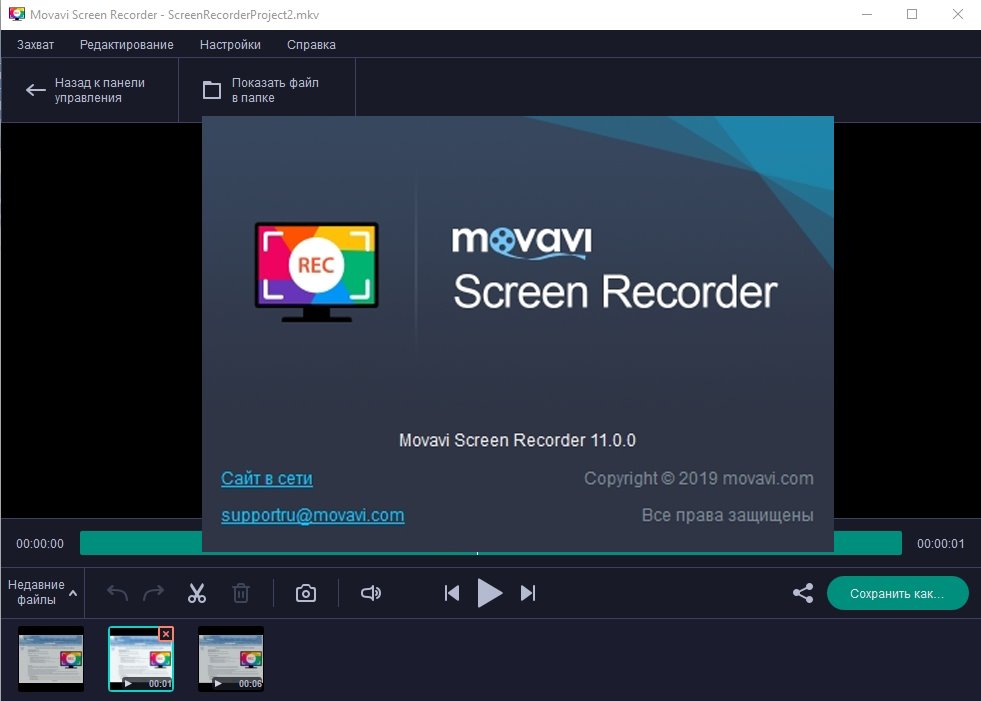
How to record a video from your Windows 11 computer screen with Movavi Screen Recorder
Movavi Screen Recorder is a screen recording program that is fully compatible with Windows 11. The tool’s capabilities cover many use cases, and its well-thought-out and well-localized interface allows you to start working right away after installation — without studying the reference information. The program supports screen capture, broadcast from a webcam, sound from a microphone, it also has a delay recording mode, options for drawing over video, displaying keystrokes and mouse clicks. You can download Movavi Screen Recorder for free to try it out. nine0003
How to record a screen with Movavi Screen Recorder
-
Install and run Movavi Screen Recorder from the Start menu or from the desktop shortcut.
-
Select the capture area — part of the screen or the whole. For clarity, which part of the screen will be displayed in the screencast will be highlighted with an orange frame during the shooting process.
-
Select one of the available audio sources — microphone or system speakers. The second option is also suitable for simultaneously capturing sound from a recorded program on a computer and your comments on what is happening on the screen. nine0003
-
Start the recording process by pressing the round red button Rec . Before the recording starts, the program will display the amount of available space on the drive where the video will be recorded, if there is not enough space, you can take this into account immediately and take any action, for example, clear the memory or change the file saving path.
-
Press Stop to stop capturing the screen. The program will automatically save the video to a file and immediately open it in the built-in video editor in Movavi Screen Recorder for viewing and further processing. nine0003
How to record a Windows 11 screen online for free
In case the Game Bar capabilities are not enough, and for some reason you can’t install Movavi Screen Recorder or its analogues, bookmark another useful tool — an online application for Screencapture.com screen recording.
Screencapture.com is a service accessible from any browser, regardless of the operating system. It supports a spartan minimum of options for screencasting: it captures the screen, broadcast from a connected webcam and sound from a microphone. But when you need to quickly prepare a video instruction for a colleague or client on how to work with a specific program or make a video for your grandmother on how to upload a photo to Odnoklassniki, you can do without delayed recording and drawing over the video. And that’s when Screencapture.com comes to the rescue — a nimble service with a free plan with restrictions and an inexpensive subscription — to remove them. nine0003
How to record a screen online using the free browser service Screencapture.com
-
Open the Screencapture.com website in any browser: Opera, Firefox, Chrome, Yandex Browser, etc. the desired options from the available ones: microphone, sound (system sounds) and webcam. Subscribers to paid service plans also become available to disable the overlay of a watermark over the video.
-
Press the big button Start recording .
-
In the pop-up window that opens, select a part of the screen to demonstrate — it can be a program window, a game, a browser tab. To record with sound, you must also check the box at the bottom of this box near item Grant access to audio in the system .
-
Click Share to start capturing the screen, audio from the microphone, and the picture from the webcam — what will be recorded depends on the settings selected at the beginning.
 nine0003
 -
When finished, press Stop recording . The tab will open a simple player with the ability to preview the recording. Here, by clicking on Download on the right side of the page, you can download the video to your device in MP4 format, and clicking on the link with the text New recording will open the start page for creating a new video.
Screen capture apps and services aren’t just for streamers and esports players, although the Xbox Game Bar mentioned in the article is aimed at just such an audience. At the end of 2021, one of the most common scenarios for using such tools is to record video instructions and training clips. This has become especially relevant against the backdrop of a surge in demand for remote work and study, when it is not possible to simply approach a colleague in the office and show how to solve a particular problem. Hosts of webinars and training courses use screen recording software to save their own live broadcasts and then turn the recorded content into social networks and video hosting sites. nine0003
Best way to capture screen video
Still have questions?
If you cannot find the answer to your question, please contact our support team.
Subscribe to the discounts and promotions mailing list
How to record the screen in Windows 11 in 2022 (4 methods) • Okie Doki
I believe that Windows, and in particular Windows 11, is the most feature-rich and versatile desktop OS , which easily outperforms macOS, Linux, and Chrome OS. However, it’s a pity that Windows 11 still doesn’t have a built-in screen recording tool. It’s not even in Windows 10, so we’ve compiled a list of the best screen recorders for Windows 10. By the way, in case you didn’t know, macOS and Chrome OS already come with a reliable screen recorder and I love using them. But if you are a Windows user, in this guide, we offer you four easy and free tools to record screen on Windows 11. You can record screen on Windows 11 PC with sound support, no watermark or any restrictions.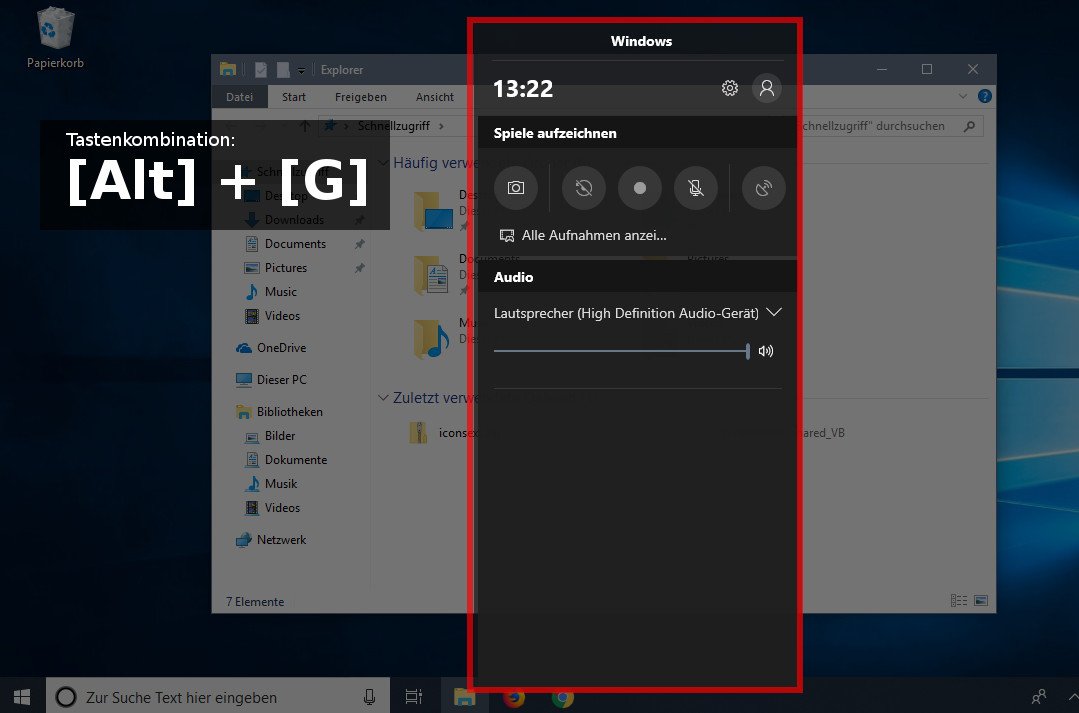 So, on that note, let’s check out these solutions. nine0003
Screen Recording on Windows 11 (2022)
We have included four easy and free ways to record screen on Windows 11. We have used Xbox Game Bar, OBS Studio and Free Cam to record screen on Windows 11. And the fourth method will be especially handy for students. You can expand the table below and test the methods at your convenience.
Record your screen in Windows 11 with Xbox Game Bar
While Windows 11 or Windows 10, for that matter, doesn’t have a built-in screen recorder, there is an Xbox Game Bar that lets you easily record your screen. It is designed to record game sessions, but you can use it to record other windows as well. The only downside is that it doesn’t record the screen when File Explorer is open or you’re on the desktop, which is a bummer. But the best part is performance. By simply using the keyboard shortcut, you can start screen recording. No need to wait for video encoding! With that said, let’s see how this method works:0003
1. First, make sure you are not on your desktop. Now open an app or window (not File Explorer) and use the Windows 11 keyboard shortcut «Windows + G». The Xbox Game Bar overlay opens.
Windows programs, mobile applications, games — EVERYTHING is FREE, in our closed telegram channel — Subscribe 🙂
2. Then go to the «Capture» option from the menu available at the top of the screen.
3. If you don’t see the Capture option, click the Widgets menu and add a Capture tab (click the star icon next to Capture). nine0003
4. A small floating pop-up window will open. Here, click the «Start Recording» button, and you’re done! Windows 11 will instantly start recording your screen. Be sure to turn on the microphone to record your voice along with desktop audio. Alternatively, you can use the keyboard shortcut «Windows + Alt + R» to start screen recording directly.
5. To stop recording, click the Stop button in the Capture Status floating window. The screen recording will be saved in your profile in the C:UsersyourusernameVideosCaptures folder. nine0003
Record your screen on Windows 11 with OBS Studio.
If you are not comfortable with the limitations of Xbox Game Bar and want to record your desktop and File Explorer without any restrictions, then OBS Studio is the best screen recorder for Windows 11. It is a free and open source program that works great and saves videos without watermarks. OBS Studio may seem overwhelming, but stick to the guide below and you should be able to easily record your screen on Windows 11.0003
1. Install OBS Studio from the link first. Right here. You can also install OBS Studio from the Microsoft Store (Free).
2. Then open the software and select «Optimize for recording only, I won’t stream» in the first pop-up window. Leave all other settings as default and follow the on-screen instructions.
3. In the OBS Studio window, click the + in the Sources section and select Screen Capture. After that, name the layer and click OK. nine0003
4. Now click «Start Recording» and OBS Studio will start recording the entire screen with audio. You don’t need to configure anything to record sound. It is enabled by default.
5. When you’re done, open OBS Studio and click Stop Recording. The screen recording will be saved to the following location on your Windows 11 PC — C:UsersyourusernameVideos.
6. If you want to capture a specific window or application in Windows 11, click the «+» button in the «Sources» section and select «Window Capture». Then select the active window and start recording. That’s all. nine0003
Record screen on Windows 11 with Free Cam third party app
If you are looking for something simple, Free Cam is probably the best third party screen recording app for Windows 11. It is lightweight, free, has a minimal user interface and does not add a watermark to the screen recording. The app also includes a video editor with noise reduction capability. The only complaint I have about Free Cam is that it exports videos in WMV format. No MP4 support. However, here is how you can capture screen on Windows 11 with Free Cam. nine0003
1. Download Free Cam from here. After that, install the application as you would any executable.
2. Then open Free Cam and click New Entry.
3. After that, you can select the area you want to record, or just select the «Full Screen» option from the drop-down menu. Be sure to turn on the microphone and press the red record button.
4. When you want to stop recording, press «Esc» on your keyboard and that’s it. The Free Cam app will open the screen recording. Here you can edit the video or click «Save as Video» on the menu ribbon at the top and you’re done. nine0003
Record your screen on Windows 11 with Microsoft PowerPoint
If you are a student looking for the easiest way to record your screen on Windows 11, you can do it with Microsoft PowerPoint. Typically, students get an Office subscription through their schools or colleges, so this can come in handy for screen recording. Here’s how to do it.
1. First, press the Windows key and search for «powerpoint». Now open Microsoft Power Point.
2. Then click the Insert tab in the menu bar. Here, find and click «Screen Recording» in the top right corner.
3. You will now be prompted to select an area for screen recording. The microphone is enabled by default, so you can also record your voice with this screen recording method on Windows 11 computers. Now select the window area or the entire screen.
4. Finally, click the Record button and the screen recording will start. And press «Windows + Shift + Q» to stop recording when you’re done. nine0003
5. The screen recording will be automatically added to your PowerPoint presentation. Now, to save it locally, right-click on the video and select the Save Media As option.