How to uninstall drivers on Windows 11
You have at least three ways to uninstall drivers on Windows 11, and here’s how.
Mauro Huc
@pureinfotech
- Method one: To uninstall drivers on Windows 11, open Settings > Apps > Installed apps, select the driver, and click on “Uninstall.”
- Method two: Open Control Panel > Programs > Uninstall a program, select the driver, and click on “Uninstall.”
- Method three: Open Device Manager, right-click the driver, and choose “Uninstall device.”
On Windows 11, a device driver is an essential component that allows the system to detect and control the hardware installed on the computer.
Although the system does a good job setting up the required drivers for your computer configuration, you may need to uninstall them manually because they are causing problems or you no longer need them.
Whatever the case, Windows 11 includes at least three ways to remove drivers from your computer using Settings, Control Panel, and Device Manager.
This guide will teach you how to remove device drivers from Windows 11.
- Uninstall drivers on Windows 11 from Settings
- Uninstall drivers on Windows 11 from Control Panel
- Uninstall drivers on Windows 11 from Device Manager
Uninstall drivers on Windows 11 from Settings
To uninstall drivers on Windows 11, use these steps:
-
Open Settings on Windows 11.
-
Click on Apps.
-
Click the Installed apps tab.
Quick note: On Windows 11 21h3, the page is listed as “Apps & features.
 ”
” -
Select the driver, click the menu (three-dotted) button on the right side, and select the Uninstall option to remove the driver from Windows 11.
-
Click the Uninstall option.
Once you complete the steps, the device will be removed from the computer. However, depending on the uninstaller instructions, the computer may keep some driver components.
Uninstall drivers on Windows 11 from Control Panel
To remove a driver through Control Panel on Windows 11, use these steps:
-
Open Control Panel.
-
Under the “Programs” section, click the Uninstall a program option.
-
Select the driver package.
-
Click the Uninstall button.
-
Click the Yes button to remove the driver.
After you complete the steps, the driver will no longer be available on Windows 11.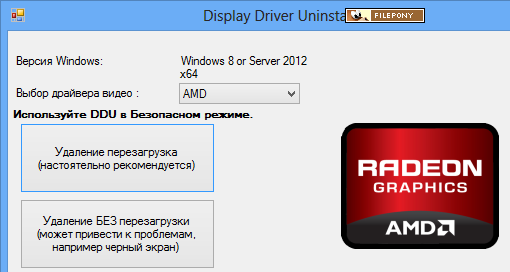 Similar to using the Settings app, the computer may keep some components depending on the uninstaller instructions.
Uninstall drivers on Windows 11 from Device Manager
To uninstall a driver from Device Manager, use these steps:
-
Open Start.
-
Search for Device Manager and click the top result to open the app.
-
Expand the category with the device driver to remove.
-
Right-click the device and select the Uninstall device option.
-
(Optional) Check the Delete the driver software for this device option (if applicable).
Quick note: If you don’t check this option, the system will uninstall the device, but it’ll keep the driver files if you need to reinstall it. However, removing and downloading it again is best if the driver has problems.
-
Click the Uninstall button.
Once you complete the steps, the driver will be entirely removed from Windows 11.
Although these instructions will work in most cases, some devices may need to be uninstalled differently, such as in the case of a printer.
If you are dealing with a problem after an update, instead of deleting the driver, you may want to try to roll back to the previous version to see if that fixes the issue.
If you recently installed a driver update and Windows 11 no longer boots correctly, you can use these instructions to uninstall the driver from the Windows Recovery Environment (WinRE).
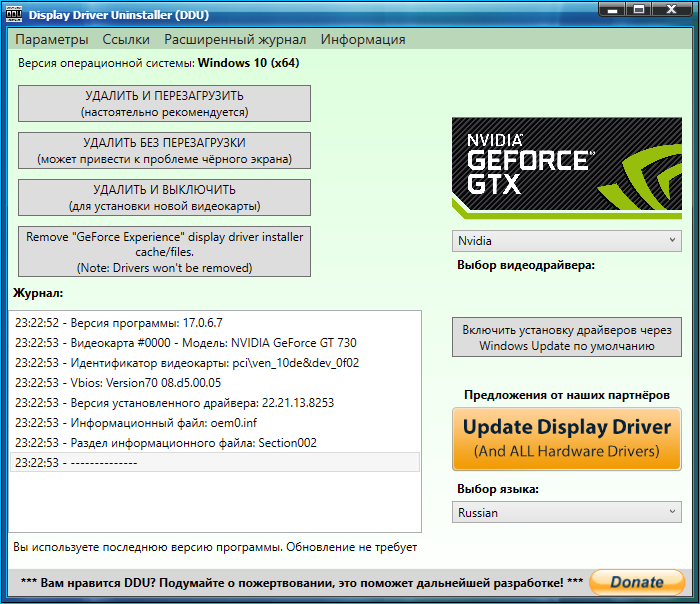
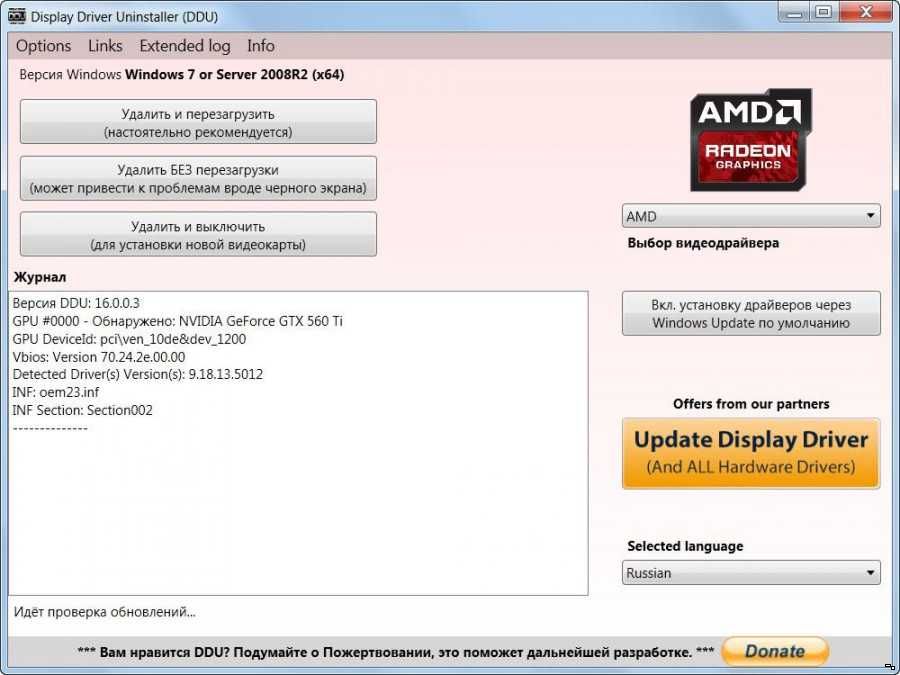
Finally, when you want to remove a graphic driver from Nvidia or AMD completely, it’s best to use the Display Driver Uninstaller (DDR) tool.
- How to fix Night Light on Windows 10
- How to find other computers in network on Windows 11
We hate spam as much as you! Unsubscribe any time
Powered by follow.it (Privacy), our Privacy.
Top 4 Ways to Uninstall Drivers From Windows 11
Device drivers are programs that allow Windows to communicate with your hardware devices.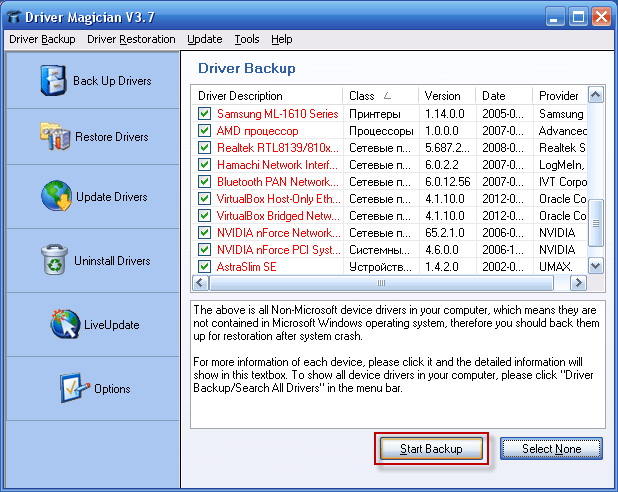 Without them, the computer would fail to run some of the components inside. If one of these device drivers on your PC is causing trouble, you may want to get rid of it entirely.
Windows 11 makes it reasonably easy to get rid of unwanted device drivers. You can uninstall a driver from the Device Manager, Settings app, Control Panel, or the Command Prompt terminal. We’ll show you how to use all of them in detail.
1. Uninstall Drivers Using Device Manager
Device Manager is a handy utility that lets you manage various hardware devices installed on your system. You can also use it to uninstall a driver from your computer easily. Here’s how to do it.
Step 1: Right-click on the Start icon or press the Windows key + X to open the Power User menu. Then, select Device Manager from the list.
Step 2: In the Device Manager window, locate the driver you want to remove. Right-click on it and select Uninstall device.
Step 3: Select Uninstall when prompted.
After completing the steps, your computer will remove the notorious driver from your PC.
2. Uninstall Drivers via the Settings App
Another option for uninstalling drivers in Windows 11 is to use the Settings app. It’s as simple as uninstalling an app from Windows. Here are the steps you can follow.
Step 1: Open the Start menu and click the gear-shaped icon to launch the Settings app. Alternatively, you can press the Windows key + I to achieve the same.
Step 2: Use the left pane to navigate to the Apps tab. Then, click on Installed apps.
Step 3: Scroll down or use the search bar at the top to locate the driver you want to get rid of. Click the three-dot menu icon next to it and select Uninstall.
Step 4: Select Uninstall again to confirm.
3. Uninstall Drivers With Control Panel
Although Microsoft intends to retire the Control Panel soon, it is still a popular option for making system-level changes on Windows.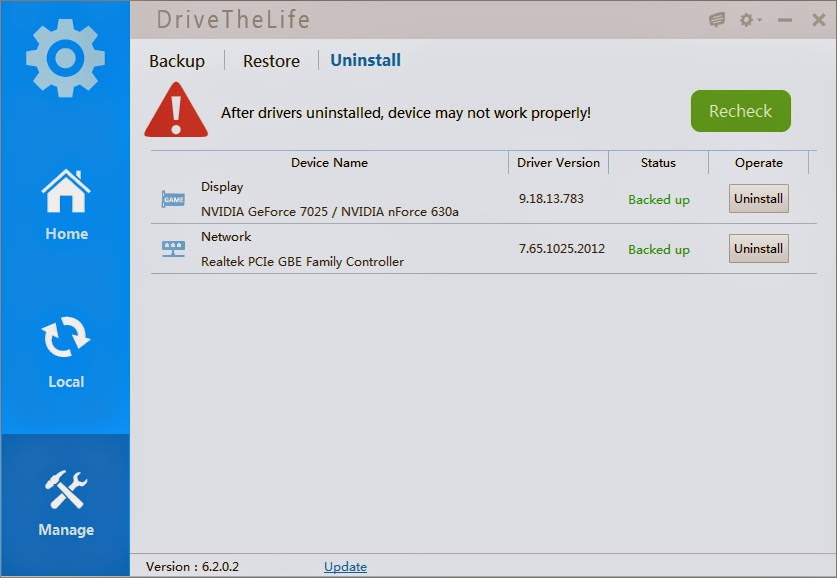 If you’re a veteran Windows user who prefers the Control Panel, you can employ the following steps to get rid of a device driver.
Step 1: Press the Windows key + R to open the Run dialog. Type control in the box and press Enter.
Step 2: Use the drop-down menu in the top right corner to change the view type to Small or Large icons. Then, click on Programs and Features.
Step 3: Locate and select the unwanted driver from the list. Then, click the Uninstall option at the top.
Step 4: Select Yes when the User Account Control (UAC) prompt appears.
From there, follow the on-screen prompts to remove the driver.
4. Uninstall Drivers With Command Prompt
The Command Prompt is one of two command-line interpreters available on Windows. If you’re a terminal geek, you may already be using Command Prompt to run batch files, troubleshoot system issues, and perform various other tasks. But did you know you can also use it to uninstall a driver from your Windows PC? We’ll show you how.
Step 1: Click the search icon on the Taskbar or press the Windows key + S to open the search menu. Type cmd in the search box and select Run as administrator.
Step 2: Select Yes when the User Account Control (UAC) prompt appears.
Step 3: Paste the following command and press Enter to view a list of available drivers on your PC.
Dism /online /Get-Drivers /Format:Table
Step 4: Note down the Published Name of the driver you want to uninstall.
Step 5: Lastly, run the following command to remove the driver.
pnputil /delete-driver [Published Name] /uninstall /force
Replace [Published Name] in the above command with the name noted in the last step.
In the following example, we try to remove the Samsung Electronics Modem driver. So, this the command we use:
pnputil /delete-driver oem52.inf /uninstall /force
Once you run the above command, Windows will remove the specified driver from your PC. Similarly, you can use the above command to uninstall more drivers if you want.
Remove the Unwanted
Your Windows 11 PC may contain drivers for devices you no longer use. Removing old or unused drivers is vital so your system runs smoothly. Fortunately, Windows 11 provides several methods for uninstalling device drivers. Let us know which method you’ll use in the comments section below.
Driver removal (Windows) | User Manual
To uninstall the driver installed on your computer, follow these steps from the control panel.
Uninstalling the printer driver
Open the Devices and Printers window.
Windows 10 (version 1703 and later)
-
From the [Start] menu, click [Windows System] [Control Panel].
-
Click [View Devices and Printers].

For Windows 10 (before 1703) and Windows Server 2016
-
Right-click [Start], then click [Control Panel].
-
Click [View Devices and Printers].
Windows 8.1, Windows Server 2012/2012 R2
-
On the Express Button Bar, click [Set] [Control Panel].
-
Click [View Devices and Printers].
Windows 7, Windows Server 2008 R2
-
On the [Start] menu, click [Devices and Printers].
Windows Server 2008
-
From the [Start] menu, select [Control Panel].
-
Click [Printer] in the [Hardware and Sound] window.
Right-click the printer to be removed, and then click [Remove Device] or [Remove].
Select the printer and click [Print server properties].
-
In Windows Server 2008, right-click the printer window area, and then click [Running as Admin] [Server Properties].
-
If the [Change Driver Settings] button is displayed in the «Print Server Properties» window, click this button and proceed to the next step.
Select the printer driver to be removed from the [Drivers] tab, and then click [Remove…].
Select [Remove driver and driver package], and then click [OK].
When a confirmation dialog box appears, click [Yes].
Click the [Delete] button.
If the driver does not uninstall, it may be because it is being used under a different printer icon. First remove the printer icon under which the driver is used, and then uninstall the driver.
Click [OK] [Close] to close the properties window.
Uninstalling the TWAIN/WIA 9 driver0005
Run the uninstaller.
Windows 10 (version 1703 and later)
-
From the [Start] menu, click [Windows System] [Control Panel].
-
Click [Uninstall a program].
For Windows 10 (before 1703) and Windows Server 2016
-
Right-click [Start], then click [Control Panel].
-
Click [Uninstall a program].
Windows 8. 1, Windows Server 2012/2012 R2
-
On the express button bar, click [Set] [Control Panel].
-
Click [Programs and Features].
Windows 7, Windows Server 2008/2008 R2
-
From the [Start] menu, select [Control Panel].
-
Click [Uninstall a program].
Select the TWAIN/WIA driver and right-click it, and then click [Uninstall/Change] or [Uninstall].
Follow the instructions on the screen to uninstall the driver.
Close the window displayed on the screen.
Uninstalling the LAN-FAX driver
Open the Devices and Printers window.
Windows 10 (version 1703 and later)
-
From the [Start] menu, click [Windows System] [Control Panel].
-
Click [View Devices and Printers].
For Windows 10 (before 1703) and Windows Server 2016
-
Right-click [Start], then click [Control Panel].
-
Click [View Devices and Printers].

Windows 8.1, Windows Server 2012/2012 R2
-
On the Express Button Bar, click [Set] [Control Panel].
-
Click [View Devices and Printers].
Windows 7, Windows Server 2008 R2
-
On the [Start] menu, click [Devices and Printers].
Windows Server 2008
-
From the [Start] menu, select [Control Panel].
-
Click [Printer] in the [Hardware and Sound] window.
Right-click the printer to be removed, and then click [Remove Device] or [Remove].
Select the printer and click [Print server properties].
-
In Windows Server 2008, right-click the printer window area, and then click [Running as Admin] [Server Properties].
-
If the [Change Driver Settings] button is displayed in the «Print Server Properties» window, click this button and proceed to the next step.
Select the printer driver to be removed from the [Drivers] tab, and then click [Remove.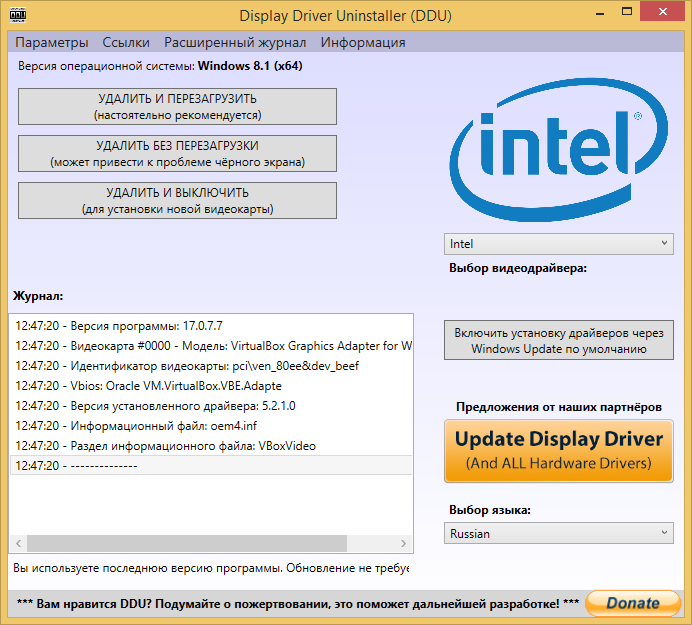 ..].
..].
Select [Remove driver and driver package], and then click [OK].
When a confirmation dialog box appears, click [Yes].
Click the [Delete] button.
Click [OK] [Close] to close the properties window.
How to uninstall a driver in Windows 10 and Windows 11
In some situations, the user needs to know how to remove a driver from a computer in order to solve a particular problem on their device. In the Windows 11 and Windows 10 operating systems, the device driver is an essential component that allows the system to detect, manage, and interact with the hardware installed on the computer.
Modern OS versions do a good job of installing the necessary drivers for your computer’s configuration, but you may need to manually remove the driver from your system in Windows because it causes problems or you no longer need it.
Contents:
- How to uninstall a driver from Windows 10 and Windows 11 using Device Manager
- How to roll back a driver using Device Manager
- How to uninstall drivers and systems using Settings
- Removing drivers in Windows 10 and Windows 11 using the Control Panel
- How to remove old drivers on Windows — method 1
- How to remove unnecessary drivers — method 2
- Conclusions of the article
- How to remove a driver in Windows (video)
Drivers from previously installed hardware, which is now gone, may have remained on your PC. Therefore, it makes sense to remove old and unnecessary drivers so that conflicts do not arise in the future.
Users need to know how to properly uninstall drivers because the problem associated with them may appear on the computer all of a sudden.
In this guide, you will find instructions on how to uninstall the driver in Windows 10 and Windows 11 operating systems. In Windows 10/11, there are several ways to uninstall drivers from your computer using the built-in tools: Settings, Control Panel, and Device Manager snap-in.
In addition, you will learn how to remove old drivers from your computer that are no longer needed, but they uselessly take up disk space. This article does not cover other ways to uninstall drivers using third party software.
Before uninstalling the drivers, close all programs and stop the current work on the computer. This is necessary in order to easily remove the driver, which at this time can be used by any device when you try to remove it.
How to uninstall a driver from a Windows 10 and Windows 11 system using Device Manager
We are now using the Device Management Console (MMC) snap-in, which displays all the devices installed on this computer (desktop PC or laptop). From the Device Manager, you can update the driver, roll back to a previous version if there are problems, or remove the device along with its drivers.
If you are reinstalling the driver, it is better to download a replacement driver to your computer in advance or create a backup copy of the drivers. In some situations, you will not be able to find and download this driver, for example, because it is not available on the Internet or in driver software packages if it is an old and rare driver. In this case, you can restore the drivers from a backup.
Read more: Windows 10 Driver Backup — 4 Ways
Use the standard method to uninstall drivers using Device Manager:
- Right click on the start menu.
- Find «Device Manager» in the list and click on it to open the application.

- Expand the category for the device driver you want to uninstall.
- Right-click the device and select the Remove device option from the context menu.
- In the «Remove a device» window, check the box «Attempt to remove the driver for this device» in the Windows operating system.
In the Windows 10 operating system, this item is called a little differently — «Delete the driver software for this device.»
Note: If you do not check this option, the system will remove the device but keep the driver files in case you need to reinstall it. In most cases, it is best to completely uninstall this device along with the drivers, so that you can then reinstall it if there are problems with this driver.
- Click on the «Delete» button.
- After completing these steps, the driver device will be completely removed from your computer.
- Restart your PC.
Immediately after removing the device, Windows may start automatically installing the removed driver again, so if you wish to manually install the correct driver version, please turn off the Internet during the driver removal operation.
See also: Snappy Driver Installer — find, install and update drivers
How to roll back a driver in Device Manager
If you experience problems with your computer after updating, instead of uninstalling the driver, you can try reverting to a previous version to see if that solves the problem.
Do the following:
- Highlight the problematic driver in Device Manager.
- Right-click on it and select Properties from the context menu.
- In the driver properties window, click the Driver tab.
- Click the Roll Back button to restore the previous driver.
Read also: DriverPack Solution — automatically install drivers on your computer
How to uninstall drivers and systems using the Settings application Settings», which has the function of uninstalling programs.
Uninstalling applications is the same on both systems, there are only slight differences in appearance inside the Settings interface.
Go through a few steps:
- Open the Settings application using the right-click menu in the Start menu.
- Go to Applications.
- In the Apps & Features window, in the list of installed programs, select the driver, click on the menu button with three dots on the right in Windows 11, or click on this application in Windows
- Click on the Uninstall button.
- After that, the driver will be removed from the computer.
However, depending on the instructions provided by the uninstaller for this software, some components of the driver may remain on the computer.
Uninstalling drivers on Windows 10 and Windows 11 using the Control Panel
Similarly, you can uninstall drivers on Windows 10 and Windows 11 operating systems using another built-in tool, the Control Panel application.
To uninstall the driver through the Control Panel in Windows 11 or Windows 10, do the following:
- Press the «Win» + «R» keys.
- In the Run dialog box, type «control panel» and then press the «Enter» key.
- The «Control Panel» window will open in the «Categories» view mode.
- In the Programs section, click Uninstall a program.
- In the Uninstall or Change a Program window, select the driver package to uninstall.
- Right-click on it and then click Uninstall/Change.
- In the window that opens, agree to remove the driver.
After completing these steps, the driver will no longer be available in Windows. As with the Settings application, the computer may retain some components depending on the operation of the uninstaller for this driver.
Read also: IObit Driver Booster — update drivers on your computer
How to remove old drivers on Windows — 1 method
Gradually, a large number of outdated drivers accumulate on the computer, which have been updated from Windows Update or from other sources.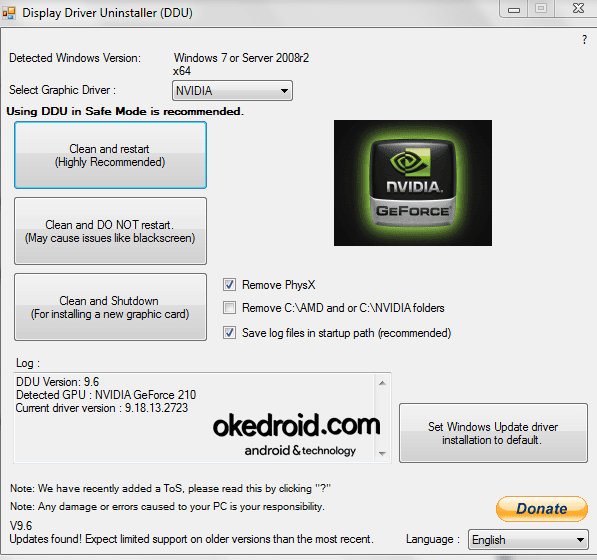 The system saves them on the computer even after installing their new versions.
You can remove these unnecessary drivers from your computer so that they do not take up disk space.
Do the following:
- Type «disk cleanup» in the Windows search box.
- Run the application as an administrator.
- After selecting a drive, Disk Cleanup will display information about the files that can be deleted from the PC.
- Check the «Device Driver Packages» box, and then click the «OK» button.
- In the warning window, click Delete Files.
Wait for this operation to complete.
See also: How to disable automatic Windows driver updates
How to remove unnecessary drivers — method 2
This operation can be performed from the Settings application without using the Disk Cleanup utility in Windows 11/10.
Do this:
- In the Settings app, go to System, tap on Memory.