ASRock Z390 Extreme4 Motherboard Review BIOS and Overclocking
1. ASRock Z390 Extreme4 Motherboard Review2. The technical data and benchmark results3. Layout, Design and Features4. BIOS and Overclocking5. PC power consumption6. Result and general impression
BIOS and Overclocking …
Get fast to the right UEFI settings …
ASRock Z390 Extreme4 BIOS and Overclocking
ASRock Z390 Extreme4 UEFI BIOS Update
ASRock Z390 Extreme4 overclocking
ASRock Z390 Extreme4 memory settings
ASRock Z390 Extreme4 voltage settings
ASRock Z390 Extreme4 Overclock even easier
ASRock Z390 Extreme4 BIOS undervolting
ASRock Z390 Extreme4 Fan control
BIOS and overclocking …
Let us continue with the BIOS / UEFI Setup options and the UEFI overclocking. After switching on the PC, press the Del or F2 key to access the UEFI setup.
The ASRock Z390 Extreme4 UEFI has a graphical interface that allows intuitive operation with the mouse or can still be operated conventionally with a keyboard.
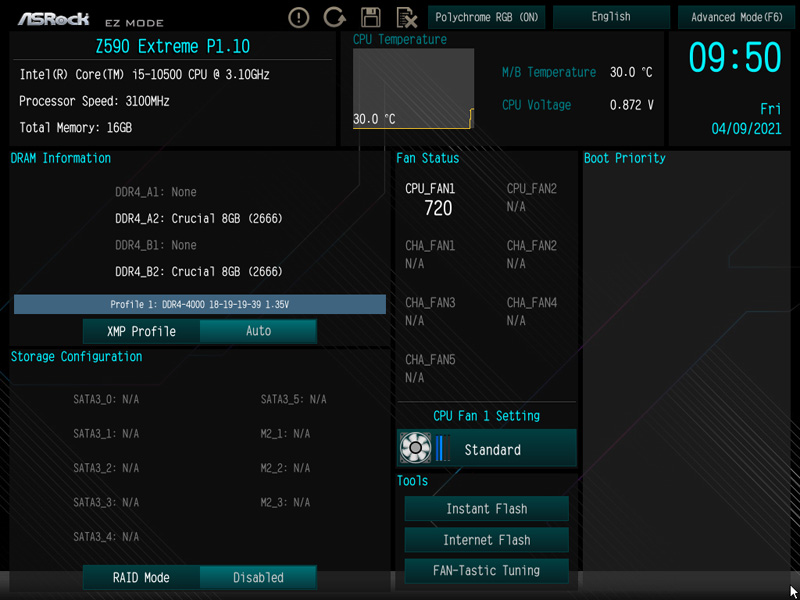
As usual at the latest ASRock motherboards, there is the ASRock EZ Mode – Easy Mode – which offers a clear input page with a lot of important information and still does not seem overloaded. It has Basic information such as time, date, CPU temperature, mainboard temperature, CPU voltage, first details about hardware, fan speed, hard disk configuration, RAID mode and fan settings with one click.
In addition, a few applications have been combined in one tools page.
Of course you can also use the EZ menu to set the time and date.
Many other functions can be operated using function keys, which can be called by pressing F1.
With the F6 key or the upper right button you get to the usual ASRock Advanced Mode, which you can also set as default.
The System Browser view at the ASRock Z390 Extreme4 motherboard can’t be found, but you will find the Full HD UEFI selection and the Active Page on Entry selection, where you can decide on which UEFI page you want to start in the UEFI setup.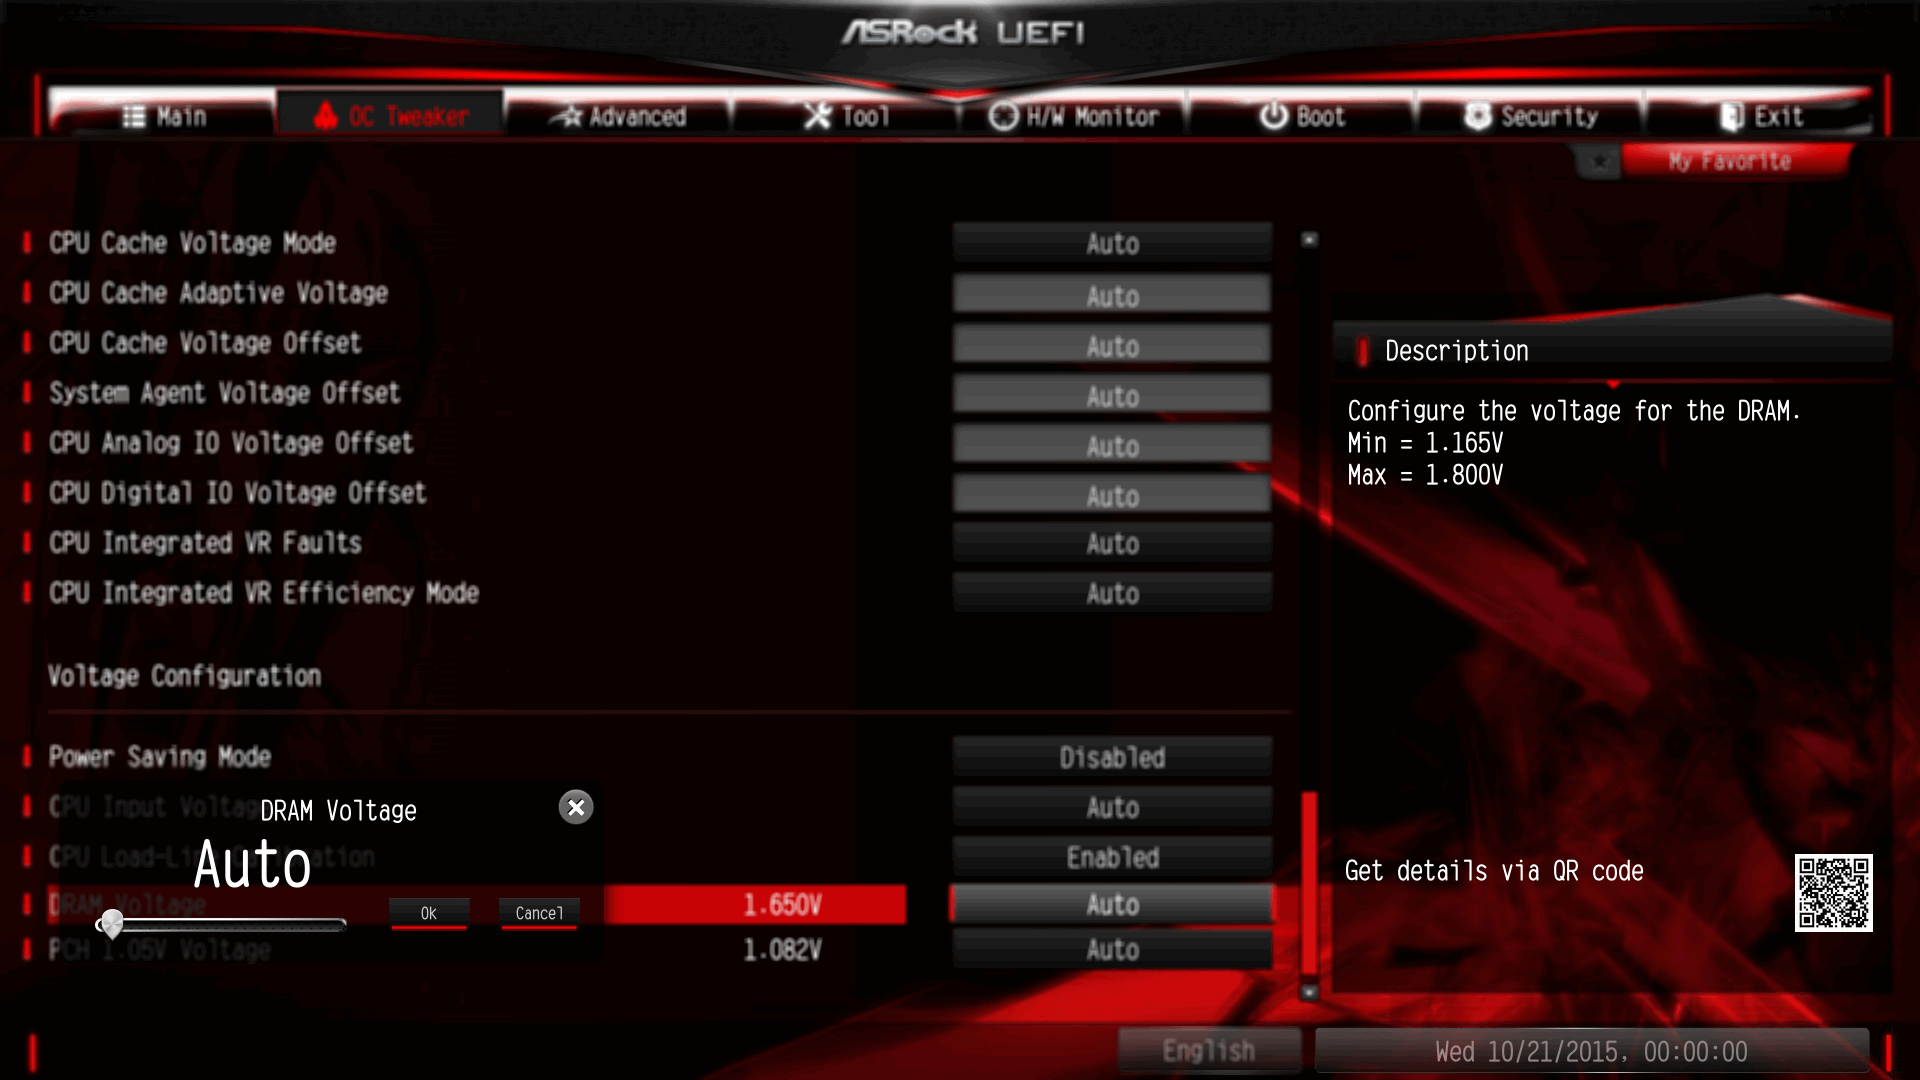 On the ASRock Z390 Extreme4 you will find the Active Page on Entry option and the Full HD UEFI selection in Advanced.
UEFI BIOS Update …
Before we start with UEFI overclocking, we update the UEFI BIOS to the latest version. Since ASRock regularly integrates new functions, better memory support and new processors, the BIOS update is recommended in most cases. For flashing the UEFI update ASRock offers several possibilities, e.g. the very simple Instant Flash or even the ASRock Internet Flash with a direct connection to the Internet. Via the so-called ASRock Instant Flash Option in the Tool Screen or via the F6 key when starting the PC you can access the ASRock Instant Flash Utility. You can simply install a previously downloaded ASRock BIOS without boot CD or similar by starting the ASRock Instant Flash Utility. Then select the BIOS Flash ROM from the desired drive, e.g. from a USB stick, which you have to unpack after downloading.
At the time of testing the UEFI BIOS version P1. 80 was available as the latest download, which we installed immediately over the pre-installed BIOS P1.60.
After a reboot the new BIOS version P1.80 is available.
The My Favorite function is very helpful because it allows you to place frequently used menu items here, so that you can see them easily on a page and access them faster. You start with a blank page – by the way, it will be emptied after a BIOS update.
The My Favorite page can now be filled with your own menu items by simply going to the respective menu item, then pressing F5 and the desired functions are already included in the My Favorite overview page. Here you can see a selection of possible favorites.
There is no RGB LED entry for this ASRock Z390 Extreme4 Mainboard, although it has the RGB connectors.
If you need technical UEFI support, you can even contact the ASRock Tech Service via the UEFI setup via network connection.
ASRock Z390M doesn’t offer an Easy Driver Installer option, but ASRock makes the RAID driver installation very easy for the user by offering with the Easy RAID Installer the easy way to download the current RAID drivers.
ASRock Z390 Extreme4 Overclocking …
Now let’s get to Intel LGA 1151 overclocking with the Z390 chipset on the ASRock Z390 Extreme4 motherboard. ASRock splits the OC-Tweaker menu into CPU Configuration, DRAM Configuration and Voltage Configuration.
In contrast to the Intel h470 chipset, the motherboard with Intel Z390 chipset can finally be overclocked again!
A look into the CPU configuration shows numerous OC options for Intel LGA1151 v2 CPU overclocking.
The BCLK/PCIE frequency can be set from 100 MHz up to an incredible 500 MHz. Of course, Intel LGA1151-2 processors also use this frequency to calculate a large number of parameters that can quickly become too high. For this reason, the BCLK host clock should only be increased with caution.
In our test, the board could be overclocked up to an incredible 350 MHz! BCLK!
Intel K processors have an unlocked multiplier, so that the desired CPU frequency can be increased via the CPU multiplier.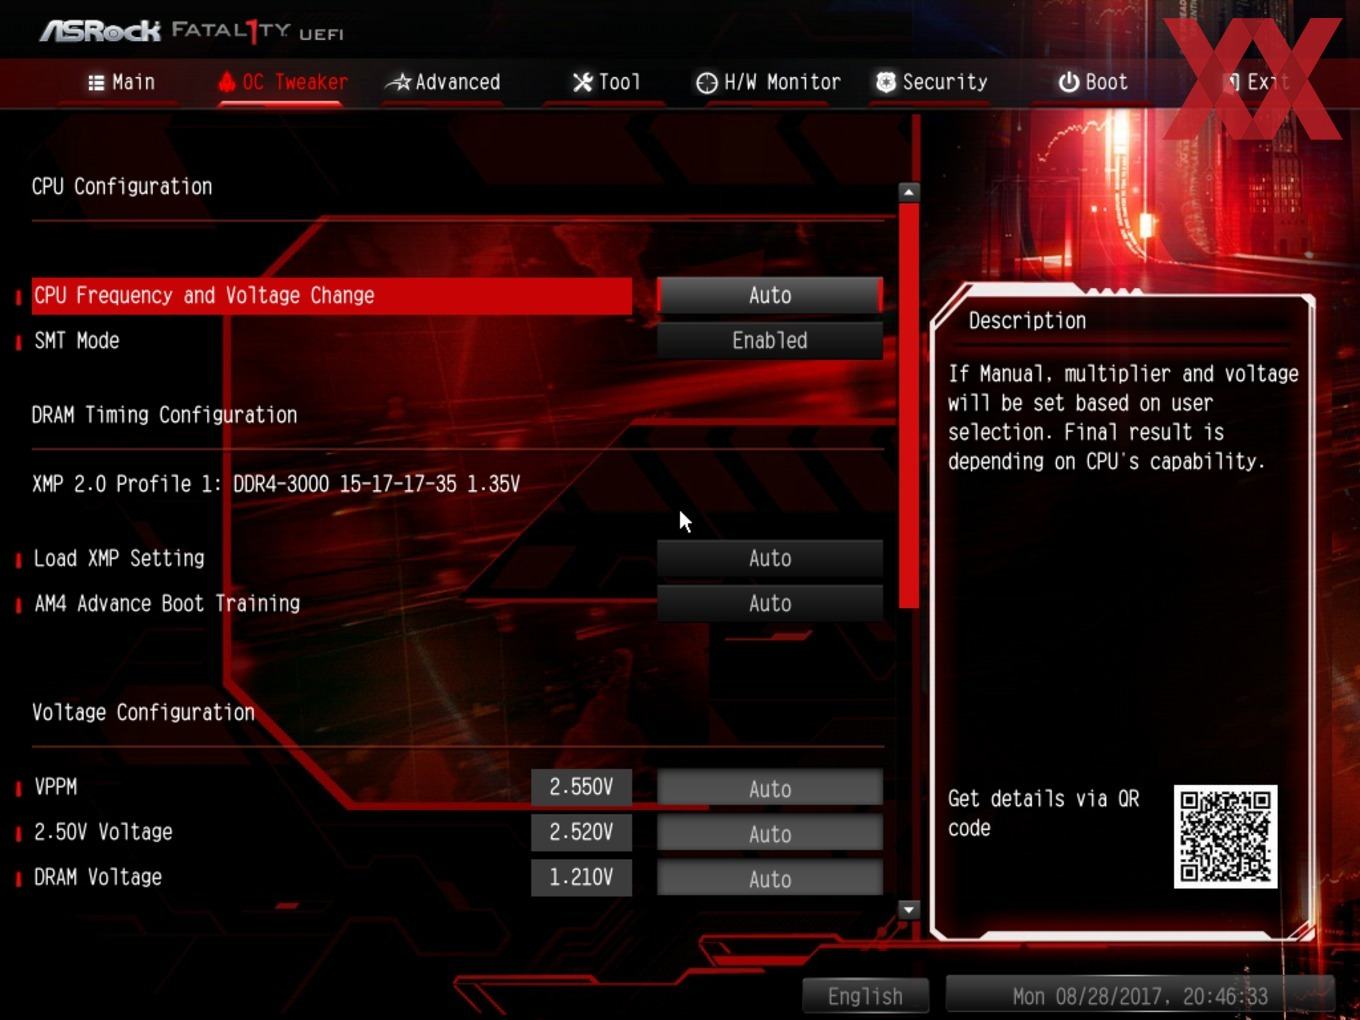 With the 8700K CPU (standard clock 3700MHz with a CPU ratio of 37x) the ASRock Z390 Extreme4 motherboard offered a multiplier range from 8x to 83x. Beside the CPU Ratio and BCLK Settings there are of course many other setting options.
We tried out how easy overclocking is with the Intel Core i7-8700K CPU, and as reported in Intel OC Forum at Intel Core i7-8700K OC, we got from 3700 MHz to 5300 MHz. Here you can see the confirmed CPU-Z tool with 5300 MHz at 1.4500 Volt (Auto +0.2V). However, the cooling for a longer operation under load should be improved significantly, because the air cooler quickly reaches its limits.
Beside the CPU Ratio and BCLK Settings there are of course many other settings.
ASRock Z390 Extreme4 memory settings …
In the DRAM configuration menu you can find all important memory settings.
Thanks to Load XMP Setting support, XMP memory modules are already correctly set with a mouse click in the UEFI BIOS.
Alternatively you can select the settings manually. With the DDR4 memory clocking you can e.g. select values from DDR4-800 …
… to DDR4-8400, where the BCLK is then increased.
All DDR4 timings can also be adjusted manually.
The ASRock Z390 Extreme4 also offers a DRAM tweaker menu with all SPD and XMP memory values for direct selection.
ASRock Z390 Extreme4 voltage settings …
Now we come to the different voltage values that can be set in the BIOS. Although the CPU cannot be overclocked, the Z390 motherboard does provide voltage settings under Voltage Configuration. At the CPU Core/Cache Voltage you can set the value Offset or Fixed Mode. With Fixed Mode, a VCore of up to 1.520V plus -0.100V to +0.200V offset can be set on the Intel Core i7-8700K Test CPU. In addition, the Z390 motherboard has the 1.0V PCH Voltage, VCCIO Voltage, VCCST Voltage, VCCSA Voltage and CPU Load Line Calibration. The DDR4 voltage can also be set in the Voltage menu.
ASRock Z390 Extreme4 even easier overclocking …
If you don’t want to deal with overclocking anymore, you can try your luck with the so-called Load Optimized CPU OC Setting.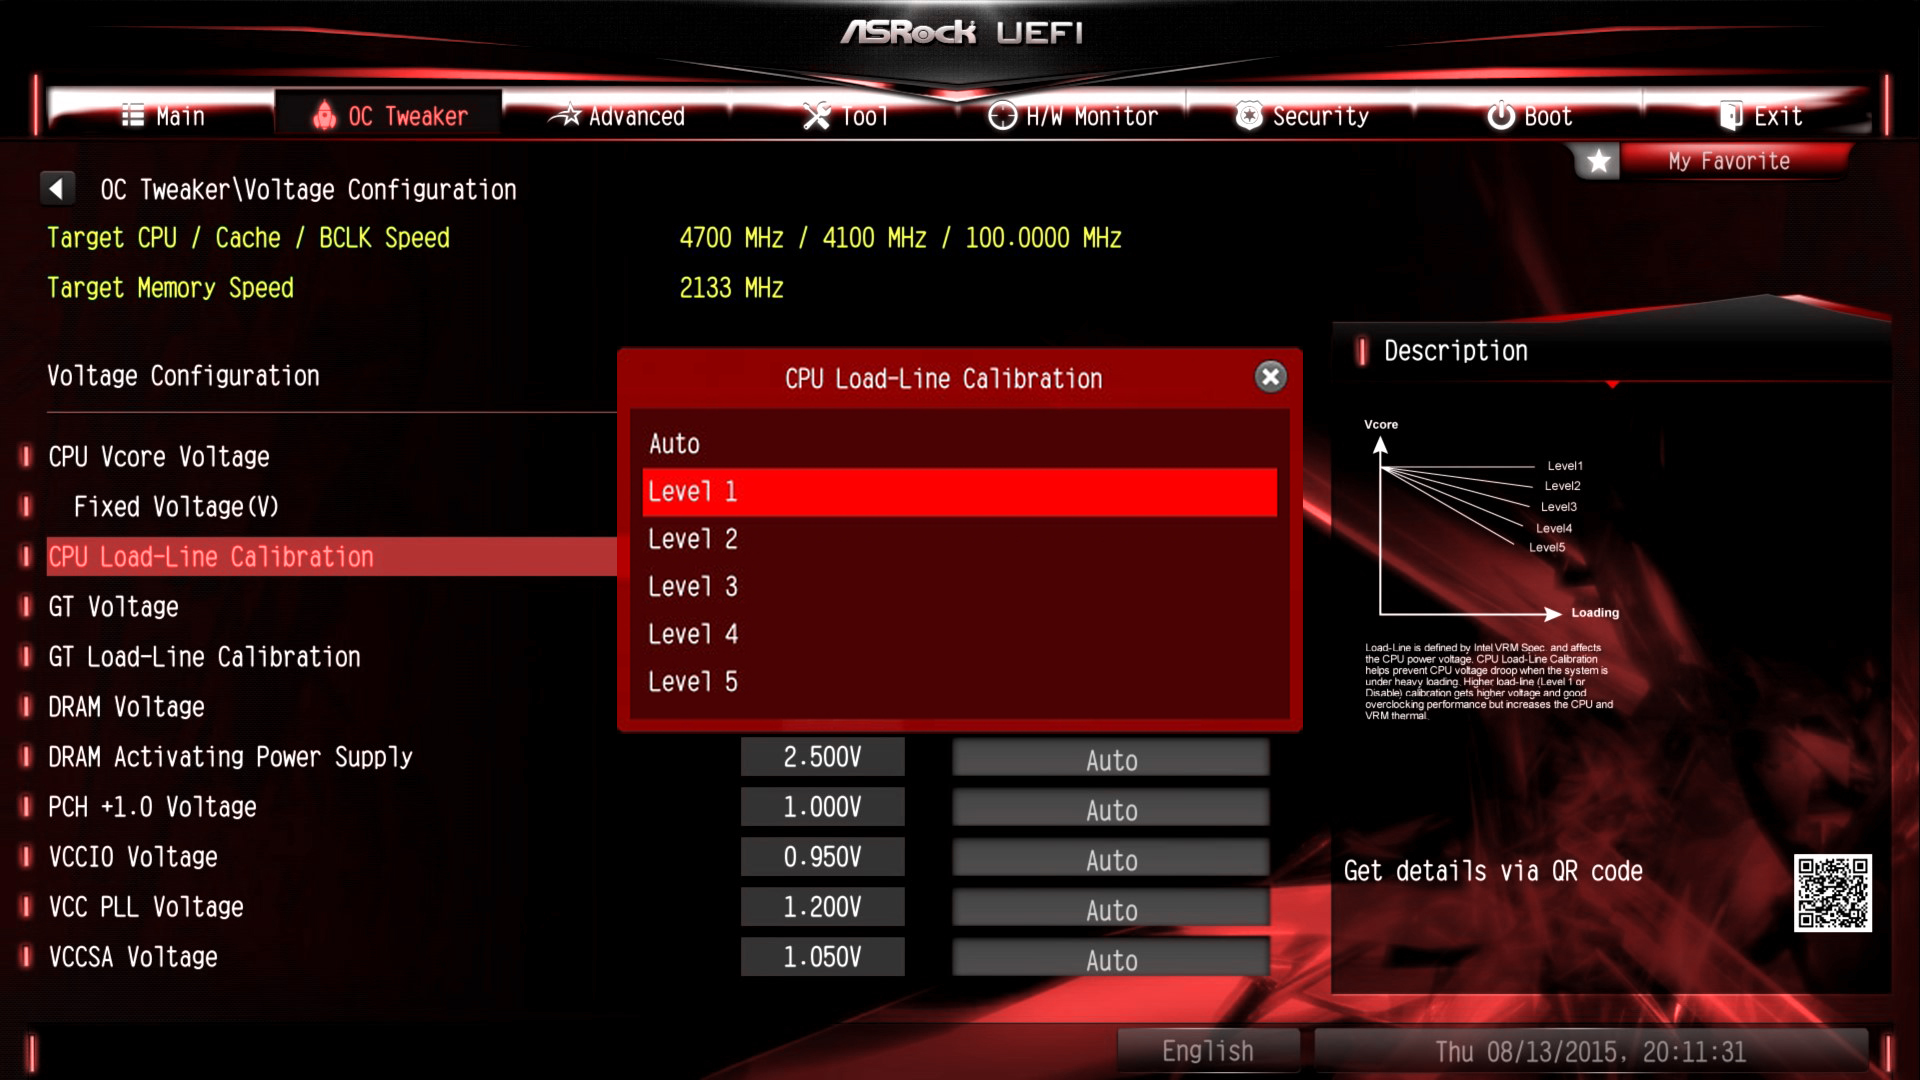 There you can overclock the system performance automatically in different turbo steps – at least if luck plays along and it is possible with the components and the CPU. Just select the desired level and some components will be overclocked with the Load Optimized CPU OC Setting (or optionally GPU overclocking) to a desired value e.g. Turbo 4.5 GHz, Turbo 4.6 GHz, Turbo 4.7 GHz, Turbo 4.8 GHz or Turbo 5.0 GHz, overclocking couldn’t be easier!
If you prefer to overclock in Windows, you can also use the ASRock A-Tuning Tool to adjust the above mentioned voltage settings and the CPU frequency or, as explained in detail in the Intel OC guide, overclock with the Intel XTU Tool (Extreme Tuning Utility).
Here you can see some settings of the ASRock A-Tuning Tool.
In the ASRock A-Tuning Tool you can also select the Load Optimized CPU OC Setting.
Once the desired settings have been found, you can save up to five different BIOS settings with names in the UEFI under OC Tweaker.
For example, you could store balanced BIOS settings, Undervolting values, Office or Gaming settings as Undervolting, Balance, Gaming and Overclocking user profiles to be able to quickly reload these values at any time.
Also interesting is the Save User UEFI Setup Profile to Disk option. Just click it to save your own UEFI settings on the hard drive or an USB stick.
BIOS Undervolting …
The downclocking or undervolting is also tested in this review. It was not possible to lower the Intel Core i7-8700K CPU frequency over the BIOS. You can lower the voltage to reduce the power consumption. Of course, underclocking is like overclocking outside of the manufacturers specification, so it is necessary to have some luck. ASRock gives several options for easy PC undervolting / downclocking. There are many other UEFI settings to choose from, such as CPU Configuration, Chipset, Storage, Intel Thunderbolt, Super IO, ACPI and USB Configuration as well as Trusted Computing.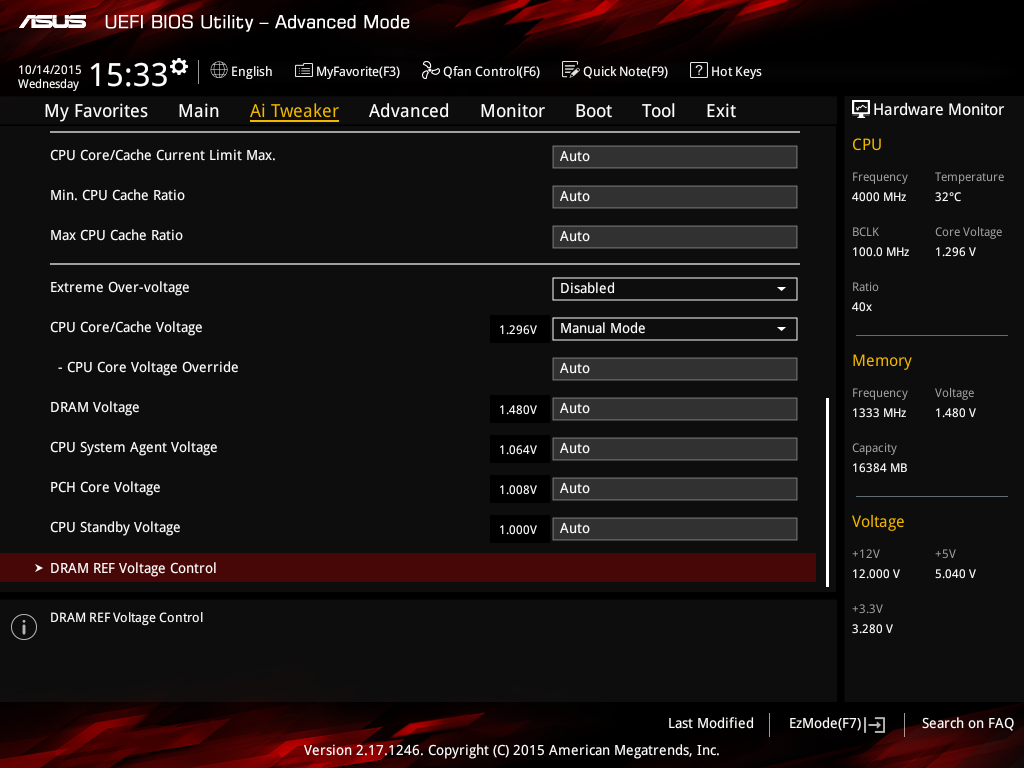
If you want to save power when running your Intel LGA1151 v2 PC or use Intel Virtualization Technology to support multiple, simultaneous operating systems, you should also check the CPU Configuration Menu under Advanced.
But also the settings in Advanced Chipset Configuration with the individual speeds of the PCIe slots, selecting the first graphics card, etc. are interesting.
It is even possible to deactivate each USB port of this ASRock Z390 Extreme4 manually.
Fan control …
The UEFI Setup of the passive cooled Z390 Extreme4 motherboard also features an extensive temperature controlled fan control. The settings for the fan controller can be found in H/W Monitor directly below the temperature and voltage display.
Here are settings for the CPU fan, chassis fans or W_Pump switch.
You have the choice between Customize, Silent, Standard, Performance and Full Speed.
In Customize Mode, several temperature steps are available to which the desired fan speed can then be assigned. The fan settings are changed immediately and can therefore be heard immediately.
ASRock has also integrated the graphical user interface for controlling the fans in the UEFI setup. The FAN-Tastic Tuning menu item can also be found in the H/W monitor and can be used for all settings. Simply select the respective fan connector on the left side and then select the mode on the right side: Silent, Standard, Performance or Full Speed.
In Customize mode, you can set all values directly in the chart and save.
For the chassis fan connectors you can even select, which source you want to use for temperature measurement – Monitor CPU or Monitor Motherboard. Then click on apply and save the values.
And even the control of the 3-pin chassis fans is possible with the DC/PWM mode switch.
Who would rather set the values in Windows, you can use also the ASRock A-Tuning tool.
You can usually get along without an expensive Fan Controller, because the fans are controlled with this fan control based on CPU or motherboard temperature.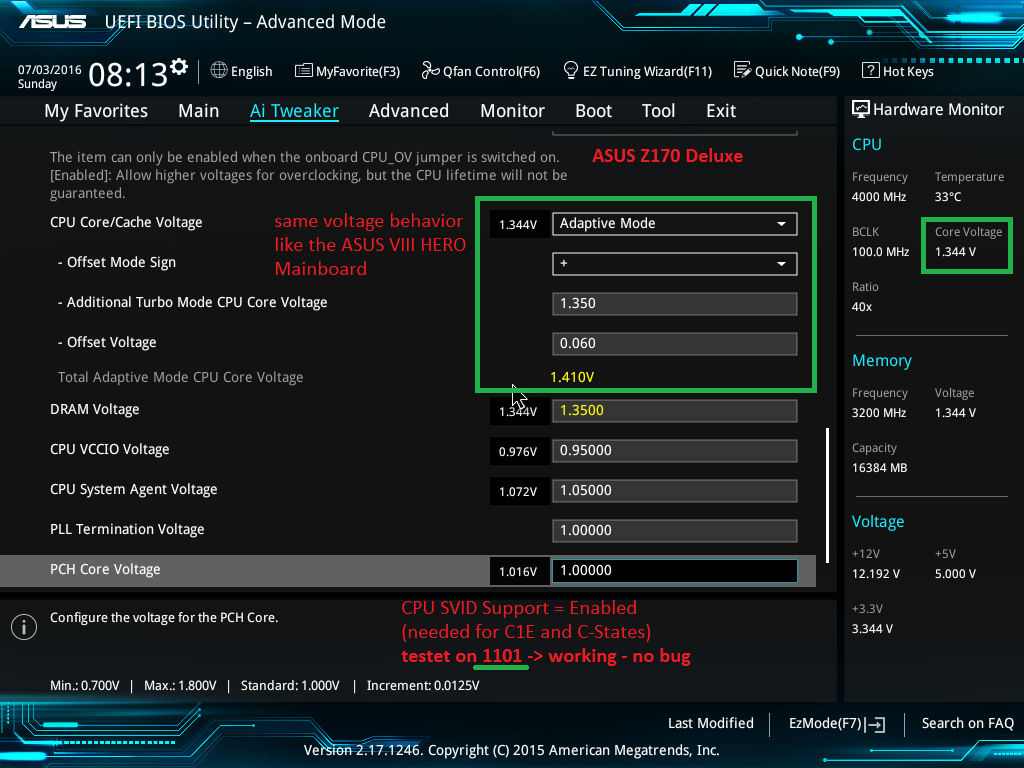
If everything is set, simply store the settings as usual with the F10 key and confirm with Z or on an English keyboard with Y.
ASRock Z390 Extreme4 energy consumption …
<< 1 2 3 4 5 6 >>
How to Overclock With ASRock UEFI BIOS
by Ian Cutress & Gavin Bonshoron April 16, 2018 2:30 PM EST
- Posted in
- CPUs
- Guides
- AMD
- MSI
- Gigabyte
- ASRock
- Asus
- Overclocking
- Zen
- APU
- Vega
- AM4
- B350
- Ryzen
- X370
- Overclock
- Ryzen 3 2200G
- Ryzen 5 2400G
63 Comments
|
63 Comments
The Basic Principles of OverclockingHow to Overclock With MSI UEFI BIOSHow to Overclock With GIGABYTE UEFI BIOSHow to Overclock With ASUS UEFI BIOSHow to Overclock With ASRock UEFI BIOSHow to Overclock With AMD Ryzen MasterOverclocking our APUs to 4. 0 GHz and UpOverclocking Results: CPU and GamingOverclocking The Ryzen 2000 Series APUs: The Conclusion
The ASRock BIOS design and layout is consistent throughout the AM4 motherboard range. Everything was present on our motherboard, except the ability to change the settings of the integrated graphics. The only options for overclocking the graphics were in the way of SoC voltage, and even then, it could only be set as an offset value, not a true value. This is a little disappointing given that the ASRock X370 Gaming-ITX/ac hasn’t got any hard issues within the BIOS for the graphics, but on the plus side, everything else is done well.
Upon entering the BIOS, the initial menu screen offers information about the board including the installed components including the processor. It is not an easy mode, and the information is very limited. Everything needed for overclocking is in the OC Tweaker menu.
In the OC Tweaker menu, changing the ‘CPU Frequency and Voltage Change’ from auto to manual opens up the frequency and voltage options. At the top is the frequency, while down the bottom is the voltage. Starting with frequency, rather than offer a CPU ratio, ASRock just offers a plain frequency, and clearly does the multiplier manually.
When it comes to applying the XMP profile, unlike the MSI board in our data testing in this article, the ASRock board only opens up a single XMP profile, the standard DDR4-3600 CL16 that the sticks are rated for. Enabling XMP and then changing the memory frequency to the setting that’s required is easy enough, as the value goes up in increments and can be adjusted using the + or – keys on a numpad. Alternatively, if the user presses enter a long list via a drop-down menu appears.
Further down the same page, options are present for changing the offset values to the SoC voltage or VDDCR. Just below these is the DRAM voltage, which when we enabled XMP automatically set the value to 1.4 volts, rather than 1.35 for which our kit is rated, which was a little odd.
Pressing F10 and selecting yes saves the settings and reboots the system. Unfortunately the options changed to not appear as in some other vendors Save and Exit popups.
Note – To overclock the integrated graphics on this board, users will need to install the AMD Ryzen Master overclocking utility within Windows. We go into Ryzen Master on the next page.
Buy ASRock X370 Gaming-ITX/ac on Amazon.com
How to Overclock With ASUS UEFI BIOS
How to Overclock With AMD Ryzen Master
The Basic Principles of OverclockingHow to Overclock With MSI UEFI BIOSHow to Overclock With GIGABYTE UEFI BIOSHow to Overclock With ASUS UEFI BIOSHow to Overclock With ASRock UEFI BIOSHow to Overclock With AMD Ryzen MasterOverclocking our APUs to 4.0 GHz and UpOverclocking Results: CPU and GamingOverclocking The Ryzen 2000 Series APUs: The Conclusion
PRINT THIS ARTICLE
How to increase the voltage on the processor and how can it be reduced?
Greetings! I have already mentioned processor overclocking in my articles, and you probably heard about it, but I did not touch on this topic separately.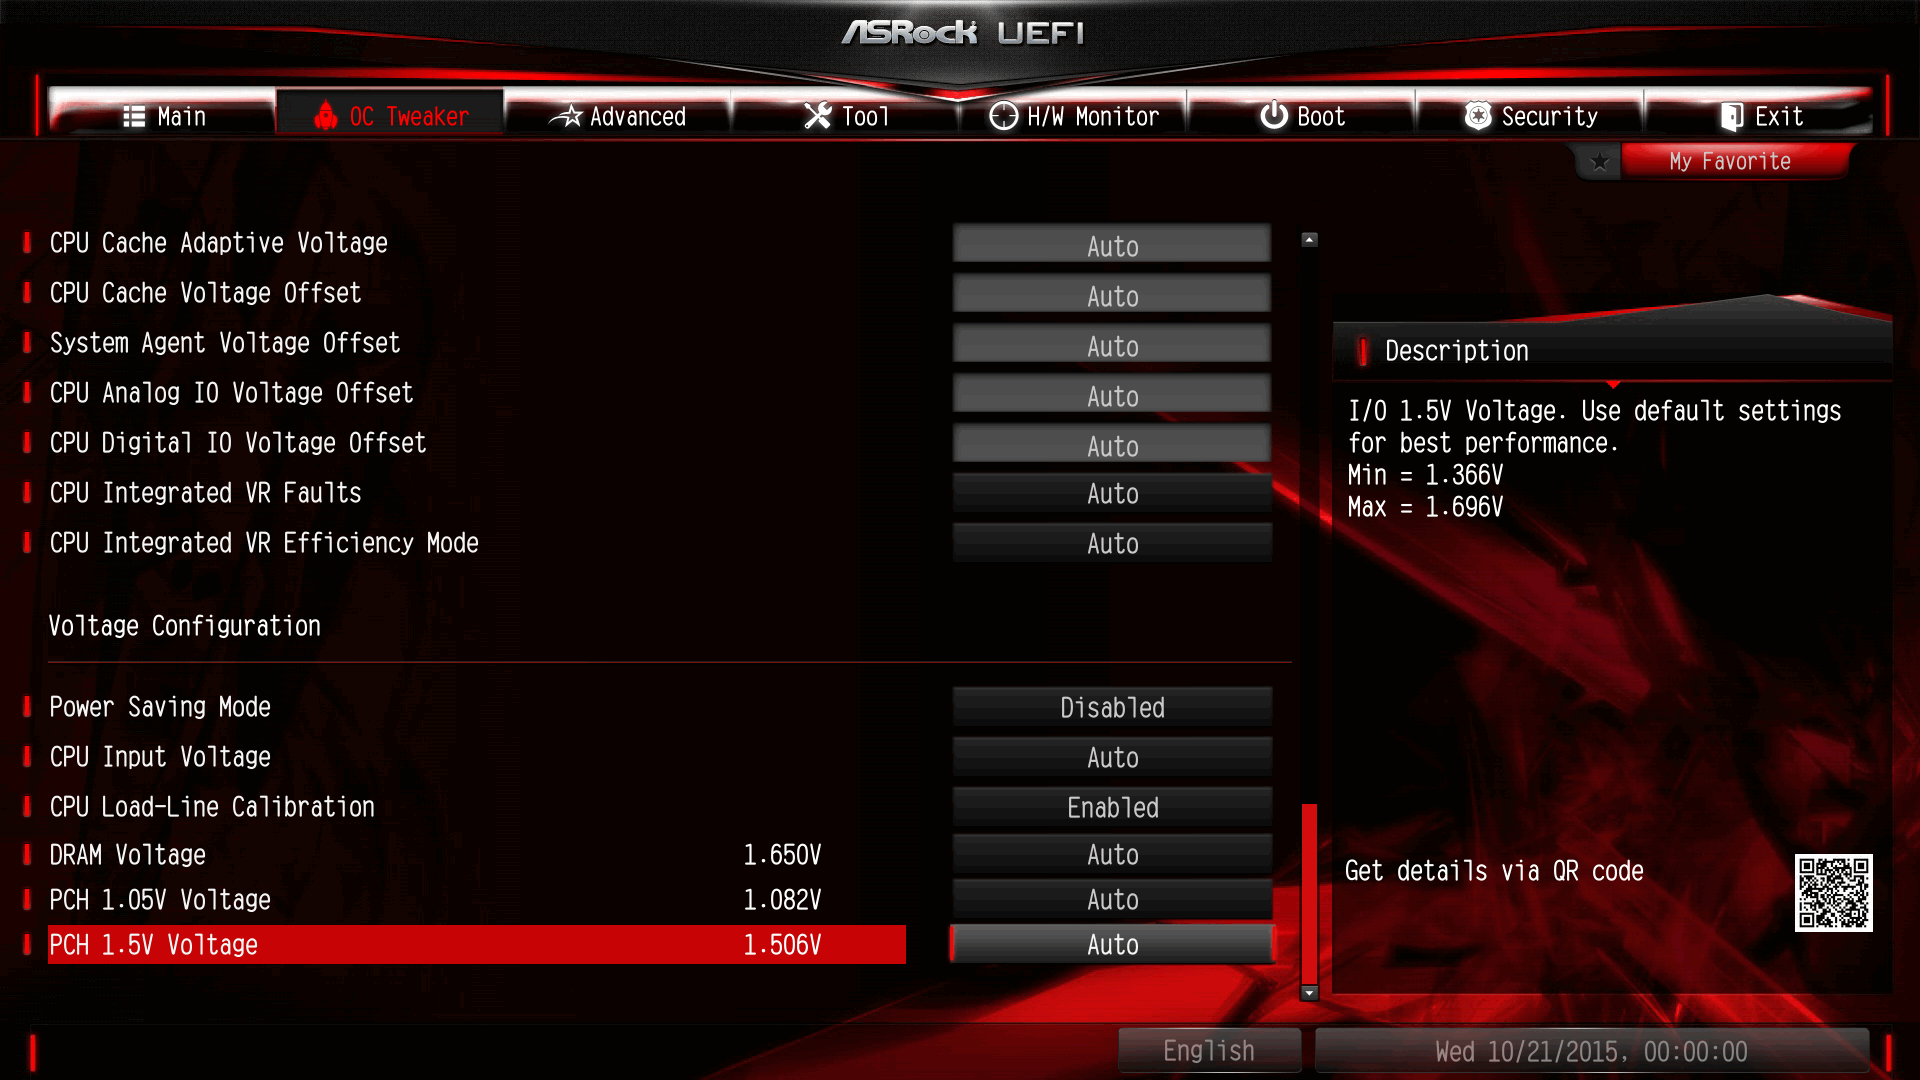 Overclocking or overclocking is the acceleration of the processor by increasing its clock frequency.
There are many ways to overclock, and in general the topic is extensive, so it is not so easy to understand it. But I can tell you about one of the simple ways, or rather about increasing the voltage. Moreover, it does not involve any extreme actions and may even be useful. Therefore, we will continue to talk about how to increase the voltage on the processor, and at the same time how it can be reduced.
Nuances for Intel processors
It is not possible to increase the CPU frequency on every Intel device. In most models, this feature is blocked, which you cannot influence in any way. But if you still want to use something from Intel for experiments, choose a processor with the letter K at the end of the name. This means that it has been unlocked to increase the frequency.
KF are also useful, but be careful with them, because the F mark means the absence of a graphics core.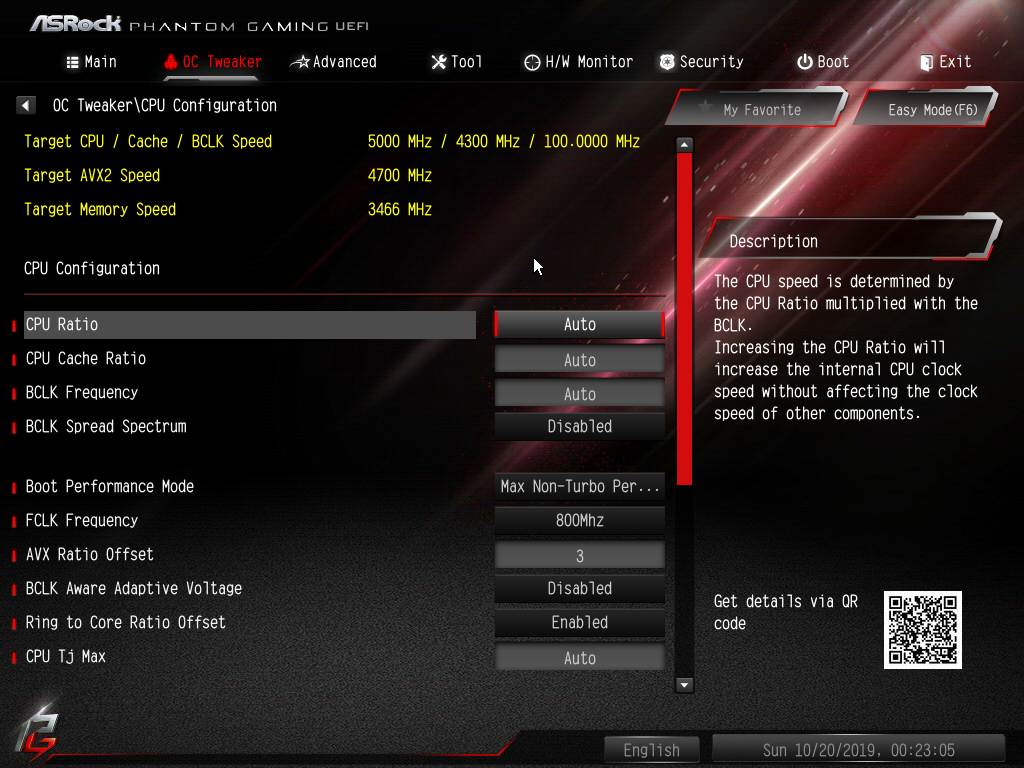 I have already talked about processor markings and some suffixes that you should know.
Nuances for AMD CPUs
If you have an AMD device, it will be easier with it, because most processors from this manufacturer are open to overclocking.
Before you start, just check if your particular model can be overclocked. If it is not very old, then there should be no problems.
Is it necessary to increase the voltage
Overclocking the processor will not work without increasing the voltage, because acceleration in any case is associated with a large power consumption and a greater load on the CPU. Therefore, you cannot increase the frequency, and leave everything else unchanged.
As for overclocking, it all depends on your desire. It is not necessary to overclock processors, nevertheless, manufacturers are trying to make such products that will satisfy you with performance without additional manipulations. But if you don’t have enough speeds or just want to know how to improve the performance of the processor, there is nothing wrong with this, if everything is done correctly.
But I still have to say that extreme overclocking is not the most useful procedure, it can lead to rapid wear of the device or its breakdown. Therefore, be careful.
With the help of programs or through the BIOS, which is better
Having decided to increase the voltage on the PC, you will find ways to do it through the BIOS and special software. And of course, here you want not to try everything in a row, but to do everything right right away.
Those who have already overclocked the processor note that it is better to work with voltage through the BIOS. All due to the fact that voltage experiments are carried out here before the OS is loaded. And if after changing the settings it loads, this will be the first sign that everything is working stably.
And the only advantage of the programs is the ease of management and search for settings, the efficiency of the BIOS does not differ.
How to increase the voltage on the processor
So, to increase the voltage on the processor, you need to act step by step.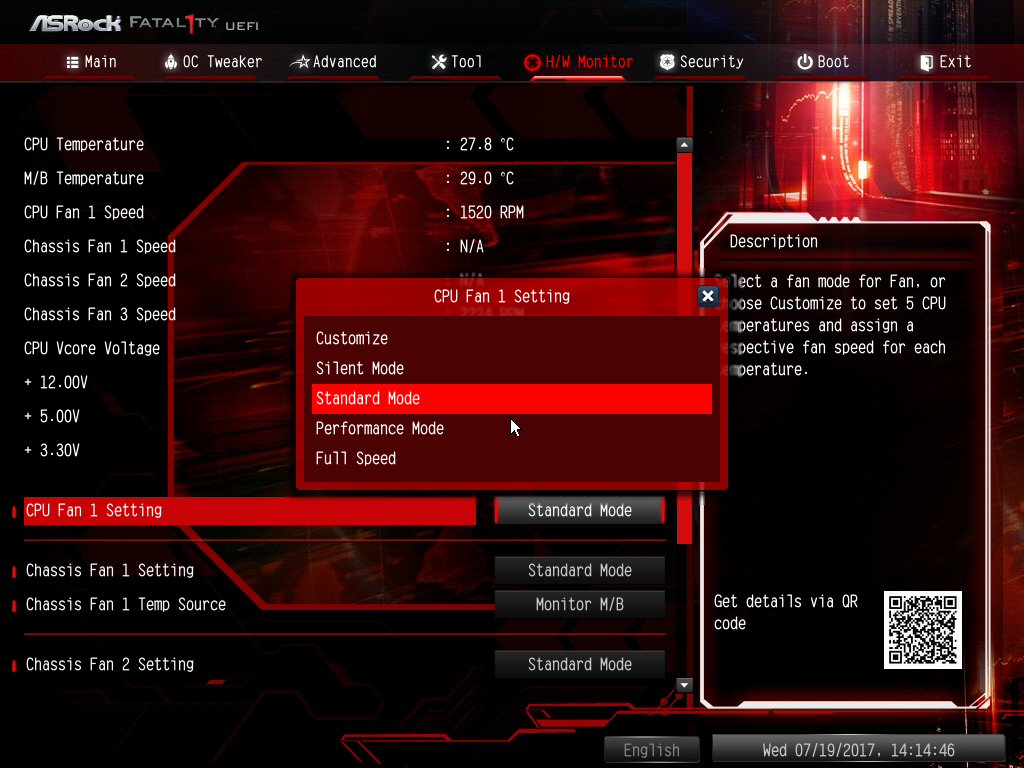 First — a mandatory check of the state of the system. Download the popular HWiNFO, AIDA 64, CPU-Z and see what performance the system produces during normal operation, if there is anything strange, like overheating or power drops. If the information does not seem enough, there is also ASRock Timing Configurator, ZenTimings, DRAM Calculator for Ryzen.
After checking the stability of the system, install the desired program or go to BIOS. This is usually done before the OS boots, by pressing the F2 key. But in Windows 10, this can be a problem, because this system usually loads quickly, and it can be difficult to catch the right moment. But on the other hand, it allows you to get into the analogue of BIOS, UEFI, without requiring you to catch the moment to press the button during reboot. But only if UEFI, of course, is.
Once you select a program, you can find the exact instructions on how to use it, so I won’t go into more detail here. I can only say that for AMD, AMD Ryzen Master or Clock Tuner for Ryzen may suit you, and for Intel, Intel Extreme Tuning Utility. But it is better to read about good software on overclocker sites.
If you work through the BIOS, here I can already tell you something. Although it’s still not that easy, because the BIOS may look different depending on the manufacturer of the motherboard.
Just keep in mind that the desired parameters will not be immediately visible. Usually they are located somewhere in the advanced settings, for example, in the tab with the words Advanced, Power, Voltage. For example, MSI will have Frequency/Voltage Control.
But with Gigabyte it can be more difficult, because the BIOS may not have the necessary parameters, but in Gigabyte UEFI you can search for them. There should be an Advanced Voltage Settings tab. If you have ASRock, then you can’t do anything through the BIOS at all, only through UEFI. But do not worry, all the sections you need are named approximately the same, so Voltage Configuration will come in handy here.
Look for lines related to the CPU or Processor, because different voltages can be applied not only to the processor, but we are interested in it.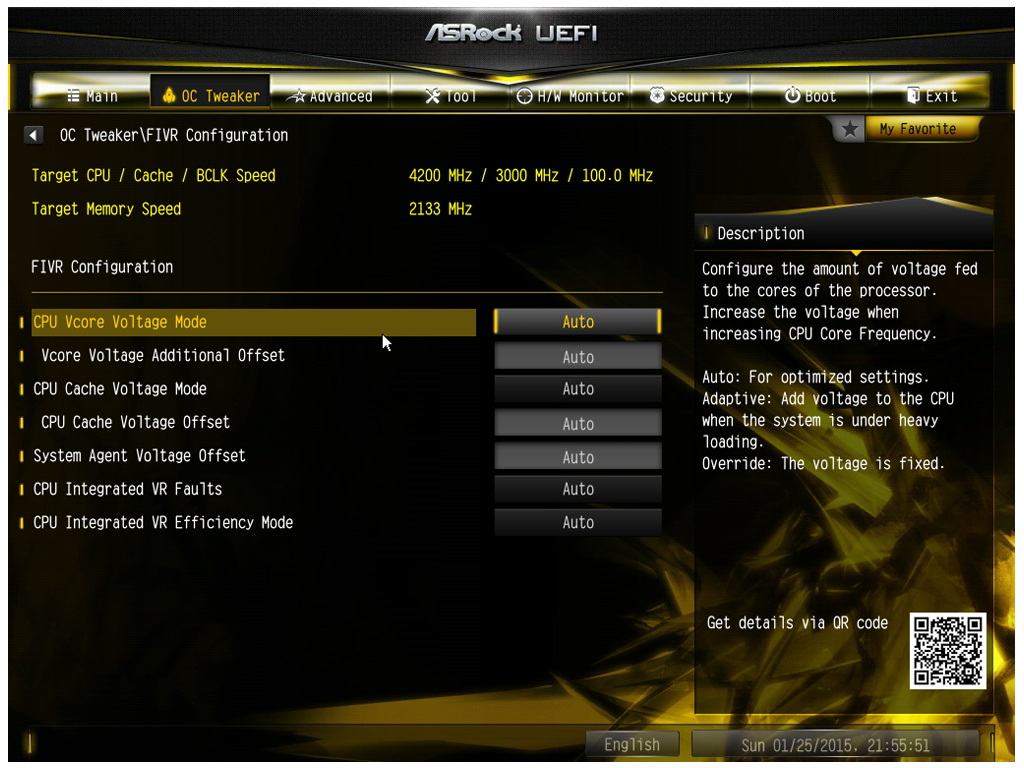 Find CPU Configuration or something like that. If you’re lucky, the section with the word Voltage will immediately catch your eye, where the current value is written in Volts (V).
If you don’t see anything similar, it’s better to find solutions specifically for your BIOS, so as not to change something that does not require it.
Keep in mind that you cannot raise the voltage as much as you want. You need to add no more than 0.1-0.3 to the original value. Take small steps so that in case of problems, you can quickly determine which values you need to fall back to so that everything is in order.
Sometimes you may be asked not to change the value itself, but to add a percentage of the current voltage level. Choose the minimum. This can be found at ASUS, where in the Advanced tab you must first find JumperFree Configuration, and then set AI Overclocking to Overlock. This will give you the functionality you need.
Stability check
To check if the system is stable after a voltage increase, you can use utilities such as
- Linx.
- OSST.
- Cinebench R23 and others.
All these programs are benchmarks, that is, they specifically load the system, thereby checking its stability. But be careful, as this software conducts a stress test, that is, it tries to use the maximum resources, and this may cause problems. I have already written about popular benchmarks, so you can find more programs and read about their benefits in my material.
You need to check the stability regardless of whether you corrected the voltage programmatically or through the BIOS.
Why lower the processor voltage
Increasing the voltage allows the processor to work at a higher frequency, but you can forget about saving energy. Here, the opposite is true, and the voltage is usually reduced just the same so that the power consumption of the CPU is less, and hence its temperature.
Is undervoltage dangerous? I will only say that the voltage has limits that determine what voltage can be considered “normal”.
 And any way out of these limits can potentially harm the device.
So don’t get carried away, and if you get carried away, be prepared for any results.
Lowering using a software utility or in Bios
Since it is better to raise the voltage on the processor through the BIOS, it is also worth lowering it here in order to immediately correct the settings if the system does not start.
But if you want to use special software, it will also be useful.
How to reduce the voltage of the processor
To determine how to lower the voltage, no special programs or special BIOS settings will need to be studied. For undervolting, you need to look for the same sections — something related to CPU and Voltage. Inside the programs, follow the same instructions as if you were to find a section to boost voltage.
However, it is better to take even smaller steps here. If it is worth raising in tenths, then the decrease should be hundredths, 0.01-0.03 each, and even less, thousandths.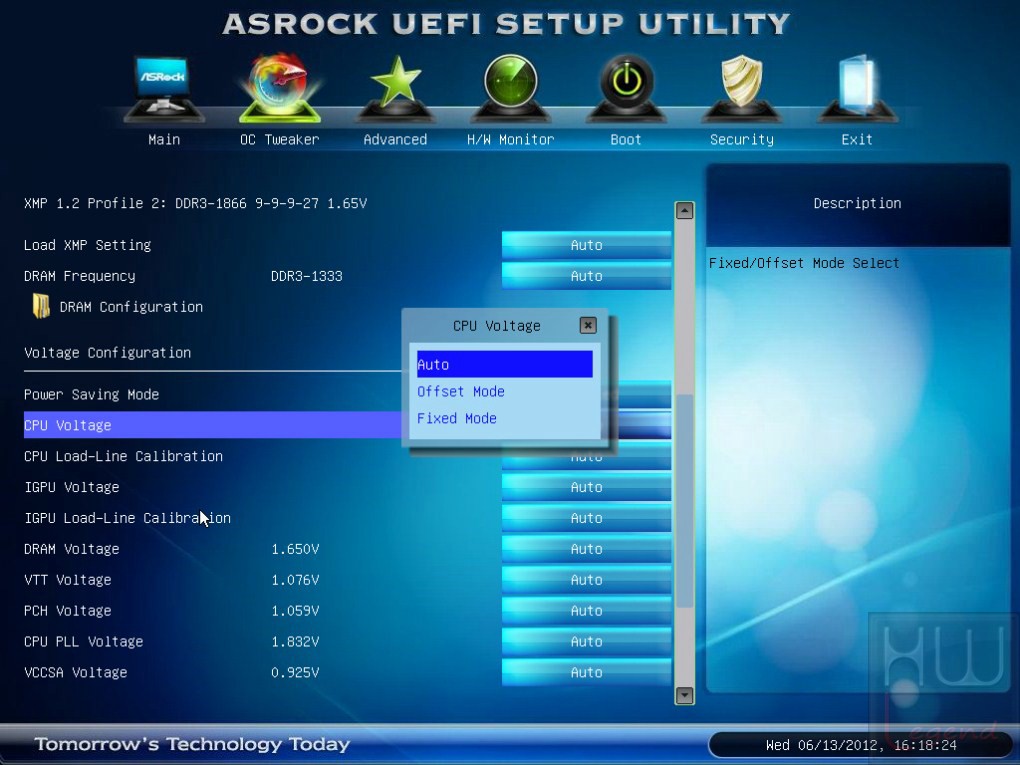 That is, 0.001-0.003. Also choose the minimum interest. And roll back to the last value, when everything worked stably, having met with problems.
Checking settings and stability
Special tests come in handy here too. They will show you how stable the system can work with such a voltage, whether it can withstand the load. The programs that are used before the test will help you find out how much the processor temperature has changed and whether other parameters are jumping.
Before overclocking your processor, be sure to dive into the topic. I have only gone through the highs and experienced overclockers would surely find many additions to my words, so you better watch the videos on the channels dedicated to overclocking the CPU, and read as many articles and forum threads on this topic as possible.
Only with a solid theoretical foundation can one move on to practice.
In general, overclocking is interesting, so I wish you good luck if you decide to do it. For now, I will reveal no less interesting topics related to the PC, and in order not to miss new publications, you just need to subscribe to my social networks! See you!
Sincerely, Andrey Andreev, the author of the blog.
How to properly overclock the processor in the BIOS
Before you start overclocking the processor (CPU), you should find out if the processor you want to overclock can be overclocked. It’s also worth looking into motherboard specs, as low-end motherboards with limited features don’t allow for overclocking.
In addition, I would like to warn you that there is always a risk of damaging the processor and motherboard. During overclocking, it is necessary to constantly monitor the temperature and stability of the processor. If overclocking is incorrect, after a while a blue or black screen may appear and freeze tightly so that even a reboot will not help. In such cases, it is recommended to remove the CMOS battery and install it back, thereby resetting the settings.
With proper CPU overclocking, you can achieve performance gains from 10% to 30%.
Before overclocking, it is recommended to install programs such as AIDA 64 and CPU — Z on the computer.
AIDA64
AIDA64 is designed to view the characteristics of the computer, as well as testing the processor, power phases, RAM and chipset at maximum load.
To enable testing, click on the graph icon (circled in red) — after that, a menu will appear for setting the elements that will be loaded.
Check that the four checkboxes are checked, then click Start to start the test with the load on the motherboard, RAM, power phases and CPU.
Test for 5-10 minutes. The test results will show the condition of the cooling system — it may be time to replace the thermal paste or install a new cooling system.
CPU-Z
Here we can look at the characteristics of the central processor: its characteristics, cache, frequency, number of cores and threads, TDP and more.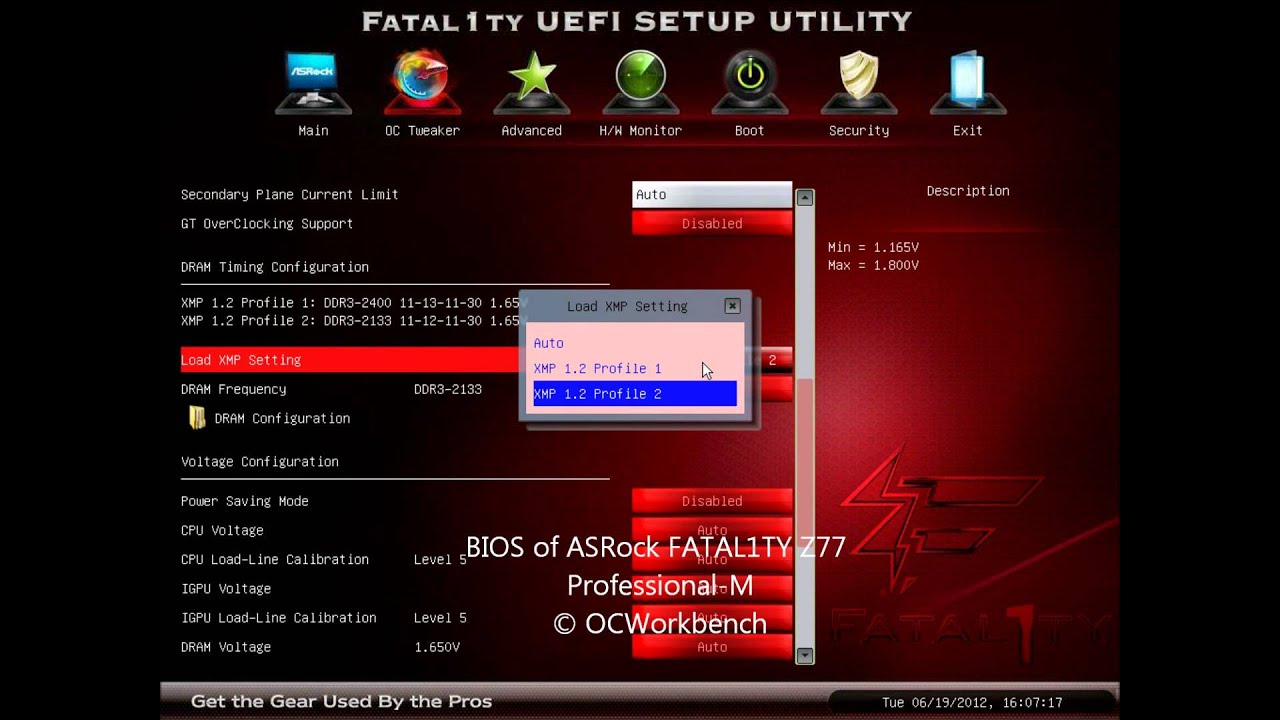
Processor overclocking
Overclocking is done through the BIOS. When you turn on the computer, press one of the buttons — «F10», «F2», « tab » or « del » — and then get into the settings menu BIOS 9011 9 .
Old and new BIOSes are different — the old ones usually have AMI (American Megatrend Inc.) or Phoenix AWARD installed, and the new ones have UEFI with a full graphical interface.
In the old ones you will find a tab with overclocking called «Frequency / Voltage Control», item «Overclock». Another option is the «Advanced» tab, the «AT Overclock» item.
But in the new UEFI BIOS you can find items such as «AI Tweaker» or «Extreme Tweaker».
In order to start overclocking the processor, you need to change the item « Ai Overclock Tuner » from « AUTO » to « X . M . P .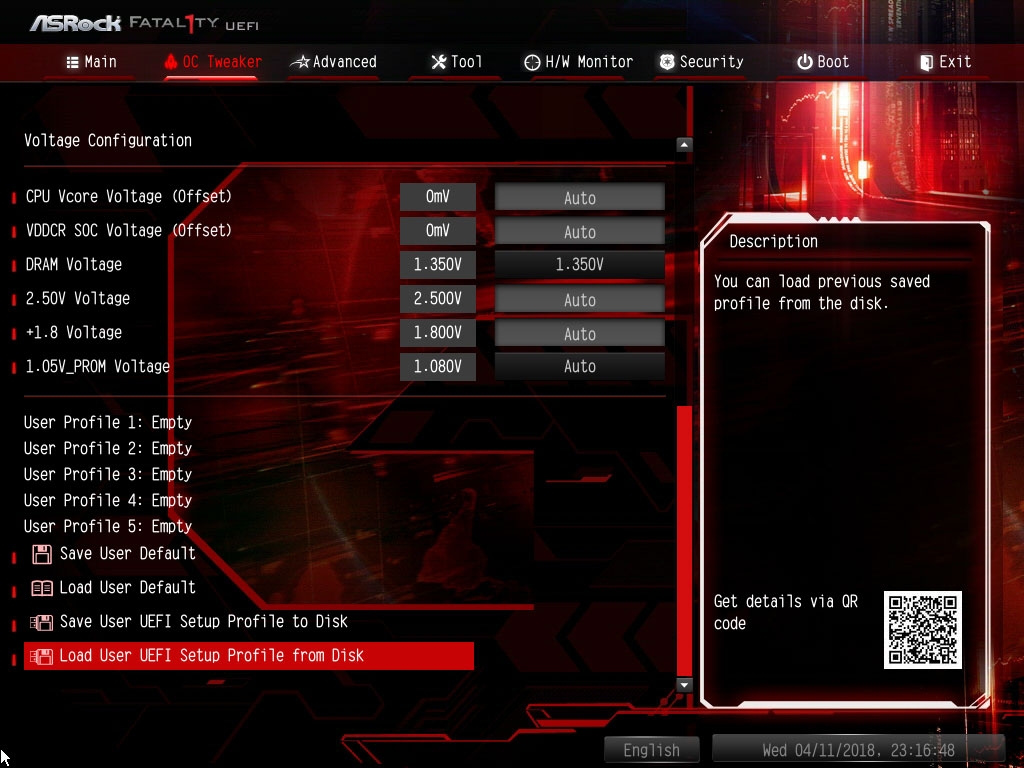 » or « Manual «.
X . M . P . — This is the easiest and most standard way to overclock the CPU to the optimal frequency without any extra effort.
Manual is the most fun way to overclock your CPU to maximum frequency and get the best performance.
It is necessary to gradually raise the values of the «BCLK Frequency» bus and the «CPU Ratio Setting» multiplier.
The processor frequency is calculated using the formula: BCLK Frequency * CPU Ratio Setting 90 119 .
First, we lower the processor multiplier to the very minimum and raise the bus frequency to the maximum until it keeps a stable frequency and shows normal temperatures in stress tests.
So far, the frequency is not the highest, but do not worry — it will start to rise when we deal with the multiplier.
Now raise the bus value. When we find the optimal value, we proceed to the selection of the multiplier. We set the values and periodically check the stability of the system.
By choosing the maximum multiplier, you may encounter a blue screen or freezes. In such cases, you should gradually increase the voltage on the processor in steps of 0.05V. Due to the strong rise in voltage, there is a risk of damaging the processor, so you should be careful. You also need to remember that when the voltage rises, the processor will start to heat up more — watch its temperatures very carefully.
Set «Load-Line Calibration» from «Auto» to «Enabled» so that the power to the processor is always stable.
It is very important that during the stress tests the temperature does not exceed 90 degrees, otherwise «Throttling» will begin.