404: Page not found
Storage
The page you were trying to reach at this address doesn’t seem to exist. This is usually the result of a bad or outdated link. We apologize for any inconvenience.
What can I do now?
If this is your first time visiting TechTarget, welcome! Sorry for the circumstances under which we’re meeting. Here’s where you can go from here:
Search
- Check out the latest news.
- Our home page contains the latest information on Storage Technology.
- Our about page contains more information about the site you are on, Storage.
- If you need to, please contact us, we would love to hear from you.
Browse By Category
Disaster Recovery
-
Users dish on ransomware protection, recovery at VeeamONTo help protect against and recover from ransomware attacks, IT professionals at VeeamON 2023 recommended planning, testing and .
..
-
10 game-changing disaster recovery trendsRecent trends in AI, ransomware and data regulations have a major impact on disaster recovery teams. Don’t let the rapidly …
-
20-year evolution of Everbridge critical event managementEverbridge critical event management has reached Ukraine and work-from-anywhere users. CEO David Wagner explains how he’s guided …
Data Backup
-
Veeam execs examine backup and security blend, other trendsVeeam leaders break down how cybersecurity issues have changed the data protection conversation. The discussion also details …
-
Commvault expands, automates ransomware discovery toolsIn its latest release, Commvault adds advanced ransomware functionality and new security features to its data protection platform.
 ..
.. -
LTO tape shipments continued to grow in 2022Driven by data growth and the uptick in ransomware, tape continues to excel as a storage medium despite newer kids on the block. …
Data Center
-
Reimaging, innovating, securing cloud-native at SUSECON 2023At SUSECON 2023, SUSE announced cloud-native AI-based observability with Opni and alluded to more announcements this year. …
-
Data center tiers and why they matter for uptimeOrganizations should consider data center tiers of colocation providers or for their own data centers based on their uptime needs…
-
Explore Red Hat’s bring-your-own-subscription model for RHELMany organizations use pay-as-you-go models with public cloud providers to run their Red Hat products in the cloud.
 Explore how …
RAID 10 & Why Should I Use It?
RAID is an acronym for Redundant Array of Independent (or Inexpensive) Disks. It is a method of storing information on hard disks for greater protection and/or performance. There are several different storage methods, named levels, numbered from 0 to 9.
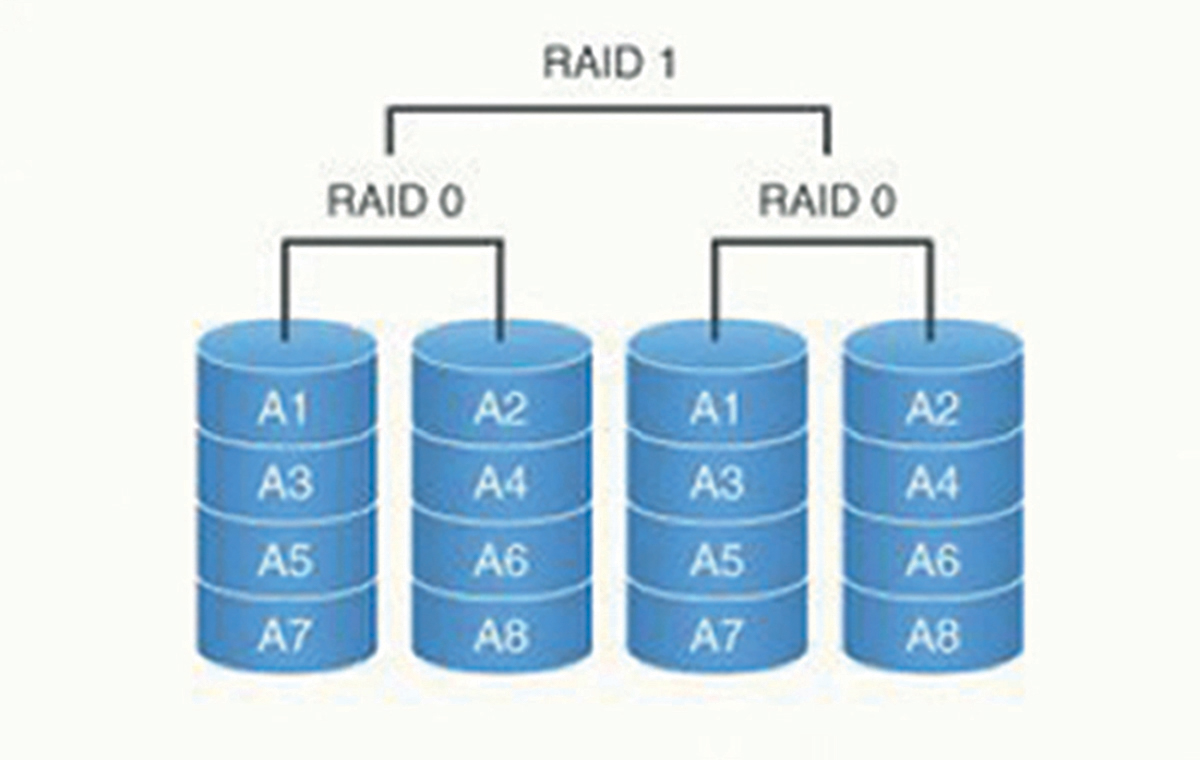
Some levels can be combined to produce a two-digit RAID level. RAID 10, then, is a combination of levels 1 (mirroring) and 0 (striping), which is why it is also sometimes identified as RAID 1 + 0. Mirroring is writing data to two or more hard drive disks (HDDs) at the same time – if one disk fails, the mirror image preserves the data from the failed disk. Striping breaks data into “chunks” that are written in succession to different disks. This improves performance because your computer can access data from more than one disk simultaneously. Striping does not, however, provide redundancy to protect information, which is why it is designated 0.
The Advantages Of RAID 10
Combining these two storage levels makes RAID 10 fast and resilient at the same time. If you need hardware-level protection for your data and faster storage performance, RAID 10 is a simple, relatively inexpensive fix. RAID 10 is secure because mirroring duplicates all your data. It’s fast because the data is striped across multiple disks; chunks of data can be read and written to different disks simultaneously.
1
To implement RAID 10, you need at least four physical hard drives. You also need a disk controller that supports RAID.
RAID Is Not Backup
Here’s one important caveat about RAID and backup. Although RAID writes data to two disks simultaneously, it is not a backup. If your operating system or software, rather than the hard disk, corrupts your data, this corrupted data is sent to both disks and simultaneously corrupts both drives. However, a backup is a copy of data, which is stored somewhere else and is detached from the original data both in space and time. Backup data is not corrupted unless you specifically back up corrupted data. In short, even if you use RAID, you still must use an effective backup software.
RAID 10 protects you from a single drive failure — the mirror takes over for a time while you replace the failed disk and rebuild the copy.
However, keep in mind that RAID 10 redundancy cuts your usable disk space in half. Since everything is mirrored (duplicated), four 2TB disks in RAID 10 give you a total capacity of 4TB of usable space.
RAID 5 Vs. RAID 10: What’s The Difference?
So, you may ask: why wouldn’t I use RAID 5 instead? It gives me 6TB of total capacity, a performance advantage, and redundancy that protects me from a single drive failure.
The biggest difference between RAID 5 and RAID 10 is how it rebuilds the disks. RAID 10 only reads the surviving mirror and stores the copy to the new drive you replaced. Your usual read and write operations are virtually unchanged from normal operations.
However, if a drive fails with RAID 5, it needs to read everything on all the remaining drives to rebuild the new, replaced disk. Compared to RAID 10 operations, which reads only the surviving mirror, this extreme load means you have a much higher chance of a second disk failure and data loss.
Remember to always use identical disks when creating a RAID 10 array. The disk geometry (number of heads, cylinders, etc.) is critical and it is strongly recommended NOT to use dissimilar disks.
Protecting Your Data Is Easier Than Ever
Since the costs of disks are decreasing, adding incremental storage space is now less expensive than ever before, whether you are adding additional disks to support your RAID 10 array or replacing the disk controller on your motherboard if it doesn’t support RAID 10.
You need to configure RAID 10, but it isn’t difficult and only takes a few minutes. The system or disk controller software includes install routines that walk you through the process.
Data protection Corporate cybersecurity Cyber protection for businesses Security software for business Cloud backup Disaster recovery
RAID 10: features, creation and configuration.
The article discusses the features of creating RAID 10 — a combination of RAID 1 and RAID 0 arrays — from 4 disks. Features of RAID 10: The minimum number of disks is 4. The volume of a RAID 10 array will be 2 times less than the total volume of disks included in it. In raid 1 data will be mirrored on 2 disks, in raid 0 it will be […]
The article discusses the features of creating RAID 10 — combinations of arrays
RAID 1 and RAID 0 — from 4 disks.
RAID Features
10:
- The minimum number of disks is 4.
- The size of the RAID 10 array will be 2 times less than the total size of the incoming
discs in it.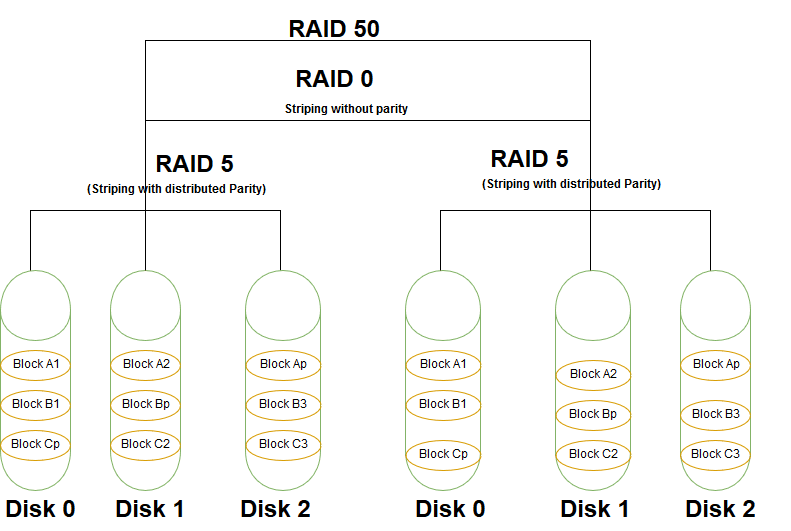
- In raid 1 data will be mirrored to 2
disk, in raid 0 —
data will be written alternately to the first and second disk, without duplication. RAID 10 combines RAID 1 and RAID 0. - Data will be retained if failure occurs 1
disk in each subarray.
RAID
10 can be used to host databases that require high
write and read speed.
Information about the system used in the example:
lsbrelease
–a
If the utility is not present, you must
will install the redhat-lsb package – ‘yum install redhat-lsb’
Information about the system used in the example
You can check their display with the command:
lsblk
List of connected drives
To create a RAID
array, the mdadm package must be installed (yum install mdadm).
Checking connected drives for missing raid metadata. If such blocks
found — must be formatted with the dd utility.
mdadm -E /dev/sd[be]
Check for mapped drives
fdisk /dev/sdb
In the fdisk console select:
- create partition( n ) 90 010
- partition type primary( p )
- partition number( 1 )
start and end blocks
- change partition id( t )
- set partition id in linux raid autodetect ( fd )
- output partition table to check results ( p )
- apply changes and exit( w ).
Also, create a partition on each disk using fdisk.
Creating a partition for raid
Re-checking disks and partitions with the mdadm utility for
existing raid array
 mdadm -E /dev/sd[b-e]
mdadm -E /dev/sd[b-e]1
Check disks and partitions with the mdadm utility
Method 1.
Create an md0 device. The parameters specify the name of the raid device (md0), the type of raid (10), the number of devices (4) and the
devices that will be included in the raid(/dev/sd[b-e]1).
mdadm --create /dev/md0 --level=10 --raid-devices=4 /dev/sd[b-e]1
Check created raid array
cat /proc/mdstat
Create raid 10
Detailed display of information about the raid array and its members
devices
 mdadm --examine /dev/sd[b-e]1
mdadm --detail /dev/md0
Detailed display of the raid array and its devices
Create an ext4 filesystem on the raid device md0
and mounting to /mnt/raid10
mkfs.ext4 /dev/md0 mkdir /mnt/raid10 mount /dev/md0 /mnt/raid10/ ls -l /mnt/raid10/
Format and mount the raid array
Add an entry to /etc/fstab for automatic
mount raid
nano /etc/fstab
Add entry to /etc/fstab
Check entries in /etc/fstab
mount -av
Check entries in /etc/fstab
Also need to save configuration raid manually,
so that it is read during system boot.
 mdadm --detail --scan --verbose >> /etc/mdadm.conf
cat /etc/mdadm.conf
Saving the configuration raid
The first method is easier.
To create a RAID 10 using another method, you must first create two RAID 1 arrays, and then using
these arrays create RAID
0.
Create two RAID 1 arrays using 4 drives
/dev/sdb, /dev/sdc and /dev/sdd, /dev/sde and checking the status of created raids
devices:
mdadm --create /dev/md1 --metadata=1.2 --level=1 --raid-devices=2 /dev/sd[b-c]1 mdadm --create /dev/md2 --metadata=1.2 --level=1 --raid-devices=2 /dev/sd[d-e]1 cat /proc/mdstat
Create RAID 0 using md1 and md2 devices and check status:
 mdadm --create /dev/md0 --level=0 --raid-devices=2 /dev/md1 /dev/md2
cat /proc/mdsta
Saving the configuration raid
mdadm --detail --scan --verbose >> /etc/mdadm.conf
Next, to test data recovery, create files
and fill with data
 touch /mnt/raid10/raid10_file_{1..10}.txt
files=$(ls -l /mnt/raid10/ | awk '{print$9}')
for file in $files
do
$(echo test file: $file > $file)
$(date >> $file)
done;
ls -l /mnt/raid10/
cat /mnt/raid10/raid10_file_1.txt
Generating test data
Replacing a failed disk in case of a failure, adding a spare disk
It is possible to add a spare disk for quick
replacement in case of failure of one of the main ones.
Check mapped disk (/dev/sdf) using
lsblk
Check presence of raid metadata on disk
will wipe), using fdisk
mark up for raid like this
same as in the example above.
Check disk connection, check for raid blocks, markup for raid
Then repeat
check partition, add disk /dev/sdf1 to md0 array, and check adding spare disk to raid device
 mdadm --examine /dev/sdf
mdadm --examine /dev/sdf1
mdadm --add /dev/md0 /dev/sdf1
mdadm --detail /dev/md0
Add spare drive to raid 10 and check status
Mark /dev/sdb1 in /dev/md0 array as failed and
check status
 mdadm --manage --fail /dev/md0 /dev/sdb1
mdadm --detail /dev/md0
cat /proc/mdstat
Mark one of the disks in the array as failed and check the status
After completion
the synchronization process, the status will change to [UUUU]. For large discs
The synchronization process will take a long time — from several hours to a day.
cat /proc/mdstat
Also, check
data available on raid array
 ls -l /mnt/raid10
cat /mnt/raid10/raid10_file_1.txt
Checking status and data after a failure
Removing a drive from the array
disk command.
 Remove the disk /dev/sdb1 from /dev/md0,
which was previously marked as failed and check the status.
 cat /proc/mdstat
mdadm --remove /dev/md0 /dev/sdb1
cat /proc/mdstat
Remove disk from array and check status.
Array expansion
Check mapped drive (/dev/sdf) with
lsblk
Check the presence of raid metadata on the disk and, if not (otherwise, they need to
will wipe), using fdisk
mark up for raid like this
same as in the example above. Add a disk to the array, increase the size of the array, and
check raid status.
 cat /proc/mdstat
mdadm --add /dev/md0 /dev/sdg1
mdadm --grow --raid-devices=6 /dev/md0
mdadm --detail /dev/md0
cat /proc/mdstat
Also, you need to make changes to /etc/mdadm.conf
mdadm --detail --scan >> /etc/mdadm.conf
Adding a disk to the raid, increasing the array size and checking the status
Raid (raid) 10: description of how to do it
Greetings to all, dear readers of the Pc-information-guide.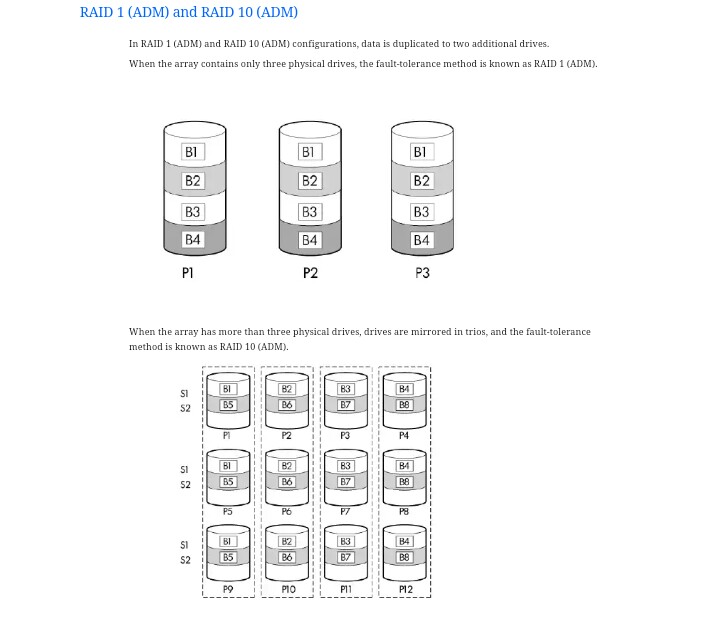 ru blog! Earlier, I already published an article about the types of raid arrays, I highly recommend reading it. There I only briefly talked about what a raid array of the tenth level, or «1 + 0» — as it is also called, is. This article will be a detailed story about all the advantages and disadvantages of this type of Raid array, as well as its comparison with the fifth raid.
As you know, Raid 10 incorporated all the good things from Raid 0 and Raid 1: increased access speed and increased data reliability, respectively. Raid 10 is a kind of «strip» of mirrors, consisting of pairs of hard drives, united in a raid of the first level. In other words, the disks of the nested array are connected in pairs to form a “mirror” raid of the first level, and these nested arrays, in turn, are transformed into a common zero-level array using data striping.
The description of the features of the raid 10 array is as follows:
- if any one disk from the nested raid 1 arrays fails, no data loss will occur.
 That is, if «inside» the tenth raid there are only four disks, which is the minimum allowable number, then painless failure of as many as two disks at the same time is possible;
 - the next feature (rather a drawback) is the impossibility of replacing damaged drives, unless, of course, the array is equipped with “hot spare” technology;
- Based on the statements of device manufacturers and numerous tests, it turns out that it is raid «1 + 0» that provides the best throughput compared to other types, except for the zero raid, of course.
Contents
- 1 Number of disks
- 2 Compare raid 10 vs raid 5
- 2.1 Also
Number of disks
900 02 Answering the question — how many disks are required for raid 10, I will say that for such an array an even number is required. Moreover, the minimum allowable number of hard drives is 4, and the maximum is 16. Also, there is an opinion that raid «1 + 0» (aka 10) and «0 + 1» are somewhat different. This is true, but the difference is only in the order in which the arrays are connected.
The last digit indicates the type of the topmost array. For example, raid «0 + 1» means a kind of mirror stripe system, within which two zero raids (total: 4 hard drives) are combined into one raid 1 — this is an example, there may be more «zero» raid arrays here. Moreover, from the outside, visually, these two subspecies of raid 10 are no different. And purely theoretically, they have an equal degree of fault tolerance.
In practice, most manufacturers now use Raid 1+0 instead of Raid 0+1, explaining that the first option is more resistant to errors and failures.
So many disks can fail and no data loss occurs
Again, the main disadvantage of raid 10 is the need to include «hot spare» disks in the array. The calculation is approximately the following: there should be one backup for 5 working drives. Now a few words about the capacity of disks. A feature of raid 1 capacity is that only half of the hard drive space of their total volume is always available to you. In a RAID 10 of 4 disks with a total capacity of 4 terabytes, only 2 TB will be available for recording. In general, it is easy to calculate the available volume using the formula: F * G / 2, F means — the number of disks in the array, and G — their capacity.
Raid 10 vs raid 5
When talking about the choice between the «tenth» raid and any other, raid 5 usually comes to mind. Raid 5 is similar to the first in its purpose, with the only difference being that it requires a minimum 3 drives. Moreover, one of them will not be available as a place to record data; only service information will be stored on it.
The fifth raid is able to survive the loss (breakdown) of only one hard one, the breakdown of the second one will result in the loss of all data. However, a level 5 raid is a good and cheap way to extend the life of drives and reduce the likelihood of them breaking down. In order for our comparison to be effective and clear, I will try to arrange the advantages and disadvantages of the fifth raid before the tenth:
- The capacity of a raid 5 array is equal to the total capacity of the drives minus the capacity of one drive. While in raid 10, in fact, only half of the storage capacity is available.
- Read/write operations can interact with data streams from multiple disks in parallel. Therefore, the speed of writing or reading increases compared to a conventional hard disk. But, without a good raid controller, the speed will not be very high.
- The performance of raid 5 in random block read/write operations is 10–25% lower compared to raid 10. If one of the disks fails in the fifth raid, the entire array goes into critical mode — all write and read operations are accompanied by additional manipulations, while performance drops sharply.
So, what do we have in the end: raid 10 has better fault tolerance and speed compared to raid 5 .