Install DirectX : Installation and Troubleshooting : Knowledge Base
Installation and Troubleshooting : Knowledge Base
Contents
Language
Install DirectXHelp! DirectX Won’t InstallPage Bottom
Attention: DirectX 9.0c is no longer required as a pre-requisite for the latest Version/release of any of our products. This information is provided only for users of older versions.
Install DirectX
Important Considerations
-
Install .NET Framework FIRST!
If you need to install a new level of the .NET Framework, then install the .NET Framework first. Otherwise, the DirectX install may skip some .Net related dlls and you will have to reinstall DirectX again later. - Setting a Windows Restore Point is highly recommended before installing any new version of DirectX.
DirectX cannot be uninstalled, so setting a Restore Point is the only way to back out of the install should you experience a problem.
-
Install Latest Maintenance Release — Even if you have verified that you are at the correct level of DirectX, it is recommended that you install the latest maintenance release. This can fix errors with missing DirectX Dll files and install important fixes and performance enhancements.
Install Instructions and Download Link
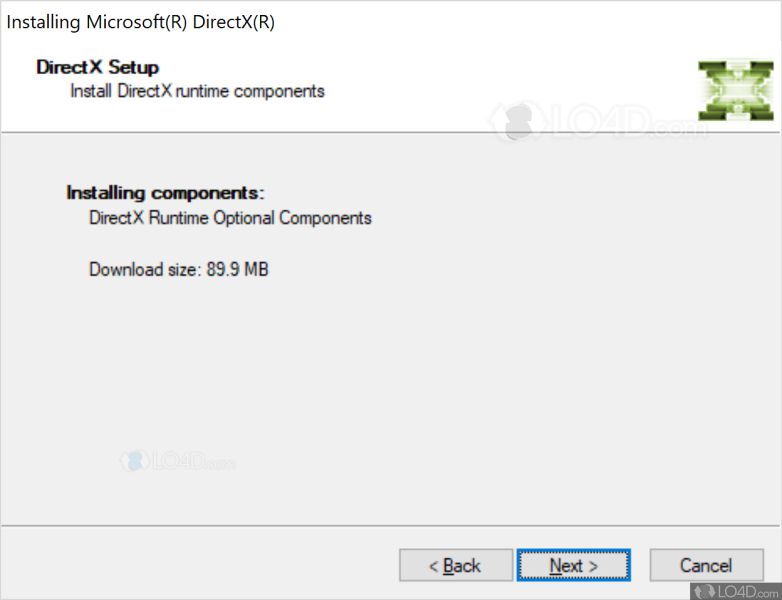
Look for the latest DirectX End-User Runtime (NOT the Software Developers Kit SDK which has a lot extra files you don’t need ). Installation typically takes 20 to 40 minutes to complete. The download is approximately 90-100 Megabytes. Important Note: Microsoft often releases updates to DirectX without updating the version number or letter so be sure to install the latest release even if your version is technically the same./i.s3.glbimg.com/v1/AUTH_08fbf48bc0524877943fe86e43087e7a/internal_photos/bs/2017/D/Z/uSi2GbSiyOAXMOU08B2w/xapofx1.png)
Download link:
Latest DirectX End-User Runtime (FREE from Microsoft Download Center).
Sort the resulting list Newest to Oldest. Then pick the DirectX End-User Runtime Web Installer.
The description of this download MUST say «Microsoft DirectX End-User Runtime provides updates to 9.0c« (see Figure 1.). Note that the release date listed may change over time.
Figure 1. Microsoft Download Center — DirectX End-User Runtime (for 9.0c)
To Page Top
Help! DirectX Won’t Install
A few users in the DirectX forums have reported that DirectX would not install on their machine and are getting this error message:
Error: (32) — The process cannot access the file because it is being used by another process.
You can try rebooting your computer, then proceed directly to the DirectX Install before starting any other programs.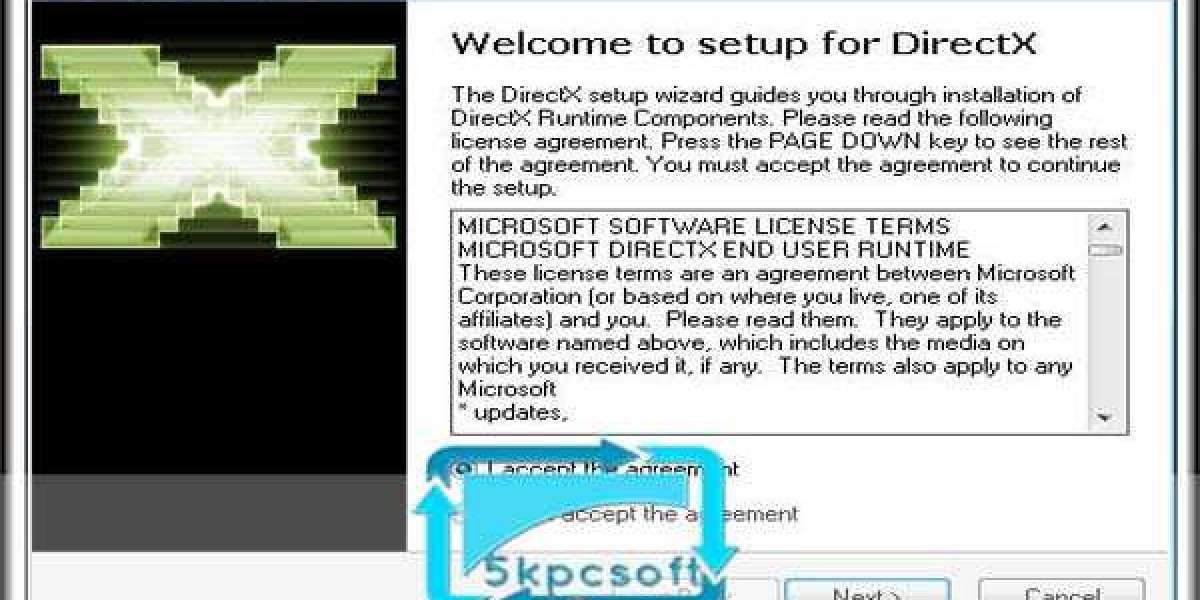
If that still fails, a reported solution is to boot the computer in
Safe Mode
, then run the DirectX installer. Choose Safe Mode with Networking if you are going to use the DirectX Web Installer link above.
Language
DirectX End-User Runtime June 10 Download Offline Installer
DirectX End-User Runtime is a very important program for the Windows PC that helps the computer to run several other programs. It is a set of components that allows different software, games, multimedia content, etc to run and work directly with the video and audio hardware of your computer. It helps video games to use the computer’s in-built multimedia accelerator features more efficiently to improve the overall multimedia output. Get DirectX 9 End-User Runtime offline installer below.
You can download DirectX 9 End-User Runtime June 2010 Redistributable on a Windows 7, Vista, or Windows XP PC on a PC that runs Windows Server editions.
Download the End-User Runtime June 2010 (version 9.29.1974) redistributable package using the download link listed at the bottom of this page. It is the offline installer of the program that contains all the files required to install the program on your PC.
DirectX version 9.29.1974 is the last version of DirectX which you can get as a standalone offline installer package. This Microsoft DirectX End-User Runtime provides updates to DirectX 9.0c and lower versions of DirectX. There is no stand-alone update package available for later versions of the program. But users can update DirectX by installing the service pack and updates.
DirectX End-User Runtime is developed by Microsoft. It is a set of DirectX libraries and essential components for running several graphical interfaces on the Windows system. These mainly DirectX libraries and components are mainly used in the development of video games for Microsoft Windows and the Xbox. This app helps the user to run several Windows applications smoothly that are written using DirectX APIs.
Developer Description:
The Microsoft DirectX® End-User Runtime installs a number of runtime libraries from the legacy DirectX SDK for some games that use D3DX9, D3DX10, D3DX11, XAudio 2.7, XInput 1.3, XACT, and/or Managed DirectX 1.1. Note that this package does not modify the DirectX Runtime installed on your Windows OS in any way.
[Related Software]
Microsoft Visual C++ Redistributable 2019
Microsoft Visual C++ Redistributable 2017
Microsoft .NET Framework 4.8
Microsoft .NET Framework 4.5.2
There are two types of installers available to install DirectX End-User Runtime on your PC. One is the online or web installer and another is the standalone installer or offline installer. The offline installer is more handy and useful. Because after downloading, you can use this offline setup file to install this program again and again on any computer that supports this version of DirectX.
Technical details of DirectX End-User Runtime (June 10):
- Program Name: DirectX End-User Runtime (June 2010)
- File Name: directx_Jun2010_redist.exe
- Publisher: Microsoft
- Version: 9.29.1974
- Category: System Updates
- Date Published: April 18, 2011
- Language: English
- File Size: 95.6 MB
- Supported OS: Windows 7, Vista, Windows Server 2003 Service Pack 1, Windows Server 2003 Service Pack 2, Windows Server 2008, XP SP 2, XP SP 3.
Download DirectX End-User Runtime June 2010:
DOWNLOAD
Or
Download from an external source:
5/5
(1 Review)
Categories Developer Tools, Offline Installer, System Update
DirectX installation for game developers — Win32 apps
- Article
- Reading takes 6 minutes
This article is intended to address some common questions about the DirectX runtime and using DirectSetup to install DirectX.
- DirectX Runtime
- DirectX version number
- DirectX Libraries
- Installing DirectX with game installer
- Small installation packages
- Debug DirectX runtime internal deployment
Important!
The legacy DirectX SDK is at the end of its life cycle, but is still available to support older games, tutorials, and projects. New projects should not use it. Legacy DirectX SDK requires legacy DirectSetup for components such as D3DX9, D3DX10, D3DX11, XAudio 2.7, XInput 1.3 and XACT. For more information about the current state of the DirectX SDK, see «Where is the DirectX SDK?» and the blog post «Not so straight forward».
DirectX Runtime
The DirectX Runtime consists of core components and optional components.
Core components such as Direct3D and DirectInput are considered part of the operating system. The core components for DirectX 9.0c have not changed since the DirectX Summer 2004 SDK update and are consistent with what was released in Microsoft Windows XP SP2, Windows XP Pro x64 Edition, and Windows Server 2003 Service Pack 1 (SP1)./i.s3.glbimg.com/v1/AUTH_08fbf48bc0524877943fe86e43087e7a/internal_photos/bs/2021/J/C/Rz9JeURAiJTP0FN9h1Og/2016-01-14-instalando-directx-9.png) Windows Vista includes DirectX 10, which supports the Windows Display Driver Model (WDDM) and Direct3D 10.x. Windows 7 and Windows Vista support DirectX 11 which supports Direct3D 11, Direct2D, DirectWrite, WARP10 software renderer, and 10level9 component levels. See the Windows Graphics API for more information.
Windows Vista includes DirectX 10, which supports the Windows Display Driver Model (WDDM) and Direct3D 10.x. Windows 7 and Windows Vista support DirectX 11 which supports Direct3D 11, Direct2D, DirectWrite, WARP10 software renderer, and 10level9 component levels. See the Windows Graphics API for more information.
Optional components are released in DirectX SDK updates and include D3DX, XACT, XAudio2, XINPUT, Managed DirectX, and other such components. Many optional components are regularly updated to integrate customer feedback and provide new features.
DirectX version number
The DirectX version number, such as 9.0c, refers only to the version of major components such as Direct3D, DirectInput, or DirectSound. This number does not include versions of various optional components released in the DirectX SDK such as D3DX, XACT, XINPUT, etc.
In general, the DirectX version number is not significant, except for a brief reference to the basic runtime bits. This number should not be used to verify that the correct DirectX runtime is installed, as it does not take into account optional DirectX components.
DirectX Libraries
In the past, optional components of the DirectX SDK, including D3DX, were released as static libraries. However, they are now being released as Dynamic Link Libraries (DLLs) due to increased demand for security best practices. DLLs allow you to maintain previously released code. If these components were deployed as static libraries, Microsoft would not be able to fix security issues after release.
As components are added or changed to optional components, the names of the corresponding DLLs are also changed to ensure there is no regression in existing games that use the released components. The DLLs for each component live in parallel, and game developers can choose exactly which version of the DLL the game uses by linking the appropriate import library.
Although having DLLs installed on the system is not as easy as just linking against static libs, some changes have been made to the DirectX SDK to address DLL model issues:
- The DirectX redistributable can be configured to contain only the components required by the application to minimize distribution and media sizes.

- The Program Files\DirectX SDK\Redist\ redistributable now contains a cabinet (.cab) file for every possible add-on so you don’t have to dig through the old SDK to find them.
- Installing the SDK itself installs all possible optional components.
- The DirectX Redistributable, which contains all optional components, is available as a web installer or as a download package; For more information, see the DirectX Developer Center (DirectX).
DirectX installation by game installer
Note
See Direct3D 11 deployment for game developers.
The following are guidelines for adding a DirectX installation to the game installer:
| Term | Description |
|---|---|
| Install the redistributables each time. | The game installation process should install the DirectX redistributables during each installation, preventing users from opting out. If you allow opt-out, some users will guess they don’t need it, and if they do, the game won’t work.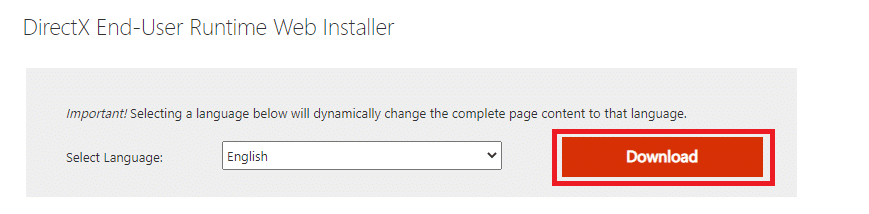 |
| Have the DirectX installer check for additional components. | Do not assume that the latest optional components are already installed on the system because the Windows Update client component and service packs do not provide any additional DirectX components. You must install the DirectX runtime by running dxsetup.exe directly or by calling DirectSetup. |
| Adjust automatically. | Run Setup in silent mode to prevent users from accidentally missing a DirectX runtime update. To do this, run dxsetup.exe with the following command:
path-to-redistributable\dxsetup.exe /silent or by calling DirectSetup and without displaying the user interface. |
| Consolidate acceptance of the terms of the license agreement. | If you prompt the user to accept the EULA, combine it with the prompt to accept the DirectX EULA when installing silently so that the EULAs are prompted only once. The prompt needs to happen before installing anything so that if the user doesn’t accept, you don’t end up with a crash and a partial install. The prompt needs to happen before installing anything so that if the user doesn’t accept, you don’t end up with a crash and a partial install. |
| Just run dxsetup or call DirectSetup. | Because the DirectX version number does not refer to anything other than DirectX core components, do not check the installed version before running dxsetup.exe or calling DirectSetup. Also, don’t check for the existence of a file to check if an optional component is installed, as this usually won’t correctly detect when a component exists but needs to be updated. However, the DirectX installation package will quickly detect this and take the correct action. |
Small installation packages
You can create small installation packages for DirectX by dividing the contents of the DirectX redistributable folder to the minimum set of files required for the installer to work, and retaining all additional components used in the game.
Depending on the minimum specifications, it may not even be necessary to include the core files of the DirectX 9.0c cabinet in the redistributable folder of the installation media. Most installations of Windows XP have Service Pack 2 (SP2), which includes the core components of DirectX 9.0c, so the DirectX install operation will be very fast and won’t require a reboot. The smallest package that can be created is about 3MB and can be compressed to about half that size. A package like this contains one version of the D3DX DLL and requires DirectX 9.0c to be already present.
The minimum files required to build the redistributable package are the following files located in the Redist folder of the DirectX SDK (Program Files\DirectX SDK\Redist):
- dxsetup.exe
- dsetup32.dll
- dsetup.dll
- dxupdate.cab
Add to these cabinet files the components you want to install. If you want your application users to already have DirectX 9.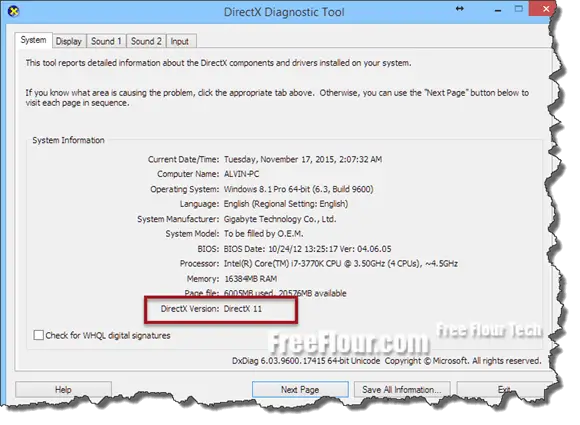 0c, you don’t need to include DirectX.cab or dxnt.cab, which make up the bulk of the space requirement. DirectX.cab is only required for Windows 98 and Windows ME; dxnt.cab is only required for Windows 2000, Windows XP, and WINDOWS XP SP1, while dxdllreg_x86.cab is only required for Windows 2000, Windows XP RTM, Windows XP SP1, and Windows RtM Server 2003 Also, if you are not using DirectShow or assume you already have it installed, you can omit BDA.cab, BDANT.cab, and BDAXP.cab.
Note
Assume that the users of the application already have DirectX 9.0c, if it was installed in a previous version of the application, you are forcing users to upgrade using the web installer, or it is assumed that they have Windows XP Service Pack 2 ( SP2) or later.
Continuing with this example, if you are only using the April 2006 32-bit version of D3DX, you can add Apr2006_d3dx9_30_x86.cab. If you are using the August 2006 32-bit version of XINPUT, add Aug2006_xinput_x86.cab.
If you have a native 64-bit application, you must add the _x64 version. However, if you have a 32-bit application running on a 64-bit OS, the 32-bit versions of the DLLs will work.
You can then distribute this file package and run DirectSetup silently or run dxsetup.exe in a command shell silently. Be sure to secure this package with file versioning and ensure that users cannot opt out of running the DirectX installer. Either of these events creates a fallback installation process.
Internal Debug DirectX Runtime Deployment
DirectX component debug runtimes are installed when you install the DirectX SDK, but installing the SDK on each test machine can be painful. You need to develop an installation process to copy the debug runtime DLLs from Program Files\Microsoft DirectX SDK\Developer Runtime\architecture\ to Windows\system32\ or the game folder.
However, it is strongly recommended that you do not just copy the released runtime DLLs, as they are easy to remove for the final product. Instead, place the DirectX installation files in a shared folder and automatically run the installer from the shared folder.
Desktop bridge applications
Desktop bridge applications that use D3DX9, D3DX10, D3DX11, XAudio 2.7, XInput 1.3, or XACT must download the Microsoft.DirectX.x86 or Microsoft.DirectX.x64 framework to deploy these legacy components the DirectX SDK in parallel. It is also possible to remove all such dependencies (see the XAudio 2.9 redistributable developer’s guide, as well as the blog posts about life without D3DX and XINPUT and Windows 8).
Pro DirectX — Win32 apps
- Article
- Reading takes 11 minutes
This example shows how to measure some of the most important performance time measurements for a DirectX application using the XPerf and 9 tools0183 GPUView , which are included with the Windows Productivity Toolkit. This is not an exhaustive guide to analyzing the performance of DirectX applications. While most of the methods described here apply to all DirectX applications, this is most relevant for applications that use buffer chains, and not for XAML DirectX applications that use SIS/VSIS and XAML animations. We’ll look at key performance time measurements, how to purchase and install tools, and then run performance measurement traces and then analyze them to understand application bottlenecks.
Tools details
XPerf
XPerf is a set of Event Tracing for Windows (ETW) based performance analysis tools designed to measure and analyze detailed information about system performance and application and resource usage. Starting with Windows 8, this command-line tool has a graphical user interface and is called Windows Performance Recorder (WPR) and Windows Performance Analyzer (WPA). For more information about these tools, see the Windows Performance Toolkit (WPT) Web page: Windows Performance Toolkit.
Windows event tracing collects requested kernel events and saves them to a file called an event trace log (ETL) file. These kernel events provide detailed information about the application and system characteristics when the application starts. Data is collected by enabling trace tracking, executing the required application script that requires analysis, stopping the recording that saves the data in an ETL file. You can then analyze the file on the same or another computer using the 9 command line program0183 xperf.exe or visual trace analysis tools xperfview.exe .
GPUView;
GPUView is a development tool for determining graphics processing unit (GPU) and CPU performance. It looks at performance in relation to direct memory access (DMA) buffer processing and all other video processing on the video device.
For DirectX applications that rely heavily on the GPU, GPUView is a powerful tool for understanding the relationship between work being done on the CPU and the GPU. Learn more about GPUView See Using GPUView.
Like xPerf , the windows trace trace is first taken by starting the trace service, executing a script that requires parsing for the application, stopping the service, and saving the details in an ETL file. GPUView presents the data present in the ETL file in a graphical format.
After installing the GPUView tool, it is recommended that you read the GPUView Primary Display section in the GPUView Help menu. It contains useful information about the interpretation of the user interface GPUView .
Tool installation
XPerf and GPUView are included in the Windows Performance Toolkit (WPT).
XPerf is available as part of the Windows Software Development Kit (SDK) for Windows. Download the Windows SDK.
GPUView is available in the Windows Assessment and Deployment Kit (Windows ADK). Download Windows ADK.
After installation, you need to add directories containing XPerf and GPUView , to the Path system variable.
Click the Start button and type System Variables. The system properties window will open. Click Edit System Environment Variables. Select Environment Variables in the System Properties dialog box. The Path variable is located in the System Variables section. Add the directory containing xperf.exe and GPUView.exe to the path. These executables are located in the «Windows Performance Toolkit» directory in Windows Kits. Default location: C:\Program Files (x86)\Windows Kits\10\Windows Performance Toolkit .
Performance time measurements
Most applications expect to run smoothly and respond to user input. However, depending on the desired scenario, one aspect of performance may be more important than another. For example, for a newsreader application running on a touch tablet PC, the most important aspect is to view one article at a time, and to pan/zoom or scroll through the same or another article. In this scenario, the ability to render the entire content of each frame is not required. However, being able to scroll through an article smoothly on a touch gesture is essential.
Otherwise, a game or video rendering application that uses a lot of animation effects if frames are dropped. In this case, it is very important to present the content on the screen without interacting with user input.
To understand which part of the application is problematic, the first step is to select the most important scenarios. Once the basic aspects of an application are understood and how they are implemented, troubleshooting using tools becomes easier.
The following are some of the most common performance time metrics.
Start time
Time from process start to first screen hit. This measurement is more useful if the system heat means that the measurement is performed after running the application several times.
CPU time per frame
Time for which the CPU is actively processing application workload for one frame. If the application runs smoothly, all the processing required for a single frame is completed within a single VM sync interval. With a monitor refresh rate of 60Hz, this is 16ms per frame. If the CPU time or frame is greater than 16ms, CPU optimization may be required to create a simple application interface.
GPU time per frame
Time for which the GPU is actively processing application workload for one frame. An application is GPU bound if the time taken to process a frame is more than 16ms.
Being able to understand whether an application is CPU or GPU bound will narrow down the problematic part of the code.
Get a performance measurement trace
Follow these steps to run a trace:
- Open a command window as an administrator.
- Close the application if it is already running.
- Change directories to directory gpuview in the Windows Performance Toolkit folder.
- Type log.cmd to start tracing events.
 This parameter logs the most interesting events. The other options available are logging different event scopes. For example, «v» or verbose log mode captures all events known to GPUView .
 - Run the example and run the example so that it covers the performance path you want to analyze.
- Back to the command windows and type log.cmd again to stop logging.
- After that, a file named merged.etl is output in the gpuview folder. This file can be saved to a different location and analyzed on the same or different computer. To view stack capture details, save the symbol file (PDB) associated with the application.
Measurements
Note
Measurements for the geometry implementation example are taken on a Quad Core computer with an integrated DirectX11 graphics card. Measurements vary by computer configuration.
This section shows you how to measure startup time, load time, and gpu time for each frame. You can record a performance trace for the same example on a machine and see the differences in different measurements.
To analyze the trace in GPUView , open the merged.elt file with GPUView.exe .
Launch time
Launch time is measured by the total time spent launching the application until the content appears on the screen.
The startup time measurement is best done by following the steps in the previous section with these options:
- If you take startup measurements the first time you run an application, it is called a cold start. This may differ from measurements taken after running the application several times over a short period of time. This is called a warm start. Depending on how many resources an application creates at startup, there can be a big difference between the two launch times. Depending on the goals of the application, measuring one or the other may be desirable.
- When you are logging performance information, exit the application immediately after the first frame appears on the screen.

Calculate startup time using
GPUView
-
In GPUView scroll down to the appropriate process, in this case GeometryRealization.exe.
-
The context CPU queue represents a graphics workload queued by the hardware, but is not necessarily handled by the hardware. When you open a trace file, all events logged between the time the trace was created are displayed. To calculate the start time, select the region of interest, increase the initial part of the context’s first CPU queue (that’s the one that shows the activity) with ctrl+Z. Learn more about controls GPUView , see Help GPUView «Summary of GPUView Controls». The figure below shows only the GeometryRealization.exe process expanded to the first part of the context CPU queue. The color of the context CPU queue is indicated by the rectangle just below the queue and the same color data packets in the queue where the GPU workloads queued on the hardware are displayed.
 The hatch pattern package in the context queue shows the real package, which means that the application wants the hardware to be displayed on the screen.
 -
The start time is the time the application (in this case, the UI thread entry point module SHCORE.dll) first starts up until the context (marked with a hatch packet) is encountered. The region of interest is highlighted in the figure.
Note
The actual submitted information is presented in the paging queue and therefore the time will be extended until the current batch actually ends in the paging queue.
The full status bar is not displayed in the figure below, which also displays the elapsed time between the highlighted parts. This is the application launch time. In this case, for the computer mentioned above, it came out around 240ms.
CPU and GPU time per frame
There are several things to think about when measuring CPU time. Locate the trace areas where you performed script analysis. For example, in the geometry implementation example, one of the analyzed scenarios is the transition between rendering primitives 2048 to 8192, all unrealized (as in, the geometry is not tessellated every frame). The trace clearly shows the difference in CPU and GPU activity before and after the transition in the number of primitives.
Two scenarios are analyzed to calculate CPU and GPU time per frame. Here is how below.
- Transition from rendering 2048 unimplemented primitives to unimplemented 8192 primitives.
- Transition from rendering 8192 implemented primitives to non-implemented primitives 8192.
In both cases, it was noted that the frame rate dropped dramatically. Measuring CPU and GPU time, the relationship between them, and a few other trace patterns can provide useful information about problem areas in an application.
Calculate CPU and GPU time when rendering unimplemented primitives 2048
-
Open trace file with GPUView.
 exe
exe -
Scroll down to the GeometryRealization.exe process.
-
Select an area for CPU time calculation and increase it with CTRL+Z.
-
Display virtual machine synchronization information by switching between F8. Keep zooming until it’s easy to see one virtual asynchronous data cost clearly. The blue lines are at the sync time location. Typically, they occur every 16ms (60fps), but if the DWM encounters a performance issue, it slows down so that they occur every 32ms (30fps). To get a sense of time, select one blue bar to the next and then look at the number of ms reported in the lower right corner of window GPUView .
-
To measure CPU time per frame, measure the length of time spent by all threads involved in rendering. It might be worth narrowing down the thread that is expected to be the most relevant in terms of performance. For example, in the geometry implementation example, the content is an animation and must be drawn to the screen every frame, which makes the UI flow important.
 Once you have determined which stream to view, measure the length of the stripes in that stream. On average, several of them give CPU time per frame. The figure below shows the time spent on the UI thread. It also shows that it fits well between two successive v-syncs this time, which means it hits 60FPS.
 You can also check by looking at the rewriting queue for the corresponding time interval, which shows that the DWM can present each frame.
-
GPU time can be measured in the same way as CPU time. Zoom in on the corresponding area, as in the case of measuring CPU time. Measures the length of stripes in the GPU hardware queue with the same color as the color of the context’s CPU queue. If the lanes are placed in successive v-syncs, the app runs smoothly at 60FPS.
CPU and GPU time calculation when rendering primitives 8192 not implemented
-
If you perform the same steps again, the trace shows that all CPU work resources for one frame do not fit between one virtual synchronization and the next.
 This means that the application is CPU bound. The UI thread saturates the CPU.
 Looking at the paging queue, it is also clear that the DWM cannot represent every frame.
-
To analyze where time is being spent, open the trace in XPerf . To analyze the startup time in XPerf , first find the time interval in GPUView . Move the mouse pointer to the left of the interval and to the right and note the absolute time shown at the bottom of the window GPUView . Then open the same ETL file in XPerf and scroll down to the «CPU sampling by CPU» chart, right click and select «Select interval…» This allows you to enter the interval of interest while looking at the GPU trace.
-
Go to the Routing menu and make sure that Load Symbols is checked. Also, go to «Routing—> Configure Symbol Paths» and enter the path to the application’s symbol.
 The symbol file contains debugging information for the compiled executable in a separate database (PDB). This file is usually named PDB. More information about symbol files can be found here: Symbol files. This file can be found in the Debug folder of the application directory.
 -
To get a breakdown of the time spent in the application, right-click the interval you selected in the previous step and click the PivotTable button. For an overview of how much time is spent in each DLL, clear the Stack check box from the Columns menu. Note that the Count column here shows how many examples are in a given dll/function. Since approximately one example is taken per ms, this number can be used as a best guess for how much time is spent in each dll/function. Checking «Stack» in the «Columns» menu will provide an inclusive time spent on each function in the call graph. This will help break down the problem points further.
-
Stack trace information for unimplemented 2048 primitives shows that 30% of the CPU time is spent in the geometry implementation process.
 Of this, about 36% of the time is spent in geometric tessellation and stroking.
 -
Stack traces for unimplemented 8192 primitives show that about 60% of the CPU time (4 cores) is spent implementing the geometry.
Calculating CPU time when rendering primitives 8192
Clearly the application is CPU bound. To reduce CPU time, geometries can be created once and cached. Cached content can be rendered every frame without incurring the cost of geometric tessellation on a per-frame basis. When looking at the trace in GPUView for the implemented part of the application, it is clear that the DWM is able to render each frame and the CPU time has been drastically reduced.
The first part of the graph shows the 8192 primitives. The corresponding CPU time per frame can correspond to two consecutive virtual clocks. This is not the case in the later part of the graph.
Looking at XPerf , the CPU is idle for a long time, with about 25% of the CPU’s time spent in the geometry implementation application.