How to Use Scanline Sync and Cap FPS In RivaTuner
While RivaTuner Statistics Server (RTSS) is most well-known for being bundled with MSI Afterburner and used for monitoring and overclocking GPUs, RTSS actually has some use separate from Afterburner. Here, we discuss those functions and teach you how to use them to cap your FPS (frame per second) or enable Scanline Sync.
What is RivaTuner?
RivaTuner Statistics Server (usually shortened to RTSS) is an application most known for being shipped with MSI Afterburner. The purpose it serves with MSI Afterburner is enabling an on-screen display of framerate and other performance metrics, including GPU utilization and temperatures.
With or without Afterburner, however, RivaTuner is capable of applying FPS caps and enabling Scanline Sync on any monitor.
What is an FPS cap?
FPS in this context refers to Frames Per Second, and on PCs where you have an FPS exceeding your refresh rate (such as 100 FPS on a 60 HZ panel), you’re much more prone to screen tearing and highly-variable FPS. Both of these can be visually disorienting and a competitive disadvantage, but the seemingly only way to fix it in most games is to enable some form of V-Sync, which is much more visually consistent but adds a lot more input latency.
Using an FPS cap, you can set your in-game framerate to just at or just under your screen refresh rate. If the game you’re playing offers an FPS cap, chances are high that you’ll want to use that cap instead of RivaTuner’s, but if you want to learn how to use RivaTuner’s for universal application, keep reading.
What is Scanline Sync?
Scanline Sync, like FreeSync and G-Sync, is another technology that looks to replace the V-Sync standard. FreeSync and G-Sync are both hardware-enabled features, though, whereas Scanline Sync is used in software to achieve a similar effect. Scanline Sync is particularly ideal for displays that don’t have FreeSync or G-Sync (e.g. your living room TV, should you want to game on it without horrific screen tearing or input lag).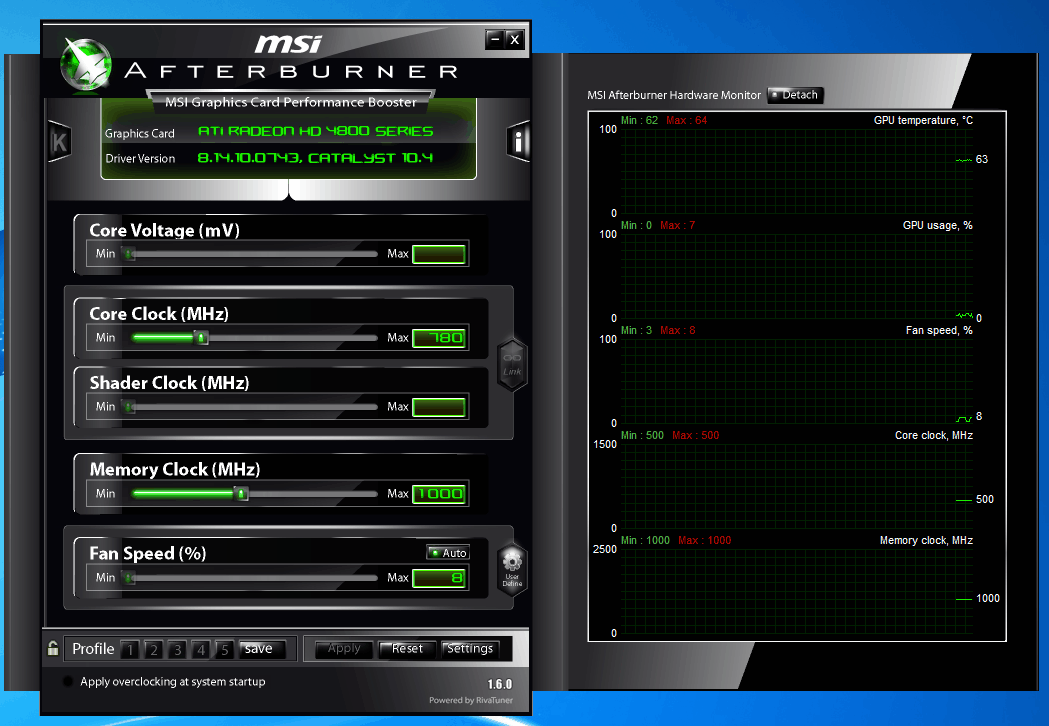
Where Scanline Sync differs from other V-Sync alternatives is actually hinted at in its name. Unlike other techniques, which work with complete frames as much as possible, Scanline Sync actually allows you to choose a specific scanline, one where screen tearing is near-guaranteed but contained. With the right adjustments, this scanline can be moved nearly offscreen and provide a tear-free, lag-free alternative to V-Sync.
Should I use an FPS cap or Scanline Sync?
While RivaTuner offers both FPS capping and Scanline Sync, you can’t actually use both simultaneously.
The main way to decide between the two features is to take a look at your existing hardware.
FPS caps will work on the most systems with the fewest issues and is preferred to Scanline Sync if you already have a FreeSync or G-Sync monitor. In this case, Scanline Sync’s job is already being done by the monitor (and compatible GPU), so it’s unneeded.
Scanline Sync is best used to compensate for the lack of FreeSync and G-Sync, but it comes with a catch, too: high GPU utilization (~80%+) under Scanline Sync can introduce major screen tearing to an image. If you’re looking to run games on a 60 Hz display with Scanline Sync and have plenty of GPU power to spare, this shouldn’t be an issue. But if you experience any, we highly recommend turning down settings or using an FPS cap instead.
How to set an FPS cap in RivaTuner
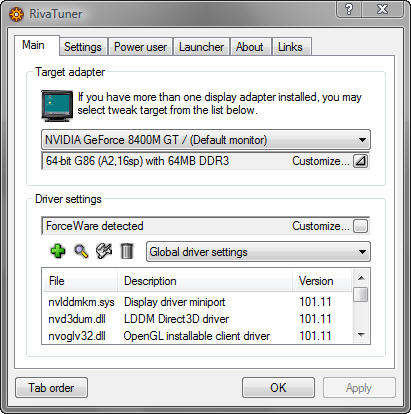
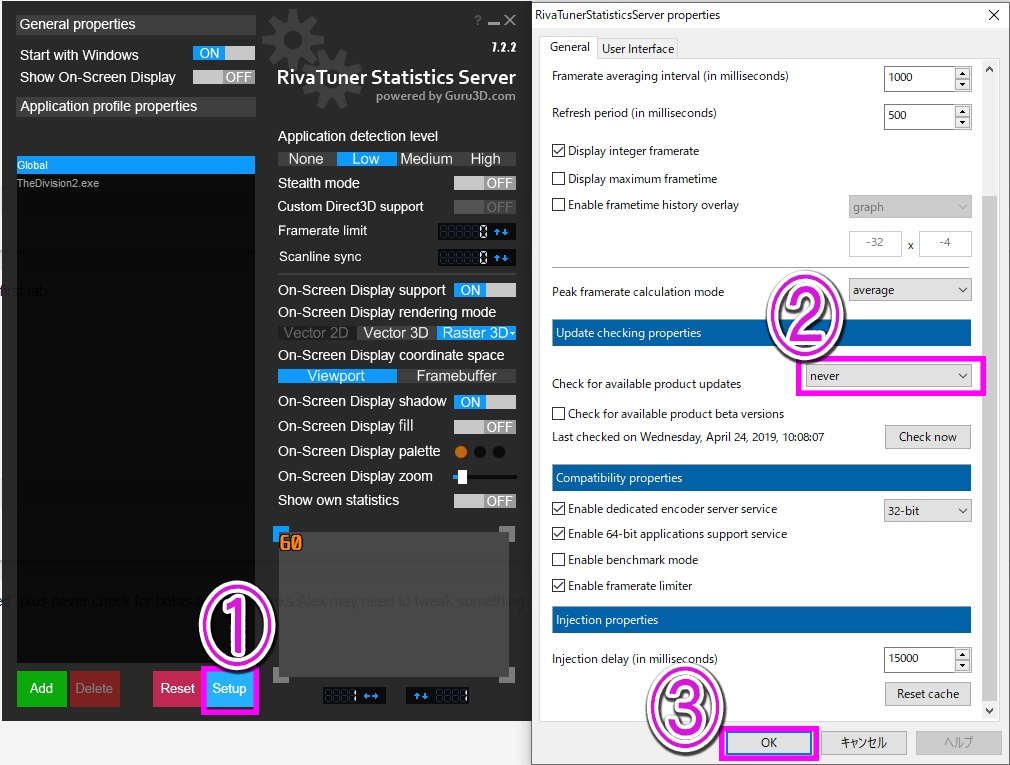
First, open RivaTuner Statistics Server. If it doesn’t immediately appear, check for its icon in your start menu. Hovering over that icon should show you the RivaTuner version, and right-clicking will open a context menu that reveals “Show,” which will reveal the main window.
From the main window, click the “Global” profile and set a framerate limit of your choice, ideally matching your monitor’s framerate.
Make sure “Application detection level” is set to Low or higher, and you’re good to go: you’ve set a global FPS cap. Should you ever want to remove it, simply turning off RivaTuner will do the job.
You can also click the green “Add” button at the bottom-left corner of the application window to set per-app FPS limits. In the following screenshot, we’ve done this with hl2.exe to cap that particular application to 120 FPS, since a stable 144 is not easily achievable with this setup.
How to set up Scanline Sync in RivaTuner
In order to use Scanline Sync in RivaTuner, the framerate limit must first be set to 0, since the two functions are mutually exclusive. Don’t worry, as this won’t literally set your frames to 0 – it just disables the FPS capping function so Scanline Sync can be used.
Now that the Framerate limit is set to 0, it’s time to set the Scanline Sync. The number that you’ll be setting in this field is not a framerate limit but rather coordinates for the tearline. Your exact results will vary depending on the size and resolution of your display, and you will need to manually adjust this value in increments of 10 since there is no one-size-fits-all option.
The best place to start is to take your vertical resolution (for instance, 1080 pixels on a 1080p screen or 1440 pixels on a 1440p screen), and subtract that number by 150 to 200. For a standard 1080p display, we recommend starting at 930 as a baseline and reducing as needed until you’ve achieved the desired result.
Is this article useful?
Subscribe to our newsletter!
Our latest tutorials delivered straight to your inbox
Sign up for all newsletters.
By signing up, you agree to our Privacy Policy and European users agree to the data transfer policy. We will not share your data and you can unsubscribe at any time.
- Tweet
How to Set Up MSI Afterburner to Display Stats While Gaming on Windows 11
By
Abhishek Kumar Mishra
Share
Tweet
Share
Share
Share
Email
Keep an eye on your hardware while you game with MSI Afterburner on Windows 11.
A decade back, gaming used to be all about playing games at whichever settings your hardware could support. But the landscape has changed now. Games have become visually appetizing and demand more computing resources than ever. That makes you wonder how to check the stats of the system resource in use while playing games.
It is possible to track various stats of components like CPU, GPU, RAM, and more with MSI Afterburner. But it doesn’t work straight out of the box. We will elaborate on MSI Afterburner and how you can configure it to display system stats while gaming.
What Is MSI Afterburner?
MSI Afterburner is a GPU-overclocking utility developed and distributed by MSI. You can use it to tweak the performance of the graphic card present in your system. On top of that, this utility works with graphics cards of all brands including MSI-made GPUs.
MSI Afterburner is free to use and has improved a lot since its release in 2010. You can allow MSI Afterburner to scan for the best possible GPU overclock settings and apply them. Or, you can take control of the reigns and tweak everything yourself. All in all, there’s pretty much everything related to GPU performance with this tool. Check out our detailed guide to Using MSI Afterburner to learn more about overclocking your GPU.
Yes. You can use MSI Afterburner to display the hardware stats on the screen and monitor them. Most users think of MSI Afterburner as an overclocking utility only. But, the app uses RivaTuner Statistics Server (RTSS) which allows it to display the hardware stats and frame rates on screen.
MSI Afterburner relies on RivaTuner Statistics Server to display the stats of the hardware resources in use. You cannot see any stats on the screen if you don’t install the RivaTuner Statistics Server. The primary purpose of the RivaTuner Statistics Server is to offer OSD capabilities to MSI Afterburner. If you install only RTSS, you will be only able to see the FPS counter and nothing more. So, installing both MSI Afterburner and RTSS is crucial.
How to Install MSI Afterburner
Here’s how to install MSI Afterburner and RivaTuner Statistics Server in one go.
- Go to the official landing page of MSI Afterburner.
- Scroll down and click on the Download Afterburner button. A ZIP file will begin downloading in your browser.
- Right-click on the setup file and select the Run as administrator option. UAC will pop up. Click on the Yes button to continue.
- Keep the language as English and click on the OK button. Then click on the Next button and accept the EULA.
- The setup will ask you to choose the components. RivaTuner Statistics Server checkbox will be automatically checked. Do not uncheck it, otherwise, you have to install it separately.
- Then follow the on-screen prompts until you see the Install button. Click on it to begin the installation.

- RivaTuner Statistics Server installer will pop up while the installation is ongoing. Follow the on-screen prompts to install it and click on the Finish button to close the setup.
- Then, click on the Finish button to close the MSI Afterburner setup as well. MSI Afterburner will automatically launch on your system.
After successfully installing MSI Afterburner, you need to configure its settings. You have to select the components whose stats you want to display while running a game.
Here’s how to set up MSI Afterburner to display stats on Windows 11:
- MSI Afterburner will launch as soon as you close the setup windows. Now, click on the gear icon in the app window to display the advanced properties window.
- Under the General tab, click on the dropdown list to select the GPU you want to monitor. Most laptops have integrated as well as discrete GPUs embedded into them.
 So, you need to pick the one you want to monitor. Here we have selected the discrete Nvidia GPU.
 - Now, switch to the monitoring tab by clicking on it. Move to the Active hardware monitoring graphs section. You will find all the graphs that you can display while running a game.
- To display a parameter in OSD, click on the tick mark icon present in front of it to select it. You won’t be able to see a graph unless you enable it using the tick mark icon next to it.
- Now, scroll down to the Graph properties section and click on the Show in on-screen display checkbox.
- Similarly, you must enable all the graphs that you want MSI Afterburner to display while running a game.
- Click on the Apply button to apply the recent changes and then click on the OK button. Don’t exit the app, otherwise, you won’t see any stats on the screen.

- Launch a game on your system. You will notice that system stats appear on the top-left area of the screen in the game window. If you switch to another window, you won’t see them.
If you want to hide the system stats and continue playing the game, press the Insert key to toggle the On-screen display off. You can even visit the settings tab and change the hotkey to toggle the On-screen display.
How to Adjust the On-Screen Display for Better Visibility
By default, the stats displayed by the On-screen display appear very tiny and hard to see. But you can change the size of the system stats text that appears on the screen. You can even reposition the on-screen display to any area of the screen you like.
Here’s how to adjust the On-screen display for better visibility.
- Launch the MSI Afterburner. Now, head over to the system tray icon area and click on the arrow button.
- Click on the RivaTuner Statistics Server icon to launch the app.

- Now, locate the On-screen display zoom option in the app window. Drag the slider to the right to increase the size of the On-screen display. You can check how big it will look by checking its appearance in the preview area located at the bottom.
- Don’t increase the size too much, or it will block your visibility while playing games.
- Now, go to the preview area and click and hold the On-screen display indicated by the number 60. Drag it to reposition the On-screen display.
- To change the color of the On-screen display text, click the On-screen display palette option. Select a color from the palette and click on the OK button to apply it.
- Now, launch a game on your system. You will see that the On-screen display text is now bigger and in a new color scheme. Press the Insert key to show or hide the on-screen display.
MSI Afterburner is a free-to-use tool that helps you to easily view hardware stats on the screen while gaming. You can check the system resources in use as well as how many FPS you are getting with the current PC. Moreover, you can adjust the size and other properties of the on-screen display for better visibility.
MSI Afterburner Overlay Customization Guide
Home » How-To’s & Guides » MSI Afterburner Overlay Customization Guide
Gaming PC Builder is reader-supported. When using links on our site to make a purchase, we may earn an affiliate commission.
Installation and Initial Settings
1. Download MSI Afterburner from the MSI website and install it with the Rivatuner Statistics server.
You can separately download and install the Rivatuner Statistics Server if needed.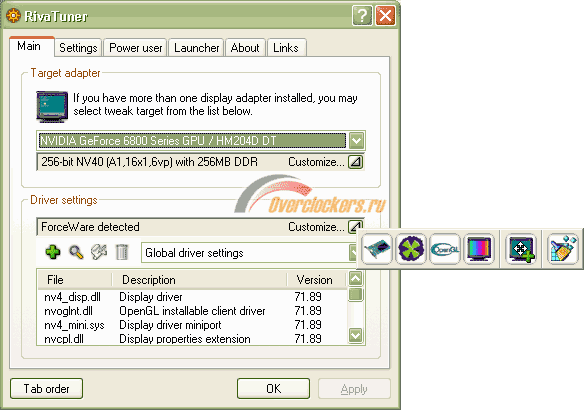 Download it from here.
2. In the MSI Afterburner interface, click the gear icon to open the settings window.
3. Click the monitoring tab then click the checkmark beside the metric you want to display and click the checkbox for “Show in On-Screen Display” in the “properties” section and click the “Apply” button.
Select:
-
- GPU Usage
- Memory Usage
- GPU Temperature
- CPU Usage
- CPU Clock
- CPU Temperature
- RAM Usage
- Framerate
Uncheck the others.
4. Rearrange the metrics by dragging it to where you want to see it. Hold click and use the mouse scroll (middle button) then click Apply. It should look like this.
5. Run a game to see the overlay. Make sure the RivaTuner Statistics Server is also running.
6. If you don’t see the overlay, just run the RivaTuner Statistics Server. The executable file is usually in “C:\Program Files (x86)\RivaTuner Statistics Server\RTSS.exe“. Turn ON the “Start with Windows” setting so it will run automatically.
Changing Colors
7. To change the color of the “name” of a metric, click the … button in the Properties section.
8. Go to “Group color” and look for the item you wanted to change the color. Double-click its current color and a drop-down list will appear, select its new color and click Apply.
Do the same for all the metrics you selected but choose red for Framerate.
9. To change the color of the values, double-click the color of “System color 0” from “Colors Library”.
10. Color palette window will appear. From there you can select the new color, then click OK and Apply.
11. To change the value color of the Framerate, go to “Value Color” then double-click the Framerate and select a new color, the same as the color of Framerate which is red. Click Apply and OK.
Our overlay now should look like this.
Notice that the “value” (red) and “unit” (white) colors for Framerate are different.
12. To change the unit color of the Framerate, go to “Units color” then double-click the Framerate and select a new color, same as the color of Framerate which is red. Click Apply and OK.
The Framerate value and unit now the same color.
Grouping
13. We want to add the Memory (Mem) to the GPU group and put it next to GPU Usage. To do that, put Memory after GPU usage from the list. Then first select “Memory usage” in the Monitoring tab then click the checkbox for “Override group name”, then rename it to “GPU” because the group name of GPU usage and temperature is GPU. All metrics with the same group name will be put on the same group.
Memory usage of the graphics card is now on the same line as GPU usage and temperature.
Changing Names
14. You can also change the group name according to what components you have in your system. You can change it from the “Override group name” option. Just keep in mind that the metrics you wanted to group should have the same group name.
Adding Graph
15. To add a graph for your framerate, select the Framerate metric from the list then select “graph” from the drop down list in the “On-Screen Display” option then click Apply.
The graph now appears, replacing D3D11.
16. Noticed that the graph is not colored red. To change its color, click the “Select On-Screen Display layout” button (…).
17. Go to graph color, and double-click the “Framerate” designated color. Select the color red then click Apply and OK.
18. To make the Framerate graph texts bigger, go to “Graph text size” then select “” from the drop down list, then click Apply.
The Framerate graph now looks like this.
19. To make the graph wider, shorter, or taller, just change the values of width and height from the “Graph” properties.
Higher negative values for width will make the graph wider and taller for height.
Units Size
20. To make the unit size (MHz, MB, %) be in its normal size, go to “Unit Size” and select “”, then click Apply and OK.
Changing Font and Size
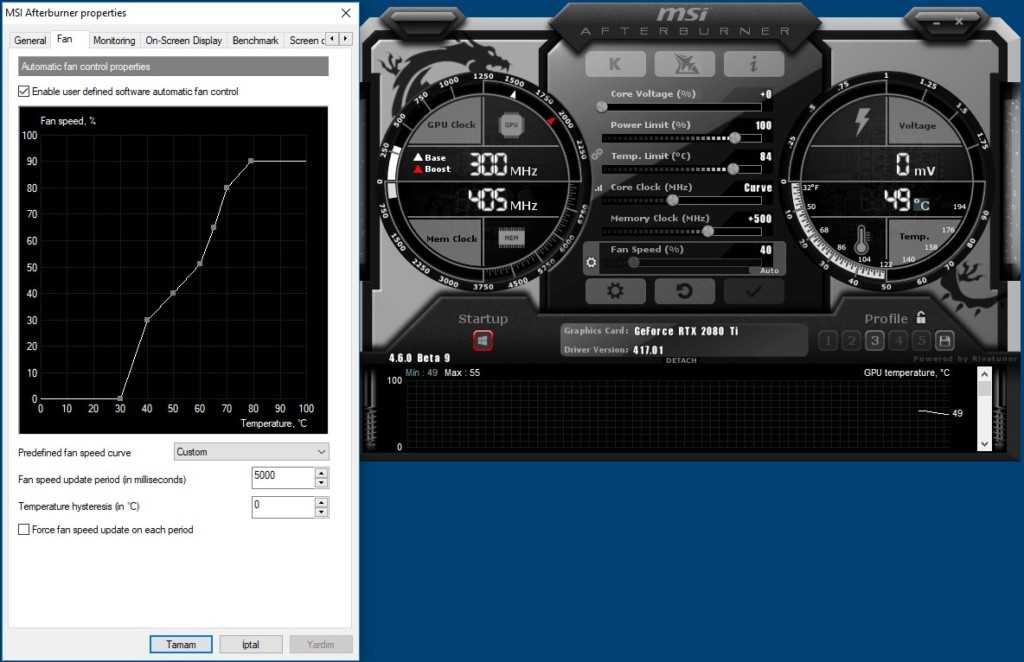
21. To change the font style, open the RivaTuner, click the “Raster 3D” and select the desired font style and size and click OK.
Positioning
22. To adjust the metrics position, open the RivaTuner Statistics Server then change the value of horizontal and vertical coordinates. It is found on the lower portion the window. You need to press the enter key to apply the new coordinates.
Spacing
23. To adjust the spaces between columns, click the “Select On-Screen Display layout” button (…), then go to “Alignments library”, double-click the “Alignment 1” then change its value and click OK. Lower value will reduce the spaces between columns.
On-Screen Display Toggle Hotkeys
24. To turn on or off the on-screen display, go to “On-Screen Display” tab and press the keys you wanted to use in the “Toggle On-Screen Display” text box.
Here is our customized layout.
That’s it!
Customize your own layout and share it with us using #MyFPSCounter in your posts.
MSI Afterburner not working in Windows 11? Apply these fixes
by Kazim Ali Alvi
Kazim Ali Alvi
Author
Kazim has always been fond of technology, be it scrolling through the settings on his iPhone, Android device, or Windows. And at times, unscrewing the device to take… read more
Published on
Affiliate Disclosure
- Several users in the recent past have reported that MSI Afterburner is not working in Windows 11, either on a particular game, a few, or all of them.

- To fix this, you can try disabling the Steam and NVIDIA overlay, providing administrative privilege to the program, amongst other methods listed below.
- Also, find out how to download MSI Afterburner in Windows 11.
XINSTALL BY CLICKING THE DOWNLOAD FILE
Fix Windows 11 OS errors with Restoro PC Repair Tool:This software repairs common computer errors by replacing the problematic system files with the initial working versions. It also keeps you away from critical file loss, hardware failure, and repairs damages made by malware and viruses. Fix PC issues and remove viruses now in 3 easy steps:
- Download Restoro PC Repair Tool that comes with Patented Technologies (patent available here).
- Click Start Scan to find Windows 11 issues that could be causing PC problems.
- Click Repair All to fix issues affecting your computer’s security and performance
- Restoro has been downloaded by 0 readers this month.

MSI Afterburner is an overclocking tool that works with most graphic cards. Along with that, you can also use it to monitor the system’s performance. But several users have reported that MSI Afterburner is not working in Windows 11.
This could be due to several reasons, and we have discussed them in the following sections. However, when this situation arises, it prevents you from altering the performance or monitoring it while playing a game.
As expected, this poses a major challenge to gamers. This is why we have dedicated this guide to help you understand the issue, and walk you through the most effective fixes for the MSI Afterburned not working in Windows 11 problem.
Why is MSI Afterburner not working in Windows 11?
While it works seamlessly for most users, the ones who are unable to get it up and running generally have misconfigured settings, NVIDIA or Steam overlay, problems with the compatibility, amongst other issues.
Also, several users have reported that using an outdated version of MSI Afterburner caused the issue in their case, which is easily fixable. Also, issues with the driver are found to affect its functioning.
Now that you have a fair understanding of the underlying causes, it’s time we head to the fixes. Execute them in the listed sequence to quickly and effectively troubleshoot the error.
What can I do if MSI Afterburner isn’t working in Windows 11?
1. Disable Steam overlay
- Press Windows + S to launch the Search menu, enter Steam in the text field at the top, and click on the relevant search result that appears.
- Now, right-click on the game you are facing trouble with and select Properties from the context menu.
- Untick the checkbox for Enable the Steam Overlay while in-game.
Overlay of any program may affect the working of MSI Afterburner in Windows 11, and Steam is commonly found to be the culprit. Therefore it’s recommended that you disable the overlay and check if that fixes the issue. If not, head to the next method.
2. Disable NVIDIA overlay
- Launch the NVIDIA GEFORCE EXPERIENCE panel, and click on the Settings (gear) icon near the top-right corner.
- Next, disable the toggle for IN-GAME OVERLAY.
3. Run MSI Afterburner with administrative priveleges
- Press Windows + E to launch the File Explorer, paste the following path in the address bar at the top, and hit Enter:
C:\Program Files (x86)\MSI Afterburner - Next, right-click on the MSIAfterburner.exe file, and select Properties from the context menu. Alternatively, you can select the file and hit Alt + Enter.
- Navigate to the Compatibility tab in the Properties window.
- Now, tick the checkbox for Run this program as an administrator, and click on OK at the bottom to save the changes and close the window.
If the MSI Afterburner lacks the permissions to run with administrative privileges, you may encounter problems while using it when playing games, as is the case with other apps as well.
4. Manually select detection level to high in RivaTuner
- Press Windows + E to launch the File Explorer, paste the following path in the address bar at the top, and hit Enter to navigate to it:
C:\Program Files (x86)\RivaTuner Statistics Server - Double-click on the RTSS.exe file to launch the RivaTuner tool.
- Click Yes on the UAC (User Account Control) prompt that pops up.
- Next, click on the Add button at the bottom.
- Navigate to the location where the game is saved, select its executable (.exe) file, and click on Open.
- Now, select High under Application detection level.

The RivaTuner Statistics Server is a tool bundled with MSI Afterburner that helps monitor hardware and overclock the graphics card.
If MSI Afterburner is not working in Windows 11 on a specific game or a bunch of them while it works on the others, changing the application detection level to high in RivaTuner might help.
In case this resolves the issue, apply the same changes to all the games you are facing trouble with.
5. Run MSI Afterburner in compatibility mode
- Press Windows + E to launch the File Explorer, type/paste the following path in the address bar at the top, and then hit Enter:
C:\Program Files (x86)\MSI Afterburner - Right-click on the MSIAfterburner.exe file and select Properties from the context menu.
- Now, navigate to the Compatability tab from the top.
- Tick the checkbox for Run this program in compatibility mode for and select each option one at a time from the dropdown menu under it, until the error is fixed.
- Finally, click on OK at the bottom to save the changes and close the Properties window.
Expert Tip: Some PC issues are hard to tackle, especially when it comes to corrupted repositories or missing Windows files. If you are having troubles fixing an error, your system may be partially broken. We recommend installing Restoro, a tool that will scan your machine and identify what the fault is.
Click here to download and start repairing.
If the methods listed above have not worked, you may try running MSI Afterburner in compatibility mode with an older version of the OS. This has been found to fix the problem for a lot of users.
6. Disable the integrated graphics card
- Press Alt + F4 to and select Restart from the dropdown menu in the Shut Down Windows box.
- Click on OK to restart the computer.
- As soon as you see the manufacturer’s name on the screen, hit the F12 or Del key (or other relevant key for your system) to enter the BIOS.
 Since you will have just a few seconds here, hit the key multiple times to be on the safe side.
 - Once in the system BIOS, navigate to the Advanced tab from the top.
- Click on Chipset from the options listed here.
- Next, click on SouthBridge Configuration.
- Select the Primary Graphics Adapter option.
- In the box that pops up, make sure you select the option that has PCIE listed first and the IGP (Integrated Graphics Processor) at the last.
- After making the changes, navigate to the Exit tab, and click on Exit & Save Changes.
If you have both the external and integrated graphics card enabled, there are chances of MSI Afterburner not working in Windows 11. In which case, it’s best that you disable the integrated graphics card.
The method to do it will differ for every computer since the BIOS interface is different. But, the steps listed above should provide you with a basic understanding of the process.
Also, it’s recommended that you do not make any other changes to the BIOS unless you are fully aware of its effects, since it could prove detrimental to the functioning of the computer.
7. Reinstall the MSI Afterburner app
- Press Windows + I to launch Settings, and select Apps from the tabs listed in the navigation pane on the left.
- Click on Apps & features on the right.
- Now, locate the MSI Afterburner app, click on the ellipsis next to it, and select Uninstall from the menu that appears.
- Again, click Uninstall in the prompt that pops up.
In many cases, it is a problem with the MSI Afterburner app itself that prevents it from working in Windows 11. Also, if you are using an outdated version of the app, there’s a possibility of encountering similar issues.
In this case, a simple fix would be to uninstall MSI Afterburner and then install the latest version of it. If you are not sure how to do the latter part, check the next section to find out.
How can I download MSI Afterburner in Windows 11?
If you had been planning to get your hands on this amazing tool but were unsure about the download process and its functioning, check our guide that details every aspect of MSI Afterburner along with the steps to download it.
The file will most likely be compressed (Zip format), and you will have to extract it before you can proceed to the installation. Once done with these steps, MSI Afterburner is now ready for use and you can both monitor and overclock the GPU.
These are all the ways you can fix issues preventing MSI Afterburner from working in Windows 11. In most cases, you wouldn’t have to execute them all, since the problem would be fixed within the first few methods.
In case you are unable to control the fan speed using MSI afterburner, learn how to resolve the issue.
Tell us which fix worked along with your experience of MSI Afterburner in the comments section below.
Was this page helpful?
Start a conversation
Share
Copy link
Newsletter
Software deals
Friday round-up
I agree with the Privacy Policy regarding my personal data
Msi Afterburner Overlay — How To Setup?
Hardware monitoring is very important for high-end computers, especially for those who have built a gaming system. As you may already know, gaming peripherals such as high-end CPUs, graphic cards, and RAMs are very powerful and require a lot of power to run. On top of that, the prices of high-end PC components have been increased a lot recently due to the worldwide shortage of silicon which is an essential element for these components.
Thus, it is very important to take proper care of these computer parts and make sure they are performing as they are supposed to even at a high load.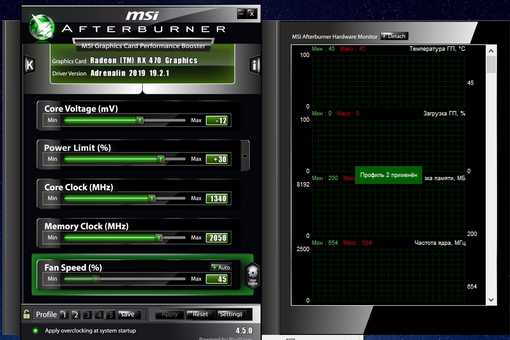 Today, we will be talking about one of the most popular hardware monitoring software made by MSI called MSI Afterburner. This might be a familiar program for many users as MSI includes a driver CD containing the software with MSI-made GPUs.
Even if you are not familiar with the software at all, don’t worry. We will be covering all aspects of the software in our guide today so that you can install and customize the software as you desire. To get all the necessary information about MSI afterburner, you should read our guide until the end.
Outline
MSI Afterburner Overlay Customization Guide
MSI Afterburner is one of the most popular hardware monitoring software and is currently being used by the majority of professional gamers and content creators. Thus, it is great to have this software installed in your system and manage your hardware with it.
MSI afterburner allows you to monitor various parameters of the hardware installed in your systems such as the GPU, RAM, and even the fan speed installed on your graphics card.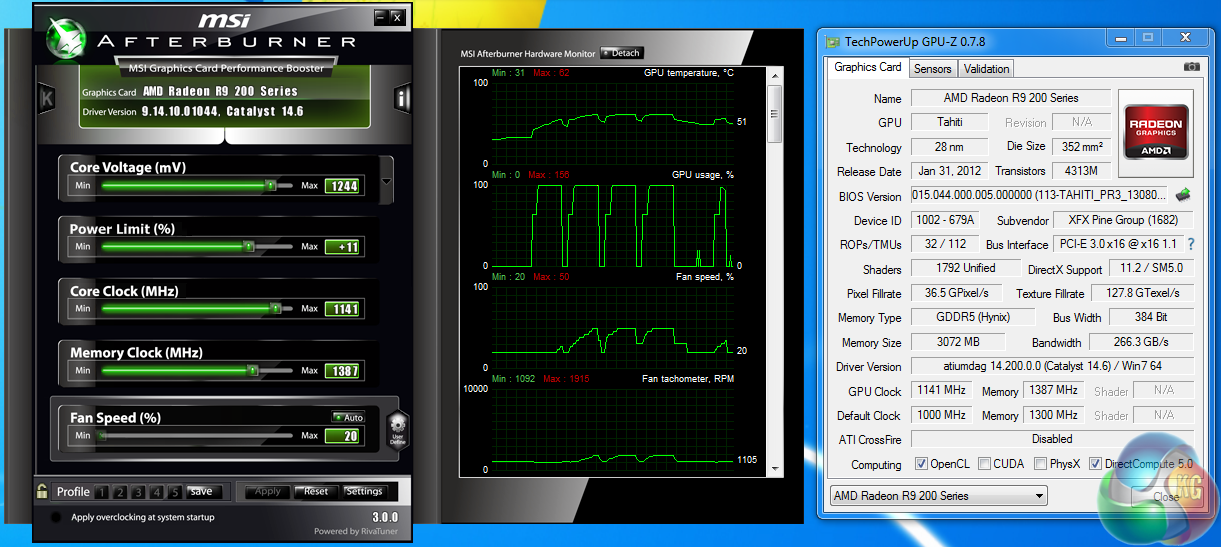 You can also control the parameters of the GPU like core voltage, core clock, and even the memory clock of your graphics. Thus, the software is very important for those who overclock the components on their computer.
Installation and Initial Setting
Before you can start using the software, you will have to download, install and configure the initial settings on the MSI afterburner software. Here’s how you can do it.
- Download the MSI afterburner software from the link given here.
https://www.msi.com/Landing/afterburner/graphics-cards
- MSI afterburner setup also includes Rivatuner Statistics Server software which you can install simultaneously. It is a frame rate monitoring software along with a built-in screen recording program. It is not completely necessary, but you can install it as well for complete monitoring.
- Once you download the setup, extract the zip file and double-click on the .exe file to initialize the setup.
- In the setup, you will be asked to select the components to install.
 Check or uncheck the Rivatuner Statistics Server and press Next based on your requirements.
 - Now, select the destination folder and start the installation. Wait until the program is installed.
- Once the software is installed, you can launch the program from the installation screen by checking the “Run MSI Afterburner” option and clicking Finish.
- Now, simply click on the gear icon on the left-hand side to enter the configuration page.
- Now, head over to the “monitoring” tab and check the parameters that you wish to monitor with the software.
- Also, make sure that you select the Show in On-Screen Display option and click on Apply.
- You can also arrange the parameters in a specific order by simply dragging the parameters within the list. The overlay within a game or program shall appear exactly in this order.
Changing Colors
A lot of users like to customize the theme of monitoring software with the theme of their setup and the games that they usually play.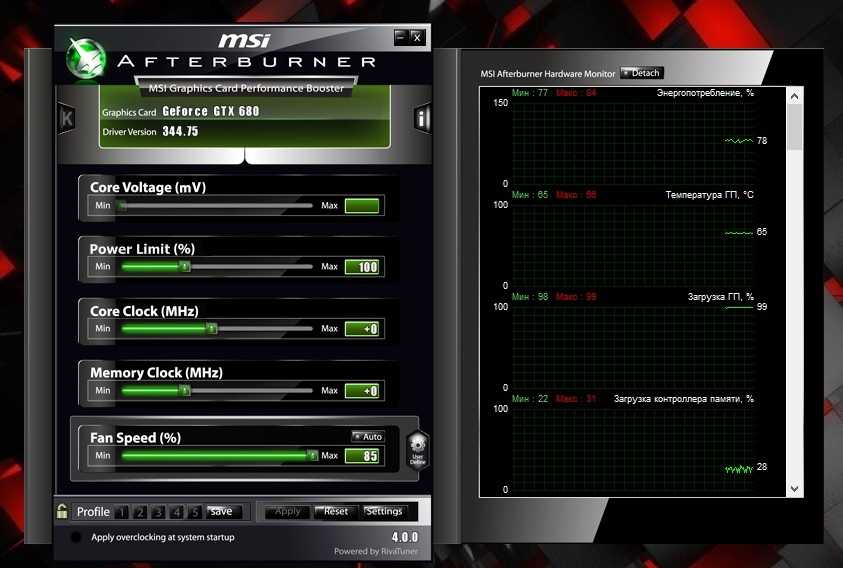 You can do that in MSI afterburner as well by following these steps.
- In the monitoring section, scroll down until you find the Show in On-Screen Display option and click on the little box present on the right side.
- Here, you can manage the parameters regarding each of the overlay options.
- To change the colors, open this section and click on the Group color options.
- Now, you will see all of the parameters that you have selected earlier that are to be displayed on the overlay.
- In front of each parameter, you can see a color code. Simply double-click on it and select the color from the list.
- You can also enter the code of a particular color which you wish to get on the overlay.
- You can also change the color of the values that are dynamic from this section. For that, simply click on the System color 0 option available in the Colors library section.
 .
.
- Now, you can select the color of your choice from the RGB color palette available here.
- To change the value color, just click on the Value Color option and select the color of your choice. Click Apply to save the changes.
- The overlay parameter also offers the units along with the values. To change the color of the units, open the Units color option and select the color as before.
Grouping
Grouping is a great feature of MSI afterburner overlay as it allows you to group similar features together. For example, you will be able to group parameters related to the GPU such as usage, temperature, and speed and put them in a single line. This makes the overlay shorter, yet more comprehensive.
- To group various parameters in the overlay, go to the top of the monitoring section.
- Here, you will find the list of all visible parameters.
 Now, simply put the parameters that you wish to group in order.
 - Now, select the subsequent parameter and scroll down until you find the Override group name option.
- Click on the checkbox to activate grouping and rename the section to the parent hardware.
- For example, if you are grouping the memory clock of GPU with usage, simply name the group as GPU.
- Now, perform the same action for all similar parameters and click Apply.
Changing Names
The names of the groups, values, and even the parent hardware can be changed in the MSI afterburner software. Therefore, you can rename the sections to what you wish to see in the overlay. This shall make the overlay quite easier to understand even when you are focused on the game.
- There is an Override group name option which we have seen in the earlier steps.
- To rename the group, simply click on the box in front of the option and type in the text that you wish to see instead of the group name.

- For example, you can insert the name of your graphics card or CPU instead of the terms GPU and CPU.
- It is very beneficial for those who record benchmark videos and publish the results online. It offers an instant acknowledgment of what GPU, CPU, and RAM are being used at the time of the benchmark.
Adding Graph
Apart from the values, MSI afterburner also offers you to get a graph of the performance right within the overlay. This enables more information about the performance of the hardware as you can check the drops in performance at certain places in the game.
- To add a graph in the overlay, simply select the Framerate parameter from the list.
- Now, scroll down in the application and look for the overlay options. In front of the Show in On-Screen Display, you will see a selectable option.
- Once you click on it, a small drop-down menu will appear that allows you to choose between text, graph, and simultaneous text and graph.

- Once you select the graph option, you will see a horizontal graph along with the FPS value at the end of the graph.
- You can also change the color of the graph from the small box present on the right side of this option.
- It is recommended to change the color of the graph to something which is easily identifiable even with a bright background.
Units Size
Each of the parameters in the overlay contains specific units at the end. For example, speed will be represented with MHz units and the usage will be represented with a % sign. While keeping the unit text to the default is recommended, you can still change the size of the text.
- To change the units size, head over to the Units Size option in the Active layout properties window.
- Now, click on it to find additional options regarding the unit’s size.
- Here, you will find the drop-down menu with options to change the size of the unit.
- You get 3 options here which are default, 50% larger than the default, and 50% smaller than the default.

- Select the appropriate option for your usage and click Apply to save the changes.
Changing Font and Size
A lot of users use a custom font throughout their computers. Well, you can use the same font even on the overlay of the MSI afterburner. However, you will have to open the RivaTuner software to change the font and font size of the overlay.
- Once you open the RivaTuner software, look for the Raster 3D option.
- Here, you can select the font of your choice for the overlay. Along with that, you also get the option to change the font size as well as style such as bold and oblique bold.
- You will also find a little preview in the lower section of the window to get an idea about your selection.
- Once you finalize the font and style, simply click on Ok to save your preferences.
Positioning
Depending upon the game you are playing, you might have to change the position of the overlay of MSI afterburner performance statistics overlay. By default, it is located at the top right of your screen. However, some games present a part of the HUD in that section which might require repositioning of the overlay.
- To adjust the position, simply open the RivaTuner software.
- Here, you will find an option to manually adjust the horizontal and vertical coordinates of the value.
- You also get a preview of the results so that you can check whether the values are correct or not.
- Once you have located the perfect position, just tap enter key to save the changes.
Spacing
In the overlay, there are various invisible columns that are present between multiple values which creates a visual difference between them. You can adjust this space manually from the MSI Afterburner software.
- To adjust the spacing, just open the MSI afterburner software again and head over to the Select On Screen Display option.
- Again, click on the small box present on the right side of the checkbox.

- After that, you will have to find the Alignments library option to manage the spacing.
- In the Alignments library option, there are 2 options available. Select the Alignments 1 option to change the spacing.
- Now, you can input a value in this option and save it. Keep in mind that lower values will decrease the spacing between characters.
On-Screen Display Toggle Hotkeys
Lastly, let’s talk about the hotkeys that you can press even when you are in the game to enable or disable the overlay quickly. The default key might interfere with a certain in-game feature which you might want to change asap to avoid interference in the game.
- In MSI Afterburner settings, open the On-Screen display tab.
- In this section, the first option allows you to change the hotkey for the overlay.
- To change the hotkey, just click on the box present in front of the Toggle On-Screen Display option and press the keys that you want to use for the overlay.

- The key combination will appear in the box once you have pressed it.
- Now, click on Apply to save the changes.
Conclusion
Downloading and installing hardware monitoring software like MSI afterburner is quite easy. But, it gets a bit tricky to customize the software according to your liking. While the default options are good enough for most users, some wish to customize various options such as the colors, size, and positioning of the overlay. For those, we have offered almost all customization options available in MSI afterburner. Once you go through our guide, you will be able to set up the MSI afterburner overlay the way you want with ease.
Uninstall and Remove RivaTuner Statistics Server Step by Step
Are you in need of uninstalling RivaTuner Statistics Server to fix some problems? Are you looking for an effective solution to completely uninstall it and thoroughly delete all of its files out of your PC? No worry! This page provides detailed instructions on how to completely uninstall RivaTuner Statistics Server.
Possible problems when you uninstall RivaTuner Statistics Server
* RivaTuner Statistics Server is not listed in Programs and Features.
* You do not have sufficient access to uninstall RivaTuner Statistics Server.
* A file required for this uninstallation to complete could not be run.
* An error has occurred. Not all of the files were successfully uninstalled.
* Another process that is using the file stops RivaTuner Statistics Server being uninstalled.
* Files and folders of RivaTuner Statistics Server can be found in the hard disk after the uninstallation.
RivaTuner Statistics Server cannot be uninstalled due to many other problems. An incomplete uninstallation of RivaTuner Statistics Server may also cause many problems. So, it’s really important to completely uninstall RivaTuner Statistics Server and remove all of its files.
How to Uninstall RivaTuner Statistics Server Completley?
Method 1: Uninstall RivaTuner Statistics Server via Programs and Features.

When a new piece of program is installed on your system, that program is added to the list in Programs and Features. When you want to uninstall the program, you can go to the Programs and Features to uninstall it. So when you want to uninstall RivaTuner Statistics Server, the first solution is to uninstall it via Programs and Features.
Steps:
a. Open Programs and Features.
Windows Vista and Windows 7
Click Start, type uninstall a program in the Search programs and files box and then click the result.
Windows 8, Windows 8.1 and Windows 10
Open WinX menu by holding Windows and X keys together, and then click Programs and Features.
b. Look for RivaTuner Statistics Server in the list, click on it and then click Uninstall to initiate the uninstallation.
Method 2: Uninstall RivaTuner Statistics Server with its uninstaller.
 exe.
exe.
Most of computer programs have an executable file named uninst000.exe or uninstall.exe or something along these lines. You can find this files in the installation folder of RivaTuner Statistics Server.
Steps:
a. Go to the installation folder of RivaTuner Statistics Server.
b. Find uninstall.exe or unins000.exe.
c. Double click on its uninstaller and follow the wizard to uninstall RivaTuner Statistics Server.
Method 3: Uninstall RivaTuner Statistics Server via System Restore.
System Restore is a utility which comes with Windows operating systems and helps computer users restore the system to a previous state and remove programs interfering with the operation of the computer. If you have created a system restore point prior to installing a program, then you can use System Restore to restore your system and completely eradicate the unwanted programs like RivaTuner Statistics Server. You should backup your personal files and data before doing a System Restore.
Steps:
a. Close all files and programs that are open.
b. On the desktop, right click Computer and select Properties. The system window will display.
c. On the left side of the System window, click System protection. The System Properties window will display.
d. Click System Restore and the System Restore window will display.
e. Select Choose a different restore point and click Next.
f. Select a date and time from the list and then click Next. You should know that all programs and drivers installed after the selected date and time may not work properly and may need to be re-installed.
g. Click Finish when the «Confirm your restore point» window appears.
h. Click Yes to confirm again.
Method 4: Uninstall RivaTuner Statistics Server with Antivirus.
Nowadays, computer malware appear like common computer applications but they are much more difficult to remove from the computer. Such malware get into the computer with the help of Trojans and spyware. Other computer malware like adware programs or potentially unwanted programs are also very difficult to remove. They usually get installed on your system by bundling with freeware software like video recording, games or PDF convertors. They can easily bypass the detection of the antivirus programs on your system. If you cannot remove RivaTuner Statistics Server like other programs, then it’s worth checking whether it’s a malware or not. Click and download this malware detect tool for a free scan.
Method 5: Reinstall RivaTuner Statistics Server to Uninstall.

When the file required to uninstall RivaTuner Statistics Server is corrupted or missing, it will not be able to uninstall the program. In such circumstance, reinstalling RivaTuner Statistics Server may do the trick. Run the installer either in the original disk or the download file to reinstall the program again. Sometimes, the installer may allow you to repair or uninstall the program as well.
Method 6: Use the Uninstall Command Displayed in the Registry.
When a program is installed on the computer, Windows will save its settings and information in the registry, including the uninstall command to uninstall the program. You can try this method to uninstall RivaTuner Statistics Server. Please carefully edit the registry, because any mistake there may make your system crash.
Steps:
a. Hold Windows and R keys to open the Run command, type in regedit in the box and click OK.
b. Navigate the following registry key and find the one of RivaTuner Statistics Server:
HKEY_LOCAL_MACHINE\SOFTWARE\Microsoft\Windows\CurrentVersion\Uninstall
c. Double click on the UninstallString value, and copy its Value Data.
d. Hold Windows and R keys to open the Run command, paste the Value Data in the box and click OK.
e. Follow the wizard to uninstall RivaTuner Statistics Server.
Method 7: Uninstall RivaTuner Statistics Server with Third-party Uninstaller.
The manual uninstallation of RivaTuner Statistics Server requires computer know-how and patience to accomplish. And no one can promise the manual uninstallation will completely uninstall RivaTuner Statistics Server and remove all of its files. And an incomplete uninstallation will many useless and invalid items in the registry and affect your computer performance in a bad way. Too many useless files also occupy the free space of your hard disk and slow down your PC speed. So, it’s recommended that you uninstall RivaTuner Statistics Server with a trusted third-party uninstaller which can scan your system, identify all files of RivaTuner Statistics Server and completely remove them. Download this powerful third-party uninstaller below.
Download RivaTuner Statistics Server Auto Uninstaller
0006
How to enable MSI AFTERBURNER
9000 MSICICICA adjust the speed of coolers, monitor, overclock equipment, capture video, and many others. The program works with graphics cards of any manufacturer. The user just needs to install MSI Afterburner on his computer, after which he can already fully use the program’s capabilities.
This article will tell you how to enable monitoring in the game using MSI Afterburner. Consider not only how to use the MSI Afterburner program, but also what monitoring settings are best to set. And also pay attention to how to configure the monitoring settings in the game, for normal display in games, so as not to distract from the game.
How to install MSI Afterburner on Windows 10
Users are looking for how to download MSI Afterburner from the official website in Russian. There really is such an opportunity, since you can change the localization of the interface right in the program. It is also recommended to choose a more convenient program skin, since the standard one is not suitable for every user.
It is worth noting before installation that you need to be careful when using MSI Afterburner. Since the hardware overclocking functionality and the ability to adjust the fan speed can harm the computer, especially in the hands of beginners.
The main thing is to make sure that MSI Afterburner and RivaTuner Statistics Server are selected at the step of selecting the components of the program to be installed. Since RivaTuner Statistics Server extends the capabilities of MSI Afterburner by adding the ability to enable FPS monitoring.
After installation, we immediately start changing the language of the program interface. Just open MSI Afterburner and go to the settings by clicking the gear at the bottom of the program. Then go to section Interface and in paragraph Regional settings select Russian language.
How to enable FPS in MSI Afterburner
In the monitoring tab, you can also enable other options that the user deems necessary to be displayed on the monitor during the game. Please note that various graphics core boot parameters or temperatures are available in MSI Afterburner without the additional RivaTuner Statistics Server component.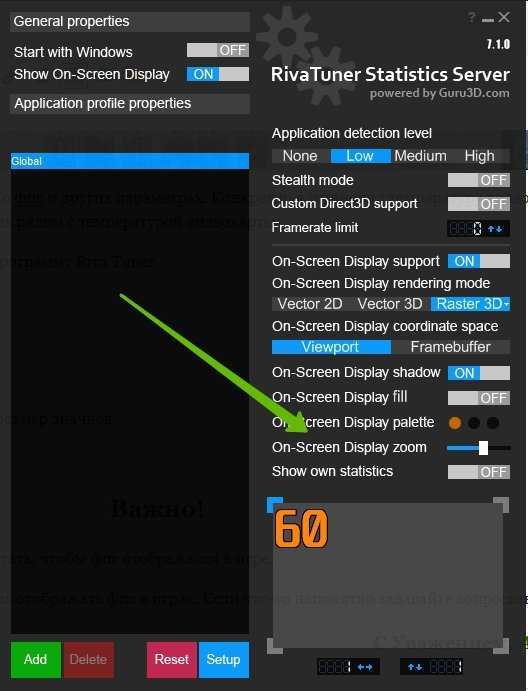 If you don’t have frame rate monitoring settings, then make sure that RivaTuner Statistics Server was installed along with MSI Afterburner.
Enabling the necessary monitoring settings We recommend setting up hotkeys that will allow you to switch visibility during the game, show, hide the current monitoring indicators.
The last step is to customize the appearance of the overlay OSD. You can choose one of the available styles, or just customize the fonts and colors for yourself.
Style settings are available in MSI Afterburner properties. Just go to the tab Monitoring and highlight the desired monitoring schedule and press the button Overlay Screen Display style selection as three dots next to item Show in EOD .
In the window that opens, just select the active display style you like or customize the current style by changing its properties.
Additional settings for displaying the Overlay Screen Display can be found in the RivaTuner Statistics Server utility. It is enough to directly open the RivaTuner Statistics Server utility or go to tab 9 in the properties of MSI Afterburner0097 OED and press the button Optional .
Here, in another interface, you can set the color, font, size and select the position of the text. And also many other options are available and the ability to immediately view the configured text options.
MSI Afterburner is a powerful tool for managing and monitoring graphics adapter settings. The user just needs to download and install the MSI Afterburner program from the official website. The ability to select the Russian language of the interface is immediately after installing the program.
MSI Afterburner allows you to enable game monitoring, namely, enable the display of the number of frames per second (FPS). Previously, we considered programs that show FPS in games, although MSI Afterburner did not make the list, but it can also display a frame per second counter and more. Also see how to use the SpeedFan 4.52 program, since it is more suitable for beginners and also control the speed of coolers connected to the motherboard.
Source
Msi afterburner and rivatuner how to disable
Do you want to monitor the performance of your system while playing? What’s the best way to see what your equipment is capable of? Does it reveal itself completely or is something preventing it?
You may have already seen game reviews with system performance information right on the computer screen while playing and wondered: How did they do it?
This information, displayed in the upper left corner of the screen, is called OSD or OSD is one of the most used functions in MSI Afterburner application. It allows you to monitor the performance of your video card and other hardware while you play, and thus gives you important information about what can be improved to increase performance.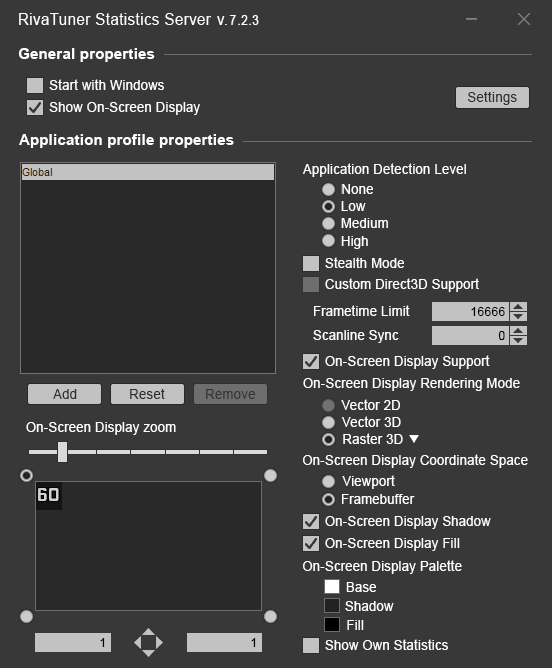 Want to know how to get this information on your screen? Just follow our directions below!
First, you need to get the latest version of MSI Afterburner and Rivatuner Statistics Server. Both programs are included in the MSI Afterburner installer. (Download here)
1. Start MSI Afterburner
2. Click “ Settings ”
3. Click “ Monitoring ” and go to “ Active hardware monitoring graphs select the information you want to display in the OSD (we use “GPU usage” as an example)
b. To display the information of interest on the screen, check the option “ Show in On-Screen Display ” (Show in OSD).
c. In the column “ Properties ”” (Properties) you will see the inscription “ in OSD ” (in the menu). Select other information to be displayed on the screen in the same way. You can change the order of the information displayed on the screen by dragging the desired menu items up or down the list.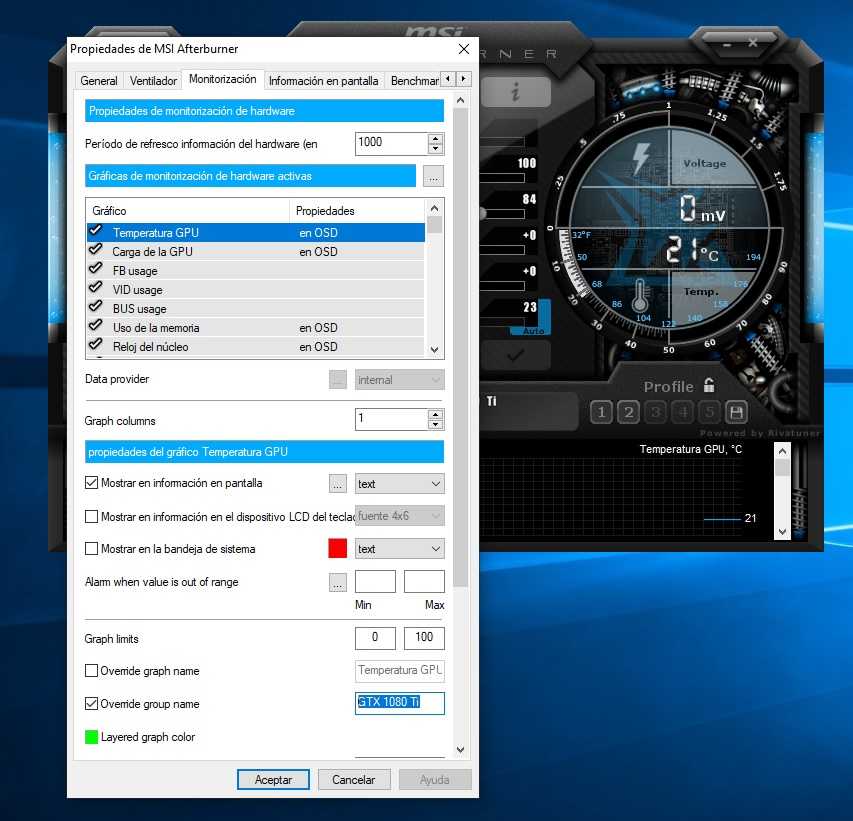
d. The text shown in “ Override group name ” to be displayed on the OSD can be changed as you like. (Here we changed the name “GPU usage” to “GPU load”)
e. Don’t forget to click OK to save your changes and exit to MSI Afterburner.
Now when you start the game, you will see the OSD menu!
But that’s not all! You can also customize the appearance of the menu. You can easily customize the OSD using the RivaTuner Statistics Server utility, which is automatically installed with Afterburner.
1. Click on the icon “ Riva Tuner Statistics Server ”
2. In the menu that opens, you will see the settings that you can change. Here are some of the most interesting options to change:
a. On-Screen Display shadow (OSD shadow setting): When enabled, the text will have a dark outline to improve its visibility.
b. On-Screen Display palette (Change OSD Color): Here you can change the color of the OSD text.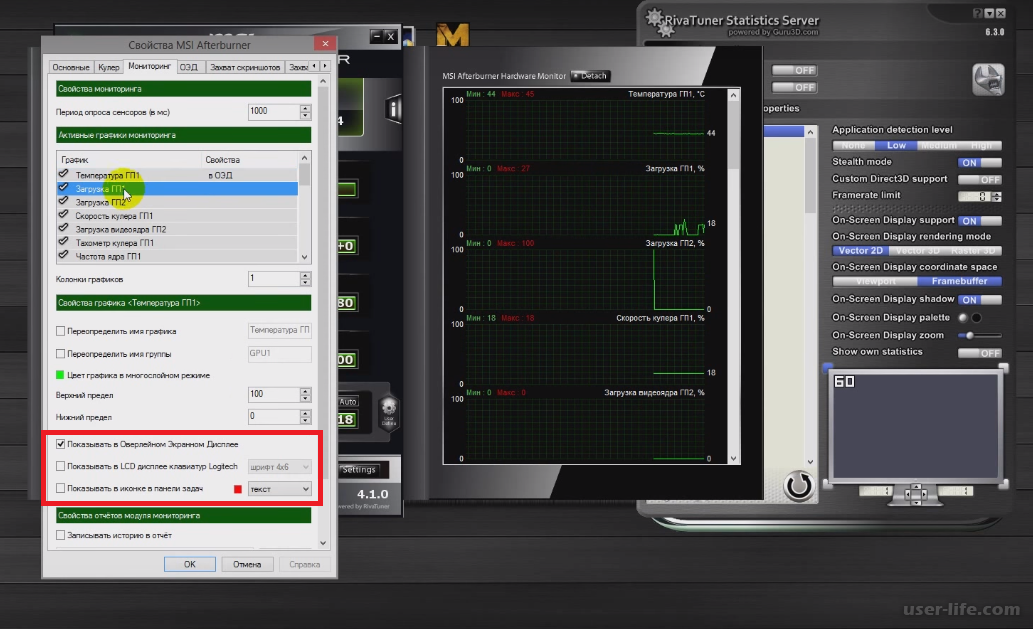 You can also change the color of the shadow.
c. On-Screen Display zoom (On-Screen display zoom): Here you can change the text size of the on-screen menu.
d. Position of OSD (OSD Position Change): Drag and drop the OSD text to any position on the screen.
MSI Afterburner allows you to control graphics cards from red and green, namely, adjust the speed of coolers, monitor, overclock equipment, capture video, and many others. The program works with graphics cards of any manufacturer. The user just needs to install MSI Afterburner on his computer, after which he can already fully use the program’s capabilities.
This article will tell you how to enable monitoring in the game using MSI Afterburner. Consider not only how to use the MSI Afterburner program, but also what monitoring settings are best to set. And also pay attention to how to configure the monitoring settings in the game, for normal display in games, so as not to distract from the game.
How to install MSI Afterburner on Windows 10
Users are looking for how to download MSI Afterburner from the official website in Russian. There really is such an opportunity, since you can change the localization of the interface right in the program. It is also recommended to choose a more convenient program skin, since the standard one is not suitable for every user.
It is worth noting before installation that you need to be careful when using MSI Afterburner. Since the hardware overclocking functionality and the ability to adjust the fan speed can harm the computer, especially in the hands of beginners.
The main thing is to make sure that MSI Afterburner and RivaTuner Statistics Server are selected at the step of selecting the components of the program to be installed. Since RivaTuner Statistics Server extends the capabilities of MSI Afterburner by adding the ability to enable FPS monitoring.
After installation, we immediately start changing the language of the program interface. Just open MSI Afterburner and go to the settings by clicking the gear at the bottom of the program. Then go to section Interface and in paragraph Regional settings select Russian language.
How to enable FPS in MSI Afterburner
In the monitoring tab, you can also enable other options that the user deems necessary to be displayed on the monitor during the game. Please note that various graphics core boot parameters or temperatures are available in MSI Afterburner without the additional RivaTuner Statistics Server component. If you don’t have frame rate monitoring settings, then make sure that RivaTuner Statistics Server was installed along with MSI Afterburner.
Enabling the necessary monitoring settings We recommend setting up hotkeys that will allow you to switch visibility during the game, show, hide the current monitoring indicators.
The last step is to customize the appearance of the overlay OSD.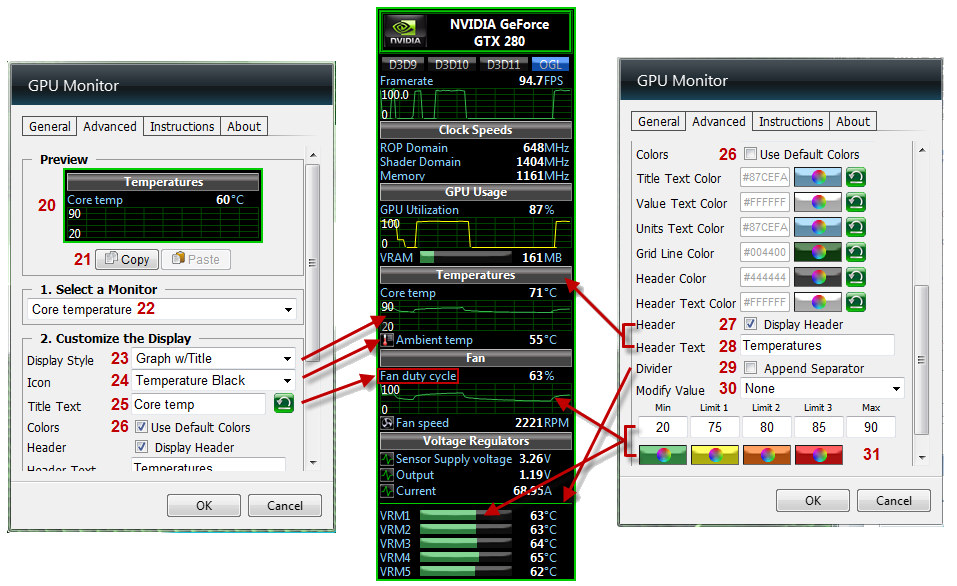 You can choose one of the available styles, or just customize the fonts and colors for yourself.
Style settings are available in MSI Afterburner properties. Just go to the tab Monitoring and highlight the desired monitoring schedule and press the button Overlay Screen Display style selection as three dots next to item Show in EOD .
In the window that opens, just select the active display style you like or customize the current style by changing its properties.
Additional settings for displaying the Overlay Screen Display can be found in the RivaTuner Statistics Server utility. It is enough to directly open the RivaTuner Statistics Server utility or go to tab 9 in the properties of MSI Afterburner0097 OED and press the button Optional .
Here, in another interface, you can set the color, font, size and select the position of the text. And also many other options are available and the ability to immediately view the configured text options.
MSI Afterburner is a powerful tool for managing and monitoring graphics adapter settings. The user just needs to download and install the MSI Afterburner program from the official website. The ability to select the Russian language of the interface is immediately after installing the program.
MSI Afterburner allows you to enable game monitoring, namely, enable the display of the number of frames per second (FPS). Previously, we considered programs that show FPS in games, although MSI Afterburner did not make the list, but it can also display a frame per second counter and more. Also see how to use the SpeedFan 4.52 program, since it is more suitable for beginners and also control the speed of coolers connected to the motherboard.
Beginning gamers have repeatedly noticed technical information in the corner of the screen in game reviews. It includes information about system load, frame rate, etc. This function is implemented by one very interesting application — RivaTuner Statistics Server. What is this program and how to configure it, let’s find out in this article.
About the application
RivaTuner Statistics Server is an application supplied with MSI Afterburner. It performs the functions of displaying technical information about the equipment (load of video memory, RAM, processor, etc.), fine-tuning graphics and overclocking the computer’s video card. As you already understood, it cannot be installed as a separate module. Therefore, we will consider a detailed algorithm for unpacking and configuring the utility.
How to install and configure?
There is nothing difficult about this. You just need to follow the steps from our instructions exactly:
This completes the configuration of MSI Afterburner. But there is still RivaTuner Statistics Server setup ahead. Therefore, do the following:
This concludes my story about the utility.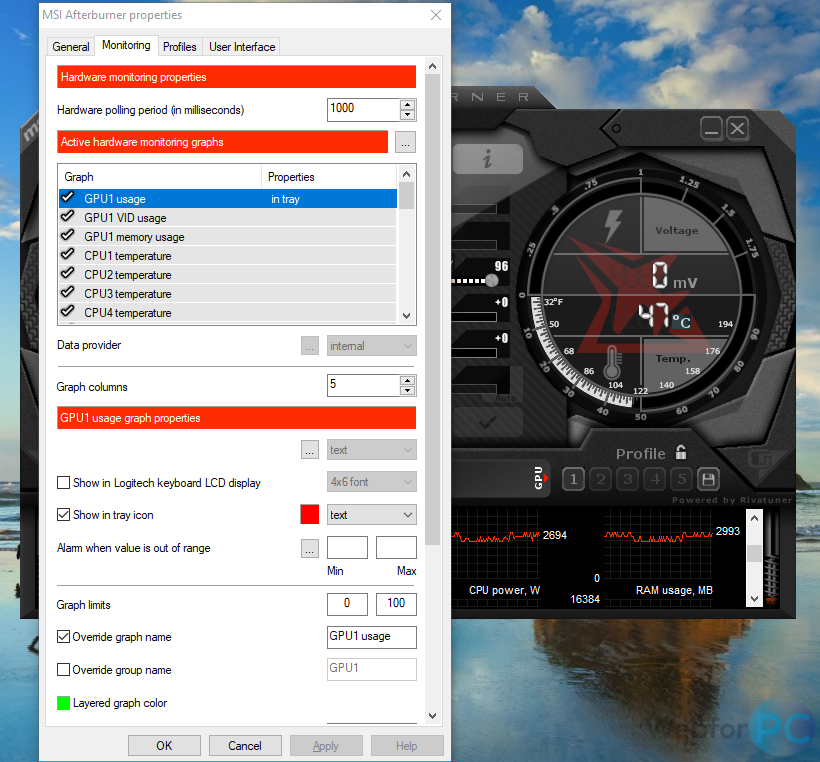 Now you know what RivaTuner Statistics Server is and how to configure it. I wish you to see only low PC load values.
Source
RivaTuner Statistics Server (RTSS) is a program that was originally developed as a small add-on to video card software for displaying frame rates in 3D applications. Today, RTSS is part of the MSI Afterburner program and is installed with it. In this article, we will look at how to use RivaTuner Statistics Server, as well as analyze what settings are responsible for what.
What is OSD and what does it have to do with RivaTuner
OSD is short for On Screen Display, which can literally be translated as an on-screen display. It displays various counters. Among such counters are the frame rate, the temperature of the processor and video core, the frequencies of the memory, the processor, and much more. RivaTuner is responsible for graphical display of OSD in 3D applications.
It doesn’t make much sense to install RivaTuner separately.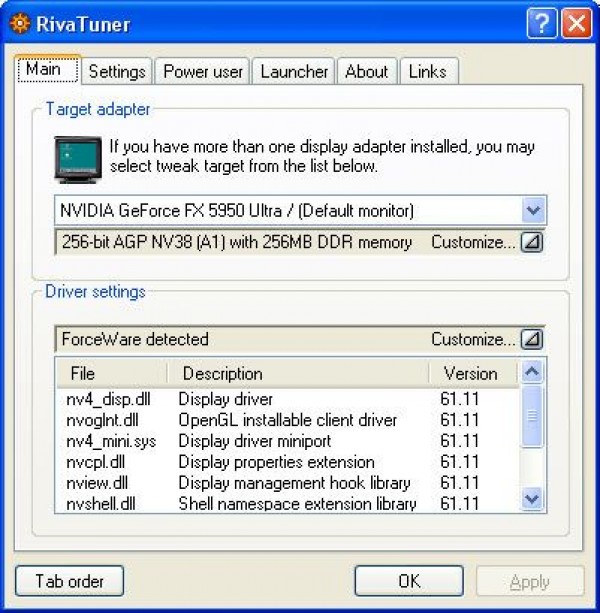 The potential of this program is fully revealed only in conjunction with the use of MSI Afterburner. If you install it separately, you will only be able to display the frame rate in 3D applications, and that’s it.
If you don’t have MSI Afterburner installed yet, you can download it from this link from the official site: MSI Afterburner
After installation, find the RivaTuner Statistics Server shortcut in the start menu and run it. After launch, as a rule, nothing will happen, but the following icon will appear in the system tray:
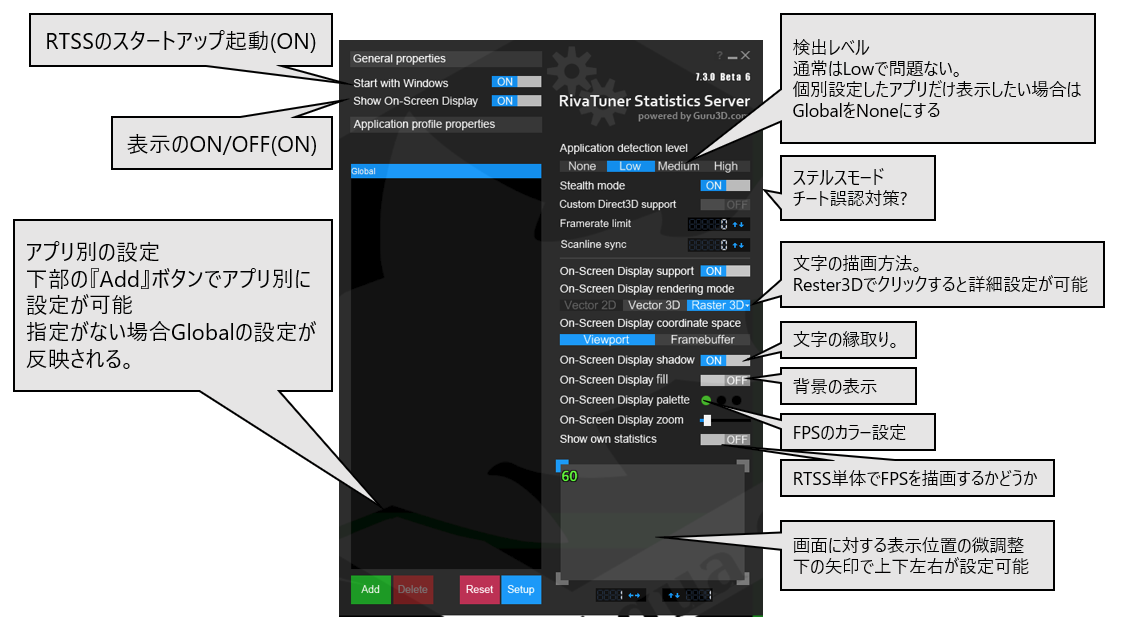
Click on it and the RivaTuner program will open. First of all, you can immediately change the program language to Russian. To do this, click on the blue Setup button at the very bottom:
The settings will open, where you need to go to the User Interface tab. Here, in the «Language» item, you must select the Russian language:
Press OK, and now all settings and tips for all menu items will be in Russian. The only thing that will remain in English is the main program window.
All program settings are provided with detailed tips. Just hover your mouse over any setting item and a detailed description of each setting will appear.
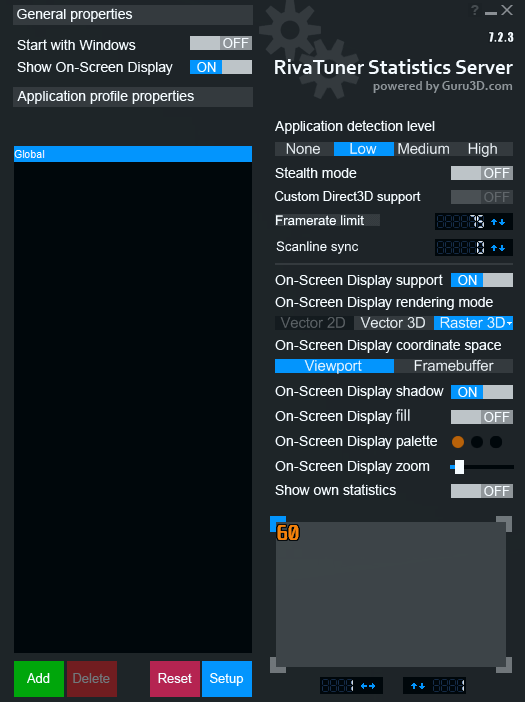
Important settings of RivaTuner
There are several important settings, the purpose of which you just need to know:
The Start with Windows parameter is responsible for automatic launch of the application when the operating system starts. If you are using RivaTuner in conjunction with another program such as MSI Afterburner, this option can be left disabled. MSI Afterburner will manage RivaTuner on its own, using its libraries and settings, and launching it when needed. It is enough to configure RivaTuner only once, and that’s it, there is no point in keeping it in forced startup all the time.
Parameter Show On-Screen Display is responsible for enabling or disabling OSD over 3D applications. As you might guess, this parameter must be enabled, otherwise the counter simply will not be shown. Again, if you’re using MSI Afterburner, you can set hotkeys to turn the OSD on and off. How to do this is written in this article: «How to use MSI Afterburner in games.»
Now let’s move on to another equally important setting:
Application detection level should be set to Low. Otherwise, there may be situations when the OSD does not appear exactly where it should. If something does not work, you can try to twist this parameter. Otherwise, it should be left at « Low «.
Stealth mode is an extremely useful mode that will come in handy for those who play online games that use an anti-cheat system. The fact is that sometimes anti-cheat systems can work to introduce the OSD screen into the game. Enabling this setting makes OSD detection by anti-cheat systems more difficult.
OSD appearance settings RivaTuner
In the screenshot below, the block responsible for setting the appearance of the OSD in the game is highlighted in red:
The “ Raster 3D ” button is responsible for selecting the font and its size. Buttons Viewport and Framebuffer should not be touched unless absolutely necessary. They will come in handy if there are any problems with the correct location of the OSD by the program.
Button Vector 3D enables vector font display instead of bitmap. I do not recommend using it, since such fonts are not at all convenient to read. Your best bet is to enable Raster 3D and set the font to your liking.
Switch On-Screen Display shadow turns font shadows on or off. It is better to leave this item enabled. It improves the perception of fonts by making them more contrasting with the background.
Switch On-Screen Display fill turns the background color on and off for even more contrast. It looks like a dark translucent background:
The color and transparency of the background can also be changed. To do this, click on the right dot On-Screen Display palette :
The remaining 2 points have no effect. They only work when you use RivaTuner as a standalone application. In conjunction with some program, such as MSI Afterburner, they do not work.
The slider On-Screen Display zoom is responsible for scaling the counter sizes. If they seem too small or too large for you, adjust their size.
In the screenshot below, the color and transparency of the background, as well as interface scaling, are adjusted:
Moving the OSD to a different location on the screen
You can specify a different location where to display counter information. The top left corner is set by default, and we can change this setting too. Pay attention to the preview window at the very bottom:
Now the upper left corner is marked as the origin point (the included corner glows blue). Below you can see the coordinates, now they are 1 and 1.
If you want to change the corner in which the counter will be displayed, just click on this corner. After selecting a corner, it should turn blue. You can also set the coordinates for the location of the OSD by simply dragging it with the mouse.
The program is constantly evolving, and some functions may no longer work as described in the article. Therefore, if you find an incorrect description of some functions, write in the comments, we will correct it ?
I hope the article was useful for you, and now you know how to use RivaTuner Statistics Server ?
Source
graphics cards
Method 1. MSI Afterburner
Afterburner is currently the only free FPS program. Many people recommend Fraps, which is a bit simpler, but not completely free and contains a lot of ads.
If desired, you can change the position, size and color of the statistics in the RivaTuner settings. And in the Afterburner settings, in addition to FPS, you can turn on the display of the temperature of the processor, video card, and much more.
If you need statistics all the time, it’s better to enable the «Run with Windows» option in Afterburner. The program hangs in the tray and does not interfere at all.
Method 3. Enable built-in game settings
In popular cs go, dota 2, and other games from Steam, you can watch FPS without third-party programs. To do this, in settings Steam
, in the “IN GAME” tab, enable the “Steam Overlay in Game” option and select where the frame counter is displayed.
In Overwatch, WOW, Starcraft, Diablo and other games from Blizzard
, the FPS display is enabled by pressing CTRL+SHIFT+R or the «enable performance data» option.
What affects FPS?
FPS primarily depends on the capabilities of the video card and to a lesser extent on the processor and RAM. Also, FPS is limited by the monitor frequency, so on most laptops it is impossible to see more than 60 FPS.
FPS is also affected by monitor resolution and image detail settings in the game. The higher the image quality, the lower the smoothness and speed of the game.
MSI Afterburner is a utility designed for GPU overclocking. She replaced the Riva Tuner. In addition to increasing the performance of video memory, the application allows you to monitor the temperature of the processor and has many other functions.
Important RivaTuner 9 settings0083
There are several important settings, the purpose of which you just need to know:
The Start with Windows parameter is responsible for automatically starting the application when the operating system starts. If you are using RivaTuner in conjunction with another program such as MSI Afterburner, this option can be left disabled. MSI Afterburner will manage RivaTuner on its own, using its libraries and settings, and launching it when needed. It is enough to configure RivaTuner only once, and that’s it, there is no point in keeping it in forced startup all the time.
Parameter Show On-Screen Display is responsible for enabling or disabling OSD over 3D applications. As you might guess, this parameter must be enabled, otherwise the counter simply will not be shown. Again, if you’re using MSI Afterburner, you can set hotkeys to turn the OSD on and off. How to do this is written in this article: «How to use MSI Afterburner in games.»
Now let’s move on to another equally important setting:
Application detection level should be set to Low. Otherwise, there may be situations when the OSD does not appear exactly where it should. If something does not work, you can try to twist this parameter. Otherwise, it should be left at « Low «.
Stealth mode is an extremely useful mode that will come in handy for those who play online games that use an anti-cheat system. The fact is that sometimes anti-cheat systems can work to introduce the OSD screen into the game. Enabling this setting makes OSD detection by anti-cheat systems more difficult.
Program features
The program can perform the following functions:
Modern utilities are equipped with additional applications that perform server functions. That is, the user, by installing the MSI Afterburner remote server not on a computer (PC), but on a phone with an Android or iOS system, will be able to remotely control video card overclocking directly from a smartphone.
Overview of the popular MSI Afterburner program
Long before the appearance of gpu-rigs, gamers overclocked video cards using RivaTuner. The utility was developed by Russian programmer Alexei Nikolaychuk. But, in 2009RivaTuner was discontinued and MSI Afterburner was created based on it. Miners simply call it AF, and there is hardly any of them who, in general, have never used an afterburner when overclocking video cards. In this review, we will tell you where is the best place to download, and how to properly configure the msi af mining program.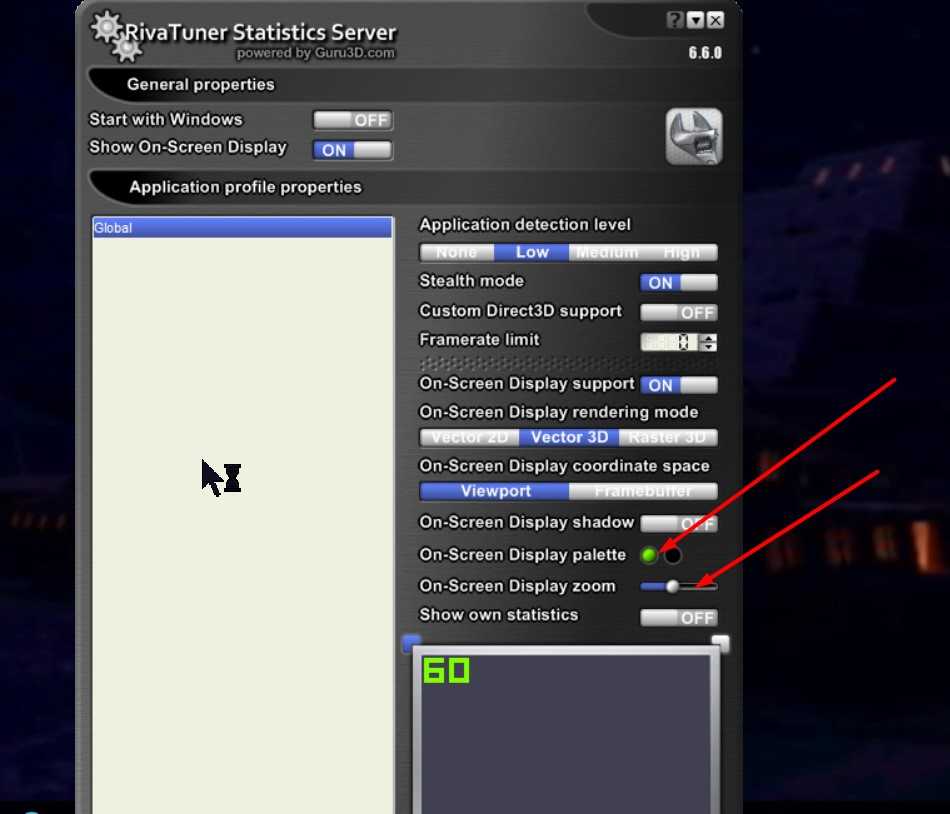
Download from the official website
The name afterburner is translated as «afterburner». With it, you can get the most out of your graphics cards. In order not to catch any attack on your PC, you need to download msi afterburner from the official website of the developers https://ru.msi.com/page/afterburner.
There are three versions of the program:
If you have a farm of several graphics adapters, then msi afterburner setup will be performed on the computer. Download the archive, unzip it to a folder convenient for you, and proceed to install the program.
Installing MSI Afterburner
Open the folder with the latest version of the utility, which is 4.6.2 at the time of writing this review, and click on the Setup.exe icon to run the setup file. You will be prompted to select the installer components. Setting msi afterburner for mining does not depend on RivaTuner Statistics Server.
This is an additional utility that provides support for frame rate monitoring, real-time video capture, and 3D acceleration usage statistics. It is needed only for gamers and can negatively affect the performance of the rig. Uncheck RivaTuner and click Next. Wait for the installation to complete and run msi af.
How to overclock msi afterburner 9 graphics card0396
With the help of the AF application you can adjust:
After installation, open the program as an administrator and make sure that it correctly displays all video cards in the rig.
By default, the panel will display the parameters of the first graphics accelerator. If all cards are of the same model, you don’t need to configure msi afterburner overclocking for each of them separately. The settings of the first map will be applied to the rest. But, if you want to separately set the frequencies of each device, click the gear icon button on the left under the Fan Speed scale to open the settings menu, and uncheck the item “ Synchronize settings of identical GPUs «.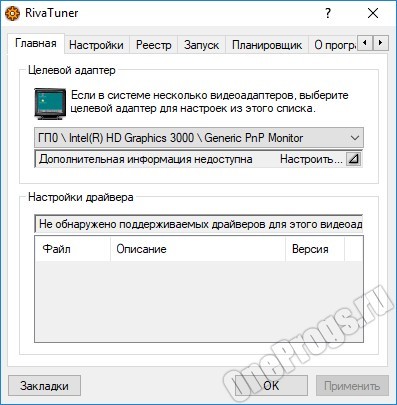
In the same window, you can unlock the voltage control and expand the overclocking parameters. To avoid malfunctions, the last option is not recommended when setting up mining farms assembled from radically different models of video cards. Now let’s start setting up msi afterburner for mining. We start with Core Clock and Memory Clock.
Important ! The parameters should be changed gradually by no more than 5-10 points. A sharp change in the frequency of the memory and the core will lead to a freeze, a reboot, a driver crash, and, possibly, to a breakdown of the video card itself.
The easiest way is to first look for the recommended parameters for this GPU model on thematic forums and set them before launching. If the result does not suit you, or you do not find the information you need, select the frequencies yourself. Just keep in mind that memory from different manufacturers, such as Hynix or Samsung, can be installed on the same model, and then the overclocking parameters will be slightly different.
Increasing the memory frequency
This indicator is set on the Memory Clock scale. There are two ways to adjust
The core frequency is adjusted in the same way. And one more nuance. When setting the memory and core clock for AMD video cards, you simply write the desired values on each scale, for example 2100, 1100. For Nvidia, everything is a little different, here you add (or subtract) the required number of steps to the factory settings, for example +150, +30 .
But, it is not enough to find the maximum values at which the farm will work stably. Profit directly depends on energy consumption, and it must be reduced.
Lower power consumption
AMD Rx 5700XT card consumes 140W in mining according to data from WhatToMine calculator, but by setting the core voltage to 860mV, you can reduce power consumption to 115W. To do this, you need to unlock the control of parameter core voltage in the settings and gradually reduce the voltage, observing the stability of the device.
This option may not be available on some GPU models, in which case alternative methods must be used. For example, modify Bios, or write the necessary parameters in the batch file of the miner program. This opportunity is provided by the latest versions of Claymore and Phoenix.
On the left, near the Core Clock scale, there is a button for adjusting voltage parameters depending on the core frequency. In the jargon of the miners, this option is called «whore».
Important! During the «whore» setup, the graphics adapter must not work under load, and the core frequency parameters must be set to zero. After that, click on the label in the form of a step and a window with two curves will open in front of you.
Set the Core voltage to Core Clock ratio, close the window and save the settings. After that, set msi af to the working core frequency and start setting up the cooler.
Optimizing the cooling system
Installing the application
You can download the utility from the official site msi.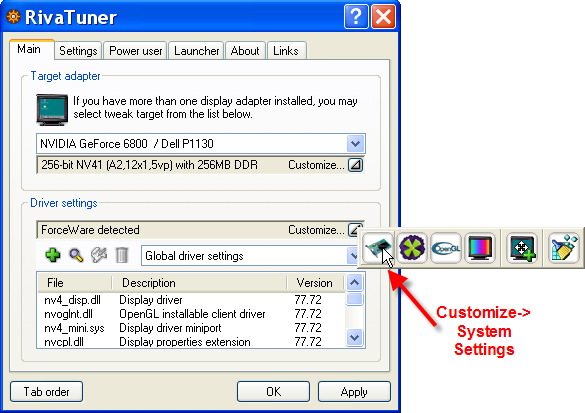 com. There are three types of program on the official website page: for PC, Server and Android.
After downloading, the user installs the utility on a computer or laptop:
MSI Afterburner does not see the video card
There can be several reasons for the incorrect operation of the application: using a damaged or outdated version of the program, any problems with the graphics adapter itself, operating system malfunctions , or if you are using an outdated or inappropriate driver.
Problems with MSI Afterburner
Incorrect installation of the application often causes problems in operation, including the absence of a video card in the list of available devices. In this case, a complete reinstallation of the application will help, it is recommended to re-download the installation file from the official website of MSI (it is better not to install the utility from other resources).
Does not see the driver
The problem may occur when using an incorrect or outdated version of the driver, removed by the Afterburner developers from the list of supported ones. You will need to update or reinstall the drivers for the video card. This can be done in several ways.
Update using the built-in Windows tools:
Manual update or driver reinstallation:
There are also programs that allow you to install or update all software in automatic mode, including drivers for the video card. Examples of such applications are
Driver Genius and DriverPack Solution.
Operating system errors
Problems in Windows can also cause MSI Afterburner to stop working. There are two ways to solve the problem:
Restoring or reinstalling is worth doing only in cases where reinstalling the program or driver did not give any results.
How to reset your computer on Windows 10:
Interface overview
After the utility is installed, you need to run it. The application interface will be displayed on the monitor screen.
There are two round monitors on the left and right sides. They show the user on the left side the frequency of the video processor and memory, and on the right side — voltage and temperature .
In the center of the interface there are sliders for:
At the top there are three buttons that are responsible for:
At the bottom, the user can see three more buttons that are responsible for:
on the left, is a button to start the change after Windows starts, and right selection of preset profiles that can be saved. In the center of , the user sees the name of his video card, and below is a graph of parameter changes during the operation of the video adapter. You can view all graphs by scrolling the slider down to the stop.
OSD appearance settings RivaTuner
In the screenshot below, the block responsible for setting the appearance of the OSD in the game is highlighted in red:
The « Raster 3D » button is responsible for selecting the font and its size. Buttons Viewport and Framebuffer should not be touched unless absolutely necessary. They will come in handy if there are any problems with the correct location of the OSD by the program.
Button Vector 3D enables vector font display instead of bitmap. I do not recommend using it, since such fonts are not at all convenient to read. Your best bet is to enable Raster 3D and set the font to your liking.
Switch On-Screen Display shadow turns font shadows on or off. It is better to leave this item enabled. It improves the perception of fonts by making them more contrasting with the background.
Switch On-Screen Display fill turns the background color on and off for even more contrast. It looks like a dark translucent background:
The color and transparency of the background can also be changed. To do this, click on the right point On-Screen Display palette :
The remaining 2 points do not affect anything. They only work when you use RivaTuner as a standalone application. In conjunction with some program, such as MSI Afterburner, they do not work.
If RivaTuner is planned to be used as a standalone application, for example, without MSI Afterburner, then the parameter Show own statistics must be enabled. Without this option enabled, the program will not show anything at all during the game.
The slider On-Screen Display zoom is responsible for scaling the counter sizes. If they seem too small or too large for you, adjust their size.
In the screenshot below, the color and transparency of the background, as well as interface scaling, are adjusted:
While you are setting up the counters interface, you can start some game and immediately see how certain settings affect the appearance of the counters.
Settings and parameters
The user adjusts and overclocks the video card using the sliders located in the central part of the interface. The user can not only overclock the video card, but also lower its performance .
There is an add-on to select the lead GPU when there are two or more on the PC. The program allows you to take screenshots from the screen, as well as display graphs of important parameters on top of other windows.
In order to return to the initial parameters that were set by the manufacturer, it will be enough to press the reset button on . Where it is located was described above.
Overview
SpeedFan
This is the first program that I encountered when I set out to find out the temperature of the video card, which suddenly began to glitch and give out a “torn” picture, instead of the once smooth one (the so-called slide show effect ). The installation did not cause any difficulties, and after launching the program hid in the tray and showed the «average temperature in the hospital.» When you click on the icon, a small window appears in front of us with a bunch of indicators.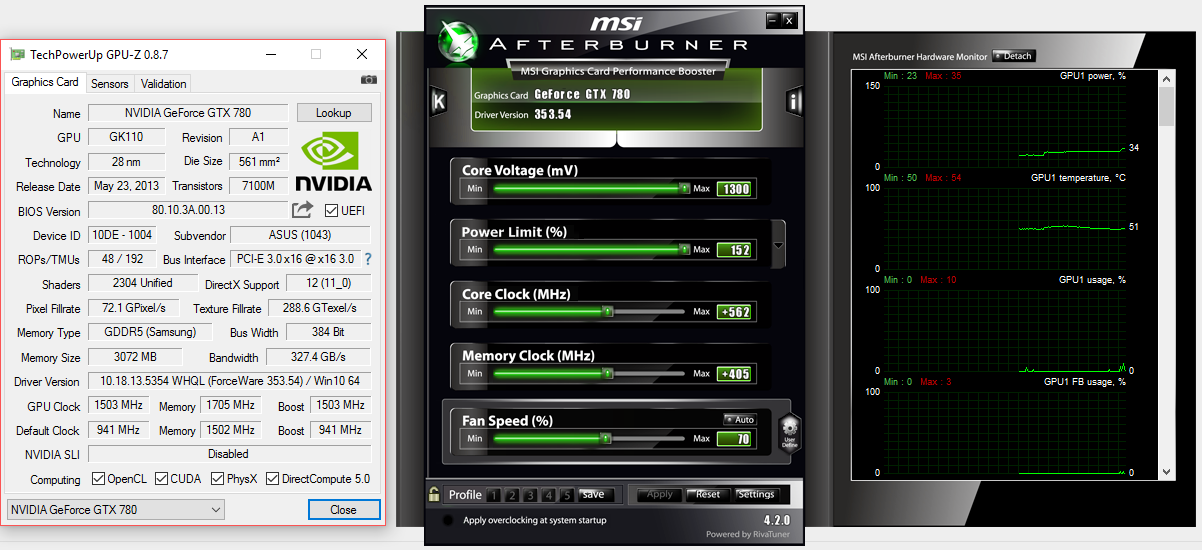 Let’s dwell on some in more detail:
Source
Video
Configure MSI Afterburner — Monitoring, fps, frametime, hardware in overlay
MSI Afterburner autoload settings
How to remove the load from the video card. Video card optimization. Rivatuner Statistics Server. RTSS.
Setting up monitoring in games MSI Afterburner + Riva Tuner
Uninstall MSI Afterburner 4 on Windows 10 Fall Creators Update
MSI Afterburner resets settings
WHAT TO DO IF THE ITEM (COOLER) FROM MSI Afterburner DISAPPEARED HOW TO INSTALL?
MSI Afterburner setup: How to enable FPS monitoring |
MSI Afterburner errors RivaTuner Statistics Server and 22, solution control parameters of graphics accelerators AMD and Nvidia. Does not support Intel graphics cards. In addition to overclocking, downvolting and fan speed control, the program offers powerful tools for monitoring the technical performance of a graphics accelerator, memory, and central processor. This article will explain in detail how to enable and configure monitoring in MSI Afterburner.
How to enable monitoring in MSI Afterburner
Monitoring tools are represented by graphs in the corresponding panel and overlay screen display (OSD). The second feature is partly supported by default, partly requires component RivaTuner Statistics Server (RTSS) . Without it, for example, in MSI Afterburner you can not see the FPS. Installed after installing the program, you can also separately download and deploy the RivaTuner statistics server on your computer.
Overlay display — a modal image located on top of the main one — the game. The overlay and the background image are processed and displayed as separate layers, they do not affect each other.
- Open the Afterburner settings, visit the «Monitoring» tab.
- In the «Active charts…» section of the «Monitoring» tab, check the boxes: «GPU temperature», «Frame rate» and other indicators.

- Click on each and turn on the «Show in OED» function.
Display parameters in overlay.
To the right of the option “Show in OED”, the colors of the inscriptions, the ways of displaying indicators (text form, graphic, and both) change.
How to configure MSI Afterburner monitoring
The application allows you to customize the appearance of the EOS in the «Monitoring» tab.
- Sensor polling period — the frequency of obtaining information from the sensors in milliseconds — respectively, and the frequency of updating information on the display.
- Click on the button with three dots to the right of the title of the «Active Charts…» subsection. A list of plug-ins will open — they import additional parameters from other information and diagnostic utilities.
Check the boxes next to the desired add-ons. Information will appear after launching the relevant programs: AIDA64, CPU-Z, GPU-Z.
- Check the box to display the graph in the monitoring window (pinned at the bottom of the program).

- Data source — from where MSI Afterburner draws information for plotting (internal or external — plug-ins).
- Chart properties – displayed at the bottom, active after selecting a chart (by clicking on it).
More about settings.
- Number of graph columns.
Two graph columns.
- Below are the properties of the current chart (which is under the cursor).
Graph properties
- Display on the on-screen overlay display, specifying the element color and parameter display method.
- Logitech keyboard built-in display.
- Adding an icon to the tray, choosing its color, visualization method.
- Alarm when the value is out of the specified range – a yellow triangle will appear in the monitoring window with information that the indicator is out of the set range.
To notify the user, MSI Afterburner can launch applications, such as a music player, can automatically end the game, turn off the computer, play a sound file.

Alert output options.
How to enable FPS in MSI Afterburner
For gamers, it is important to see not only the temperature, load and frequencies of the computer components during the gaming press, but also to monitor the FPS. This is the most important indicator for comfortable gameplay. The more FPS the video card generates, the smoother and more pleasant the picture.
To enable display of FPS over games:
- Visit the «Monitoring» tab in the program settings.
- Activate the «Frame rate» option — check the box in front of the name.
- Change the values of the remaining parameters to your liking (described above) and save the configuration.
Activation and setting of the frame rate.
Configuring EOS hotkeys in MSI Afterburner
Activated the screen display in the overlay — it appeared. How can I turn off this OED? Hot keys.
- Open the MSI Afterburner settings and visit the EOS tab.

- Click on the «Show EOD» field and hold down the key combination to enable the overlay with Alt, Ctrl or Shift, not used in Windows and other applications.
- Repeat the same to disable monitoring.
Assigning keyboard shortcuts to control the overlay.
- Save settings.
Programming buttons to display and disable EOS in games is not necessary, but soon after the function is used, assigning operations to the global key combination will be required.
Important. The first line «Toggle EOS visibility» replaces the next two. One click will turn off monitoring in MSI Afterburner (if enabled), and display if disabled.
Enabling the overlay in MSI Afterburner (OED)
To visualize and disable the selected indicators over the game, hold down the previously programmed buttons.
- If nothing appears, or MSI Afterburner stopped showing monitoring in games, click «Advanced …» in the «OED» tab to call the statistics server.

Opens a window with additional options.
- Activate the «Show On-Screen Display» option.
- Then enable «On-Screen Display Support».
Overlay configuration.
The overlay appearance is configured in the window: color, font, size, shadow, display mode.
If EOS does not appear:
- Close the game and start RivaTuner Statistics Server.
- Click «Add», select the game executable file, click «Open».
Add individual settings for each application.
You can change the appearance of the OED for each game.
How to enable Frametime graph in monitoring?
FPS — frame rate displayed per second. Frametime — distribution of these frames in time. Out of 30 FPS, 10 frames can be generated in the first half second, and 20 FPS in the second. The uniformity of draw intervals is important for gamers. In 9 cases0097 microfreezes appear more skewed , jamming is noticeable.
In the summer of 2017, MSI Afterburner 4.4.0 was released with a new function to display Frametime or Frame Time on the chart.
Enable frametime in MSI Afterburner in settings:
- Click on the gear, activate the «Monitoring» tab.
- Among the graphs, activate «Frame time» — check the box in front of the name.
- Click on the name of the option, then — «Show in OED».
- Select the visualization method Graph or Text, Graph.
- Apply settings.
Algorithm for activating frame time display.
Game Screenshot and Video Capture Settings
The screenshot and video capture functions of MSI Afterburner are rarely used. First you need to set the keys to take screenshots, start and stop recording screen video.
- In the settings, click on the text field and hold down the keys to take a screenshot.
- Select the format (jpg is optimal) and image quality.
- Directory for saving graphic files.
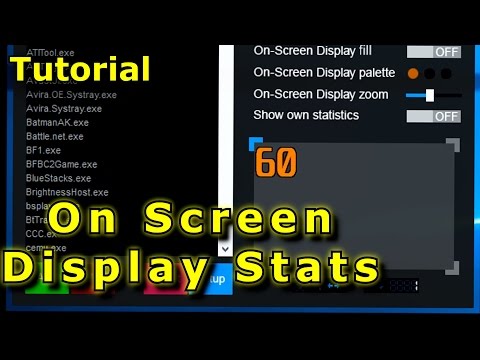
Configuring screenshots in MSI Afterburner.
- Save the settings.
During the game, press the specified button or combination to take screenshots.
Game Video Recording Setup
- Visit the Video Capture tab.
- Click on the first text field and enter a key or combination to record a game video.
Video capture settings.
- Specify other recording parameters: mode — desktop or 3D application (game), video format, container, quality, frame rate, output directory and others.
How to use monitoring in games
To prevent overheating, be sure to turn on the alarm when the temperature sensor reaches 80-85°C. In order not to miss the moment of overheating, activate the sound function as a warning.
Enable an alarm to prevent thermal damage to the video adapter.
In addition to the temperature of , pay attention to the FPS — falling below 24 frames will lead to jerky playback of the image. The situation is possible if the graphics accelerator can not cope with the load, with a strong heating of the video card. In the latter case, it resets the frequencies for cooling. When the device regularly or quickly heats up over 80-85 ° C, games crash, it is worth considering lowering the operating frequencies by a few percent. If you increased the voltage of the video core, reset it.
It happens that MSI Afterburner stops displaying EOS in Counter-Strike: Global Offensive (CS: GO). It helps to launch the game through the launcher with the «-allow_third_party_software» parameters. Try updating Afterburner. Read more about solving problems with monitoring at the link.
How to turn off monitoring in Afterburner
- Turn off the display of unnecessary indicators in the monitoring settings: click on the parameter, uncheck «Show in OED» and apply the changes.
Algorithm for disabling one or more indicators.
- All parameters will be removed from the screen by a combination of hot keys specified in the OED tab.

The first combination alternately shows and hides, the third only hides.
The second option to turn off monitoring
Move the RTSS «Show On-Screen Display» switch to the «OFF» position.
Hide the panel using the Statistics Server.
Questions and answers
We will help you solve any problem with Afterburner.
Is it possible to adjust the monitoring position on the game screen?
Launch RTSS, select a profile (global or specific game), on the screen at the bottom right, place the element in the right place with the mouse. Use the arrow buttons to precisely position the overlay. The «On-Screen Display zoom» switch changes the scale of the overlay.
Overlay position control.
How to remove a darkened background that overlaps the same picture?
In RTSS background filling with color is disabled by the «On-Screen Display fill» option (see screenshot above).
What it is
The RivaTuner Statistics Server application controls the graphics adapter, allowing you to set the parameters you need without harming the hardware — that’s what this program is. It works with both NVIDIA and AMD. The interface looks quite simple, all functions are visualized in the form of buttons, scales and levers — this is done so that everyone can work with the application, regardless of knowledge about PCs and devices. There is also a mode for advanced users.
How it works
This program allows you to easily «get» to those functions of the graphics adapter that are difficult to access with a standard set of resources at hand. Its options make it possible to monitor drivers and registry entries.
To improve performance, mini-utilities are built into the shell that communicate with the central and graphic processors and give them the necessary commands. The program is suitable for all versions of Windows, starting with the 7th and higher, and for all known video adapters that are not obsolete.
RivaTuner Statistics Server functions
When you start the game, the program window remains visible so that you can monitor performance changes and resource consumption.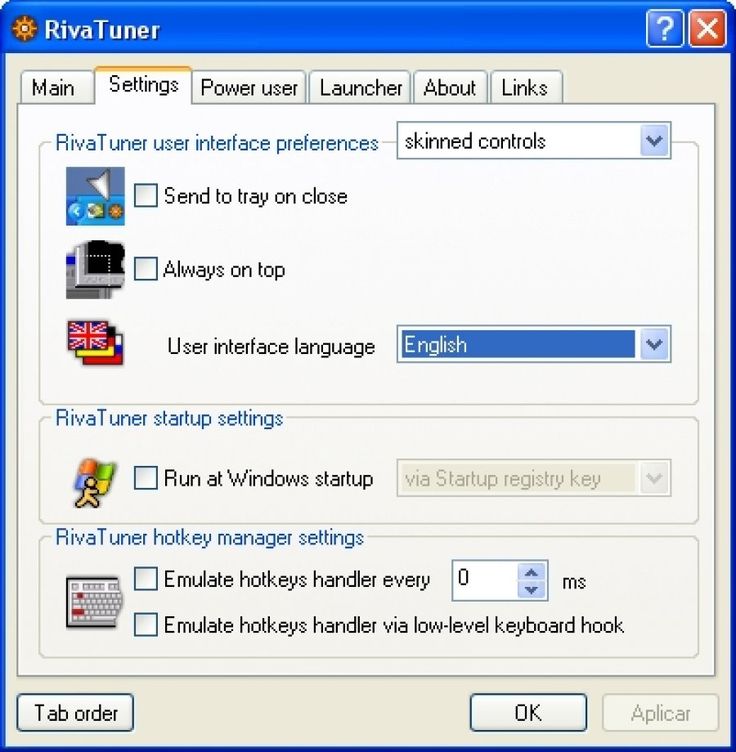 The app is capable of:
- Overclock your graphics card by spinning up the fan at the same time to avoid overheating.
- Maintain high performance graphics card and CPU, which allows you to comfortably play games and use other resource-intensive software (for example, animation).
- Summarize productivity across applications and offer insightful statistics.
- Quickly and conveniently take screenshots and convert them to the desired extension.
- Make a video recording of the screen.
- Change the number of frames per second, which is especially important for games where the composition is built in the first person, i.e. the player looks at everything as if through the eyes of a character.
Installing and configuring utilities
The RivaTuner Statistics Server distribution kit is not distributed by itself, but along with another productivity application — MSI Afterburner. The latter shows all the data about the internal hardware of the PC, and the utilities work exclusively in tandem, so you have to install both. You can download the installer on the official website of the developer. After unpacking and launching the boot file, you can simply follow the prompts that appear: select the language, where the program is stored, and agree to the terms of use. First, install MSI Afterburner, and then RivaTuner (depending on the version of the distribution kit, they can be placed in different folders of the shared archive or installed immediately as a single package). Now let’s figure out how to set everything up:
- First, open MSI Afterburner — on the left, under the big round button, you will see several small ones. We need the one with the cogwheel.
- Clicking on it opens another window with several tabs — select Monitoring and in the Active Charts section specify all the indicators you want to see.
- Turn on Show in Overlay on-Screen Display.
- Specify the settings in which your PC hardware should operate. It would be better if before that you carefully study its capabilities, so as not to set the bar too high.
Parsing the RivaTuner setting:
- Before using it, you need to find the icon. As a rule, it is located in the lower right corner, where the antivirus, Bluetooth and Update Center icons are usually located.
- Click on it and open the program window.
- Here you can change the frame rate in the game and customize the interface design of the application itself.
Sometimes in Steam the RivaTuner window is not displayed on top of the game. In this case, you need to open RivaTuner, click the plus sign at the bottom right, select the name of the game and move the corresponding slider to the “Enabled” position on the left.
Now let’s talk about how to uninstall the RivaTuner utility if you no longer need it:
- Open Control Panel — Add/Remove Programs.
- Find the software in the list, select and delete using the special button.
- If it is not there, call the «Task Manager» (Ctrl+Alt+Del) and find the program’s executable file.
- Right-click on its name and look in «Properties» for the location.
- Go to this folder and clear everything related to RivaTuner.
Of course, this program is also removed along with MSI Afterburner, as it is installed.
How to use RivaTuner
Now directly to the question of how to use the features of the software called RivaTuner.
As mentioned earlier, this utility is designed to overclock and change the settings of the video card installed on a computer or laptop.
But you should use the software very carefully. If you violate the recommendations, as well as make inappropriate changes, this can lead to the most unpredictable consequences. There have been cases of partial malfunctions and even complete failure of the graphics adapter. This is just a warning, and not an attempt to intimidate users and force them to completely abandon the use of the utility.
Most gamers are interested in more than just how to enable RivaTuner. There is nothing difficult in this. It is much more important to get an intelligible answer to the question regarding how to overclock the fan using the capabilities of the RivaTuner software.
The instructions for using the software can be presented in the following form:
- Download the installation file of the utility, install it on your computer, and then run it. The main screen will appear in front of you, from where all subsequent actions will be carried out.
- Select partition for video card settings. To do this, click on the triangle icon on the right side directly below the name of your graphics adapter.
- A panel will appear where you need to click on the button with a magnifying glass.
- Examine general graphics adapter performance settings. Also take a look at the current temperature and frequency of the equipment.
- Then click again on the triangle in the line called ForceWare Detected. Here a panel will drop out on which you need to click on the first button from the list.
 It displays a thumbnail of the video card. This will open the system settings window of the utility. Here go to the tab called Fun. This is the first step towards overclocking the fan.
 - Select Direct Control in the top right corner. That is, this is overclocking at the level of the driver used. Click Apply to confirm your selection.
- Next, you need to change the core frequency. This is done in the line labeled Performance 3D. The frequency changes with an interval of 25–50 Hz. Click Apply again and save the new settings. To do this, you need to click on the button that displays a small floppy disk. Save about 4 different settings, where the first will be 40%, the second 60%, and the third and fourth 80 and 100% respectively.
- Now set the value to 40% and confirm with the OK button. Open the Launcher tab in the RivaTuner application.
- Click on the green plus here and select Regular Item. Confirm your choice with the «OK» button.
- After the performed manipulations, a window appears.
 Here, the necessary characteristics are set for accelerating the graphics adapter, that is, the video card. To do this, in the line called Name, write 40%.
 - The next step is to find the parameter registered as Associated Fan Profile. Here you also need to set the value to 40, set the Driver Level and confirm the changes with the OK button.
- By analogy, it will be necessary to set parameters from 60 to 100%.
- Next, move to the tab called Scheduler. Enter 40% in the Name field. After that, you can click on Run Task, and select On hardware Monitoring Range Event. This is an optional mode setting. Here you should set the Core Temperature, select the color for the displayed graphics. The standard color variant is red, but green can be used for convenience.
- It is important to note that 40% is the minimum value. Therefore, in the column called Range min, you should put 0. The maximum value cannot exceed the following, that is, 60%, which is why parameter 55 should be specified in the Range max column.
 The next two characteristics will determine the frequency of the graph. It is recommended to set 15000 and 0.
 - In the case of the 60% parameter, 56 is written in the Range min column, and 65 will be indicated in the max column. In order not to get confused in the graph, you should set a different display color. It’s purely at your own discretion. Either yellow or purple.
- The settings for 80 and 100% are changed in the same way.
- As a result, the program will display a temperature graph.
If after the work done all the parameters are within the acceptable range, then overclocking can be continued further using the proprietary utility for NVIDIA.
But it also happens that the test freezes, the parameters go off scale and go beyond the permissible limits. In this situation, in order to prevent a possible crash of all computer hardware, the best solution would be to stop RivaTuner.
Whether or not to overclock a video card is up to each user personally.
Yes, programs like RivaTuner demonstrate frankly good features and properties. However, it is always a potential risk. It is often easier and safer to initially buy a high-performance graphics adapter, rather than squeeze the last juices out of it by overclocking.
- FITTLE
- graphics card and/or defined video BIOS
- When running 3D applications and games, they crash, the computer freezes, or the operating system crashes into a blue screen
- Problems in Wolfenstein (2009)
- What is «auto-brake» and how can I disable/bypass it?
- AGP bus video card installation notes
- The program or game won’t start, reporting that my video card does not have certain features (TnL, shaders, etc.). Can I still run the program / game?
- Some OpenGL applications and games stopped working, referring to the fact that OpenGL is not supported by the system.
 The ones that do run are very slow. What happened?
 - The image in the game jerks, sometimes fragments of two frames are displayed, or there is a flickering horizontal bar in the middle of the screen
- Using the built-in overclocking tools of the NVIDIA driver The system did not detect NVIDIA hardware. When I try to install the driver manually, it says that no hardware information was found in the specified location
- 3D graphics quality settings in utilities do not work with new drivers
- Disabling PowerMizer power saving
- Problems in GTA IV
- How to safely overclock the video card?
- The video card does not go into 3D mode when starting games/3D applications
- Why is the temperature of the graphics core not displayed, because GeForce FX and above have a built-in thermal sensor?
- TV output not working, driver does not detect connected TV or no picture
- What is the difference between the two tabs for overclocking, in the low level settings and in the driver level settings in RivaTuner? Which one to use? Why is the bookmark in the low-level settings unavailable?
- How can I determine the characteristics of the video card, such as the type of graphics processor, frequencies, video memory bus width, video memory type?
- Can a GeForce video card be converted to a Quadro video card?
- Colors on the monitor sometimes shift to one color area
- Some chipset compatibility issues with NVIDIA based video cards
- Driver installation, DxDiag and other utilities report that the driver is not certified by Microsoft, although a driver marked as WHQL was installed at the stage of loading the desktop, and when entering the screen properties?
- The option to enable DualView mode is not available after connecting a second monitor/TV
- After updating the video BIOS, colored dots on solid backgrounds began to appear, the colors of graphic elements randomly changed
- How can I control the operation of the cooling system on a video card?
- I heard that NVIDIA-based video cards are counterfeited.
 Is this true, and how to avoid buying a fake?
 - When playing a movie in a window, the image appears only on one of the displays connected in clone mode
- My motherboard supports SLI technology, but I do not see the SLI control tab in the driver panel
- Is it possible to overclock video cards combined in SLI?
- The driver and diagnostic utilities report that the video card is in PCI mode. AGP texturing acceleration is disabled in DxDiag and is not supported
- AGP video card does not operate at the maximum bus speed (2x instead of 4x, for example)
- Is it possible to make the desktop larger than the current physical display resolution?
- In GTA 3, GTA Vice City, GTA San Andreas textures and surfaces disappear0006
- Why is there no multitexturing in GLQuake/Quake2 games?
- Problems in FarCry
- Dark Messiah of Might and Magic crashes immediately on startup
- Sound stuttering and popping after installing an NVIDIA-based graphics card into the system
- Is it possible to enable GPU pipelines that are disabled by the manufacturer?
- Monitoring utilities such as ASUS SmartDoctor or nTune warn if +3.
 3V or +12V is out of safe limits
 - In games and 3D applications, the refresh rate is only 60 Hz
- Where can I find video BIOS updates?
- I read in the RivaTuner documentation that video cards based on GeForce FX and higher can be voltmoded via BIOS editing. How exactly to do this?
- Graphics card overclocking tools
- Why are multiple frequencies displayed instead of one GPU frequency and what do they mean?
- Is there a way to enable autobrake event logging?
- What do the parameters in the RivaTuner/NiBiTor automatic cooling system control setup dialog mean?
- The TV picture has large black borders. How to remove them?
- Forcing shader version in RivaTuner and 3D Analyze utilities
- Known limitations of NVIDIA GPUs
- AGP Fast-Writes (FW) mode does not work or is reported as not supported
- Fonts and images become fuzzy, blurry and doubled
- Need for Speed: Underground comes with strong image jerks
- Return to Castle Wolfenstein writes «.
 ..ignoring GL_EXT_texture_filter_anisotropic» in the console. How to make the game work with anisotropic filtering?
 - Medal of Honor: Pacific Assault crashes into a blue screen
- Why is it impossible to set frequencies in RivaTuner higher than on the overclocking tab in the driver panel?
- Image distortions are observed — “artifacts”: colored dots, stripes, missing parts
- All of a sudden, all objects on the desktop become twice as large, stretching vertically. ASUS video card
- VGA signal multipliers, extenders and monitor switches with NVIDIA video cards
- How to measure FPS in a game that does not contain built-in performance measurement tools?
- Graphics card cooling system does not respond to adjustments
- Notes on GeForce GT 220 OEM cards
- High CPU usage with GeForce 6800 GS
- AGP SBA mode does not work or is reported not supported
- Notes for Acorp 6BX81, 6BX86 motherboards
- Notes for Gigabyte GA-6OXT motherboards BIOS Warning
- In a game from the Need for Speed series, the entire image is in pink or yellow fog
especially video cards based on GeForce 6X00 and newer
How to get rid of frame tearing and input lag in games / Sudo Null IT News0001
Screen tear or input lag? Should I use vsync? For a very long time in the world of PC gaming, it was a matter of either-or.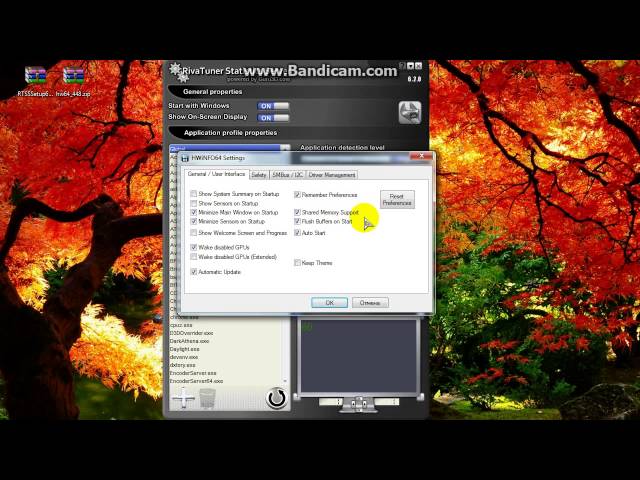 You can achieve either a picture without tearing frames, or low input lag. But it is impossible to get both. Or is it possible?
The answer to this question is ambiguous. If you already have a modern gaming monitor that supports variable refresh rates (FreeSync or G-Sync), then you don’t need this article at all. But if you have a regular monitor with a constant refresh rate, or if you like to play games on your TV, then this article will help you reduce frame tearing and input lag.
Using the millisecond frame limit in RTSS (Rivatuner Statistics Server), low latency vsync can be achieved. What will we get as a result? A clear picture without frame breaks and input lag is 50 ms less than with regular vsync.
This is one of those few PC enhancements that can dramatically improve your gaming experience with minimal compromise and completely free. What is it? And how to achieve this? In this article, we will explain everything in detail and step by step.
Terrible frame tearing with vsync disabled
What is input lag?
Before proceeding to solve the problem, it would be nice to understand what exactly we will do. Low latency Vsync is a technique to reduce input latency. What does this mean? When you type on the keyboard or move the mouse, there is a small, almost imperceptible delay between your action and the screen output. This delay is so small that it is measured in milliseconds. If you are using the computer to read the Internet or play casual games, this does not affect the process in a tangible way.
However, in intense situations such as eSports shooters, every millisecond counts. A few milliseconds of input lag can decide the fate of a headshot or the death of your hero.
All monitors (and TVs) have a certain amount of input delay added by default. It usually depends on the type of panel being used. High refresh rate IPS and TN panels provide the lowest input lag by default. For some monitors, it is only 0.5 ms. VA panels typically have higher input lag, many reaching 8-10ms. TVs (which often use VA panels) tend to perform the worst, some with latency up to 30ms or more.
When vsync is disabled, the computer’s GPU sends rendered frames to the display as fast as possible. Since the frame rate on the display is limited (on 60 Hz displays it is one frame every 16.66 ms), frame tearing occurs when a new frame arrives before the previous one has disappeared from the screen.
When traditional vsync is enabled, the GPU can no longer replace the contents of the monitor buffer with a new frame before the old frame has had its 16.66ms of glory. This means that each frame can be displayed in full and frame tearing is eliminated. However, this forces the GPU to queue up frames instead of sending them as fast as possible.
Due to queuing, traditional vsync can add up to 50ms of latency on top of the standard display latency. This is where low latency vsync comes into play.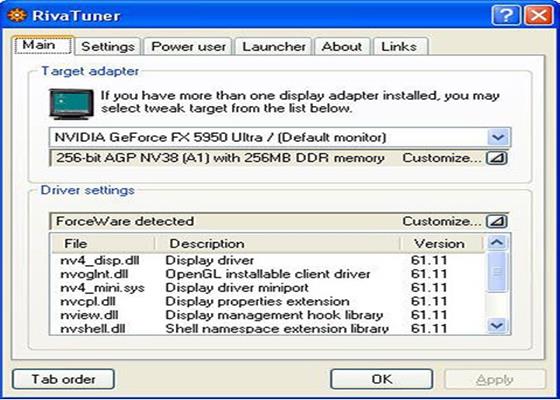
With low-lag vsync, we are essentially limiting the frame rate (the rate at which the GPU transmits frames) to a number slightly below the monitor’s refresh rate. This prevents the GPU from sending new frames before the monitor is ready to display them. What will we get as a result? Game without tearing frames and almost the same delay as with disabled vsync. Now let’s talk about how to achieve this…
What we need
Before proceeding, you need to download the latest version of Rivatuner Statistics Server (RTSS). You will also need an internet connection to go to these two pages to run the tests:
- UFO Refresh Rate Test
- vsync Tester
HPET (High Precision Event Timer) must be enabled in your computer’s BIOS. If for some reason you turned it off, then turn it on.
Getting Started
First of all, we need to determine the true refresh rate of the monitor. If you have a 60Hz display, then it’s probably very close to 60, but different by a few hundredths of a second. Use either UFO Refresh Rate Test or vsync Tester. If you have free time, then run both and check if the values match.
To test the refresh rate of your monitor, close all other browser tabs and all background processes, and then wait between 30 seconds and 1 minute. The test page will show your display refresh rate to a few decimal places. For the next step, round them up to three digits.
Using UFO Test to determine the true refresh rate
Installing and running Rivatuner
After installing Rivatuner, run the program with administrator rights. Then click on the green «Add» button in the lower left corner. Navigate to the folder where the desired game is installed. (Note that you can also set the parameters globally, but we prefer to set them individually for each game).
Select the game executable and then add it to Rivatuner.
Adding a new game to RTSS
Calculating the frame limit value
Take the update rate to three decimal places and subtract 0.01 from it. For example, if your refresh rate is 60.001, then the frame limit will be 59.991.
Select a game on the left side of the Rivatuner interface. Then enter a frame rate limit value in the field next to Frame rate limit. So we limited the frame rate of the game to a value below the refresh rate of the monitor. You may need to experiment a bit with this value. Some games are more sensitive to frame capping than others: if you notice a lot of judder, then try increasing the frame rate cap in 0.002 increments.
Enable vsync and start
Launch the game and then enable vsync in its settings. If you can’t do that, then enable forced vsync at the driver level from the AMD or Nvidia control panel. That’s all!
After enabling vsync with low latency, you will get significantly better input latency without frame tearing.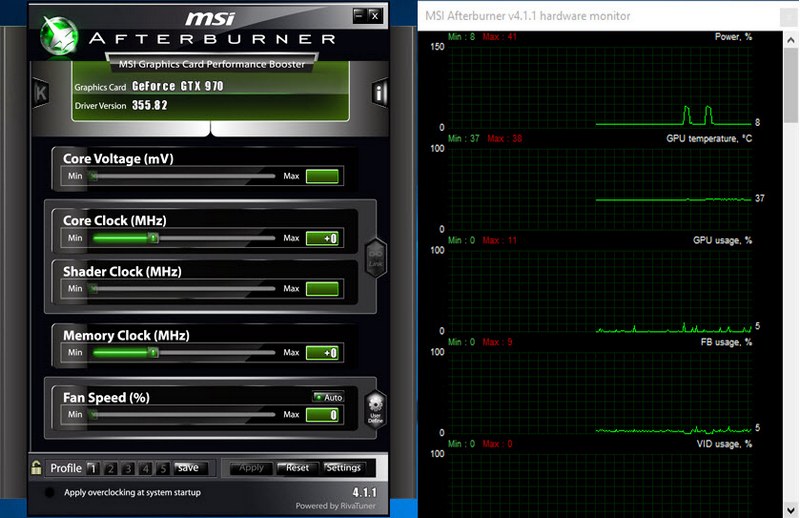 However, there are subtleties that are worth paying attention to. Low latency Vsync works best if your system is capable of sustainably running above your monitor’s frame rate. If it only reaches the 60 FPS mark, then enabling this feature may cause additional jerks when the frame rate drops.
Scanline sync: an even more convenient alternative
If you don’t want to experiment with fractional frame rate limits, then RTSS has an alternative: scanline sync. Scanline sync allows you to control where on the screen frame breaks occur with vsync disabled.
How will this help? The frame break is displayed as a single line that we can move to the edge of the screen, to the very top or bottom, where it will essentially disappear. To enable scanline sync, disable the frame rate limit by setting RTSS Framerate limit to 0 and disable in-game or driver vsync.
Now let’s decide where we want to place the scan line.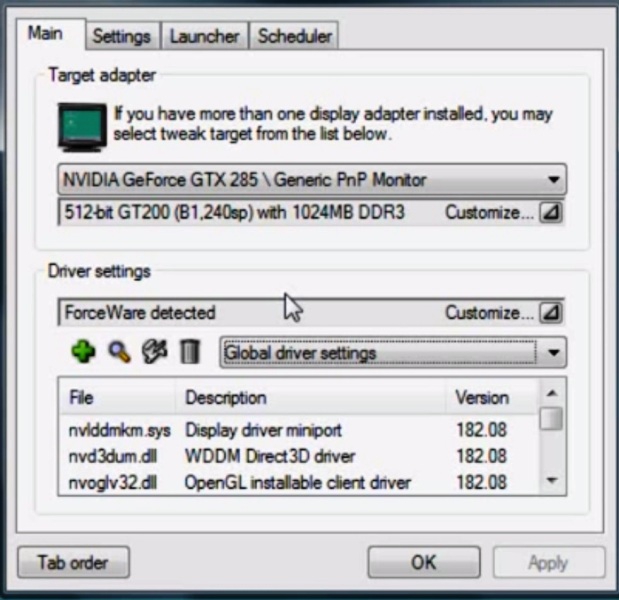 You can experiment with this, but ideally you should take your monitor’s vertical resolution (1440 if it’s a 1440p monitor) and then subtract 10-20. Enter this number in the Scanline Sync field. S-Sync often provides even lower input latency than low latency vsync.
However, you will need a powerful system (or a less demanding game) for optimal performance. In games where the GPU load is constantly above 80 percent, S-Sync does not have enough performance to hold the tear line in one place, which can cause significant stuttering.
Rule of thumb: Use S-Sync for less demanding games where average frame rates can be well above 60 FPS. Low latency Vsync should be used in games that run close to 60 FPS.
Trouble-free setup
Some ways of tuning PC performance can have a placebo effect or have overhead, such as resolution scaling. But with low latency vsync, you actually get a better gaming experience without any compromises. If you’ve got some extra performance to spare but aren’t playing on a VRR gaming monitor, enabling low-lag vsync can change the feel of shooters and competitive games while eliminating frame tearing.
No special hardware is required for this, and only RTSS is needed from the software. If you follow our instructions, you will notice a significant reduction in input lag and improved responsiveness in all your games.
As advertised
Playing is always good, but sometimes you need to work. Epic servers is a great option not only for work, but also for hosting game servers. You can choose absolutely any OS or install the system from your ISO.
MSI Afterburner how to use when overclocking AMD graphics card
You can use MSI Afterburner to adjust the fan speed depending on the temperature and to overclock the Radeon graphics card. The program can work with any video cards, but only NVIDIA and AMD Radeon branded cards work with all the sliders, and with other video cards there may be problems and sometimes the voltage sliders do not move in MSI Afterburner.
Created overclocking graphics card MSI Afterburner will start at system startup
To properly configure MSI Afterburner, you first need to make sure that the settings you made for overclocking and cooling are applied on subsequent Windows startups. To do this, in the main window of the program, you need to click on the inscription Apply overclocking at system startup and the green circle in front of the inscription should light up.
Method 3: Enable built-in game settings
In popular cs go, dota 2, and other games from Steam, you can watch FPS without third-party programs. To do this, in the settings Steam
, in the tab “IN THE GAME”, enable the option “Steam Overlay in the game” and select the place where the frame counter is displayed.
In Overwatch, WOW, Starcraft, Diablo and other games from Blizzard
, the FPS display is enabled by pressing CTRL+SHIFT+R or the «enable performance data» option.
What affects FPS?
FPS primarily depends on the capabilities of the video card and to a lesser extent on the processor and RAM. Also, FPS is limited by the monitor frequency, so on most laptops it is impossible to see more than 60 FPS.
FPS is also affected by monitor resolution and image detail settings in the game. The higher the image quality, the lower the smoothness and speed of the game.
MSI Afterburner is a utility designed for GPU overclocking. She replaced the Riva Tuner. In addition to increasing the performance of video memory, the application allows you to monitor the temperature of the processor and has many other functions.
Simple voltage control rules
The program allows you to adjust the voltage on the master graphics adapter. Depending on its microarchitecture and the chip used, the parameter may be displayed in millivolts or percentage of the original value.
By default, the option is disabled on all devices, except branded ones (from MSI). To activate it, you need to go to the main settings of the application and enable the corresponding option. Several modes are available here: for reference chips, for chips from MSI and third-party graphics adapters.
Fig. 13 — Unlocking the voltage control function
If, after enabling the option, it is still inactive (grayed out), refer to the GPU manual. Most likely, Afterburner does not support the programmable microcontroller installed on the device, even if it supports voltage control.
Increase the value of the parameter gradually, by a few percent each time, and closely monitor the temperature and stability of the video card after each change. With a significant increase, the device will overheat faster and make more miscalculations, which will most likely lead to failures in the entire system, the appearance of artifacts, etc.
After reprogramming the controller, which is done by clicking on the checkmark button, it is best to stress test the video card, for example, using the Kombuster proprietary utility. If no deviations are noticed for a couple of hours, the indicator can be increased by a few more percent or tens of units.
Fig. 14 — Applying the new configuration
If the core voltage value changes to the default after saving, try going to settings and choosing a different voltage control method, but most likely it will not be possible to adjust the value through MSI Afterburner.
Program features
The program can perform the following functions:
- GPU cooling setting from a distance;
- max performance level ;
- setting clock frequency memory;
- voltage monitoring in the video card;
- monitoring the frequency of shaders, CPU load, random access memory (RAM).
Modern utilities are equipped with additional applications that perform server functions. That is, the user, by installing the MSI Afterburner remote server not on a computer (PC), but on a phone with an Android or iOS system, will be able to remotely control video card overclocking directly from a smartphone.
How to enable game monitoring in MSI Afterburner
MSI Afterburner allows you to control graphics cards from red and green, namely adjust the speed of coolers, monitor, overclock equipment, capture video, and many others. The program works with graphics cards of any manufacturer. The user just needs to install MSI Afterburner on his computer, after which he can already fully use the program’s capabilities.
This article will tell you how to enable monitoring in the game using MSI Afterburner. Consider not only how to use the MSI Afterburner program, but also what monitoring settings are best to set. And also pay attention to how to configure the monitoring settings in the game, for normal display in games, so as not to distract from the game.
How to install MSI Afterburner on Windows 10
Users are looking for how to download MSI Afterburner from the official website in Russian. There really is such an opportunity, since you can change the localization of the interface right in the program.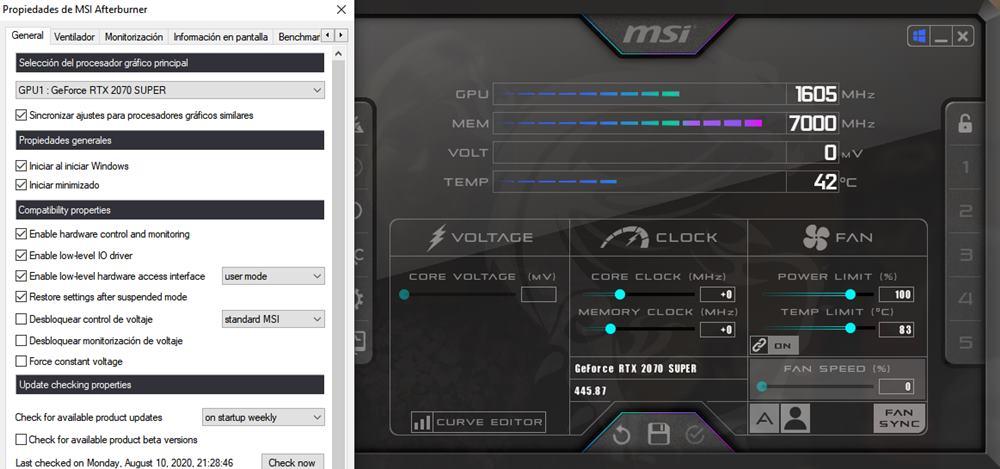 It is also recommended to choose a more convenient program skin, since the standard one is not suitable for every user.
It is worth noting before installation that you need to be careful when using MSI Afterburner. Since the hardware overclocking functionality and the ability to adjust the fan speed can harm the computer, especially in the hands of beginners.
- Go to the official website of the MSI Afterburner program and in the section Download click the button Download Afterburner .
- Next, open the downloaded file and follow all the steps of the program installer.
The main thing is to make sure that MSI Afterburner and RivaTuner Statistics Server are selected at the step of selecting the components of the program to be installed. Since RivaTuner Statistics Server extends the capabilities of MSI Afterburner by adding the ability to enable FPS monitoring.
After installation, we immediately start changing the language of the program interface.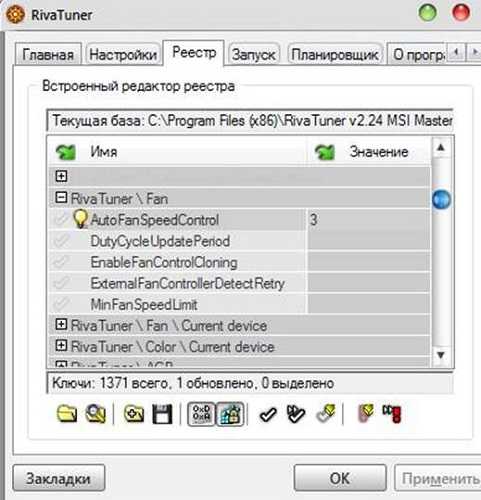 Just open MSI Afterburner and go to the settings by clicking the gear at the bottom of the program. Then go to section Interface and in paragraph Regional settings select Russian language.
How to enable FPS in MSI Afterburner
- Open MSI Afterburner properties by clicking on the gear settings .
- In the window that opens, go to the tab Monitoring find item Frame rate .
- Activate item Frame rate by checking the box and check Show in EOD below.
- Opposite the current item, select the value Text or Graph , which will display the number of frames per second.
In the monitoring tab, you can also enable other options that the user considers necessary to be displayed on the monitor during the game. Please note that various graphics core boot parameters or temperatures are available in MSI Afterburner without the additional RivaTuner Statistics Server component.
If you don’t have framerate monitoring settings, then make sure that RivaTuner Statistics Server was installed along with MSI Afterburner.
Enabling the necessary monitoring settings We recommend setting up hotkeys that will allow you to switch visibility during the game, show, hide the current monitoring indicators.
- Open MSI Afterburner Properties by pressing Ctrl+S .
- Next, go to the tab OED and set the values for items Show OED and Hide OED .
The final step is to customize the appearance of the overlay OSD. You can choose one of the available styles, or just customize the fonts and colors for yourself.
Style settings available in MSI Afterburner properties. It is enough to go to the tab Monitoring and having selected the required monitoring schedule, press the button Selecting the style of the Overlay Screen Display in the form of three dots near the item Show in EOD .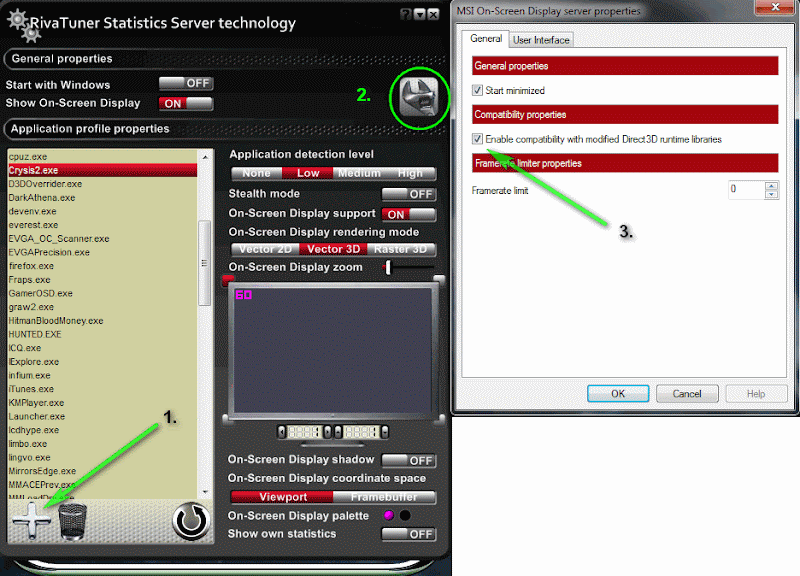
In the window that opens, just select the active display style you like or customize the current style by changing its properties.
Additional settings for displaying the Overlay Screen Display can be found in the RivaTuner Statistics Server utility. It is enough to directly open the RivaTuner Statistics Server utility or go to tab 9 in the properties of MSI Afterburner0097 OED and press the button Advanced . Here, in another interface, you can set the color, font, size and select the position of the text. And also many other options are available and the ability to immediately view the configured text options.
Conclusion
MSI Afterburner is a powerful tool for managing and monitoring graphics adapter settings. The user just needs to download and install the MSI Afterburner program from the official website. The ability to select the Russian language of the interface is immediately after installing the program.
MSI Afterburner allows you to enable game monitoring, namely, enable the display of the number of frames per second (FPS). Previously, we considered programs that show FPS in games, although MSI Afterburner did not make the list, but it can also display a frame per second counter and more. Also see how to use the SpeedFan 4.52 program, since it is more suitable for beginners and also control the speed of coolers connected to the motherboard.
Source: https://windd.ru/kak-vklyuchit-monitoring-igr-v-msi-afterburner/
Installing the application
You can download the utility from the official site msi.com. There are three types of program on the official website page: for PC, Server and Android.
After downloading, the user installs the utility on a computer or laptop:
- Start the installation using a file with the name of the utility and the .exe extension.
- Find and select Russian.
- Accept license agreement .
- Check two boxes. Click the button « Next «.
- Select Russian language for «MSI Afterburner and RiverTuner Statistics Server» utility.
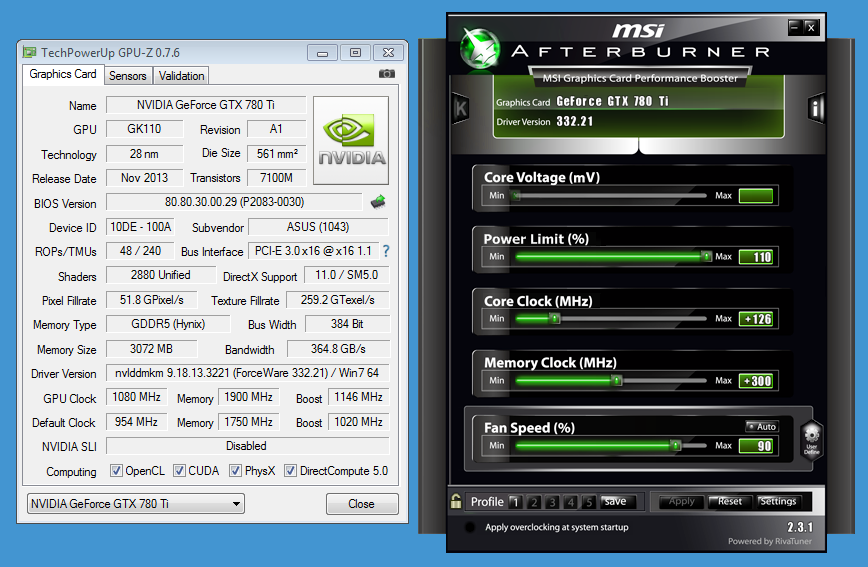
- The program will be automatically installed on your computer or laptop.
How to download and install?
In order to download and install RivaTuner Statistics Server, you will need to download to your computer the installation files of the MSI Afterburner package, which includes the utility we are considering. For this you need:
- go to the official MSI Afterburner developer page;
- at the bottom of the page, click on the pop-up button «»;
- download MSIAfterburnerSetup file;
- unpack archive;
-
run the installation file unpacked from the archive;
- follow the installation wizard;
- when selecting components, check the RivaTuner Statistics Server option so that this utility is installed on your computer along with MSI Afterburner;
- wait for the installation to finish and start RivaTuner Statistics Server using the appropriate shortcut in the Start menu.
Interface overview
After the utility is installed, it must be launched.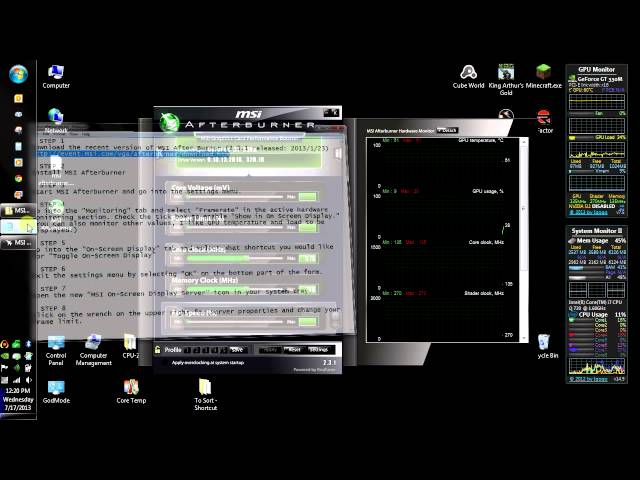 The application interface will be displayed on the monitor screen.
There are two round monitors on the left and right sides. They show the user on the left side the frequency of the video processor and memory, and on the right side — voltage and temperature .
In the center of the interface there are sliders for:
- voltage increase core;
- overclocking rotation cooler;
- frequency increase processor and memory.
At the top there are three buttons that are responsible for:
- the first button (from left to right) — the beginning of the stress test to check how the video card behaves when running at full power;
- second — Internet help about the utility ;
- third — general information about the system and hotkeys.
At the bottom, the user can see three more buttons responsible for:
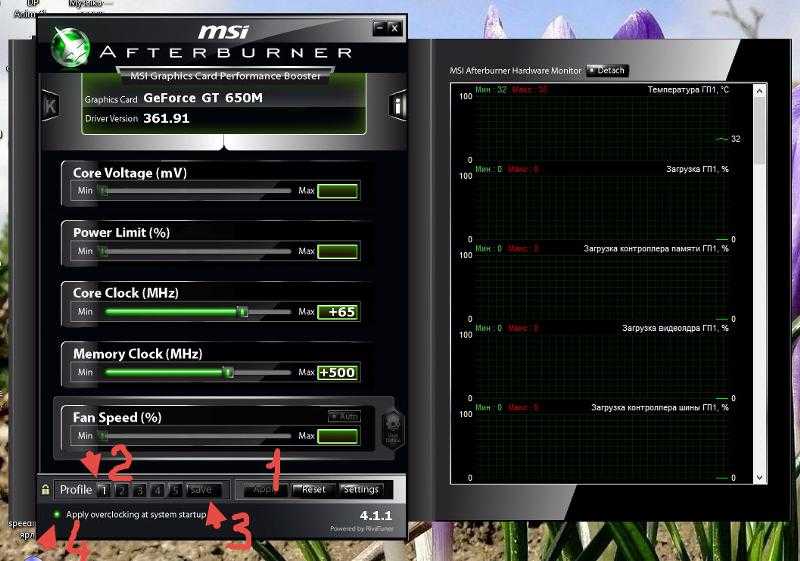
Under the GPU temperature and frequency monitors are: on the left, is a button to start the change after Windows starts, and on the right, is a selection of profiles with preset parameters that can be saved. In the center of , the user sees the name of his video card, and below is a graph of parameter changes during the operation of the video adapter. You can view all graphs by scrolling the slider down to the stop.
Overview of the popular MSI Afterburner program
Long before the appearance of gpu-rigs, gamers overclocked video cards using RivaTuner. The utility was developed by Russian programmer Alexei Nikolaychuk. But, in 2009RivaTuner was discontinued and MSI Afterburner was created based on it. Miners simply call it AF, and there is hardly any of them who, in general, have never used an afterburner when overclocking video cards. In this review, we will tell you where is the best place to download, and how to properly configure the msi af mining program.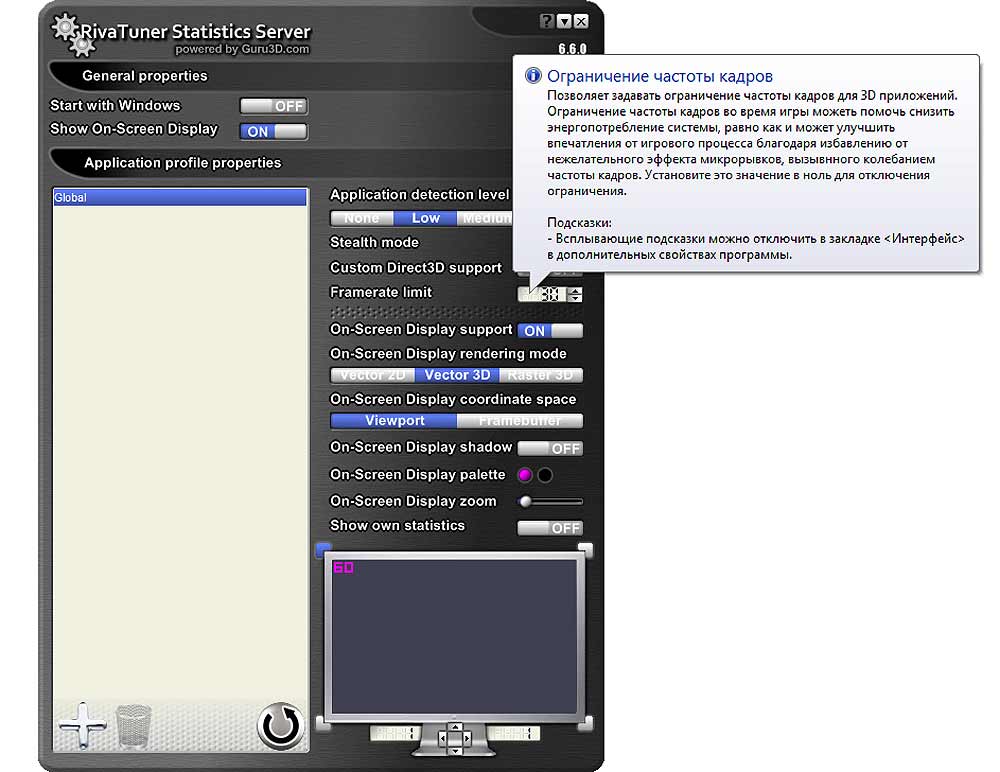
Download from the official website
The name afterburner is translated as «afterburner». With it, you can get the most out of your graphics cards. In order not to catch any attack on your PC, you need to download msi afterburner from the official website of the developers https://ru.msi.com/page/afterburner.
There are three versions of the program:
- Msi afterburner for Windows
- Android version for setting up the video card using a smartphone.
- MSI Afterburner Remote Server.
If you have a farm of multiple graphics adapters, then msi afterburner setup will be performed on the computer. Download the archive, unzip it to a folder convenient for you, and proceed to install the program.
Installing MSI Afterburner
Open the folder with the latest version of the utility, which is 4.6.2 at the time of writing this review, and click on the Setup.exe icon to run the setup file. You will be prompted to select the installer components. Setting msi afterburner for mining does not depend on RivaTuner Statistics Server.
This is an additional utility that provides support for frame rate monitoring, real-time video capture, and 3D acceleration usage statistics. It is needed only for gamers and can negatively affect the performance of the rig. Uncheck RivaTuner and click Next. Wait for the installation to complete and run msi af.
How to overclock msi afterburner 9 graphics card0396
The AF application can be used to adjust:
- Memory and core frequency.
- Cooler rotation speed.
- Power consumption limit.
- Core voltage.
After installation, open the program as an administrator and make sure that it correctly displays all video cards in the rig.
By default, the panel will display the parameters of the first graphics accelerator. If all cards are of the same model, you don’t need to configure msi afterburner overclocking for each of them separately. The settings of the first map will be applied to the rest. But, if you want to separately set the frequencies of each device, click the gear icon button on the left under the Fan Speed scale to open the settings menu, and uncheck the item “ Synchronize settings of identical GPUs «.
In the same window, you can unlock the voltage control and expand the overclocking parameters. To avoid malfunctions, the last option is not recommended when setting up mining farms assembled from radically different models of video cards. Now let’s start setting up msi afterburner for mining. We start with Core Clock and Memory Clock.
Important ! The parameters should be changed gradually by no more than 5-10 points. A sharp change in the frequency of the memory and the core will lead to a freeze, a reboot, a driver crash, and, possibly, to a breakdown of the video card itself.
The easiest way is to first look for the recommended parameters for this GPU model on thematic forums and set them before launching. If the result does not suit you, or you do not find the information you need, select the frequencies yourself. Just keep in mind that memory from different manufacturers, such as Hynix or Samsung, can be installed on the same model, and then the overclocking parameters will be slightly different.
Increasing the memory frequency
This indicator is set on the Memory Clock scale. There are two ways to adjust
- Move the slider manually with the mouse.
- Click on the number at the end of the scale and enter the desired parameter using the keyboard. Then press Enter and apply the set value by clicking the checkmark button in the AF interface. It is located on the right under the cooler settings scale.
The core frequency can be adjusted in the same way. And one more nuance. When setting the memory and core clock for AMD video cards, you simply write the desired values on each scale, for example, 2100, 1100. With Nvidia, everything is a little different, here you add (or subtract) the required number of steps to the factory settings, for example +150, +30.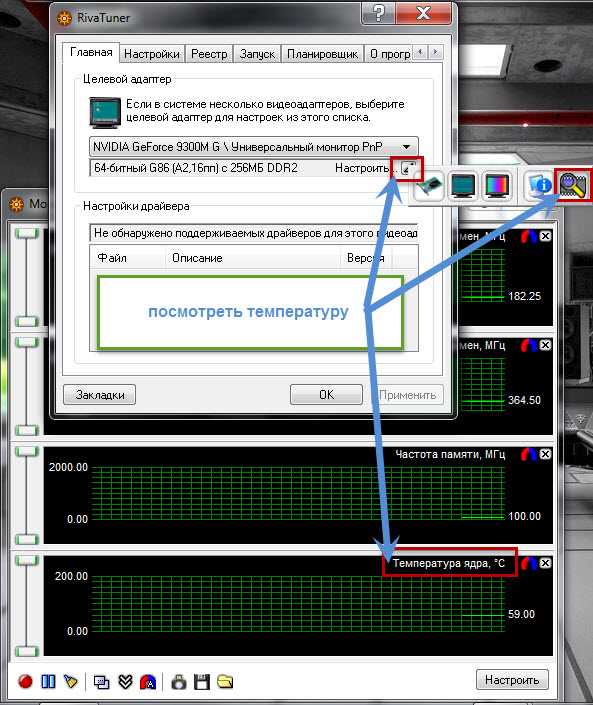
But, it is not enough to find the maximum values at which the farm will work stably. Profit directly depends on energy consumption, and it must be reduced.
Lowering power consumption
AMD Rx 5700XT card consumes 140W in mining according to WhatToMine calculator, but by setting the core voltage to 860mV, you can reduce the power consumption to 115W. To do this, you need to unlock the control of parameter core voltage in the settings and gradually reduce the voltage, observing the stability of the device.
This option may not be available on some GPU models, in which case alternative methods must be used. For example, modify Bios, or write the necessary parameters in the batch file of the miner program. This opportunity is provided by the latest versions of Claymore and Phoenix.
On the left, near the Core Clock scale, there is a button for adjusting voltage parameters depending on the core frequency. In the jargon of the miners, this option is called «whore».
Important! During the «whore» setup, the graphics adapter must not work under load, and the core frequency parameters must be set to zero. After that, click on the label in the form of a step and a window with two curves will open in front of you.
Set the Core voltage to Core Clock ratio, close the window and save the settings. After that, set msi af to the working core frequency and start setting up the cooler.
Optimizing the cooling system
Scale power limit is used to set the power consumption limit. The default is 0(100%). If the video card overheats, try reducing the limit, for example, to -20, and if it gives few shares or the core frequency constantly jumps, add the limit, for example, to +20. If the card is running at a lower voltage, increasing the power limit will not affect power consumption, but lowering it can lead to a loss of hashrate and a decrease in the number of shares.
Setting and parameters
Tuning and overclocking of the video card is done by the user using the sliders located in the central part of the interface. The user can not only overclock the video card, but also lower its performance .
There is an add-on to select the lead GPU when there are two or more on the PC. The program allows you to take screenshots from the screen, as well as display graphs of important parameters on top of other windows.
In order to return to the initial parameters that were set by the manufacturer, it will be enough to press reset button . Where it is located was described above.
What is RivaTuner Statistics Server and how to use it?
RivaTuner Statistics Server is a special program that provides fine tuning and overclocking of graphics accelerators from NVIDIA and AMD. In the graphical interface of this software, you monitor the temperature, core frequency and memory speed of the video card.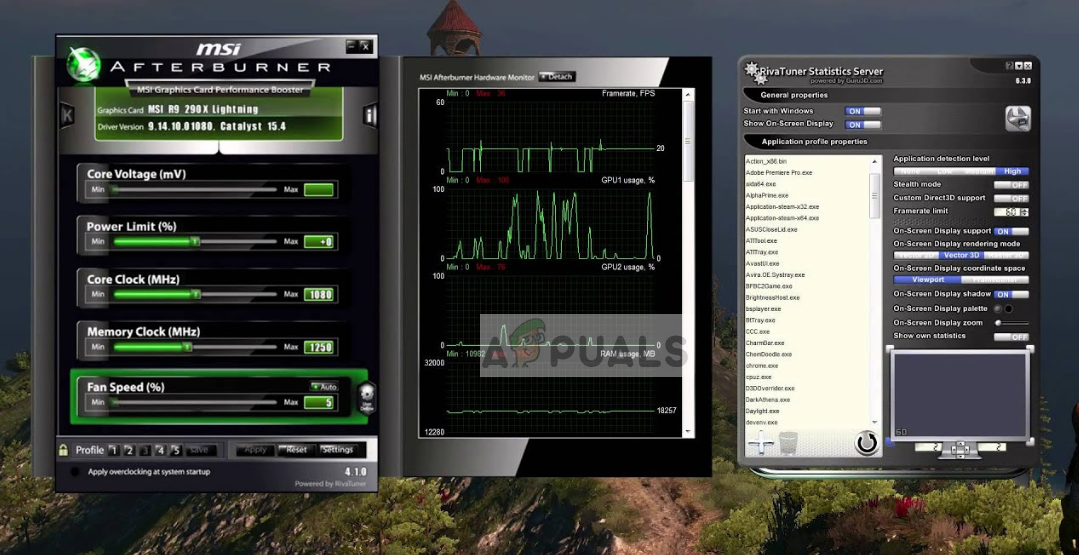
The utility manages the main settings of the video adapter. In the program, you adjust the fan speed, activate a special mode that cools the device better, and also select the «intensity» of the cooling system (in percent) depending on the overclocking mode.
Change voltage parameters
To change voltage parameters, the user must use the first slider from the top in the main window. This slider is initially activated only on MSI video devices. On others, it is blocked.
To unlock you need to do the following:
- Go to « Settings «.
- Check the box « Unlock voltage control «.
- In the drop-down box on the right after the inscription of the designation of this item, select « Extended MSI «.
How to Use MSI Kombuster
So, if you decide to overclock your graphics card, you need to know how to use Kombustor.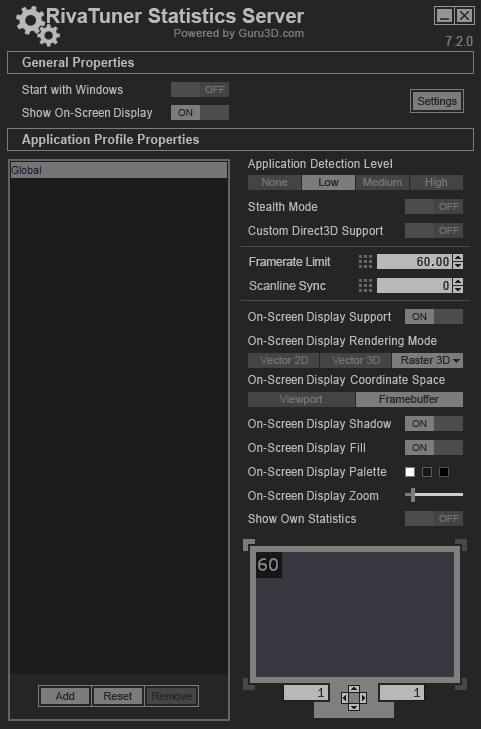
You need to understand how to use Kombustor because before overclocking our card we need to know what performance we are currently achieving at the base levels.
The following short guide will tell you how.
- Open MSI Afterburner
- Near the top, in the center, you should see three buttons. Select the letter “K” The “K” stands for Kombustor and should be highlighted like the rest. If it is not highlighted and cannot be clicked, go to the MSI Afterburner website and download the Kombustor app.
- Click on the «K» icon, which should be above the «core voltage» indicator.
- MSI Kombustor should start immediately and start stress testing your card
- Now you can monitor your GPU temperature, FPS, GPU load and more. This will give you an idea of how your graphics card performs at basic levels.
- After the test is completed or before the test is closed, record the performance data so you can compare it to the overclocked settings with improved performance.
At this point, you’ll want to start the overclocking process. We recommend looking into what other users have achieved by overclocking the same card as you, to make sure you push your card to the limit.
Frequency correction
The slider Core Clock is responsible for the correction of the frequencies of the video card. Due to the large value of the frequency, more information is processed, which means increases the speed of the video processor.
The frequency is increased using the fourth slider from the top. It must be moved to the right by as many points as the user wants to increase the clock frequency.
Cooling settings
The cooler is controlled through the slider under the name « Fan Speed «. The user can activate it using the gear, which is located to the left of it.
And in order to perform a more precise setting, you should enter the “ Cooler ” tab. In it, you can set the fan speed and reduce the noise.
Efficient cooling
To activate the manual change of the variable, click on the gear icon next to the Fan Speed slider.
Fig. 17 — Enabling manual fan speed control
If you want the system to independently adjust the fan speed based on the current temperature of the video card, switch to automatic control of the value by clicking on the Auto icon.
Fig. 18 — Activate automatic fan speed control
In the «Cooler» settings section, you can specify the parameter update frequency and achieve maximum cooling efficiency, minimizing fan bounce.
Fig. 19 — Changing the period for updating data on the current fan speed
Enabling monitoring
To monitor ongoing processes and enable monitoring in the game, as well as to set peak values upon reaching which the program will notify the user, open the tab « Monitoring «.
Here you can also follow the curve of the rotational speed of the cooler after the video card is heated up as a result of the load. In this way, the temperature hysteresis is determined. That is, if the speed increases at a temperature of 60 degrees, then when it drops to 55, the cooler speed should decrease.
Adjusting the fan speed
The next thing to do is to adjust the speed of the video card cooler, and for this you need to open the settings.
Overclocking done by MSI Afterburner will start with the system
To open the program settings, click on the button Settings . A window called MSI Afterburner Properties will open. In this window, you need to go to the tab Cooler 9009eight .
Configuring video card cooling in Afterburner
In the window that opens, check the box next to Enable software user auto mode and a custom graphics card fan speed graph will immediately appear. To build a graph, you need to left-click on the line and, without releasing the mouse button, drag to the right place. In this graph, you need to set the fan speed to 100 percent at a temperature of 85 degrees and above, and the initial fan speed when the computer is idle should be stable and it is individual for each video card. When you build your curve for changing the cooler rotation speed, click the OK button in the window and the settings will close. After that, you need to start some game and play it for 15 minutes. After exiting the game in the monitoring window of MSI Afterburner, you need to make sure that the temperature of the video card has not risen too high. If the temperature rises to 90 degrees at maximum fan speed, then it is not necessary to overclock the video card.
Video capture and screenshot creation
The program has video capture and screenshot creation functions. In order to enable the video recording option from the screen, you need to go to the “ Video Capture ” tab and correctly configure all the parameters:
- Select the codec for recording. Preferably MPEG or H.264. Then the video will be recorded without loss of quality.
- Specify the location where the video will be recorded.
Two sources are allocated for audio recording. Microphone for commentary and system sounds via Direct Sound.
Screenshot capture is also configured in the tab of the same name.
Monitoring
In the Afterbuner settings tab of the same name, you can disable the visualization of unnecessary graphs and specify the peak values of all indicators that are read by the program from the sensors. When the specified value is reached, the application will warn the user about reaching the upper limit, for example, temperature.
Fig. 20 — Remove unnecessary charts from the monitoring window » if they are not set.
Then set the sliders to the values that the user wants to change and test the video card. The test is carried out first by a software tester, then by the FurMark utility.
If the test was successful, save in profile settings .
Stylish design of Afterburner
The default skin for the program is not very convenient to use, so many users immediately change it to be more friendly. To do this, call «Settings» by clicking on the gear icon in the center of the window.
Fig. 6 – Button for calling application settings
Then go to the “Interface” tab and in the third subsection “Skin Properties…” select a more appropriate type of application design. It also indicates its language, temperature format (Celsius / Fahrenheit) and time.
In the «Basic» tab, select the graphics processor to be configured if a pair of video cards is used or, in addition to the integrated one, a discrete one is also installed. If there are two identical devices working in conjunction, we mark the option to synchronize their settings.
Fig.7 — Selecting the default video card
The left panel contains data with numbers about the current value of the frequency of the graphics processor and video memory. To the right, the current temperature and voltage are visualized.
Fig. 8 — Information panel
The central part of the interface is occupied by a frame with sliders, with the help of which the regulation is carried out:
- core voltage;
- power limit;
- boundary temperature;
- graphics core frequency;
- memory frequency;
- cooler speed.