Page not found — FTDI
404
It looks like nothing was found at this location. Maybe try one of the links below or a search?
Newsletter
CountryAfghanistanAlbaniaAlgeriaAmerican SamoaAndorraAngolaAnguillaAntarcticaAntigua and BarbudaArgentinaArmeniaArubaAustraliaAustriaAzerbaijanBahamasBahrainBangladeshBarbadosBelarusBelgiumBelizeBeninBermudaBhutanBoliviaBosnia and HerzegovinaBotswanaBouvet IslandBrazilBritish Indian Ocean TerritoryBrunei DarussalamBulgariaBurkina FasoBurundiCambodiaCameroonCanadaCape VerdeCayman IslandsCentral African RepublicChadChileChinaChristmas IslandCocos (Keeling) IslandsColombiaComorosCongoCook IslandsCosta RicaCote D’IvoireCroatiaCubaCyprusCzech RepublicDenmarkDjiboutiDominicaDominican RepublicEast TimorEcuadorEgyptEl SalvadorEquatorial GuineaEritreaEstoniaEthiopiaFalkland Islands (Malvinas)Faroe IslandsFijiFinlandFrance, MetropolitanFrench GuianaFrench PolynesiaFrench Southern TerritoriesGabonGambiaGeorgiaGermanyGhanaGibraltarGreeceGreenlandGrenadaGuadeloupeGuamGuatemalaGuineaGuinea-BissauGuyanaHaitiHeard and Mc Donald IslandsHondurasHong KongHungaryIcelandIndiaIndonesiaIran (Islamic Republic of)IraqIrelandIsraelItalyJamaicaJapanJordanKazakhstanKenyaKiribatiNorth KoreaSouth KoreaKuwaitKyrgyzstanLao People’s Democratic RepublicLatviaLebanonLesothoLiberiaLibyan Arab JamahiriyaLiechtensteinLithuaniaLuxembourgMacauFYROMMadagascarMalawiMalaysiaMaldivesMaliMaltaMarshall IslandsMartiniqueMauritaniaMauritiusMayotteMexicoMicronesia, Federated States ofMoldova, Republic ofMonacoMongoliaMontserratMoroccoMozambiqueMyanmarNamibiaNauruNepalNetherlandsNetherlands AntillesNew CaledoniaNew ZealandNicaraguaNigerNigeriaNiueNorfolk IslandNorthern Mariana IslandsNorwayOmanPakistanPalauPanamaPapua New GuineaParaguayPeruPhilippinesPitcairnPolandPortugalPuerto RicoQatarReunionRomaniaRussian FederationRwandaSaint Kitts and NevisSaint LuciaSaint Vincent and the GrenadinesSamoaSan MarinoSao Tome and PrincipeSaudi ArabiaSenegalSeychellesSierra LeoneSingaporeSlovak RepublicSloveniaSolomon IslandsSomaliaSouth AfricaSouth Georgia & South Sandwich IslandsSpainSri LankaSt. HelenaSt. Pierre and MiquelonSudanSurinameSvalbard and Jan Mayen IslandsSwazilandSwedenSwitzerlandSyrian Arab RepublicTaiwanTajikistanTanzania, United Republic ofThailandTogoTokelauTongaTrinidad and TobagoTunisiaTurkeyTurkmenistanTurks and Caicos IslandsTuvaluUgandaUkraineUnited Arab EmiratesUnited KingdomUnited StatesUnited States Minor Outlying IslandsUruguayUzbekistanVanuatuVatican City State (Holy See)VenezuelaViet NamVirgin Islands (British)Virgin Islands (U.S.)Wallis and Futuna IslandsWestern SaharaYemenDemocratic Republic of CongoZambiaZimbabweMontenegroSerbiaAaland IslandsBonaire, Sint Eustatius and SabaCuracaoPalestinian Territory, OccupiedSouth SudanSt. BarthelemySt. Martin (French part)Canary IslandsAscension Island (British)Kosovo, Republic ofIsle of ManTristan da CunhaGuernseyJersey
Do not show this pop up again.
This data you have provided for our marketing communications with the latest news, offers, promotion, events and for other purposes described in our privacy policy.
Should I Uninstall Old Graphics Drivers Before Installing New?
-
-
Home -
Partition Magic -
Should I Uninstall Old Graphics Drivers Before Installing New?
By Amy | Follow |
Last Updated
You sometimes are required to reinstall graphics drivers. Here comes the question – do you have to uninstall old graphics drivers before installing new ones. Well, MiniTool would focus on this topic and explore the answer to it.
Why Do You Need to Reinstall Graphics Drivers
The graphics driver is the mediator between the system and the graphics card. Without the necessary GPU software for the PC, you may encounter issues like crashes, screen flickering, stuttering, frame drops, and even artifacts on the monitor.
Besides, GPU drivers are prone to bugs due to frequent updates. Outdated or corrupted GPU drivers result in errors like Nvlddmkm.sys BSOD and NVIDIA settings are not available. Under these circumstances, you need to reinstall graphics drivers.
However, many people wonder that do I need to uninstall old graphics drivers before installing a new card. Well, the section below will explain that for you.
Also read: How to Check If Drivers Are up to Date? Here Are Details
Do You Have to Uninstall Graphics Drivers before Installing New Ones
Do I have to uninstall old graphics drivers? Yes, you’d better to uninstall the old GPU drivers when you buy a new GPU. If you don’t uninstall old graphics drivers, you may encounter driver conflicts after installing the new drivers.
In addition to that, it is very likely that your new GPU won’t work properly because of the old drivers. You are recommended to uninstall old graphics drivers before installing new in the following two cases.
- The graphics drivers aren’t updated for quite a long period of time.
- The new GPU is pretty new and the previous GPU is very old not even in the market for sale.
Also read: Here Are 4 Solutions to the MHW Graphics Device Crashed Error
How to Reinstall Graphics Drivers Correctly
Here’s the step-by-step tutorial on how to reinstall graphics drivers correctly.
Stage 1: Check the Specs of Your Graphics Card
To get the new GPU properly work in your computer, you should get a compatible one. For that, you need to check the specs of the current GPU before buying a new GPU. By doing so, you can ensure the new GPU fits your computer.
Tip: Since most graphics cards plug into the PCI-E slot and almost all motherboards have this feature, it won’t be a big issue. To ensure that your PSU can power the new graphics card, you should consider the total power consumption of your CPU, RAM, motherboard, and other components of your PC while buying the new GPU.
You can find the specs of your graphics card via these steps.
Step 1: Open the Run window by pressing Windows and R keys, and then type dxdiag and hit Enter.
Step 2: In the DirectX Diagnostic Tool window, navigate to the Display tab. Then you can view all the information about your graphics card.
Stage 2: Uninstall Old Graphics Drivers
You are recommended to uninstall old graphics drivers before putting the new graphics card in your computer. Though you can skip this step technically, it sometimes could cause some issues while installing the new card.
These steps show you how to uninstall graphics drivers.
Step 1: Right-click on the Windows icon on the desktop and click Device Manager.
Step 2: Double-click Display adaptors to expand it. Then right-click on your graphics driver and click Uninstall device.
Step 3: In the prompted window, check the delete the driver software for the device checkbox and click Uninstall to confirm the operation.
Step 4: Then follow the on-screen instruction to finish the process.
Stage 3: Install the New Graphics Card
Now, you can install the new graphics card to your PC. To do that, you can refer to these steps.
Step 1: Turn off the computer and detach all the power cables.
Step 2: Open the case of your PC with a screw.
Step 3: Turn the computer on its side to make the motherboard face upwards.
Step 4: Disconnect power cables to the graphics card. Look the back of the computer and then you will see that the graphics card is screwed into the case. Remove screws and put them at a safe place.
Tip: The graphics card should be found easily as it is one of the biggest components inside.
Step 5: Remove the graphics card.
Step 6: Take out the new graphics card and remove all packaging including plastic sheets stuck to the main body.
Step 7: Slot the new graphics card into the unoccupied PCI-E slot. Usually, you will hear another click after it is slotted in.
Step 8: Reclaim the screws and fasten the graphics card. Then plug int the power cables to the graphics card.
Tip: Ensure that every power port is occupied and hooked to PSU. The graphics card requires a 6-pin or 8-pin connector or even multiple power connectors.
Step 9: Reattach the case and put your computer upright. Connect power cables to the power source and turn on PC.
Stage 4: Download and Install New Graphics Drivers
After your computer boots up, the graphics card can run on basic drivers offered by Windows 10. To get the optimal performance, download Nvidia or AMD drivers from their official websites and then follow the on-screen instruction to install.
Do I need to uninstall old graphics drivers before installing a new card? This post has made a reply. You can check the answer and follow the given guide to upgrade your graphics drivers.
About The Author
Driver uninstallers
Contents
- Display Driver Uninstaller
- Driver Fusion
- Driver Sweeper
- Driver Magician
- Revo Uninstaller
- Driver Easy
- FAQ
9000 5 Device Cleanup Tool
As you know, for the correct operation of the equipment installed in the computer or connected to it, it is necessary to have special software — drivers. Unfortunately, sometimes conflicts arise between several drivers or even different versions of the same driver, affecting the operation of the entire system. To avoid this, it is recommended to remove from time to time those software components that are not used.
To facilitate this process, there is a category of software, the most worthy representatives of which are presented in this material.
Display Driver Uninstaller
The program is designed to remove video card drivers from the most famous manufacturers, such as nVidia, AMD and Intel. In addition to the drivers themselves, it also removes all additional software that is usually installed «into the load».
Also in this product you can get general information about the video card — its model and identification number.
Download Display Driver Uninstaller
Driver Fusion
This software product is designed not only and not so much to remove drivers, but to automatically update them and obtain information about them and about the system as a whole.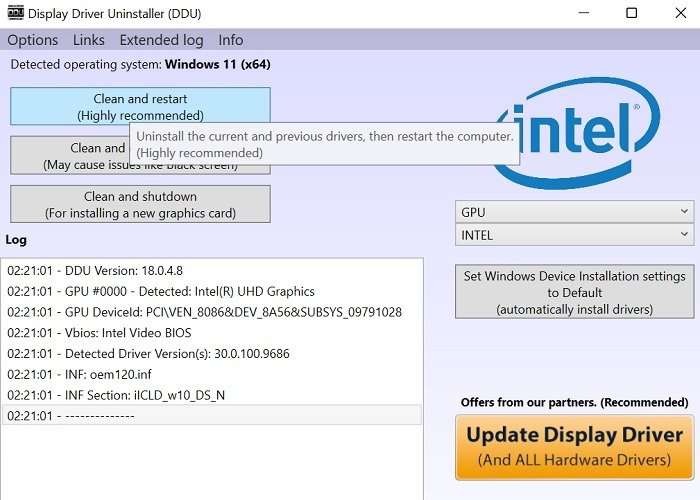 There is also the possibility of working in manual mode.
Here you can save objects on the desktop.
Download Driver Fusion
Some drivers can be removed manually using the tools built into the operating system, but in order to control the provision of all equipment, it is better to use special programs.
Driver Sweeper
Driver Sweeper is a highly specialized software that is mainly designed to remove a wide variety of drivers on a PC. Aimed at ordinary users who do not want to deal with manual uninstallation, but are simply looking for a method to quickly clean up unnecessary device files with a minimum number of steps. The Driver Sweeper interface consists of a main menu and several sub-windows designed to customize the behavior of the program itself. Just in the main menu, you see all detected drivers, you can select any number of them with checkmarks and start uninstallation. This software does not guarantee complete cleaning of traces of equipment, however, it does an excellent job of removing certain versions of drivers for subsequent installation of the latest ones.
Additional features of Driver Sweeper include the presence of an activity log, so you will always be aware of what changes have occurred during the last session. The software also offers access to a tool for saving positions and the number of shortcuts on the desktop. You back them up and restore as needed. This is mostly true for those users who, after working with a video card driver that provokes a change in screen resolution, are faced with the fact that the icons on the desktop change their original position. Driver Sweeper is distributed free of charge, has support for the Russian interface language, does not take up much space on a PC and is compatible with all current versions of Windows.
Download Driver Sweeper
Driver Magician
Next, we suggest stopping at another free software aimed exclusively at working with drivers. Driver Magician can be used as a complete solution for uninstalling and installing drivers. The software correctly scans all connected equipment, including peripherals, and deletes files with virtually no traces. Along with this, batch uninstallation is also supported, if you suddenly want to get rid of a whole pack of drivers that have become unnecessary. The Driver Magician interface is quite simple, divided into thematic sections and has support for the Russian language, so even those who have not previously encountered such software will not need to understand how to use the application.
Let’s touch on additional features of the Driver Magician, which can also become useful during the interaction. First of all, it is worth noting that after removing the drivers, you can open the software again and run a scan for updates. Most likely, the program will detect all the same devices that you have worked with before and offer the latest drivers suitable for them. Before uninstalling, you can make backup copies of the drivers so that if necessary, restore them in one click. Driver Magician’s database of drivers is taken from the servers of the developers themselves, so the software is constantly updated and you can be sure that the latest versions of files will be offered for installation. In addition, there is a button directly in the program that allows you to quickly check for updates to the database via the Internet.
Download Driver Magician from the official website
Revo Uninstaller
A program called Revo Uninstaller is familiar to many as a tool for removing applications on a computer. However, some drivers are also displayed in the list of programs available for removal, and Revo Uninstaller allows you to get rid of them both using the built-in uninstallers, initiating their launch, and through its own tools, cleaning directories and registry entries. The only drawback of Revo Uninstaller is that not all drivers can be detected using this method, so you won’t see some of them in the list. For a complete list of applications available for removal, including drivers, you will need to go to section «Uninstaller» and check the boxes for uninstallation, then confirm this process.
In addition, the free version of Revo Uninstaller has tools for cleaning up PC junk, managing startup and superficial threat analysis. All this makes the program a comprehensive solution that can be suitable for a variety of tasks. In the Revo Uninstaller review article at the following link, the reader is invited to learn about all the features of this software, as well as compare the free version with the Pro version in order to understand whether it is worth spending money on purchasing a full license.
Download Revo Uninstaller
Device Cleanup Tool
Device Cleanup Tool is one of the simplest programs in terms of supported functions, which we will discuss in this material. Its main purpose is to remove all traces of device usage in the operating system. This process means deleting references from the registry, cleaning files, all entries in the «Device Manager» , as well as a complete uninstallation of the driver. Such software is great in cases where you have problems replacing components or new versions of drivers do not want to be installed after manually removing the previous ones.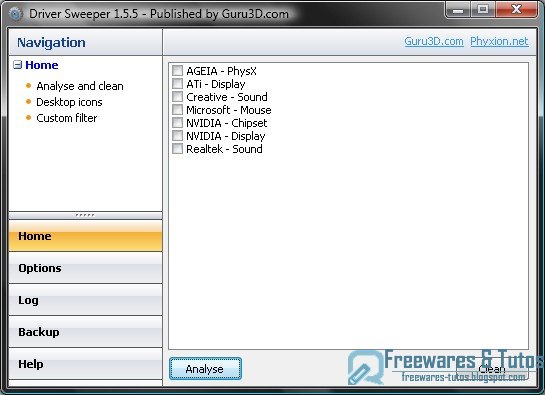
The principle of working with the Device Cleanup Tool is as easy as possible, and you just see the full representation of the interface in the screenshot above. You just need to run the software, wait for the device scan to complete and select the one you would like to get rid of from the list. After launch, the process of complete cleaning of hardware references in the operating system begins, along with the removal of drivers. Keep in mind that you will not be able to roll back the changes, except perhaps by completely reconnecting the equipment.
Download Device Cleanup Tool from the official site
Driver Easy
In conclusion, we recommend that you familiarize yourself with the Driver Easy program, which is positioned as a tool for updating drivers. Supports almost all types of devices that are standard components or peripherals. This program is in our list only because with its help, after the standard removal of drivers manually (the easiest way to do this is through «Device Manager» ), you can quickly start scanning and install the appropriate file versions, if this was the purpose of the preliminary uninstallation.
The Driver Easy interface is designed in such a way that you can immediately get the basic information about the components, and then decide which updates to install. In addition, information about the current version of the driver and available in the database is always displayed, so you can make flexible decisions about installing different software builds.
Download Driver Easy from the official website
How to remove the driver from a computer on Windows 11?
- Standard uninstall of drivers via Device Manager
- Using utilities to uninstall drivers
- Manually uninstalling drivers
- How do I install a driver using DriverHub?
To fix problems in the PC, reinstalling drivers often helps, which implies first removing them from the system. If you try to install the driver over the one already installed on the computer (that is, without first removing it), you can only worsen the situation. And it’s not a fact that the user will be able to do this, because.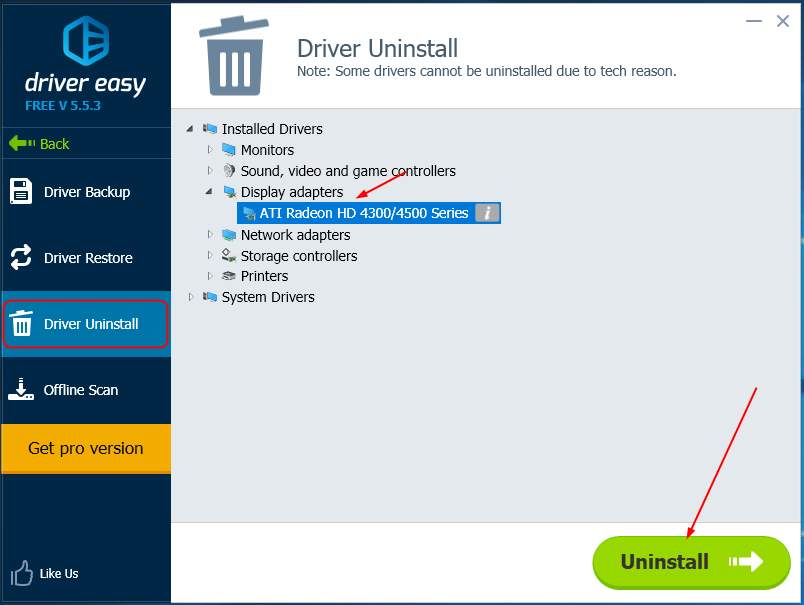 the operating system may block the installation of the driver due to the presence of the old one.
There are three ways to remove drivers in Windows 11 operating systems:
- Standard removal through Device Manager or by uninstalling a program designed to work with a particular device (drivers are also removed along with the program).
- Using specialized utilities to uninstall drivers.
- Manual removal of drivers using the Windows Terminal (PowerShell).
Inexperienced users may have a question about the advisability of using the 2nd and 3rd methods, because there is a standard procedure. As practice shows, some drivers simply «do not want» to be deleted after Device Manager . It is in such situations that you have to act outside the box — either use utilities or resort to a manual method.
Standard uninstallation of drivers via Device Manager
Let’s consider the standard method of uninstalling drivers using the video card software as an example. To begin with, it is worth trying to uninstall the program (or several) responsible for managing the device (or setting up the driver). For this:
- Open Windows Control Panel from the Start menu or using the system program Run as follows: press the keys Win + R the displayed window and press OK .
0
- In the window Control Panel click on the element Uninstall a program (if this element is missing, change the view mode of the Panel elements to Category in the upper right corner):
- The window that opens displays a list of programs installed on the computer. We are interested in applications related to the device whose driver needs to be removed. In our case, we are dealing with a graphics adapter from NVIDIA. Find the software related to the video card:
- In the image above, all three graphics card programs are highlighted — the graphics driver, the proprietary NVIDIA GeForce Experience utility, and the PhysX software.

- To remove the program, simply right-click on the name of the video card driver and select the only item in the drop-down menu Change/Remove . Follow the instructions on the screen, after which the computer will restart.
- Uninstalling the driver usually uninstalls all additional graphics card software. If this does not happen (that is, the port still remains the software from the video card in the list of installed Windows programs after rebooting the PC), remove it in the same way as the driver itself.
Now consider removing drivers from the system application Device Manager . For example, let’s also take the video card software:
- To launch Device Manager , you can also use the menu Start or Control Panel . Press the key combination Win + R , and in the window that appears Run enter the command msc , then click OK .

- In the window that opens, expand the Video adapters section. It will display the name and model of the video card.
- Right-click on this name, then select the option Delete from the context menu. This will open a dialog box. Check the box next to the item (if any) Delete driver software and click OK .
- In some cases, before uninstalling, the manufacturer asks you to indicate the reason for uninstalling the driver — select any option and press OK .
After uninstallation, the computer will need to be restarted, after which you can proceed to install the new driver.
Using utilities to remove drivers
All existing utilities for removing drivers can be divided into two conditional categories — universal and highly specialized. The former are able to remove the drivers of any devices, the latter — only certain ones. Let’s give a few examples and at the same time consider working with such programs.
Driver Fusion
The Driver Fusion multi-functional utility allows you to uninstall device drivers by deleting their files from disk and cleaning registry entries. The program works with all key devices, but from a limited number of manufacturers (with the most famous ones) — video cards, sound, game and video devices, keyboards, storage controllers, printers, network cards, etc. It also allows you to remove branded and auxiliary applications that are attached to drivers (for example, the same NVIDIA GeForce Experience) from your computer.
Driver Fusion is easy to use. To uninstall a driver using it, just do the following:
- Go to the tab Driver Cleaner , expand the category of devices that the driver to be removed belongs to, and then select the manufacturer from the list. For example, let’s remove the sound card driver:
- As you can see in the screenshot above, when choosing the manufacturer «ASUS», the label «No entries found» was displayed on the right side of the Driver Fusion window.
 This means that there are no drivers from ASUS audio cards in the system. We move on to the next manufacturer — and so on until a list of driver files and registry entries about it is displayed on the right. In our case, this is «Realtek»:
- To remove the driver, you just need to click the button Clear in the upper left corner and then agree to the removal:
- Done.
Driver Fusion is a shareware program. Without purchasing a license, it may not be able to remove some drivers.
Display Driver Uninstaller
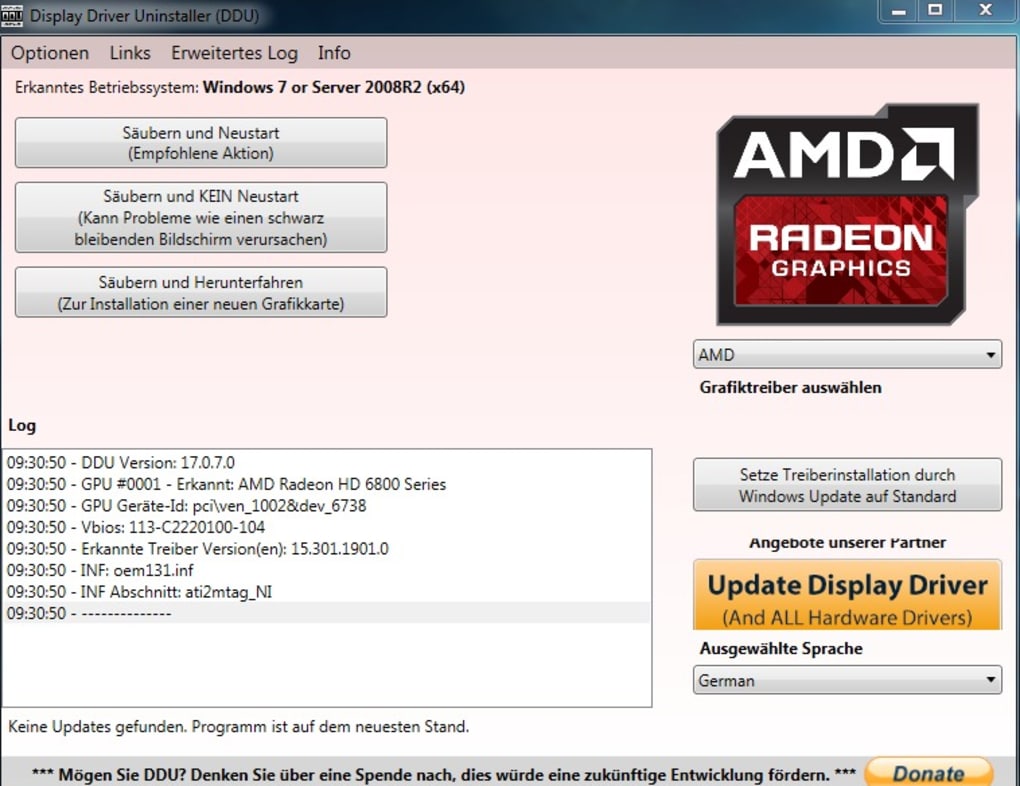
Display Driver Uninstaller (DDU) is a highly specialized program for removing NVIDIA, Intel and AMD video card drivers, as well as Realtek and Sound Blaster audio cards from your computer. The utility is distinguished by the ability to delete not only the main files, but also all traces left by the driver in the system — temporary folders, cache files, registry entries, configuration files, etc. Also, with its help, you can remove proprietary software from the video card.
Uninstalling drivers using the Display Driver Uninstaller looks like this:
- It is recommended that you run the Display Driver Uninstaller from Windows Safe Mode. So she can work more efficiently.
- At the first start, a window with uninstallation settings will be displayed on the screen. You can leave everything as it is or check the boxes next to those options where they are not. For example, with default settings, Display Driver Uninstaller does not uninstall NVIDIA’s PhysX software.
- Next, in the right part of the window, select the device type from the corresponding list:
- For example, we will install Video card , and in the list of manufacturers we will select NVIDIA . Immediately after that, you can start uninstalling the driver by clicking on one of the buttons on the left (they differ only in the action that the program will perform after uninstallation — restart or turn off the computer or do nothing, but simply remove the driver).
 The uninstallation process will be displayed in block Magazine . When everything is completed, the program will display a corresponding message.
We have considered working with driver removal programs, moving on to the manual method.
Manual removal of drivers
In particularly difficult situations (for example, when the driver cannot be removed because it is blocked), you can resort to manual uninstallation of software from any device. Either the Windows command line or the system PowerShell application will help with this. It is more convenient to work with the latter, and we will consider it:
- First you need to run PowerShell as an administrator. In Windows 11, just right-click on the Start icon and then select Windows Terminal (Admin) from the menu that appears.
- Next, in the window that appears, paste one of the two following commands (you can both in turn), then press Enter :
Get-WmiObject Win32_PnPSignedDriver| select DeviceName, DeviceClass, Manufacturer, DriverVersion, DriverDate,InfName|Out-GridView
Or
Get-WindowsDriver —Online| select Driver, ClassName, BootCritical, ProviderName, Date, Version, OriginalFileName|Out-GridView
- A new window will appear on the screen.
 The first command will display a list of all drivers installed in the system (including built-in ones), the second one will list only those that were installed after Windows was installed (that is, third-party ones). This is how the window with the list of third-party drivers looks like:
- First you need to determine the name of the driver to be removed (displayed in the column Driver ). To do this, you need to focus on the name of the software developer / vendor (listed in column ProviderName ) and device type / class (column ClassName ).
- For example, let’s remove the driver called «oeminf», which is one of the software components of the Intel chipset. To do this, go back to the PowerShell window and paste the following command into it:
pnputil.exe /delete-driver oem21.inf
- Result: Driver package removed successfully:
A few important points for manually removing drivers via PowerShell:
- Some drivers require the use of the /force key in the command that should be written after the driver name, i.
 e.:
e.:
pnputil.exe /delete-driver oem21.inf /force
- If the driver cannot be uninstalled even when using the /force key, you need to boot the operating system in safe mode.
- Care must be taken when uninstalling drivers on which the initial boot of the operating system depends. For such drivers, parameter BootCritical is in the state True .
After removing the drivers using any of the methods discussed above, the computer should be restarted, and only then proceed with installing a new one. If the driver being installed is the same one that was just removed, it is better not to use it. You can download the new version yourself from the official website of the device manufacturer or use program DriverHub , which we will do everything ourselves in automatic mode.
How to install the driver using DriverHub?
DriverHub is a free driver manager for installing and updating software for computer devices from various manufacturers.