How to Format Your Hard Drive Using DiskPart and Command Prompt?
Yesterday I was trying to format the hard drive of my computer using DiskPart. But I am not sure about the detailed steps. Can anyone guide me on how to format using DiskPart?
Hard drive formatting is always crucial, and if not done appropriately, it can even make it non-functional. But performing it with DiskPart or command prompt can save your hard drive from this risk. A formatted drive is almost the same as the new drive because formatting clears all the stored media. This article will guide you through the DiskPart commands and ways of formatting hard drive with DiskPart and Command Prompt.
- Part 1: How to Clean Hard Drive Using DiskPart Quick Format Command?
- Part 2: How to Format Hard Drive Using Command Prompts in DiskPart?
- Part 3: How to Delete Hard Drive Partition Using DiskPart?
- Part 4: What Are the DiskPart Commands?
- Part 5: DiskPart Format Command Options
How to Clean Hard Drive Using DiskPart Quick Format Command?
Before learning the steps for cleaning the drive, let’s first understand what does DiskPart clean do? When you use the «clean» command in Diskpart, the utility software will clean the selected disks and information from the hidden sectors. All the stored data gets deleted, and you can’t undo it. It is recommended to take a backup first if there is some important data in the drive.
The time taken by the complete process depends on the disk size. To clean the drives follow the following steps:
Step 1 Open Command Prompt
Search command prompt, right-click, and run it as an administrator.
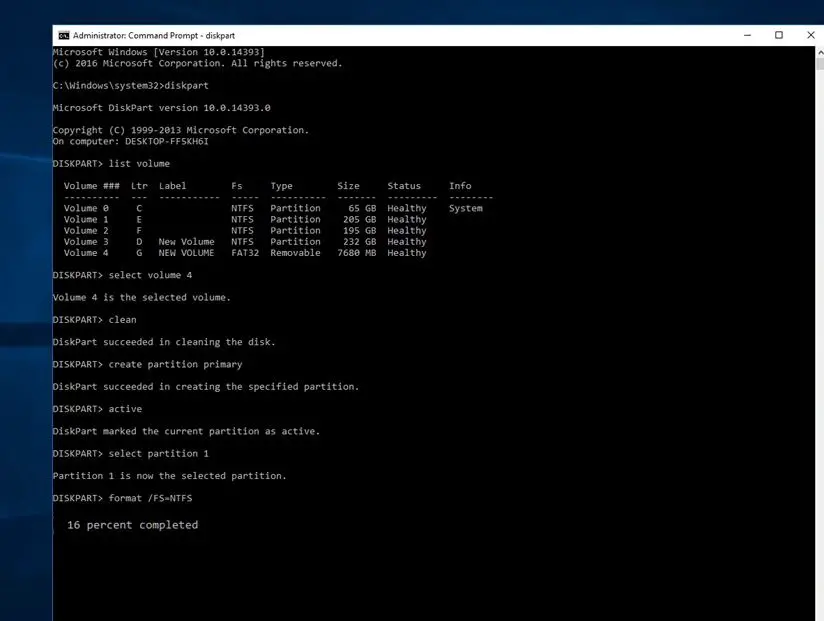
Step 2 Type diskpart
Type the command as mentioned above and press ‘Enter’ to launch DiskPart.
Step 3 Type «list disk»
The command will list all the drives that are available with the computer. After typing the command, press ‘Enter’.
Step 4 Select the Drive by typing select disk *
The * mentioned in the command needs to be replaced with the drive number that requires cleaning. Make sure you put the right number else you will end up cleaning the wrong drive.
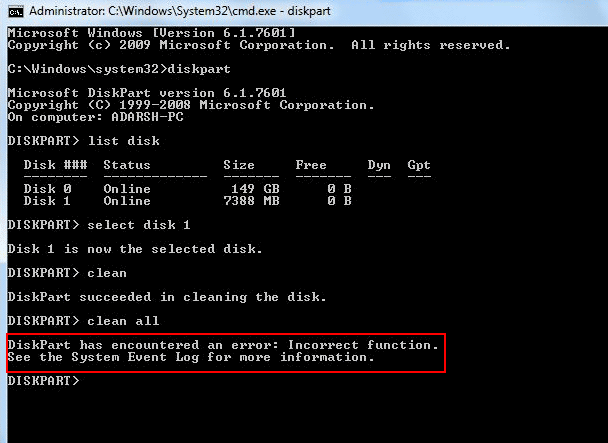
Step 5 Type «clean»
The «clean» command will wipe out your required hard drive. Press »Enter» after typing it.![]() It will clean up all the files and folders of the drive permanently.
It will clean up all the files and folders of the drive permanently.
Step 6 Close the Command Prompt after Successful Completion of Disk Cleaning Once the cleaning process completes, the command prompt will show the message that DiskPart cleaning is successful. Close the window from the button located up in the right corner.
Now you can reinitialize, partition and even format the cleaned drive.
Free Download | Win Windows Version Free Download | Mac Mac Version
How to Format Hard Drive Using Command Prompts in DiskPart?
While formatting a hard drive, you can clean both storage media- internal as well as external. But before beginning the formatting, you need to complete the cleaning of the drive first. The steps are the same as explained above. Once the disk cleaning is successful; you can continue with the formatting of the drive.
To understand how to format using DiskPart look for detailed steps below:
Step 1 Open the command prompt and run as administrator.
Step 2 Type diskpart and press ‘Enter’. It will launch the DiskPart.
Step 3 Type list disk to let the Diskpart list all the drives of the computer.
Step 4 Select the required drive by typing select disk *, here * is the number of the drive that will undergo formatting.
Step 5 Clean the files and folders on the selected drive using the clean command.
Step 6 Type list disk and press ‘Enter’ to confirm the drive that needs to be formatted is still selected. Here the output that comes out has an asterisk (*) before the selected drive.
Step 7 Create a new partition by typing create partition primary and press ‘Enter’.
Step 8 Select the created partition and press ‘Enter’ after typing the command select partition 1.
Step 9 Type active so that the selected partition comes in an active state. Press ‘Enter’ after that.
Step 10 Format the drive with the command format fs=ntfs. Press ‘Enter’ to begin the process.
Step 11 Assign a letter to the drive, to make it available in the File Explorer and then exit.
Press ‘Enter’ after typing assign letter=*, type your preferred letter in place of * that you want to assign to the partition.
Then to exit the DiskPart, type exit and ‘Enter’.
After completing all these steps, the drive is available at File Explorer. You can now start storing files on the drive.
How to Delete Hard Drive Partition Using DiskPart?
Sometimes for better management, you need to create more free space by deleting partitions. You also want to delete them because you don’t require them anymore or it has become damaged or corrupted. Follow the listed steps to delete the partition with DiskPart.
Step 1 Launch DiskPart in the command prompt by typing diskpart. Press ‘Enter.’
Step 2 Type list disk and then press ‘Enter’ to list down all the available partitions.
Step 3 Select the disk to delete your required partition. Type select disk *, (*) is the disk number. After typing the command press ‘Enter.’
Step 4 Type list partition and then ‘Enter’ to view all the partitions.
Step 5 Now select the partition to be deleted by typing select partition *, again * here is the number of the partition. ‘Enter’ after typing the command to execute it.
Step 6 Now delete the partition by typing delete partition and begin the deletion by pressing ‘Enter.’
If the dynamic disk is in use, use the delete volume command for the deletion process.
What are the DiskPart commands?
DiskPart is a command-line tool that does disk management with a simple Command Prompt. You can do disk listing, formatting, partitioning, and partition deletion with this tool. Several DiskPart commands are used to execute these functions.
The tool first came in Windows XP, and now it is available on almost all operating systems of Microsoft- Windows 2000, XP, Vista, 7, 8, and 10. Before initiating with Diskpart commands on Command Prompt, it is necessary to make a list and then focus by selecting an object. In this way, DiskPart commands will act on the focused object.
As Diskpart gets loaded on the Command Prompt,which is also known as CMD. The CMD is referred to as a command-line interpreter, available in all operating systems. The program allows you to ‘Enter’ and execute commands. You will be using the platforms like DiskPart and Command Prompt for disk formatting. It is the process of configuring storage mediums like a flash drive and a hard disk drive. During the formatting process, any of the documents or files that are already saved on the drive gets deleted. Usually, it is done before the installation of the operating system, and many times, it is also required for creating an additional storage space too.
Note!
Your stored data gets erased when you format the drive using CMD. Though it can be retrieved by using the recovery software, taking a backup is still advised.
If you have lost your data through the formation, it is strongly recommend that you use Wondershare Recoverit to regain your data. It allows 100MP free recovery amount. Besides, it can save files and videos from crashed hard drive or computer. Download it through the following link.
Free Download | Win Windows Version Free Download | Mac Mac Version
DiskPart Format Command Options
DiskPart format command that runs on command prompt is used for formatting internal and external storage mediums of hard drives. The command is available in all Windows operating systems like Windows 10, 8 7, Vista, XP, and other older versions too. You can use it to deal with unlocked files means the files that are not currently in use. However, the syntax for the command differs from one operating system to another.
The format command syntax is as following:
format drive: /* /fs:file-system /r:revision /d /v:label /p:count /?
Here * refers to q, c, x, and l
Now understand the syntax in detail:
- drive:
You will write here the letter that represents the drive or the partition for which you require formatting.
- /q
It represents drive will undergo DiskPart quick format without searching a bad sector.
- /c
It will enable compression of folder and file. The option is available only when the drive is being formatted to NTFS (New Technology File System). It is a primary file system that is used in Windows 10, 8, 7, Vista, XP, 2000, and NT operating systems.
- /x
If there is the requirement to dismount the drive before formatting, then this command is used in the format.
- /l
While formatting with NTFS, the command is used on dedupe-enabled drives that consist of files with size more than 100GB.
- /fs:file-system
You will add the file system to which you want the format the drive. The file systems can be FAT, exFAT, FAT32, UDF, or NTFS
- /r: revision
It is used to focus the formatting on a specific UDF version. The options include 1.02, 1.50, 2.00, 2.01, and 2.50. If you don’t specify any revision, by default it will take the 2.01 version. When you are using /fs:udf only then you can use /r: command.
- /d
When formatting is done with UDF v2.50 only then this command can be used to duplicate metadata.
- /v:label
It is used to specify the volume label. If you have not mentioned it before formatting, the systems will enquire about it after the completion of the process.
- /p:count
It will write zero once to all sectors of the drive. If you specify the count, it will write some random number on the drive, as many times as you mention. The random number writing will start once the zero writing completes.
/p cannot be used with /q.
- /?
It is used to show help for the several options of commands.
Closing Words
If your hard drive is causing any trouble, you can now quickly fix it by using DiskPart. Follow the steps explained above to clean and format the disk using DiskPart, and also to delete the hard drive partition. Before performing any of these actions, it is necessary to take a backup of the data. Somehow if you forgot taking backup and lost any of your important files during DiskPart commands execution, don’t panic. Use Recoverit Mac Data Recovery software to retrieve your lost data.
Free Download | Mac Free Download | Win
How to use DiskPart to clean and format drive not working on Windows 10
(Image credit: Future)
On Windows 10, when an external drive (USB flash drive, SD card, or secondary drive) stops working due to data corruption or another logical problem, you can use the DiskPart tool to erase everything and start from scratch again.
DiskPart is a command-line tool to manage drives, partitions, volumes, and virtual disks through Command Prompt, which usually works better than other tools, such as Disk Management and the Format feature available in File Explorer.
You can have different types of partition styles, including Master Boot Record (MBR) and GUID Partition Table (GPT). The MBR is the legacy partition style for the standard Basic Input/Output System (BIOS). The GPT is a newer partition style typically found in Unified Extensible Firmware Interface (UEFI) devices. The difference between the two is that GPT is meant to replace MBR since it supports more than four partitions, and it’s required on drives with more than 2TB of space. You usually want to use GPT, but MBR is also acceptable for external drives. These instructions will help you use DiskPart on either partition style.
Also, these instructions will erase everything on the selected drive, and you cannot undo the changes. If the drive is still accessible, it’s recommended to back up the data before proceeding. If you have multiple drives connected to your device, disconnect them to avoid selecting the wrong device.
This guide will walk you through the steps to use the DiskPart tool to clean and format a hard drive to fix data corruption and other problems on Windows 10.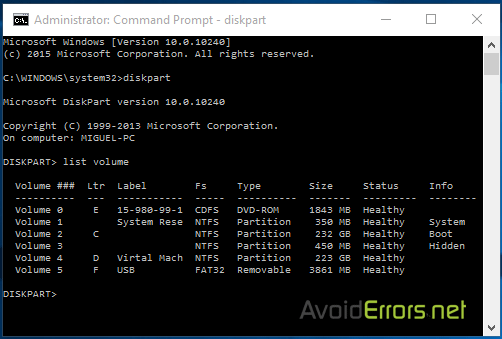
How to fix drive (MBR) problems with DiskPart on Windows 10
To use DiskPart to fix storage drive issues on Windows 10, use these steps:
- Open Start.
- Search for Command Prompt, right-click the top result, and select the Run as administrator option.
- Type the following command to launch DiskPart and press Enter: diskpart
- Type the following command to list all the active drives and press Enter: list disk
- Type the following command to select the drive to clean and press Enter: select disk DISK-NUMBER
- In the command, replace DISK-NUMBER with the drive number you want to repair as it appears in the «Disk» column. If you do not perform this step correctly, you could erase the wrong drive. Proceed with caution.
- Type the following command to wipe out the drive and press Enter: clean
(Image credit: Future)
- Type the following command to confirm the drive is still selected, and press Enter: list disk
- Quick note: The output should include an asterisk (*) next to the selected drive.
 If the correct storage is not specified, perform step 5 again.
- (Optional) Type the following command to convert the drive to an MBR partition style and press Enter: convert mbr
- Quick note: This step is only required if the drive is currently set GPT, and you must use MBR partition style. If the partition is already MBR, you don’t need to run the command, but running the command won’t affect the process. You should be able to determine the partition type with the list disk command. If the drive doesn’t have a GPT mark (*), it’s an MBR partition.
- Type the following command to create a new partition and press Enter: create partition primary
- Type the following command to select the new primary partition and press Enter: select partition 1
- Type the following command to make the partition active and press Enter: active
- Quick tip: You only need to set a partition as active when using the MBR (Master Boot Record) partition style.
 You can determine if the drive uses an MBR or GPT partition style with the list disk command. If the partition has a mark in the GPT column, it’s not an MBR partition. If you need to set up a GPT partition style, use the other steps (see below).
(Image credit: Future)
- Type the following command to format the partition using the NTFS file system, set a drive label, and press Enter: format fs=FILE-SYSTEM label=DRIVE-LABEL quick
In the command, replace FILE-SYSTEM with the name of the file system you want to use, such as NTFS or FAT32, and replace DRIVE-LABEL with the name of the drive as you want it to appear in File Explorer. The quick option is optional to perform a format more quickly. However, if you are unsure about the drive’s condition, it is best to skip the option. Remember that depending on the hard drive’s size, the format could take a long time. This example formats the drive using the NTFS file system and names the partition «myData»: format fs=ntfs label=myData quick
(Image credit: Future)
- Type the following command to assign a letter and make the drive available in File Explorer, and press Enter (as needed): assign letter=DRIVE-LETTER
In the command, change DRIVE-LETTER for the letter you want the drive to use, which is not assigned to another device. This example assigns the «G» letter: assign letter=g
- Type the following command to terminate DiskPart and press Enter: exit
- Type the following command to close Command Prompt and press Enter: exit
Once you complete the steps, if the drive does not have physical issues, it should now be available through File Explorer, and you can begin to store files on it.
If you determine that the external storage has an issue related to hardware and you need a replacement, we recommend the Western Digital My Passport because it offers up to 5TB of reliable storage, and it has a compact design at a reasonable price.
Western Digital My Passport
Compact, affordable, and a lot of storage
It isn’t as fast as an SSD, but the Western Digital My Passport is an excellent option for anyone who needs to store files without breaking the bank.
How to fix drive (GPT) problems with DiskPart on Windows 10
To use DiskPart to fix drive issues with GPT partition style, use these steps:
- Open Start.
- Search for Command Prompt, right-click the top result, and select the Run as administrator option.
- Type the following command to run DiskPart and press Enter: diskpart
- Type the following command to list all the active drives and press Enter: list disk
- Type the following command to select the drive you want to clean and press Enter: select disk DISK-NUMBER
In the command, replace DISK-NUMBER with the drive number you want to repair as it appears in the «Disk» column.
- Type the following command to wipe out the drive and press Enter: clean
(Image credit: Future)
- Type the following command to confirm the drive is still selected and press Enter: list disk
- Quick note: The output should include an asterisk (*) next to the selected drive.
 If the correct storage is not specified, perform step 5 again.
- Type the following command to convert the partition style to GPT and press Enter: convert gpt
- Type the following command to create a new partition and press Enter: create partition primary
- Type the following command to select the new primary partition and press Enter: select partition 1
- Type the following command to format the partition using the NTFS file system, set a drive label, and press Enter: format fs=FILE-SYSTEM label=DRIVE-LABEL quick
In the command, replace FILE-SYSTEM with the name of the file system you want to use, such as NTFS or FAT32, and replace DRIVE-LABEL with the name of the drive as you want it to appear in File Explorer. The quick option is optional to perform a format more quickly. However, if you are not sure about the drive’s condition, it is best to skip the option. Remember that depending on the hard drive’s size, the format could take a long time. This example formats the drive using the NTFS file system and names the partition «myData»: format fs=ntfs label=myData quick
(Image credit: Future)
- Type the following command to assign a letter and make the drive available in File Explorer, and press Enter: assign letter=DRIVE-LETTER
In the command, change DRIVE-LETTER for the letter you want the drive to use, which is not assigned to another device. This example assigns the «W» letter: assign letter=w
- Type the following command to terminate DiskPart and press Enter: exit
- Type the following command to close Command Prompt and press Enter: exit
After you complete the steps, the drive should be fixed with a GPT partition style and accessible from File Explorer.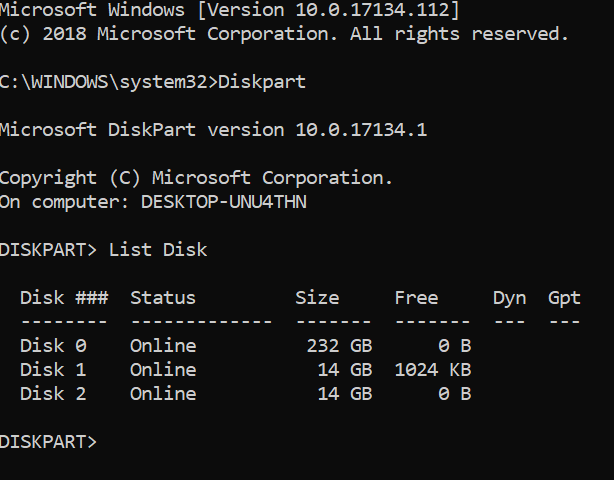
More resources
For more helpful articles, coverage, and answers to common questions about Windows 10 and Windows 11, visit the following resources:
- Windows 11 on Windows Central — All you need to know
- Windows 10 on Windows Central — All you need to know
Mauro Huculak is technical writer for WindowsCentral.com. His primary focus is to write comprehensive how-tos to help users get the most out of Windows 10 and its many related technologies. He has an IT background with professional certifications from Microsoft, Cisco, and CompTIA, and he’s a recognized member of the Microsoft MVP community.
Formatting a drive via the command line: 3 ways
Users encounter situations where it is necessary to format a drive through the Windows command line, for example, if for some reason formatting a hard drive in another way fails.
In this case, the user has the option to format the hard disk via the command line in the Windows operating system. Using the command line, depending on the situation, you can format the entire hard drive or one of the partitions (volumes) on the hard drive.
Contents:
- How to format a disk via the command line using the format command
- Using the DiskPart utility
- How to format a disk via the command line using Diskpart — method 1
- Formatting a disk via the command line in Diskpart — method 2
- Conclusions of the article
If the computer has one partition: «Logical disk (C:)», which contains the Windows operating system and user data, it is impossible to format the disk in a running system, because this disk is currently used for work systems. In this guide, we will analyze how to proceed in this situation.
Disk formatting is carried out in some situations:
- when installing an operating system on a disk;
- in case of virus infection, PC malfunction;
- when using a new hard drive;
- to delete unnecessary data.

In this article, we will look at several ways to format a hard drive through the command line, the instructions will analyze examples for different situations that users encounter. These methods work on Windows 10, Windows 8.1, Windows 8, Windows 7 operating systems.
How to format a drive from the command line using the format command
The Command Prompt (CMD) tool has a «format» command that formats a drive to a specified file system. In a running operating system, using this command, you can format partitions on a disk that do not have Windows installed.
If there are several partitions on the hard disk (the system is located on drive «C»), for example, drives «D» and «E» that need to be formatted, then using the «format» command, the drive «D» is formatted first, and then drive «E». If another optional hard drive is connected to the computer, this drive can be completely formatted because it does not have an operating system.
1 option.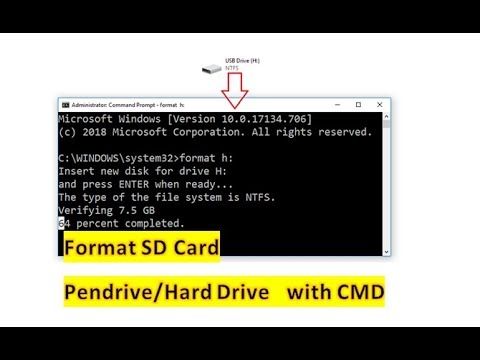 We format the disk through the Windows command line (standard):
- Run the command prompt as an administrator.
- Enter the command to format the disk:
format d: /FS:NTFS
- Enter the volume label for the disk to be formatted.
- Next, you need to press the «Y» key to agree with the conditions for formatting the disk, and then press the «Enter» key. You are warned that all data on the disk will be destroyed.
This will start the disk formatting process.
2nd option. If you add additional switches to the «format» command, you can customize the formatting options.
- Run a command prompt as an administrator.
- In the command line interpreter window, execute the command:
format d: /FS:NTFS /x /q
- To start formatting, press the «Y» key.
After the process is completed, information about the completion of this operation will appear in the command line window.
We have considered the option of formatting individual partitions of a hard disk, or another hard disk on which Windows is not installed, on the command line.
Using the DiskPart utility
The Diskpart utility is designed to work with disks, the application performs the following operations: creating a new disk (volume), deleting an existing disk, creating a bootable flash drive, formatting a disk partition or the entire hard disk.
The program can be used on a running Windows operating system, but for simple formatting it is much easier to use the «format» command. We will consider two options for using DiskPart: formatting a hard disk partition, or formatting a hard disk system partition, the entire hard disk, if we have only one partition on it.
Due to the fact that we will not be able to format the system disk in a running Windows, we will use bootable media from which we will launch the command line. To do this, we need bootable media from which we can boot on the computer, and then run the command line: bootable Windows USB flash drive, Windows Recovery Disc, Windows installation DVD, Windows PE flash drive or disc, Live CD (Live CD, Live DVD, Live USB).
Needs to be booted into the computer from a USB flash drive or CD/DVD, depending on which media you are using. First, enter the BIOS or UEFI boot menu, select a boot device, and then, after booting from the media, in the Windows RE recovery environment, launch a command prompt.
How to format a disk via the command line using Diskpart — Method 1
To format a separate non-system partition or hard drive, you can work from Windows or from bootable media.
In the command line interpreter window, you need to execute sequential commands (after entering the command, press the «Enter» key):
- Starting the DiskPart utility.
diskpart
- Enter a command to list all disks (volumes) on the computer.
list volume
On this computer, this is Volume 3. You need to select your drive number to be formatted.
- Select the volume letter (you will have your own number).

select volume 3
- Start formatting in the «NTFS» file system, if necessary, you can select the «FAT32» file system.
format fs=ntfs quick
- Run the command to exit the DiskPart application.
exit
Formatting a disk via the command line in Diskpart — method 2
If you need to format the entire system disk with all partitions, you need to boot to the PC from bootable media.
In the Windows RE recovery environment, enter the command prompt, and then run the following commands in sequence:
 diskpart
list volume
select volume 2
clean
 create partition primary
format fs=ntfs quick
exit
Conclusion of the article
If necessary, the user can format the disk via the command line. Using the «format» command at the command line, format a single hard disk volume or hard disk if it is an additional non-system hard disk. Using the DiskPart program, you can format an individual partition or the entire hard drive.
To do this, you will need to boot on your computer from bootable media with the Windows RE recovery environment, from where you need to launch a command prompt, and then perform the necessary actions.
By clicking on the button, I consent to the processing of personal data and accept the privacy policy
Formatting a disk via the command line: 3 ways or for some reason, formatting the hard disk in another way failed.
In this case, the user has the option to format the hard disk via the command line in the Windows operating system. Using the command line, depending on the situation, you can format the entire hard drive or one of the partitions (volumes) on the hard drive.
If the computer has one partition: «Logical drive (C:)», which contains the Windows operating system and user data, it is not possible to format the drive in a running system, because this drive is currently used for system operation. In this guide, we will analyze how to proceed in this situation.
Please note that when formatting, all data will be completely deleted from the disk: files, folders, programs, photos, videos, music, etc. Therefore, take care of the safety of the necessary information in advance: copy important data to another disk , which will not be formatted, or to removable media such as an external hard drive, flash drive, or CD/DVD drive.
Disk formatting is carried out in some situations:
- when installing an operating system on a disk;
- in case of virus infection, PC malfunction;
- when using a new hard drive;
- to delete unnecessary data.
In this article, we will look at several ways to format a hard drive through the command line, the instructions will analyze examples for different situations that users encounter. These methods work in Windows 10, Windows 8.1, Windows 8, Windows 7 operating systems.
Formatting a hard drive via the command line: instructions.
 Command Prompt Windows 10
One of the most common things to do with any type of hard drive is to format it. There can be quite a lot of situations when a logical partition or hard drive needs to be formatted. But in some cases, in particular with regard to the system partition, the standard procedure cannot be performed using Windows tools. In this case, the command line is used (we take Windows 10 as an example), which can be launched by booting from removable media. Next, we will consider several options for carrying out the formatting process both in the operating system environment and when booting from an optical disk or a regular flash drive.
The cause of the malfunction
As a rule, the user himself is the culprit in a situation in which the system refuses to clean a certain area of the hard drive. Due to limited knowledge, a novice user is not always able to predict the result of his actions. The desire to optimize the performance of the hard disk with the help of any of the service programs often ends in disastrous consequences.