Deepcool Gammaxx GT CPU Air Cooler Review
Deepcool has sent us for Deepcool Gammaxx GT Review. The GT is a new RGB enabled single tower air cooler. It comes in two variants one is GT and the other TGF which is a member of the Asus TUF Gaming Alliance. The deepcool gammaxx gt review is a 120mm single tower feature direct contact technology where the heat pipes make contact with the heat source directly for better thermal heat dissipation.
Deepcool Gammaxx GT CPU Air Cooler Review
It is compatible with AMD AM4 out of the box and majority of the Intel sockets. It is rated for 140W TDP for AMD CPUs and 150W TDP for the Intel CPUs. Above all, it features a stunning and immersive RGB lighting effect not only on the supplied fan but the top plate of the heatsink has LED PCB underneath the diffuser. Deepcool also has some high quality cooler such as; Deepcool as500, Castle 360ex, Captain 240ex and much more. Without further ado let’s take a look at it.
- Item: Deepcool Gammaxx GT Review
- Manufacturer: DEEPCOOL
- Price: Check Price on Amazon
Gammaxx GT Specifications
Gammaxx GT Packaging and Unboxing
The cooler comes inside a cardboard box of black and blue colors. The front side of the box has Deepcool brand name printed on the left side. There is a picture of the cooler with the top plate in main focus illuminated in multiple colors to signify the RGB lighting on the cooler. Gammaxx GT is printed at the bottom.
The left side of the box has a Deepcool brand logo printed on the left side followed by the Gammaxx GT. A serial no sticker is printed at the bottom. Part no is printed above the sticker. Deepcool information is printed at the bottom left side. The right side is basically a continuation of the front side. We can see the remaining portion of the top plate of the cooler here.
A deepcool brand logo is printed on the top followed by the Gammaxx GT.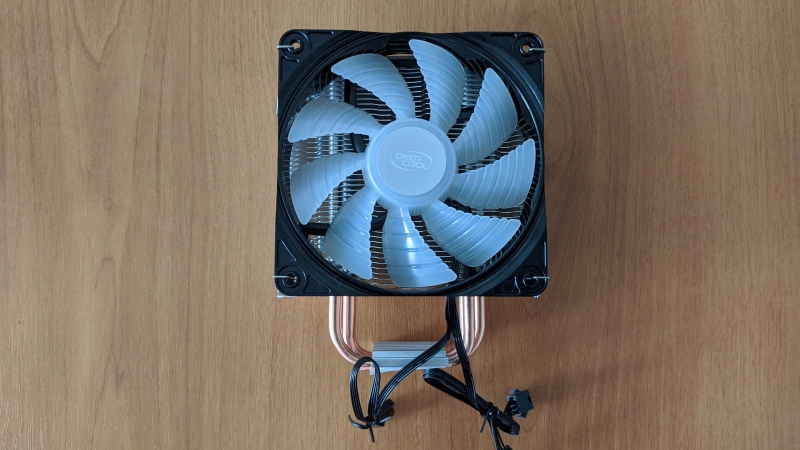 RGB is printed in a pleasing manner here where G letter is printed in the Deepcool’s logo format. The backside of the box has a Deepcool brand logo printed on the top left side. Gammaxx GT RGB CPU Cooler is printed on the top right side. Specifications are printed below the picture of the cooler. Socket compatibility information is printed on the right side.
There are three diagrams on the bottom showing the dimension of the cooler. The top side of the box has a Deepcool brand logo at the top left side. Gammaxx GT is printed in the center. Salient feature highlights are mentioned at the bottom like RGB cooler, RGB fan, Controller etc. Opening the top cover will show another cover under it with Deepcool brand logo in the center.
Opening that will show a blue color cover with the cooler’s features printed on it. Opening it will show the top side of the cooler exposed through another blue color cover. Opening that cover will show the contents of the box nicely stacked. There is a white color box which has accessories followed by the heatsink in the middle and then a fan at the bottom.
The fan and heatsink have white color Styrofoam pads on all three sides for safety. There is a plastic container at the bottom of the box where the fan and the heatsink are rested. Once again, I am impressed with the premium packaging and attention to the details. Are you going to buy cpu for video editing to make a powerful PC? It has many advantages. So it is worth investment.
1 of 9
Deepcool Gammaxx GT Accessories
Following are included in the box:
1 of 3
CPU Air Cooler Closer Look
The GT is a new CPU air cooler from Deepcool under the Gammaxx lineup of the coolers. Not only it is compatible with the leading sockets from both sides excluding the TR4 but also it comes with some vivid RGB lighting to make you’re a build a perfect showcase.
Here is what the Deepcool is saying about it, “To provide gamers with all-new air cooling experiences, Deepcool has released the GAMMAXX GT featuring sleek RGB lighting and optimized cooling performance. It’s not just cooling. It’s DEEP, high-quality CPU-cooling for optimal heat dissipation while fulfilling your desires for that spectacular RGB gaming rig.”
1 of 7
It is time to take a peek at the design elements of this cooler. The dimension of the cooler is 135×84.5x156mm (WxDxH). This cooler has a height of 156mm which gives it a better compatibility with the majority of the PC Chassis in the market. Still, it is better to check the CPU Cooler Height clearance of the given PC Chassis before buying to be certain of it.
The cooler has a weight of 870gm. Deepcool has rated it for Intel chips up to 150W TDP and AMD chips up to 140W TDP. Given that, I am sure it can handle load beyond these ratings. We will see to that in the testing section. It is compatible with Intel LGA20xx/LGA115x/LGA1366 sockets and AMD’s AM4/AM3+/AM3/AM2/FM2+/FM2/FM1 sockets.
Clearly, this cooler has no incompatibility issues with respect to any given socket at hand. This cooler features 48 aluminum fins each with 0.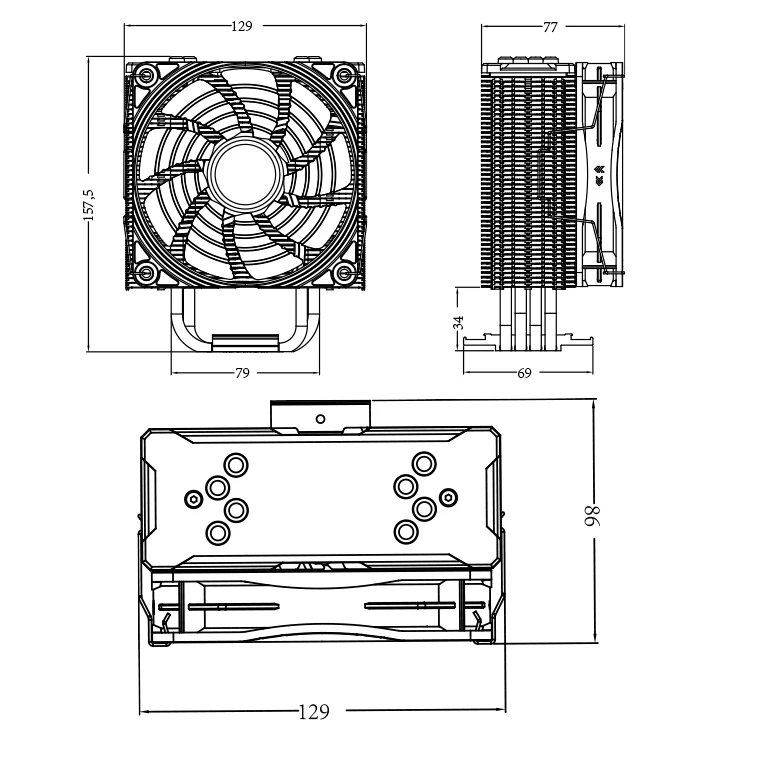 5mm thickness stacked in a manner that overall heatsink is less dense which would relax the fan consideration in the overall equation. The front side of the heatsink has a dimension of 125mmx122mm.
Please note that this is the dimension of the heatsink from the front side excluding the fans and the base part. There is an edged inset in the middle going all the way to the bottom. Bottom of the heatsink only has insets on both sides as well. The fins finishing is top notch and I did not observe anything peculiar here. Let’s take a look at the left and the right sides of the heatsink which is identical with the same dimensions.
The dimension of these sides is 50mmx122mm. Again, take a note that I am mentioning the heatsink only dimension without the fan, mounting clips and the base. We have two cutouts per fin on its length and this is followed for all the 48 fins. These cutouts or grooves are to be used for the fan mounting clips holder. This cooler can be used in push/pull configuration for which Deepcool has provided two sets of the fan clips.
These cutouts are designed such as it gives the impression of fins being superimposed on each other which is not the case. The backside of the heatsink is identical in layout to the front side. The only difference is the 4-pin LED cable coming out from the top and very well routed through the central inset to the bottom where there is a cutout to pass this cable all the way through the heatsink outside.
This cable has a length of 385mm. The last fin plate of the heatsink shows the pattern resembling the Gammaxx symbol in the middle. There are two small holes one on each side. These could be for air flow or symmetry with the top plate’s mounting holes.
1 of 4
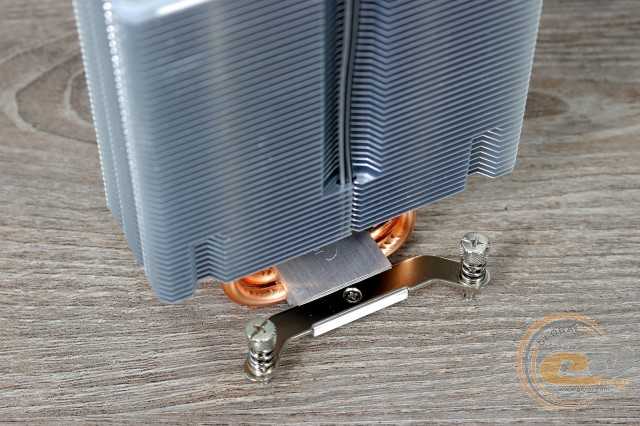
It is time to take a look at the base of the cooler. The base has a single aluminum plate with the Deepcool brand logo embossed in the center on the upper side. It’s both ends have insets with a mounting hole in the middle. This is where the mounting brackets are placed and secured using the screws. This plate has a dimension of 69.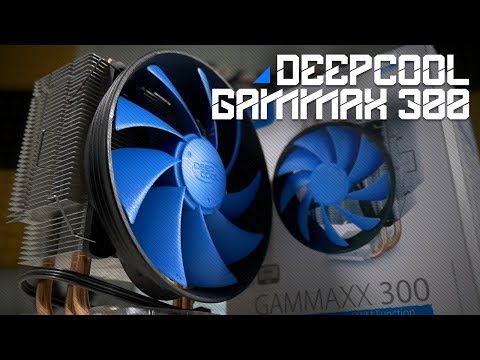 2mmX34.5mm (LxW).
Taking a look at the base of the cooler, there is a sticker pasted warning the users to peel it off before the installation. Removing this sticker we see that Deepcool is using CDC technology which stands for CPU Direct Contact. In this technology, the heat pipes make direct contact with the heat source and there is no base plate.
But, Gammaxx GT is not following a Continuous Direct Contact method as we can see the gaps between the heat pipes. Invariably, we have an aluminum plate and copper heat pipes making contact with the CPU. Deepcool has implemented 4 integrated sintered metal powder heat pipes which seem to be of 6mm thickness.
The first and the third heat pipes are parallel to each other in implementation. The second and the fourth are parallel to each other but offset to the other group. This will help ensure maximum coverage of the heatsink for effective heat dissipation.
1 of 8
Having discussed the heatsink and the base, it is time to take a look at the top side of the heatsink with all the magic and majestic looks.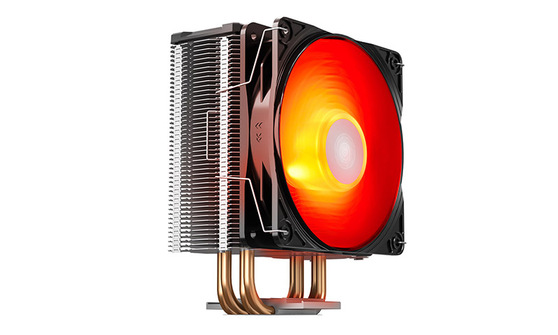 I did not count the top plate in the overall number of the fins for a reason that this plate is not directly attached to the heatsink. It has a blasted finish to it or so it seems and there are 4 circular covers on each side.
The deepcool gammaxx gt review symbol pattern is visible in the center and it is made using cutouts in the plate. This is for the reason that lighting effect would light up the pattern to create one heck of a view. There are two screws on the plate. Removing them would take off the top plate and we get to see a dense diffuser designed in the same dimension as is of the top plate.
Take it off and we get to see the black color LED board with 8 RGB LEDs on it. Deepcool brand logo printed on the top in the center. There are angular cutouts on both sides exposing the terminating ends/tips of the heat pipes and the mounting screw holes. These LEDs are following the +12V/G/R/B pin format and these are not addressable ones. Taking this PCB off, we get to see the actual top side of the cooler.
The underside of the diffuser shows that it has 8 circular points covering the LEDs for better and even light spread across the length. I did not observe any discontinuity or uneven flow of lighting across the entire length of the diffuser and Deepcool has definitely delivered an impressive design with utmost attention to the details.
Remember that when installing inside the chassis, the top side of the cooler is what the user gets to see every time and deepcool gammaxx gt review has some spectacular visuals here.
1 of 3
Deepcool has bundled RF120 fan with this cooler. RF120 is a 4-pin RGB LED enabled fan with 6 LEDs in the hub having a dimension of 120x120x25mm. These fans are using Hydro bearings and are rated for 10.8~13.2VDC operating voltage. The rated voltage is 12VDC. Started Voltage is 7VDC. Rated current is 0.23A with a power input of 2.76W.
The fan’s speed is rated between 500±200 to 1500±10%RPM. Maximum airflow is 56.5CFM which seems low but given the low density of the heatsink, this would get the job done. The sound level is rated at 17.8~27dB(A).
There are 9 translucent blades on the fan each with having 5 channels for the airflow. There is a black color sticker on the hub with Deepcool brand logo printed on it. Each corner has an anti-vibration pad on it on both sides. Though this is a square design it gives an impression that there is a circular central frame encapsulating the blades and motor with 4 corners mounted to it.
We have a slope inward design on each mounting side above the inner circular frame. The backside clarifies that it is a single frame the looks on the front side are giving such an impression. The back side shows the air ducts on each of the mounting corners for better directional airflow. We have a 4-arms assembly. There is a black color sticker pasted on the back with Deepcool brand logo printed on the top.
The fan is made in China. The fourth arm has an extended area with a latch to catch the wires coming out of the fan. There are two cables coming out of the fan.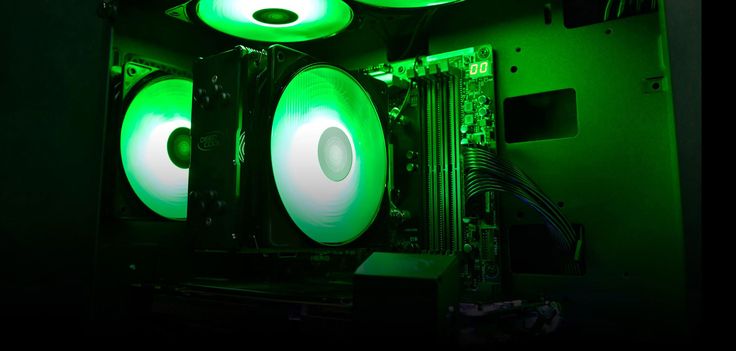 One is the 4-pin PWM cable measuring 289mm and a 4-pin LED cable measuring 380mm approximately. The cables are nicely sleeved.
The frame side where the cables are coming out has two small arrows indicating the direction of the blades movement and the direction of the airflow. Deepcool has provided 4 metal clips to mount these fans to the heatsink. Deepcool has got you covered should you be going for a second fan to make the cooler in push/pull configuration.
Deepcool Gammaxx RGB Lighting
We have already taken a look at the main RGB elements of this cooler that is the RGB Lighting on the top side of the cooler and the RF120 fan. To control the RGB lighting, Deepcool has bundled two cables with this cooler. One is the RGB Controller and the other is the Motherboard sync cable. The RGB Controller is powered by SATA connector.
The other end has two headers so to connect up to two RGB enabled devices to it. Please, note that in case of push/pull configuration, you would have to use two controllers due to the limitation of the controller.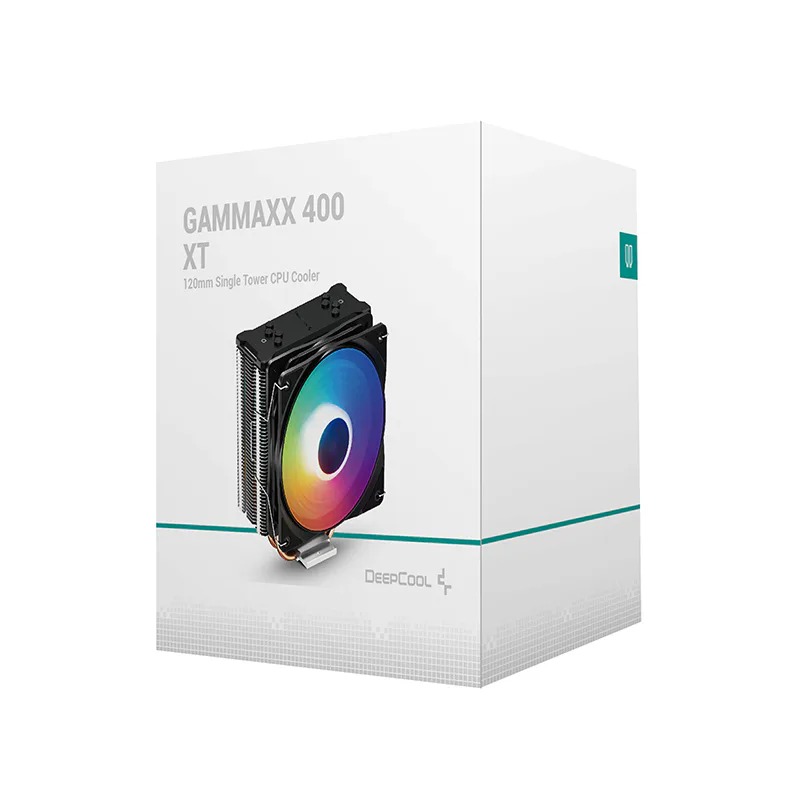
The motherboard sync cable has +12/G/R/B pin format cable which can be connected to any RGB enabled header (+12V only) on the motherboards. It is compatible with Asus AURA Sync, MSI Mystic Lighting, Gigabyte RGB Diffusion, ASRock RGB Sync etc. Up to two RGB enabled devices can be connected to the motherboard RGB sync cable.
1 of 5
Following modes are available:
- Static Color
- Static Color Fading
- Cycle Color
- Cycle Color with Fading
- Cycle Color with Breathing
There are 3 buttons on the controller. The first button has M printed on it and it is used to switch between the modes. The middle button has a dot printed on it and it is used the control the brightness of the lighting. Long press it to power off the lighting.
Pressing it again will light the connected devices again. The last button has S printed on it and it is used to control the speed of the lighting effects like cycling colors, breathing, fading.
Here are some pictures for your eye pleasure:
1 of 13
Cooler X99 Installation
We have tested the cooler on the X99 platform using 2011-3 socket. I was hoping to see an easy installation as Deepcool is mentioning on their website but I have a gripe here. While it definitely seems like a walk in a park but it will take some force/pressure only for LGA20XX socket. For other sockets it is easier.
Here are the steps for the cooler mounting on the LGA-2011(3). Take out the Intel mounting brackets. These are ones with angular ends and shorter length. Take out the two small size screws. Using those screws secure the mounting brackets on top of the base plate. Make sure to consult installation guide before proceeding. Apply thermal paste on the CPU surface.
Place the cooler in your desired orientation by carefully aligning the spring-loaded screws on the mounting bars to the socket’s holes. Screw in any one of the spring-loaded screw. Make it so that it only makes proper contact with the socket hole. Don’t fully screw it in. This is where the easy installation would say bye bye as you would need to use force on the opposite screw in the diagonal pattern to make contact with the socket hole.
Once you get successful with this screw, repeat the procedure with the other two screws. Then start threading them down till the threads run out. On paper, it is like a snap of a finger but in reality, it would take patience and force to do it. Next, using two metal clips, connect the fan to the heatsink. Next, connect the 4-pin PWM cable to the CPU Fan header or any 4-pin PWM header of your choice.
Connect the 4-pin LED cable coming out of the heatsink to the RGB Controller and similarly repeat the step for the LED cable from the fan. Connect the RGB Controller to the SATA cable or if using motherboard sync cable, connect the cable to the motherboard’s header. This would complete the installation.
1 of 6
Clearance Issues
The thing with the air cooler is that one would need to check for the clearance with respect to the Chassis, DIMM, and First PCIe slot. The height of the cooler is 156mm. Any chassis with CPU height clearance of 156mm or so will be an easy fit. There is enough clearance from the first PCIe slot with this deepcool gammaxx gt review cooler. We have tested the cooler with the Ballistics Elite DDR4 kit.
These modules have a height of 44mm. Heatsinks have no issue in terms of clearance for this RAM. This cooler with fan clipped on will not interfere with the DIMM slots so it is universally compatible.
1 of 9
Cooler Testing Methodology
Following test bench was used for testing this deepcool gammaxx gt cooler review: –
- Asus Rampage V Edition 10
- Intel i7 6850k
- Crucial Ballistics Elite 4x4GB @ 3000MHz
- Colorful iGame GTX 1060 6GB
- Samsung 840 EVO 250GB SSD
- WD Black 6TB
- Corsair AX1200i
Following software were used for the testing and monitoring.
- Asus Real Bench v 2.44
- Real Temp GT v 3.70
The thermal paste being used on my test bench is the Noctua NT-h2 thermal paste. The use of a same thermal paste for all coolers will ensure the standardization and mitigate any performance benefit that may come using the supplied thermal paste. Delta temperatures are reported on the graphs.
The cooler is tested on stock clocks i.e 3.6GHz using 1.136V manual VCore. The Asus RealBench 2.44 is used to stress test the cooler’s performance. Each run of the test was of 60 minutes followed by 15 minutes break to let the system cool down. The fan was set to run at their 100% RPM. CPU is overclocked to 4.3GHz with 1.350V manual Vcore.
Three test runs are made. Average of each test run is calculated. The max temps on each core are summed up and divided by the core count to give the average figure. The max average of three tests is used for reporting. Delta temp is calculated by subtracting the ambient temp from the max average temp. Being a single tower with 120mm size, I am interested to find out how it stacks up against the likes of the Noctua H_U12S, Reeven Justice, Leto Pro RGB.
Results
Let’s take a look at the graphs. On stock clocks, the CPU was idling at 3°C. 31.01°C was the temperature under stress testing.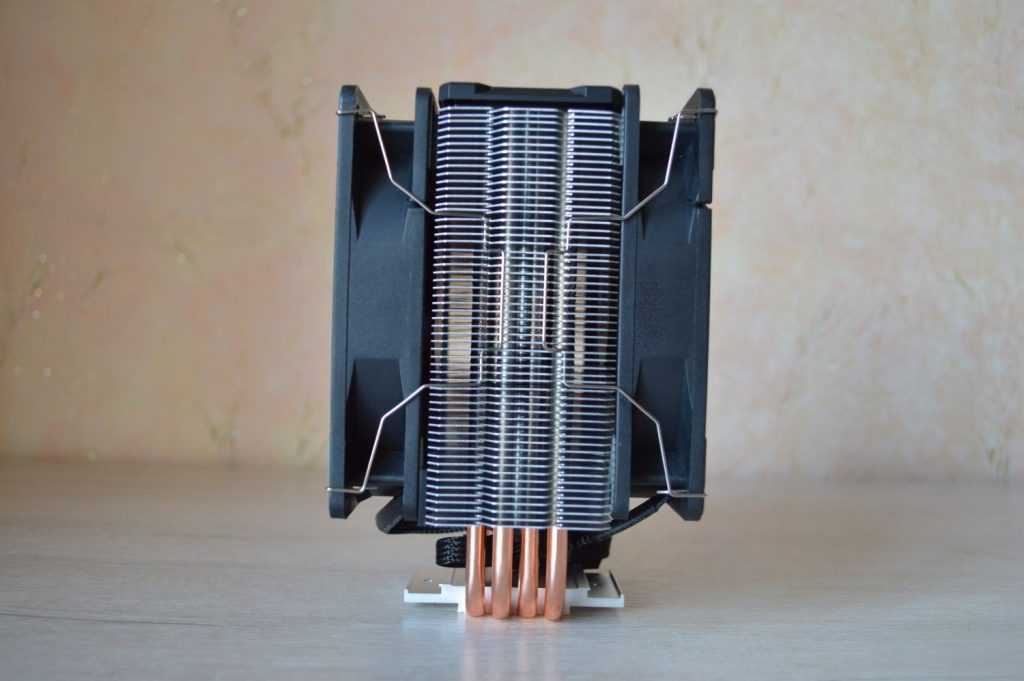 This cooler has not disappointed me as it has taken a lead over the Noctua NH-U12S, Reeven Justice and falls short of Raijintek Leto Pro RGB with just a 0.3°C difference. Mind you, Leto Pro RGB is a dual fan cooler out of the box. This is one heck of an excellent performance from the Gammaxx GT.
With overclocked 6850k to 4.3GHz at 1.350V, the CPU was idling at 4°C. 45.97°C was the temperature under the stress test. This cooler has beaten the Noctua NH-U12S, Reeven Justice, Raijintek Leto Pro RGB with overclocked chip showing its impressive performance.
We could not measure the sound level of the unit as the summer season here is at peak and ceiling fan plus the noise coming out of the room would invalidate the actual sound level. Based on my experience with the fans and coolers testing over a period of time, this cooler even at full speed was near silent. Clearly, Deepcool has done some magic with this deepcool gammaxx gt cooler review and the fan.
Conclusion
The Deepcool Gammaxx GT Review is an RGB enabled 120mm single tower CPU air cooler. It has a dimension of 135×84.8x156mm when assembled. It has a height of 156mm so keep this in mind when buying this cooler or the chassis for this cooler. This cooler has 0.5mm thick 48 aluminum fins packed in a less dense heatsink.
This cooler is featuring a CDC technology where copper heat pipes make direct contact with the CPU surface for more effective heat dissipation. But this is not a continuous direct contact as there are gaps between the heat pipes. Heat pipes seem to be of 6mm thick each. There is an aluminum base plate with Deepcool’s brand logo on the topside.
It has two insets on both edges where the mounting brackets are installed. Overall build quality is good and I did not observe anything peculiar to report as a Con. This cooler is compatible with Intel LGA20XX/LGA115X/LGA1366 sockets with maximum 150W TDP. It is compatible with AMD’s AM4/AM3+/AM3/AM2/FM2+/FM2/FM1 sockets with maximum TDP of 140W TDP. It definitely has a potential of handling much more than this rated TDPs.
This deepcool gammaxx gt cooler review has a brilliant design on the top side. The top plate is actually like a cover. It has a thick diffuser underneath it. There is a Gammaxx symbol formation using cutouts on the top. This is the area on the top that we will see light up once in action in addition to the borders of the diffuser. There is a black color LED board with 8 LEDs on it.
It is following +12V/G/R/B pin format. Deepcool has bundled RF120 RGB LED fan in the box. We have two LED zones this way, one on the top side of the heatsink and one on the fan. To make things more eloquent Deepcool has provided an RGB controller as well as motherboard sync cable.
If your motherboard does not have a dedicated RGB lighting header then Deepcool has got you covered and if your motherboard does have such header(s) then you can color coordinate your build accordingly. It is compatible with Asus AURA Sync, MSI Mystic Lighting, Gigabyte RGB Diffusion, ASRock RGB Sync etc. Up to two RGB enabled devices can be connected to the motherboard RGB sync cable.
Following modes are available:
- Static Color
- Static Color Fading
- Cycle Color
- Cycle Color with Fading
- Cycle Color with Breathing
There are 3 buttons on the controller. The first button has M printed on it and it is used to switch between the modes. The middle button has a dot printed on it and it is used the control the brightness of the lighting. Long press it to power off the lighting. Pressing it again will light the connected devices again. The last button has S printed on it and it is used to control the speed of the lighting effects like cycling colors, breathing, fading.
The RF 120 is an RGB fan having a dimension of 120x120x25mm. It is a 4-pin PWM fan. These fans are using Hydro bearings and are rated for 10.8~13.2VDC operating voltage. The rated voltage is 12VDC. Started Voltage is 7VDC. Rated current is 0.23A with a power input of 2.76W. The fan’s speed is rated between 500±200 to 1500±10%RPM.
Maximum airflow is 56.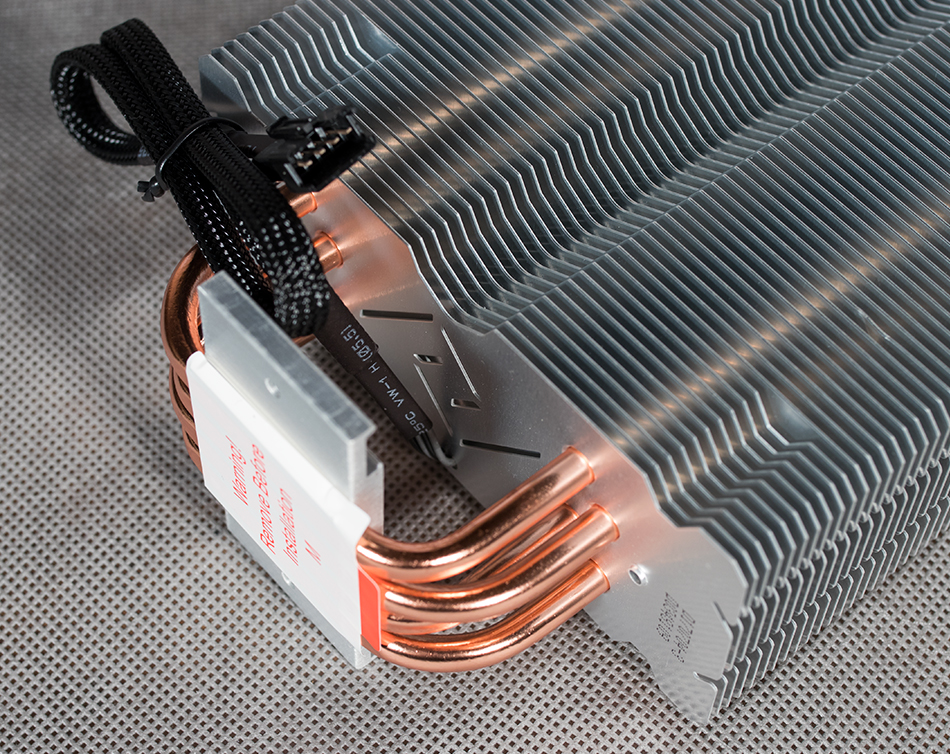 5CFM which seems low but given the low density of the heatsink, this would get the job done. The sound level is rated at 17.8~27dB(A).
This cooler has no clearance issue with respect to the first PCIe slot and DIMM slots. Having a height of 156mm, you would need to check for the compatible chassis for better clearance. This cooler demands patience and force when screwing the heatsink to the mounting holes on the Intel LGA20XX socket only.
It is easier to install on other sockets. Check the installation section for more detail. I wish it has a better mounting mechanism for the LGA20XX socket as well. In terms of thermal performance, this cooler has not disappointed me at all. I was interested to see how it would perform against the likes of the Noctua NH-U12S, Reeven Justice, and Raijintek Leto Pro RGB coolers.
On stock clocks, it has beaten all but Raijintek Leto Pro RGB cooler with a marginal difference of 0.3°C which is still a very good performance given that Leto Pro RGB is a dual fan cooler.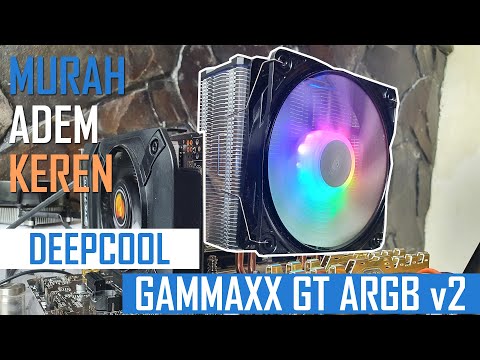 With an overclocked i7 6850k, this deepcool gammaxx gt cooler review has beaten all these coolers. This is one heck of a performance.
Given its powerful thermal performance, sublime RGB Lighting effects, and 2 years of warranty it has emerged as a clear winner. We are thankful to Deepcool for giving us the opportunity to review their Gammaxx GT CPU air Cooler.
Check Price on Amazon
Was our article helpful? ??
Thank you! Please share your positive feedback. ?
How could we improve this post? Please Help us. ?
Deepcool GAMMAXX GT A-RGB CPU cooler review
Deepcool Gammaxx GT ARGB CPU fan. That didn’t sound short at all. But the fan isn’t short too. So what exactly is short here if neither the name nor the fan is short?
So I received this CPU cooler to do my scientific researches on it. But some of you may already know what sort of scientist I am right? So this fan is an upgraded version of its predecessors. Of course? They upgraded the fan and made the lighting addressable RGB.
The fan quality is just fine but for the price you’d be paying for it, you should just be happy. I really like the finish on the top of the heatsink. It’s aesthetically pleasing. The matte black finish is nice and who doesn’t like matte black finish on their things.
The CPU, of course, comes with a 120 mm RGB fan with an RPM range of 500 to 1650. And there are 4 heat pipes on the bottom.
The heatsink has 6” height,3” depth with the fan being 1” in its depth. And an overall width of 5”. Wow, maths.
The built quality is fine. For the price it’s okay. It costs somewhere around 3000 rupees in India and somewhere around 35 US dollars in….USA? I won’t say its the best or the most premium feeling CPU cooler out there. But it doesn’t matter much in this price range and if it performs well too. Which we shall see ahead. The manual says that this CPU cooler should come with a 5V power SATA RGB controller for those motherboards which do not have a compatible header for the fan to run on. So make sure you get one in the box if your motherboard isn’t compatible.
It will support most of the sockets of Intel and AMD including the latest intel 10th gens and the current Ryzens so you don’t need to worry about all that. But checking all these facts on the product page can never hurt too.
You get a basic thermal paste packing inside the box with all kinds of screws and nuts and bolts and mounts. I have a strong suggestion here though. If you don’t have any alternative thermal paste compound lying around then, for the time being, you can put this one on the CPU. But if you are someone who games a lot or renders a lot then buying a decent thermal paste will help the cooler perform even better than the standard paste provided with this or with most of the CPU coolers you go out and buy.
If you are upgrading an old system with this fan then be aware of the fact that if your CPU case is from the stone age, then you’d have to disassemble the whole motherboard to place the backplate under it and then hook it.
The backplate also has all socket naming finely demarcated on it. But the plate feels kind of flimsy so make sure you are super careful and do not tighten the bolts too tight as you install the cooler.
Even if you have a newer case, my suggestion will be to get the motherboard out and screw the backplate carefully on the bottom so that you can feel the tension between the screws and your screwdriver which I hope isn’t screwing your driver.
If you are rocking a motherboard with ARGB headers on them then connecting and syncing it to your workstation lighting is going to be super easy. I tested it on my Asus TUF x570 motherboard and everything was immediately synced. The 2 cables coming out of the fan and the heatsink, get hooked to this controller cable which has these labels of different motherboard vendors on them. (see video for reference) And then this fan cable which goes into the CPU fan header. If you wanna put another fan for a push-pull configuration you can do so too if your motherboard has a CPU optional fan header too or just put it anywhere else just to power it on without any stats like RPM etc.
If not then you would need a converter and whatnot. But if you already have a converter then you do know what I am talking about.
Now after connecting everything and installing the motherboard, not in that particular series, you are ready to test your new CPU cooler and check if it performs any better than your stock CPU cooler or did you just wasted a good chunk of your money.
Well in my case I didn’t want to fiddle with my primary system as I can’t afford to disassemble it and lose time on other projects I am currently doing. So I went to my office, where most of the systems are sitting idle due to everyone working from home. And because I couldn’t take my cameras and tripods there I couldn’t actually shoot the installation process. But Deepcool has made a very nice video on the same which I will post in the description below for you to go through. https://www.youtube.com/watch?v=jKmMbaIS3g4
I tested the CPU cooler performance on a Ryzen 2700x with a GTX 1050 and 16GB of RAM.
I also made sure to test the same bench with a Noctua u14s as it’s generally a good habit to compare a ton of CPU coolers together unless you are a pseudoscientist. Which clearly I am not.
As compared to the AMD stock cooler which was wraith prism, in this case, there was a definite boost in performance of the about 8.5% in idle temps. But the Noctua was even 7.3% better than the Gammaxx but you have to pay almost twice of the Gammaxx and forget RGB and start loving this brownish theme instead which many dislike except for utilitarian people like me?
And during prime 95 small FFTs test the Gammaxx performed 8.3% better than the wraith prism but as expected the Noctuas performed about 7.6% better than the Gammaxx.
So as expected the cooler definitely performs better than the stock cooler most of you would get with your CPUs. The wraith prism is actually one of the better stock coolers but I am pretty sure if I had an Intel CPU with its stock cooler to compare with then the Gammax would have yielded even better results.
The noise levels were quite moderate. I could not hear the fans much during the prime95 test even though when it was in an open case. So inside a closed case, they would be hardly audible.
And before I forget, the cooler looks good as the bright RGB lit fan right in the front looks good and is RGB and just lits. So yeah it lits well. But my favorite part is the top part of the heatsink. The subtle lighting bleeding through the deep cool logo is pleasing to the eyes.
Stay safe humans. Otherwise, what’s the point of all this RGB? That’s all for today. MuBot out.
Overview of the Deepcool Gammaxx GT CPU cooler with RGB backlight
Passport specifications, scope of delivery and price
| Model name | Gammaxx GT |
|---|---|
| Model code | DP-MCh5-GMX-RGB-GT; EAN: 6933412726098 |
| Cooling system type | for processor air tower with active cooling with a heatsink located on heat pipes |
| Compatible | mat. boards with processor sockets: boards with processor sockets: Intel: LGA20XX, LGA1366, LGA115X; AMD: AM4, AM3+, AM3, AM2+, AM2, FM2+, FM2, FM1 |
| Cooling capacity | Intel: TDP 150W AMD: TDP 140W |
| Fan type | axial (axial) |
| Fan model | Deepcool DF1202512CL-076 |
| Fan supply | 10.8-13.2V, 0.23A (12V), 7V start voltage |
| Fan dimensions | 120 mm |
| Fan speed | 500±150—1500±10% rpm |
| Fan capacity | 96 m³/h (56.5 ft³/min) |
| Fan static pressure | n/a |
| Cooler noise level | 17.8-27 dBA |
| Fan bearing | hydraulic (Hydro Bearing) |
| Fan MTBF | n/a |
| Cooler dimensions (H×W×D) | 156×135×84.8 mm |
| Coolant weight | 870 g |
| Radiator material | aluminum fins (0.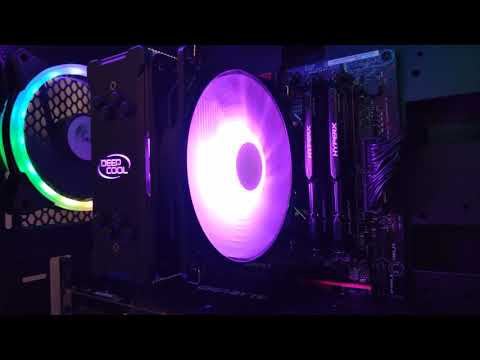 5mm thick) and copper heatpipes (4x ∅6mm, direct contact with CPU cover) 5mm thick) and copper heatpipes (4x ∅6mm, direct contact with CPU cover) |
| Heat sink thermal interface | thermal paste in syringe |
| Connection | fan: 4-pin connector (power, rotation sensor, PWM control) to the CPU cooler header on the motherboard. board RGB lighting from the heatsink and fan: into the connector on the motherboard through a splitter or to the controller from the kit. |
| Features |
|
| Scope of supply (better to check before buying) |
|
| Link to manufacturer’s website | Deepcool Gammaxx GT |
| Average price |
ask prices |
| Retail offers |
ask price |
Description
The Deepcool Gammaxx GT CPU cooler comes in a colorful cardboard box.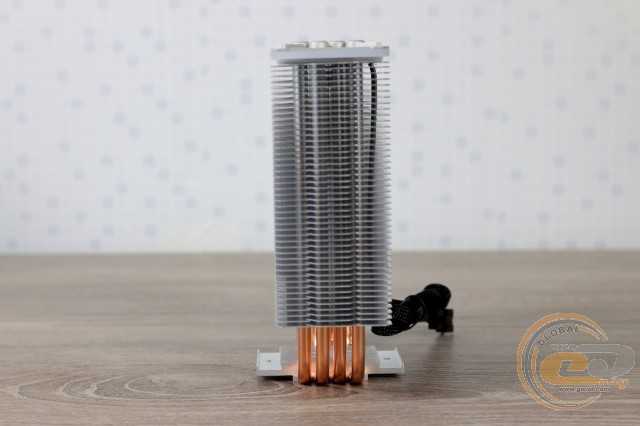
The outer planes of the box not only depict the product itself, but also provide its description and technical characteristics. The text is in English only.
Installation instructions in English are included and can be downloaded as a PDF file from the manufacturer’s website. The instruction is mostly in pictures, so it is understandable without translation.
The cooler is equipped with a remote heatsink, to which the heat from the soleplate is transferred through four heat pipes. The tubes are, of course, copper. At the sole of the heat sink, the tubes are flattened and pressed into a thick aluminum plate. The planes of the tubes adjacent to the processor are ground, but not polished. There are barely pronounced grooves on the sole of the heat sink between the tubes and the ribs of the sole. The working plane of the heat sink is almost perfectly flat, before installation it is protected by a plastic film.
There is no pre-applied thermal interface, but the manufacturer has attached a small syringe with thermal paste to the cooler.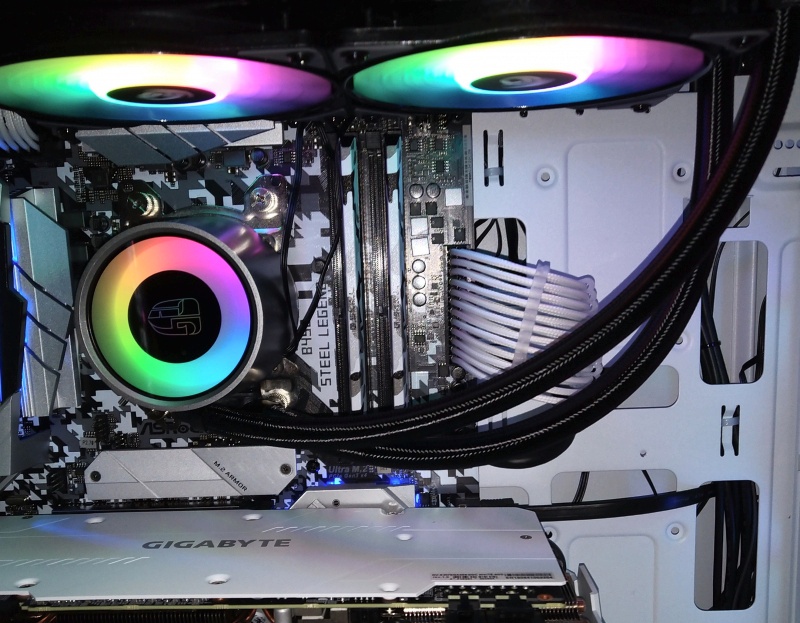 The manufacturer recommends applying thermal paste at five points on the processor cover.
If used sparingly, the bundled thermal paste should last twice.
The heatsink is a stack of aluminum fins tightly fitted onto the heatpipes.
The heatpipes are staggered, which should improve the efficiency of the cooler. A light-scattering insert made of matte translucent plastic is installed in the upper part of the radiator. Somewhere in it there are RGB LEDs connected with a separate cable.
The top of the insert is covered by a relatively thick anodized aluminum plate.
The width of the fan is slightly less than the working plane of the radiator, and the height of the radiator is approximately equal to the height of the fan, so the entire airflow passes through the fins.
Standard size of the complete fan 120 mm. Frame height 25 mm. If necessary, a second fan can be installed on the radiator using the second pair of mounting brackets.
Three exactly the same fans are included in the Deepcool RF 120 — 3 in 1 kit discussed earlier. The fan impeller is made of white translucent plastic. The impeller blades have a special geometry. Vibration-isolating pads made of rubber of medium hardness are glued into the eyes in the corners of the fan frame. In the uncompressed state, the pads protrude by about 0.7 mm relative to the dimensions of the frame. As conceived by the developers, this should provide vibration decoupling of the fan from the attachment point. However, if we estimate the ratio of the fan mass to the stiffness of the linings, it becomes clear that the resonant frequency of the structure is very high, that is, there can be practically no effective vibration decoupling. The marking on the fan allows you to determine that the model DF1202512CL-076 is used. We did not disassemble the fan (it is impossible to do this without damaging the fan), we believed the manufacturer that it had a hydraulic bearing (Hydro Bearing). The fan supports PWM regulation. The cables from the fan are encased in a braided sheath of slippery plastic.
 The cable from the radiator backlight is in the same braid. According to the legend, the sheath reduces aerodynamic drag, but taking into account the thickness of the flat four-wire cable inside this sheath and its outer diameter, we strongly doubt the veracity of this legend. However, the shell will allow you to maintain a single style of interior decoration of the case.
The remaining cables (controller and splitter adapter) are simply flat, which is more convenient to use. The controller only controls the operation of the backlight. The controller’s power cable is connected to the SATA power connector, which is much more convenient than to the peripheral connector («Molex»). The «S» button of the controller switches the rate of change in dynamic modes, the middle button — on / off (long press) and brightness control in static modes (short press), the «M» button — switching modes. Up to two devices are connected directly to the controller, in this case it is the backlight on the radiator and on the fan. If the motherboard or another controller has a standard four-pin connector for connecting RGB backlight, then the controller from the kit can be omitted and the backlight can be connected using the supplied splitter adapter, although it does not have a pass-through connector, which means it will be the last in the chain of devices with RGB — backlight.
Five backlight modes: static backlight in one color (red, green, blue, orange, purple, cyan or white), smooth increase and then decrease in brightness in a cycle with one of the same colors, switching colors in a cycle, smooth increase and then decrease brightness on a cycle with enumeration of colors and a smooth transition between colors through intermediate shades. The video below demonstrates the backlight modes:
How the cooler looks in the case is shown in the video below (the Deepcool RF 120 fan is in the background):
And photos of the same case:
The metal parts of the processor mount are made of hardened steel and have a durable galvanized coating.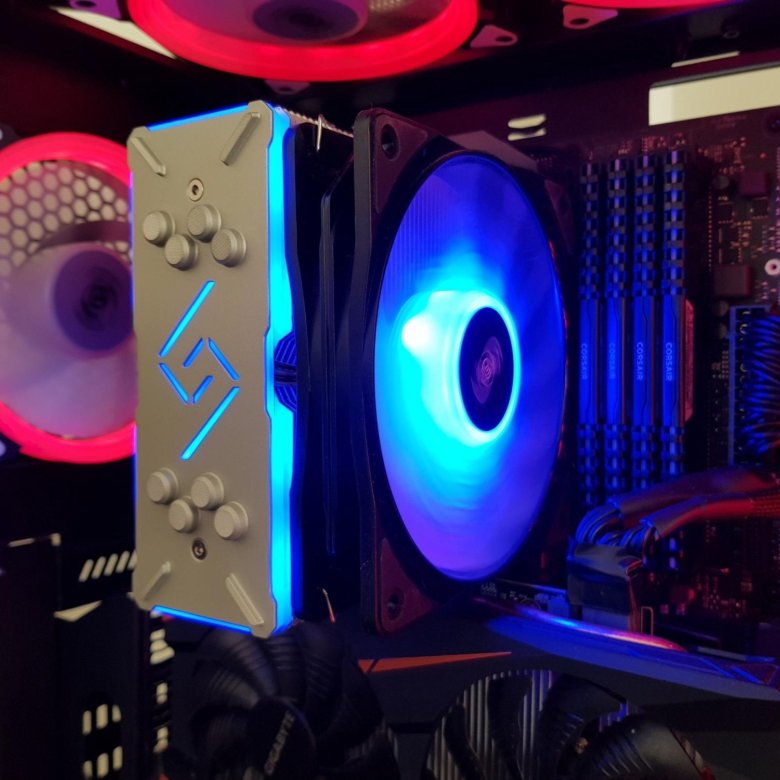 The platform on the back side of the system board is made of durable plastic.
Testing
Below in the summary table we present the results of measurements of a number of parameters.
| Height, mm | 158.6 |
|---|---|
| Width, mm | 127 |
| Depth, mm | 76.6 (without heat sink) |
| Heat sink dimensions, mm (W×H) | 35×35 |
| Coolant weight*, g | 774 |
| Fin height, mm | 113 |
| Fan cable length, mm | 285 |
| RGB fan cable length, mm | 390 |
| Radiator RGB cable length, mm | 395 |
| RGB cable length from the controller, mm | 53 + (2×)100 |
| Controller power cable length, mm | 400 |
| RGB cable length from motherboard connector, mm | 280 + (2×)100 |
* with mounting kit for LGA 2011
A complete description of the testing methodology is given in the corresponding article «Testing methodology for processor coolers (coolers) of the 2017 model».
Stage 1. Determining the dependence of the cooler fan speed on the PWM duty cycle and/or supply voltage
Smooth increase in rotation speed when the duty cycle changes from 25% to 85%. Note that at a short circuit of 0%, the fan does not stop, therefore, in a hybrid cooling system with a passive mode at minimum load, such fans will have to be stopped by reducing the supply voltage.
The voltage adjustment allows the range to be slightly extended down to approximately 300 rpm. The fan stops when the voltage drops to 4.2 V and starts from 5.1 V. Note that when the fan backlight is connected to a 12 V power source, it is no longer possible to control the fan speed by changing the voltage.
Stage 2. Determining the dependence of the temperature of the processor when it is fully loaded on the speed of the cooler fans
In this test, our processor with a TDP of 140 W does not overheat even at the minimum fan speed (adjustment using PWM), but the maximum temperature is already quite high.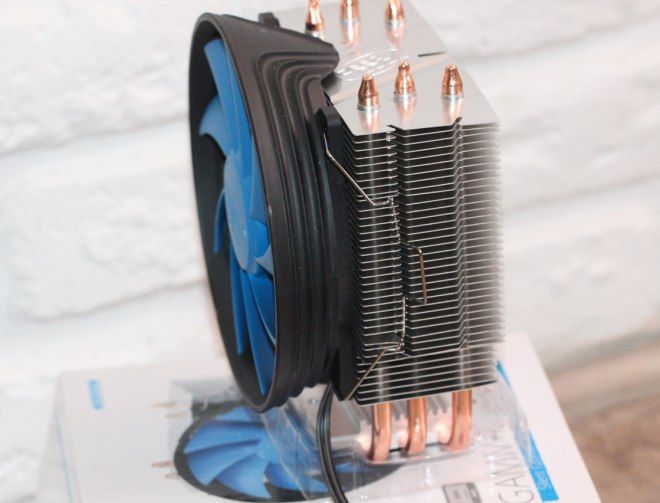
Step 3. Determine the noise level depending on the speed of the fan(s) of the cooler
The Deepcool Gammaxx GT cooler can be considered a quiet device. It depends, of course, on individual characteristics and other factors, but in the case of coolers somewhere from 40 dBA and above, the noise, from our point of view, is very high for a desktop system, from 35 to 40 dBA the noise level is tolerable, below 35 dBA noise from the cooling system will not stand out much against the background of typical non-noisy PC components — case fans, on the power supply, on the video card, as well as hard drives, and somewhere below 25 dBA the cooler can be called conditionally silent. The background level was equal to 16.8 dBA (conditional value, which shows the sound level meter).
Stage 4. Plotting the dependence of the noise level on the temperature of the processor at full load
Stage 5. Plotting the dependence of the real maximum power on the noise level
Let’s try to get away from the test bench conditions to more realistic scenarios.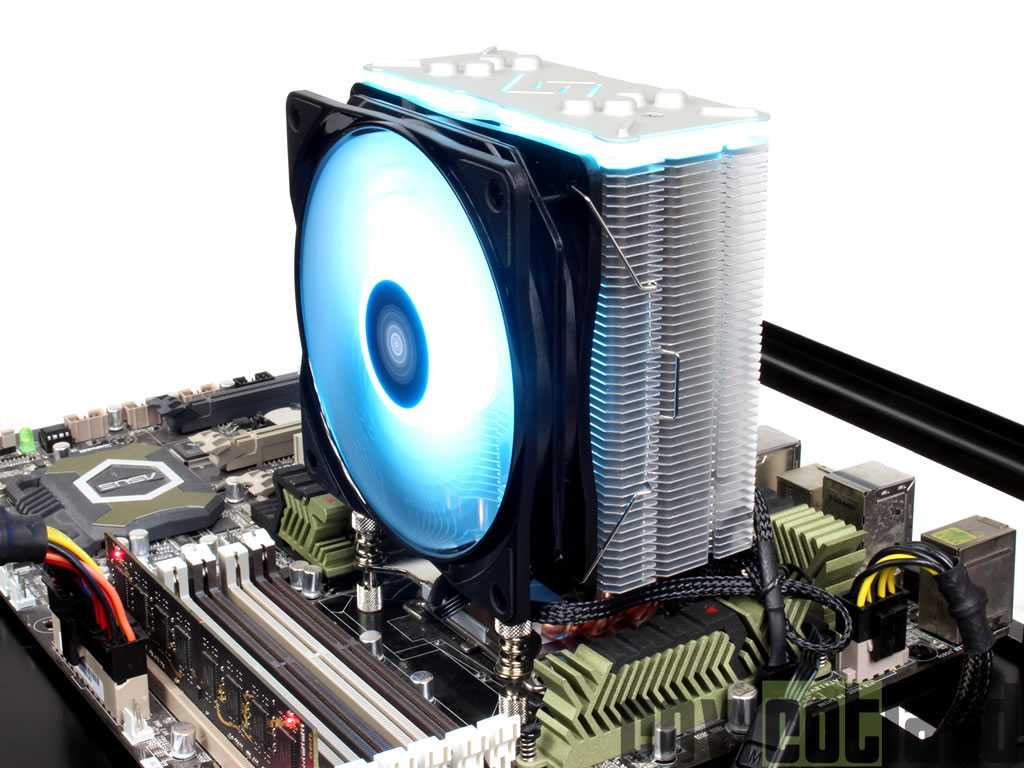 Let’s say that the temperature of the air taken in by the cooler fan can rise to 44 °C, but we don’t want to raise the temperature of the processor under maximum load above 80°C. Restricting ourselves to these conditions, we construct the dependence of the real maximum power (denoted as Max. TDP ), consumed by the processor, on the noise level:
Taking 25 dBA as a criterion for conditional noiselessness, we get the approximate maximum power of processors corresponding to this level, which is about 130 W. Hypothetically, if you ignore the noise level, the power limits can be increased to somewhere up to 144 watts.
Conclusions
Our testing has shown that the Deepcool Gammaxx GT cooler can be used with processors with a TDP of about 130 W, while even taking into account the possible increase in temperature inside the case to 44 ° C, a very low noise level of 25 dBA and below will be maintained . The advantages of the cooler include a neat design, as well as RGB-illumination of the radiator and fan. You can control the operation of the backlight using the included push-button controller, as well as regular means of the motherboard or other controller equipped with a standard four-pin connector for connecting RGB backlight.
let there be light on GECID.com. Page 1
::>Cooling systems
>2018
> Deepcool GAMMAXX GT
23-08-2018
Page 1
Page 2
One page
Given the fact that processors from various price ranges can boast of good overclocking capabilities — from affordable AMD Ryzen 3 to AMD Threadripper, the choice of coolers for cooling them should also be extremely diverse. Moreover, coolers are often bought for processors without overclocking, instead of a boxed solution — you can’t do anything to reduce noise.
Today we will talk about a more affordable segment, where the DEEPCOOL GAMMAXX line is very popular.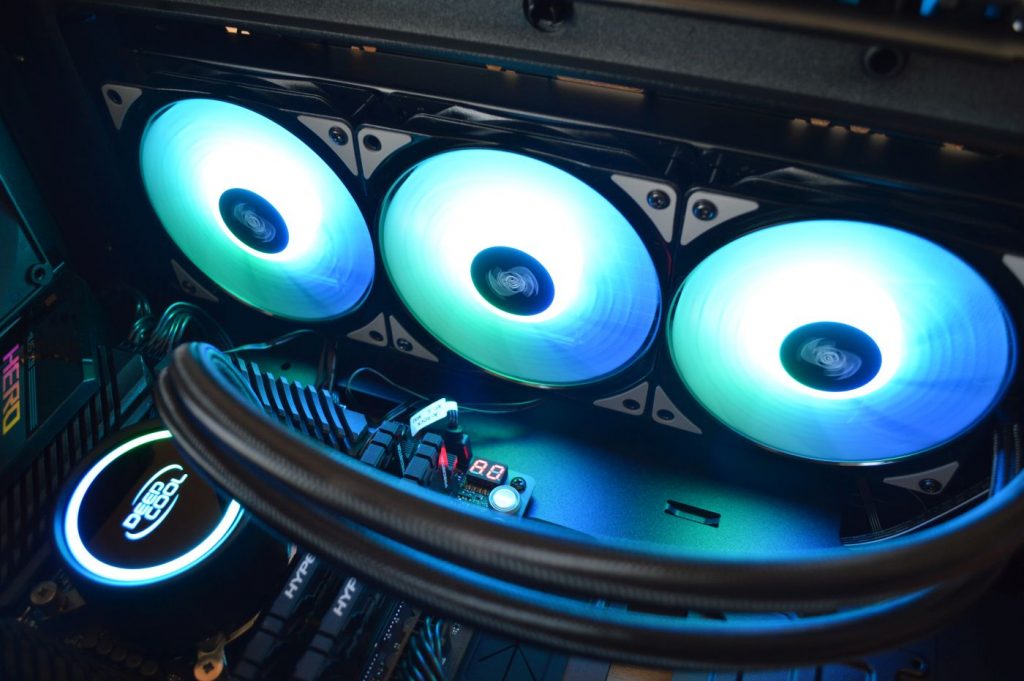 It boasts a range of products with two, three or four heat pipes starting at $16. All of them are tower models with 120mm fans based on hydraulic bearings, and in the current material we will get acquainted with one of the top solutions of this line.
We are talking about the cooler DEEPCOOL GAMMAXX GT . The list of its advantages includes the presence of multi-color illumination, which can rightly be called its hallmark. How is it implemented and what else can the tested solution boast of?
Specification
|
Model |
DEEPCOOL GAMMAXX GT |
||
|
Support for processor sockets |
AMD Socket AM2 / AM2+ / AM3 / AM3+ / AM4 / FM1 / FM2 / FM2+ Intel Socket LGA115X / LGA1366 / LGA20XX |
||
|
Heatpipes |
Material |
Copper |
|
|
Quantity |
4 |
||
|
Diameter, mm |
6 |
||
|
Radiator plates |
Material |
Aluminum |
|
|
Quantity |
46 |
||
|
Plates per inch |
11 |
||
|
Thickness, mm |
0. |
||
|
Distance between plates, mm |
1.9 |
||
|
Base dimensions, mm |
35 x 35 |
||
|
Thermal interface |
Thermal Grease Syringe |
||
|
Number of fans |
1 |
||
|
Support PWM blade speed control |
Yes |
||
|
LED light |
RGB |
||
|
Bearing type |
Hydro Bearing |
||
|
Fan supply voltage, V |
Rated |
12 |
|
|
Working |
10.8 — 13.2 |
||
|
Starting |
7 |
||
|
Current consumption, A |
0. |
||
|
Power, W |
2.76 |
||
|
Fan speed, rpm |
500±150 – 1500±10% |
||
|
Noise level, dBA |
17.8 — 27 |
||
|
Air flow m 3 /h (CFM) |
96.1 (56.5) |
||
|
Power connector |
4-pin |
||
|
Power cable length, cm |
30 |
||
|
Fan dimensions, mm |
120 x 120 x 25 |
||
|
Cooler dimensions, mm |
156 x 135 x 84.8 |
||
|
Weight, g |
870 |
||
|
Manufacturer website |
DEEPCOOL Product page |
||
 6
6  23
23 Packing and contents
A beautiful box pleases with good information content, however, only in English.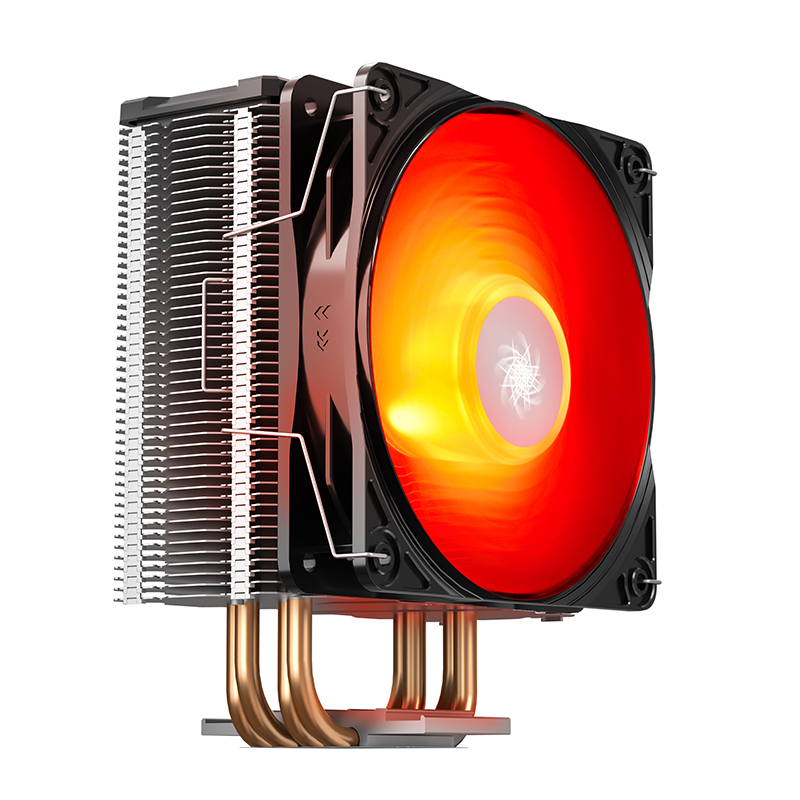 It contains such important information as a list of supported platforms and a detailed specification of the device. No discrepancies were found with the official site.
The bundle did not greatly affect the final cost of the device. In addition to fasteners, a reinforcement plate (870 g after all) and screws, it also includes a couple of cables for controlling the backlight, thermal grease in a syringe and paper documentation.
Appearance and design
DEEPCOOL GAMMAXX GT is a fairly compact cooler — when assembled, it has dimensions of 156 x 135 x 84.8 mm. The first value corresponds to the height of the structure, and with this indicator it will fit in most familiar Middle Tower cases.
The dimensions of the radiator part are 116 x 107 x 60 mm. Thus, it is completely blown by the airflow from the 120mm turntable. The wafers are fairly tightly spaced, less than 2 mm apart (11 wafers/inch). This made it possible to increase their number to 46, which in turn had a positive effect on the heat dissipation area. The design is based on four U-shaped heat pipes of the usual diameter of 6 mm.
But we did not like the placement of the tubes inside the structure. All of them huddle very close to each other, heating only certain areas of the plates. Therefore, I would like to distribute them over a larger area so that the air from the fan adequately reaches each of them.
In general, the Hi-Tech decorative aluminum plate with a pattern in the middle looks nice. Below it is an element responsible for the illumination of the radiator. It is powered by a four-pin wire, which is wrapped in a nylon braid closer to the bottom of the cooler.
The contact of the DEEPCOOL GAMMAXX GT heat pipes with the heat distributing cover of the processor is carried out without any intermediaries in the form of a copper plate — exclusively through the thermal interface. Initially, there is a film on the base that protects it from damage — do not forget to remove it during installation.
Footprint — small (35 x 35 mm). It is hardly worth recommending for use in high-end high-end platforms (for example, Intel Socket LGA2066), where it cannot completely cover the CPU cover. As for the quality of processing, traces of this procedure are visible to the naked eye, due to which there is a slight roughness of the surface. Also, thermal paste will have to fill the longitudinal grooves at the border of the neighborhood of aluminum and copper. But we have no complaints about the plane of the tubes.
On the reverse side of the base we have only the DEEPCOOL logo — beautiful and in the spirit of more expensive solutions, but there will be no one to look at it here. On the sides of the aluminum plate that unites all the heat pipes into a single base, there are ears with threaded holes for mounting.
Unlike the junior models of the line, the GT version cannot be called a budget version, which is clearly reflected in its design. So, the usual black and blue turntable was replaced by a more suitable black and white propeller.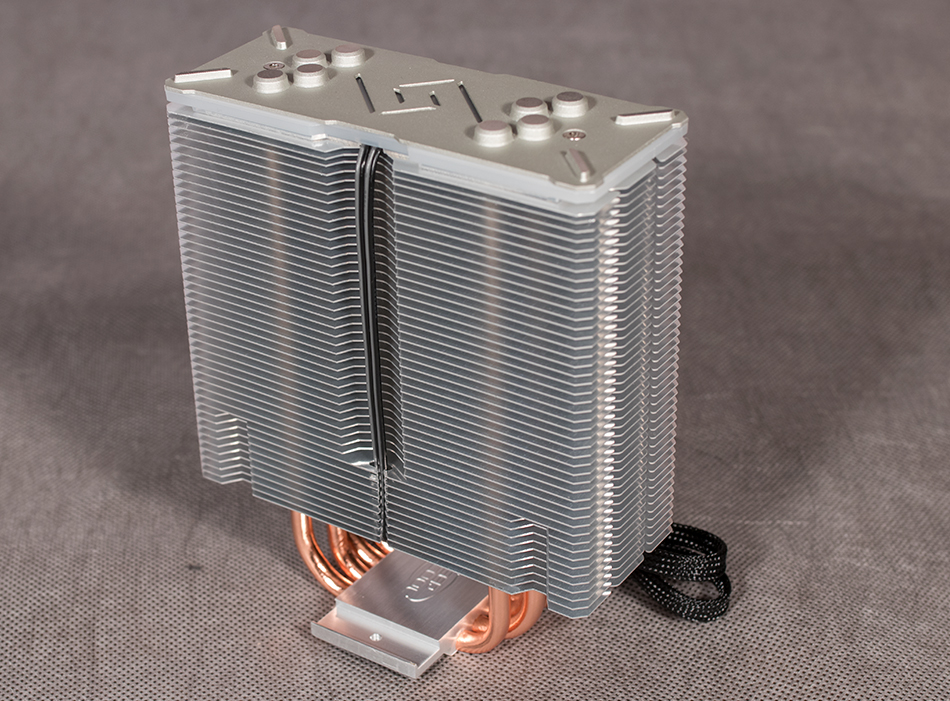
It is attached to the radiator with a pair of supplied brackets. Although the manufacturer does not mention this, the symmetrical design will certainly allow you to place another 120mm turntable on the back side. Alas, she herself, as well as the brackets for fastening, will have to be found on her own.
Pale white 120mm fan impeller with grooves on both sides of the blades, apparently a combination of decoration and aerodynamic shapes. Hydro Bearing, or hydraulic bearing (not to be confused with hydrodynamic) is a relatively budget option, but this is no longer a sleeve. The propeller promises to rotate at a frequency of 500 to 1500 rpm with a certain error, of course. And power is supplied to it through a 4-pin cable 30 cm long. The second cable coming out of it is used to organize LED backlighting.
The same black anti-vibration pads made of dense rubber are masked on the black frame at the corners of the turntable — it’s nice that they have not been forgotten here.
So, the fan impeller, the decorative cutout in the top plate and the plastic under it — all this is designed to shine with rainbow colors, and not just somehow, but to the beat of the motherboard and other components. It looks beautiful — this is the main highlight of the device.
The illumination can be controlled in two ways. The first is when connecting the cooler to the 4-pin RGB connector on the motherboard, if any. In this case, the glow mode will be set by it. The second is to use a complete cable with an integrated controller. It is already connected to the SATA power connector and is controlled using three buttons. The first allows you to sequentially switch colors (red, green, blue, orange, purple, cyan and white) and flicker modes. The second is responsible for adjusting the brightness of the backlight and even turning it off. And with the help of the third, you can select the frequency of color changes in flashing modes. You can evaluate all available modes on the official website of the manufacturer.