database — why sequential write is faster than random write on HDD
The write performance of a disk is influenced by the physical properties of the storage device (e.g. the physical rotational speed in revolutions per minute in case of a mechanical disk), the disk I/O unit to I/O request size ratio and the OS/application.
One major drawback of traditional mechanical disks is that, for an I/O request to be honored, the head has to reach the desired starting position (seek delay) and the platter has to reach the desired starting position (rotational delay).
This is true for sequential and random I/O. However, with sequential I/O, this delay gets considerably less noticeable because more data can be written without repositioning the head. An «advanced format» hard disk has a sector size of 4096 bytes (the smallest I/O unit) and a cylinder size in the megabyte-range. A whole cylinder can be read without repositioning the head. So, yes, there’s a seek and rotational delay involved but the amount of data that can be read/written without further repositioning is considerably higher. Also, moving from one cylinder to the next is significantly more efficient than moving from the innermost to the outermost cylinder (worst-case seek).
Writing 10 consecutive sectors involves a seek and rotational delay once, writing 10 sectors spread across the disk involves 10 counts of seeks and rotational delay.
In general, both, sequential and random I/O involve seek and rotational delays. Sequential I/O takes advantage of sequential locality to minimize those delays.
As you know, a solid-state disk does not have moving parts because it’s usually built from flash memory. The data is stored in cells. Multiple cells form a page — the smallest I/O unit ranging from 2K to 16K in size. Multiple pages are managed in blocks — a block contains between 128 and 256 pages.
The problem is two-fold. Firstly, a page can only be written to once. If all pages contain data, they cannot be written to again unless the whole block is erased. Assuming that a page in a block needs to be updated and all pages contain data, the whole block must be erased and rewritten.
Secondly, the number of write cycles of an individual block is limited. To prevent approaching or exceeding the maximum number of write cycles faster for some blocks than others, a technique called wear leveling is used so that writes are distributed evenly across all blocks independent from the logical write pattern. This process also involves block erasure.
To alleviate the performance penalty of block erasure, SSDs employ a garbage collection process that frees used pages that are marked as stale by writing block pages excluding stale pages to a new block and erasing the original block.
Both aspects can cause more data to be physically read and written than required by the logical write. A full page write can trigger a read/write sequence that is 128 to 256 times larger, depending on the page/block relationship. This is known as write amplification. Random writes potentially hit considerably more blocks than sequential writes, making them significantly more expensive.
As outlined before, a disk imposes a minimum on the I/O unit that can be involved in reads and writes. If a single byte is written to disk, the whole unit has to be read, modified, and written.
In contrast to sequential I/O, where the likelihood of triggering large writes as the I/O load increases is high (e.g. in case of a database transaction log), random I/O tends to involve smaller I/O requests. As those requests become smaller than the smallest I/O unit, the overhead of processing those increases, adding to the cost of random I/O. This is another example of write amplification as a consequence of storage device characteristics. In this case, however, HDD and SSD scenarios are affected.
The OS has various mechanisms to optimize both, sequential and random I/O.
A write triggered by an application is usually not processed immediately (unless requested by the application by means of synchronous/direct I/O or a sync command), the changes are executed in-memory based on the so-called page cache and written to disk at a later point-in-time.
By doing so, the OS maximizes the total amount of data available and the size of individual I/Os. Individual I/O operations that would have been inefficient to execute can be aggregated into one potentially large, more efficient operation (e.g. several individual writes to a specific sector can become a single write). This strategy also allows for I/O scheduling, choosing a processing order that is most efficient for executing the I/Os even though the original order as defined by the application or applications was different.
Consider the following scenario: a web server request log and a database transaction log are being written to the same disk. The web server write operations would normally interfere with the database write operations if they were executed in order, as issued by the applications involved. Due to the asynchronous execution based on the page cache, the OS can reorder those I/O requests to trigger two large sequential write requests each. While those are being executed, the database can continue to write to the transaction log without any delay.
One caveat here is that, while this should be true for the web server log, not all writes can be reordered at will. A database triggers a disk sync operation (fsync on Linux/UNIX, FlushFileBuffers on Windows) whenever the transaction log has to be written to stable storage as part of a commit. Then, the OS cannot delay the write operations any further and has to execute all previous writes to the file in question immediately. If the web server was to do the same, there could be a noticeable performance impact because the order is then dictated by those two applications. That is why it’s a good idea to place a transaction log on a dedicated disk to maximize sequential I/O throughput in the presence of other disk syncs / large amounts of other I/O operations (the web server log shouldn’t be a problem). Otherwise, asynchronous writes based on the page cache might not be able to hide the I/O delays anymore as the total I/O load and/or the number of disk syncs increase.
Difference Between in Sequential & Random Speed of an SSD or HDD
Mainly the performance of a drive is measured by two different types of data operations, sequential and random operations. So, by using the ‘Sequential/Random Speed Stats’ you can easily calculate any drive’s performance which you can use to compare it with others and make a wise decision.
As we all know, every data that we saved in our computer is written on blocks. ‘Sequential Read/Write Speed’ simply means that how fast that drive can write or read the data from a series of blocks. On the other hand, when we turn on our computer, it starts to process numbers of files from multiple locations, which simply means that the drive needs to access the data from random blocks, again and again;
And that’s where the ‘Random Read Speed’ comes in.
To understand ‘Random write speed’, let suppose you are installing software or an OS update (a little one). You’ll see that a minor update or an installation will surely take a while, however, a 40GB 4K video will load easily to play or seak. Generally, updation or installation takes time because the software needs to write multiple files at multiple locations, which basically take time as compare to write a big file in a series of blocks.
So, In sequential operations mainly large data chunks are operated in a collective manner without repeated seeks. Sequential operations work for bigger and serially managed data blocks whereas random operations work with small and randomly located, scattered data blocks, causing more latency time.
To understand ‘Sequential and Random Read/Write Speed’, first, you’ll need to understand ‘IOPS’.
IOPS is a commonly used technical acronym for the phrase ‘Input/Output Operations Per Second’, it is a scale for measuring the performance of a storage device or network;
More value in the IOPS signifies the capability of executing more operations per second. In simple words, data operations speed is proportionate to the IOPS value of the drive. More read and write operations per second enables the drive for performing smoother and faster.
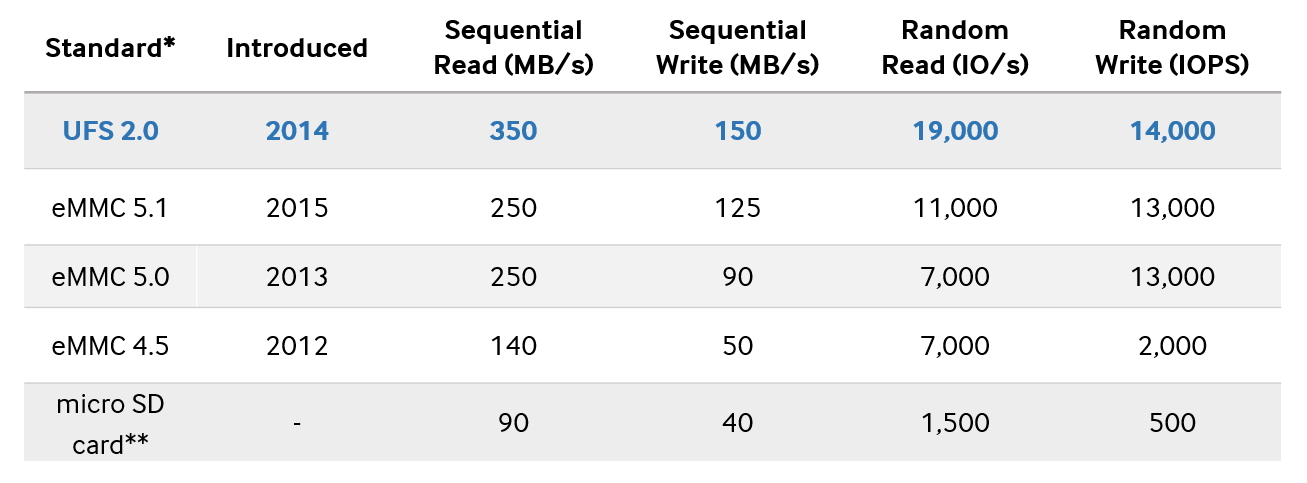
In solid-state drives or you can say SSDs, IOPS is always a lot higher than hard disk drives or HDDs. HDDs work on the basis of RPM or revolutions per minute (being circular disks the drive head moves around inside) which is usually 7200 RPM with a value of 90 IOPS, but SSDs are made of solid-state flash memory banks and can provide an IOPS of more than 400,000.
You know that by using a simple equation you can easily convert the IOPS digits to MB/s for the better understanding.
IOPS = (MB/s Throughput / KB per IO) * 1024
or
MB/s = (IOPS * KB per IO) / 1024
Let’s say that you have an SSD claiming a Random 4K write speed of 40,000 IOPS and it achieves 155MB/s in the CrystalDiskMark with the QD32 write test. So to convert the 155MB/s to IOPS, we perform the following calculation:
- IOPS = (155 / 4) * 1024
- IOPS = 38.75 * 1024
- IOPS = 39,680
To see what throughput we need to achieve to match the actual 40,000 IOPS claim, we can do this calculation in reverse:
- MB/s = (40,000 * 4) / 1024
- MB/s = 160,000 / 1024
- MB/s = 156.25
Sequential & Random operations in SSDs
In SSDs, operations are always faster as there are no moving drive heads for data operations; all the data cells are in solid state and working simultaneously in a lightning fast speed. For this flash drives, it all depends upon the device’s internal controller logic and memory interface speed.
In sequential and random operations the NAND package of SSD does data locating and arranging it all in a serial manner to execute the task without seeking, which majorly transforms operations looking sequential and smoother.
Sequential & Random Operations in HDDs
In HDDs both the operations go slow because of the moving drive heads, when the fastest HDD can accomplish 15k RPM and for operational activities to read and write the disk keeps rotating. IOPS of the HDDs are dependent on random seek time. While operating in a sequential manner, first it seeks the storage location on the disk and then operates the data blocks serially, otherwise, in random operations it seeks and operate time and again to execute the task.
#Ultimate Performance Comparison
In our real-world activities it never shows up significantly, but SSDs are a lot faster in executing tasks with smaller data blocks than HDDs. In sequential data write sector SSDs can perform approximately 3.4 times faster whereas in the read sector it is faster by about 3.5 times to 5 times.
But when it comes to random operations the only latency time SSDs take is to reprogram the controller which makes it more than 50 times faster to process read requests and almost 100 times faster to process the write ones.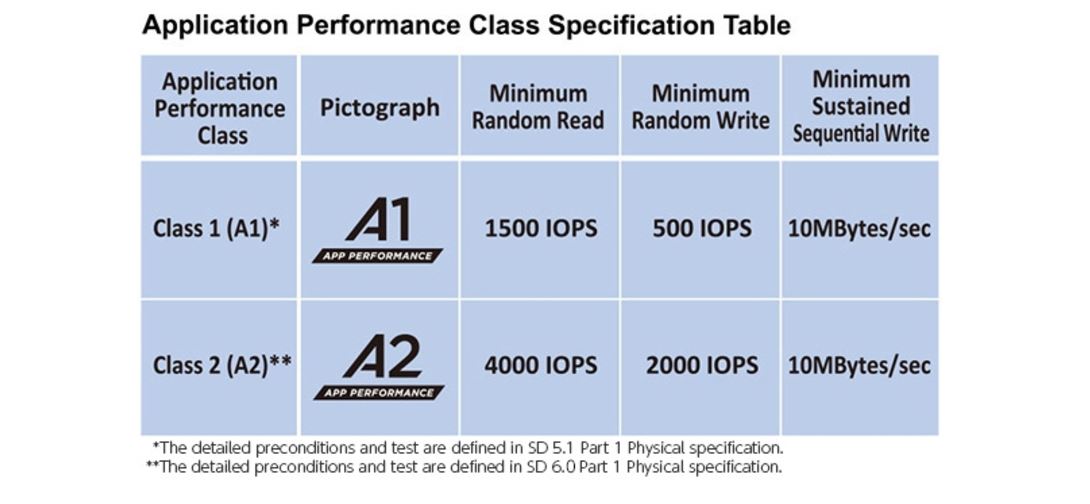
In transfer operations, SSDs always read and write upon the basic unit of pages. Otherwise, it consumes less power and works more efficiently as a storage device. As I said, booting up an OS can show users the proper speed differences of random operations in SSDs and HDDs.
“That’s all for now, thanks for sticking with the article. It is always good to let me know about your views, in the comments below.” ?
Azure Serial Console for Linux — Virtual Machines
- Article
- Reading takes 14 minutes
Serial console in the Azure portal provides text-based console access for Linux VMs and virtual machine scale set instances. This serial connection connects to the ttys0 serial port of the virtual machine or virtual machine scale set instance, allowing it to be accessed regardless of the state of the network or operating system. The serial console can only be accessed using the Azure portal and is only allowed to users who have the Contributor or higher role for the VM or virtual machine scale set.
The serial console works the same way for virtual machines and virtual machine scale set instances. In this document, all references to virtual machines will implicitly include virtual machine scale set instances unless otherwise noted.
Serial Console is publicly available in Azure Global Regions and is available in public preview on Azure Government. It is not yet available in the Azure China cloud.
For Windows Serial Console documentation, see Serial Console for Windows.
The serial console is compatible with Boot Managed Diagnostics storage account.
Prerequisites
-
Your virtual machine or virtual machine scale set instance must use the resource management deployment model. Classic deployments are not supported.
-
Your account using the serial console must have the VM Contributor role for the VM and the Boot Diagnostics storage account.

-
Your virtual machine or virtual machine scale set instance must have a password-based user. You can create one using the VM Access Extension Password Reset feature. Select Reset password in section Help .
-
The virtual machine instance or virtual machine scale set must have boot diagnostics enabled.
-
For options specific to Linux distributions, see Linux distribution availability for serial console.
-
The virtual machine or virtual machine scale set instance must be configured for serial output to
ttys0. This is the default for Azure images, but you’ll want to double check this on custom images. See below for more information.
Note.
The serial console requires a local user with a configured password. Virtual machines or virtual machine scale sets that are configured with an SSH public key only will not be able to log into the serial console.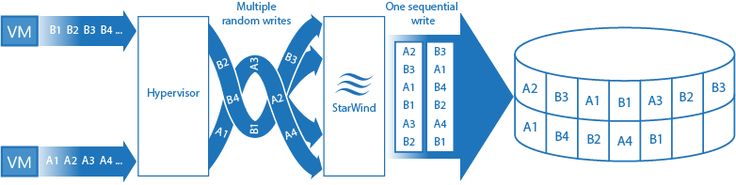 To create a local user with a password, use the VMAccess extension available in the portal by choosing Reset password in the Azure portal, and create a local user with a password.
You can also reset the admin password on the account using GRUB to boot in single user mode.
Linux distribution availability for serial console
For the serial console to function properly, the guest operating system must be configured to read and write console messages to the serial port. Most supported Azure Linux distributions have a serial console configured by default. Choice Serial Console in section Help The Azure portal provides access to the serial console.
If nothing is displayed in the serial console, make sure boot diagnostics is enabled on the virtual machine. Pressing the Enter key often resolves issues that cause nothing to appear in the serial console.
| Distribution | Serial console access |
|---|---|
| Red Hat Enterprise Linux | Serial console access is enabled by default. |
| Centos | Serial console access is enabled by default. |
| Debian | Serial console access is enabled by default. |
| Ubuntu | Serial console access is enabled by default. |
| CoreOS | Serial console access is enabled by default. |
| SUSE | New SLES images available on Azure have serial console access enabled by default. If you’re running earlier versions (10 or earlier) of SLES on Azure, see the KB article on enabling the serial console. |
| Oracle Linux | Serial console access is enabled by default. |
Custom Linux images
To enable serial console for a custom Linux VM image, enable console access in file /etc/inittab to start a terminal at ttyS0 . Example: S0:12345:respawn:/sbin/agetty -L 115200 console vt102 . You may also need to spawn getty on ttyS0.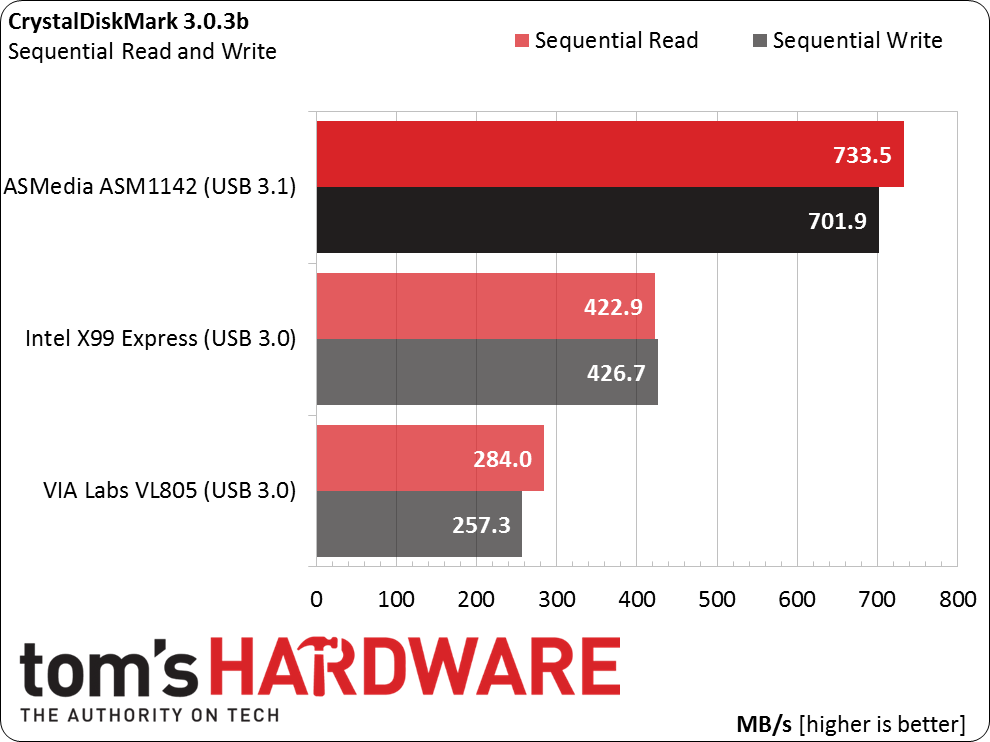 This can be done with
 systemctl start [email protected] .
You’ll also want to add ttys0 as a destination for serial output. For more information about configuring a custom image to work with the serial console, see General system requirements in Create and upload a Linux VHD to Azure.
If you are building a custom kernel, consider enabling the following kernel flags: CONFIG_SERIAL_8250=y and CONFIG_MAGIC_SYSRQ_SERIAL=y . The configuration file is usually located in the path /boot/ .
Common Serial Console Access Scenarios
| Scenario | Actions in the serial console |
|---|---|
| Non-functional FSTAB file | Press the ENTER key to continue and use a text editor to correct the FSTAB file. This may require single user mode. For more information, see the Serial Console section of Troubleshooting fstab issues and Using the Serial Console to Access GRUB and Single User Modes. |
| Incorrect firewall rules | If you have configured iptables to block SSH connections, you can use the serial console to interact with the virtual machine without the need for SSH. More information can be found on the men’s iptables page. Similarly, if the firewall is blocking SSH access, you can access the virtual machine via serial console and reconfigure the firewall. See the firewall documentation for more information. |
| File system corruption or check | For more information about troubleshooting corrupted file systems using the serial console using the serial console, see Azure Linux Virtual Machine Serial Console. |
| SSH configuration problems | Access the serial console and change the settings. The serial console can be used regardless of the virtual machine’s SSH configuration, as the virtual machine does not require a network connection to run. For troubleshooting guidance, see Troubleshoot SSH connections to an Azure Linux VM that crashes, throws errors, or refuses. For more information, see Detailed steps for troubleshooting SSH when connecting to a Linux VM in Azure. For more information, see Detailed steps for troubleshooting SSH when connecting to a Linux VM in Azure. |
| Loader interaction | Restart the virtual machine from the serial console column to access GRUB on the Linux virtual machine. For more information and information about distributions, see Using the Serial Console to Access GRUB and Single User Modes. |
Disable serial console
Serial console access is enabled by default for all subscriptions. The serial console can be disabled at the subscription or virtual machine or virtual machine scale set level. For detailed instructions, see Enable or disable the Azure Serial Console.
Serial Console Security
Using the Serial Console with Custom Boot Diagnostics Storage Account Firewall Enabled
The serial console uses the storage account configured for Boot Diagnostics in the connection worker process. If the firewall is enabled on this storage account, the Serial Console Service IP addresses must be added as exceptions. To do this, follow these steps:
-
Navigate to the boot diagnostics storage account custom firewall settings that you enabled.
Note.
To determine which storage account is enabled for the virtual machine, under Support and Troubleshooting , select Diagnostic Settings Boot.
-
Add Serial Console Service IP addresses as firewall exceptions based on the geographic location of the virtual machine.
The following table lists the IP addresses that should be allowed as firewall exceptions based on the region or geographic location of the virtual machine. This is a subset of the complete list of serial console IP addresses that are processed for inclusion in service tags.
IP address Regions Geography 20.205.69.28 East Asia, South East Asia AsiaPacific 20.  195.85.180
 East Asia, South East Asia AsiaPacific 20.53.53.224 Australia Central, Australia Central 2, Australia East, South East Australia Australia 20.70.222.112 Australia Central, Australia Central 2, Australia East, South East Australia Australia 191.234.136.63 South Brazil, South East Brazil Brazil 20.206.0.194 South Brazil, South East Brazil Brazil 52.228.86.177 Central Canada, Eastern Canada Canada 52.242.40.90 Central Canada, Eastern Canada Canada 20.45.242.18 Canary (EUAP) 20.51.21.252 Canary (EUAP) 52.146.139.220 Northern Europe, Western Europe Europe 20.  105.209.72
 Northern Europe, Western Europe Europe 20.111.0.244 Central France, Southern France France 52.136.191.10 Central France, Southern France France 51.116.75.88 Northern Germany, Central West Germany Germany 20.52.95.48 Northern Germany, Central West Germany Germany 20.192.168.150 Central India, South India, West India India 20.192.153.104 Central India, South India, West India India 20.43.70.205 East Japan, West Japan Japan 20.189.228.222 East Japan, West Japan Japan 20.200.196.96 Central Korea, South Korea Republic of Korea 52.  147.119.29
 Central Korea, South Korea Republic of Korea 20.100.1.184 Western Norway, Eastern Norway Norway 51.13.138.76 Western Norway, Eastern Norway Norway 20.208.4.98 Northern Switzerland, Western Switzerland Switzerland 51.107.251.190 Northern Switzerland, Western Switzerland Switzerland 20.45.95.66 Central UAE, North UAE UAE 20.38.141.5 Central UAE, North UAE UAE 20.90.132.144 Southern UK, Western UK United Kingdom
20.58.68.62 Southern UK, Western UK United Kingdom
51.12.72.223 Central Sweden, Southern Sweden Sweden 51.12.  22.174
 Central Sweden, Southern Sweden Sweden 20.98.146.84 US Central, US East 2, US East, US North Central, US South Central, US West 2, US West 3, US West Central, US West US 20.98.194.64 US Central, US East 2, US East, US North Central, US South Central, US West 2, US West 3, US West Central, US West US 20.69.5.162 US Central, US East 2, US East, US North Central, US South Central, US West 2, US West 3, US West Central, US West US 20.83.222.102 US Central, US East 2, US East, US North Central, US South Central, US West 2, US West 3, US West Central, US West United States 20.141.10.130 All US Government Cloud Regions USGov
52.127.55.131 All US Government Cloud Regions USGov
Important!
- The IP addresses that must be resolved are for the region where the virtual machine is located.
 For example, a VM deployed in the Northern Europe region must add the following IP exceptions to the storage account firewall for the Europe geographic region: 52.146.139.220 and 20.105.209.72. Review the table above to find the correct IP addresses for your region and geographic region.
 - In the current serial console operation, a web socket is opened to an endpoint such as
.gateway.serialconsole.azure.com serialconsole.azure.comendpoint is allowed for browser clients in your organization. In the cloud US Government (Fairfax) endpoint suffix is serialconsole.azure.us.
For more information about adding IP addresses to the storage account firewall, see Configure Azure Storage and VNet firewalls: Manage IP network rules.
- The IP addresses that must be resolved are for the region where the virtual machine is located.
After successfully adding IP addresses to the storage account firewall, try connecting the serial console to the virtual machine again. If you’re still having connectivity issues, make sure the correct IP addresses are excluded from the storage account firewall for the VM region.
Access security
Access to the serial console is restricted to users who have the VM Contributor role or a later role to the VM. If your Azure Active Directory tenant requires multi-factor authentication (MFA), then serial console access will also require multi-factor authentication because serial console access is through the Azure portal.
Channel Security
All data sent back and forth is encrypted in transit using TLS 1.2 or later.
Data storage and encryption
The Azure Serial Console does not validate, validate, or store data sent to and from the virtual machine’s serial port. Therefore, there is no inactive data to encrypt.
Use host-based encryption to ensure that all in-memory data transferred to disks by virtual machines running Azure Serial Console is encrypted. Host-based encryption is enabled by default for all Azure Serial Console connections.
Data location
Azure Portal or Azure CLI act as remote terminals for the VM’s serial port. Since these terminals cannot connect directly to the servers hosting the virtual machine over the network, an intermediate service gateway is used to proxy the terminal traffic. Azure Serial Console does not store or process this customer data. The service gateway that relays the data will be in the VM’s geographic location.
Audit logs
All serial console access is currently logged in the virtual machine boot diagnostic logs. Access to these logs is owned and controlled by the administrator of the Azure VM.
Caution
Console passwords are not logged. However, if commands run in the console contain or output passwords, secrets, usernames, or any other form of personal data, they will be written to the virtual machine boot diagnostic logs. They will be written along with all other visible text as part of the implementation of the serial console’s scroll back functionality. These logs are cyclical and can only be accessed by users with read permissions on the diagnostics storage account. If you are entering any data or commands containing secrets or personal details, it is recommended to use SSH unless a serial console is absolutely necessary.
Parallel usage
If a user is connected to a serial console and another user successfully requests access to this virtual machine, the first user will be disconnected and the second user will be logged into the same session.
Warning
This means that a disabled user will not be logged out. The ability to force logout on disconnect (using SIGHUP or a similar mechanism) is still included in the roadmap. For Windows, the dedicated administrative console (SAC) has automatic timeout enabled; however, for Linux, you can adjust the terminal timeout setting. To do this, add export TMOUT=600 to .bash_profile or .profile for the user that is used to log into the console. This setting expires after 10 minutes.
Accessibility
Accessibility is key to the Azure Serial Console. To do this, we made sure that the serial console would be fully accessible.
Keyboard navigation
Use the TAB key on your keyboard to navigate to the serial console interface from the Azure portal. Your location will be highlighted on the screen. To leave the focus of the serial console window, press keys CTRL + F6 on the keyboard.
Using the Serial Console with a Screen Reader
The serial console has built-in support for a screen reader. When you navigate with a screen reader enabled, you can read alt text for the selected button aloud.
Known issues
We are aware of some issues with the serial console and the virtual machine operating system. Below is a list of these issues and troubleshooting steps for Linux virtual machines. These issues and their workarounds apply to both virtual machines and virtual machine scale set instances. If they don’t match the error you’re seeing, see Common Serial Console Service Errors in Common Serial Console Errors.
| Problem | Risk management |
|---|---|
| Pressing the ENTER key after the connection banner does not display the login prompt. | GRUB may not be configured correctly. Run the following commands: grub2-mkconfig -o /etc/grub2-efi.cfg and/or grub2-mkconfig -o /etc/grub2.cfg . For more information, see Press input does nothing. This issue can occur if you are using a custom virtual machine, a secure device, or a GRUB configuration that causes the Linux serial port connection to fail. |
| Serial console text takes up only a fraction of the screen size (often after using a text editor). | Serial consoles do not support window size negotiation (RFC 1073), which means that the SIGWINCH signal to update the screen size will not be sent, and the virtual machine will not know the size of the terminal. Install xterm or a similar utility to give you the resize command and then run resize . |
| Inserting long lines does not work. | The serial console limits the length of lines inserted into the terminal to 2048 characters to prevent overloading the serial port bandwidth. |
| Erratic keyboard input in SLES BYOS images. Keyboard input is only occasionally recognized. | This is a problem with the Plymouth package. Plymouth should not be run on Azure as a splash screen is not required and Plymouth prevents the platform from using the serial console. Remove Plymouth from sudo zypper remove plymouth and reboot it. Also, change the GRUB config kernel line by adding plymouth.enable=0 to the end of the line. This can be done by changing the boot entry at boot time, or by changing the GRUB_CMDLINE_LINUX line in /etc/default/grub , rebuilding GRUB with grub2-mkconfig -o /boot/grub2/grub.cfg help, and then rebooting. |
FAQ
Q. How do I submit feedback?
A. Provide feedback by creating a GitHub issue at https://aka.ms/serialconsolefeedback. Alternatively, you can submit feedback via [email protected] or in the virtual machines category https://feedback.azure.com .
Q. Does the serial console support copy and paste?
O. Yes. To copy and paste into the terminal, use CTRL + SHIFT + C and CTRL + SHIFT + V .
Q. Can I use a serial console instead of an SSH connection?
A. Although this use may seem technically possible, the serial console is intended primarily for troubleshooting situations where SSH connection is not possible. We do not recommend using the serial console as a replacement for SSH for the following reasons:
- The serial console does not have as much bandwidth as SSH. Since this is a text-only connection, more complex GUI interactions are difficult.

- Serial console access is currently only possible using a username and password. Because SSH keys are much more secure than username/password combinations, it is recommended that you use SSH over a serial console from a login security point of view.
Q. Who can enable or disable the serial console for my subscription?
A. To enable or disable the serial console at the subscription level, you must have Write permissions to the subscription. Roles that have write permission include the administrator or owner roles. Custom roles can also have write permissions.
Q. Who can access the serial console for my virtual machine or virtual machine scale set?
A. To access the serial console, you must have the Virtual Machine Contributor role or a later role for the Virtual Machine Scale Set.
Q. My serial console is not displaying anything, what should I do?
A. The image is most likely not properly configured for serial console access. To configure an image to include a serial console, see Linux distribution availability for serial console.
Q. Is the serial console available for virtual machine scale sets?
Oh yes! Cm . See Getting Started with the Serial Console.
Q. If I configure a virtual machine or virtual machine scale set using only SSH key authentication, can I still use the serial console to connect to the virtual machine or virtual machine scale set instance?
O. Yes. Because the serial console does not require SSH keys, you only need to set up a username/password combination. You can do this by selecting Reset password in the Azure portal and using these credentials to log in to the serial console.
What to do next
- Use the serial console to access GRUB and single user modes.
- Use the serial console for NMI and SysRq calls.
- Learn how to use the serial console to enable GRUB on various distributions
- The serial console is also available for Windows virtual machines.
- Additional information about boot diagnostics.
If you have questions or need help, create a support ticket or contact the Azure community for support. You can also submit product feedback to Azure Community Support.
Automatic line numbering — Microsoft Support
Unlike other Microsoft 365 programs, Excel doesn’t provide a button for automatic data numbering. However, you can easily add consecutive numbers to rows of data by dragging a fill handle to fill a column with a sequence of numbers, or by using the ROW function.
Tip: If you need a more advanced automatic numbering system and you have Access installed on your computer, you can import Excel data into an Access database. In it, you can create a field that automatically generates a unique number when a new record is added to the table.
In this article
-
Filling a column with a sequence of numbers
-
Numbering Lines with the ROW Function
-
Show or hide the fill handle
Filling a column with a sequence of numbers
-
Enter the starting value for the sequence.
-
Enter a value in the next cell to set the fill pattern.
Tip: For example, if you want the sequence 1, 2, 3, 4, 5…, enter 1 and 2 in the first two cells. If you want to enter the sequence 2, 4, 6, 8…, enter the values 2 and 4.
-
Select the cells containing the initial values.
Note: In Excel 2013 and later, button Quick Analysis is displayed by default when multiple cells containing data are selected.
 You can ignore the button to complete this procedure.
 -
Drag the fill handle to the range you want to fill.
Note: As you drag the fill handle across cells, Excel shows a preview value. To change the swatch, drag the fill handle while holding down the right mouse button, and then select the swatch.
To enter a sequence in ascending order, drag the marker down or to the right. To enter a sequence in descending order, drag the marker up or to the left.
Tip: If the fill handle is not visible, it may need to be displayed first. For more information, see Show or hide the fill handle.
Note: When rows are added, moved, or deleted, these numbers are not automatically updated. Sequential numbering can be updated manually by selecting two numbers in the correct sequence and dragging the fill handle to the end of the numbered range.

Select the first cell in the range you want to fill.
Line numbering with the ROW function
-
In the first cell of the range you want to number, enter the formula =ROW(A1) .
Function ROW returns the number of the referenced row. For example, the function =ROW(A1) returns the number 1 .
-
Drag the fill handle to span the range you want to fill.
Tip: If the fill handle is not visible, it may need to be displayed first. For more information, see Show or hide the fill handle.
-
These numbers are updated when the data is sorted.
 When adding, moving, or deleting rows, the sequence may be interrupted. The sequence can be updated manually by selecting two numbers in the correct sequence and dragging the fill handle to the end of the numbered range.
 -
If you use the ROW function and want numbers to be inserted automatically when new data rows are added, convert the data range to an Excel spreadsheet. All rows added to the end of the table are consecutively numbered. For more information, see Create or delete an Excel table in a worksheet.
You can use function 9 to enter certain sequential numeric codes, such as purchase order codes.0782 LINE together with function TEXT . For example, to start a numbered list at 000-001 , enter the formula =TEXT(ROW(A1),»000-000″) in the first cell of the range you want to number, and drag the fill handle to the end of the range.
Show or hide the fill handle
The fill handle is displayed by default, but you can turn it on or off.
-
In Excel 2010 and later versions, click the File tab and select Options .
In Excel 2007, click the Microsoft Office Button , and then click Item Excel Options.
-
In category Advanced in section Edit Options check or uncheck Allow fill handles and cell dragging to show or hide the fill handle.
Note: To prevent overwriting existing data when you drag the fill handle, Warn before cells are overwritten is selected by default.