ALT + F4 keys Stopped Working Problem in Windows 11/10. Automated Solution Included. — Auslogics Blog
Contents
- Fix 1: Restart Your Computer
- Fix 2: Use the Fn Key
- Fix 3: Update and Reboot Your Computer
- Fix 4: Check the Keyboard Driver
- Fix 5: Disable Sticky Keys
- Fix 6: Troubleshoot Your Keyboard
- Fix 7: Tweak Your Windows Registry Settings
- Fix 8: Replace Your Keyboard
- Fix 9: Disable Legacy Fx Function
- Fix 10: Check for Hardware Problems
- Conclusion
Even before I became fully conversant with using a personal computer, I had already learned the Alt + F4 command. When I was much younger, I had to remind myself regularly, “Use Alt + F4 to close a window or to shut down a computer system.”
It might be a real shocker if your computer does nothing when you use the Alt + F4 combo. If that is what happened to you, don’t begin to think that you got the shortcut wrong or that you didn’t press it the right way. Something could have gone wrong on your PC, and that’s why you should learn how to fix the “Windows Alt + F4 not working” error in Windows 10.
The Alt + F4 command usually closes an existing window (quite similar to what the “Esc” key does, which is to interrupt a process that is running). For example, you don’t need to use a mouse to close a Microsoft Word document window – press the Alt and F4 keys and watch your computer do the trick for you.
You can also use the Alt and F4 keys to shut down a system, hibernate it, put it to sleep, or even change users (depending on what you have allowed in the shutdown menu options via your computer’s control panel). Simply press the Alt key and F4 key and then scroll down to the action you want your computer to perform.
So much for two simple keys on your keyboard, right? When you press the Alt + F4 shortcut on your keyboard and it does nothing, try any of the easy fixes below. If it does not solve the problem, keep trying other solutions until you have found the one that works.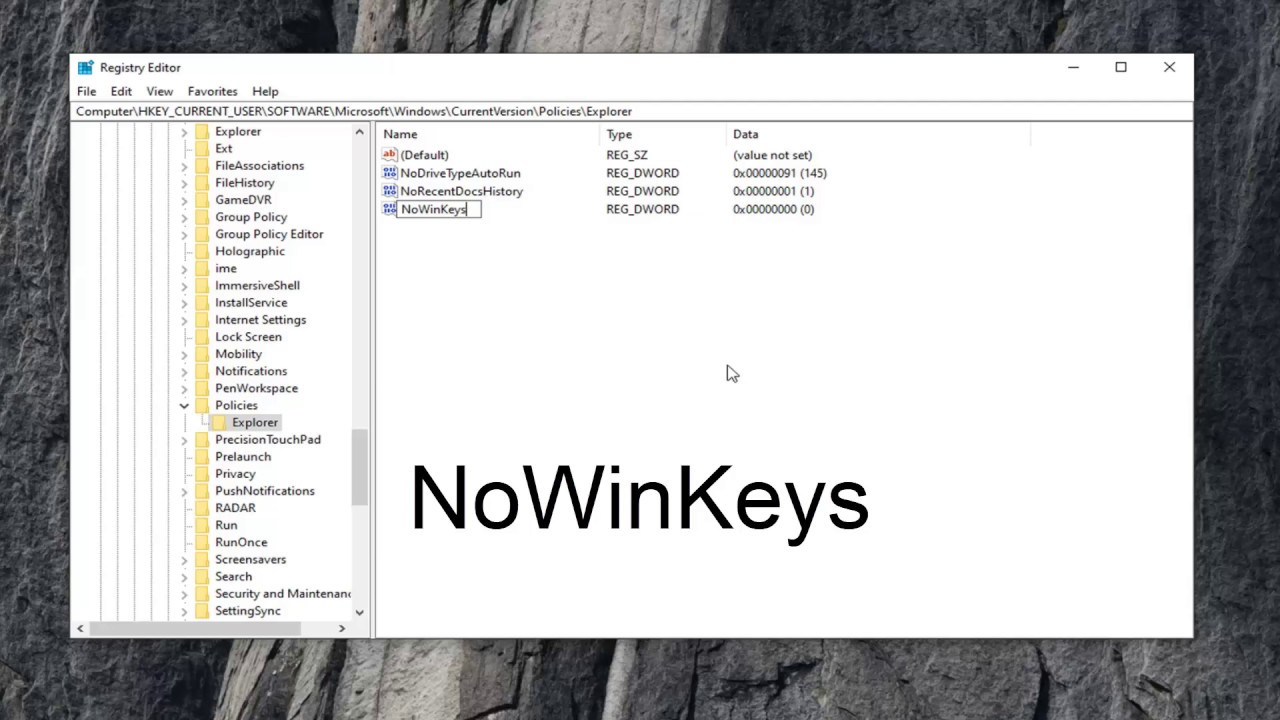
Fix 1: Restart Your Computer
Sometimes, you can resolve the Alt + F4 shortcut problem on Windows 10 by restarting your computer. Anyway, restarting your computer should be your first action when you encounter any confusing issue on Windows 10.
There are a few ways to restart your Windows PC if the ALT + F4 shortcut is not functioning. One way is to click the Start button, then click the Power symbol, and then choose Restart.
Another way is to press and hold the Ctrl + Shift + Esc keys to open Task Manager, then click the File menu and click Restart. You can also use the Windows Security toolbar to restart your PC.
However, if restarting your computer does not solve the problem, try the next solution.
Fix 2: Use the Fn Key
The Function key (Fn, or FN on some keyboards) is used as a modifier, and it is present on most – if not all – laptops. The main reason why it exists is because of the compact nature of laptops –it helps to perform certain actions using your keyboard.
On my keyboard, for example, I can increase the brightness of my display screen by holding down the Function key and pressing the right arrow key until I am satisfied with the intensity of the light on my screen.
The Function key is often located between the Ctrl key and the Windows key. It may be somewhere else, though, so make sure to find it.
If the Alt + F4 combo fails to do what it is supposed to do, then press the Fn key and try the Alt + F4 shortcut again. Still not working? Try pressing Fn + F4. If you still cannot notice any change, try holding down Fn for a few seconds.
If that doesn’t work too, try ALT + Fn + F4. This should work. If it doesn’t, something else may be the problem. Try our third fix and see if that has solved the ALT + F4 problem.
Fix 3: Update and Reboot Your Computer
Windows 10 needs regular updates, and something that needs to be updated at this moment might be what is affecting your ALT + F4 command. Let me show you how to update and reboot your computer in the following simple steps:
- Click the Start menu button in the bottom-left corner of your screen and type “Settings.
 ”
” - Click “Settings,” and then click “Update & Security.”
- You’ll see either “Updates available” or “You’re up to date.” If what appears on the screen is “You’re up to date,” then you don’t need to update your PC. However, if you see “Updates available,” then you have to update your PC.
- Update your PC and reboot it; then try pressing ALT + F4 again to see if it works.
Did it work? Don’t worry if it didn’t – just move on to the fourth fix.
Fix 4: Check the Keyboard Driver
If updating and rebooting your computer hasn’t made any difference, check your keyboard driver and then uninstall and update it. Follow the steps below to uninstall and update your keyboard driver:
- Press the Windows logo and X keys together and select “Device Manager”.
- Double-click “Keyboards” after the Device Manager window appears.
- Right-click the keyboard driver you want to uninstall and select “Uninstall device.”
- You will be prompted to either cancel your action or to continue with uninstallation.
- Restart your computer after uninstalling the driver. Windows will automatically reinstall it.
Alternatively, you can use an uninstaller to help you uninstall the driver.
Use the procedure described above to access your keyboard driver. This time, click “Update driver” instead of “Uninstall device,” and then select “Search automatically for updated driver software.”
Windows will search for the latest keyboard driver update and install it. After that, you should restart your computer to save the changes.
Instead of going through that long process, you can use Auslogics Driver Updater to make things simple and easy. Auslogics Driver Updater will help you to locate faulty drivers and install their updates automatically.
Some of the other benefits you can derive from using Auslogics Driver Updater include the following:
- You get to save time that you would otherwise have to spend manually downloading updates.
- Only compatible, up-to-date drivers are downloaded and installed on your computer.

- Your current drivers are backed up so that you can revert to them if you don’t like the new versions.
- The tool has been proven safe and effective by PC experts and users.
Fix 5: Disable Sticky Keys
Holding the Alt, Fn and F4 keys at the same time may be a little challenging. If you don’t like the idea of having to press two or more keys at the same time, sticky keys may be a better alternative for you.
Sticky keys can help you retain the function of a key even when you are not holding it. So, you could press the Alt key and leave it, then press the Fn key and leave it before finally pressing the F4 key.
However, if sticky keys are turned on, it can affect your computer’s response to Alt + F4 when you press it. So, try turning the feature off by clicking the Start menu and typing “ease of access” into the search box. Click “Ease of Access keyboard settings” and then navigate your way to Sticky keys to turn the feature off.
If that hasn’t worked too, please try the fix below.
Fix 6: Troubleshoot Your Keyboard
Windows 10 has a built-in troubleshooter that can help to diagnose your keyboard. Press the Windows and I keys and type “troubleshoot keyboard” into the search box that appears in the window.
Click “Find and fix keyboard problems,” and Windows will help you to troubleshoot your keyboard. This should help to solve the problem. If it doesn’t, try our seventh solution.
Fix 7: Tweak Your Windows Registry Settings
Making certain changes to the Windows registry may also help to solve the problem. To get the job done, follow the instructions below:
- Press the Windows key + R combination, type “regedit” into the “Run” dialog box, and press Enter.
- Select “HKEY_CURRENT_USER” and then navigate your way to “Explorer” by successively clicking “Software,” “Microsoft,” “Windows,” “CurrentVersion,” “Policies,” and “Explorer.”
- Right-click “Explorer”, create a new DWORD (32-bit) value entry and name it “NoWinKeys.
 ”
” - Double-click the entry you just created, select “Decimal” under Base, and then set the value as “0.”
- Save your input and reboot your PC. But if you are editing an existing entry, make sure you create a backup first.
If you still don’t know what to do if Alt + F4 isn’t working in Windows 11, you may need to replace your keyboard.
Fix 8: Replace Your Keyboard
If none of the methods above has worked, you should consider getting a new keyboard. It could be that the keyboard you are currently using is faulty.
This is a relatively simple and straightforward process that can be completed in a few minutes.
First, you’ll need to find a new keyboard. You can purchase a replacement keyboard from your local electronics store or online. Be sure to select a keyboard that is compatible with your computer.
Next, you’ll need to remove the old one and connect the new keyboard to your computer. To do this, you’ll need to find the appropriate cable and plug it into the back of the keyboard. Once the keyboard is plugged in, check if the ALT + F4 shortcut is working.
Fix 9: Disable Legacy Fx Function
If you are troubleshooting an issue with the ALT+F4 shortcut not working to close apps, you can try this alternate method to disable the legacy Fx function in the BIOS.
- Switch off your PC.
- Then press the Power button to restart. Don’t forget to press the F2 or F12 key right away to enter BIOS.
- Next, go to the Configuration tab. Use the arrow keys to navigate.
- Select Hotkey Mode.
- Set it to Disabled.
- Save the changes and exit BIOS Setup.
- Restart your computer.
Fix 10: Check for Hardware Problems
If you still don’t know how to fix the Windows 11 Alt + F4 problem, there are a few things you can do to check for hardware problems.
First, check to see if all of the cables are plugged in correctly. Next, restart your computer and see if the problem persists. If the problem does not go away, it is likely that you have a hardware issue.
To diagnose the problem, you can try running a hardware diagnostic tool. This will allow you to check for problems with your CPU, memory, and other hardware components. If the ALT + F4 key still isn’t working, you may need to contact a professional.
Conclusion
If you find that your Alt + F4 shortcut isn’t working in Windows 11, there are a few things you can try. First, check to see if the shortcut has been disabled in the settings. If it hasn’t, then try restarting your computer. If that doesn’t work, try tweaking your Windows registry settings. Better yet, replace your keyboard.
If you still cannot fix the Alt + F4 combination in Windows 10, please let us know in the comment section below.
winforms — VB.NET- Disabling Alt + F4 From Closing My Application
So, I am designing a fake virus application in vb.net using winform wherein the form’s opacity property would be set to 45 and its background color would be set to white which would give it a frosted look so that it looks that the computer has hanged.
But, the problem is that when i press Alt+F4, it closes the application but i want the application to close only when x key is pressed and i am able to achieve this by putting this code in the form’s keydown event.
          If e.KeyCode = Keys.X Then
                 Application.Exit
          EndIf
But, I don’t know how to disable Alt+F4 From Closing My Application. Is There Any Way To achieve This? Thanks For The Help In Advance.
- vb.net
- winforms
1
To stop the app from closing, use the form closing event. It will prevent the form from closing for any reason:
Private Sub Form1_FormClosing(ByVal sender As System.Object, ByVal e As System.Windows.Forms.FormClosingEventArgs) Handles MyBase.FormClosing
    If (e.CloseReason = CloseReason.UserClosing) Then
        e.Cancel = True
    End If
End Sub
To ext the application using the X key, use keydown event
Private Sub Form1_KeyDown(ByVal sender As System.Object, ByVal e As System.Windows.Forms.KeyEventArgs) Handles MyBase.KeyDown If e.KeyCode = Keys.X Then Application.Exit End IF End Sub
3
try this:
    Private keyPressAltF4 As Boolean = False
Private Sub Form1_Load(ByVal sender As System.Object, ByVal e As System.EventArgs) Handles MyBase.Load
    Me.KeyPreview = True
End Sub
Private Sub Form1_FormClosing(ByVal sender As Object, ByVal e As System.Windows.Forms.FormClosingEventArgs) Handles Me.FormClosing
    If keyPressAltF4 = True Then
        keyPressAltF4 = False
        e.Cancel = True
    End If
End Sub
Private Sub Form1_KeyUp(ByVal sender As Object, ByVal e As System.Windows.Forms.KeyEventArgs) Handles Me.KeyUp
    keyPressAltF4 = False
    If e.Alt = True Then
        If e.KeyCode = Keys.F4 Then
            e.Handled = True
            e = Nothing
            keyPressAltF4 = True
        End If
    End If
End Sub
Sign up or log in
Sign up using Google
Sign up using Facebook
Sign up using Email and Password
Post as a guest
Required, but never shown
Post as a guest
Email
Required, but never shown
By clicking “Post Your Answer”, you agree to our terms of service and acknowledge that you have read and understand our privacy policy and code of conduct.
Shutdown options in the Alt+F4 dialog
Working with Windows 10 is getting pretty easy these days, thanks to the tricks and tweaks available. We have all seen that with each new major release, the Windows OS evolves. But what we miss the most is the basic settings we used when Windows XP was at its peak. In this article, I will show you how to change the default shutdown options in the Alt + F4 dialog box in Windows 10.
The Alt + F4 keyboard shortcut is one of the most commonly used keyboard shortcuts in the Windows environment. If someone knows how to control the system with shortcuts, he/she can easily handle it without even touching the mouse. These shortcuts are easy to use and speed up our work. Using Alt + F4 opens a dialog box with restart (or whatever) as the pre-selected option. Today we will see how to change it to default Shutdown.
It doesn’t matter if there are many other ways to shut down the system, Alt + F4 remains everyone’s favorite.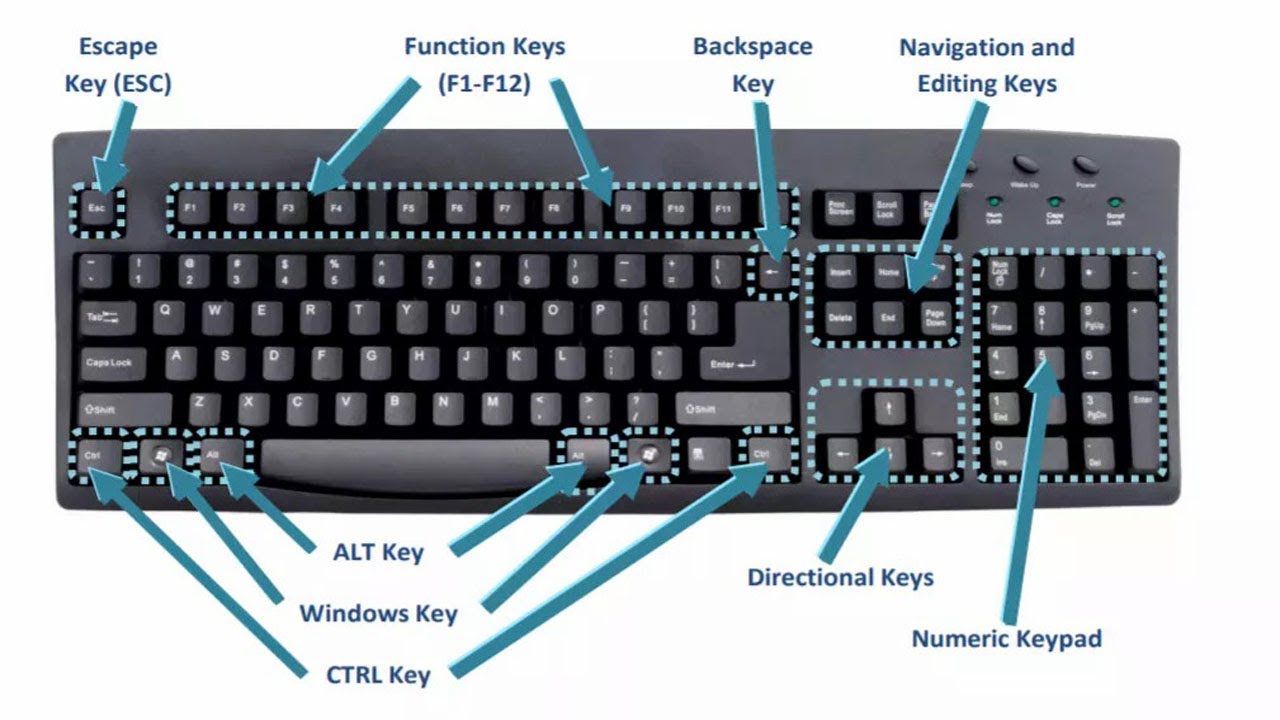 Keep in mind that the method we are going to follow today requires some changes to the Windows Registry, so do not change anything that is not mentioned in the methods below.
1] Using the Windows Registry
Press the Win + R keys, the Run dialog box will appear. Type regedit and press Enter.
Go to registry:
HKEY_CURRENT_USER\Software\Microsoft\Windows\CurrentVersion\Explorer\Advanced
Right-click the extended registry tree and click New. Now select a DWORD (32-bit) value.
Name it like Start_PowerButtonAction . It will control the default action in the shutdown dialog.
Double click on the newly created sword.
Now enter these values as 2 to make «Shut Down» as the default action. Select Base as decimal.
To make any other option the default, you can use:
- 4 make Restart as the default action
- 256 to switch user as default action
- 1 do Register from as default action
- 16 to make sleep as default action
- 64 to make Hibernate the default action.

Note: you can make Sleep and Hibernate available in the control panel.
Note that you can use this method as an administrator for every user on the system. To make it available to a user only, this is done by logging in as that user and applying the above method.
2] Using Local Group Policy
You can use this method for all kinds of groups such as all users, users except administrator, etc. But you must be logged in as an administrator to use this method.
Open the Start menu and type Edit Group Policy.
Click on an app to open it.
In the left pane, expand the Administrative Templates tree under User Configuration.
Now select the start menu and taskbar.
In the Settings window, double-click the Change Start Menu power button.
Click Enabled and select Disable from the drop-down list in the Options window.
Click Apply, and then click OK.
This way you can easily change the default action for the dialog box ALt + F4.
Be sure to restart the system for these changes to take effect.
How useful is the publication?
Click on a star to rate!
Average rating / 5. Number of ratings:
No ratings yet. Rate first.
Related articles:
How to fix Alt + F4 not working on Windows
How
Alt + F4 is probably the first keyboard shortcut that everyone learned when they turned on their first computer. It is used to close the currently active window, or even launch the shutdown menu if the desktop screen is currently active. However, users have reported that the combination does not work after installing an update or after making some changes to their PC.
This usually happens after a major upgrade or when upgrading to Windows 10, but many other scenarios have also been reported. Check out the methods we have prepared that have helped others and should help you!
There aren’t many causes for this problem, but it’s still good to check them out so you can try a solution better adapted to your scenario. Check the list below:
- Fn Lock enabled — Your keyboard settings can always be configured to always pretend that the Fn key is being held down when using the F1-F12 keys, which actually control some other settings.
- Windows disabled this combination by mistake — This can happen after an update or update because the registry entry changes its state. Here we can change the registry keys or create new ones to fix the problem.
- BIOS out of date — This issue has been seen in several BIOS versions. Many manufacturers have released newer BIOS versions that prevent this issue.
- Old Keyboard Drivers — outdated keyboard drivers can also cause problems when pressing a key combination. Users have reported that they were able to fix the issue by installing new keyboard drivers.
Solution 1: Disable Fn Lock
The F1-F12 keys can be used as standard function keys, but they often have special multimedia functions when pressed while holding down the Function (Fn) key on the keyboard.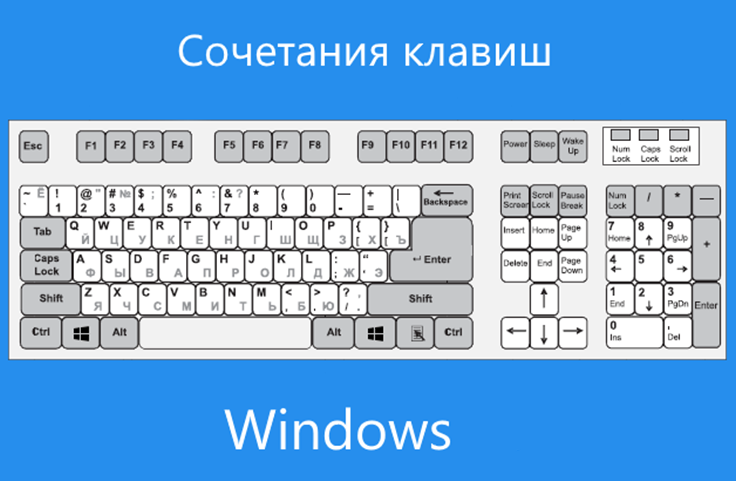 However, there is an Fn Lock option that, when enabled, makes the F1-F12 keys behave as if you were always holding the Fn key. This can be easily disabled in the BIOS if you follow the instructions below!
- Turn on the computer again and try to enter the BIOS settings by pressing the BIOS button when the system starts to boot. The BIOS key is usually displayed on the boot screen labeled « Press ___ to enter the installer » or something similar. There are other keys as well. Common BIOS keys are F1, F2, Del, etc.
- Now it’s time to toggle Fn Lock. The option you will need to change is in different tabs of BIOS firmware tools made by different manufacturers and there is no unique way to find it. It is usually found under the Advanced 9 tab0010″, but there are many names for the same option.
- Use the arrow keys to navigate to advanced , advanced BIOS or similar BIOS audio options.
 Inside, select the option named « Function Key», «Fn Lock» or something similar inside.
- After selecting the option, you will be prompted to either enable / disable options, or function key or multimedia key , depending on the actual name of the option. Make sure you select Off for Fn Lock or function key for function key behavior , depending on the context.
- Go to the Exit section and select Exit saving changes . This will continue to boot the computer. Check if the problem persists.
Solution 2: Edit registry entry
This method can be useful if Windows has mistakenly disabled the keyboard shortcut feature completely. This can be reversed in the Registry Editor by simply changing the value of the registry entry. Be sure to follow the instructions below carefully!
- Since you are about to edit a registry key, we recommend that you read this article we have published so that you can safely back up the registry to avoid other issues. However, nothing bad will happen if you follow the instructions carefully and correctly.
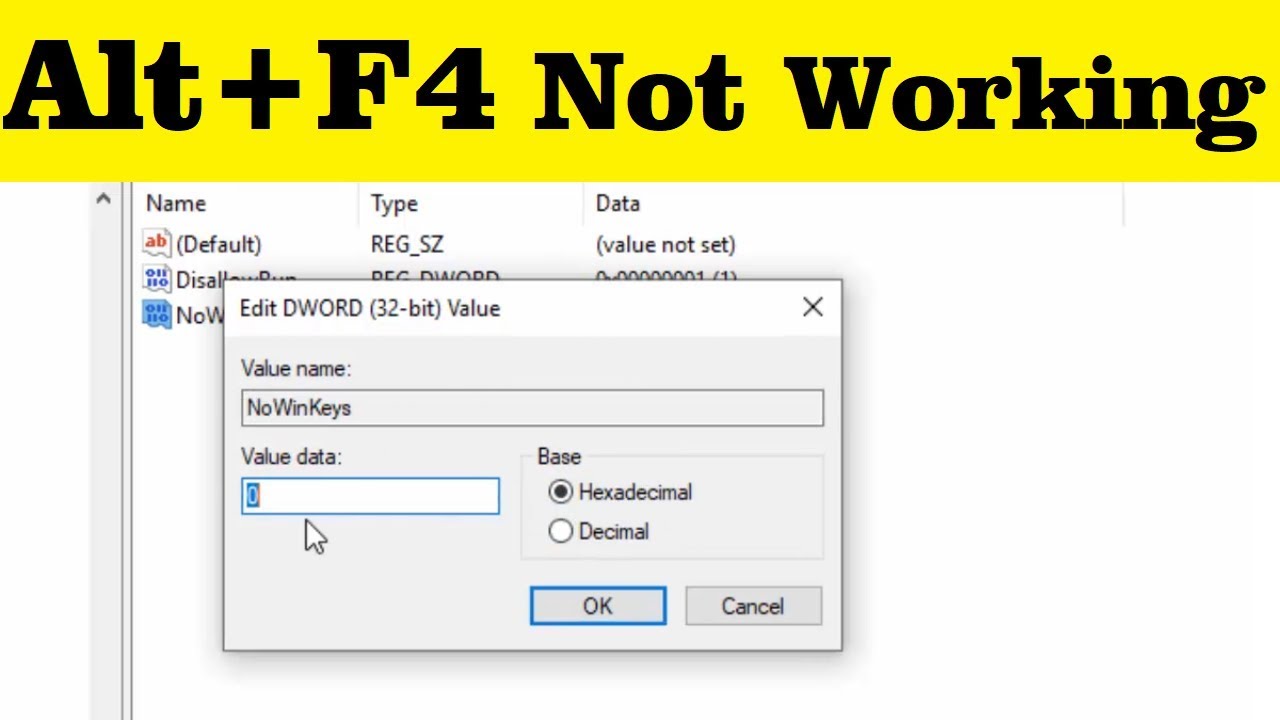
- Open the Registry Editor window by typing «regedit» in the search bar, Start menu, or in the Run dialog, which can be accessed with the Windows + R key combination . Navigate to the next key in your registry by going to the left pane:
HKEY_CURRENT_USER \ Software \ Microsoft \ Windows \ CurrentVersion \ Policies \ Explorer,
- Click on this key and try to find an entry named NoWinKeys . If it’s not there, create a new DWORD Value entry with name NoWinKeys by right-clicking on the right side of the window and selecting New >> DWORD (32-bit) Value .
 Right-click on it and select Edit from the context menu.
- In the « Edit» window, in the « Value of » section, change the value to 0 and apply the changes. Make sure Base is set to Decimal. Confirm any security dialogs that may appear during this process.
- You can now manually restart your computer by clicking Start menu > Power button > Restart and check if the problem is gone. This will probably fix the issue immediately.
Solution 3: Update the BIOS on your computer
Sometimes a problem can be caused entirely by your computer’s BIOS, especially if you recently performed a system update or installed new devices. Updating the BIOS can be a complex process, and the problem is that it varies greatly from manufacturer to manufacturer. That is why you must follow the instructions carefully if you want to fix the problem.
- To find out the current version of the BIOS utility installed on your computer, enter « msinfo » in the search bar or start menu.
- Find the BIOS version information under your processor model and copy or paste something into a text file on your computer or on a piece of paper.
- Find out if your computer was built, pre-built, or built. This is very important because you don’t want to use a BIOS created for just one component of your PC when it won’t apply to your other devices and you’ll overwrite the BIOS with the wrong one, leading to serious errors and system problems.
- Prepare the computer for a BIOS update. If you are upgrading your laptop, make sure its battery is fully charged, and plug it into the wall just in case. If you are updating your computer, it is recommended that you use the Uninterruptible Power Supply (UPS) to make sure that your computer does not turn off during the update due to a power failure.

- Follow the instructions we have prepared for various desktop and notebook manufacturers such as Lenovo, Gateway, HP, Dell and MSI.
Solution 4: Reinstall the keyboard drivers.
Users have reported that installing the latest available drivers resolved the issue without having to change any additional settings. Keyboard drivers can be found on the manufacturer’s page.
- Click the start menu button, type « Device Manager » and select it from the list of available results by simply clicking the first one. You can also press Windows Key + R key combination to open the Run dialog box. Enter « devmgmt. msc ” in the dialog box and click OK to run it.
- Since this is the keyboard driver you want to update on your computer, expand the Keyboards section, right-click on the keyboard and select Uninstall device.
