Guide — MSI Afterburner Download
- MiniTool
- MiniTool News Center
- Guide — MSI Afterburner Download | How to Use MSI Afterburner
By Daisy | Follow |
Last Updated
Overclocking is a great way to go if you plan to get the most out of your system. To do this, we’ll show you how to download and use MSI Afterburner. Now, continue to read this post from MiniTool to get more details.
What Is MSI Afterburner
MSI Afterburner is a popular GPU monitoring and benchmarking tool. In addition to monitoring, it’s the perfect tool for overclocking and underclocking your GPU. Although it is developed by MSI, this software can be used on all graphics cards including AMD, NVIDIA, Intel, etc.
How to Download and Install MSI Afterburner
How to get MSI Afterburner download? Follow the guide below:
Step 1: Go to the MSI Afterburner official website.
Step 2: On the page, click the Download Afterburner button to start the download process.
Step 3: Then, choose a path to store the zip file and click Save.
Step 4: Extract the downloaded zip file and you can start to install it.
Step 5: Choose the language and click the Next button. Then, read the license agreement and click the I accept the terms of the License Agreement option, and click Next.
Step 6: Check the components you want to install and uncheck the components you don’t want to install. Then, click Next.
Step 7: Choose the destination and click the Next button. Then, click the Install button.
How to Use MSI Afterburner
After downloading and installing MSI Afterburner, you can start to use it. Then, we will introduce how to use MSI Afterburner.
1. Enable Screen Display
On-screen benchmarks with MSI Afterburner are a great way to show how good or bad your GPU is. You can easily set up the software to display temperatures, workloads, memory clocks, clock speeds, and everything else that comes with your GPU.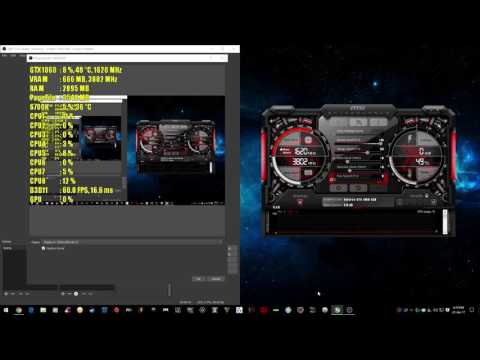
Click the Settings icon and find the Monitoring tab. Under the Active hardware monitoring graphs part, select the information you would like to display on-screen by clicking the desired fields. You can assign in-game hotkeys to toggle the OSD on and off which is ideal for everyday use.
2. Set Fan Profile
Click the Settings icon and locate the Fan tab in the menu bar at the top. Check the Enable user-defined software automatic fan control option. Then, you can start to customize the fan profile.
You will see a curve chart that has both “fan speed %” and “temperature” as values. You can change the curves to suit your specific needs. Once you have designed your ideal fan profile, click Apply and close the window. Your new fan settings will be fully in effect.
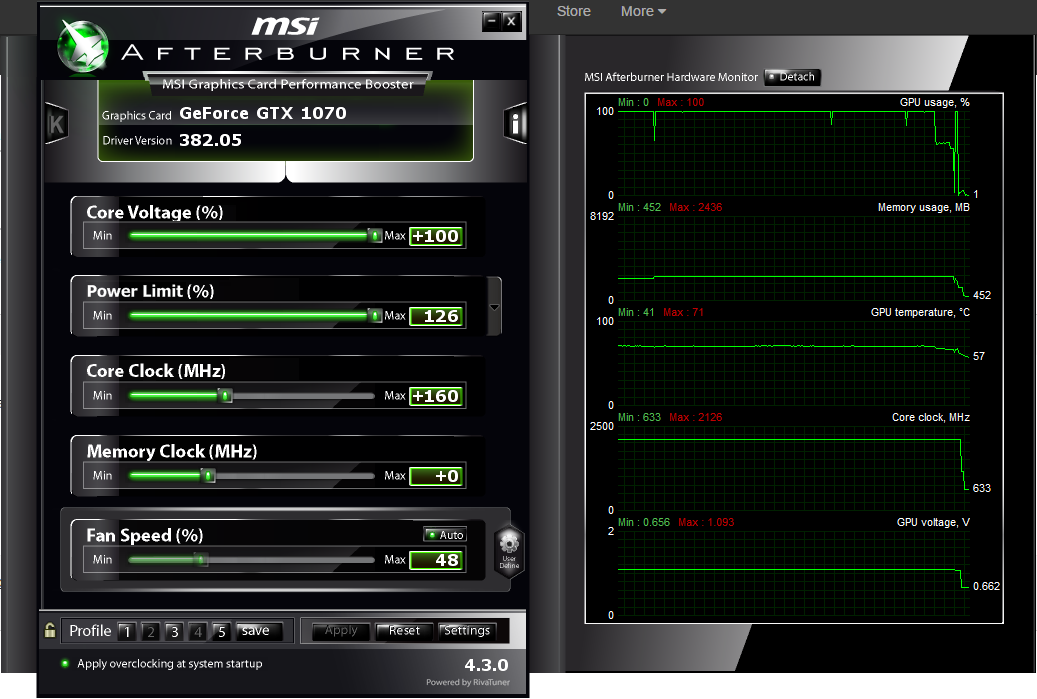
3. Limit Your GPU
You can overclock with the power limit/temperature slider.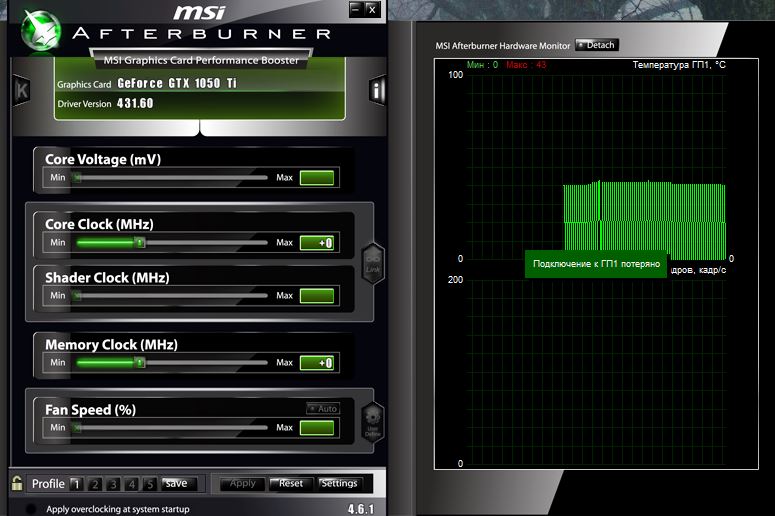 But you can also use it to control power consumption or temperature without losing too much performance. To do this, you need to move the slider down, not up. For example, if you don’t want your graphics card to consume a lot of power, you can move the power limit slider down to around 75% so the graphics card won’t exceed any limits you set.
Final Words
Here are all the details about MSI afterburner. Now, you have known how to free download MSI afterburner and how to use it. I hope that this post can be helpful to you.
About The Author
User Comments :
How to use MSI Afterburner while gaming?
By using this software you can see important information such as hardware temperature, clock rate, etc., about your system. One of the best abilities of this software is that it provides tools for you to overclock your system and increase your system speed.
Introduction to MSI Afterburner software:
To play powerful games using your system, your system must have a powerful CPU and ram, and you need a strong graphics card. Graphics cards are one of the most expensive components in computers. On the other hand, your system may be strong in hardware, but not all of its capabilities are used during the game. Using MSI Afterburner software, you can monitor the performance of your system during the game and find out if your device is working at its peak performance or settings are blocking it?
MSI Afterburner program is one of the very good programs for monitoring the performance and overclocking of the system graphics card. Although this software is a product of MSI Company, it also supports NVIDIA, AMD graphics cards, and all their models. This program is a program that monitors the performance of the graphics card and also allows you to control it.
This software has excellent monitoring and control capabilities.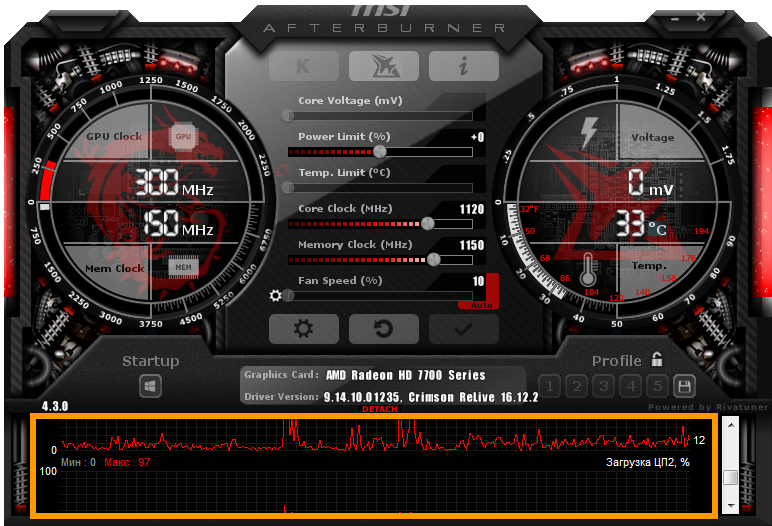 It is very easy to use and is free. These reasons caused this software to quickly become a favorite software of many users to overclock the system.
In the next sections, there is a description of what users can do using this software.
System Overclocking:
MSI Afterburner software is primarily overclocking software. Overclocking a piece of hardware means increasing its clock speed, which causes an increase in the number of operations to be processed in the system per unit time. As a result, the operating speed increases.
Using this software, you can increase the performance of your system graphics card. In fact, by overclocking the graphics card, your system can use this card more, but this increase in productivity will increase the temperature of the graphics card and may even damage your hardware.
Some notes for overclocking:
You need to go through overclocking your system slowly and step by step. This means that you can slowly increase the core clock and memory clock values each time, and if the system does not have a problem and the graphics card does not see a large increase in temperature, you can continue to increase the clock.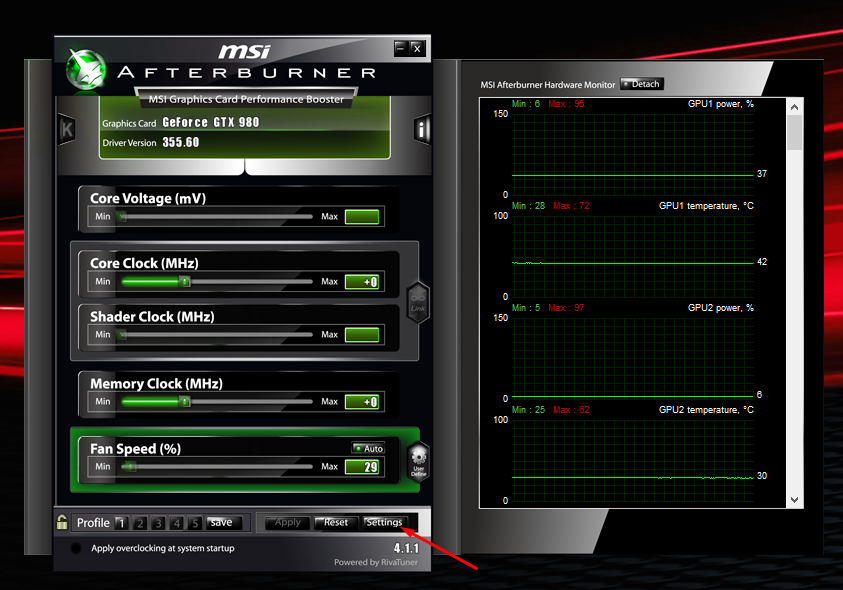
Of course, this software allows you to view the temperature of the graphics card during the game and, if necessary, control the system fans, and when the temperature is high, increase the speed of the fans to cool the parts.
It is also important to note that not all hardware can be overclocked. If you want to change the system clock, it is better to provide parts that can change the clock when buying the system.
Also, note that your device’s cooling system is designed to cool parts before overclocking, and you may need to upgrade the cooling system after overclocking and buy a stronger fan or heatsink.
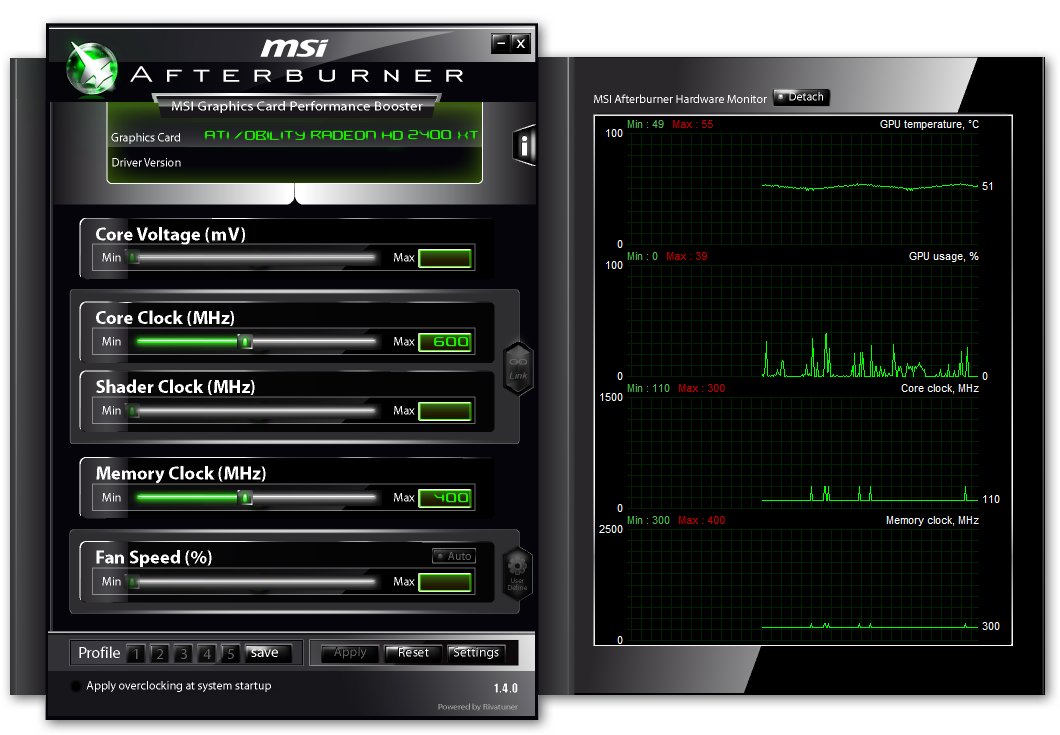
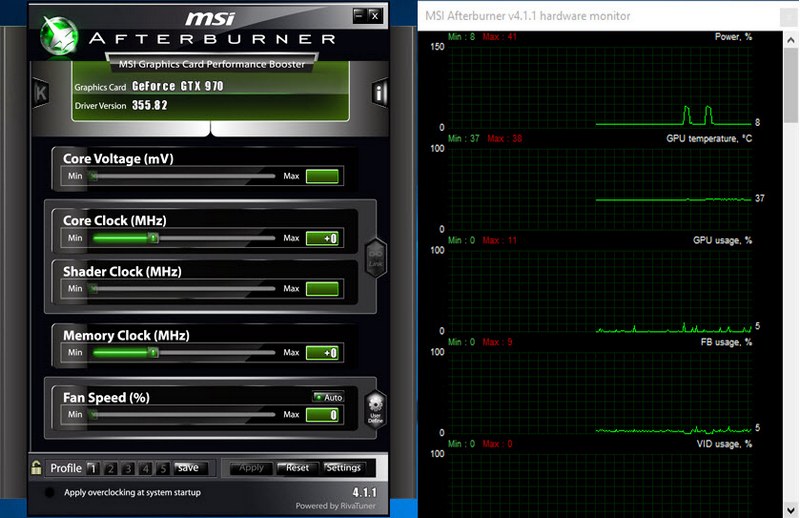
Monitor system performance using MSI Afterburner:
You can see information about temperature, voltage, and system clock speed on the main page of this software. This software also provides general information about the software and hardware of its graphics card and GPUs. By clicking on the gear icon or settings, you can see the advanced settings page with several tabs.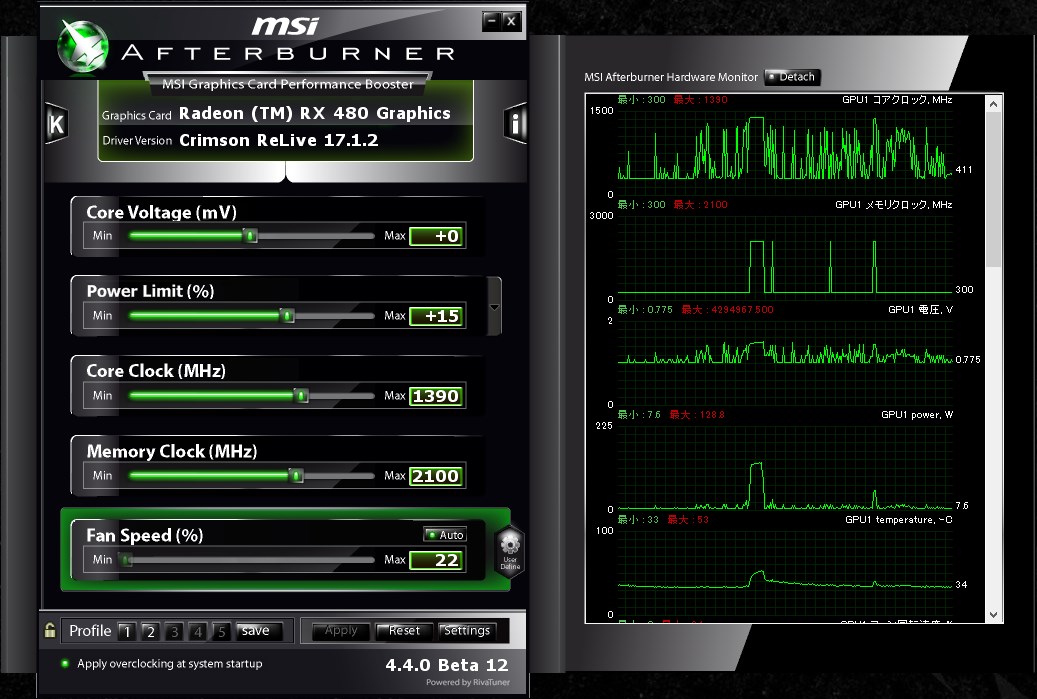 You can view system information in real-time with system performance while playing using this software. After viewing this information, you can overclock your system if needed. By looking at the information displayed by the software, you can see the effect of overclocking on your system.
You can even use this software to control the rotation speed of system fans.
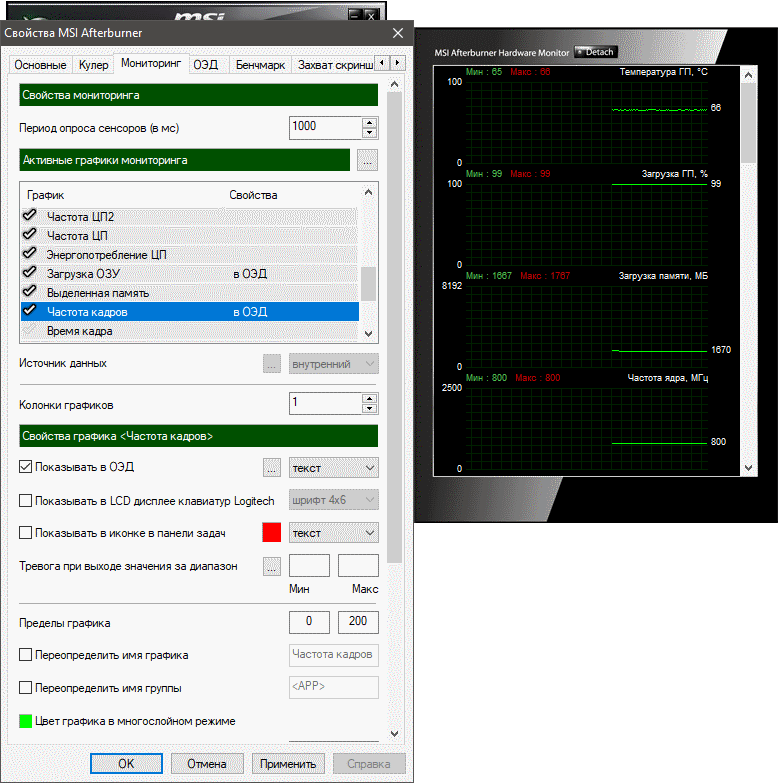
There is a list of available hardware in the monitoring section that can be monitored. This section is better not to enable unnecessary graphs because the CPU spends more time preparing the desired information. Also, using this software, you can see different graphs on the screen, but displaying information related to selected graphs requires CPU and GPU resources. Therefore, it is better to do this only when necessary.
Other abilities of this software:
This software has screen capture capability. With this tool, you can accurately record your favorite moments in your favorite game. Using this feature, you can record how to go through the difficult stages of the game and record the overclocking settings under your system specifications.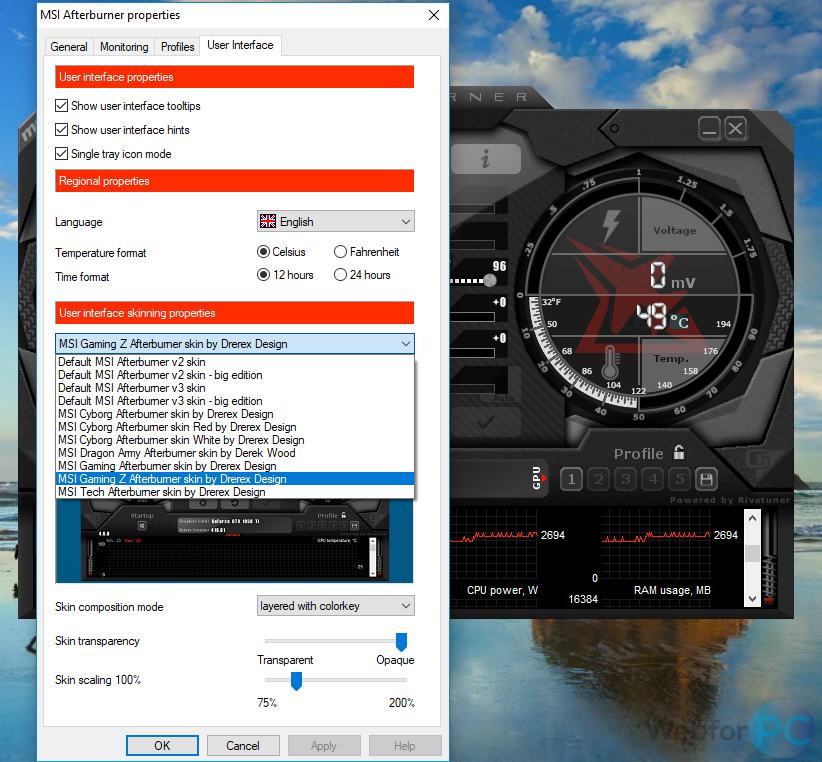
The possibility of preparing a benchmark is another good feature of this software. A benchmark reports how a system works in a particular situation. Different users can benchmark how their system works in a particular game and share it so that other users can compare the performance of their system with the system of others. When sharing a benchmark, users should also share the exact details of their system and the name and version of the game so that a correct comparison can be made.
How to prepare a benchmark:
On the software’s main page, click on the gear icon to show the MSI Afterburner properties page.
— Go to the benchmark tab.
— In the «Global benchmark hotkeys section,» specify the keys to start and end the benchmark operation, and in the «Benchmark results file,» specify the path and file name to save the results. The results are stored in a text file.
After these steps, click apply and ok buttons to apply the settings.
Now run the game and after starting the game, press the benchmark recording start button. After playing for a few minutes, press the benchmark end key.
You can now open your benchmark file and view the average, minimum, and maximum frame rate values.
Related software:
— For this software to show the graphs well, you must install the «Direct X» program on your system.
— To monitor information such as the temperature of various parts of the system during the operation, frame rate, and other related information, Simultaneously with the installation of this software, let the software «Riva Tuner statistics server» be installed on your system.
— There is also an Android version of this software, and it can be installed on a mobile phone.
MSI Afterburner how to use: setup instructions
Home » Questions and Answers
MSI Afterburner utility is not only a tool to increase the speed of the computer’s graphics subsystem. Its arsenal is full of additional tools for video capture, monitoring, and they are expanded through plugins.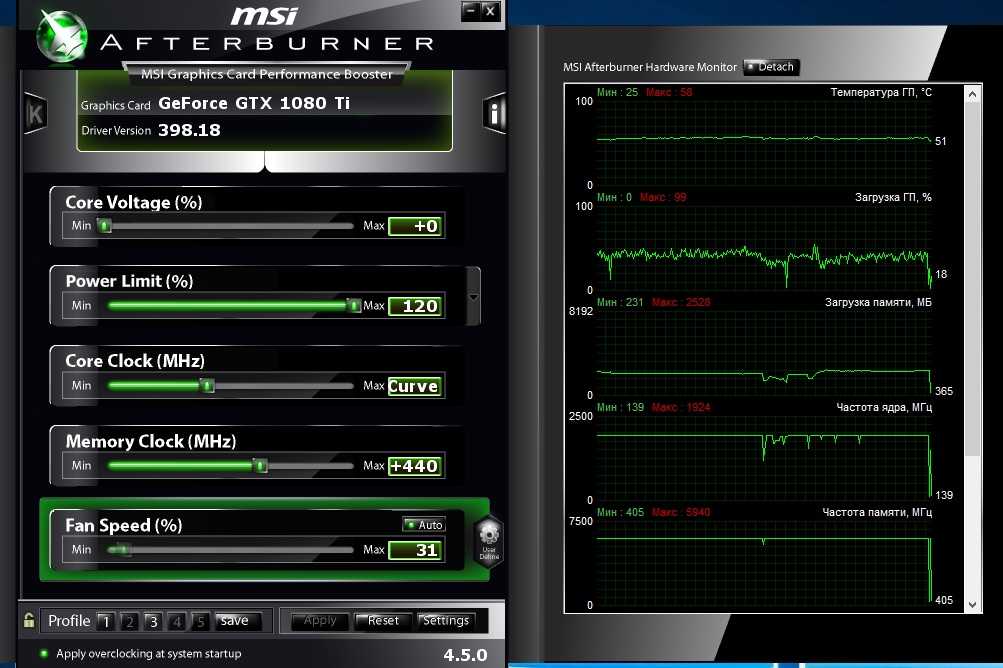
We will tell you how to use Afterburner: we will provide a general algorithm for overclocking video chips, describe the main functions and options of the application . We will show the monitoring capabilities, ways to personalize charts and control the speed of the video card fan. We will show how the afterburner hotkey control is configured.
About program
A stable and reliable assistant for a gamer, overclocker, miner, capable of taking discrete graphics performance to a new level. Gives access to real-time performance monitoring of the graphics accelerator. Builds graphs of two dozen indicators, including temperature, frequencies, load on video card components .
Read about video card overclocking options here.
The appearance of windows is changed by themes. The updated engine made it possible to reduce their size and speed up the drawing of the interface.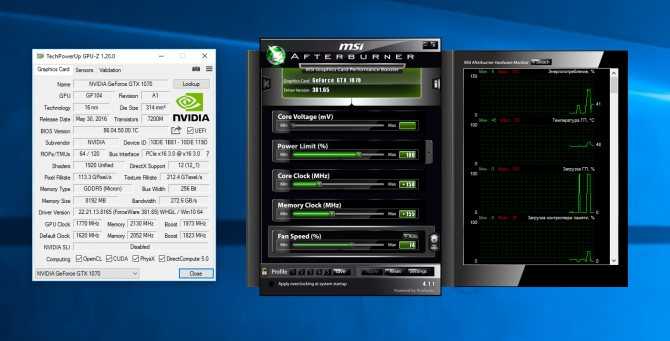 RivaTuner Statistic Server (RTSS) will record the screen video to a file and display the frame rate (FPS) in the game. MSI Afterburner saves up to five overclocking profiles, supports hotkey control. Can automatically start with Windows. To autorun, click on the «Startup» icon.
Program autostart button together with Windows.
Monitoring panel
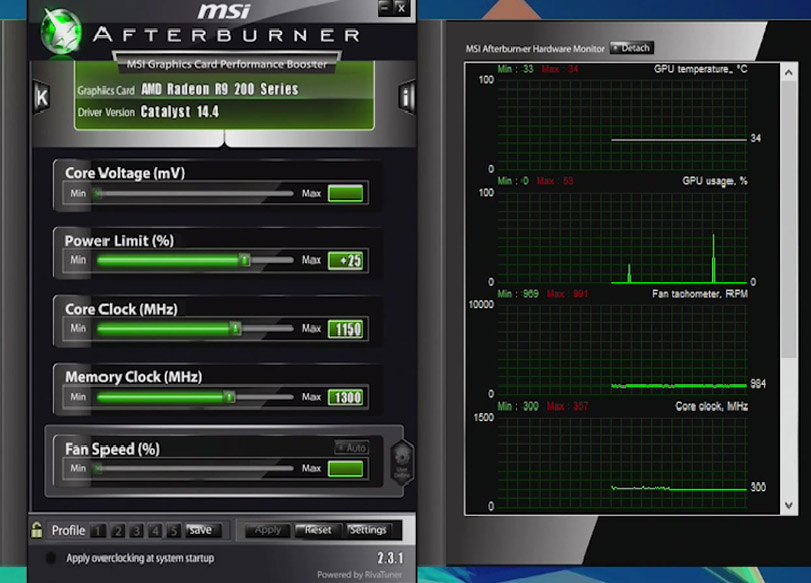
Represented by two information elements with useful information about the operating modes of the hardware components of the graphics accelerator: core and video memory frequencies, voltage, thermal parameters, video core voltage.
Information elements of the utility.
Below is the «Monitoring Window» — a panel with time graphs of the characteristics of the video card: frame rate, computing elements, RAM and video memory usage, CPU and GPU, other (26 variables).
Panel with time graphs of video card characteristics
You can turn off unnecessary graphs, change the color of the curve and the name (caption), font, size for quick orientation.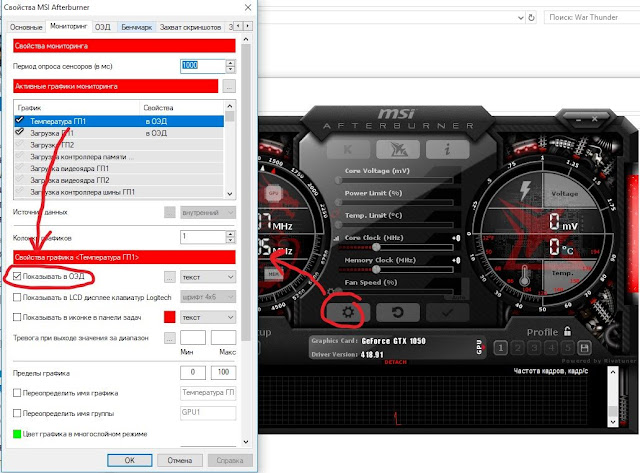 To expand the number of active monitoring charts, third-party plugins are connected (with AIDA64, HWiNFO). Afterburner provides for the installation of through markers (left click with the Alt button pressed) in the monitoring window.
Monitoring window.
Basic parameters
The purpose of MSI Afterburner is to overclock the graphics subsystem by increasing the base frequencies and voltage of its components. This is done in the main window by dragging the sliders. The parameters are available here:
| Core Voltage | The amount of supply voltage on the core of the card | ||
| Power Limit | Limiting the maximum consumed capacity | Peak temperature at which the program resets settings | |
| Core Clock | The frequency of the graphic processor | ||
| Memory CLOCK | Frequencies of graphic memory | ||
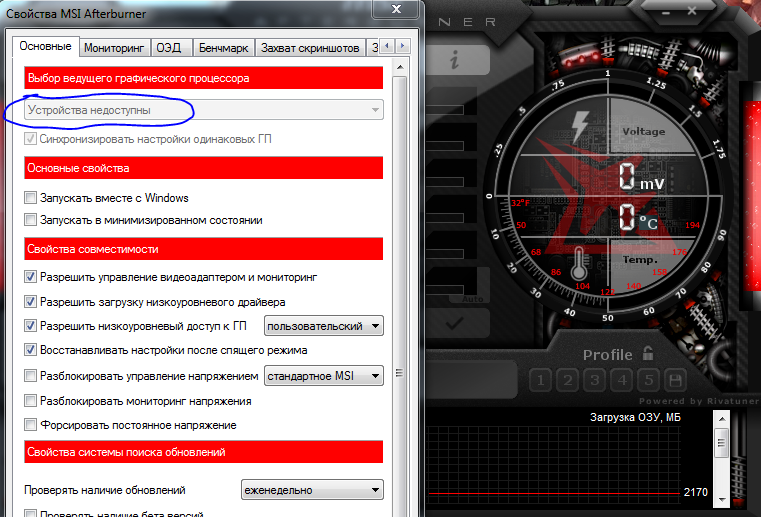
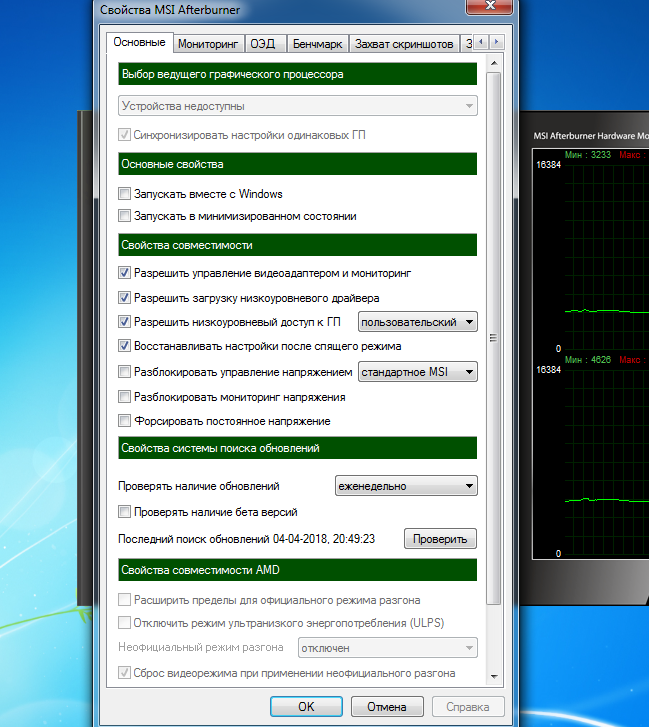
| FAN SPEED | PAMMENT ROOTIONS FAMITERS PARTIONS 9000 9000 9000 9000 9000 To learn how to unlock controls in MSI Afterburner, such as Core Voltage, go to settings, enable «Unlock Voltage Control» in Afterburner, apply the settings and restart the application.
Unlock Voltage Control» in Afterburner.
MSI Afterburner SettingsClick the gear icon or use Ctrl + S to open the settings. General interface settings. Cooler settingsParameters for automatic fan speed control by changing the curve. The temperature of the graphics core is set horizontally, and the cooler frequency as a percentage of the peak is set vertically. This specifies the period for updating the rotation speed (default is 5 seconds). Cooler rotation settings. Configuring monitoring parameters in MSI Afterburner Enable/disable graphs on the dashboard by clicking on the checkmark next to their names, customize their appearance, set limit values. Limits are set here: minimum and maximum values (for example, temperatures). When the parameters for which the alarm is triggered are exited, a warning window will appear. Configuring monitoring parameters /
OED — overlay screen display Information panel with information about the frame rate in games. These are frequencies, temperature, workload (RAM and graphics memory, central and video cores).
Overlay screen display The Advanced button will open the RivaTuner Statistic Server settings — a window with overlay options. Only if RTSS is installed. RivaTuner Statistic Server settings. Settings benchmark Programming keys to start and stop the built-in benchmark, view test results, transfer the directory to store them. Programming keys for starting and stopping the built-in benchmark / Capturing screenshots, recording video The first tab contains the parameters for creating screenshots in 2D and 3D applications: saving path, format, quality, hot keys for triggering the trigger. Capture screenshots. In the next tab, configure the video capture settings. It changes the keys to start and stop recording, indicate the characteristics of the video file: resolution, method (desktop, 3D), video format, container used to store it, frame rate. Below select the audio source — Afterburner writes only one audio track. Video capture settings. Overclocking save profilesCorrection of the contents of cells with templates — overclocking settings, of which there are five in Afterburner. To activate each preset, you can set a global key combination, bind a profile slot with a video card operating mode: 2D or 3D. Interface settingsIn this section, disable pop-up hints, change the localization language, temperature unit, time display format. Below they change the themes themselves (skins), the transparency level of the Afterburner window. The program interface can also be customized. Saving Afterburner settings by profiles The application can store up to five profiles with different overclocking settings and fan settings (from the General Settings section):
How to enable fan control
How to overclock a video card? Overclockers, subject to close monitoring and the presence of a high-quality cooling system, will be able to squeeze the potential of the device from the manufacturer. The overclocking algorithm depends on the model of the graphics accelerator and the version of the used driver . In the general case, you can increase the frequency of the memory, the core of the video card, the value of the supply voltage of the video core, and the power consumption.
Hot keys By default, most actions are not assigned to key combinations. Bind hotkeys to actions in the settings:
Afterburner displays data from GPU and CPU thermal sensors. To view the current value, double-click on the monitoring panel at the bottom of the window or hold down Ctrl + M. The «GPU temperature» of the graphics core is displayed in the first lines, to view the heating intensity of the CPU cores (a separate graph for each), scroll down the list. How to display data/statistics on the screen? Open the settings, in the «EOS» tab, click on the «Show» EOS «field, assign hotkeys and apply the settings. Switch to the game and hold the indicated keys.
Rating ( 8 assessments, average 2.5 of 5 ) MSI AFTERBURner Use 2011 — . |
MSI Afterburner is by far the most popular program for fine-tuning, monitoring and testing a video card among overclockers and ordinary users. And recently it has become interesting for gamers, having learned how to shoot videos and screenshots from games.
MSI Afterburner is easy to learn for the average user and, if desired, you can easily understand all the intricacies of this program. In capable hands, MSI Afterburner becomes an indispensable tool for fine-tuning graphics card settings, as well as capturing amazing scenes from games. 1. Installing After installing it, you will have two programs: MSI Afterburner itself and MSI Afterburner on screen display server, which we will talk about a little later. 2. Interface
I’ll note right away that the shader domain of AMD RadeOn video cards runs at the core frequency, so the corresponding slider will be inactive. Selecting and saving a profile is as follows: first, press the Save button, after which the buttons 1-5 will flash, press the free button, after which the profile is automatically saved. You can press Esc on your keyboard to cancel. The lock on the same panel allows you to block buttons 1-5 in order not to accidentally load another profile. To activate a profile, just click on the corresponding number. Additional settings, editing, and deleting a profile can be done from the profile settings menu, which we will talk about later. On the right is the graphics card status monitor (it can be unlocked by pressing the Detach button, and stuck back to the application by simply closing it):
As you can see, the monitor is self-documenting — in the upper right corner of each graph is its name, and in the upper left are the Min (Min) and Max (Max) parameters, and does not need additional explanations. 3. Tuning to your needs
Scroll through the top menu to the “Interface” item and change the language in the “Language” column to Russian.
Also in this tab you can change the skin of the program. If you wish, you can also download skins from of. site
Click OK. The translation of the program into Russian is made completely — all menu items, settings and tips. Agree, a trifle, but nice! This menu also has the following settings: «Show tooltips» and «Show tooltip messages in the monitor window». I advise beginners to check the boxes next to these items. Now go to the first tab «Basic»:
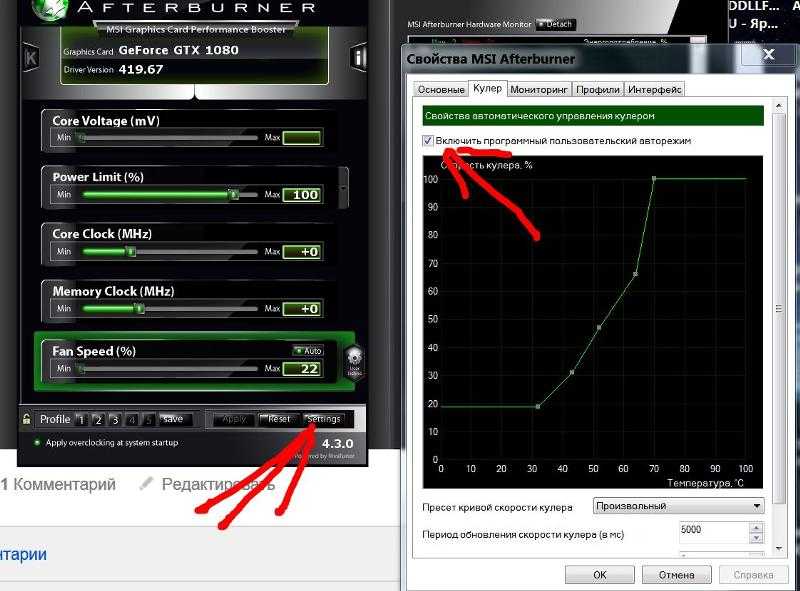
Where: Click OK to save all changes. Go to the «Cooler» tab
The next thing you need to configure is the parameters of the Cooler (or turbine, depending on your video card). Now you need to set up this very mode, which is very simple: 2. and drag it (square) in the right direction:
You can add more points to the chart by clicking the line once. To delete a point, select it by clicking once on it and delete it by pressing the «Delete» button on the keyboard. By double-clicking on a point, the graph will take on an angular, stepped look. You can choose the optimal cooler operation mode as follows: In order for your user settings to work, you must click on the «User Defined» button in the program window:
Immediately after this, the Fan Speed area will be illuminated.
Go to the «Monitoring» tab:
What settings are there on this tab: “Sensor polling period” with this parameter you can adjust the data reading period (500ms by default). Let’s move on to setting up active monitoring schedules. Check the boxes next to the parameters you are interested in. The mandatory ones include: “GPU temperature”, “GPU load”, “Cooler speed”.
Thus, in the overlay mode, you can observe the indicators you are interested in. I advise you to add there “GPU Load”, “GPU Temperature”, “Cooler Speed” and “Memory Load” for monitors with full-HD resolution and higher. It is very convenient to monitor the GPU load in games to assess the processor power, and the «Cooler Speed», «GPU Temperature» parameters will be useful for setting the cooler’s software mode. The memory load will help determine if your video card has enough working memory to comfortably play at high screen resolutions. Immediately go to the tab «OED» Overlay Screen Display
On this tab, you can define shortcuts, preferably from the F1-F12 series, for which click on the corresponding field with the mouse, then press the desired button on the keyboard. You can also show the system time in overlay mode and show the EOS on screenshots and videos, for which check the appropriate box. Moreover, when any of the settings are enabled, it will launch the MSI RivaTuner Statistics Server program, which we will discuss below. After the EOD, go to the «Screenshot Capture» tab:
The «Screenshot Capture» button can be defined in the same way as in the «OED» tab. We also select the location, format and quality of the saved screenshots. Go to the tab « Capture video «:
The «Video Capture» button can be defined in the same way as in the «OED» tab. « Profiles »: To create a profile, we need to set the desired frequencies. Then we press the «Save» button and the «1» button, see the beginning of the article for more details. We create as many profiles as you need. Be sure to fix the profiles by pressing the lock.
Press OK. Click Apply to apply the changes.
Let’s move on to MSI RivaTuner Statistics Server. This program is responsible for displaying monitoring metrics on the screen during application launch.
The photo shows the basic settings of MSI RivaTuner Statistics Server can also be Russified by going to advanced settings:
Go to the «User Interface» tab and select your native language. Here you can also change the skin and check the box for tooltips, which will also be in your native language. On the General tab, I checked the Run in minimized state checkbox. To save all changes, click OK.
Look for all the information about video card overclocking on other sites. | |

 To enable editing profiles, click on the button with the lock icon above the cells.
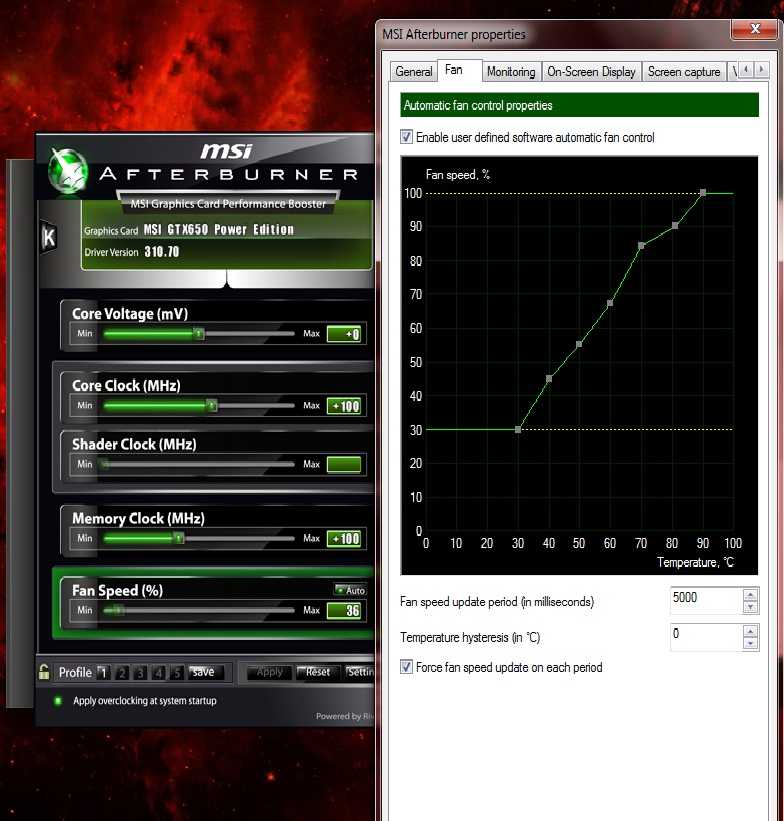

 :Soft
:Soft

 To do this, go to the “Cooler” tab and check the box “Enable software user auto mode”.
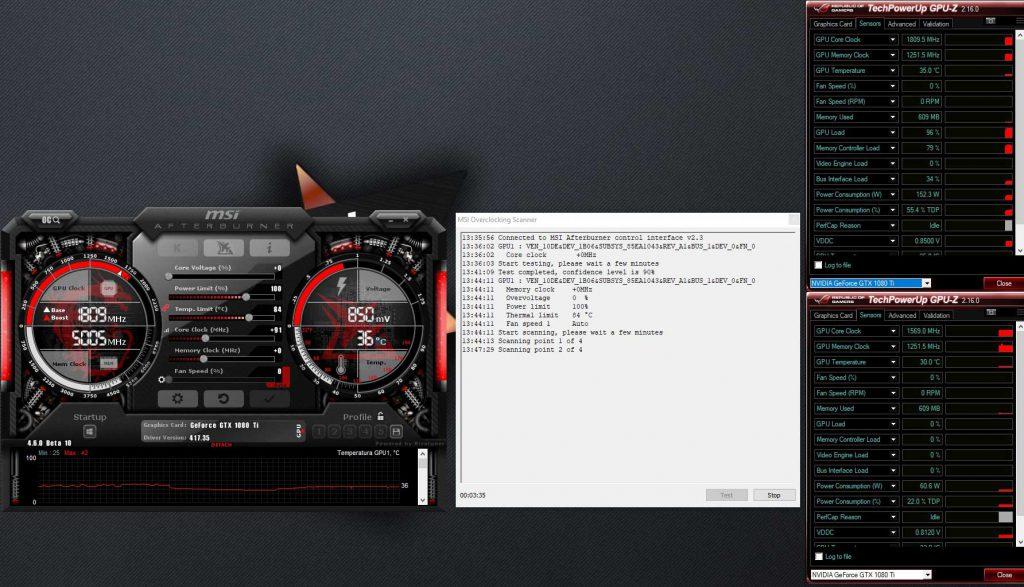
 MANDATORY, set the turbine speed from 80-90 degrees to the threshold of hearing of the cooler / turbine, so that you can determine by ear that something is wrong with your card. The only rule is that as the temperature of the GPU rises, it is necessary to INCREASE the speed of the cooler (turbine). It is advisable to use many points — it will turn out better to set up. The final combinations may be different
  It practically does not affect performance, so at first I advise you to use it, you will learn a lot of interesting things about the operation of the video card. The log can be saved anywhere on your hard drive, for which click browse and the desired folder. The report can be divided by size and overwritten by checking the boxes next to the corresponding menu.
 We also select the compression format (there are three of them so far), quality (only with MJPG compression), size and frame rate (I think at least 25 frames), as well as a place to save the video. You can indulge with a lot of threading. It is also possible to record video without sound and convert multi-channel audio to stereo. Choose settings according to the capabilities of your system.