How to Test Graphics Card in 7 Easy Steps
Owning a graphics card is nothing less than feeling blessed. Without a decent GPU, smooth gaming is impossible and if you have got a new one, then you might be interested in knowing the potential of your graphics card without taking much risk.
I have created this guide for gamers who are beginners in the field of computer hardware and don’t know much about using their graphics cards to their full potential. I will guide you on how you can test your graphics card without taking any risks and without going too far. But still, use this guide at your own risk.
If you do it properly then you will learn something new and won’t be disappointed by the performance of your graphics card. Also, whenever you will face any performance issue, you can benefit from these methods and know by certainty if your graphics card is running fine or not.
Step 1- Clean your Graphics card
Before you stress test your graphics card, it’s best to clean it with the help of an air blower which will remove excess dust from its heatsink that can put a hindrance to the performance. You can either use a non-electric hand-held dust blower or you can use an electric air blower which is way more powerful and effective in removing the dust. I personally use the electric one as it can clean your whole PC without any hard work.
After cleaning the excess dust, you can use a soft brush to clean the PCB of your graphics card if it doesn’t have any Backplate. This will make it look nicer and will remove the stubborn dirt that is difficult to remove by an air blower.
Step 2- Update the drivers
Not updating the drivers will lead to different results. Manufacturers like AMD and Nvidia from time to time release new drivers to make the performance of GPUs bug-free and better. Update the drivers through the installed GPU software or through the websites to make sure that your GPU performs the best.
Related- 15 Best Software For A Newly Built PC
Step #3:- Make proper ventilation
This one is a not-to-ignore step because suffocation will lead to GPU failure and it will increase the temperature of your graphics card much faster than you would expect. You don’t want your GPU to slow down when you are gaming. Make sure you have a good chassis that properly exhaust hot air through the rear and top and at the same time intakes cool air from the front to make a balanced airflow system.
Step 4- Graphics Card Stress Test
There are a lot of GPU stress test software online but you can do the job with just 2 of them to make sure your GPU is performing well.
For the Stress Test, use HeavyLoad and FurMark. Both of them are good software for taking your graphics card to its max potential. Although, FurMark is much more intensive and you should not use it if you think your PC case isn’t allowing enough airflow. You can choose the graphics settings in FurMark accordingly and run the GPU until your GPU has not exceeded 85C. After this value, I don’t recommend going on with this test. Note down how much time it took to reach there. In games, however, the temperature won’t rise so fast and to this value.
Step 5- Benchmark
Benchmark can be done in two different ways:-
- 1.
 By the use of software
 - 2. By playing intensive graphical games.
For benchmarking by the software, install Unigine Heaven. This will test your graphics card for a couple of minutes and will display the Average Frames Per Second on the chosen graphical settings.
Related- Best GPU Benchmarking Software
Next are the Games:- I recommend going with the GPU-intensive games which are mostly AAA titles like The Witcher 3, DOOM Eternal, Shadow of the Tomb Raider, GTA V, and many of the latest games.
Step 6- Overclock
Here comes the real thing which many don’t know how to do. Overclocking requires some skill and you don’t want to mess up with it or your GPU may get some serious unrepairable damage. Use the MSI Afterburner software to increase the Core Clock and Memory clock either by +20Mhz or by +50Mhz at max. After increasing these clocks the first time, stress test again and see if everything is stable or not.
Once, the GPU passes the first stress test, increase the clocks again, and repeat until your GPU fails in the stress test. Don’t worry, your GPU will be totally safe because graphics cards are designed to protect themselves against physical damage unless you increase the Core Voltage manually.
When your graphics card reaches its max potential, simply stick to that and don’t go for the Voltage increase as it can shorten the lifespan of your graphics card and you shouldn’t be pushing it beyond its limits. You should also use the MSI Afterburner fan speed curve for cooler operation.
Related- How To Use MSI Afterburner- A To Z Guide
Step 7- Benchmark Again
After successful overclocking, benchmark again with the software and games to compare the performance differences between the results obtained without overclocking and with overclocking. By the end of this process, you should become aware of the full potential of your graphics card and it will make it easy for you to observe any bottlenecking or performance issues in the near future.
Graphics Card Test Online
Fortunately, we today have a lot of online programs and tools where you can compare the results of your graphics card with people around the world. As testing graphics cards offline doesn’t let you know if your graphics card is really performing up to the mark, you should also use at least one online tool to know if your graphics card is working well or not.
UserBenchmark is my favorite Online Test Tool that stores worldwide testing results and it’s very unlikely that you won’t find another user on the planet using similar specs or at least the same GPU you are using. It will automatically fetch your PC hardware data and benchmark it.
A Quick Overview
8 Free GPU Video Card Test Tools
Is your graphics card memory free of errors? If you overclock them and it overheats, chances are, the RAM memory might be damaged. Unlike other components in your desktop, if a memory fails be it RAM or GPU’s Memory errors, your system will automatically reboot itself, sometimes it will display the Blue Screen of Death.
??? 4 Free Tools To Test RAM Memory For Windows, Linux and Mac
The only way to know if your GPU’s memory is faulty is to perform a stress test on the GPU memory quickly and thoroughly! Below are 5 very useful tools to stress test your GPU.
Video Memory Stress Test is a small application that is free for home use (but paid for commercial use) and is designed to test the RAM on your video card. Similar to Memtest86+, it will read and write data to each part of the video card’s RAM and log any errors found. This test allow you to completely test your video RAM (accessible to DirectX). The best way to check stability after overclocking 😉
↓ 02 – OCCT |
Free | Pro
OCCT is a stability checking tool, free for personal use. It comes with 4 built-in tests aimed at testing CPUs, GPUs and Power supplies. OCCT also monitors temperatures, voltages and fan speed, as well as system constants such as CPU Usage, Memory Usage and FPS (if testing in 3d).
↓ 03 – GpuMemTest |
nVidia Only
GpuMemTest is suitable for anyone who wants to verify that their hardware is not faulty. GpuMemTest is suitable for overclockers (only on nVidia GPUs!) who want to quickly determine the highest stable memory frequency.
We recommend setting the memory frequency to be no higher than 90% of the highest stable frequency. Please do not use GpuMemTest for overclocking on AMD GPUs, as it might fail to detect errors. GpuMemTest is suitable for CUDA and OpenCL programmers, because having confidence in hardware is necessary for serious application development.
↓ 04 – FurMark |
OpenGL
FurMark is a very intensive OpenGL benchmark that uses fur rendering algorithms to measure the performance of the graphics card. Fur rendering is especially adapted to overheat the GPU and that’s why FurMark is also a perfect stability and stress test tool (also called GPU burner) for the graphics card.
↓ 05 – GpuTest |
Linux | Windows | macOS
GpuTest is a cross-platform (Windows, Linux and maxOS) GPU stress test and OpenGL benchmark. GpuTest comes with several GPU tests including some popular ones from Windows World (FurMark or TessMark). The number of GPU tests grows with the new versions of the tool.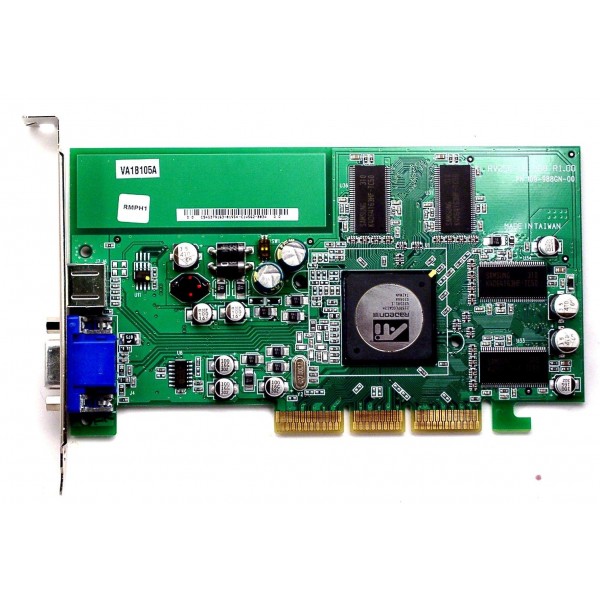 The following tests are available in the latest version:
- FurMark based stress test (OpenGL 2.1 or 3.2).
- TessMark based tessellation test (OpenGL 4.0).
- GiMark: geometry instancing test (OpenGL 3.3).
- PixMark Piano pixel shader test (OpenGL 2.1 or 3.2).
- PixMark Volplosion pixel shader test (OpenGL 2.1 or 3.2).
- Plot3D vertex shader test (OpenGL 2.1 or 3.2).
- Triangle one of the most simple 3D scenes ever made… (OpenGL 2.1 or 3.2).
Introducing EVGA OC Scanner X, the essential utility for any EVGA GeForce card. This application allows you to take your card to the limit with exclusive built-in artifact scanning, benchmarking tools, GPU vitals information, CPU burn in utility and built-in log functionality. When combined with EVGA Precision X, your GeForce overclocking experience is complete!
FurMark ROG Edition is a heavily revamped version for ASUS of the popular FurMark tool. FurMark ROG Edition comes with modern stress-tests and artifact scanner based on OpenGL and Vulkan. Thanks to FurMark ROG Edition, you can push your graphics card to the limits to test stability and thermal performance.
↓ 08 – MSI Kombustor |
Free For MSI Cards
MSI Kombustor is MSI’s exclusive burn-in benchmarking tool based on the well-known FurMark software. This program is specifically designed to push your graphics card to the limits to test stability and thermal performance. Kombustor supports cutting edge 3D APIs such as OpenGL or Vulkan.
Updated On January 1, 2022 / Category: Freeware and Software Reviews / Author: Ngan Tengyuen
How to check a graphics card on a Windows 10 PC • Okie Doki
Every laptop and computer is equipped with a graphics processing unit (GPU). Without it, you would not get an image on the screen. Some machines have a GPU built into the motherboard or processor while others have a dedicated graphics card.
If you don’t know what video card you have, it’s easy to find out by different methods. Here’s how to test your graphics card in Windows 10.
1. Check your graphics card in settings.
-
Press Windows Key + I to open Settings.
-
Click System. By default, you will be in the Display section.
-
Under multiple displays, click Advanced display settings. nine0003
-
Different video cards can be connected to different monitors. If necessary, use the drop-down list to select the primary monitor.
-
Shows below the display information which graphics card you are connected to for this monitor.
You can also use this section to check your resolution, refresh rate, bit depth and more. nine0003
Programs for Windows, mobile applications, games — EVERYTHING is FREE, in our closed telegram channel — Subscribe 🙂
2. Check your video card using the task manager.
-
Right-click the taskbar.
-
Click Task Manager. nine0003
-
If necessary, click More details.
-
Click the Performance tab.
-
Click GPU 0 on the left (you’ll see GPU 1, GPU 2, etc if you have multiple graphics cards).
-
The name of your graphics card is displayed in the upper right corner.
You can also use this section to check your graphics card’s current load, temperature, driver version, etc.
Related: 10 Windows Task Manager Tricks You Probably Didn’t Know About
3. Check your video card with the DirectX diagnostic tool.
-
Press the Windows key + I to open Run.
-
Type dxdiag and click OK. The DirectX Diagnostic Tool opens. nine0003
-
Click the Display tab.
-
The name of your graphics card is displayed below the device.
You can also use this tool to view your graphics card memory, driver information, and monitor information.
4. Check your video card through Device Manager.
-
Press Windows Key + X.
-
Click Device Manager.
-
Double-click Display Adapters. It will list all your graphics cards.
If necessary, double-click the graphics card to open its properties to view additional driver information or view the event log. For example, you can switch to the Driver tab and click Update Driver to search the web for the latest drivers. nine0003
Related: How to find and replace outdated Windows drivers
5. Check your graphics card with system information.
-
Type System Information in the Start menu search bar, then select Best Match.
-
In the left pane, double-click Components. nine0003
-
Click Show.
-
The right panel displays the name of your graphics card.
You can also use System Information to find out about your other components, such as your sound device or drives, or check your software environment for things like running services or print jobs.s.jpg)
6. Check your video card through the manufacturer’s control panel. nine0003
If you have an integrated graphics card, it is most likely made by Intel. If you have a dedicated graphics card, chances are it’s from AMD or Nvidia.
Therefore, you should do a system search for these brands to see if you have their control panel programs installed. For example, AMD has Radeon Software and Nvidia has GeForce Experience. nine0003
These programs will give you detailed information about your video card — just go to the settings page. You will also find many customization options in these programs, such as enabling features such as FreeSync or G-Sync.
Related: Best budget graphics cards for cheap games
Should you upgrade your graphics card?
Now that you know what graphics card you have, you might think it’s time to upgrade, especially if your computer can’t handle intensive tasks like video editing or gaming. nine0003
This is where the advantage of a dedicated graphics card comes into play. It will cost you more, but they are much more powerful than the integrated ones because they have their own chip, memory and cooling fan.
Programs for Windows, mobile applications, games — EVERYTHING is FREE, in our closed telegram channel — Subscribe 🙂
How to check the performance of a video card?
The correct operation of the video card is the key to the full use of the computer, because otherwise, there will be constant problems with artifacts on the monitor and unexpected shutdown. Usually, the display of the card’s performance is its minimum operating and maximum temperatures, by which one can draw a conclusion about its operation as a whole. nine0003
It should immediately be noted that when buying a used video card, you can run into a broken copy. This is due to the fact that when the adapter burns out, it can still be warmed up, restoring performance for a certain period of time. In this case, the tests that will be presented below will not help determine the health of the card, since it is still in working condition. Again, the «repaired» adapter fails after 1-30 days, depending on luck and the method of warming up.
The only way to check the video card for performance, whether the video card has been warmed up, is to simply visually inspect it using a magnifying glass, a magnifying glass is required. You need to look at the solder points, they should not be subjected to any defects. The method does not give a 100% result, since the displacement of the soldering contacts could occur due to excessive overheating of the card itself during a stress test, a modern game or overclocking, in any case, this is a significant minus in its favor. nine0003
So, there are several methods for checking the performance of a video card on a laptop or desktop PC. First of all, a simple test using Windows tools, then using special programs. You should also make sure that the installed drivers are complete, otherwise problems will arise with the working card.
See also: How to change a video card on a computer?
Checking the operation of the video card via DxDiag
The window responsible for the basic information on the card also tests it. The information received cannot be called complete, since the test is carried out in the standard working range of work, and many problems arise precisely in stressful work, but there is such a possibility of preliminary verification.
- Press Win + R;
- Type dxdiag and press enter;
- Click on the «Screen» tab;
- The «Notes» field should read «No problems found». nine0015
If the field contains a list of errors or failures, then you need to check the driver, perhaps the reason lies precisely in it.
How to check the operation of the video card with the FurMark program?
The FurMark app is a great way to test your graphics card’s performance. With the help of a “hairy donut” (an animation for the test), the video card receives exorbitant loads, which allows you to get complete information about the operation of the adapter. In this regard, the danger should also be noted, because the load is large, even despite the limiters that work when a certain temperature is reached, the video card may suffer. This does not happen often and only with an already worn out card. nine0003
Also, if you have passive cooling (without a cooler), then the program will be too tough a test for the video adapter. Not for nothing is FurMark called the killer of video cards. In this case, we will not turn on the application to the maximum. To use the program to check the FurMark video card, you need:
- Download the application from the office. site https://furmark.ru/downloads/FurMark.zip;
- Run the utility after installation;
- Click on the «Settings» button;
- Make sure Dynamic Background and Burn –in are checked, and be sure to uncheck Xtreme burn –in;
- Now run the program by pressing GPU stress test.
- Download the Aida64 program https://www.aida64.ru/download;
- Start the application;
- Click on the «Tools» tab;
- Click the «System stability test» option;
- Check the Stress GPU box and click Start.
- Use the link https://www.techpowerup.com/downloads/SysInfo/GPU-Z /;
- Start the program;
- Go to the «Sensors» tab.
nine0213
Read also: Error code 43 on the video card
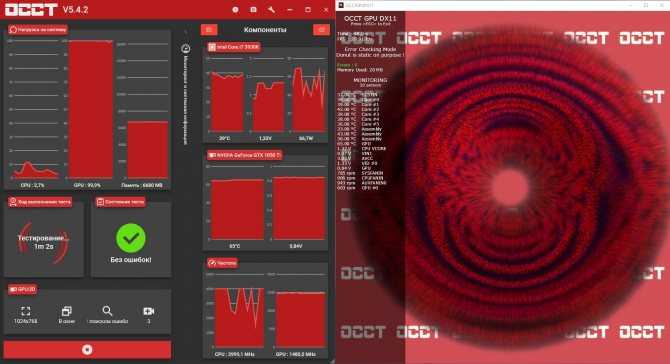
So, how can this program for checking the temperature of the video card help us. Immediately after starting the utility, you will experience a strong increase in the temperature of the video adapter, this will be accompanied by a stronger buzzing of the cooler.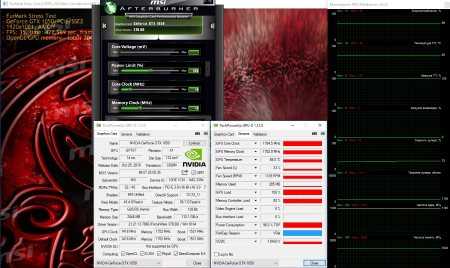 The main aspect, by which we will determine the performance, will begin 2-3 minutes after launch. After a significant increase in temperature, the graph should become horizontal, and heating should be limited to 80-95 degrees. This will show that your card is working fine and handling the load. If the temperature rises further, then at 100 degrees there will be an emergency shutdown of the computer. Everything that warms up to 100 and above is no longer normal, try cleaning the cooler, radiator and lubricating it. You may need to completely disassemble the cooler and get rid of the used grease and then drip a new one.
Video adapter stress test using Aida64
In fact, Everest and Aida64 are parallel applications and you can use either one or the second. The principle of their operation is similar to the previous program, but the load is created a little less, sufficient for 100% load. Using the same utilities, you can check the processor, RAM or HDD, and at the same time.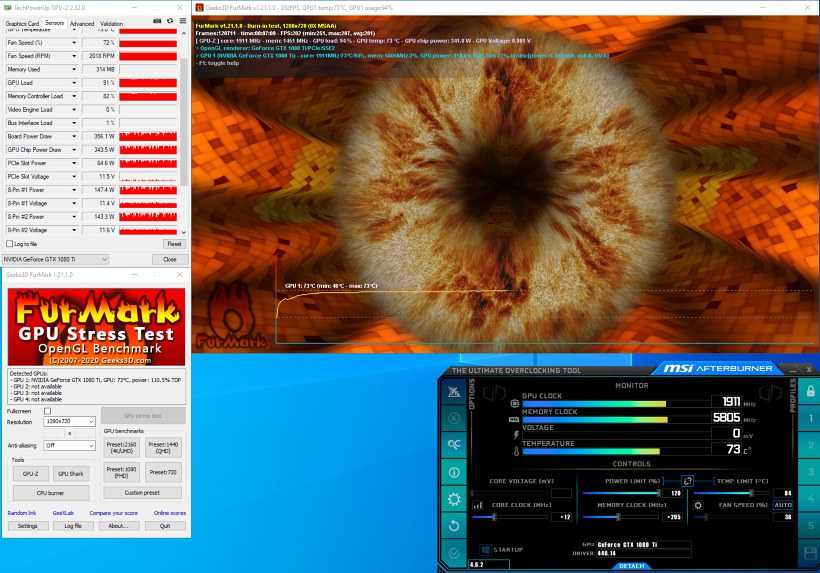 To use the method, you need:
Similarly, you need to make sure that the heating limit hangs around 80-95 degrees, the lower the better. Also, first you should find out the maximum allowable temperature for your card, as it ranges from 80 to 120 degrees. Hold the load for about 10 minutes for an objective assessment of performance. nine0003
See also: How to determine which video card is on the computer?
Another way to do the same sanity check is to run a modern game, but first you need to download a small GPU-Z utility: