PC Won’t Boot To BIOS? [7 Ways To Fix]
No matter what PC you are using, whether it is a laptop or a desktop, you just need to get access to your PC BIOS at some point. But, what to do when your PC is not booting to BIOS?
If you have just built your new PC, then this is the most common problem that you would face. Here on this page, you will find various causes for this problem along with the fixes.
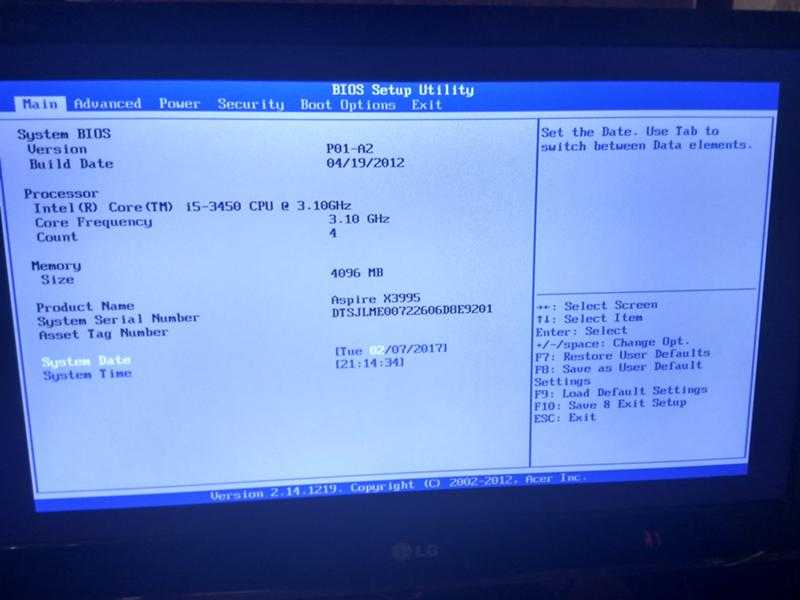
I want you to read the complete article to find where the problem is on your PC and the required solution.BIOS Setup Utility on a desktop computer
The above image will let you know what the BIOS page looks like on a computer. However, the page may or may not be the same for different computers because it all depends on the motherboard manufacturer. Here you can find the complete guide to understanding BIOS in a computer.
Ok, now we will see why this page is not displaying on your PC.
On this page
Press the Right Key to Enter BIOS
This is the basic step to access BIOS on your PC – You need to press the right function key. The BIOS accessing key varies from PC to PC.
For example, this PC that I am using here has the ‘Del’ button as the BIOS accessing button. But my friend’s HP laptop needs to press F9 to get access to the BIOS.
When you hit the wrong key for BIOS, the OS will load if you installed an Operating System on your PC. Otherwise, it will display the boot devices connected to it.
Fix it:
Finding the BIOS key on your PC is not a complex task. Here you can find it in multiple ways.
Check the motherboard manual – The motherboard manual is your first guide to solving most of your PC problems. Why? Because it is full of information about your motherboard.
If you have the physical copy of the motherboard manual, go through it. Otherwise, download the soft copy from the web. For that, you need to know what motherboard you have on your PC.
Just type “Your motherboard model + manual” on the web. You can see the results. Your motherboard manufacturer must provide a copy on their official site. I recommend you go with it.
Download the manual and find the BIOS accessing key to your computer.
Test the keys on the keyboard – The function keys from F1 to F12, del, and Esc are the keys you need to test. If you think the first approach is not good for you, press any one of these keys repeatedly after you turn ON the computer.
Only test the single key at a time. If BIOS loads, that is ok. Otherwise, use another key and repeat the process. A bit of a hard task. Right?
Let’s see what the next method we have is.
Do some research – If you know about your motherboard model or manufacturer, search for the BIOS key for that.
You may or may not find the right information on time. Here is my recommended post to save you time.
Use the right method at your convenience to find the BIOS key.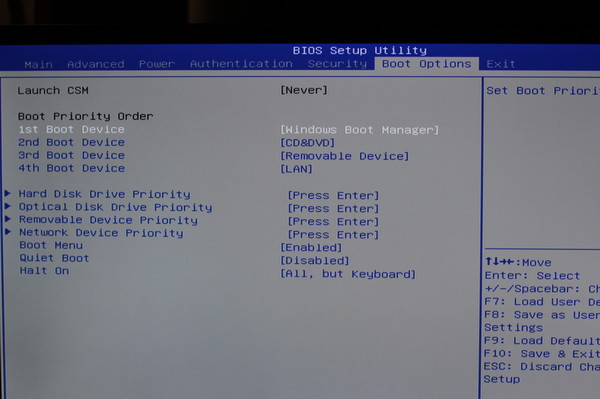
Give Enough Power Supply to Your PC
The computer is an electronic device, so it needs a power supply to work. All the components in a PC from a small cable to the motherboard require a sufficient power supply.
Just guess, what happens if they don’t get enough power supply?
You are right. Problems like not booting BIOS, Blue Screen of Death, PC freezing, etc will occur.
Fix it:
You can fix the issue by using a high Watt Power Source Unit.
To find your PSU watt capacity, open the list of components you purchased when building your PC. And find the power source component to know more about it.
In other cases, you need to remove the CPU case and look at the product details on the PSU.
A normal PC requires at least 400 Watts of power source. If you are using a gaming PC, 600 Watts or more is recommended. The gaming components require more power than normal ones. Go through the article to find how much power your PC is consuming.
Remove External Drives, CMOS Battery, and Case Panel for 10 Minutes
Sometimes, the external drives are not in sync to make your PC perform well. Especially, in this case, the CMOS battery on your motherboard will cause you trouble, and fixing it can solve the problem.
All the external devices connected to your PC, like CMOS on your motherboard, hard disk, etc, should be removed for a while.CMOS battery on a motherboard
Fix it:
The power supply to the PC needs to be reset and with this action, you can fix the issue.
Remove all the external components and wait for at least 10 minutes after that, you can place all of them as usual and turn ON your PC. Now your PC will show BIOS utility setup.
Make Sure You Are Using Compatible PC Components
A computer can only work when all the components in it are compatible. Some specifications might be up or low but all the components must be compatible.
So, how should you find that your PC components are compatible?
You just need to find your motherboard model. And all the other components must be compatible with it. If they don’t, then you’ll get problems like your PC not booting to BIOS or Blue Screen error, etc.
We have already discussed how to get the motherboard manual.
Just open the manual and find these topics.
- The compatible processor
- RAM type
- GPU type
- Connecting pins
- PSU requirement
- Hard disk storage capability
- SSD compatibility
- and more…
This is a professional approach to finding the compatibility of a computer.
Fix it:
If your PC has incompatible components, you need to replace them with new compatible ones.
Ignore this step if all of your PC components are compatible.
Place RAM, ROM, and Processor Correctly
In general, there is no need to look at this section for this issue.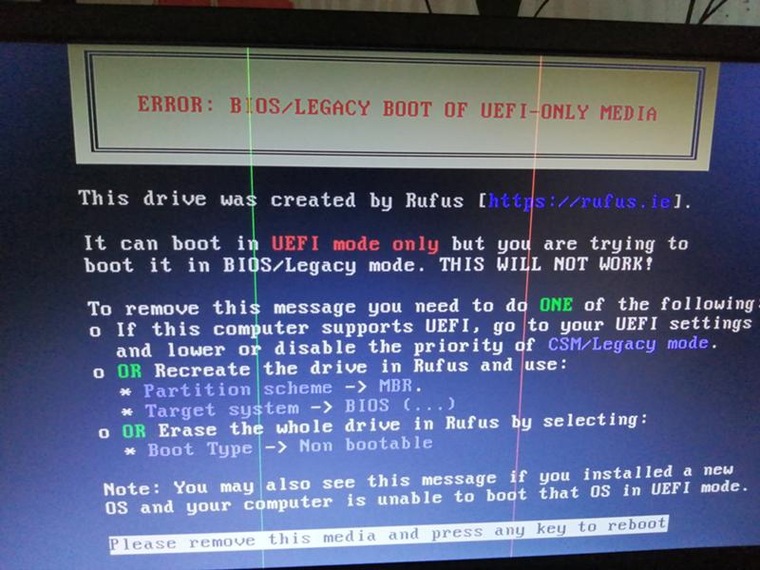 But in some worst cases, RAM misplacement can cause this issue. And also, the ROM and processor installations are important to place.
Faulty RAM and processor give a chance for your PC not booting to BIOS.
Fix it:
Make sure you handle all these components well, especially the processor. If you make any PC build mistake, the problem will arise.
Dismantle your computer and remove RAM, ROM, and the processor from the allocated place, and place them properly.
A laptop user can ignore this step though the laptop hardware handling is much more complicated than the desktop.
However, it is not suggestible to dismantle your laptop until you think the problem is with the components in it.
This will help you fix the problem.
Any Burnout on Your Motherboard? Check Once.
I hope you know the value of a motherboard in an electronic device. Especially in computers, the motherboard plays a vital role in giving instructions to other PC components.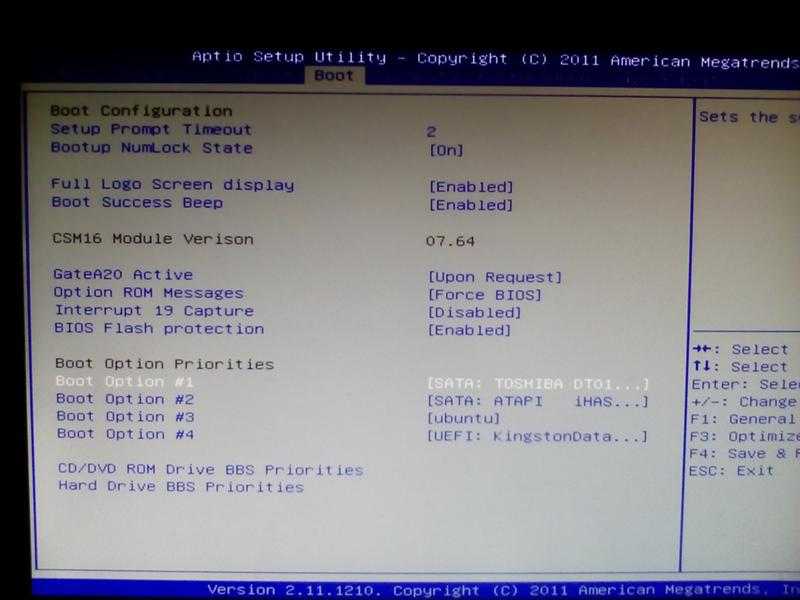
If you observe clearly, the motherboard has various internal connections like RAM to Hard disk, processor to HDMI port, PSU to CPU cooler, etc. Because of all these internal connections, the computer works fine without any short circuits. And that’s why it is called MOTHERboard.
Any unwanted or neglectful action toward the motherboard will disturb the network structure and lead to a short circuit. It is not a good sign for your PC.
The burnout on your motherboard will impact its working. And as a result, you can’t get access to your PC BIOS.
Fix it:
You must be careful while handling the motherboard of your PC. It is sensitive. If this is the case for you – you will find a black area on your board. This is the sign that your board was damaged. Click here to find the symptoms of a dead motherboard in a PC.
You need to buy a new one to access BIOS on your computer.
No burnout means no problem.
Replace CMOS Battery And Try
Sometimes, a CMOS battery might cause this issue on a computer. And it can’t help to load the basic BIOS files on a computer. The battery is a small thing to suspect, but it is one of the main components in the entire motherboard.
The main question is, how do you determine whether the problem is with the CMOS battery or other components on the computer? Well, there is no shortcut or recommended tool yet for hardware scanning.
Make sure you check all the above conditions and then come to the CMOS battery for assurance.
Fix it:
Here you don’t have other options except to replace your CMOS battery with the new one. Don’t worry, its cost is cheap.
These are the issues that I found on a PC when it is displaying a blank screen instead of BIOS.
However, I will update this list when I find other issues that are causing this problem. If I miss anything to list here, let me know with your comment.
I’m happy to see you in the conversation. And it helps others to solve their problems.
How To Fix PC Won’t Boot to BIOS [Ultimate Solution 2023]
Written By FarhanMax
Maybe you want to enable a system feature or change system settings, or solve a specific error issue on your computer.
But, when you try to enter your system BIOS, your system does not let you get into BIOS. You are trying a few times, but you get the same result every time.
Are you worried and frustrated about your BIOS issue and looking for an ultimate solution?
Don’t worry. You are not alone.
I have been in a similar situation as you, and I have been able to get out of this issue with proper tests and research. So, if you are looking for an ultimate solution to solve your BIOS access issue on your system, you are in the right place then.
Don’t miss any part and precisely follow the tutorial.
So, let’s get started to know the solution to solve your BIOS access issue.
Check out the easiest way to Gigabyte BIOS ID Check Error.
Why Won’t Your PC Boot to BIOS?
Bootstrap Loader
BIOS Drivers
CMOS Setup
How to Fix PC Won’t Boot to BIOS
1. Disable Fast Startup using Control Panel
2. Use UEFI Firmware Settings
3. Reset CMOS
Final Thoughts
Why Won’t Your PC Boot to BIOS?
Your PC won’t boot to BIOS because the fast booting startup process is enabled on your system, preventing access to BIOS. Another possible reason is your system does not pass the Power-On Self-Test (POST) test, which means your system has hardware malfunction.
BIOS has a vital function called Power-On Self-Test (POST). It is a hardware testing system on BIOS to check hardware errors before booting BIOS.
The POST test helps verify your system requirements to boot up your Windows and BIOS correctly. If your POST test does not meet your system requirements, that means your system has a hardware malfunction.
However, there are also some other critical functions in BIOS that help your system boot BIOS properly. These are:
Bootstrap Loader
One of the essential functions of an operating system is Bootstrap Loader because BIOS control is transferred on the Bootstrap Loader.
The Bootstrap Loader function helps load your BIOS correctly on your Windows system computer. Without the Bootstrap Loader function, your BIOS does not load correctly.
Follow our guide to fixing CPU Fan Not Detected in BIOS.
BIOS Drivers
BIOS drivers are the most crucial low-level system drivers of a system.
The BIOS drivers give your computer primary hardware control, which helps to load your BIOS correctly on your Windows system. If any BIOS drivers have issues, your BIOS won’t load.
Do check our latest post on the BIOS Application Error 501.
CMOS Setup
Another crucial function of your BIOS is CMOS. CMOS stands for Complementary metal-oxide-semiconductor, which stores BIOS settings.
CMOS is a piece of memory on your computer motherboard where BIOS software is stored, which helps to load your BIOS correctly. If your CMOS is corrupted, your BIOS does not work and won’t load properly.
Check out my new post on SVM Mode In BIOS.
How to Fix PC Won’t Boot to BIOS
BIOS stands for Basic Input Output System, and it allows you to get the most basic access to your computer system.
Sometimes, users need to access or enter BIOS to enable a system feature or change system settings, or solve a specific error issue on their computer.
But, many Windows users reported that they faced the BIOS won’t boot issue on their computer.
This section will discuss some proven and tested ways to solve your BIOS booting issue on your Windows computer.
Let’s dive right in to know the solutions to resolve your issue.
Go through our epic guide on how to Fix Keyboard Not Working In BIOS.
Here are the steps to fix your PC won’t boot to BIOS:
1.
 Disable Fast Startup using Control Panel
The fast startup feature is helpful for your Windows system for some aspects, such as it helps boot your windows faster than a typical startup.
But, in some cases, the first startup is not a good thing.
When your system has the Quick Startup feature enabled, it disables the BIOS startup function on your system, preventing booting to BIOS.
So, to solve the BIOS booting issue on your Windows computer, you need to disable the fast startup feature. By disabling the fast startup feature, you can boot to BIOS.
Disabling the fast startup on your Windows 11 or 10 system is the same process.
The System Control Panel is the first and most straightforward way to stop the fast startup option. Using the Windows Control Panel on your system, you can easily disable the fast startup feature.
Follow our guide to fixing GPU not Detected in BIOS.
Here are the steps to disable the fast startup using the Control Panel:
- Press the Win+S Key on your keyboard to open the Windows Search Or,
- Click on the Search icon on the left side of the taskbar to open the Windows Search
- Type control panel on the search bar and hit the Enter key or click on the search result to open the Control Panel.

- Set your Control Panel is viewed by Category.
- Select the Hardware and Sound settings option.
- Click on the Change what the power buttons do under the Power Options.
- Click on the Change settings that are currently unavailable link at the top of the screen.
- Uncheck the Turn on fast startup (recommended) box under the Shutdown settings section.
- Click on the Save changes button to disable the fast startup feature.
- Restart your computer and boot to BIOS to check whether your problem is solved. If it does not solve your problem, try the next solution.
Check out our expert-recommended Gateway BIOS Updates.
2. Use UEFI Firmware Settings
UEFI Firmware setting is another practical method to open the BIOS on your system.
To do this, you need to open the Advanced startup window to use UEFI Firmware settings to boot to BIOS quickly on your Windows system.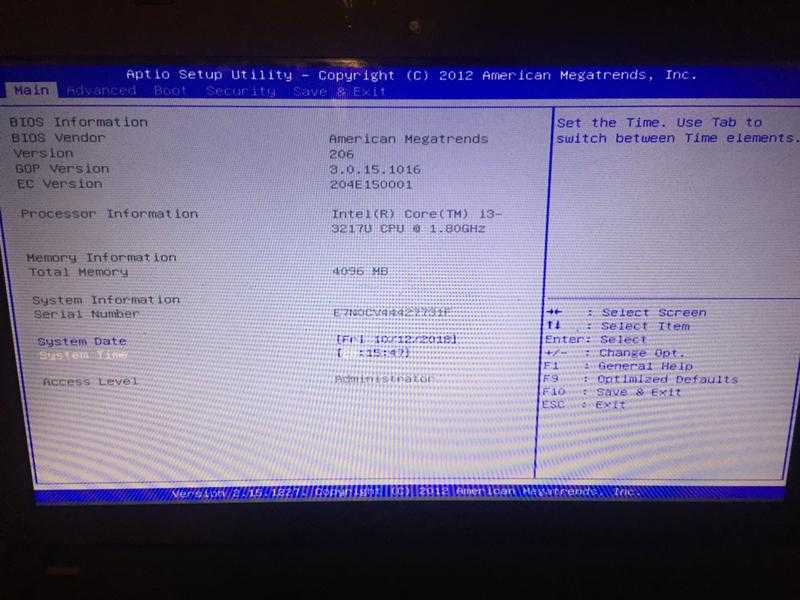
Here are the steps to boot to BIOS using Firmware Settings:
- Press the Win + I keys on your keyboard to open the Windows System Settings.
- Type settings on the windows search panel and hit the Enter button to open Windows Settings.
- Select the System tab on the right-side Settings menu panel.
- Scroll down and select the Recovery tab from the left side System menu panel.
- Find the Advanced startup option under the Recovery options
- Click on the Restart now button next to the Advanced startup
- Wait a few seconds to restart your computer and open the Advanced startup
- Select Troubleshoot option on the Advanced Startup
- Click on the Advanced Options from the list.
- Select the UEFI Firmware Settings
- After selecting the UEFI Firmware Settings option, it will boot your BIOS
Quickly check out our latest fix for BIOS Not Detecting USB.
3. Reset CMOS
CMOS is a piece of memory on your computer motherboard where BIOS software is stored, which helps to load your BIOS correctly. If your CMOS is corrupted, your BIOS does not work and won’t load properly.
You can easily reset your CMOS by removing the BIOS battery from your motherboard.
Here are the steps to reset CMOS:
- Turn off your computer.
- Unplug your computer power cable from the primary power source.
- Remove all the cords and peripherals.
- Open your CPU protecting casing.
- Find the BIOS battery on your motherboard.
 The BIOS battery location is different based on the motherboard model and manufacturer.
 - Remove the BIOS battery from your motherboard.
- Wait at least twenty to thirty minutes or more if you can to reset CMOS.
- Reconnect the BIOS battery on your motherboard.
- Replug all the cables and other peripherals.
- Replug the power cable into the primary power source.
- Press the power button to turn on your computer and boot to BIOS to check whether your problem is solved.
Check out our latest fix for fix M.2 SSD Not Showing Up In BIOS.
Final Thoughts
Bios won’t boot on Windows system computers is a common issue for Windows users.
In most cases, your system will not boot to BIOS because your system’s fast booting startup mechanism is enabled, which prevents access to BIOS.
Another possible reason is your system has hardware malfunction because your system does not pass the Power-On Self-Test (POST) test before booting to BIOS.
Here, I demonstrate some of the best proven and practical methods to fix the BIOS accessing issue that you face on your Windows 10 or 11 computer. You can successfully solve your BIOS accessing problem quickly by applying these proven methods.
I hope you learned anything new from this post. Please let me know which method worked for you if you discovered your solution.
If you’re interested in learning more about similar topics, you can also browse other posts.
Why is the BIOS not loading?
Forum question:
— My screen does not show. I was advised to disassemble the laptop and have a look. I have never disassembled a laptop. What threatens me?
— You will never collect it. ?
Imagine this situation: one fine day you turn on your computer or laptop and see that it does not start; moreover, you find that the BIOS does not load. Surely those of the readers who have encountered a situation where a computer or laptop does not boot or even start, are unlikely to find it pleasant. In addition, it may also happen that the computer or laptop turns on by itself and loads the BIOS and operating system, but you cannot enter the BIOS, that is, the BIOS Setup computer settings program does not start. In this article, we will try to give advice on what to do when a computer or laptop turns on but does not load the BIOS, and the system does not boot beyond the hardware check procedure and the operating system does not start or does not load BIOS Setup, and how to solve these problems . 91.1. Black screen and one beep
Description of the situation
instead of the familiar BIOS messages, the user sees only a black monitor screen in front of him. Sometimes a black screen on a computer or laptop is not a constant companion of this problem. For example, you turn on a computer or laptop, and you see that the system initially boots, some BIOS messages are displayed, but the boot process does not go beyond this stage, and the operating system does not start. What to do next in this case? First of all, you should not immediately panic and take your computer or laptop for repair, as you can try to solve this problem yourself.
The reasons that the computer or laptop does not start, or the BIOS does not start loading, may be various malfunctions, both related to the BIOS of the computer and related to the PC hardware. And the solution to the problem “the computer does not load the BIOS” in this case largely depends on its cause.
Varieties of situation:
-
1. Black screen
The first and most unpleasant situation is when you press the power button on a computer or laptop, but the computer does not boot, the BIOS does not start loading, and you see a black screen in front of you.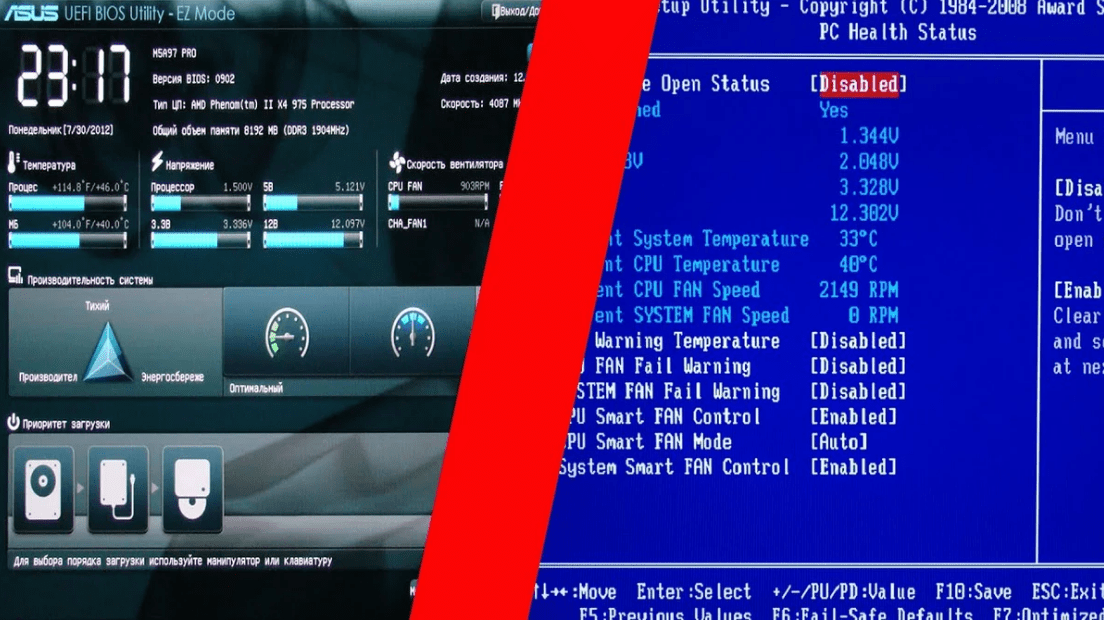 You wait further, but in vain, because nothing else happens. In this case, to determine the reason why the computer or laptop does not boot, you need to listen to the sounds that the BIOS produces during boot. One short beep usually means that the BIOS passed the hardware check successfully.
In this case, the monitor is most often the cause of the problem (of course, if we are talking about a desktop computer). Therefore, it is best to check the connection of the monitor to the computer or the monitor’s power cable in such a situation. If the computer does not start after that, but the black screen remains, then it’s not the monitor.
The presence of several signals at the moment when the computer is turned on and the system is booting usually means some kind of malfunction. As a rule, the meaning of these signals is different for different BIOS models. But most likely, if you do not see anything on the screen, then the problem is again related to the video system, but this time, most likely, with the video card. However, in order to be completely sure about this issue, it is best to refer to the list of conditional beeps for the BIOS version that is installed on your computer or laptop.
If the computer turns on, but the «black screen» is not accompanied by any beeps, then we can assume that something is wrong with the power system. For example, the power supply has failed and for this reason does not supply the required voltage to the system board. Or there is simply no contact between the motherboard and the power cable. Also, the cause of the problem may be a malfunction of the BIOS itself, the motherboard, processor, memory, and even the hard drive. In addition, sometimes the reason that the computer does not boot may be insufficient cooling of the electronic components of the motherboard.
Separately, it is worth mentioning the variant of the situation when the computer turns on, but there is no “black screen” and the system boots normally, but it does not enter the BIOS setup program for the computer settings — BIOS Setup.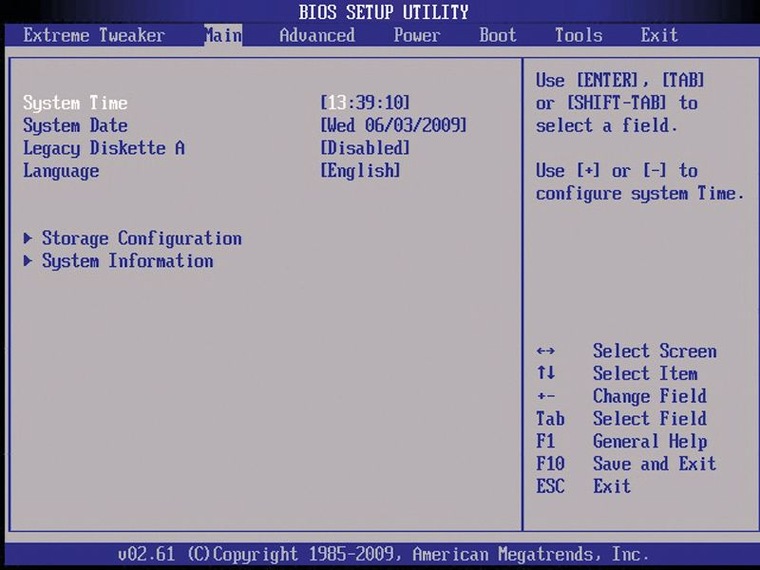
True, there is one nuance here. Some users may immediately panic “I can’t get into the BIOS”, although they simply don’t know how to enter the BIOS correctly. To enter the BIOS, you simply need to press the appropriate key after the computer turns on. But many users press the wrong key or do it at the wrong time and that’s the only reason they can’t enter the BIOS. We wrote about what to do to enter the BIOS setup program after the computer turns on in the corresponding article.
But it may also happen that the BIOS Setup does not start and you cannot enter it even though the correct key seems to be pressed. Most often, if you press the desired key and cannot enter the BIOS, the keyboard is the culprit of the problem. For example, if you are using a USB keyboard and the BIOS is not set to support USB devices, you will not be able to enter BIOS Setup. In addition, it is worth checking the health of the keyboard on another computer. If the BIOS does not open even after excluding the keyboard factor, then the matter is in another component of the computer.
It is also not uncommon for a computer to start up, but not load the operating system, but displays a text message about a specific error when loading the BIOS. Whether the download continues depends on the nature of the error. For example, a BIOS checksum error message may indicate a low CMOS battery, and usually the user in this case can continue his work after pressing a certain key.
Ways to solve problems
First of all, in order to solve the problem and eliminate the reason why the black screen appears and the computer does not load the BIOS and the operating system, you should remember what you were doing before the problem arose? Did you install new devices in your computer just before the black screen appeared? Have you made any changes to the BIOS settings?
If you have indeed made changes to the hardware, it is recommended that you restore the system to its previous state by removing the newly installed hardware. If after that the computer works normally and loads the BIOS, then this means that the problem was precisely in the remote equipment.
In the event that you made independent BIOS settings, then the BIOS can be returned to safe factory settings. To do this, as a rule, it is enough to install a special CMOS memory reset jumper on the motherboard or remove the CMOS battery. As a rule, this operation often helps when the computer does not load the BIOS.
If you know for sure that you have not done anything with the BIOS or hardware, but your computer or laptop still gives you a black screen and does not load the BIOS, then you will have to check all the hardware yourself.
Sometimes the cause of a malfunction may be the dustiness of the «innards» of the computer. Therefore, the very first procedure for any user trying to revive a computer is cleaning the internal space of the system unit. Only after that it will be possible to move on and check the performance of all systems.
It is also possible that the system may temporarily fail due to overheating of the processor or motherboard. Therefore, it is worth checking the coolers of the system unit and processor. Then one by one it is worth checking the main components of the computer — processor, RAM, motherboard, video card, power supply. A hard drive failure can rarely cause the BIOS to not boot, but this option should not be discarded either.
Conclusion
The situation when the computer does not start and does not load the BIOS and OS, and the user instead sees only a black screen in front of him, of course, cannot be called pleasant. Since in this case the computer cannot be used for its intended purpose, as a business or entertainment tool, this is a great inconvenience to the user. However, the situation when the computer BIOS does not start is not always as fatal as it seems at first glance. Since it is extremely rare for a computer to hang and not be able to boot into the BIOS or not be able to enter BIOS Setup is a symptom of a hard drive failure, the user does not lose important information stored on it. In addition, there are a number of ways that allow you to identify a faulty element and revive your computer. Of course, in some cases it is impossible to identify a malfunction by the user, and then it is best to use the services of computer specialists from the service center.
Recommend this article to your friends:
BIOS opens when you turn on your computer or laptop — a solution to the problem
hardware setup, but usually nothing critical, the cause can be identified and the problem fixed.
This manual explains in detail why when you turn on a PC or laptop, BIOS can immediately open and what to do in this case.
Before proceeding to the analysis of possible sources of the problem, I ask you to pay attention to one nuance: sometimes in the situation under consideration, before the BIOS automatically opens, there is text on the initialization start screen that tells you exactly what problem was detected — it can be useful and eliminate unnecessary operations when correcting a problem.
Boot options
The first thing to look for when a problem occurs is boot options:
- Check if the correct device is set as the first boot device in the BIOS (it should be either your system disk or Windows Boot Manager), the steps will be similar to those described in the material on what to do with a Reboot and Select error proper boot device.
- If the error occurred after a BIOS/UEFI update, reset boot mode settings may be the cause of the problem. Try enabling Legacy Mode support (may be called CSM or Compatibility Support Mode), disable Secure Boot.
- Actions from the 2nd paragraph can also be useful if the BIOS parameters were reset for any other reason: a dead battery, problems in the electrical network.
- In the case of an Asus laptop or a motherboard from this manufacturer (may work for other manufacturers if there is a similar parameter), check if the Fast Boot option is present if you enter Advanced mode using F7 (if there is such an item) — if the option is there, switch it to Disabled and save the settings.
Problems with the operation of the equipment or its connection
If the above methods do not help, it is very likely that we have some problems with the computer or laptop hardware. What you should pay attention to:
- If the BIOS does not display boot devices, you should try disconnecting the drive (on a dead computer), and then reconnecting it.
 In the case of a PC, you can use a different cable. You can’t rule out disk failure either.
 - If the problem occurs after adding new hardware, try disabling it and see if that fixes the problem.
- Attention to USB devices and USB hubs: incorrect operation of the connector or connected equipment can lead to loading into the BIOS, and this is not only about flash drives and similar devices, but also, for example, about the keyboard and mouse. Try disconnecting all optional devices, temporarily connecting another keyboard and mouse (and if they are not available, use a different type of ports for connection, for example, USB 3.0 instead of 2.0, and if this does not work, try starting without a keyboard and mouse connected).
- If you have multiple drives connected via SATA interface, check if the situation changes if you leave only the system drive connected.
- You can try booting your device without disks: if in this scenario, instead of BIOS, you see a message that there is no boot drive, you can assume a problem with the HDD or SSD, its connection or compatibility (most often in the case of a recently installed M.
 2 SSD with the wrong interface: SATA instead of PCI-e NVMe or vice versa).
 - Official Asus support for this case recommends resetting the BIOS to safe default settings (Load optimized Defaults on the Exit tab, in the case of a graphical interface, you may first need to open “Advanced mode”. You can try on other systems, but keep in mind: when resetting boot options will also be reset (for example, Legacy support may be disabled and will need to be enabled again).
- If automatic loading into BIOS started after you did some work inside the PC or laptop, for example, dust removal, you should check the quality of the reassembly: did you forget to connect something, are the components installed tightly in their sockets.
And one more possibility, which in some cases allows you to return the system to working capacity: try to perform a complete blackout:
- For PC — turn off by long holding the power button, unplug it, press and hold the power button for a few seconds.