How to Use NVIDIA Profile Inspector to Greatly Improve Visual Quality in Pre-DX10 Games – GND-Tech
NVIDIA Profile Inspector is a tool for editing driver settings on NVIDIA GPUs (as well as monitoring and overclocking, like RivaTuner and its derivatives). Like an expanded version of that section of NVIDIA Control Panel. Many people aren’t aware that Inspector has a plethora of options for tweaking image quality. The tweaks I’m going over in this thread are forcing ambient occlusion and supersampling into games.
This methods of forcing anti-aliasing are infinitely more effective than ReShade, GeDoSaTo, SweetFX, and whatever other shader injectors exist. This is at the driver level; it is much more precise, and supersampling is technically by far and large the most effective anti-aliasing method and it just cannot be beaten as it gets right to the root cause of aliasing and eliminates it with absolutely no performance-saving metrics. The downsampling used by NVIDIA DSR, AMD VSR, and GeDoSaTo is less effective than these supersampling methods, as those use much less effective rescaling filters even when set to the best ones.
However, forcing ambient occlusion through drivers/NVIDIA Inspector is inferior to ReShade MXAO. Only use this if ReShade somehow doesn’t work in said game.
Preface
Without ambient occlusion (or full global illumination which is even better), games look so much less realistic as light no longer seems to have much of an effect on the environment. And aliasing? It can make an otherwise great looking game look horrible. Many games today are heavily aliased even with their anti-aliasing setting maxed out, because they only have highly ineffective, overly simple AA such as MLAA, FXAA, or SMAA. These games, even at 2560 x 1440 and sometimes even at 4k, are so aliased that all objects will appear like distorted raw polygons with moving, white jaggy edges. Some of the biggest offenders include The Witcher 3, Assassin’s Creed: Unity, all the modern Tomb Raider games, and numerous others. Unfortunately, nothing in this article can help those games.
Supersampling is the ultimate anti-aliasing method, and also the most demanding. You see, if we could play games at a large enough resolution (5k or higher from my experience) then aliasing wouldn’t be an issue. This is the principle behind downsampling, supersampling’s infant brother; simulate a larger resolution by rendering the image at a larger resolution and then scaling it back down with a rescaling filter (Lanczos being the best I know of, used by GeDoSaTo).
But supersampling doesn’t just use a simple rescaling filters. The filters it applies are far more complex and effective at eliminating aliasing, and it gets rid of all kinds of aliasing whether it’s geometry, shader, aliasing on transparent textures, temporal, you name it. Whereas MSAA is only good for removing aliasing on geometry, MLAA/SMAA/FXAA targets only shader aliasing but they’re pretty much good for nothing at 3440 x 1440 and below, TAA is a good all around method but still not on supersampling’s level (though it’s often not demanding at all so there is no good reason for MLAA/SMAA/FXAA to exist anymore).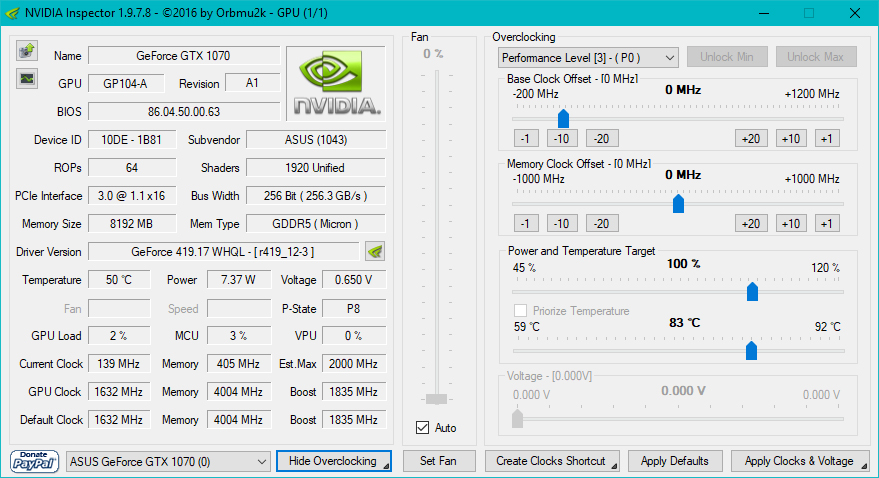
Unfortunately these tweaks only work in pre-DX10 games, the ambient occlusion probably only working in DX9 (and maybe a few OpenGL titles). There are very few exceptions; it is possible to force ambient occlusion into Metro Redux using this method (a DX11 game), and it does improve image quality ever so slightly. Nonetheless, these tweaks are a primary reason as to why I stick with NVIDIA graphics cards; many of the best games ever made are DX9, and I like to make them look as good as possible. Plus I hate aliasing more than almost anything else.
Why don’t these tweaks work in newer games? I suppose NVIDIA decided that compatibility isn’t needed. Modern games always have their own ambient occlusion implementation, although they could really use the supersampling because modern games are more aliased than ever before. But then again, supersampling is very hard to run.
Speaking of performance, I can’t speak for the performance impact of forcing ambient occlusion. The last time I felt an actual impact was in Skyrim using a GTX 680. Nowadays, it’s just negligible.
As for supersampling, see this quote:
In the situation where a game is bound by pixel shaders (usually the case in modern games) assuming no external bottlenecks the framerate after SSAA is applied will be 1/n of the framerate without SSAA where n is the number of samples. In other words 4xSSAA would give you 1/4th the performance of no SSAA, or a 75% drop in performance to put it another way.
Source
So 2x supersampling will give you a 50% performance penalty, 4x will give you a 75% drop, 8x will give you an 87.5% drop.
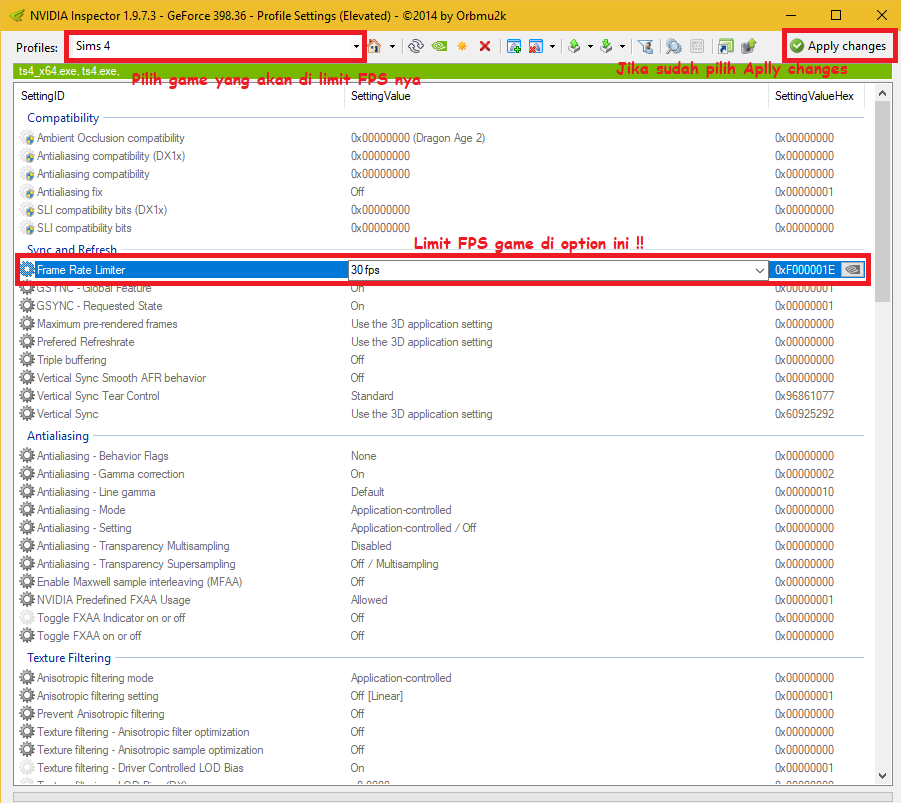
Procedure
1. Download NVIDIA Inspector’s latest release.
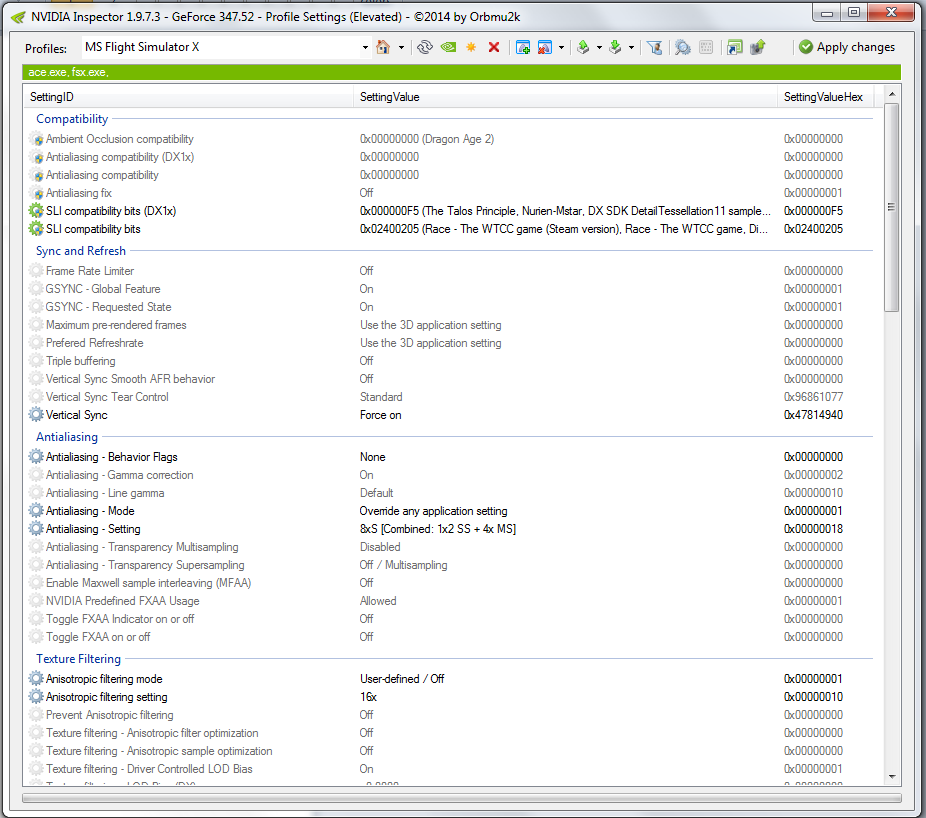
2. Upon launching nvidiaProfileInspector, you are greeted with the global driver profile pictured below. It applies to all 3D applications, but anything you change in individual profiles will overwrite this global setting.
3. You should set these basic parameters in the global profile:
- Set texture filtering to High Quality, and just enable High Quality ambient occlusion.

- Set your desired Power management mode (I prefer “Prefer Maximum Performance” so that my GPU never downclocks when it shouldn’t).
- Disable Shadercache since it might cause stuttering in some games.
- Set “Texture filtering – Negative LOD bias” to Clamp, and leave LOD bias at 0. This will usually deliver the best image quality all things considered as you won’t get shimmering. I only recommend using Allow and a negative value when using supersampling, which we’ll go over later.
- Set Preferred Refresh Rate to Highest Available.
4. Now we can look at modifying individual game profiles. See the dropdown menu in the image below. You can also type out your own game, and create your own profiles for unsupported games. Although if said unsupported game uses a common engine, it might be better to just add its executable file to an existing profile for a game using that engine (by choosing that game’s profile and clicking one of the icons near the top that says “Add application to current profile”).
5. Since we’re focusing on forcing ambient occlusion and supersampling into games, you need to use compatibility bits (save for DX8 games which don’t need them). See the red box labeled 1. in the image below. Notice there is a separate field for anti-aliasing compatibility in DX1x games (DX10, DX11, DX12). Funny they put this because to my knowledge, there are no bits for any DX10/DX11/DX12 game.
6. To find proper compatibility bits, go here for anti-aliasing bits and here for ambient occlusion bits. If that Guru3D anti-aliasing thread says to either use or do not use “AA fix” then do as they say. If they say nothing (which is usually the case), do not use AA fix.
So let me go over the labeled red boxes in that image above. The numbers in the list below correspond to the image above.
- As I said earlier, these are the compatibility bits. Get them from those Guru3D threads, and if a game isn’t listed find out what engine it uses and see if there are any bits for other games on that engine.
- Antialiasing – Behavior Flags – Set this to None every time, so that it doesn’t screw with your AA.
- These are the actual anti-aliasing settings. Antialiasing – Mode allows for application-controlled (doesn’t make any changes), Enhance the application setting (enhances the game’s current AA), and Override the application setting (bypassing the game’s AA and forcing its own). You can force or enhance multisampling (full screen or just transparent), sparse grid supersampling aka SGSSAA (full screen or just transparent), ordered grid supersampling aka OGSSAA (full screen or just transparent), and hybridsampling aka HSAA (full screen only). Read all about these different AA forms here, under “Nvidia” but do read the others too since it’s good knowledge to have. Personally, I find that SGSSAA typically looks the best, when there is a bit that allows for all three. The image above showcases 2x full screen SGSSAA (aka FSSGSSAA). I rarely use Enhance, only using it if the game for some reason supports Enhance but not Override (e.
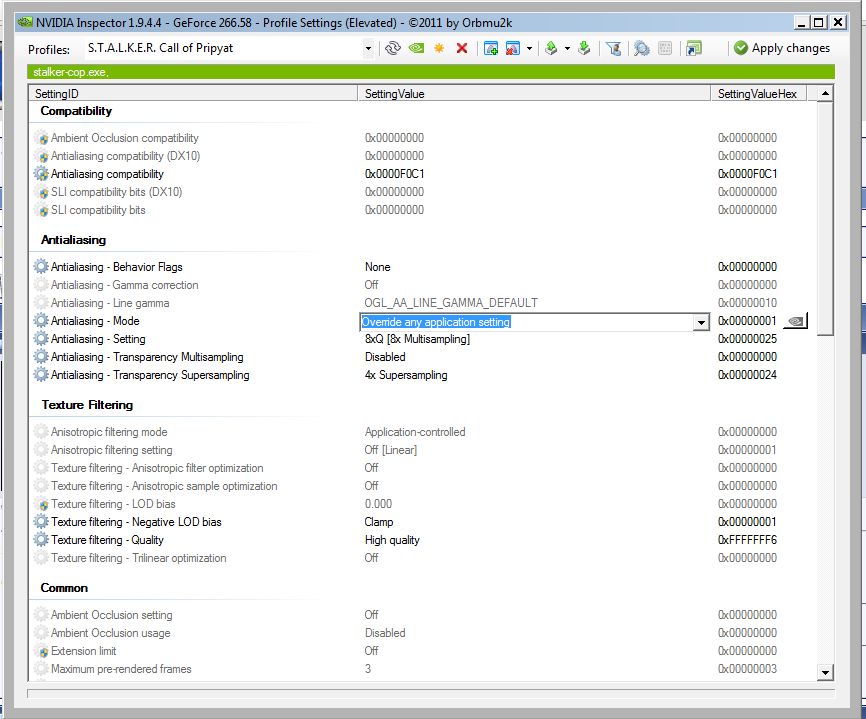 g. KOTOR).
 - “Texture filtering – Driver Controlled LOD Bias” should be set to On in the default profile, don’t touch this. The other three settings in this box control your LOD or Level Of Detail settings. Ideal settings here depend on what kind of AA you’re forcing. Unless it’s supersampling or hybridsampling, leave it at Clamp and 0. If hybridsampling, set it to Allow and 0 since hybridsampling has auto LOD adjustment.
- Ambient occlusion settings. Always leave it as Enabled unless you can’t run it at all, though the other setting does have three performance options: Performance, Quality, and High Quality (and Off, seems redundant given the other setting but whatever).
So those are the things you need to adjust, using the appropriate bits listed in those Guru3D threads. You might even discover working bits yourself, for a certain game.
SGSSAA
Here are some examples of settings you may find yourself using. The last image above shows me forcing 2x SGSSAA into Half-Life 2: Episode Two (and any Source mod built on Source SDK Base 2007).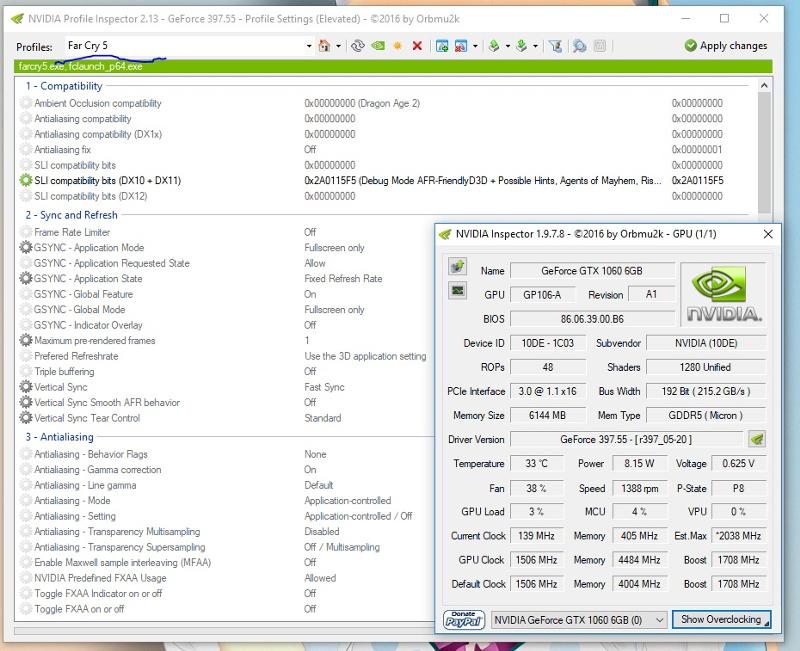 Below is another example of SGSSAA, this time 4x:
Notice the pattern? Below are the steps to apply full screen SGSSAA:
- Make sure AA Behavior Flags are set to None.
- Set Antialiasing – Mode to Override.
- Antialiasing – Setting must be set to either 2x multisampling, 4x multisampling, or 8xQ multisampling. I suppose 8x CSAA and 16xQ might work with 4x and 8x sparse grid supersampling respectively. The reason for this rule is, sparse grid supersampling gets its sample coordinates from the MSAA samples, thus they have to match numerically.
- Disable transparency multisampling.
- Set transparency supersampling to sparse grid and however many MSAA samples you chose in step #3 (e.g. if you’re using 4x multisampling, use 4x sparse grid supersampling).
- Set “Allow Negative LOD Bias” to Allow.
- Set the LOD Bias (the correct one; DX means DirectX, OGL means OpenGL) to -0.5 if using 2x SGSSAA, -1.0 if using 4x SGSSAA, or -1.
 5 if using 8x SGSSAA.
 - Don’t forget to hit apply!
So, following the above steps, the image below shows the correct settings for 8x SGSSAA. Alternatively, 16xQ might work as the antialiasing setting as well.
OGSSAA
Now let’s look at OGSSAA in the image below.
There are only a few differences on how to set this up over SGSSAA. The first being, multisampling is never used for the AA setting. Second, sparse grid is obviously not used for transparency supersampling; instead the regular supersampling is used (which is ordered grid). The LOD works the same way, I’ll just quote that blog again here:
Set negative lod to allow and set the lod bias as follows:
1×2 OGSSAA (2 samples): -0.5
2×1 OGSSAA (2 samples): -0.5
2xSGSSAA (2 samples): -0.5
2×2 OGSSAA (4 samples): -1.0
4xSGSSAA (4 samples): -1.0
8xSGSSAA (8 samples): -1.5
3×3 OGSSAA (9 samples): -1.58 (or as close as you can get)
4×4 OGSSAA (16 samples): -2.0
The formula for determining the correct lod bias is “y = -0.5 * log, base 2, of (n)” where n is the number of samples and y is the correct lod bias. Of course since some of you may have forgotten how to use logarithms I went ahead and typed out the correct values for each SSAA mode above.
Expanding on this, if using 1×2 or 2×1 supersampling, transparency supersampling should be set to 2x (just do the math, 2 * 1 = 2 and 1 * 2 = 2 and the goal here is to apply full screen supersampling). 2×2 supersampling should use 4x transparency supersampling. Thus, you can’t apply full screen 8x or 9x OGSSAA, only 2x, 4x, and 16x!
It is of course possible to run into a scenario where your PC can handle 1×2 or 2×1 OGSSAA + 4x transparency supersampling. It’s not going to look worse than 2x FSOGSSAA (which is 1×2 or 2×1 + 2x transparency supersampling) though it’ll run much worse. In this case you might be better off running 2×2 OGSSAA and 2x transparency supersampling. Either way you are applying a different amount of supersampling to transparent edges compared to the rest of the image.
What is the difference between 1×2 and 2×1 you ask? 1×2 = 1 horizontal sample and 2 vertical, 2×1 is the opposite. Neither one is perfect, if 2x FSSGSSAA works instead it’s bound to look better.
HSAA
To enable HSAA, which is OGSSAA + MSAA + auto LOD adjustment, follow these steps:
- Set AA behavior flags to None.
- Set AA mode to Override.
- Set Antialiasing – Setting to one of the settings that ends in “xS”. This indicates HSAA.
- Disable transparency multisampling.
- Set transparency supersampling to one of the regular supersampling options, matching the OGSSAA samples (NOT the multisamples) of your chosen “xS” option in step 3 (e.g. if you chose 4xS, use 2x supersampling, or if you chose 12xS use 4x supersampling, personally I don’t bother using any other HSAA settings than these).
- Set LOD bias to 0.
- Set Allow Negative LOD Bias to Allow. Remember, HSAA has auto LOD adjustment.
Examples of it in action; the image below shows 2x HSAA, since 4xS includes 1×2 OGSSAA and 2x MSAA thus 2x transparency supersampling is used.
The image below shows 4x HSAA. 32xS = 2×2 OGSSAA (4x) + 8x MSAA, so 4x transparency supersampling is used.
Recommended HBAO+ and SSAA bits for games NOT listed on the Guru3D lists
Many excellent games support forced HBAO+ and SSAA but aren’t featured on either of those lists (or I found better bits listed below). Here is a list I am making. Feel free to add! Note, I am not going above and beyond here. I don’t test every possible compatibility bit, I will stop once I find something that satisfies me, and I test SGSSAA first and then HSAA and then OGSSAA. I am hard to satisfy though so I will end up testing quite a bit.
| Game Title / Engine | HBAO+ bits | AA bits | Comments |
| Rainbow Six 3: Gold (Unreal Engine 2) | 0x00000002 (Mirror’s Edge) | 0x080000C1 | Only tested SGSSAA. There is probably a better SSAA bit, perhaps 0x080022C1, but this game already has performance issues. This is a light HBAO+ flag but it is the only one I’ve tested that doesn’t bleed through your character model. There is probably a better SSAA bit, perhaps 0x080022C1, but this game already has performance issues. This is a light HBAO+ flag but it is the only one I’ve tested that doesn’t bleed through your character model. |
| SWAT 4 (Unreal Engine 2.5) | 0x00000002 (Mirror’s Edge) | 0x000012C1 | Only tested SGSSAA and it’s perfect. This is the only HBAO+ bit I have tested that doesn’t flicker on and off. It is overall a light HBAO+ implementation, though it bleeds through smoke/fog and light a bit. |
| Unreal Tournament 2004 (Unreal Engine 2.5) | 0x00000030 (Aliens: Colonial Marines) | No bits needed for SGSSAA | SGSSAA works flawlessly without bits. This AO bit looks great but might glitch occasionally. Make sure you disable “Reduce mouse lag” in game options since that butchers performance on modern PCs. |
| Painkiller: Black Edition and Painkiller: Overdose (custom in-house engine) | 0x00000270 | 0x00000041 (Warmonger, Sid Meier’s Civilization V, QQ Xi You) | Only tested with SGSSAA.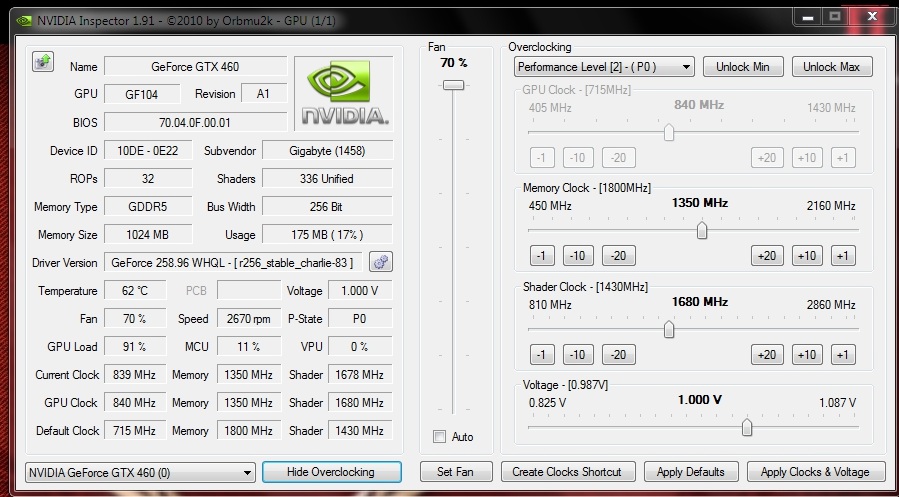 HBAO+ is flawless for me. HBAO+ is flawless for me. |
Also, 0x00000045 and adjacent bits work in many games, so if nothing else works give them a try.
Lastly, for DirectX 8 games you will always want to use this. This isn’t related to NVIDIA Inspector directly but it’ll help with performance and stability.
Screenshot Comparisons
Unreal Engine 3 games
Unreal Tournament 3 (2007). Before = no driver tweaks, After = 4x SGSSAA and high quality ambient occlusion using the UT3 AO bits. Be sure to open the images in a new tab and magnify them by clicking on them.
Mass Effect (2007).
Mass Effect 2 (2010).
Dishonored (2012).
Source Engine games
Underhell (2013).
No More Room in Hell (2013).
id Tech games
Call of Duty (2003).
Other Examples
Dragon Age: Origins (2009).
Other than performance, the possible downside to forcing supersampling is blur, which is caused by conflicting post-process shaders.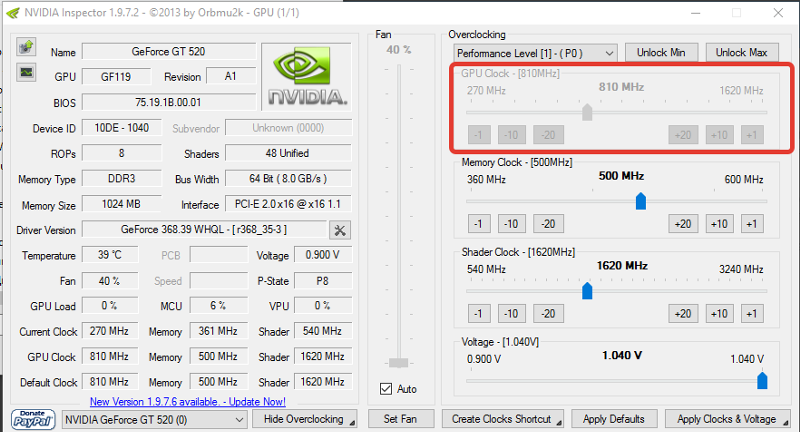 This blur can be countered with post-sharpening injected by something like ReShade, SweetFX, or GeDoSaTo. Alternatively, it can be countered by using more than 2x supersampling. 4x and 8x will either blur a lot less or not have visible added blur at all because the blur is offset by the extra samples (rendering at 4x or 8x native resolution).
When forcing ambient occlusion, if you’re using compatibility bits not listed for a game on that Guru3D thread above, you may notice flickering (ambient occlusion turning on and off). Also, in some engines like UE3, forced ambient occlusion will appear to shine through fog and volumetric effects.
graphics enhancement nvidia inspector ogssaa reshade sgssaa ssaa supersampling sweetfx
How To: Improve Image Quality in Pre-DX10 Games with NVIDIA Inspector
After seeing the response to this post of mine, I have decided to make this thread.
NVIDIA Inspector is a tool for editing driver settings on NVIDIA GPUs (as well as monitoring and overclocking, like RivaTuner and its derivatives).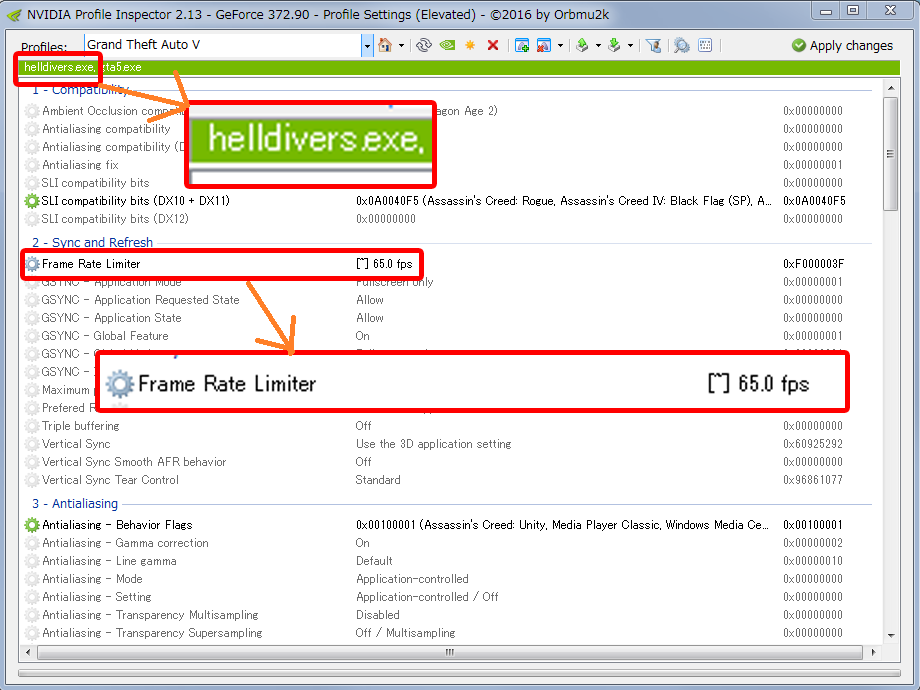 Like an expanded version of that section of NVIDIA Control Panel. Many people aren’t aware that Inspector has a plethora of options for tweaking image quality. The tweaks I’m going over in this thread are forcing ambient occlusion and supersampling into games.
Preface
Without ambient occlusion, games look so much less realistic as light no longer seems to have much of an effect on the environment. And aliasing? It can make an otherwise great looking game look horrible. Most games today are heavily aliased even with their anti-aliasing setting maxed out, because they only have highly ineffective, overly simple post-process AA such as MLAA, FXAA, or SMAA. They attempt to blur out aliased edges after the scene is already fully rendered and fully aliased.
These games, even at 2560 x 1440 and often even at 4k, are so aliased that all objects will appear like distorted raw polygons or blobs with moving, white jaggy edges. Some of the biggest offenders include The Witcher 3, Assassin’s Creed: Unity, Crysis 3, Mass Effect series, S.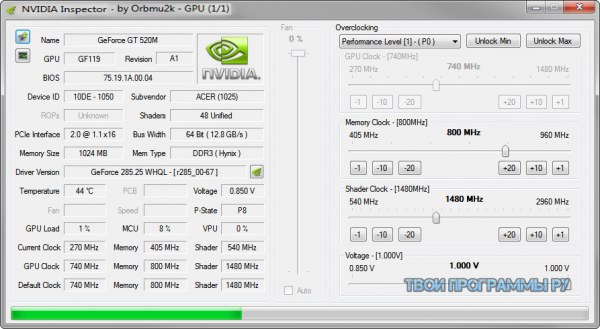 T.A.L.K.E.R. Shadow of Chernobyl, and numerous others.
Supersampling is the ultimate anti-aliasing method, and also the most demanding. You see, if we could play games at a large enough resolution (5k or higher from my experience) then aliasing wouldn’t be an issue. This is the principle behind downsampling, supersampling’s infant brother; simulate a larger resolution by rendering the image at a larger resolution and then scaling it back down with a rescaling filter (Lanczos being the best I know of, used by GeDoSaTo).
But supersampling doesn’t just use a simple rescaling filters. The filters it applies are far more complex and effective at eliminating aliasing, and it gets rid of all kinds of aliasing whether it’s geometry, shader, aliasing on transparent textures, temporal, you name it. Whereas MSAA is only good for removing aliasing on geometry, MLAA/SMAA/FXAA targets only shader aliasing but they’re good for nothing, TAA is a good all around method but still not on supersampling’s level (though it’s not demanding at all so there is no good reason for MLAA/SMAA/FXAA to exist anymore).
Unfortunately these tweaks only work in pre-DX10 games, the ambient occlusion probably only working in DX9 (and maybe a few OpenGL titles). There are very few exceptions; it is possible to force ambient occlusion into Metro Redux using this method (a DX11 game), and it does improve image quality ever so slightly. Nonetheless, these tweaks are a primary reason as to why I stick with NVIDIA graphics cards; many of the best games ever made are DX9, and I like to make them look as good as possible. Plus I hate aliasing more than almost anything else.
Why don’t these tweaks work in newer games? I suppose NVIDIA decided that compatibility isn’t needed. Modern games always have their own ambient occlusion implementation, although they could really use the supersampling because modern games are more aliased than ever before. But then again, supersampling is very hard to run.
Speaking of performance, I can’t speak for the performance impact of forcing ambient occlusion.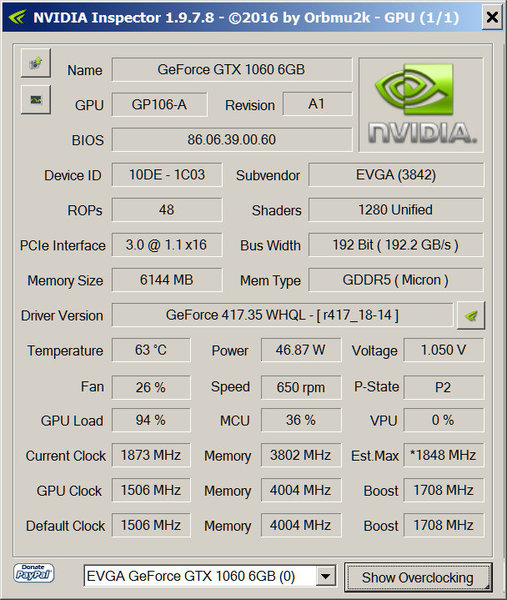 The last time I felt an actual impact was in Skyrim using a GTX 680. With my current PC (see my system specs) I obviously can’t really measure a difference.
As for supersampling, see this quote:
Quote:
In the situation where a game is bound by pixel shaders (usually the case in modern games) assuming no external bottlenecks the framerate after SSAA is applied will be 1/n of the framerate without SSAA where n is the number of samples. In other words 4xSSAA would give you 1/4th the performance of no SSAA, or a 75% drop in performance to put it another way.
Click to expand…
Source
So 2x supersampling will give you a 50% performance penalty, 4x will give you a 75% drop, 8x will give you an 87.5% drop.
Procedure
1. Download NVIDIA Inspector from Guru3D. Link.
2. You must run «nvidiaProfileInspector.exe» to perform these tweaks. Not the regular Inspector application, which is the monitoring and overclocking tool.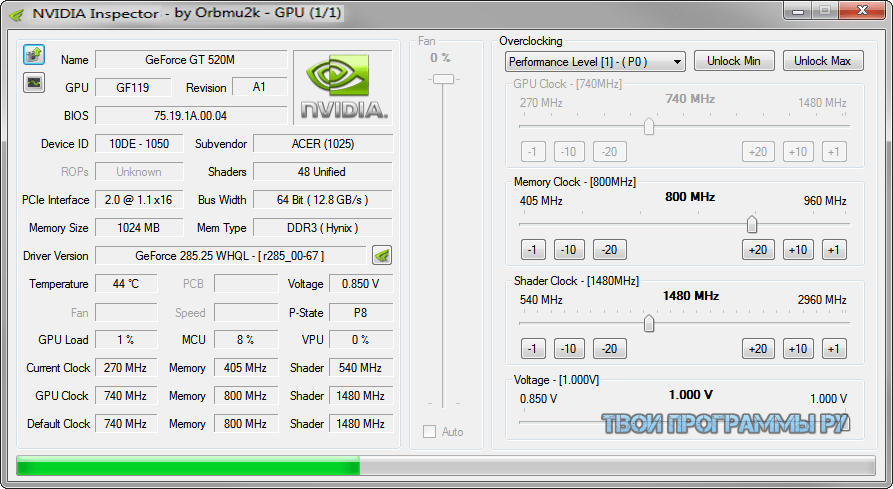
3. Upon launching nvidiaProfileInspector, you are greeted with the global driver profile. It applies to all 3D applications, but anything you change in individual profiles will overwrite the global setting.
You should set some basic parameters in the global profile.
- People with decent modern PCs should set texture filtering to High Quality, and just enable High Quality ambient occlusion.
- Set your desired Power management mode (I prefer «Prefer Maximum Performance» so that my GPU never downclocks when it shouldn’t).
- Disable Shadercache since it might cause stuttering in some games.
- Set «Texture filtering — Negative LOD bias» to Clamp, and leave LOD bias at 0. This will usually deliver the best image quality all things considered as you won’t get shimmering. I only recommend using Allow and a negative value when using supersampling, which we’ll go over later.

- Set Preferred Refresh Rate to Highest Available. This may have to be changed in very specific scenarios, such as if you want to use a lower than maximum refresh rate in certain games (e.g. using 120 Hz ULMB in Source games on my 144 Hz monitor). In which case, set the appropriate setting for that game’s driver profile.
4. Now we can look at modifying individual game profiles. See the dropdown menu in the image below. You can also type out your own game, and create your own profiles for unsupported games. Although if said unsupported game uses a common engine, it might be better to just add its executable file to an existing profile for a game using that engine (by choosing that game’s profile and clicking one of the icons near the top that says «Add application to current profile»).
5. Since we’re focusing on forcing ambient occlusion and supersampling into games, you need to use compatibility bits (save for DX8 games which don’t need them).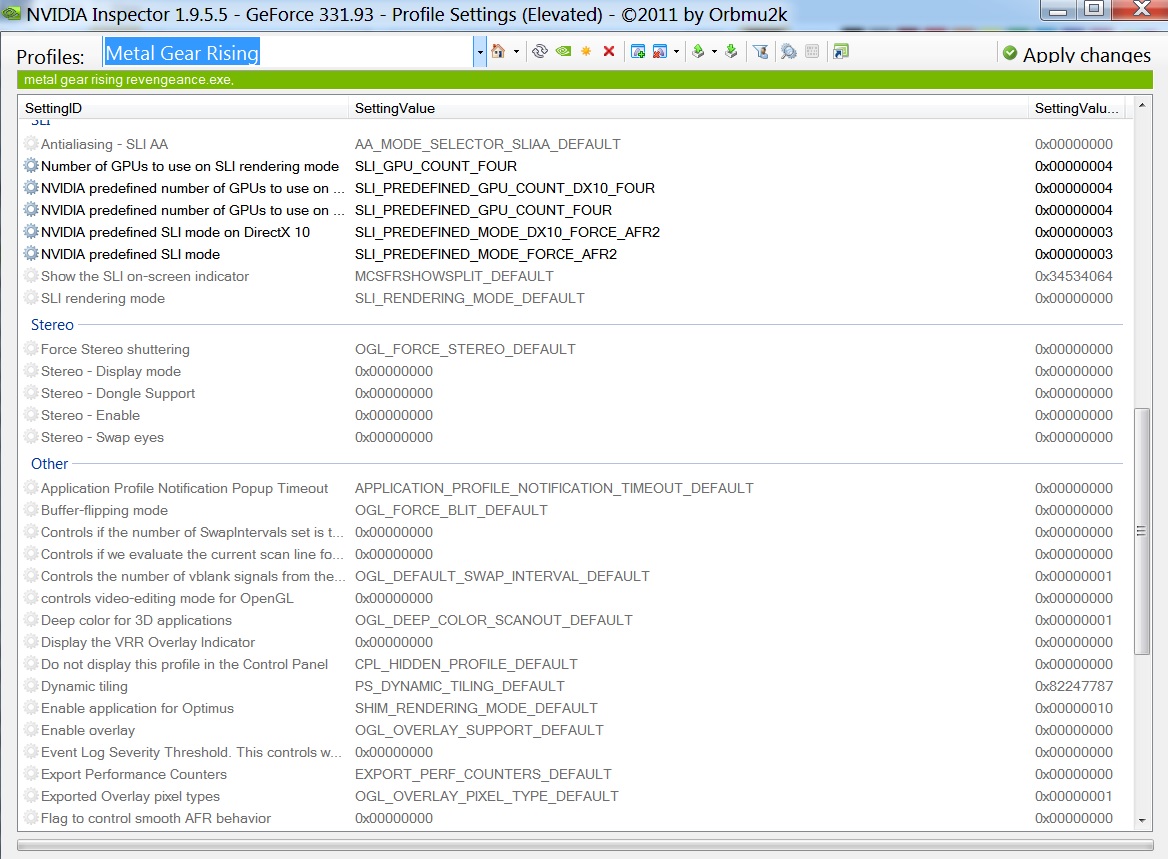 See the red box labeled 1. in the image below. Notice there is a separate field for anti-aliasing compatibility in DX1x games (DX10, DX11, DX12). Funny they put this because to my knowledge, there are no bits for any DX10/DX11/DX12 game.
To find proper compatibility bits, go here for anti-aliasing bits and here for ambient occlusion bits. If that Guru3D anti-aliasing thread says to either use or do not use «AA fix» then do as they say. If they say nothing (which is usually the case), do not use AA fix.
So let me go over the labeled red boxes in that image above. The numbers in the list below correspond to the image above.
- As I said earlier, these are the compatibility bits. Get them from those Guru3D threads, and if a game isn’t listed find out what engine it uses and see if there are any bits for other games on that engine.
- Antialiasing — Behavior Flags — Set this to None every time, so that it doesn’t screw with your AA.
- These are the actual anti-aliasing settings. Antialiasing — Mode allows for application-controlled (doesn’t make any changes), Enhance the application setting (enhances the game’s current AA), and Override the application setting (bypassing the game’s AA and forcing its own). You can force or enhance multisampling (full screen or just transparent), sparse grid supersampling aka SGSSAA (full screen or just transparent), ordered grid supersampling aka OGSSAA (full screen or just transparent), and hybridsampling aka HSAA (full screen only). Read all about these different AA forms here, under «Nvidia» but do read the others too since it’s good knowledge to have. Personally, I find that SGSSAA typically looks the best, when there is a bit that allows for all three. The image above showcases 2x full screen SGSSAA (aka FSSGSSAA). I rarely use Enhance, only using it if the game for some reason supports Enhance but not Override (e.g. KOTOR).
- «Texture filtering — Driver Controlled LOD Bias» should be set to On in the default profile, don’t touch this.
 The other three settings in this box control your LOD or Level Of Detail settings. Ideal settings here depend on what kind of AA you’re forcing. Unless it’s supersampling or hybridsampling, leave it at Clamp and 0. If hybridsampling, set it to Allow and 0 since hybridsampling has auto LOD adjustment.
 - Ambient occlusion settings. Always leave it as Enabled unless you can’t run it at all, though the other setting does have three performance options: Performance, Quality, and High Quality (and Off, seems redundant given the other setting but whatever).
So those are the things you need to adjust, using the appropriate bits listed in those Guru3D threads. You might even discover working bits yourself, for a certain game.
Here are some examples of settings you may find yourself using. The last image above shows me forcing 2x SGSSAA into Half-Life 2: Episode Two (and any Source mod built on Source SDK Base 2007). Below is another example of SGSSAA, this time 4x:
Notice the pattern? Below are the steps to apply full screen SGSSAA:
- Make sure AA Behavior Flags are set to None.

- Set Antialiasing — Mode to Override.
- Antialiasing — Setting must be set to either 2x multisampling, 4x multisampling, or 8xQ multisampling. I suppose 8x CSAA and 16xQ might work with 4x and 8x sparse grid supersampling respectively. The reason for this rule is, sparse grid supersampling gets its sample coordinates from the MSAA samples, thus they have to match numerically.
- Disable transparency multisampling.
- Set transparency supersampling to sparse grid and however many MSAA samples you chose in step #3.
- Set «Allow Negative LOD Bias» to Allow.
- Set the LOD Bias (the correct one; DX means DirectX, OGL means OpenGL) to -0.5 if using 2x SGSSAA, -1.0 if using 4x SGSSAA, or -1.5 if using 8x SGSSAA.
- Don’t forget to hit apply!
So, following the above steps, the image below shows the correct settings for 8x SGSSAA. Alternatively, 16xQ might work as the antialiasing setting as well.
Now let’s look at OGSSAA in the image below.
There are only a few differences on how to set this up over SGSSAA. The first being, multisampling is never used for the AA setting. Second, sparse grid is obviously not used for transparency supersampling; instead the regular supersampling is used (which is ordered grid). The LOD works the same way, I’ll just quote that blog again here:
Quote:
Set negative lod to allow and set the lod bias as follows:
1×2 OGSSAA (2 samples): -0.5
2×1 OGSSAA (2 samples): -0.5
2xSGSSAA (2 samples): -0.5
2×2 OGSSAA (4 samples): -1.0
4xSGSSAA (4 samples): -1.0
8xSGSSAA (8 samples): -1.5
3×3 OGSSAA (9 samples): -1.58 (or as close as you can get)
4×4 OGSSAA (16 samples): -2.0The formula for determining the correct lod bias is «y = -0.5 * log, base 2, of » where n is the number of samples and y is the correct lod bias.
Of course since some of you may have forgotten how to use logarithms I went ahead and typed out the correct values for each SSAA mode above.
Click to expand…
Expanding on this, if using 1×2 or 2×1 supersampling, transparency supersampling should be set to 2x (just do the math, 2 * 1 = 2 and 1 * 2 = 2 and the goal here is to apply full screen supersampling). 2×2 supersampling should use 4x transparency supersampling. Thus, you can’t apply full screen 8x or 9x OGSSAA, only 2x, 4x, and 16x!
It is of course possible to run into a scenario where your PC can handle 1×2 or 2×1 OGSSAA + 4x transparency supersampling. It’s not going to look worse than 2x FSOGSSAA (which is 1×2 or 2×1 + 2x transparency supersampling) though it’ll run much worse. In this case you might be better off running 2×2 OGSSAA and 2x transparency supersampling. Either way you are applying a different amount of supersampling to transparent edges compared to the rest of the image.
What is the difference between 1×2 and 2×1 you ask? 1×2 = 1 horizontal sample and 2 vertical, 2×1 is the opposite. Neither one is perfect, if 2x FSSGSSAA works instead it’s bound to look better.
To enable HSAA, which is OGSSAA + MSAA + auto LOD adjustment, follow these steps:
- Set AA behavior flags to None.
- Set AA mode to Override.
- Set Antialiasing — Setting to one of the settings that ends in «xS». This indicates HSAA.
- Disable transparency multisampling.
- Set transparency supersampling to one of the regular supersampling options, matching the OGSSAA samples of your chosen «xS» option in step 3.
- Set LOD bias to 0.
- Set Allow Negative LOD Bias to Allow. Remember, HSAA has auto LOD adjustment.
Examples of it in action; the image below shows 2x HSAA, since 4xS includes 1×2 OGSSAA and 2x MSAA thus 2x transparency supersampling is used.
The image below shows 4x HSAA. 32xS = 2×2 OGSSAA (4x) + 8x MSAA, so 4x transparency supersampling is used.
Screenshot Comparisons (open them in new tab, then magnify by clicking on it)
Now let’s look at some screenshot comparisons! Details provided below for each game comparison. For every before/after comparison, before shows the game with no driver tweaks. Remember, the differences are even more obvious in gameplay since aliasing is more obvious in moving images (the jaggies appear to move).
Unreal Engine 3 games
Unreal Tournament 3 (2007). Before = no driver tweaks, After = 4x SGSSAA and high quality ambient occlusion using the UT3 AO bits. Interestingly enough this is the one game I can detect an FPS drop caused by high quality HBAO+. Without it, and even with 4x SGSSAA, I get 120 FPS with V-Sync. With high quality HBAO+ my frame rate is dropped to 100-110. Be sure to open the images in a new tab and magnify them by clicking on them.
Mass Effect (2007): Before = no driver tweaks, After = 2x SGSSAA and high quality ambient occlusion using Mass Effect AO bits. The changes are even more significant in practice due to the fact that the aliased edges move a lot.
As you can see even 2x SGSSAA isn’t enough to get rid of all the aliasing, although it gets rid of a lot and prevents the edges from glowing white and moving like they do without it.
Mass Effect 2 (2010): Before = no driver tweaks, After = 4x SGSSAA and high quality ambient occlusion using Mass Effect AO bits.
Dishonored (2012): Before = no driver tweaks and in-game FXAA, After = 2x SGSSAA and high quality ambient occlusion using Hawken AO bits. I’m actually shocked that the difference isn’t as obvious in the screenshots, although the aliasing difference is still major to me just in the screenshots.
Source Engine games/Source mods.
Underhell: Before = no driver tweaks and in-game 8x MSAA, After = 2x SGSSAA and high quality ambient occlusion using HL2 E2 AO bits.
No More Room in Hell: Before = no driver tweaks and in-game 8x MSAA, After = 2x SGSSAA and high quality ambient occlusion using HL2 E2 AO bits.
id Tech Games
Call of Duty: Before = no driver tweaks, After = 4x SGSSAA with 16x AF and forced ambient occlusion using Wolfenstein AO bits. The AO doesn’t seem to work, but the other two things make a massive difference.
Other examples
Dragon Age: Origins: Before = no AA, since in-game AA doesn’t work with the SweetFX I’m using. After = 4x SGSSAA.
Other than performance, the possible downside to forcing supersampling is blur, which is caused by conflicting post-process shaders. This blur can be countered with post-sharpening injected by something like ReShade, SweetFX, or GeDoSaTo. Alternatively, it can be countered by using more than 2x supersampling. 4x and 8x will either blur a lot less or not have visible added blur at all because the blur is offset by the extra samples (rendering at 4x or 8x native resolution).
When forcing ambient occlusion, if you’re using compatibility bits not listed for a game on that Guru3D thread above, you may notice flickering (ambient occlusion turning on and off). Also, in some engines like UE3, forced ambient occlusion will appear to shine through fog and volumetric effects.
NVIDIA Inspector 1.9.6.5 — a tiny utility for diagnosing GeForce
video cards
Edition
Software News fin
Diagnostics, monitoring, overclocking, driver profile management. With minor improvements and support for GeForce 300.xx drivers.
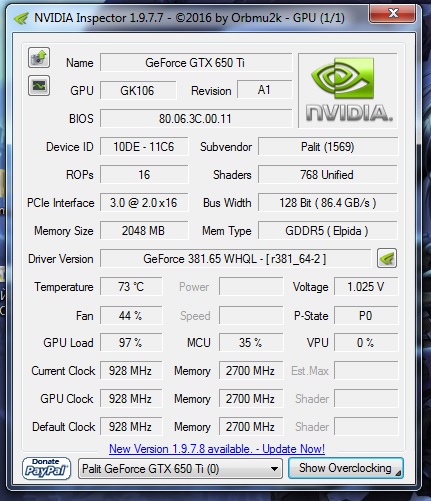
Update of compact utility for information about GeForce video cards and their overclocking. NVIDIA Inspector can be described as a cross between GPU-Z and EVGA Precision.
NVIDIA Inspector 1.9.6.5 changelog:
- Additions:
- bad BIOS image recognition;
- definition of several new manufacturers;
- «—restartDisplayDriver» command-line option to restart the display driver on Windows Vista/7.
- Updates and improvements:
- updates to support GeForce 300.
 xx drivers;
 - The number of pre-rendered frames is zero by default, as it is now managed by the 3D application;
- Minor changes to default frequency interpretation.
- updates to support GeForce 300.
- Fixes:
- incorrect GDDR3 bandwidth calculation;
- trilinear filtering optimization settings («1» — enabled, «0» — disabled).
NVIDIA Inspector
— a utility for diagnosing and managing GeForce video cards, offering a good set of functions for its tiny size. Provides information about the characteristics and current operating modes of video cards, driver and BIOS information. Allows you to change core frequencies and voltages, manually control the fan speed. It has a monitoring module with graphs of temperatures, voltages and frequencies, GPU and video memory loading. there is a complex editor for application profiles instead of the inconvenient standard one in the driver, there is a module for manually controlling the speed level of the video card according to the list of applications.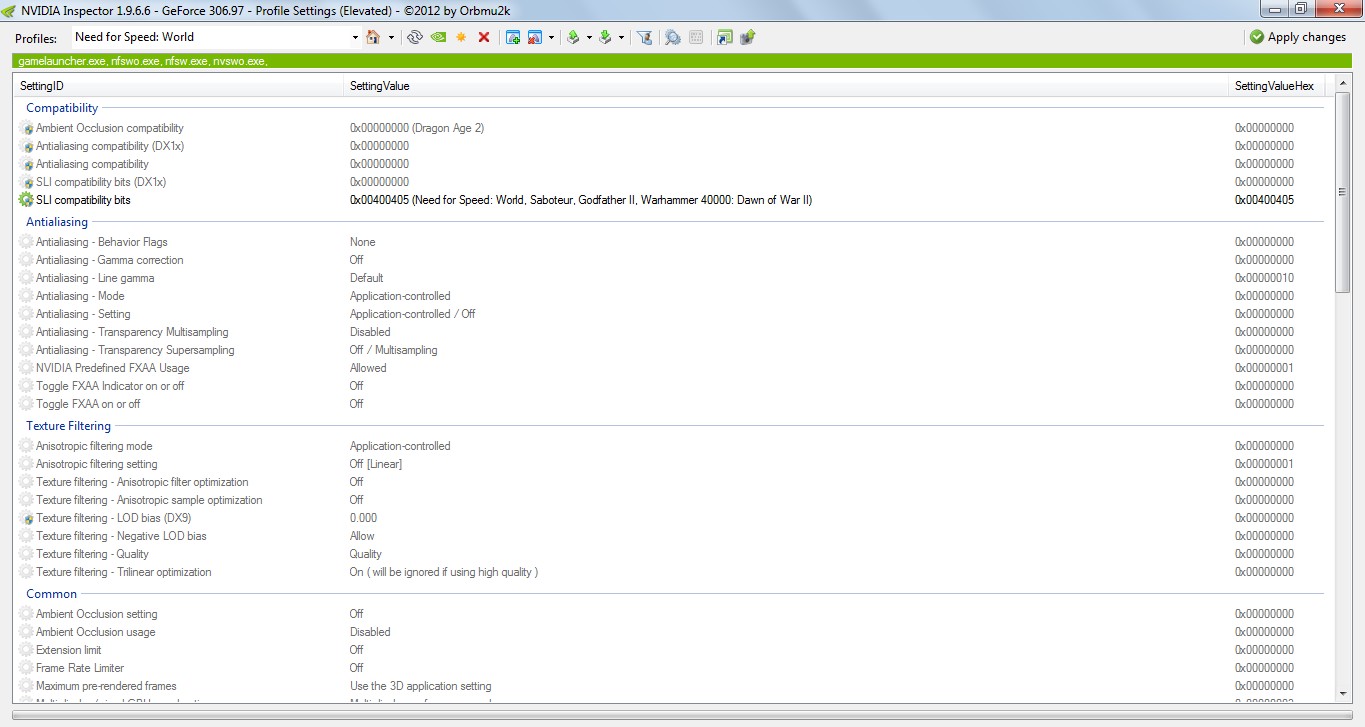 Can create shortcuts to quickly set frequencies, save screenshots and automatically upload them to a web server.
NVIDIA Inspector 1.9.6.5 (Windows, freeware, portable)
- nvidiaInspector.zip (224 KB)
#nvidia inspector
recommendations
Effective advertising for your business
«Drill everything» — A new smart projectile «Drill» is being prepared for use in NWO
What kind of missile Iran promised to use against the US flotilla — we understand the details
Why GeForce GT 710s sell like hotcakes in 2023
Choosing the right power supply for your PC
Why do people unscrew the antennas of a Wi-Fi router — debunking the myths
«The Exorcist of the Vatican» — a short review of the movie
India’s supply of MLRS Pinaka to Armenia caused serious concern in Azerbaijan
How to choose an external drive: practical advice and recommendations
All that is known about the future «Nintendo Switch 2»
The most deadly and interesting examples of new Iranian weapons
Nvidia Inspector: how to use it in games?
The American company Nvidia annually releases dozens of new models of video cards that allow you to create a variety of systems, both in terms of performance and functionality.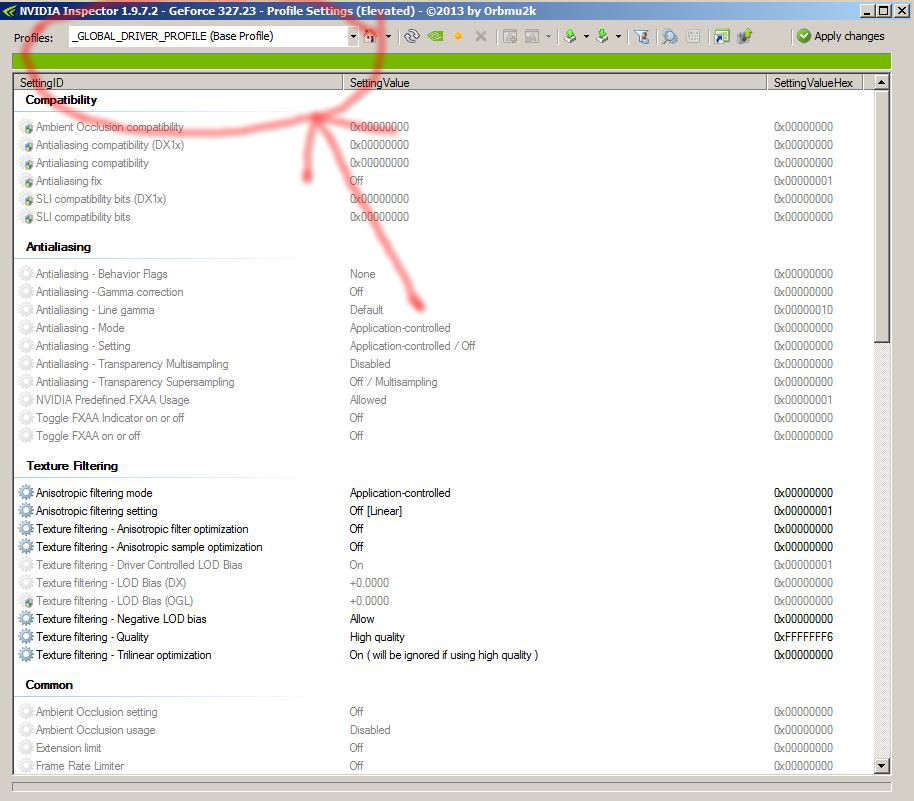 Gaming computers became popular, often self-assembly. There, in addition to a powerful video card, they place a productive motherboard and processor. But the user does not always have enough of the system that he has assembled. Sometimes software interventions are needed, and in order to improve performance, he wonders how to use the Nvidia Inspector.
Program
It should be noted right away that this software is not designed only for optimizing games. Its main task is to monitor and change the parameters of the graphics accelerator. It is important to know that this application is designed only for products of an American company and it will not work to improve an AMD card.
Complete guide: CS:GO settings from professionals
In such a popular game as CS:GO, the developers have made maximum realism thanks to…
Features
Before we understand how to use Nvidia Inspector, let’s take a look at its features. The program allows you to get brief information about the characteristics of the accelerator. Monitors frequency, voltage, temperature and analyzes the operation of the cooling system.
Software is a tool for overclocking and improving performance. You can adjust the supply voltage, fan speed, edit the «firewood» profiles.
Preparation
So, in order to start dealing with the question of how to use the Nvidia Inspector program, you need to prepare for installation. The software is free, easy to find on the Internet and install on your PC. But in order to work with it, you need to understand whether we need overclocking at all.
Remove lags in Dota 2 and improve performance?
A huge number of people play Dota now. You can also join them…
Of course, almost any modern system can be improved. But sometimes it makes no sense, and sometimes it can even lead to problems. Therefore, if you do not have a completely balanced “stuffing”, a weak processor and a strong video card, or, conversely, one of your components may not withstand the load. If the system is not optimized, there may be problems, programs in the background, or incorrectly configured drivers may interfere. All this needs to be checked before figuring out how to use the Nvidia Inspector.
Results
Many users immediately want to understand what results they expect after overclocking. In general, if you have devices that are configured for additional overclocking, then there may be a 50% increase in frequencies. On average, this is 15-25%, which in terms of «fps» gives us an additional 20-30 frames.
It is important to understand that be that as it may, there is a certain risk of damaging one of the system components. The video card, although it is designed for improvement, at least a minimal one, with the wrong settings, it can simply stop working. Nevertheless, if you understand overclocking or are set to follow all the recommendations step by step, then the risk of malfunctions is extremely small.
The last thing you should know, besides how to use Nvidia Inspector 1.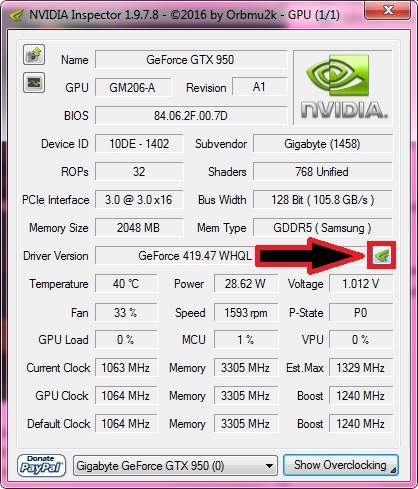 9.7.3, is that overclocking reduces the life of your GPU. This is due to the increase in temperatures that occur when raising frequencies and voltages. All this affects the chip and its service life.
Video card overclocking software: when risks are unjustified…
A special video card overclocking software allows you to use hidden potentials…
Overclocking
Before working with the program in games, you can try to overclock, which can significantly affect the increase in FPS. You need to run the software and select Show Overclocking. The system will warn you that overclocking is dangerous and can damage the accelerator.
A new window will open alongside, showing the options and sliders to adjust. The Performance Level section will be listed at the top. You can change it, but you don’t need to do it for overclocking.
Below, in the same window, there will be information on several parameters. To start overclocking, you need to find the frequency indicators and advance the slider by 10% from the standard values.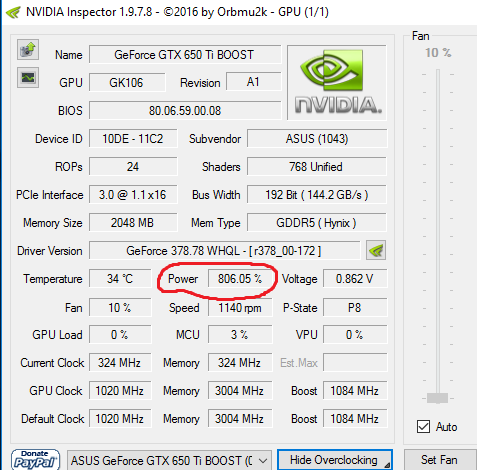 Then click Apply Clocks & Voltage. In general, this increase should not affect the system. But if, nevertheless, the PC “shut up”, turned off, or the video card drivers flew off, then the experiments ended there.
Continuation of
If everything is fine, then we work with Nvidia Inspector. How to use the new parameters in games? You just need to launch any game and follow the process. If jamming, artifacts, automatic folding, etc. began to appear, then all the indicators that we raised should be approximately lowered by 10 MHz. If, on the contrary, it has become much better, we try to increase the performance by 10 MHz. Thus, we find values that are comfortable for the system.
Parameters
Before you will be a lot of unfamiliar words, since the software is in English. Of course, you can translate them or guess on your own, since in general, not everything is as mysterious as it might seem. Voltage Offset adjusts the voltage. This is clear from the name. Adding voltage to your video card will increase the frequency. Sometimes, to make the speed even a little higher, this traffic controller comes into play. If you do not have enough to raise the frequency to a certain mark, try adding voltage first. But all this must be done very carefully even if the video card has good potential.
The next parameter is Fan. Using its settings, you can set a certain speed for the rotation of the cooler, so that the automatic adjustment does not constantly drop the speed and allows you to effectively overclock. Although it is desirable that this indicator is always on the automatic setting. So the system will independently determine the desired speed and increase the speed at high loads, and reduce it at low loads.
For all selected parameters to take effect, you must click Apply Clocks & Voltage, if you are afraid that something went wrong, then reset all settings using Apply Defaults.
Details
Those who are trying to figure out how to use the Nvidia Inspector should understand that overclocking is the safest in this case, as it works at the driver level.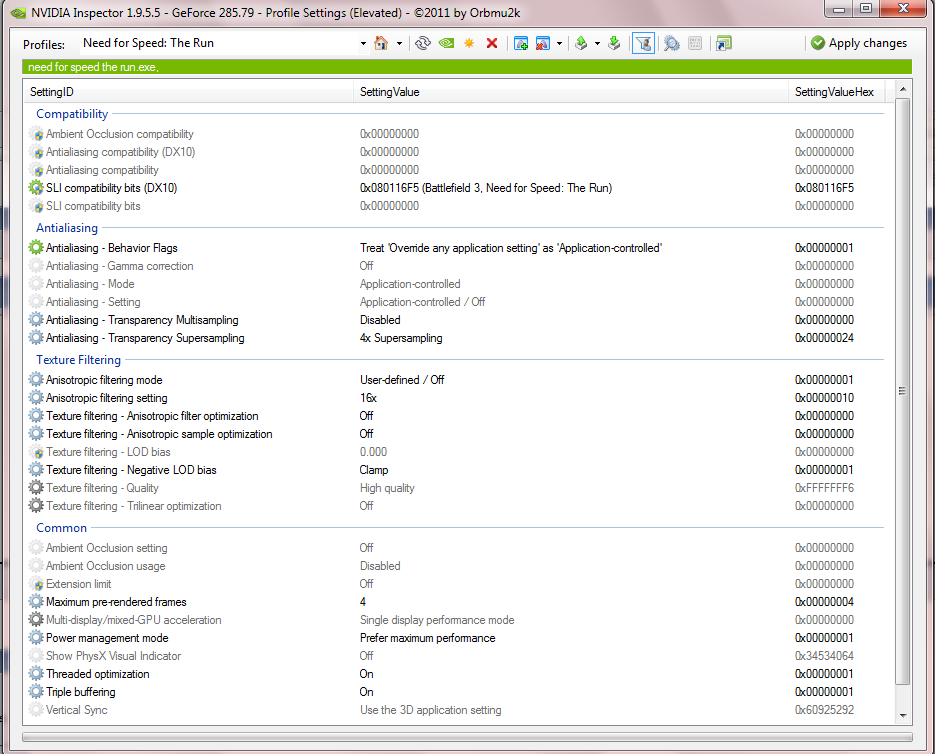 Hardware overclocking is more dangerous and risky. But the disadvantage of software overclocking is that after rebooting the system, all parameters are reset. To prevent this from happening, once you find the most relevant metrics, select Create Startup. So you will have your own preset in the form of a shortcut. Before starting the system, just click on it, and everything falls into place.
Games
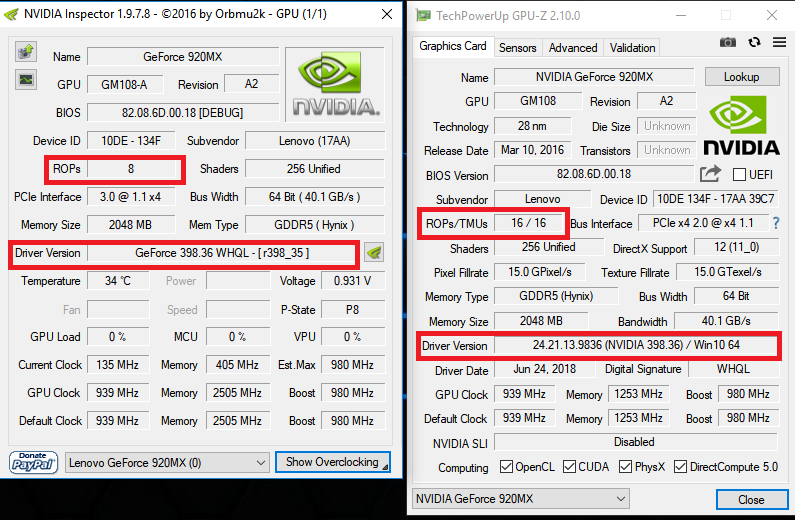
To make sure games work, you need to learn how to use the Nvidia Inspector Profile. First you need to run Nvidia Inspector as an administrator. When the window opens, you need to find Driver Version among all the parameters. There, after the name of the video card, there is a settings icon. This is how we get to Profile.
Here you need to specify the path to the game that we want to optimize. Moreover, it must be an absolute path with the client.exe extension. On the right, at the top, there will be an Apply Changes button. It allows you to save all the actions performed.
If you need to understand how to use Nvidia Inspector in CS, then select the path to this game, save the changes and find Threaded optimization in the list. There will be several modes to choose from, you need to click on OGL THREAD CONTROL IGNORE GET ERROR. Now in the table we find Shim rendering mode Options per application Optimus and select SHIM RENDERING OPTIONS DEFAULT RENDERING MODE from the list.
After all that has been done, we need to go to the Nvidia settings, in the «3D Settings» tab there will be a «Management» section. The setup program is removed from the list. Here we are looking for the game we need, which has already been configured in the Profile Nvidia Inspector. There is no point in explaining again how to use GTA 5, CS:GO, DOTA 2, etc. in games. The algorithm of actions is the same.
When you have selected your game in the drop-down list or added it, you need to return to Profile again. In the table, select the SLI compatibility bits parameter on the line with the name of our game.