How To Overclock Your RAM for Ryzen Using The Ryzen DRAM Calculator
By Alyssa Arford November 11, 2020
7 minutes read
Updated: 11 November, 2020
Performance enthusiasts in the PC world first and foremost look at their CPU processor and its functioning capabilities to determine the kind of performance they’re going to reap. In gaming PC configurations or graphics-intensive setups, the graphics card in the GPU is something they next look at when working on overclocking their setup. While overclocking the CPU and GPU will monumentally increase the speed at which your processor performs its general computing or graphics processing tasks, your performance will be impaired if your memory module is not operating at its maximum capability. This means that even after overclocking your CPU or GPU, there remains a window for further improvement which is directly controlled by how far you have overclocked your RAM. Therefore, it is apparent that spending some time overclocking your memory module is worth your time in the effort of optimizing your PC’s performance.
The traditional four steps to follow when it comes to overclocking any processing or memory modular component are to:
- Check the base values
- Adjust the clock and frequency parameters slightly
- Perform a stress test
- Repeat until optimum level reached
While third-party software applications such as CPU-Z work well in getting a sense of the parameters you’re already operating on and tweaking them repeatedly to see how far you can push, a bit of good news for AMD Ryzen users is that 1usmus has gone ahead and created a DRAM calculator that you can use to get a sense of your standard operating values and the best values to overclock your memory module to. In the layout of the traditional steps, you will need to use the DRAM calculator to check your base values and get a sense of your ideal overclocking values, head into your system’s BIOS to make the necessary tweaks and adjustments, and then start up your device to check your updated performance.
The Basics of RAM Overclocking
There are a few things you should know going into the RAM overclocking procedures to have a fundamental sense of the parameters that you will be tweaking and what the base values are expected to be.
Firstly, know that RAM overclocking is slightly more complex than CPU and GPU overclocking BUT it is notably safer as well because you do not have to fret over overheating systems and rising temperatures as much. RAMs produce significantly less heat as compared to the CPU and GPU units.
Secondly, know that for DDR4 RAMs and the like, the stock speed of approximately 2400 MHz that the memory module is stipulated to operate at is actually not the speed at which it runs. The actual speed is half of this because the stipulated amount is the double data rate.
Third, going back to the notion of the complexity involved, there are over two dozen different parameters you will need to adjust to improve your RAM’s latency (which directly impacts your memory module’s performance). The CAS Latency clock cycles will help you do just this.
Fourth, if you are someone who does not want to get into the nitty-gritty of manually overclocking your RAM, many manufacturers have created extreme memory profiles such as Intel’s XMP that you can apply through your system’s BIOS to implement a moderate overclocking that is safely recommended by the manufacturer. If you want to head into this yourself, though, you’ll have far more customizability and you’ll be able to push your RAM module beyond the XMP settings as well.
Using The DRAM Calculator To Find The Ideal Parameters
AMD Ryzen users out there are in luck because 1usmus has created a DRAM calculator to tell you exactly what the ideal values will be for your overclocking activity. The application is not the most fun one to use because it does require a decent amount of playing around to get the best set of values, but we will break it down for you to make it simpler.
The main page of the DRAM calculator allowing you to calculate SAFE, FAST, and EXTREME parameter values.
- Download and install the Ryzen DRAM Calculator. Follow the on-screen instructions with administrator privileges until this is complete. Now, launch the application.
- On the launch screen, you will be able to see the details of the Ryzen memory that you are running. You can check any manufacturer documentation to identify and confirm its type as well. Your operating values will become visible
- At the bottom of the window, you will find a purple button that says “R-XMP.” Click on this.
- Type in your Ryzen memory type and the version you are using and click on the green button at the bottom of the window that reads “Calculate SAFE.” This will give you a sense of the safe values to adjust your parameters. These safe parameters will always work well once overclocked but they will not be the maximum that you can overclock your memory module to.
- If you want to push these values further, hit the orange button at the bottom that reads “Calculate FAST.” These values will overclock your RAM further but may not always be stable.
 Stress tests will be important in identifying which values work well for your system.
 - There is also an option to “Calculate EXTREME” values at the bottom in the form of a red button, but keep in mind that these values may not necessarily be stable like the “Calculate FAST” ones.
- Once you’ve gotten your values for whichever setting you’re aiming for (we suggest taking screenshots of the R-XMP, SAFE, and FAST values), send these screenshots to yourself so that you can open them up on a separate device while you head into your system’s BIOS to make the tweaks.
Notice that when you calculate these values, your DRAM calculator lets you compare them to your XMP profile and standard base values to see how far you have pushed them. This is a good indicator to get a sense of how the overclocking ranges work and how far it’s safe for you to push.
Implementing The Tweaks In Your System’s BIOS
Now it comes down to actually implement the tweaks that you have jotted down from your DRAM calculator. Boot up your device and head into its BIOS. For most devices, this requires that you restart the device and press the F2 or Del key repeatedly.
The memory settings in the system BIOS. Image: Tech Power Up
Once you have entered your BIOS, do the following:
- Look for where your memory settings are located and apply your XMP profile values.
- Look for the section that says “DRAM Timing Control After Training.” Head into this and start typing in the values that you got from your DRAM Calculator.
- Depending upon your motherboard, the names for some of these value parameters may be different. Match them up against the values you got off of your DRAM calculator and fill them all in. Some of the parameters you will be tweaking include CAS latency, read/write delays, RAS precharge timing, and the RAS active timing.
- After typing in the memory clock and frequency related parameters in the above memory section, find the section that deals with your memory module’s voltage settings.
 Enter the voltage you were recommended in your DRAM calculator’s output. Be mindful of the fact that voltages above 1.45 V may be dangerous so as long as you remain under that amount, you will be safe.
 - Save the setting adjustments you have made and restart your computer. If your computer does not restart at this point, don’t panic. Wait thirty seconds and start it up in safe mode. Revert your settings back to the last safe settings and restart again. This can happen if your values were not ideal and your system failed its power-on self-test. If the safe mode startup doesn’t work either, again, don’t panic. Clear your CMOS by removing your motherboard’s connected battery and resetting it.
These steps above are what you’ll need to repeat to push your values further after you check your system’s stability and ensure that you aren’t running into the blue screen of death or any other fatal error.
Checking Stability
Using the DRAM Calculator’s Membench tool to check your memory module for instability causing faults or errors.
After restarting your computer, head back into the DRAM calculator and head under the “MEMbench” tab at the top. Here, you will be able to test your RAM to see if there are any errors present. Set the mode in this tab to custom and type in 300 for task scope (to check three times just to be extra certain). Click on “MAX RAM” and then “Run” to perform the test. Depending on how big your memory module is in storage size, your device will take more or less time to test it three times over.
If your system survives the stability test unscathed and without errors, you can head back into your BIOS and try implementing your FAST values calculated by your DRAM calculator. You can repeat the stability test as explained here and go even further if needed. You can also make manual tweaks to the parameter values based on your own understanding of the parameters but this is not recommended. The DRAM calculator application usually gives you quite decent values to work with to overclock your Ryzen memory module.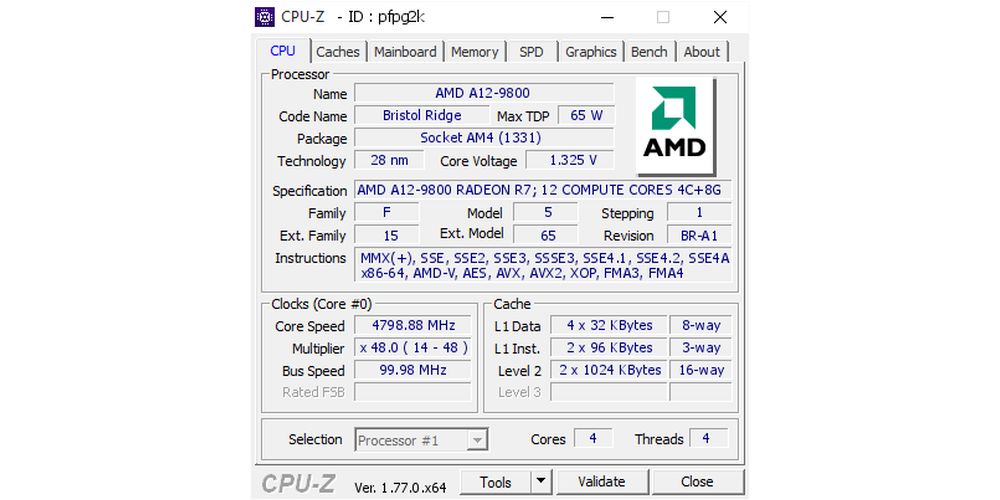
Final Thoughts
The Ryzen DRAM Calculator makes it significantly easier what would otherwise have taken immense trial and error as well as a deep understanding of the parameter values to accomplish. This application gives you a set of values against your standard values for the XMP, SAFE, FAST, and EXTREME overclocking profiles. You can simply head into your BIOS then to implement the values suggested. The SAFE values are guaranteed to work but if you want to go further at the risk of running into unstable values (which is something you can easily revert back from so don’t panic), you can look onto implementing the FAST or EXTREME values suggested by the DRAM calculator.
The calculator application also has its own built-in memory checker that allows you to run a test across the module to scan for any errors that may cause it to become unstable. This all in one solution is a great tool for AMD Ryzen users to overclock their memory modules without having to get into the intricacies and complexities of memory module parameters.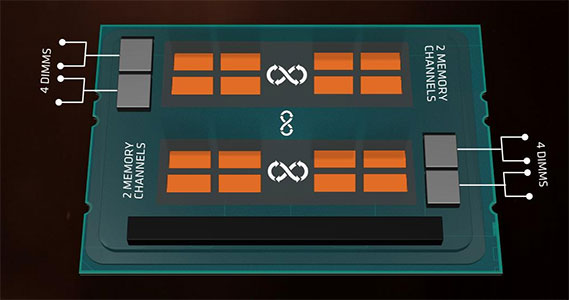 Lastly, if you’re looking for the perfect ram for your Ryzen build head over to our this article.
How To Overclock Your RAM for Ryzen Using Ryzen DRAM Calculator
The CPU processor and its functional abilities are key aspects to decide the performance of a computer. While working on overclocking the setup, the graphic card present in the GPU needs to be focused on in graphics-intensive setups or gaming computers.
How to Change Photoshop CC User Int…
Please enable JavaScript
How to Change Photoshop CC User Interface Color Theme
While overclocking the CPU and GPU will extensively raise the speed at which your processor carries out its graphics processing tasks or general computing tasks. If your memory module doesn’t operate at its maximum capability, your performance would be severely affected. This implies that even after performing overclocking of your GPU and CPU, there is still a need for improvements. Improvements that need to be done are directly regulated by how much you have overclocked the RAM.
It is worthwhile to spend time overclocking the memory module if you want to optimize the performance of your computer.
Here are the steps you need to follow to overclock any memory module or processing module:
- Check the base value
- Slightly vary both clock and frequency parameters slightly
- Performs a stress test
- Iterate until you get the optimum level
Third-party software applications like CPU-Z work efficiently in understanding those parameters on which you are operating. Also, these applications can tweak them recurrently to know how much you can overclock. The amount by which you need to overclock can be easily measured with the help of a DRAM calculator from 1usmus. It gives you an understanding of your standard operating values as well as the best values by which you need to overclock your memory module.
You can use the DRAM calculator to determine your base values and know your ideal overclocking values. Also, it helps you to enter into your system’s BIOS so that you can make needful adjustments and tweaks. Finally, you can start up the device to observe the performance improvement.
For AMD Ryzen users, the DRAM calculator from1usmus is quite useful because it precisely informs the user of the ideal values required for overclocking. Keep in mind that the application may not seem fun to use because you need to tweak it around to find the best set of values.
This DRAM calculator greatly simplifies knowing the overclocking parameters. The reason is using some other method may demand several trial and error and deep comprehension of parameter values. On the other hand, this application provides you with a set of values against your standard values for XMP, SAFE, FAST, and EXTREME overclocking profiles.
You can enter in your BIOS to implement the values that the DRAM calculator suggests. Hence, the ‘SAFE’ values certainly work. However, if you want to explore further at the peril of running into unsteady values, it is better to implement the ‘FAST’ and ‘EXTREME’ values which your DRAM calculator suggests.
Ryzen DRAM calculator also comes with its built-in memory checker allowing you to perform a test through the module. This way, you can check for any errors that might result in unstable performance. Without falling into the complexities of the memory module parameter, this application provides an easy solution for AMD Ryzen users to overclock memory modules.
Steps to Overclock Ryzen RAM Using Ryzen DRAM Calculator
Step-1: Firstly, download and install the Ryzen DRAM Calculator from the following link:
https://www.techpowerup.com/download/ryzen-dram-calculator/
Step-2: Now follow the displayed instructions and provide administrator privileges. Now launch this application.
Step-3: On the launch screen shown to you, you can see various details of the Ryzen memory which you are running. If you want, you can check any manufacturer documentation to discover and confirm its type. You can see your operating values.
Step-4: Click on the purple-colored “R-XMP” button at the bottom of the screen.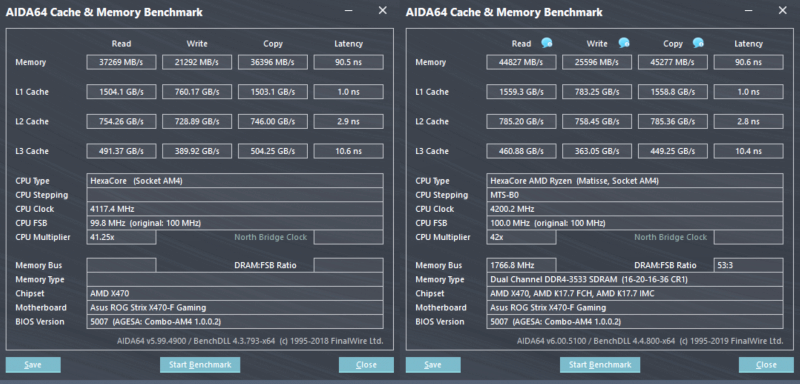
Step-5: Now type in your Ryzen memory type as well as the version you are currently using.
Step-6: Click on the green-colored “Calculate SAFE” button at the bottom of the window. After you click on this button, the screen gives you an understanding of safe values to tweak your parameters. Once overclocked, these safe parameters would always work. But keep in mind that they would not be at their maximum values which you can overclock your memory module.
Step-7: To further push the vales of the parameters, click on the orange-colored ‘Calculate FAST’ button present at the bottom of the window. The corresponding values will further overclock your RAM but might not always be steady. In this case, stress tests are important to discover values that are the best suitable for your computer.
Step-8: An option to calculate extreme values is available. (See the red-colored ‘Calculate EXTREME values at the bottom.) Just like the ‘Calculate FAST’ values, the ‘Calculate EXTREME’ values may not be always stable.
Step-9: After you have adjusted your values depending on your setting and aim, simply send these screenshots to another device you use. This way, you can open those screenshots on another device when you enter into your system’s BIOS to make adjustments.
(You can capture screenshots of R-XMP, SAFE, and FAST values.)
How to check stability:
Step-1: Restart your PC.
Step-2: After restarting, open the DRAM calculator and click on the “MEMbench” tab available at the top. From this tab, you can test your RAM so that you can know about any existing errors.
Step-3: Now set the ‘MEMbench mode’ to custom.
Step-4: Enter the value 300 in ‘Task scope (%)’ and then click on Max RAM.
Step-5: Now run to carry out the test.
Based on the size of your RAM memory module, your device would take less or more time to perform the test three times over.
-If your PC system passed on the stability test safely and without errors, enter again into your BIOS and try to implement FAST values as calculated by the DRAM calculator. It is fine to iterate the stability test and explore more if required. Furthermore, you can make manual tweaks in the parameter values depending on your own perception of the parameters; however, this is not advisable. Usually, the DRAM calculator shows you recommended values at which you can overclock your Ryzen memory module.
How to overclock RAM: a comprehensive guide
What characteristics determine the speed of RAM
Computer speed depends on the amount of RAM. And how fast it itself allows you to write and read data, these characteristics will show.
Effective transfer rate
Memory speed depends on the number of transfers that can be made in one second. The higher this characteristic, the faster the memory works. nine0005
Formally, speed is measured in gigatransfers (GT/s) or megatransfers (MT/s). One transfer is one data transfer operation, a megatransfer is a million such operations, a gigatransfer is a billion.
But almost always the speed is indicated in megahertz or gigahertz — manufacturers decided that it would be clearer to buyers. If your memory bar is marked, for example, DDR4‑2133, then its data transfer rate is 2133 MT/s or 2133 MHz.
Memory module with a frequency of 2133 MHz and an operating voltage of 1.2 V. Photo: Wikimedia Commons
But the effective data transfer rate of DDR memory is twice its clock rate. Actually, DDR is a double data rate, twice the data transfer rate.
In such modules, data is transmitted twice for each cycle: the pulse is read both along the signal edge and along its fall, that is, one cycle is two operations. Thus, the real frequency at which DDR-2666 memory operates is 1333 MT/s or 1333 MHz.
If you have memory sticks installed with different frequencies, the system will run at the lowest of them. Of course, the motherboard must support this frequency. nine0005
Timings
CAS timings (Column Access Strobe) are delays in the process of RAM operation. They show how many cycles the memory module needs to access data bits. The lower the timings, the better.
Basically, memory is a rectangular table that consists of cells in rows and columns. To access the data, you need to find the correct row, open it and access the cell in a particular column.
Timings are usually written in the following format: 15‑17‑17‑39. These are four different parameters:
- Actually, CAS Latency is the signal delay between sending the column address to memory and the start of data transfer. Reflects the time it takes to read the first bit from the open string.
- RAS to CAS Delay — the minimum number of cycles between opening a memory row and accessing its columns. In fact, this is the time to open a string and read the first bit from it.
- RAS Precharge Time — the minimum number of cycles between the issuance of a precharge command (closing a row) and the opening of the next row. Reflects the time until the first bit of memory is read from cells with an invalid open string. In this case, the wrong line needs to be closed, and the right one needs to be opened.
 nine0030
- DRAM Cycle Time tRAS/tRC — the ratio of the time interval during which the row is open for data transfer to the time during which the full cycle of opening and updating the row is completed. This parameter reflects the performance of the entire memory chip.
If the RAM has a high clock speed and high timings, it may run slower than the version with a lower frequency, but also lower timings. You can divide the clock speed by CAS Latency (the first number in the timings line) and get an idea of how many instructions per second the memory is capable of executing. This will allow you to evaluate how fast it is. nine0005
Voltage
In the RAM documentation, you can see many different parameters: controller voltage (SOC), memory training at system startup (DRAM Boot), voltage reference (Vref) and so on. For overclocking, SOC is important first of all. It depends on the memory class — the following values \u200b\u200bare considered the norm:
- DDR2 — 1.
 8 V;
8 V; - DDR3 — 1.5V;
- DDR4 — 1.2 V.
Also, for each memory class, there are peak voltage values that should not be exceeded during overclocking:
- DDR2 — 2.3V;
- DDR3 — 1.8V;
- DDR4 — 1.5 V.
Increasing the RAM frequency will require more voltage. But the higher it is, the greater the risk of premature failure of the modules.
Rank
RAM is one-, two- and four-rank. Rank is the number of arrays of memory chips soldered on one module. The width of one array (bank), as a rule, is 64 bits, in systems with ECC (error correction code) — 72 bits. nine0005
Single rank modules usually include 4 or 8 chips on one strip. Double rank — 16 such chips. Quad rank — 32 chips, and this format is quite rare.
Usually this indicator is marked with a letter in the name: S (single) — single-rank, D (double) — two-rank, Q (quad) — four-rank.
Peer-to-peer chips are usually cheaper and have more prospects for overclocking. Dual-rank modules initially work with higher performance, but the gain during overclocking will be less. nine0005
Whether any RAM can be overclocked
It depends primarily on the motherboard. If it supports overclocking (overclocking), then, most likely, there will be no problems with memory overclocking.
Motherboards based on B350, B450, B550, X370, X470, X570 chipsets for AMD processors support overclocking, A320 does not. On this page you can check if your model has overclocking capability.
For systems with Intel processors for overclocking, motherboards based on X-series and Z-series chipsets are suitable. Models from the W-, Q-, B- and H‑series lines do not support overclocking. You can check the details for your motherboard here. nine0005
Samsung RAM is considered to provide the highest gain when overclocked. The performance gain of Hynix and Micron chips will be smaller.
We emphasize that we are talking about chips. Some brands, such as Kingston or Crucial, may release memory based on Samsung, Hynix, or Micron chips.
The only question is why you need to overclock the memory. If you want to speed up surfing the Internet in this way, you are unlikely to achieve noticeable results. But to increase FPS in games, speed up photo processing in Adobe Lightroom and video in Adobe AfterEffects or Premiere, overclocking is justified — you can “squeeze out” a performance increase of 15–20%. nine0005
We also note that for AMD Ryzen processors, the frequency of RAM is related to the frequency of the internal bus, which connects two blocks of cores. Therefore, for AMD-based systems, overclocking directly affects the performance of the CPU.
But in any case, the manufacturer’s warranty does not cover memory whose settings you have changed. So any overclocking you do at your own peril and risk.
How to prepare for overclocking RAM
Follow these steps to get the best results and not harm your computer. nine0005
Clean your computer
Any overclocking leads to an increase in the temperature of the components.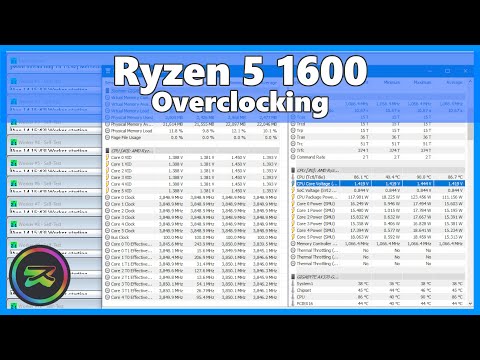 In order for the cooling system to effectively cope with this, do a general cleaning inside the system unit or laptop. On this page you will find instructions for a laptop, with a PC everything will be even easier: the components are in plain sight, it is easier to disassemble the system unit.
Install software
These utilities will tell you about the characteristics of your system and help you test it after overclocking. You will definitely need a program to determine the parameters of memory and a benchmark for tests. We recommend the following software options:
- Thaiphoon Burner is perhaps the most popular utility for determining memory parameters among overclockers. The price is from $26 per year.
- CPU‑Z is a small free program that will help you to determine the characteristics of the memory and the system as a whole.
- ida64 — also shows system parameters and includes benchmarks for testing. The official website has paid options and free demos.

- DRAM Calculator for Ryzen is a free utility that will help you set the optimal RAM overclocking parameters for AMD Ryzen based systems. The software also includes a memory benchmark that is also suitable for systems based on Intel processors. nine0030
- Prime95 is a free benchmark for testing system stability: it loads both the processor and RAM well. When using, you need to select the Blend option in order to achieve a significant memory load.
- MemTest86 is a benchmark where you will find more data and algorithms to test. For the program to work, you will need a USB flash drive — you will write a disk image with tests on it. Then you need to boot the computer from a flash drive (set BIOS / UEFI to boot from USB) and run the tests. The free version is enough for overclocking RAM. nine0030
Find the latest motherboard BIOS / UEFI
Update the motherboard software before overclocking. You can download the latest BIOS / UEFI from the manufacturer’s website.
As a rule, newer versions are more stable and have fewer bugs and risk factors. In addition, older firmware of some board models may not support memory overclocking, and new ones already include this feature.
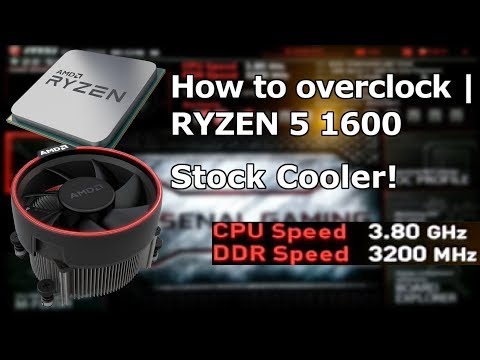
How to overclock RAM in BIOS
Overclocking in BIOS is the most versatile way. It requires a lot of effort and time, since you have to select the parameters manually. Sometimes it can take a day or two to achieve optimal performance. But it always works — of course, if your motherboard supports overclocking. The main thing is not to increase the voltage above peak values and not to ignore errors in system stability tests. nine0005
Determine the specifications of the RAM
In Thaiphoon Burner, click Read and select the desired memory module. Characteristics are shown separately for each of them.
1 / 0
2 / 0
In CPU‑Z, this data is shown on the SPD tab. In the upper part — the type of memory, its frequency, rank, information about the manufacturer and release date. At the bottom are the timings.
The same information is in Aida64: in the item «Motherboard» — SPD:
Benchmark memory performance
Run a benchmark to evaluate the speed of modules before overclocking. For example, in the Tests section of Aida64, the options available are Memory Read, Memory Write, Memory Copy, and Memory Hold. Wait for the end of each test and save the results — write down or take screenshots.
1 / 0
2 / 0
3 / 0
4 / 0
Increase the voltage and frequency
Increase the operating voltage of the memory modules. For the most common DDR4 standard today, 1.2 V is considered the norm, peak — 1.5 V, which means that overclocking can be carried out within 1.35–1.45 V.
We also recommend increasing the controller voltage (VCORE SOC for AMD, VCCSA for Intel) if the motherboard does not do this automatically. The parameter should be between 1.05-1.1V.
You can also increase VCCIO by 0.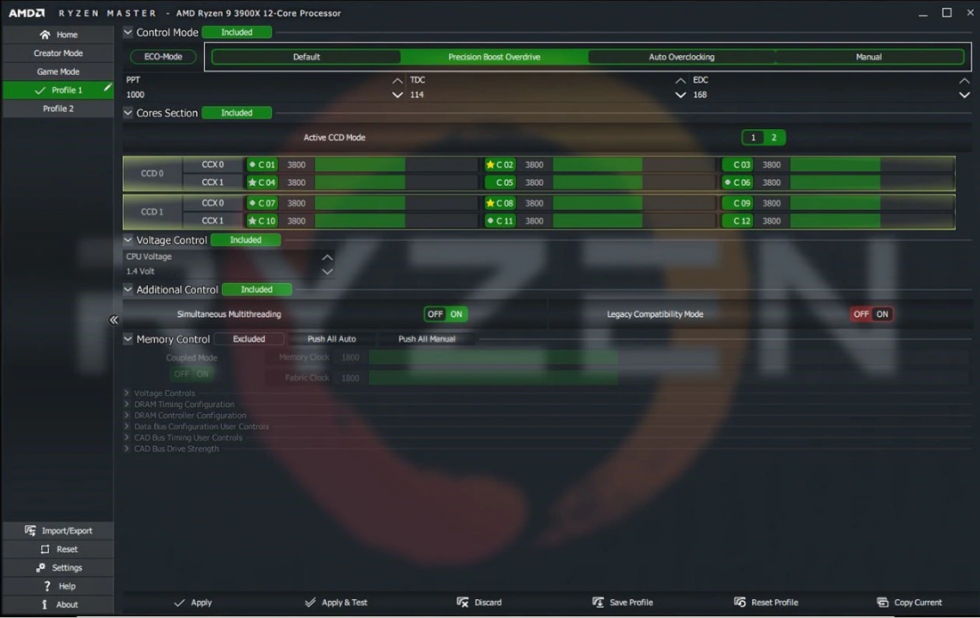 05-0.1V. The extra voltage can make the system more stable.
Then gradually increase the memory frequency. For Ryzen, a lot depends on the processor architecture. So, in systems with chips based on the Zen microarchitecture, RAM can be overclocked to 3466 MHz, on Zen + — up to 3533 MHz, on Zen2 — up to 3800 MHz. Zen3, which went on sale in November, is expected to be overclocked to 4,000 MHz and beyond. nine0005
You can find approximate values in the DRAM Calculator for Ryzen for AMD based systems. You need to specify microarchitecture (Zen, Zen+, Zen2, Zen3), memory chip type, rank (1 or 2), number of modules, and motherboard chipset.
As a reminder: memory characteristics are described in detail in Thaiphoon Burner. The family of the processor and motherboard can be found in CPU‑Z or Aida64.
Once you have set the basic system parameters in the DRAM Calculator for Ryzen, click R‑XMP to have it perform basic calculations. And then determine the desired settings for safe (Calculate Safe), fast (Calculate Fast) or extreme overclocking (Calculate Extreme).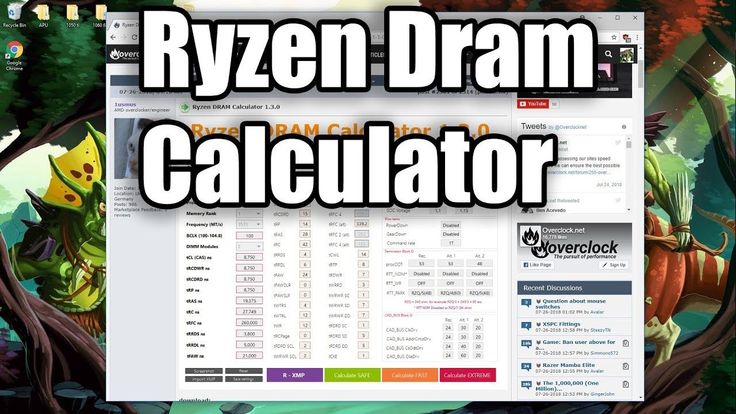 nine0005
There are no analogues of DRAM Calculator for Ryzen for Intel yet. But if you use some tools that facilitate the selection of parameters, write about them in the comments.
DRAM Calculator for Ryzen developers offer users to share overclocking results and collect statistics in tables:
- Zen;
- Zen+;
- Zen2.
We do not recommend immediately increasing the frequency of RAM above the values supported by the processor. Look for specifications of Intel processors on this page. nine0005
You can also find information on the specific chipset model on the AMD website.
Reboot your computer and check the result
First of all run the benchmark and see if the results have increased. If not, return the previous values - you probably reached the maximum memory frequency. If the numbers increase, run a system stability test, for example from the DRAM Calculator for Ryzen.
If there are no errors in the test, you can start more fundamental tests. A couple of hours in Prime95 or other memory-intensive benchmark will suffice. Only if during the long stress test you did not catch BSOD («blue screen of death») or other errors, you can proceed to the next stage of overclocking. Otherwise, return the previous values.
Repeat
Increase the frequency of the RAM while the computer is stable. If it did not start after reboot, return the previous values of the parameters that you changed.
Reduce timings
When you have reached the maximum possible RAM frequencies, reduce the base timings (the first four values) by one and test the system again. It’s worth stopping when you stop seeing performance gains or when your computer can’t run stably.
1 / 0
2 / 0
How to overclock RAM using the XMP profile
XMP profile (eXtreme Memory Profile — extreme memory profile) — these are the parameters for overclocking RAM, set by the manufacturer. In fact, this is “approved overclocking”: the power will be higher than with the original factory settings, and the risks of damaging the system are minimal. nine0005
This is perhaps the easiest way to overclock. Unless, of course, XMP profiles are available for your PC.
Check if the system supports XMP profiles
Go to BIOS / UEFI and go to the memory settings page. If there is an item like Memory Profile and there are options for XMP profiles, then your system supports this feature. In the profile itself, you can see the specific values \u200b\u200bof the parameters of the RAM.
Benchmark memory performance
Open DRAM Calculator for Ryzen, launch Membench and select the appropriate test. We recommend Easy if you have up to 8GB of RAM and Memtest if you have more.
You can also run tests in Aida64 or other benchmarks.
Apply XMP profile
Change BIOS / UEFI configuration from default to desired XMP profile. Apply the settings and reboot the system.
Some boards enable profiles differently. For example, in the BIOS / UEFI of ASUS motherboards, they can be activated in the AI Tweaker section. In the BIOS/UEFI of MSI gaming motherboards, this item is placed on the main page or in the Extreme Tweaker tab. nine0005
Evaluate the result
Run the benchmark again and evaluate the increase in indicators. Then run a system stability test (Prime95 and others) — for at least two hours, and preferably for 12-24 hours.
If everything went well, use this profile or try the next one. Then compare the results and choose the one that gives you the best performance.
If the system does not start, experiment with a different profile or reset to factory settings. Usually, the first option improves system performance slightly, while the second and subsequent options provide more extreme overclocking. nine0005
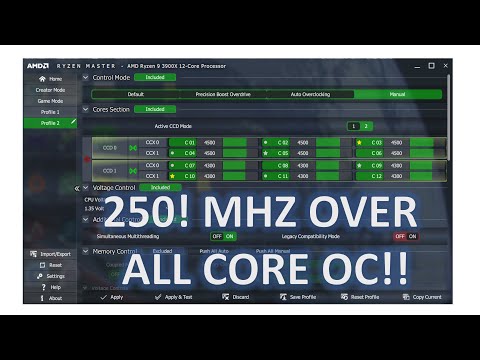
How to overclock RAM using AMD Ryzen Master
AMD Ryzen Master is a utility for comprehensive overclocking of systems based on AMD Ryzen processors. Overclocking here is similar to memory overclocking in the BIOS. But the interface is more universal and there is a ready-made benchmark for tests.
In the Memory Control section you can set the required performance parameters. When choosing settings, we recommend starting from the values \u200b\u200bthat the DRAM Calculator for Ryzen will give.
After configuration is complete, save the profile and then click Apply & Test. The built-in benchmark will help you check the stability and productivity of your system.
Download AMD Ryzen Master →
0029 How to overclock your processor without harming your computer
RAM A-Data XPG SPECTRIX D50 16GB DDR4 (AX4U360038G18A-DT50)
Under the cut, a review of the A-Data XPG RAM of the SPECTRIX D50 model with a capacity of 16GB.
Let’s look at the characteristics, do a little overclocking through the Ryzen dram calculator,
let’s compare the results of manual overclocking with XMP profiles from the store, and of course, the most important thing — check the RGB backlight!
Let’s start with the purchase.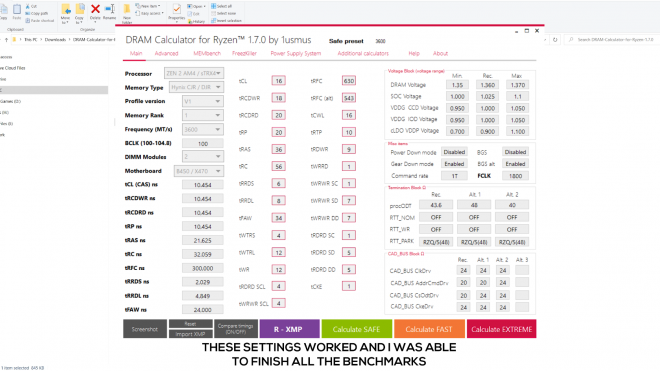
In the header there is a link to the dns where you can buy this particular modification with Hynix chips, and in the online trade you can find the same modification, but with white painting. There are a lot of confusions and modifications in this memory, so be sure to check the description and reviews where they often write the type of memory under the hood.
The memory itself is sold in such a nice gray package, it is universal and important characteristics, such as volume, frequency and exact model, are applied with stickers. nine0283
The main and general information for the entire SPECTRIX D50 memory line is as follows.
• RGB protocol support Asus aura • Gigabyte RGB Fusion • Msi mystick light sync • ASRock RGB led
• lifetime warranty
• The memory of this line is available only in ddr4 standard
• Only for use in desktop PCs
QR code leads here www.adata.com/redirect/687
2 memory sticks are in a protective antistatic blister. nine0283
Standard packaging for any memory sticks.
Visual inspection.
First impressions are very pleasant. The dies are pleasantly heavy due to the fairly large aluminum heatsinks.
Radiators are decorated with lines that create uncomplicated geometric shapes. On the bottom right, there is an XPG logo in bright red, which is a little out of the gray color scheme, but after installation it is not visible.
On top of the insert is made of matte white plastic, which, after switching on, is illuminated very evenly. nine0283
Inside the PC looks interesting. Next, I will talk in more detail about RGB backlighting and its control through third-party software, as well as the manufacturer’s software, so here I will add only a couple of interesting types.
Under the heatsink there are 5 RGB LEDs controlled by a separate chip. Surprisingly, even with such a small number of LEDs, the gradients are very smooth both in static and in motion.
Now to the technical.
If you look closely, you can see 8 Micron memory chips, all the chips are located on only one side of the board, which makes this memory peer-to-peer. nine0283
Let’s take a typhoon to determine the chips. Unfortunately, the developer of this software is not very apolitical, so its latest versions do not work on systems with the Russian language. As part of this review, the completely current version 16.1 will be used, which works without problems with my platform on an AMD b450 and a Ryzen 3800x processor.
Report in English, but briefly.
•Manufacturer — A-DATA
• Chip manufacturer — Micron
• Memory type DDR4
•Info — 8GB memory per stick, E-Die
chips
•8 chips 1gb each
•standard JDEK profile 2666MHz
• minimum timings — CL19
•Standard voltage 1.2v
•XMP0 — 1799MHz 18-20-20-42-62
•XMP1 — 1600MHz 16-18-18-36-54
• Date of production — March 2021, fresh
Full typhoon report.
And also a full report from Aida64
Now let’s look at XMP and easy overclocking. nine0283
The test bench is simple.
• Asus tuf b450m pro gaming — not a champion, but an excellent board in terms of memory overclocking
• AMD Ryzen 7 3800x — a good example of
• Water cooling system for 2 sections
• RTX 3080TI
• Picture one, stock. 88ns latency, 37.6 at 21.2k mbs, standard is not the best result for amd. On Intel, everything is much better, but because of the AMD architecture, such weak results are obtained, improving which we greatly change the performance of the processor. nine0005
• The second picture, XMP profile 3200Mhz cl16, as we can see, the delays have lost weight by 14ns and the speeds have increased significantly to 45.8 and 25.5k mb.
• Scene 3, XMP profile 3600Mhz cl18, in order for these frequencies to work on a larger number of devices, the manufacturer decided to slightly increase the timings, but even under such conditions the result is still growing. delays are 69ns, the speeds have risen a little more, but not as critical as when switching from the drain to the XMP 3200, 50. 6 to 28.7k mb / s.
• Fourth, final scene. I’m not really an overclocker and I can’t say for 200% that I squeezed all the juice out of this memory, I went on a simple and stable path — 3600 CL16, such results are achievable for most mid-range memory, they are not something that would be the limit, but golden above which the effort is almost not worth it, and my results as a whole confirm this. Reducing the timings by a couple of points gave a slight decrease in latency as well as a minor increase in throughput to 51.3 and 28.7k mb/s, and further experiments, unfortunately, give a meager increase and require a large investment of time for tests and fine-tuning of parameters. nine0005
Although the difference between XMP 3600 AND manual tuning is minimal, I will still describe the simplest algorithm that can serve as your starting point for learning about memory overclocking on Ryzen. After all, even if you have the cheapest platform and memory, but there is the possibility of minimal memory overclocking, then you will get free additional performance without paying a penny of money or hardware resources.
First of all, you will need a typhoon (thaiphoon burner), unfortunately its developer behaved politically incorrectly and decided to block the program for Russian-speaking users, and you will have to look for the program version 16.1 in which there is no lock yet and it works without problems getting data from memory on new platforms . In general, you can even skip this item, simply knowing your memory chips and how many of them there are, such information is usually found in product reviews. nine0005
UPD from 13.08
In the comments alexanster noticed that the typhoon lifted the restrictions https://vk.com/wall-163311119_58070
And now the latest version works on RU systems, you can download it on the off site http://www.softnology.biz/files.html
Next, you need a ryzen calculator, it’s not difficult to find it on the net, how to use it.
Sobsno here is an example of what you need to do.
1 — select your processor generation, old zens work worse with memory, new ones are fine, in my case it’s Ryzen 3800x zen2
2 — select the type of memory, here you need to know exactly the manufacturer of the memory as well as its quality, which frequencies and timings you will get depends heavily on it.
3 — the frequency you want to get, you can start from the XMP tests above, as well as from the limitations of your platform and processor, a little further I will attach a not the worst video with frequency and timing tests.
4 — chipset of your board
5 — click calculation safe
And you will get your simplest results, there are a lot of values, but you can start with the first six. nine0283
tCL, tRCDWR, tRCDRD, tRP, tRAS,tRC
Just transfer them to the BIOS in the memory timings settings, leaving all the rest on AUTO.
We also set the memory frequency, the same that you entered into the calculator.
And this is the end of the simplest manual overclocking. Then press f10 to save and reboot. If there is a problem with starting, then we clear the BIOS settings, boot into Windows and select a lower frequency, etc.
If everything is ok, then we test our settings, the minimum memtest lies directly with the ryzen calculator, and if everything is ok with it, then we test it in work and games, there is also an ultimatum method, the same TestMem 5 with a set from anta777 on an EXTREME profile, which is exactly will tell you if there are problems in your overclocking, but this is for those who want to go deeper and squeeze more out of iron. nine0005
ADATA itself on the box speaks of full support for a whole list of RGB backlight control protocols.
Since I have a motherboard, the ASUS AURA protocol is available for me, which is available from two programs, this is AURA CREATOR, as well as ARMORY CRATE, which I will use.
As you can see, our RAM is defined in the program and allows you to select one of 10 presets. Some of them simply shine with a static light, others shimmer, and others, like adaptive color, intelligent or music, allow you to somehow react to events on the PC, whether it is the temperature of the iron, the sound or the picture on the screen. nine0283
But no one is interested in looking at the settings, let’s see live.
The minimum size of the gradient, it cannot be made in more detail due to the small number of diodes, but this does not interfere
this device to be beautiful.
Pure white unfortunately has a slight red tint and requires fine manual adjustment to achieve a neutral white.