SpeedFan Temp 3 Shows Abnormal values? Best Ways to Solve
Are your SpeedFan temp 3 readings above the mark and worried if it is right or wrong? Well, it is wrong in 99 percent of the cases.
We will discuss installing the software SpeedFan, how to use it, the various values and readings it shows, its alternatives, and most importantly, why and how SpeedFan temp 3 is wrong.
Contents
- 1 What is SpeedFan temp 3
- 2 Advantages of SpeedFan
- 3 Disadvantages SpeedFan temp 3
- 4 What are the various values that are shown by SpeedFan
- 5 Criticism of SpeedFan temp 3 showing wrong reading
- 5.1 Why are the values shown are wrong?
- 6 How to download & install SpeedFan
- 7 FAQs on SpeedFan temp 3
- 7.1 What are the alternatives to SpeedFan software?
- 7.2 What is the difference between SpeedFan temp 1, temp 2, and temp 3
- 7.3 SpeedFan temp 3 shows 127 degrees! Should I be concerned?
- 8 Winding up
- 9 Trending Articles
What is SpeedFan temp 3
The SpeedFan is open-source software, can be downloaded from any browser and installed easily. This helps to monitor the various functionalities and readings from your system.
The various readings that it notes are clocking rates, fan speeds, core temperatures, rpm values for fans, etc.
This also allows you to alter the values for a few things like clocking rates and fan speeds.
Advantages of SpeedFan
- Shows the analysis for temperatures and clock rates.
- Is simple and easy to see the data.
- Allows to configure the values for fan speed and fan’s RPM rates.
- Shows the value of CPU usage, frequency and battery left.
- Can alter the clock cycles rate.
Disadvantages SpeedFan temp 3
- Should change a few things in the settings before you can alter the values and data.
- Has not brought up any updates for a long period of time.
- Values for SpeedFan temp 3 and temp 4 can be wrong.
- Looks and feel is not good.
What are the various values that are shown by SpeedFan
The values shown by the monitoring program and their features are as follows:
- Temp1 : Motherboard Temperature
- Temp2 : CPU & GPU
- Temp3 : CPU chipset
- HD0 : Hard Disk Temperature
- GPU : GPU temperature
- Core 0 : CPU Core readings
- Core 1 : CPU Core readings
- Fan1 – Fan5 : Fan’s RPM values
- (Voltage Flow) : Supply of voltage across the components
Popular now
4 Magnificent Methods to Resolve: Please Wait for the Group Policy Client
Criticism of SpeedFan temp 3 showing wrong reading
The SpeedFan temp three and temp four and temp 6 are also sometimes shown as wrong and null as the readings when the application starts up.
Why are the values shown are wrong?
The sensors placed on the motherboard can note down the value of the surrounding temperature and pass it to the requested software or applications. So, there can be broadly two reasons as to why the values are wrong.
- There are no sensors placed in the motherboard at theat specific location (CPU shipset) by the manufacturers, or the sensor is damaged. In either case, there is no need to worry a thing, as there are many more other sensors wose values you can consider for your device’s saftey.
- Access denied to the software “SpeedFan”. When the high security settings of the computer system prevents this application software to gain access to the vital information of the computers, then the values which the application will show will be either zero or beyond 120 degree celsius (above 248 fahrenheit).
The users have created many forums to ask why the SpeedFan Temp 3 values are abnormal or beyond range. They have got their answer as the values measured by the software is incorrect. The only choice left with them is to use an alternative.
Trending
Got into error csc_7200026? 5 Impressive Patches Can Be Useful
How to download & install SpeedFan
- Click on the below link:
- https://www.almico.com/sfdownload.php
- It will take you to a new tab.
- Click on the Download tab available at the top side of the webpage.
- Then, click on the link SpeedFan 4.52, or which ever latest version is available during the time.
- This should start the download. If the download does not begin, then an antivirus software or a blocker extension or protocol is preventing the download from happening.
- Try other websites for downloading this application.
- After downloading, click on the execution icon to start the installation process.
- After the installation gets complete, an icon of it is made by default on the home desktop screen.

- Double clicking on it will open the application, it will ask to provide with User Control to the app, to which you should select YES option.
Trending
2 Formulas Can Fix We’re Having Trouble Loading Your Feed
FAQs on SpeedFan temp 3
What are the alternatives to SpeedFan software?
The various alternatives to this software are:
1. Real Temp
2. iStat Menus
3. Hmonitor
4. Core Temp
5. Argus Monitor
What is the difference between SpeedFan temp 1, temp 2, and temp 3
Temp1 shows the temperature of the motherboard. It is nearly accurate and is never wrong.
Temp 2 indicates the temperature of the CPU and GPU components. This is also a correct indicator reading.
Temp 3 mostly gives wrong values in most applications and displays the temperature for some CPU and CPU chipsets components.
SpeedFan temp 3 shows 127 degrees! Should I be concerned?
There is no need to be concerned unless your system is slow and lagging.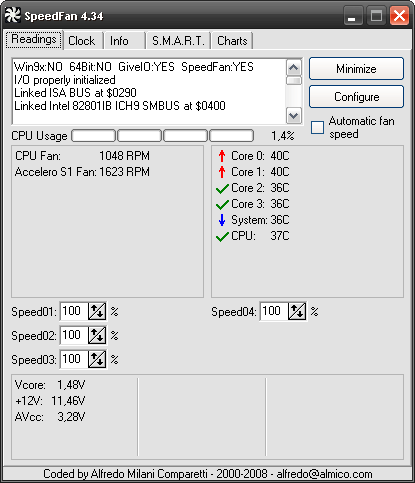 The displayed temperature reading for Temp 3 is wrong, and there has not been an update to fix this issue.
Winding up
The software SpeedFan has not been doing great when compared to its competitors. The software developers need to find a way to bring it back to track or lose its customers. It is advised to locate the correct readings from the BIOS setup or some other software.
You can ping us anytime for any queries using the comment box available at the bottom of the page.
Trending Articles
What is temp1,temp2,temp3 in speedfan? | TechEnclave
JavaScript is disabled. For a better experience, please enable JavaScript in your browser before proceeding.
-
Thread starter
CA50 -
Start date
CA50
-
-
#1
Hi everybody, many of you might be using speedfan for monitoring your system’s temperature. Can you please explain me what are temp1, temp2 and temp3, and also mention the safe temperature of these.
Thanks
haraakiri
-
-
#2
I am not very sure, but I think these can be different on different boards. They generally represent cpu temp, motherboard temp and system temp. Run prime95, and stop it after a while. The fastest changing temp is cpu temp and the least chaning is system temp.
CA50
-
-
#3
Got it temp1 is the cpu one, but what are the temp2 and temp3?? Also what is the location of the motherboard temp sensor and the system temp sensor?
adi_vastava
Code Game Code F**K
-
-
#4
if it is showing you some insane value, i.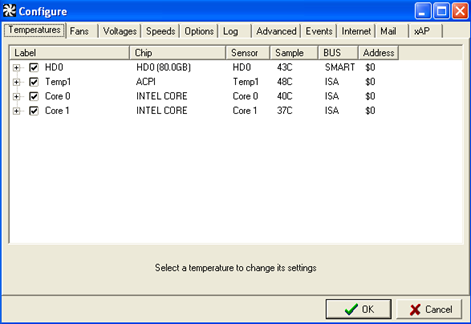 no m8, the temperature values are as follows:
GPU : 0C
Temp1 : 37C
Temp2 : 43C
Temp3 : 38C
HD0 : 40C
HD1: 41C
Actually i am worried with my temp2 temperature that usually remain 40+, even when my cpu/temp1 temperature hovers between 36-40C. Is the temp2 temperature the temperature of the NB, because i can feel that the me NB is bit warm.
I RMAed my board recently (blew the previous one by BIOS flashing hyeah, and the new mobo i got is OK, but i think that my NB of the previous board was cooler in comparison to this one. I already removed the heat sink over the NB and applied a fresh layer of TIM as there was previously less TIM. Now the temp is 40C+ (but haven`t it crossing 50C).
Will this lead to any issue?
saumilsingh
-
-
#6
Most of the time, one is CPU, the other is motherboard, and the remaining one does nothing.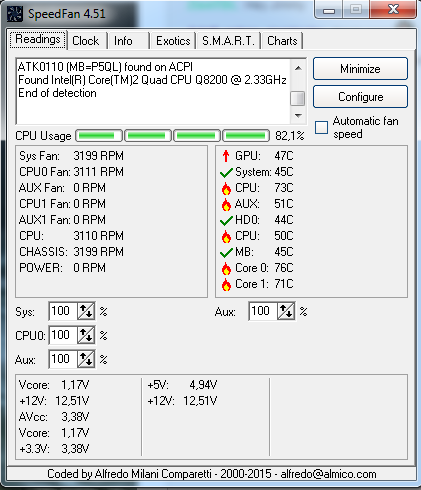
CA50
-
-
#7
OK!! but where is the motherboard temperature sensor??
asingh
-
-
#8
SpeedFan is highly unreliable. Ok i tried Everest, but here too the temperatures are same so you see, speedfan is lying either.
The Everest reading are
Code:
Field	Value
Sensor Properties
Sensor Type	ITE IT8718F  (ISA A10h)
Chassis Intrusion Detected	Yes
Temperatures
Motherboard	43 °C  (109 °F)
CPU	38 °C  (100 °F)
[B]MCP[/B]	43 °C  (109 °F)
[B]Aux[/B]	37 °C  (99 °F)
Maxtor 6V080E0	42 °C  (108 °F)
WDC WD5000AAKS-22V1A0	42 °C  (108 °F)
Cooling Fans
CPU	2647 RPM
Chassis	2606 RPM
Voltage Values
CPU Core	1.34 V
+2.5 V	1.33 V
+3.3 V	3.01 V
+5 V	5.00 V
+12 V	11.78 V
+5 V Standby	5.00 V
VBAT Battery	3.12 V
What is this MCP? and AUX?
asingh
-
-
#10
MCP would ideally be media communications processor, and aux is an unassigned sensor.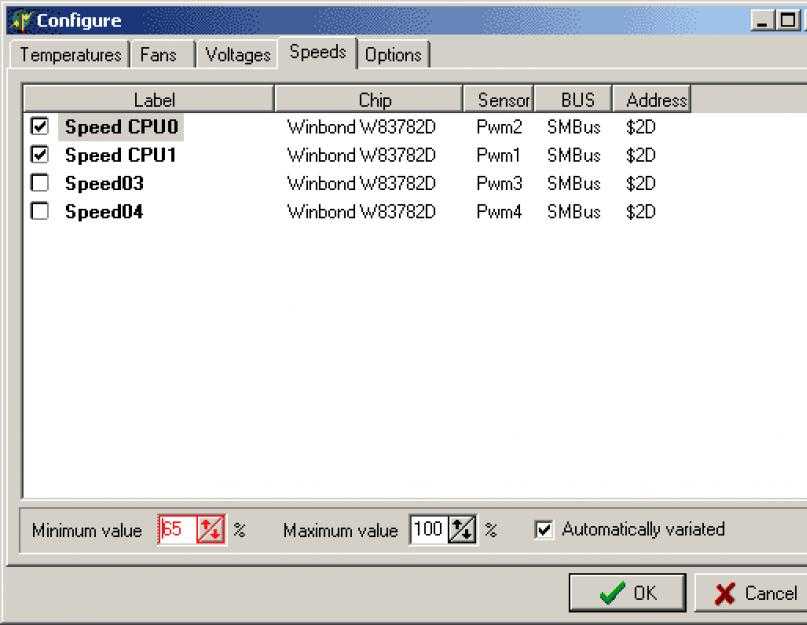 Do not worry about Aux. Overall your temperatures seem fine to me…!
buddingwhizkid
-
-
#11
why is motherboard temp more than cpu ?
isnt motherboard temp is the cpu temp got by the sensor on the motherboard !
asingh
-
-
#12
^^
See all these things are just indicative, and not that precise. It can vary motherboard to motherboard, and how the sensing applications detects it. The only way to be precisely sure, would be to see official documentation for the board, and note down what and where each sensor actually is. The critical field are the cores. If those are fine, you really not need worry. His temperatures are in the decent ballpark, so he should be fine.
CA50
-
-
#13
asingh said:
MCP would ideally be media communications processor, and aux is an unassigned sensor.
Do not worry about Aux. Overall your temperatures seem fine to me…!
Click to expand…
Thanks mate
nRiTeCh
-
-
#14
speedfan sucks. it was ok in old age p3 n p4 systems. for perfect accurate results use hwmonitor or lavalys everest
Share:
Facebook
Twitter
Reddit
Pinterest
Tumblr
WhatsApp
Email
Share
Link
Top
Access temperature sensor in your computer
|
||||||||||
What is SpeedFan
SpeedFan is a program that monitors voltages, fan speeds and temperatures
in computers with hardware monitor chips.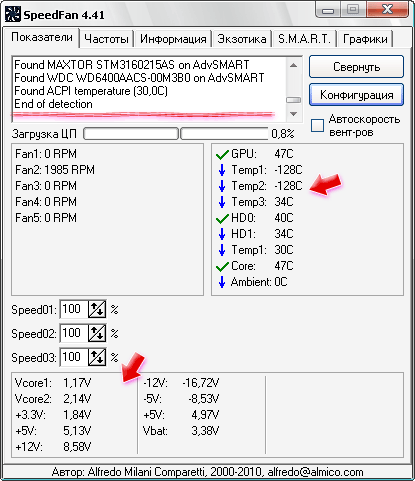 SpeedFan can even access S.M.A.R.T. info and show
hard disk temperatures. SpeedFan supports SCSI disks too.
SpeedFan can even change the FSB on some hardware (but this should be considered a bonus feature).
SpeedFan can access digital temperature sensors and can change fan speeds
accordingly, thus reducing noise.
SpeedFan works fine with Windows 9x, ME, NT, 2000, 2003, XP, Vista, Windows 7, 2008, Windows 8, Windows 10 and
Windows Server 2012. It works with Windows 64 bit too.
Hover on the icons to read more about specific SpeedFan features.
advertisement
News
|
SpeedFan 4.52 Final is online! |
SpeedFan 4.52 Final is now online! It adds support for a lot of new hardware. Bug fixes and more, as always. Both the installer and the executable are digitally signed with my company’s (SOKNO S.R.L.) |
|
|
Advanced Fan Control How-To |
An article has been added to describe the long awaited new Advanced Fan Control method. You can find |
 New versions will now appear more often. Stay tuned 🙂
Release notes
| 4.52 | — | added full IPMI support |
| — | added full support for IT IT8771E | |
| — | added full support for Intel Sunrise Point (Z170) SMBus | |
| — | added full support for STMicro STTS2004 | |
| — | added full support for NCT6793D | |
| — | added full support for Giantec GT34TS04 and GT34TS02 | |
| — | added support for Atom E3800 SMBus | |
| — | added support for Atom C2000 SMBus | |
| — | added support for Fintek F71878A/F71868A at non standard addresses | |
| — | enabled SMBus on Intel 6 Series / C20x, if needed | |
| — |
more. |
 ..
..How fan speed changing works
SpeedFan monitor temperatures from several sources. By properly configuring SpeedFan, you can
let it change fan speeds based on system temperatures. When choosing parameters for the minimum
and maximum fan speed, try to set them by hand (disable all the VARIATE FANs checkboxes) and
listen to the noise. When you hear no noise from the fan then you can set that value as the
minimum fan speed for that fan. I suggest to use 100 as the maximum value, unless you hear a
lot of noise from it, in which case you might reduce the maximum speed to 95 or 90. You can
set, say, 60 as the maximum value and, sometimes, I myself set it that way. Consider that when
the WARNING temperature is reached, the program sets the fan speed to 100, whatever maximum
speed you selected. One last word should be said regarding the USE FAN x listbox. In my pc,
more than one temperature changes when a fan runs faster. You can configure on which fan every
temperature should rely. On my system, TEMP1 and TEMP3 are both influenced by FAN1.
Credits
|
A few numbers…
SpeedFan can handle:
- almost any number of South Bridges
- almost any number of hardware monitor chips
- almost any number of hard disks
- almost any number of temperature readings
- almost any number of voltage readings
- almost any number of fan speed readings
- almost any number of PWMs
Disclaimer
This program is aimed at the power user.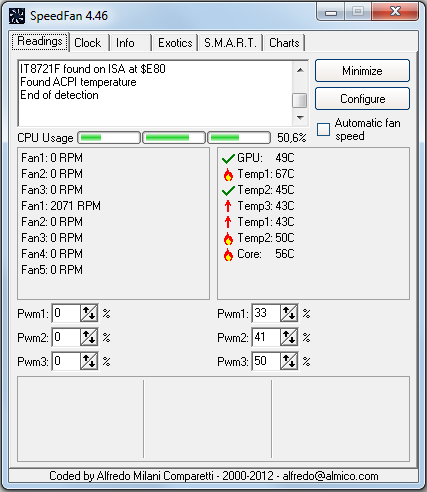 At those who know what they’re doing. I’ve known of no
real problem caused by SpeedFan, but may be it’s due to the fact that once it made the PC
explode and the user disappeared in the blast, thus being unable to report 🙂 Anyway: SpeedFan
can be extremely useful, but you should first watch its behavior before setting and forgetting it.
Feedback
You can contact me at alfredo [at] almico.com if you’ve got
any question or suggestion or discover any strange behavior. I’d appreciate an e-mail from those
of you who try and find useful my program. Just a line of text will do.
Thanx for your attention.
Links
You might consider to visit my Delphi Page.
| Web | www.almico.com |
Page generated in 0. 0434 seconds 0434 seconds |
Powered by (new)… | Page viewed 94901812 times |
| — | Did you know that SpeedFan has an feed? |
Privacy policy |
Newest ‘speedfan’ Questions — Super User
Ask Question
SpeedFan is a program that monitors voltages, fan speeds and temperatures in computers with hardware monitor chips.
- Learn more…
- Top users
- Synonyms
84
questions
Newest
Active
Bountied
Unanswered
Filter by
No answers
No accepted answer
Has bounty
Sorted by
Newest
Recent activity
Highest score
Most frequent
Bounty ending soon
Tagged with
My watched tags
The following tags:
0
votes
0
answers
75
views
Unable to change fan speed on Acer laptop
My laptop is Acer Swift SFX14-41G, which can use combination Fn+F to change fan speed.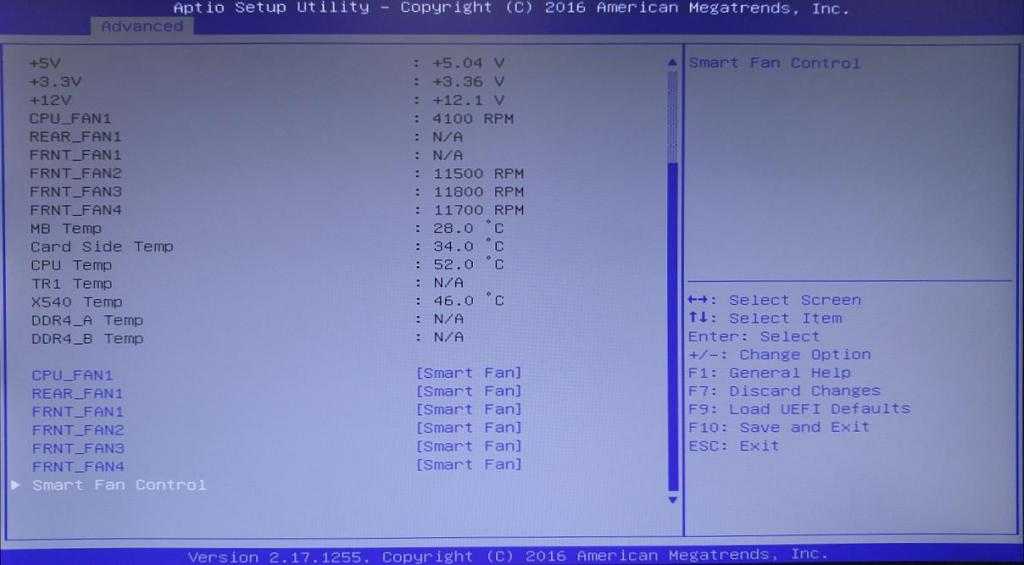 But after I reinstall Windows 10 from Microsoft (not use reset this PC) I am unable to change the fan speed.
So …
- windows
- laptop
- drivers
- speedfan
1
vote
0
answers
43
views
Laptop fan speed with strange behaviour
I have had a N550JV Asus laptop for more than 6 years. Recently I noticed the fan speed noise increase without any reason, the CPU activity is normal and the system has been checked for any probable …
- laptop
- fan
- asus-laptop
- speedfan
0
votes
0
answers
46
views
is the speed of the second fan normal?
I am using SpeedFan to see the fan speed.
My laptop is HP Pavilion — 14-ce3009ne.
The speed of the second fan does not look normal. it does not exceed 100 rpm. If this normal?
- laptop
- hp-pavilion
- speedfan
0
votes
0
answers
64
views
CPU fan spins crazy all the time (CPU temp is 35 °C)
I have a Toshiba Satellite u300 (old) laptop. As soon as I turn it on, its fan is going full blown all the time regardless of CPU usage. It’s very strange and uncomfortable because of its noise.
I …
- speedfan
0
votes
0
answers
61
views
How to measure/interpret temperature of computer and what should it be at?
I have installed SpeedFan but don’t fully understand how to use it. Here is a read out of what I get…
I’m guessing the fire icon means the unit is too hot? It’s unfortunate the CPU heat sink was …
- fan
- desktop-computer
- cooling
- temperature
- speedfan
0
votes
1
answer
1k
views
Uncontrollable CPU Fan in Ubuntu and UEFI firmware
The speed of my CPU fan it’s out of control, going to the fastest speed and lowest without any reason.
I have tried the following without success:
Changing fan speed in UEFI settings and setting …
- ubuntu
- motherboard
- uefi
- fan
- speedfan
0
votes
0
answers
402
views
Fans not working on Asus X555LJ
as of yesterday or so my laptop’s fans stopped working with no apparent reason.
This is what appears on SpeedFan:
Open Hardware Monitor:
I also have an error on SpeedFan that I don’t know the …
- windows
- fan
- temperature
- asus-laptop
- speedfan
0
votes
0
answers
3k
views
Is it possible to override fan control settings directly through REGEDIT?
I have a Dell Latitude e6420 and the fan noise is driving me crazy. I took the entire fan assembly apart and it is clean as a whistle, but still making obnoxiously loud noise regularly.
I believe …
- windows-10
- windows-registry
- fan
- cooling
- speedfan
0
votes
0
answers
75
views
New laptop fan won’t compensate for heat increase
I recently replaced my laptop fan because it was rattling, but the new fan does not seem to accelerate when I’m in game or doing any other power hungry tasks.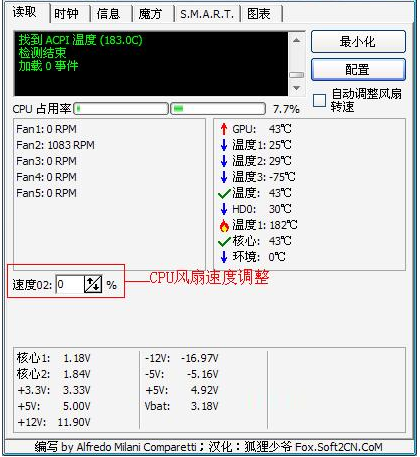 My laptop is a MSI GE60. This makes the …
- laptop
- fan
- cooling
- speedfan
7
votes
1
answer
112k
views
SpeedFan not detecting fans
SpeedFan 4.52 is not detecting any of my system fans. Am I doing something wrong? Is my motherboard not supported?
Motherboard: https://www.gigabyte.com/Motherboard/GA-Z170-Gaming-K3-rev-10#ov
Fans: …
- motherboard
- fan
- cooling
- speedfan
5
votes
3
answers
16k
views
Laptop Windows 10 noisy fan constantly running
I have been having an issue with my Laptop fan constantly running @ high speed creating an unbearable noise that is making it hard to work.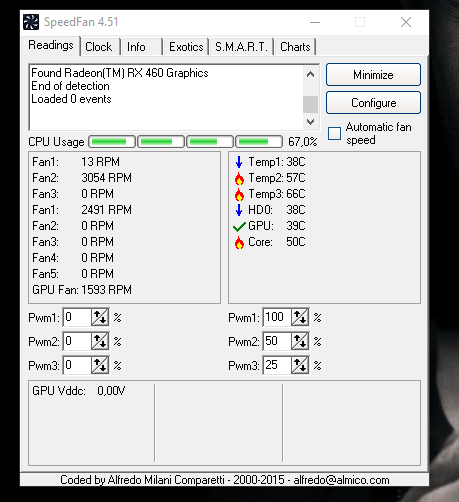
My processor is almost at idle when this happens only …
- windows-10
- fan
- speedfan
-1
votes
1
answer
99
views
Do I need a second (non-CPU) fan in my system?
I have a mini-tower desktop PC containing (primarily) a MicroATX motherboard, 2 HDDs (2TB AND 3TB), one SSD, and one non-stock CPU fan (Arctic Cooler 11 LP). I’ve always felt this was sufficient, but …
- cpu
- fan
- desktop-computer
- temperature
- speedfan
5
votes
4
answers
16k
views
SpeedFan suddenly stops being able to detect controllers and sensors mid game
so I’m playing games on my PC and I have some fan control setup using SpeedFan for my PWM fans which usually works really nice. However, the other day my game wasn’t running so smoothly and I saw that …
- fan
- temperature
- speedfan
- sensors
1
vote
0
answers
2k
views
Controlling fan speed with Windows without additional programs
This is clearly a duplicate of at least five question with almost the same title of mine. However I tried all the free programs in the respective answers and none of them worked for me. For this …
- windows-10
- fan
- asus-laptop
- speedfan
1
vote
1
answer
899
views
SpeedFan shows ridiculous numbers for Temp2 and Temp3
I have the Dell XPS 15 (9550). I have recently noticed that my fans seem to be running constantly, so I ran SpeedFan to see if I could figure out why.
Can anybody explain what these numbers mean, and …
- temperature
- dell-xps
- speedfan
per page
A Free Windows App To Monitor Every Aspect Of Your System Temperature
By
Erez Zukerman
Share
Tweet
Share
Share
Share
Email
Just as shorting a computer out will ruin it, making it run in temperatures it was never meant to take will cause it to malfunction. SpeedFan is a free utility for Windows designed to help you keep a close eye on just how hot your computer is getting, down to the individual component level.
Computers are very reliable, except when they’re not.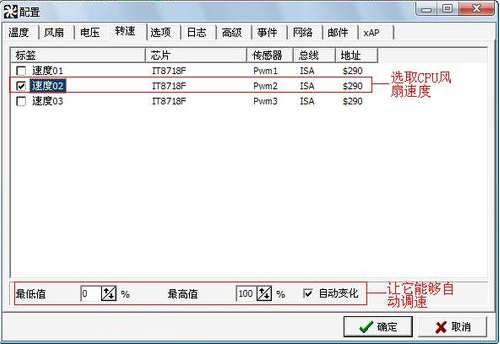 «The computer never makes any mistakes» — that’s true, for the most part. But dunk your smartphone in a glass of deliciously refreshing mint tea, and it will probably make a mistake or two (or, in other words, die). Dunking your phone in a glass of tea would be silly, of course, but letting your computer run too hot can be almost as damaging, if less visible.
Just as shorting a computer out will ruin it, making it run in temperatures it was never meant to take will cause it to malfunction. SpeedFan is a free system temperature monitor for Windows designed to help you keep a close eye on just how hot your computer is getting, down to the individual component level.
First Impressions: A Lean, Clean, Classic
This is not the first time we are reviewing SpeedFan: Guy covered it way back in 2009. You’ll be excited to hear that since then, SpeedFan has moved from version 4.37 all the way to 4.49, making huge strides in… well, nothing really. This tool is a classic, and it looks like one.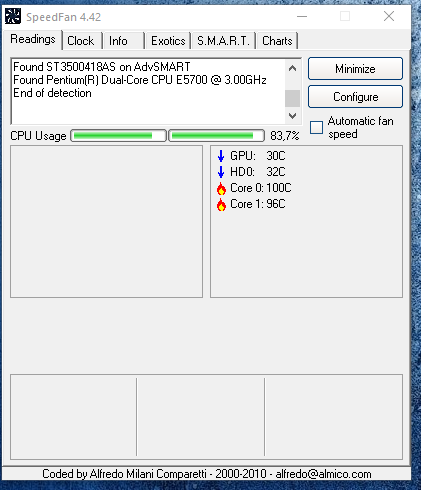 It’s a case of not fixing what isn’t broken, and the interface shows few changes relative to four years ago.
An application’s installer can speak volumes of its simplicity and polish. The worst offenders bundle browser toolbars and other junk trying to make a buck, while bloated behemoths often force you to run through a complicated multi-step process. SpeedFan’s installer keeps things simple and has only two steps, with absolutely no junk in the process:
The only caveat to using SpeedFan is that it does require Administrator access to work properly.
Tabs and Numbers
Launch SpeedFan, and you’ll find an interface that makes almost no effort to make things simple. This tool is all about the numbers:
Breaking the wealth of information down to six tabs is a welcome concession to usability. Even so, the Readings tab is packed full of information, along with very few explanations. You can see system temperatures at a glance: Turns out my computer reports no less than nine separate readings, some cryptically labeled as Temp1, Temp2, and Temp3 — and then there’s Temp1 and Temp2 yet again, with different numbers. Others are clearer, though: I do have a discrete GPU (I use a desktop workstation), so seeing its temperature right off the bat is nice. Due to the cryptic labels, this screen is mostly useful for understanding if anything is amiss. You may not know what Temp2 is about, but if it’s at 70C, that’s probably a cause for concern.
Exotics: What a Tab!
I had to show this tab just because of its name. I mean, really, who can resist clicking a tab called Exotics?
At first, the Exotics tab is tantalizingly blank, save for a button labeled Show the magic coupled with a Beta warning. All of this buildup only makes its eventual output somewhat of a letdown:
This thoroughly anticlimactic screen carries some useful data formatted into exciting rectangles. It starts out with the same temp readings we’ve seen on the prosaically-labeled Readings tab, but continues to display hard-drive S.M.A.R.T ratings (HD0 and HD1), as well as the utilization of each CPU core, the CPU’s master clock frequency, and the system’s uptime.
S.M.A.R.T: All About Your Drives
You didn’t really think SpeedFan was going to limit itself to just a single number concerning your hard drive, did you? Just click the S.M.A.R.T tab to see more information than you’ve ever wanted to know about your hard drive(s):
You can see the make, model, and firmware of the drive, followed by a list of S.M.A.R.T performance and health readings. Some of these prove too much even for SpeedFan, hence the «Unknown Attribute» labels. In other words, «here are some numbers, but we’re not sure what they mean.» To be fair, this is an SSD. When analyzing my other drive, a magnetic HDD, it did better:
Some of these metrics are cryptically named, but you can always search for their meanings online. The icons next to some of the entries offer at-a-glance health indicators: They’re all OK in my case.
Charts
Last but not least comes the Charts tab. It’s not as excitingly named as Exotics, but it does offer a more visual treat:
These are not as nicely formatted as the Resource Monitor or Reliability Monitor built into Windows, but they are quite descriptive, and you can switch metrics on and off as you wish. One feature that’s missing is a way to export the data into a CSV file for graphing outside of SpeedFan.
Final Thoughts: A Tool To Keep In Mind
The SpeedFan system temperature monitor is not exciting. That’s not a bad thing, though: Sometimes we need a tool that’s just useful, rather than thrilling. It’s certainly established in its field, and is good enough to make it into our coveted list of the Best Windows Software under the eclectic Other category. You may not use it every day, but next time your computer starts acting weird and you can’t figure it out using the tools built into Windows, this is one tool you can try.
Almico SpeedFan Download & Review
Almico SpeedFan is an amazing PC fan controller and CPU temp monitoring utility. It can monitor voltages, fan speed, and temperature on a PC. This PWM fan control utility also lets you monitor hard disk drive temperature.
Free Download
For Windows 10 PC
With added support to SCSI disks, this software can change FSB (Front Side Bus). If your CPU fans are making loud noise or you are feeling that your PC is overheating then you can use this tool to change fan RPM speed.
This software supports all modern motherboards i.e. it8620e. You can also check a complete list of compatible motherboards with SpeedFan here.
Why would you use a utility such as SpeedFan? If your computer is in a situation where fans are getting noisy or it won’t start at an optimal level, then you will need this software.
Using SpeedFan Safely
What is SpeedFan? Well, it’s a fan control software for Windows PC. You can change or control the CPU fan speed manually. Its added ability also lets you check CPU temperature on Windows.
This is a smart guardian for Windows that accurately reads S.M.A.R.T sensors and lets you change the CPU fan speed. This is how SpeedFan works and shows you correct information while giving you more control over your PC fans.
This utility is safe and free from any virus or malware. You can download this tool on Windows10 and Windows 7. Even Linux and Mac users can use this tool after making little changes.
Users can install SpeedFan’s latest version 4.52. This is a good tool that doesn’t let you install any additional toolbar. Its developers are providing continuous support, so you will receive updates if any bugs or error pops up.
If you need to Uninstall this tool due to any reason you can do so very easily. Just head towards the control panel and you will find this utility icon appearing on a list. Click on it to uninstall.
How To Setup & Use SpeedFan?
If you know how to set up automatic fan speed then you should use custom fan curves and set up fan speed that will increase in proportion to CPU temperature.
However, if you are a newbie and for the first time you are using this CPU fan control utility, then you may damage your computer with a utility like SpeedFan.
So first you should learn the tutorial and instructions so that you can safely configure fan settings.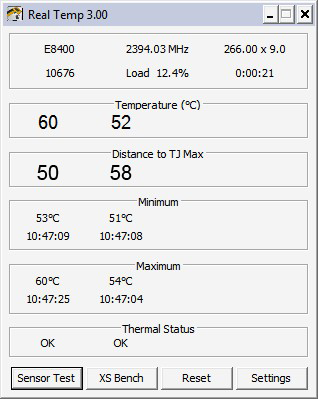 You can also read a quick guide on how to set up SpeedFan to test fan speed.
How Read SpeedFan Temp 1, 2, 3?
Many users still ask on forums what is Temp 2 on SpeedFan is or which temp is accurate CPU. First, understand that SpeedFan is a flexible temperature monitoring utility.
It detects and labels thermal sensors according to the various motherboard, chipset, and super I/O chip configurations. That’s why you will see the Tcase label as the CPU core, Temp 1, Temp 2, or Temp 3.
However, if you have installed an aftermarket graphics card then you can also see GPU fan and GPU temp readings. Unlike temp 1, temp2, and temp 3, the GPU-related readings are easy to understand.
You can also run prime95 and while stressing CPU, take a note on readings that quickly increase, it should be your CPU core temp. This utility usually shows it as Temp 2 or Temp 1 but it’s still uncertain
Read: How to Read HWMonitor | Which CPU Temp is Correct?
Where does Speedfan get the information it uses to monitor the computer? This software utilizes S. M.A.R.T and DTS sensors placed on motherboards and gathers data. Then it shows you the information in a simple way.
How To Control Fans Speed?
This fan temp monitoring utility can easily let you change the CPU fan speed. If you are certain that your CPU fans are not running at their ideal RPM speed then you should take control and adjust the fan speed manually.
Read our article that explains how to increase the fan speed on PC and laptop.
Download SpeedFan For Windows 10 & 7 Laptop
Whether it’s a laptop or a desktop PC the latest version 4.52 works fine in all windows OS. Many users are searching for its portable version but it’s available only in the setup files. You need to install this utility on your PC.
The only feature that this utility lacks is that it won’t startup up when your turn on the PC. Many users complain that once rebooted, this utility reset the fan settings. So to make Speedfan startup on windows 10.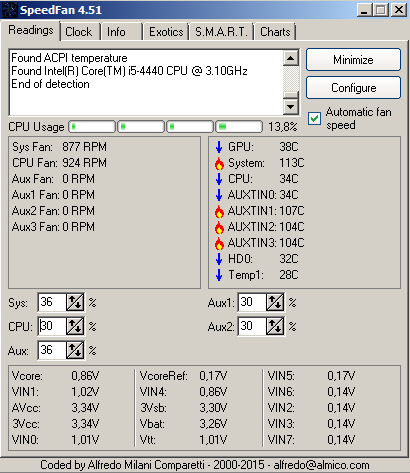 You have to tweak a little:
How to Make Speedfan Start with Windows 10
Use Windows Task Scheduler “taskschd.msc” to enable automatic startup. Here’s how:
- Go to start, type Run, alternatively press Windows+R
- Type shell:startup and press Enter
- Copy and then paste the shortcut of Speedfan in that folder
- Restart your PC, it should start once you’re in.
- To remove it from running at startup, just delete the shortcut.
Fix SpeedFan Not Working or Detecting Fans
Recently due to the release of modern CPUs and motherboards, SpeedFan reads CPU temp wrong or it simply won’t detect/show fans. To fix this problem you have to configure its settings a little or make sure that the motherboard is compatible.
Here is a complete guide if it’s not showing fans. The same driver not installed problem also occurs in Windows 10.
Is it Possible to Damage a Computer With a Utility Like SpeedFan?
Yes and No…!
Yes because if you don’t know what you are doing you may end up causing CPU fan error problems.
No, because if you simply saw some tutorial to use this utility then you won’t need to worry about any error =.
CPU Fan Speed Software Alternatives
If you are looking for programs like SpeedFan then you should try Argus monitor and MSI Afterburner. These are the best alternatives to control fan speed.
Rainmeter is another PC customization utility you can use to install SpeedFan skin and it will perform the same functions.
As for SpeedFan Vs Coretemp Vs HWMonitor VS Speccy, all other software either shows CPU temperature or a complete list of PC hardware but they don’t let you adjust the fan speed.
We conclude SpeedFan review on a line that if you want to control the CPU fan speed then give a try to this tool.
How to view the fan speed of windows 10
Contents
- How to set the Windows 10 cooling policy?
- What is the system cooling policy?
- Active Cooling Policy vs. Passive Cooling Policy?
- Active cooling
- Passive cooling
- When should I use an active or passive cooling policy?
- Activate active/passive cooling policy in Windows 10
- Add/Remove System Cooling Policy Settings in Windows 10
- Manual Fan Speed Control in Windows 10
- Fan Speed Control
- Automatic Cooler Speed Control to Reduce Noise
- Why Fans are Noisy and How to Fix It
- Cooler control program SpeedFan
- Program launch and appearance
- SpeedFan settings
- Additional parameters
- Control of the Windows 10
- Cooler Program
- Speedfan
- MSI AFTERBURNER
- AMD Radeon Software
- MSI DRAGON & Creator Center
- Best Coupler Coler BIOS
- Cooler management software
- SpeedFan
- MSI Afterburner
- AMD OverDrive
- Riva Tuner
- Conclusion
- Video
How to set up Windows 10 cooling policy?
Have you ever wondered why your system gets hot or why the fan starts running even when the processor is not loaded? This is due to the Microsoft system cooling policy modes introduced in Windows 8 and are now also available in Windows 10.
In this article, we will discuss what these cooling modes are and how you can optimize your system for better performance (especially battery usage). laptop) using these modes.
What is the system cooling policy?
The Windows 10 operating system can automatically detect changes in computer usage and environmental conditions. This only applies when you have a device with temperature control capabilities.
Once temperature changes are detected, Windows can automatically apply a custom cooling policy to the hardware, which will then make the appropriate changes to the system to bring the temperature down to a normal range.
Let’s take an example, the processor is the most heat-prone component of a computer. Each processor comes with minimum, optimum, and maximum operating temperature specifications. If you go outside these limits, your processor may be damaged. Thus, processor power management is very important for optimal performance of your system.
For modern Intel processors, the maximum operating temperature range is about 100 ° C. And the optimal range is below 80 €. If your CPU temperature exceeds 80°C, Windows will automatically activate the system cooling policy.
Active cooling policy vs. passive cooling policy?
By default, Windows 10 comes with two cooling policies:
Active cooling
An active cooling policy will turn on and speed up the system fan to cool the system temperature without impacting system performance. This, in turn, increases the power consumption of the system.
Passive Cooling
Passive cooling will reduce the power consumption of the system components, hence reducing the overall performance of the system. This in turn saves power but also reduces system performance.
When should an active or passive cooling policy be used?
Desktop PCs do not normally have a built-in battery. Therefore, they must be constantly connected to a power source. This means that power consumption is not an issue for desktop PCs. Therefore, we recommend that you keep the system cooling policy mode active for all desktop PCs.
If you are using a laptop and want to extend battery life, you must use an active cooling policy while the laptop is connected to a power source. And a passive cooling policy should be used when the laptop is running on battery power.
Activate active/passive cooling policy in Windows 10
Now let’s jump into the action part. The following steps will allow you to set the system cooling policy to active or passive. We will be using a laptop so we can set different policies for connected and battery settings.
This setting will optimize and prolong the battery life of your laptop. You can read more about Microsoft’s system cooling policy here.
Add/remove system cooling policy settings in Windows 10
In some cases, you won’t see the system cooling policy setting in Windows 10. Usually, Microsoft only allows pass-through cooling policy for mobile devices, but if you have a laptop and don’t see this option, you can add it with the command below:
Open a command prompt with administrative rights and run the following command:
And to remove this option, you can run the following command:
We hope this gives you a good idea of when and how to use system cooling policy settings in Windows 10. What is the default policy setting? What settings do you prefer for your system? Please share your thoughts in the comments below.
Source
Manual fan speed control in Windows 10
Almost all laptops and personal computers are equipped with built-in fans (coolers). Typically, the latter spin faster when you load the operating system, and then go to normal speed when the load is reduced. This happens all the time and automatically if your applications use more or less system resources.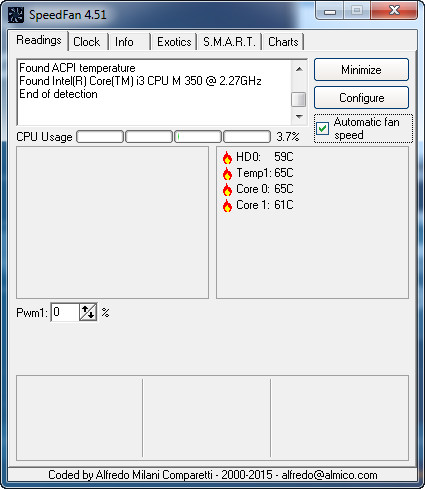 Manual fan speed adjustment is rarely required and is almost always undesirable. What to do if such a situation arises?
It’s very simple, you can use one of two applications specially designed to control the rotation speed of coolers. They are called «SpeedFan» and «HWiNFO».
Fan Speed Control
Fans know when to start spinning faster and when to slow down. They have built-in special sensors that periodically monitor the temperature of your system. When the temperature reaches a certain threshold, they begin to rotate to cool it down.
The body of the device (laptop, PC) is designed in such a way that the air will escape. It is very important that no one ever blocks the ventilation openings.
Temperature sensors, their management and limitations set for them, are not available to the user by default. This is because users cannot judge how hot the system components are and when it is time to start the fans spinning faster or slower. It’s a very delicate balance.
But if you, at your own risk, want to control the fan speed in Windows 10, then be aware that this can damage the hardware to the extent that it needs to be replaced with a new one or repaired. Therefore, be careful and think about it, do you really need to do this?
If so, we can recommend two applications for you and you should choose the one that can correctly identify your fans and allow you to change their rotation speed. Download the first — « SpeedFan » from this link:
as a 2.9 MB executable file. Install and run it. Click on the «Configuration» button, which is located in the main application window. Next go to the «Fan Control» tab, select the fan you want to control and use the histogram curve to adjust.
If «SpeedFan» fails to detect your fans, try another application — » HWiNFO «, download from:
install and run. In the main window, click on the «Sensors» button. A new window will open with an icon at the bottom. Click on it to open a new tab with a list of coolers. After that, manual 9 will become available to you.0153 fan speed control .
Finding a way to control the temperature of your CPU and graphics card is very important here. Once again, we warn you that manually adjusting the cooler rotation speed can directly have a negative impact on the components of your computer or laptop. Don’t use it unless absolutely necessary. Thank you for your attention!
Source
Automatic fan speed control to reduce noise
Sometimes the hum from the system unit does not allow you to enjoy the silence or concentrate. In this article I will tell you how to adjust the speed of coolers using a special program for Windows XP / 7/8/10, and at the end I will show the whole process in more detail on the video.
Why fans are noisy and what are the ways to fix it
With the exception of special fanless modifications, each computer has two or more coolers installed: in the power supply, on the processor, video card, in the case, and others. And everyone makes noise in their own way, and this is bad news. Many simply got used to the noise of their system unit and believe that it should be so. Maybe it should, but it doesn’t have to! AT 99% of the time, computer noise can be reduced by 10%-90%, which is good news.
As you have already understood, noiselessness is achieved by reducing the noise from the coolers. This is possible by using coolers that are quieter in nature, or by reducing the speed of existing ones. Naturally, you can reduce the speed to values \u200b\u200bthat do not threaten to overheat the computer! This article will focus on this method. Programs to reduce crackling from the hard drive will help to reduce noise even more.
So, to reduce the cooler rotation speed, you can use one of the options:
For those who have control from the BIOS normally, they can stop reading further. But often the BIOS only superficially regulates the speed, not lowering them to silent, and at the same time still acceptable, values. Utilities from the manufacturer are sometimes the only way to influence fans, because third-party programs often do not work on unusual motherboards and laptops. Let’s analyze the most optimal — the first method.
SpeedFan cooler control software
This is a multifunctional and completely free program. I’ll probably upset you a little right away, saying that this program does not work on all laptops, but you can try, and it will not regulate the speed of those fans that the motherboard cannot control from the BIOS. For example, from my BIOS it is possible to enable the SmartFan cooler control function for the CPU only. Although you can watch the current speed for two more. There is another program to control the laptop cooler.
Otherwise, the following situation may occur. At the time of loading the SpeedFan program, the current revolutions are read and taken as the maximum. Accordingly, if by this time the BIOS does not spin up the fan to maximum speed, then the program will not be able to do it either.
It once happened to me that at the time of loading the program, the cooler on the processor was spinning at a speed of 1100 rpm, and SpeedFan could not set a higher value. As a result, the processor heated up to 86 degrees! And I noticed this by chance, when at the time of heavy load I did not wait for the noise from the fan. Fortunately, nothing burned down, but the computer could no longer turn on …
Launch and appearance of the program
Download and install the application from the official website.
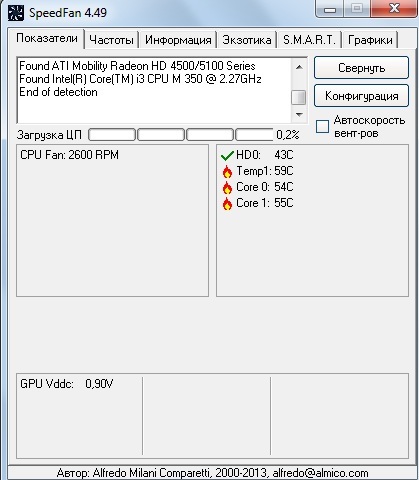
As you can see, it also shows the processor load and information from the voltage sensors.
Block «1» contains a list of detected cooler speed sensors with the names Fan1 , Fan2 …, and their number may be more than it actually is (as in the picture). We pay attention to the values, for example, Fan2 and the second Fan1 have real indicators of 2837 and 3358 RPM (revolutions per minute), and the rest are zero or with garbage (in the picture 12 RPM is garbage).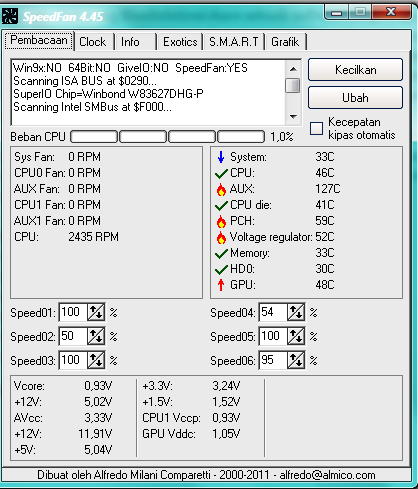 We’ll remove the rest later.
In block «2» the detected temperature sensors are shown. GPU is a graphics chipset, HD0 is a hard drive, CPU is a central processing unit (instead of a CPU in the Temp3 picture), and the rest is rubbish (cannot be 17 or 127 degrees). This is the disadvantage of the program, that you need to guess where everything is (but then we will rename the sensors ourselves as needed). True, on the site you can download known configurations, but the procedure is not simple and complicated in English.
If it is not clear which parameter is responsible for what, then you can look at the values in some other program to determine the parameters of the computer and sensors, for example AIDA64 and compare with those determined by the SpeedFan program in order to know exactly where the speed and temperature readings are (in the video under I will show everything in the article).
And in block «3» we have speed controls Speed01 , Speed02 . .., with which you can set the rotation speed in percent (it can be displayed as Pwm1, Pwm2 …, see the video for more details). For now, we need to determine which Speed01-06 affects which FanX. To do this, change the values of each from 100% to 80-50% and see if the speed of any Fan has changed. We remember which Speed influenced which Fan.
SpeedFan setting
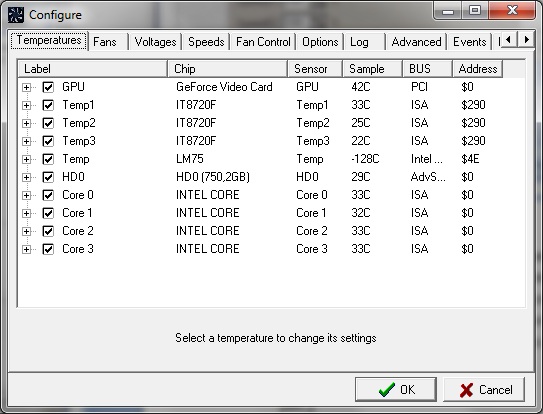
So we got to the settings. We press the “Configuration” button and first of all we will name all the sensors with understandable names. In my example, I will programmatically control the CPU cooler.
On the «Temperatures» tab, we find the processor temperature sensor defined in the previous step (I have Temp3) and click on it first once, and then again a second later — now you can enter any name, for example «CPU Temp». In the settings below, enter the desired temperature that the program will maintain with the minimum possible cooler rotation speed, and the alarm temperature at which the maximum rotation turns on.
I set 55 and 65 degrees respectively, but it’s different for everyone, experiment. At a very low set temperature, the fans will always spin at maximum speed.
Next, expand the branch and uncheck all the checkboxes, except for the Speed0X that regulates the processor’s FanX (we already determined this earlier). In my example, this is Speed04. And also uncheck all other temperatures that we do not want to see in the main program window.
On the fans tab, simply find the necessary fans, name them as you like, and turn off the unnecessary ones.
We go further to the «Speeds» tab. We get on the Speed0X that is responsible for the desired cooler, rename it (for example, to CPU Speed) and set the parameters:
I have a minimum of 55%, and a maximum of 80%. It’s okay that the program will not be able to set the value to 100%, because on the «Temperatures» tab, we set the alarm threshold at which 100% rpm will be forced. Also, for automatic adjustment, do not forget to check the box «Autochange».
Basically, that’s it. Now go to the main SpeedFan window and check the «Auto fan speed» checkbox and enjoy automatic rotation speed control ? The first time you can’t optimally set it up for yourself, experiment and leave the appropriate parameters, it’s worth it!
Additional parameters
Well, everything worked out, the program works, the speed is adjusted automatically? Or maybe you use other methods? I hope the information was useful to you. Do not be lazy to share it with your friends, I will be very grateful to you!
And now a video with detailed settings for SpeedFan. Note: There was a slight glitch in the video. After manually adjusting the fan of the Fan1 processor, its value did not return to 3400 RPM, but for some reason remained at 2200 RPM. After restarting the program everything went back to normal. In the latest versions of SpeedFan, this did not happen on my computer.
Source
Windows 10 computer cooler management
You can use third-party software to manage your computer cooler.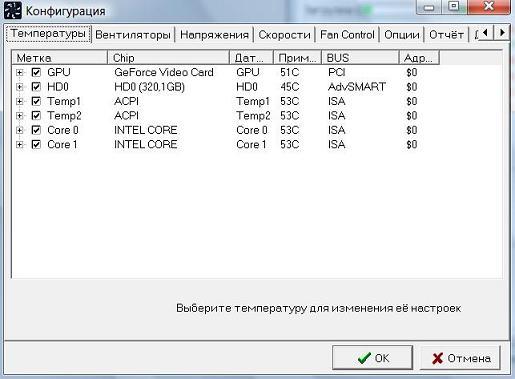 Under the cooler, they mean a combination of a fan with a radiator installed to cool components (at least a processor and a video card).
This article will tell you how to manage your computer’s coolers in Windows 10. We will use only the best programs to adjust the fan speed. Some software allows you to adjust the speed of all coolers, and others only for a separate video card or processor.
Programs for adjusting the speed of coolers
Depending on the operating temperatures, you can change the speed of coolers (meaning each of the fans). You can choose the program to your taste for adjustment. You should not add little-known inconvenient utilities to the list. Although everything is in taste and color.
Manufacturers now release their own software for management. For example, AMD Ryzen Master or Intel Extreme Tuning Utility. Or MSI Dragon Center, Gigabyte Aorus Engine, Smart Fan 5 and Sapphire TriXX. It is with its help that you can easily adjust the speed of coolers (fans).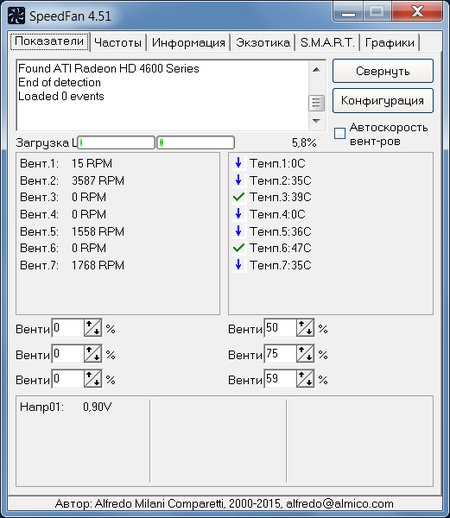
SpeedFan
The program displays all fans connected to the motherboard. You can change the speed of the CPU/GPU cooler and case fans. Displays the temperature of the components from the sensors and, if necessary, allows you to control them.
The free SpeedFan application is available for use. Navigate to Configure > Options and in Language change the interface language to Russian . Now you can change the cooler speed in section Indicators or set your own value in percentage.
Using SpeedFan, you can view data from component sensors and adjust cooler rotation speeds for yourself. It all depends on room temperature and your computer. The application automatically detects all information about your hardware.
MSI Afterburner
This software is used to tune the performance of the graphics card. With it, you can fine-tune the speed of the fans. Find the parameter Fan Speed (%) and disable the auto mode with the button Auto . Now you can manually set the desired value.
Go to Settings > Cooler and check Enable software user auto mode . Select multiple cooler speeds and temperatures. Fine tuning consists in manual correction of the temperature graph.
AMD Radeon Software
Updated AMD Radeon Software Adrenalin 2020 Edition drivers deserve attention from users. Of course, it only works with red brand graphics cards. Their software replaces many third-party programs (recording, monitoring and overclocking).
Go to Performance > Setup. Now change parameter Configuration management to Manual . Next, turn on the fan settings. With advanced control selected, adjust ratio Fan speeds / Temperatures .
MSI Dragon & Creator Center
All self-respecting manufacturers release software to manage their components. Motherboards, graphics cards and even laptops get the opportunity to use MSI Dragon Center. With it, you can already adjust the performance of the system as a whole.
Open User Scenario > User Mode. Select e.g. System fan and enter the value Manual control or set the schedule Automatic fan control . Depending on the version of software and hardware, the interface is different.
Indeed, there are few normal programs for adjusting the speed of coolers. Old and poorly proven utilities are even worth considering. For example, even now SpeedFan is the leader, although it has not been updated for a long time. See how to use SpeedFan 4.52.
Most applications use a percentage scale for setting speeds or a graph for speed versus temperature. The user specifies a specific speed value when a certain temperature is reached. Also take a look at proprietary software.
Source
The best programs for adjusting the speed of the cooler
A prolonged load on the computer threatens to overheat the fan. The problem is especially acute in the hot season. An overheated cooler slows down the computer, and sometimes this is fraught with constant independent shutdowns. Whether you work or play, in any case, it causes discomfort, and there are worries about your PC.
Fortunately, there are several ways to control fans. The initial settings allow the cooling system to work at half its capacity. To solve the problem of overheating, you need to change the settings of the cooling system.
Ways to control fans
Personal computers of the latest models have three built-in coolers — for the processor, video card and hard drive. Older laptops and PCs are forced to work with a single fan. You can increase the strength of the cooling device by increasing the strength of the cooler.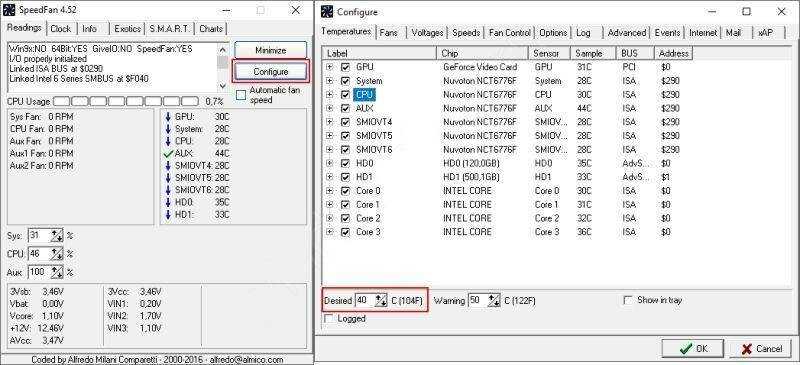
There are two ways to solve the fan overheating problem:
Before you can start using one of the methods, you need to prepare the computer first. To do this, open the lid of the laptop or system unit and gently clean the fan between the blades, then all the elements of the motherboard. Make sure the device is not clogged with dust.
Mechanical pollution of the computer worsens the process of heat transfer, which automatically increases the heating temperature of the device. If you can’t clean your laptop or PC from dust on your own, contact the service.
BIOS setting
The efficiency of the cooling system can be improved using BIOS settings. Most laptops come with a feature that controls the cooling process. We raise the power of the cooler as follows:
Finally, restart your computer and test it under load.
Cooler management software
Users who find it inconvenient to work with the BIOS or do not have time to understand it, have the opportunity to use an alternative method. There are special programs for controlling fans. We will present four best softwares: SpeedFan, MSI Afterburner, AMD OverDrive, Riva Tuner.
SpeedFan
The utility, which has earned a good reputation among PC users, helps to overclock the cooler, test the processor and hard drive under load. The program is free and has a simple and intuitive interface. Checking the fan speed at high temperatures is as follows:
In addition, if desired, go to the “Speeds” parameter and change the speed of the cooler blades. There are upper and lower bounds for indicating speed.
MSI Afterburner
Free overclocking software from MSI. Represents a lot of functionality for testing the state of the board, the voltage on the GPU. Includes cooler adjustment function. Suitable for Intel and AMD.
Basic settings are on the main screen. Move the sliders in the desired direction, and adjust the parameters yourself. To control the cooling system, the speed is changed in the «Fan Speed» section. The «Auto» button automatically changes the speed of rotation, depending on the load of the computer.
AMD OverDrive
A feature rich program that manages coolers. The fan speed is adjusted in several steps:
The set parameters must be saved so that they do not disappear after the computer is restarted. To do this, starting from the main screen of the program, move through the following tabs:
Click «OK» and close the program.
Riva Tuner
Suitable for all versions of Windows to control the operation of the cooler. The utility is easy to use and free of charge. Follow a few simple steps to change fan settings:
After the changes, click «OK» and exit.
Adjust the cooler speed based on the state of your computer. Maintain the optimum temperature by changing the program.
Conclusion
Changing the speed of the cooler is easy. We have listed several reliable ways to solve this problem.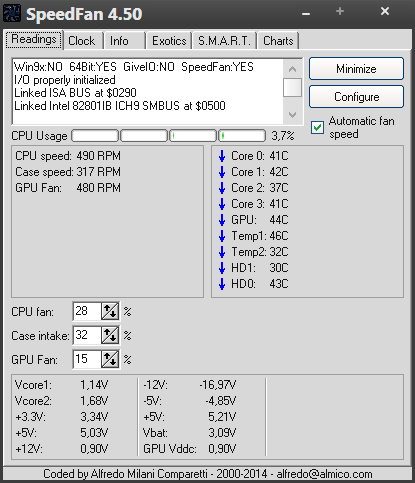 Keep in mind that the fan will run louder if you increase its power. Therefore, be guided by the situation. Use these programs by following the instructions.
Source
Video
How to control fan speed in SpeedFan. Detailed instructions
How to increase/decrease the rotation speed of coolers | How to change the speed of coolers
CPU cooler rotation speed
How to overclock a laptop cooler?
Installing and configuring SpeedFan Temperature control
Reducing the speed of the CPU cooler in the BIOS
Adjusting the ROTATION speed for ANY FANS
How to increase the speed of the cooler on a laptop? EASILY!
Setting the fan speed in MSI Afterburner
Adjusting the CPU cooler
Fan speed in Russian — Assembly-Revision
you. It allows you to control fans based on the temperature of any component (not just your CPU), and allows you to do all this from one window, which is very convenient. because if you are not careful there is a chance to damage your equipment (even though it is small).
Also, keep in mind that SpeedFan does not support all models of computers, which means that not everyone will be able to control the operation of the fans of this program. But if it suits you, it will be very useful.
To find out if the program can work on your computer, you can analyze the list of supported chipsets here — www.almico.com/forummotherboards.php, or just install it and try it. In some cases, the motherboard may not be listed and SpeedFan will still work fine.
If SpeedFan isn’t compatible with your computer, don’t worry, you’re not the only one.
Speedfan — how to use the program
First acquaintance with the SpeedFan program
Download the speedfan program from our website and install it (program installation instructions). Run it, and after the program scans your computer for a few seconds, you will see the main window.
On the left, you’ll see a column that shows how fast your fans are running — revolutions per minute (RPM).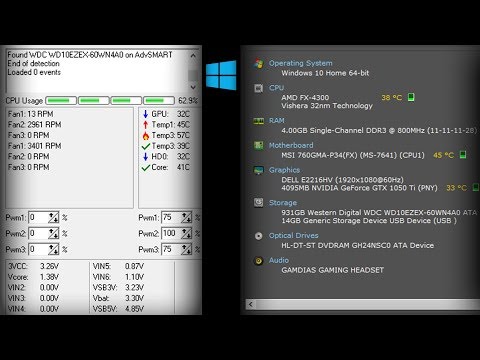 On the right, you’ll see a list of temperatures for your graphics card, motherboard chipset, hard drives, CPU, and more.
SpeedFan, unfortunately, does not always mark the displayed data well. For example, in the screenshot, you may have noticed that some sensors are simply called «Temp1», «Temp2» and «Temp3» — in the figure, these were the motherboard and system temperatures. HD is the name of the hard drives, and ”Core” is the CPU cores.
Also note that not all of your sensors may be visible in the main SpeedFan window. If you press the «configure» button and go to the «temperature» tab, you will see a complete list. If you’re not sure which sensor is which, you can try downloading the optional HWMonitor program and comparing its values with the speedfan values to see what’s what.
You can rename any sensor from this window, which is useful if something doesn’t match what you see in the HWMonitor program. You can also drag and drop the metrics to change their order, and these changes will appear in the main SpeedFan window after you click OK.
Looking at the information that this tab gives you, you will notice that some of the values are absurd — as in the case of Temp2, Remote 1, and Remote 2 temperatures, which show a temperature of -111 degrees Celsius.
It is immediately clear that these are not correct values, and usually means that such a sensor simply does not exist on your equipment. Therefore, it is better not to display such indicators on the main window of the program; for this, it is better to uncheck the box to hide them.
You can also uncheck other stats that you don’t need to display in the main SpeedFan window. The figure shows that the temperature information of all processor cores is disabled except for one — Core 5, which is currently the hottest.
In general, GPU, HD and CPU (or “processor core”) temperatures are the main temperatures that most users need.
You can put an icon in the system tray that will monitor the temperature of your system, which is useful when configuring the SpeedFan program. You can configure this icon in the SpeedFan configuration under the options tab.
SpeedFan fan control test
Let’s start experimenting with some fan controls. Click the «Configure» button — configure and go to the «Advanced» tab — in addition. Click on the «Chip» dropdown and select your motherboard’s chipset from the list. Find the ”PWM Mode” items in the properties list and make sure they are all set to “MANUAL” — manual control. Change the values if necessary — using the drop-down list at the bottom of the «set to» window — set to.
Note: You may have multiple «Chip» items in the top menu, so check them all.
Before further work, go to the «Options» tab — parameters and check the box «Set fans to 100% on program exit» — set the fans to 100% when exiting the program. This ensures that if you accidentally log out of SpeedFan, it will stop automatically adjusting your fans — and they will start running at normal 100% mode, this will ensure that they do not stay at a low speed and prevent your computer from overheating.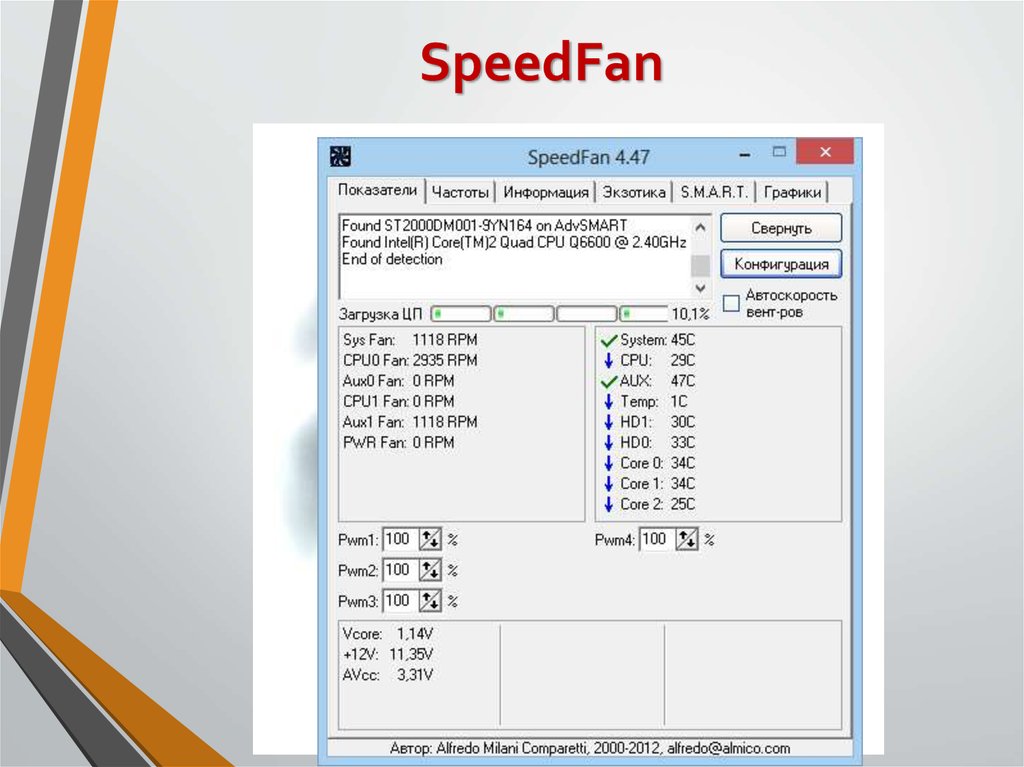
Now click the OK button to return to the main window of the SpeedFan program. Use the arrow buttons to raise or lower the speed of your first fan — Pwm1 in the picture. To understand which fan is being controlled, you can open the lid of your computer to see it visually.
If, for example, you found out that the first fan is a processor fan, it is most convenient to give it an appropriate name. So, on the “fans” tab of the configuration window, according to our example, you need to rename Fan1 to “CPU Fan”. You can also go to the «Speeds» tab — speeds and rename «Pwm1» to «CPU Fan». To rename an element, simply select it and press F2. When you click the OK button, the changes will take effect and propagate to the main interface of SpeedFan, as shown in the figure below.
Similarly, you can rename other fan names, this will make the program more informative and understandable for you.
Configuring Automatic Fan Control
Okay, now that we’ve sorted out all of our sensors and fans and named them appropriately, it’s time to set up automatic fan control.
Press the configure button to return to the configuration menu. The bulk of what we need is in the temperature tab. We are going to set the operating modes of certain fans depending on the temperature of the sensors — in other words, we will speed them up or slow down, focusing on temperature indicators.
So, for example, we can set our CPU fan to speed up when our CPU heats up, thus helping it cool down. You can also set the operating modes of the system unit fans (if you have them), — when the hard drive heats up, the fan speed increases, and vice versa.
On the temperature tab, click the plus sign next to the sensor name to see all the fans it can control. Check if they are present and working in manual mode. In our example, we will be setting up the sensor — «Core 5» — which shows the highest temperature — 41 degrees Celsius.
Then select the sensor itself — in the example it is “Core 5” — additional settings will appear at the bottom of the window: “Desired” — desired and “Warning” — warning.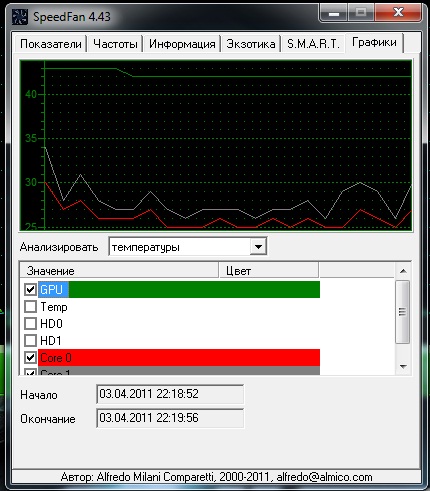 «Desired» temperature — at which the fans will start to react. «Warning» — determines at what temperature SpeedFan will warn you that a component is getting excessively hot (a small flame icon will appear next to the temperature) and the fans will start running at 100% mode.
In our example, we took a computer with an overclocked processor, so the temperatures here will be slightly higher than in a regular PC. We set the SpeedFan response at 55 degrees and the warning at 80. Your values may differ from those indicated — it all depends on the specific processor, fan and of course your preferences.
When finished with the settings, press the OK button and repeat this process for the rest of the sensors you want to automate.
In the next step, you need to go to the “speeds” tab and select the desired fan. Additional settings will appear at the bottom of the window: “minimum value” and “maximum value”. They indicate in which mode the fans operate before the “Desired” temperature (minimum value) and after the “Desired” temperature (maximum value).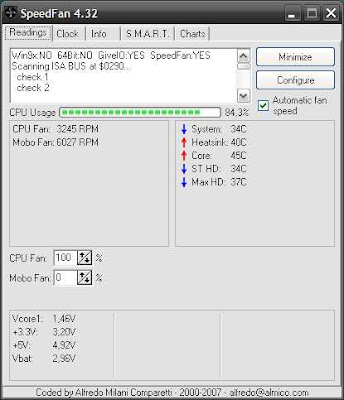
If the temperature reaches «Warning» — a warning, as already mentioned, the fans will work with 100% efficiency.
Also check the «Automatically Variated» checkbox and repeat the above steps for all of your fans affected by the sensor.
When finished, click OK.
If you have a large radiator and it can cope with cooling without the help of a fan, then 15% at a minimum should be enough for it. For standard sizes of radiators, this is not enough, so the percentage should be higher — here you need to look at your equipment or analyze the temperature behavior.
Finally, in the main window of the SpeedFan program, check the «Auto fan speed» box.
Now you need to monitor the operation of the fans — they react as you specified in the settings or not. There are times when the program manages them not quite correctly, so everything needs to be checked and checked at first.
Note: If you enter too low values for «desired temperature» or «minimum speed», you may find yourself in a situation where your fan speed changes too often — once a minute or two.
This is not correct, and dangerous for your computer, and also annoying — therefore, you better play around with the settings of the SpeedFan program and find a more suitable option.
Screenshots of the SpeedFan program
Program main window:
Program frequencies tab:
Program info tab:
Program Exotic tab:
S.M.A.R.T. tab:
SpeedFan graphics tab:
SpeedFan setting Video programs
| Windows |
| 32 bit, 64 bit, x32, x64 |
| computer |
| Russian |
| 2019 |
| Free |
| Alfredo Milani Comparetti |
www. almico.com almico.com |
|
|
|
| Version | Platform | Language | Size | Format | Loading | |
|---|---|---|---|---|---|---|
| SpeedFan | Windows | English | 3.1MB | .exe | ||
| Speedfan 4.52 RUS | Windows | Russian | 3.0MB | .exe | ||
| * free download SpeedFan for Windows , file verified! | ||||||
SpeedFan (Speedfan) — a utility with which you can adjust the speed of rotation of computer coolers.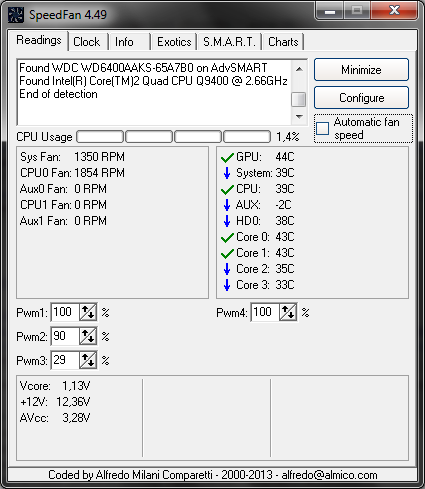 Adjustment can be done both manually and automatically. In addition, SpeedFan is able to read and display the indicators of the sensors of the video card, motherboard and hard drives. The program works with hard drives via SATA, EIDE, SCSI interfaces, but is poorly compatible with IDE/SATA RAID.
Basic functionality
All of the listed SpeedFan features require hardware support at the level of the computer’s stuffing. Program features:
- Support for SMART technologies;
- Display graphs with changes in temperature, voltage or fan speed;
- Logging with detailed statistics of parameters taken;
- Changing the system bus frequencies, provided that the program supports the frequency generator installed on the motherboard;
- Testing hard drives using S.M.A.R.T technology according to the online database;
- Display information about the battery, RAM status, processor load and other system data.
It is possible to set the actions to be performed on a specific event. For example, when the maximum temperature set by the user is exceeded, the utility can send an e-mail message, launch third-party software on its own, or warn with a sound signal. SpeedFan is widely used to test PC hardware, as well as to reduce noise by lowering the speed of coolers when performing tasks that do not require large amounts of power.
The program has a multilingual interface, including Russian. The latest version to date, 4.52, was released in 2016.
SpeedFan is a powerful software for monitoring and controlling the fan speed of your computer. With Speedfan you can easily overclock your PC. “Overclocking” a PC may be necessary to run certain applications and games.
While the description of speedfan sounds like it’s a very simple utility, it has a fairly complex user interface that hasn’t changed much since its inception. Since Speedfan is not designed for any specific motherboard or line of motherboards, by default the program is very limited in its functionality. For beginners, this can be intimidating. Download Speedfan from the link below and read our guide on how to use Speedfan properly, where we have listed the main features and how to use them effectively. Hopefully with Speedfan you get rid of the noise from your coolers and save yourself money by not buying quieter fans or a dedicated fan controller.
Warning.
Speedfan is for the advanced user who knows what he is doing. Setting the fan speed too slowly can cause overheating and possibly critical damage to your hardware. Please exercise caution when using SpeedFan.
Features of the latest version of Speedfan
After you download Spedfan, install and run the program, you will see a very frightening program window with its number of settings. Understanding this, the developers have implemented tooltips in Speedfan that are more annoying than helpful. I recommend turning them off by checking the box, as indicated in the screenshot below.
The main interface of SpeedFan is confusing with the abundance of various numbers, data, buttons, etc. , but once you understand a little, you will get a very powerful tool for overclocking your PC and troubleshooting. SpeedFan offers even more functionality and options than your PC’s BIOS.
In recent versions, the developer has tried to implement some user interface elements in Speedfan, namely charts, graphs and counters, etc. However, this did not change the situation much, and the utility still continues to load the user with a large amount of data.
Advanced users can download SpeedFan and use it in combination with third party programs like Prime95 to stress test PC builds. This pair of utilities is currently the best complex for testing the performance of your PC.
SpeedFan is useful for both beginners and experts. Beginners can use the program to check the health of their PC and monitor the speed of their fans (especially useful on a laptop), while more advanced users can take advantage of the troubleshooting and performance monitoring aspects that SpeedFan provides.
Downloading the latest version of SpeedFan is essential for anyone who is serious about the performance and stability of their PC.
Benefits
- Improved DELL support.
- Support V >The biggest drawback, as mentioned above, is the very complicated interface of Speedfan. Of course, it is unlikely that the users of Speedfan will be pensioners far from computer literacy. But the interface could be more friendly.
However, today Speedfan is and remains the best software for monitoring the temperature of the internal components of your computer and overclocking its performance.
You can download Speedfan in Russian from the official site at the following link:
How to adjust the speed of the cooler in a laptop. How to adjust the rotation speed of computer coolers
Comments:
The speed of a modern computer is achieved at a fairly high price — the power supply, processor, video card often need intensive cooling.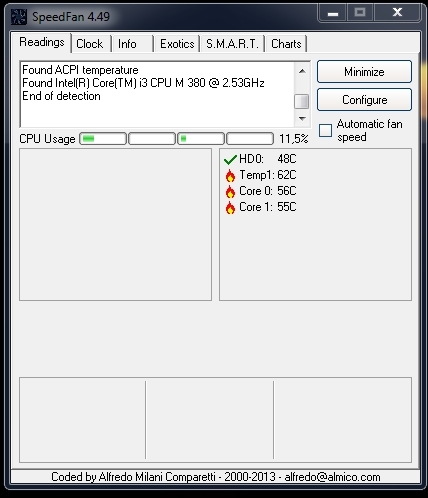 Specialized cooling systems are expensive, so a home computer usually has several case fans and coolers (radiators with fans attached to them).
The result is an efficient and inexpensive, but often noisy, cooling system. To reduce the noise level (while maintaining efficiency), a fan speed control system is needed.
Various kinds of exotic cooling systems will not be considered. It is necessary to consider the most common air cooling systems.
To reduce fan noise without compromising cooling efficiency, it is advisable to adhere to the following principles:
- Large diameter fans work more efficiently than small ones.
- The maximum cooling efficiency is observed in coolers with heat pipes.
- Four-pin fans are preferred over three-pin ones.
There can only be two main reasons for excessive fan noise:
- Bad bearing lubrication. Eliminated by cleaning and new grease.
- The motor is rotating too fast.
 If it is possible to reduce this speed while maintaining an acceptable level of cooling intensity, then this should be done. The most accessible and cheap ways to control the speed of rotation are discussed below.
Fan speed control methods
Back to index
The first way: Switching the fan control function in the BIOS
The Q-Fan control, Smart fan control, etc. functions supported by some motherboards increase the fan speed when the load increases and decrease it when it falls. It is necessary to pay attention to the method of such fan speed control using the Q-Fan control as an example. It is necessary to perform a sequence of actions:
- Enter BIOS. Most often, this is done by pressing the «Delete» key before booting the computer. If you are prompted to press another key at the bottom of the screen instead of «Press Del to enter Setup» before booting, do so.
- Open the «Power» section.
- Go to the line «Hardware Monitor».

- Replace the value of the CPU Q-Fan control and Chassis Q-Fan Control functions on the right side of the screen with «Enabled».
- In the CPU and Chassis Fan Profile lines that appear, select one of three performance levels: enhanced (Perfomans), quiet (Silent) and optimal (Optimal).
- Press the F10 key to save the selected setting.
Back to index
Second way: fan speed control by switching
Figure 1. Voltage distribution on the contacts.
For most fans, the nominal voltage is 12 V. When this voltage decreases, the number of revolutions per unit time decreases — the fan rotates more slowly and makes less noise. You can take advantage of this circumstance by switching the fan to several voltage ratings using an ordinary Molex connector.
The voltage distribution on the pins of this connector is shown in fig. 1a. It turns out that three different voltages can be taken from it: 5 V, 7 V and 12 V.
To ensure this method of changing the fan speed, you need:
- After opening the case of a de-energized computer, remove the fan connector from its socket.
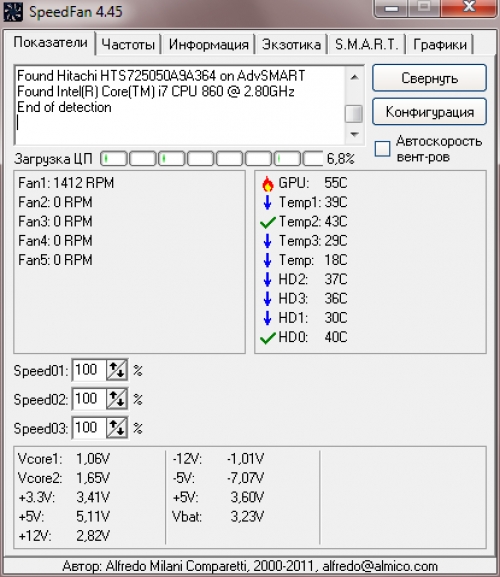 The wires leading to the power supply fan are easier to unsolder from the board or just have a snack.
 - Using a needle or an awl, release the corresponding legs (most often the red wire is a plus, and the black wire is a minus) from the connector.
- Connect the fan wires to the Molex connector pins to the required voltage (see Fig. 1b).
A motor with a rated rotation speed of 2000 rpm at a voltage of 7 V will give 1300 revolutions per minute, at a voltage of 5 V — 900 revolutions. An engine with a nominal value of 3500 rpm — 2200 and 1600 rpm, respectively.
Figure 2. Scheme of serial connection of two identical fans.
A special case of this method is the serial connection of two identical fans with three-pin connectors. Each of them has half the operating voltage, and both rotate more slowly and make less noise.
A diagram of such a connection is shown in fig. 2. The left fan connector is connected to the motherboard as usual.
A jumper is installed on the right connector, which is fixed with electrical tape or tape.
Back to index
The third way: adjusting the fan speed by changing the supply current
To limit the fan speed, you can connect fixed or variable resistors in series to the fan power circuit. The latter also allow you to smoothly change the speed of rotation. Choosing such a design, one should not forget about its disadvantages:
- Resistors heat up, wasting electricity and contributing to the heating process of the entire structure.
- The characteristics of the electric motor in different modes can be very different, each of them requires resistors with different parameters.
- The power dissipation of the resistors must be large enough.
Figure 3. Electronic speed control circuit.
It is more rational to use an electronic speed control circuit. Its simple version is shown in Fig. 3. This circuit is a stabilizer with the ability to adjust the output voltage. A voltage of 12 V is applied to the input of the DA1 microcircuit (KR142EN5A). A signal from its output is supplied to the 8-amplified output by the transistor VT1. The level of this signal can be adjusted by a variable resistor R2. As R1, it is better to use a tuning resistor.
If the load current is not more than 0.2 A (one fan), the KR142EN5A chip can be used without a heat sink. If it is present, the output current can reach a value of 3 A. At the input of the circuit, it is desirable to include a small ceramic capacitor.
Back to index
The fourth way: adjusting the fan speed using the reobas
Reobas is an electronic device that allows you to smoothly change the voltage supplied to the fans.
As a result, the speed of their rotation smoothly changes. The easiest way is to buy a ready-made reobas. It usually fits into a 5.25″ bay. There is only one drawback: the device is expensive.
The devices described in the previous section are in fact reobasses that only allow manual control. In addition, if a resistor is used as a regulator, the motor may not start, since the current is limited at the time of starting. Ideally, a full-fledged reobas should provide:
- Trouble-free starting of engines.
- Rotor speed control not only in manual but also in automatic mode. As the temperature of the cooled device increases, the rotation speed should increase and vice versa.
A relatively simple circuit that meets these conditions is shown in fig. 4. Having the appropriate skills, it is possible to make it yourself.
Changing the supply voltage of the fans is carried out in a pulsed mode. Switching is carried out using powerful field-effect transistors, the channel resistance of which in the open state is close to zero. Therefore, the engine starts without difficulty. The highest speed will also not be limited.
The proposed scheme works like this: at the initial moment, the cooler that cools the processor runs at the minimum speed, and when heated to a certain maximum allowable temperature, it switches to the maximum cooling mode. When the processor temperature drops, the reobas switches the cooler back to the minimum speed. The rest of the fans support the manually set mode.
Figure 4. Scheme of adjustment using reobas.
The basis of the node that controls the operation of computer fans, integrated timer DA3 and field effect transistor VT3. Based on the timer, a pulse generator with a pulse repetition rate of 10-15 Hz was assembled. The duty cycle of these pulses can be changed using the trimmer resistor R5, which is part of the timing RC circuit R5-C2. Thanks to this, it is possible to smoothly change the speed of rotation of the fans while maintaining the required amount of current at the time of start-up.
Capacitor C6 performs pulse smoothing, so that the rotors of the motors turn softly and without making clicks. These fans are connected to the XP2 output.
A similar CPU cooler control unit is based on the DA2 chip and the VT2 field effect transistor. The only difference is that when a voltage appears at the output of the operational amplifier DA1, it, thanks to the diodes VD5 and VD6, is superimposed on the output voltage of the DA2 timer. As a result, VT2 opens completely and the cooler fan starts to rotate as fast as possible.
If you are interested in the question of how to adjust the cooler speed in the BIOS, then modern BIOSes offer a whole range of various options that allow you to optimize the speed parameters of the fans operating inside the system unit.
The question of how to adjust the required cooler rotation speed is far from being an idle one — after all, a processor cooler, or rather, a fan included in the cooler, consumes quite a lot of energy; in addition, its rotation creates a constant noise.
The noise produced by the cooler sometimes does not matter much when the computer is running intensively. For example, against the background of sound effects that accompany many computer games, the noise of the cooler is unlikely to be noticeable. However, during those periods when the processor is not busy with intensive work, the noise of the processor cooler, most likely, will only annoy the user.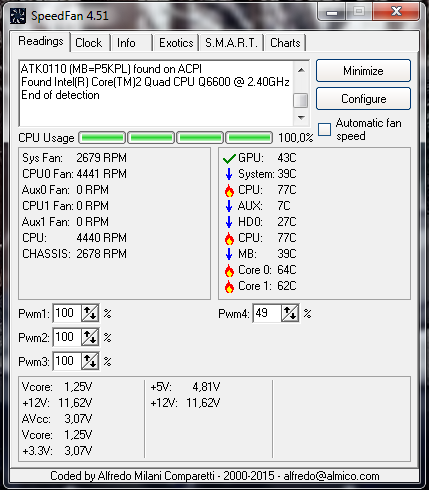 Other fans located in the system unit also make noise, for example, the fan located on the back of the system unit, or the fan that cools the motherboard chipset.
Many coolers have a feature that allows you to slow down their rotation during those periods when the processor is not too busy. Thus, at these times, the cooler will make little or no noise at all. Such coolers are called «smart» and today they have practically replaced old-style coolers, which had no rotation speed control.
BIOS options to adjust cooler speed
The user has the ability to change the operation parameters of «smart» coolers both programmatically from the operating system and BIOS. In particular, there are several BIOS options related to setting the cooler rotation speed. Typically, these options can be found in the BIOS section dedicated to setting up devices that ensure the normal functioning of a personal computer or in the section where the hardware monitoring functions are located.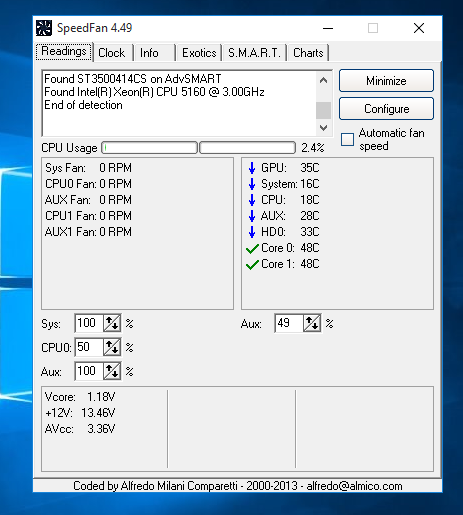 For example, in the BIOS from Phoenix-Award, a similar section is called PC Health Status, and in the BIOS from AMI — Hardware Monitor.
The Smart Fan Control option, like other similar options, is designed to enable support for intelligent fan speed control. In this mode, the fan speed will depend on the CPU load.
Many users, especially those who overclock the central processor, are also interested in the question of how to increase the speed of the cooler in the BIOS. The method of this process depends on each specific BIOS type. It is far from always possible to set the rotation speed in the BIOS directly. However, such options do exist. For example, the CPU Fan Control option allows the user to enter a fan speed value as a percentage of its maximum possible fan speed. An alternative option for the user in this option is to enable the intelligent capabilities of the cooler, allowing the operating system to independently determine its speed depending on the processor load.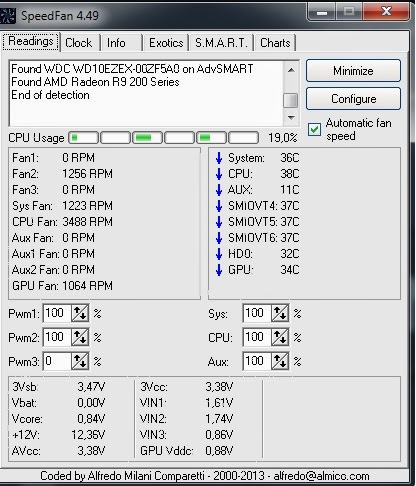
Some BIOS options, an example of which is the Fan Profile, allow you to set a specific fan mode. In these options, Performance or Turbo mode means that the cooler will always operate at full capacity, cooling the processor even if it is not particularly necessary. The Standard mode assumes that the fan operates at a load level designed for an average noise level. The Silent mode allows you to prioritize the way the fan works that produces the least noise.
Also, many BIOSes have options that allow you to set the dependence of the fan speed on the processor temperature. An example of such an option is the Smart CPU Fan Target. In it, the user can select the desired value for the processor temperature that the fan will strive to maintain.
In addition, there are a number of options that allow you to set the temperature at which the fan will turn on or run at maximum speed. Examples of such options are CPU Fan Start Temperature and Full Speed Temperature.
Many BIOSes also have options that allow you to configure not only the processor fan rotation settings, but also the settings of other fans located in the system unit, for example, a fan on the case panel, a chipset fan, etc.
Conclusion
Modern cooling units have a wide range of options for adjusting the optimal way they work, including adjusting the speed of the fan included in their composition. In the process of setting them up, the built-in BIOS tools can help the user. The BIOS of any personal computer, as a rule, offers several options for configuring «smart» coolers, allowing you to select a specific fan profile or set the fan speed to depend on the temperature of the central processor.
SpeedFan is a utility that will describe in detail the state of your PC or laptop. In particular, the application can give you information in real time. Statistical information is given for all parameters vital for a computer: power supply mode, processor and video card temperature, cooler rotation speed, RAM load, and many other data).
In addition to all the above parameters, the SpeedFan program will detect if there are errors in your system, which it will try to fix if possible (for example, it will increase the speed of the cooler to lower the processor temperature).
Well, the main feature of the SpeedFan utility, you guessed it, is the ability to both reduce and increase the speed of the cooler on a laptop or PC, which will undoubtedly please those users who believe that their fans do not cool the system very well — in this case, it is better to increase the speed of their rotation.
When you start the program, the first thing that will open is the “indicators” tab. It will collect and display all the basic information about your system. In the arsenal of the Speedfan program there is a warning algorithm that signals if the equipment is operating outside the normal temperature range of the processor, overheating has been detected, or, on the contrary, a sharp cooling has been noticed.
Such events are marked on the monitor screen with a special label, in the form of a light, which should draw the user’s attention if the equipment operates in non-standard temperature conditions.
But you should not be wary of such alerts, since the equipment tends to heat up, and the SpeedFan program will emphasize the changes that have occurred even with a deviation from the norm of one degree.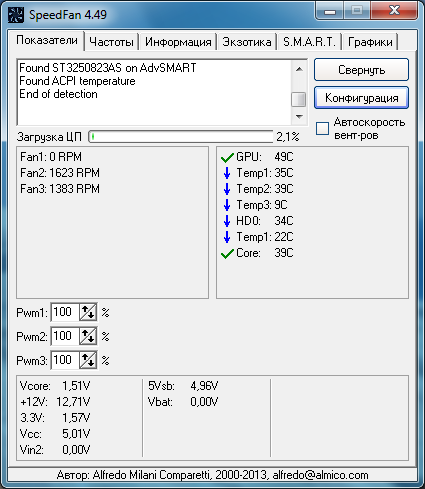
In such cases, look in the passport of your device and find what temperature is considered normal for the processor in order to be completely calm and not worry when the normal temperature of the processor changes.
If you wish to analyze the condition of your hard drive, then for this purpose SpeedFan has a diagnostic function using the S.M.A.R.T technology. This type of test has 2 operating modes — extended and short. Upon completion of the hard drive diagnostic process, a corresponding column with errors (if any) will appear, which are displayed in the form of icons: green, orange and the “STOP” icon with white bricks.
What each label means is clear on an intuitive level — the first is all good, the second is working at the limit and the third label indicates the presence of malfunctions.
The SpeedFan program (SpeedFan) can be downloaded in Russian for free, the only thing you have to do is switch the language from English, it is Russian, if English is set by default.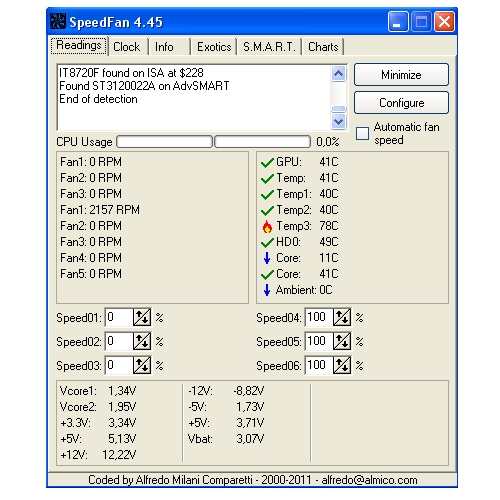
The main purpose of the free program SpeedFan is that the utility monitors the cooling of the system in detail, and this program is used in cases where there are serious suspicions about overheating of the chips. In any case, if it detects overheating problems, it will try to increase the speed of the cooler on a laptop or PC.
The cooler is an important element of the cooling system of the system unit, preventing overheating of the main components. However, sometimes the fan runs too hard, making unnecessary noise. Let’s see how to change the fan speed using the Speedfan software.
and built-in BIOS
to adjust the amount of noise produced.
Using SpeedFan
Cooler Speed Adjustment Program SpeedFan
is the most famous utility with which users control the operation of the fan. It is distributed under a free license, moreover, it has a Russian-language interface, which can be enabled in the “Options” section.
«.
Important! In order for you to control the cooler, it must be connected to the motherboard via 3-pin
connector. If you have several fans, and they are powered directly from the power supply, then you must switch them, otherwise you will not be able to increase the speed of the cooler or reduce it.
The utility provides many functions for managing computer components, but we will focus specifically on working with the cooler:
- Pay attention to the item “CPU
0Fan
” — it reflects the rotation speed of the processor cooler. - At the bottom you see several fields with percentages. You need to find the field that is responsible for the cooler. This is done as follows: you alternately change the value of each of the fields to 50-70% and see when in the “CPU
0Fan
» RPM starts to drop. - Using the found field, reduce the rotation speed so that the cooler starts to work more quietly. Do not forget ; if the fan does not cool the chip enough, it will overheat.
Similarly, you can adjust the speed of all coolers connected to the motherboard.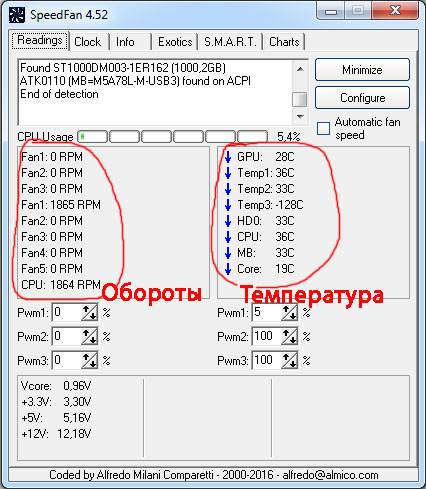 You can use a more flexible setting option and specify not a specific value, but a range of fan speed.
Blade speed should decrease, cooler noise should decrease. Do not forget to monitor the temperature of the processor in the line «CPU
«. If it exceeds 70 degrees, run the cooler at full power.
Using BIOS Tools
The fan speed can be adjusted without the use of special utilities. All the tools necessary to perform this action are in the basic I / O system; to use them, you just need to know how to set the speed of the cooler in BIOS.
This method may seem difficult for novice users who have never worked with the BIOS
. Therefore, if you are not sure of your knowledge, it is better to choose Speedfan
.
Changing the speed of the cooler is done by activating certain functions in the BIOS
and setting temperature thresholds at which the fan starts or stops (if possible).
The main disadvantage of this method is the need to activate several utilities, the name and number of which varies depending on the BIOS version
, motherboard model and processor generation.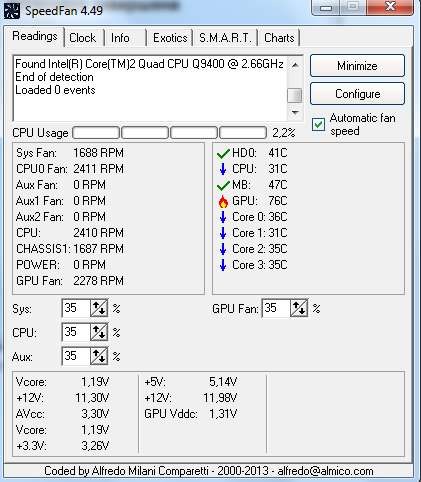 For example, for an Intel chip
Core
you need to activate the AI Quiet and Intel SpeedStep utilities, which automatically reduce the fan speed when the processor temperature is low.
Another difficulty is that all parameters have to be configured manually, plus sometimes it is necessary to change them on the fly if the operating conditions of the computer become different. You will have to re-adjust the settings every time, turning on / off the utilities, so to solve the question of how to adjust the speed of the cooler, it is better to choose the SpeedFan utility.
.
Sometimes the hum from the system unit does not allow you to enjoy the silence or concentrate. In this article I will tell you how to adjust the speed of coolers using a special program for Windows XP / 7/8/10, and at the end I will show the whole process in more detail on the video.
Why fans are noisy and what are the ways to fix it
With the exception of special fanless modifications, every computer has: in the power supply, on the processor, video card, in the case and others.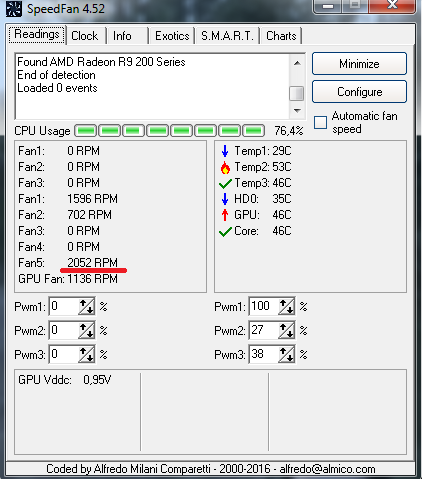 And everyone makes noise in their own way, and this is bad news. Many simply got used to the noise of their system unit and believe that it should be so. Maybe it should, but it doesn’t have to! In 99% of cases, computer noise can be reduced by 10%-90%, which is good news.
As you have already understood, noiselessness is achieved by reducing the noise from the coolers. This is possible by using coolers that are quieter in nature, or by reducing the speed of existing ones. Naturally, you can reduce the speed to non-threatening values! This article will focus on this method. Programs for .
So, to reduce the cooler rotation speed, you can use one of the options:
- Cooler rotation speed control program
- «Intelligent» speed control system, wired into the BIOS
- Utilities from the manufacturer of the motherboard, laptop or video card
- Use a special device — reobas
- Artificially lower the fan supply voltage
For those who manage normally from the BIOS, they may not read further.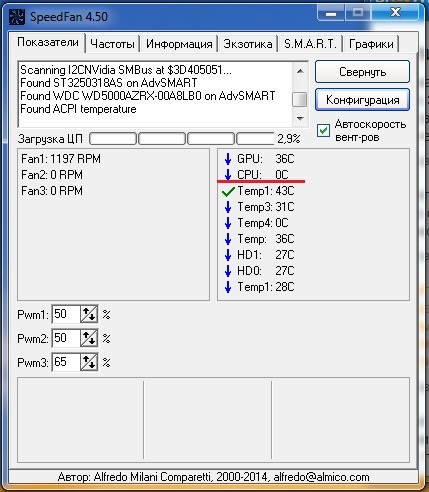 But often the BIOS only superficially regulates the speed, not lowering them to silent, and at the same time still acceptable, values. Utilities from the manufacturer are sometimes the only way to influence fans, because third-party programs often do not work on unusual motherboards and laptops. Let’s analyze the most optimal — the first method.
SpeedFan cooler control software
This is a multifunctional and completely free program. I’ll probably upset you a little right away, saying that this program does not work on all laptops, but you can try, and it will not regulate the speed of those fans that the motherboard cannot control from the BIOS. For example, from my BIOS it is possible to enable the SmartFan cooler control function for the CPU only. Although you can watch the current speed for two more.
Attention: Disable cooler control from BIOS before using the program!
Otherwise, the following situation may occur. At the time of loading the SpeedFan program, the current revolutions are read and taken as the maximum. Accordingly, if by this time the BIOS does not spin up the fan to maximum speed, then the program will not be able to do it either.
It once happened to me that at the time of loading the program, the cooler on the processor was spinning at a speed of 1100 rpm, and SpeedFan could not set a higher value. As a result, the processor heated up to 86 degrees! And I noticed this by chance, when at the time of heavy load I did not wait for the noise from the fan. Fortunately, nothing burned down, but the computer could
Launch and appearance of the program
Download and install the application from the official website.
At the first start, a regular window will appear offering help on program functions. You can check the box so that it does not appear again and close it. Next, SpeedFan reads the parameters of the microcircuits on the motherboard and the values of the sensors. A sign of success will be a list with the current fan speeds and component temperatures.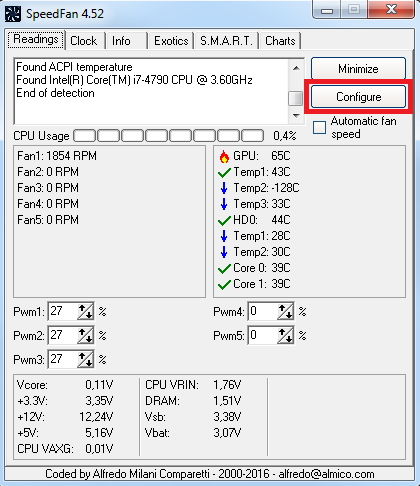 If the fans are not detected, then the program will not be able to help you. Immediately go to «Configure -> Options» and change the language to «Russian».
As you can see, it also shows the processor load and information from the voltage sensors.
In block «1»
there is a list of detected cooler rotation speed sensors with names Fan1
, Fan2
…, and their number may be more than it actually is (as in the picture). We pay attention to the values, for example, Fan2 and the second Fan1 have real indicators of 2837 and 3358 RPM (revolutions per minute), and the rest are zero or with garbage (in the picture 12 RPM is garbage). We’ll remove the rest later.
In block «2»
the detected temperature sensors are displayed. GPU
is a graphics chipset, HD0
— hard disk, CPU
is the central processor (instead of the CPU in the Temp3 picture), and the rest is rubbish (cannot be 17 or 127 degrees). This is the disadvantage of the program, that you need to guess where everything is (but then we will rename the sensors ourselves as needed).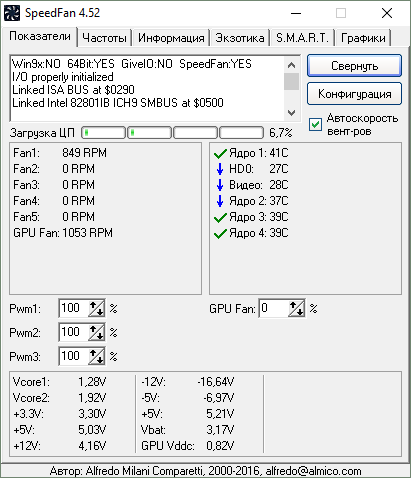 True, on the site you can download known configurations, but the procedure is not simple and complicated in English.
If it is not clear which parameter is responsible for what, then you can look at the values in some other program to determine the parameters of the computer and sensors, for example, and compare with those determined by the SpeedFan program in order to know exactly where the speed and temperature readings are (in the video under I will show everything in the article).
And in block «3»
we have speed control Speed01
, Speed02
…, with which you can set the rotation speed in percent (it can be displayed as Pwm1, Pwm2 …, see the video for more details). For now, we need to determine which Speed01-06 affects which FanX. To do this, change the values of each from 100% to 80-50% and see if the speed of any Fan has changed. We remember which Speed influenced which Fan.
I repeat that not all fans will be regulated, but only those that the motherboard can control from the BIOS.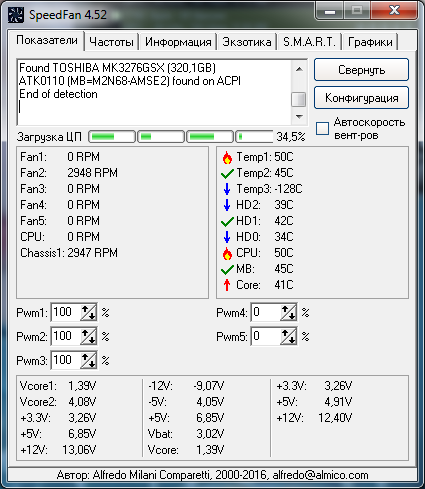
SpeedFan setting
So we got to the settings. We press the “Configuration” button and first of all we will name all the sensors with understandable names. In my example, I will programmatically control the CPU cooler.
On the «Temperatures» tab, we find the processor temperature sensor defined in the previous step (I have Temp3) and click on it first once, and then again a second later — now you can enter any name, for example «CPU Temp». In the settings below, enter the desired temperature that the program will maintain with the minimum possible cooler rotation speed, and the alarm temperature at which the maximum rotation turns on.
I set 55 and 65 degrees respectively, but it’s different for everyone, experiment. At a very low set temperature, the fans will always spin at maximum speed.
Next, expand the branch and uncheck all the checkboxes, except for the Speed0X that regulates the processor’s FanX (we already determined this earlier).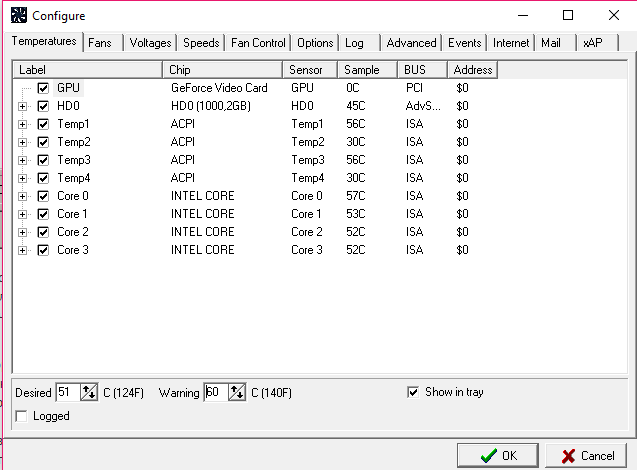 In my example, this is Speed04. And also uncheck all other temperatures that we do not want to see in the main program window.
On the fans tab, simply find the necessary fans, name them as you like, and turn off the unnecessary ones.
- Minimum — the minimum percentage of the maximum rpm that the program can set
- Maximum — respectively, the maximum percentage.
My minimum is 55% and the maximum is 80%. It’s okay that the program will not be able to set the value to 100%, because on the «Temperatures» tab, we set the alarm threshold at which 100% rpm will be forced. Also, for automatic adjustment, do not forget to check the box «Autochange».
Basically, that’s it. Now go to the main SpeedFan window and check the «Auto fan speed» checkbox and enjoy the automatic adjustment of the rotation speed. From the first time you will not be able to optimally configure it for yourself, experiment and leave the appropriate parameters, it’s worth it!
Additional parameters
The SpeedFan program has a bunch of other functions and parameters, but I won’t go into them, because. this is the topic of a separate article. Let’s put a few more necessary checkboxes on the «Configuration -> Options» tab
- Launch collapsed
— so that SpeedFan starts immediately in minimized form. If not set, then when Windows starts, the main program window will hang on the desktop. If the program does not start with Windows, then simply add its shortcut to startup. - Static icon
— I prefer to set the system tray to display just the program icon instead of numbers - Collapse when closed
— set so that when you click on the «cross» the program does not close, but minimizes to the system tray (near the watch) - Fans full speed at exit
— if not set, then after exiting the program, the cooler speed will remain in the state it was in at the time of closing. And since there will be no one else to manage them, the computer may overheat.
And now a video with detailed settings for SpeedFan. Note:
There was a slight glitch in the video. After manually adjusting the fan of the Fan1 processor, its value did not return to 3400 RPM, but for some reason remained at 2200 RPM. After restarting the program everything went back to normal. In the latest versions of SpeedFan, this did not happen on my computer.
Elderberry jam: benefits and harms
Find out if we will meet. Dream interpretation of the house of the sun. How to correctly formulate a question in the process of divination
Program for controlling coolers in a computer ?
Sometimes the hum from the system unit does not allow you to enjoy silence or concentrate. In this article I will tell you how to adjust the speed of coolers using a special program for Windows XP / 7/8/10, and at the end I will show the whole process in more detail on the video.
Contents
Why fans are noisy and what are the ways to fix it
With the exception of special fanless modifications, each computer has two or more coolers installed: in the power supply, on the processor, video card, in the case, and others.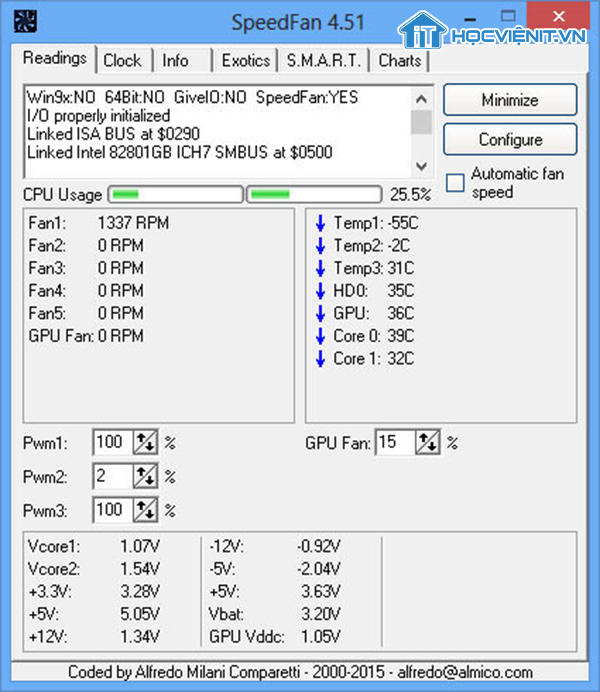 And everyone makes noise in their own way, and this is bad news. Many simply got used to the noise of their system unit and believe that it should be so. Maybe it should, but it doesn’t have to! In 99% of cases, computer noise can be reduced by 10%-90%, which is good news.
As you already understood, noiselessness is achieved by reducing the noise from the coolers. This is possible by using coolers that are quieter in nature, or by reducing the speed of existing ones. Naturally, you can reduce the speed to values \u200b\u200bthat do not threaten to overheat the computer! This article will focus on this method. Programs to reduce crackling from the hard drive will help to reduce noise even more.
So, to reduce the cooler rotation speed, you can use one of the options:
- Cooler speed control software
- «Intelligent» speed control system, wired into the BIOS
- Utilities from the manufacturer of the motherboard, laptop or video card
- Use a special device — reobas
- Artificially lower the fan supply voltage
For those who manage normally from the BIOS, they may not read further.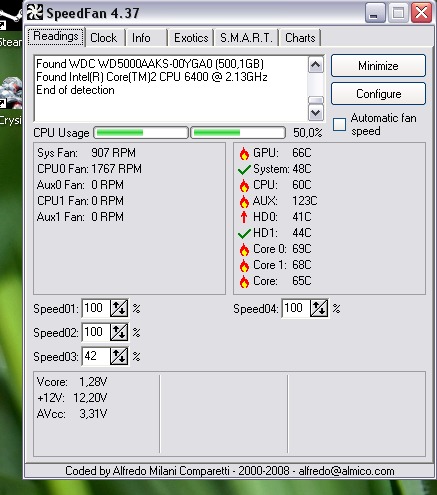 But often the BIOS only superficially regulates the speed, not lowering them to silent, and at the same time still acceptable, values. Utilities from the manufacturer are sometimes the only way to influence fans, because third-party programs often do not work on unusual motherboards and laptops. Let’s analyze the most optimal — the first method.
SpeedFan cooler control software
This is a multifunctional and completely free program. I’ll probably upset you a little right away, saying that this program does not work on all laptops, but you can try, and it will not regulate the speed of those fans that the motherboard cannot control from the BIOS. For example, from my BIOS it is possible to enable the SmartFan cooler control function for the CPU only. Although you can watch the current speed for two more. There is another program to control the laptop cooler.
Attention: Disable cooler control from BIOS before using the program!
Otherwise, the following situation may occur. At the time of loading the SpeedFan program, the current revolutions are read and taken as the maximum. Accordingly, if by this time the BIOS does not spin up the fan to maximum speed, then the program will not be able to do it either.
It once happened to me that at the time of loading the program, the cooler on the processor was spinning at a speed of 1100 rpm, and SpeedFan could not set a higher value. As a result, the processor heated up to 86 degrees! And I noticed this by chance, when at the time of heavy load I did not wait for the noise from the fan. Fortunately, nothing burned down, but the computer could no longer turn on …
Launch and appearance of the program
Download and install the application from the official website.
Download SpeedFan
At the first start, a regular window will appear offering help on the program’s functions. You can check the box so that it does not appear again and close it. Next, SpeedFan reads the parameters of the microcircuits on the motherboard and the values of the sensors.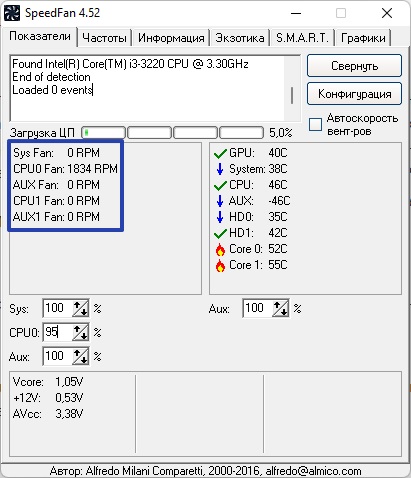 A sign of success will be a list with the current fan speeds and component temperatures. If the fans are not detected, then the program will not be able to help you. Immediately go to «Configure -> Options» and change the language to «Russian».
As you can see, it also shows the processor load and information from the voltage sensors.
Block «1» contains a list of detected cooler speed sensors with the names Fan1 , Fan2 …, and their number may be more than it actually is (as in the picture). We pay attention to the values, for example, Fan2 and the second Fan1 have real indicators of 2837 and 3358 RPM (revolutions per minute), and the rest are zero or with garbage (in the picture 12 RPM is garbage). We’ll remove the rest later.
In block «2» the detected temperature sensors are shown. GPU is a graphics chipset, HD0 is a hard drive, CPU is a central processing unit (instead of a CPU in the Temp3 picture), and the rest is rubbish (cannot be 17 or 127 degrees).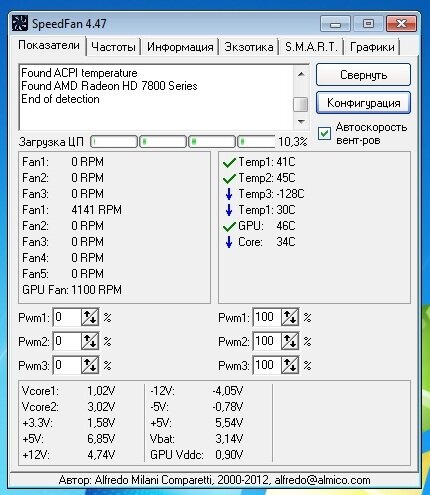 This is the disadvantage of the program, that you need to guess where everything is (but then we will rename the sensors ourselves as needed). True, on the site you can download known configurations, but the procedure is not simple and complicated in English.
If it is not clear which parameter is responsible for what, then you can look at the values in some other program to determine the parameters of the computer and sensors, for example AIDA64 and compare with those determined by the SpeedFan program in order to know exactly where the speed and temperature readings are (in the video under I will show everything in the article).
And in block «3» we have speed controls Speed01 , Speed02 …, with which you can set the rotation speed in percent (it can be displayed as Pwm1, Pwm2 …, see the video for more details). For now, we need to determine which Speed01-06 affects which FanX. To do this, change the values of each from 100% to 80-50% and see if the speed of any Fan has changed. We remember which Speed influenced which Fan.
I repeat that not all fans will be regulated, but only those that the motherboard can control from the BIOS.
SpeedFan setting
So we got to the settings. We press the “Configuration” button and first of all we will name all the sensors with understandable names. In my example, I will programmatically control the CPU cooler.
On the «Temperatures» tab, we find the processor temperature sensor defined in the previous step (I have Temp3) and click on it first once, and then again a second later — now you can enter any name, for example «CPU Temp». In the settings below, enter the desired temperature that the program will maintain with the minimum possible cooler rotation speed, and the alarm temperature at which the maximum rotation turns on.
I set 55 and 65 degrees respectively, but it’s different for everyone, experiment. At a very low set temperature, the fans will always spin at maximum speed.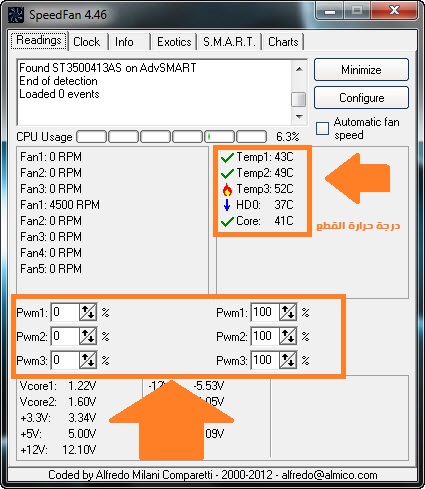
Next, expand the branch and uncheck all the checkboxes, except for the Speed0X that regulates the processor’s FanX (we already determined this earlier). In my example, this is Speed04. And also uncheck all other temperatures that we do not want to see in the main program window.
On the fans tab, simply find the necessary fans, name them as you like, and turn off the unnecessary ones.
We go further to the «Speeds» tab. We get on the Speed0X that is responsible for the desired cooler, rename it (for example, to CPU Speed) and set the parameters:
- Minimum — the minimum percentage of the maximum speed that the program can set
- Maximum — respectively, the maximum percentage.
My minimum is 55% and the maximum is 80%. It’s okay that the program will not be able to set the value to 100%, because on the «Temperatures» tab, we set the alarm threshold at which 100% rpm will be forced. Also, for automatic adjustment, do not forget to check the box «Autochange».
Basically, that’s it. Now go to the main SpeedFan window and check the «Auto fan speed» checkbox and enjoy automatic rotation speed control ? The first time you can’t optimally set it up for yourself, experiment and leave the appropriate parameters, it’s worth it!
Additional parameters
The SpeedFan program has a bunch of other functions and parameters, but I won’t go into them, because. this is the topic of a separate article. Let’s put a few more necessary checkboxes on the «Configuration -> Options» tab
- Minimized launch – to start SpeedFan immediately in minimized form. If not set, then when Windows starts, the main program window will hang on the desktop. If the program does not start with Windows, then simply add its shortcut to startup.
- Static icon — I prefer to set the system tray to display just the program icon instead of numbers
- Minimize on close — set so that when you click on the «cross» the program does not close, but minimizes to the system tray (near the clock)
- Full fan speed at exit – if not set, then after exiting the program, the cooler speed will remain in the state it was in at the time of closing.
 And since there will be no one else to manage them, the computer may overheat.
Well, how did everything work out, the program works, the speed is automatically adjusted? Or maybe you use other methods? I hope the information was useful to you. Do not be lazy to share it with your friends, I will be very grateful to you!
And now a video with detailed settings for SpeedFan. Note: There was a slight glitch in the video. After manually adjusting the fan of the Fan1 processor, its value did not return to 3400 RPM, but for some reason remained at 2200 RPM. After restarting the program everything went back to normal. In the latest versions of SpeedFan, this did not happen on my computer.
Watch this video on YouTube
A program to reduce the cooler speed on the processor. Controlling the Linux Cooler
Today we are going to talk about coolers. The term «cooler» was formed by transcribing the English word «cooler», which means «cooler». In simple terms, a cooler is an ordinary fan used to cool the central processor, video card, power supply and other heating elements of the computer.
The cooler has one unpleasant side — they make noise during their operation. And the more coolers are involved in your PC, the more noise they make. In this article, we will look at how you can simply and effectively reduce the noise produced by a fan.
Why coolers are noisy
Apart from special fanless modifications, each computer is equipped with two or more coolers. As mentioned earlier, this can be a cooler on the processor, on the graphics accelerator, in the power supply, as well as fans installed on the side and rear walls of the system unit case. And each of the listed fans creates a separate noise, and together it sometimes turns into a rather unpleasant hum. Some PC users have simply gotten used to this noise in their system unit and do not pay attention to it, believing that such a hum is in the order of things and nothing can be fixed. But there is good news! AT 9In 8% of cases, the noise from the operation of fans in the computer can be reduced by at least 10%, and as a maximum — by all 90%.
As you may have guessed, the noise level in a working fan depends mainly on its speed. As the rotation speed decreases, the noise of the cooler also decreases. Luckily for us, there are wonderful programs with which you can easily control coolers by changing their speed. Of course, you can also reduce fan noise by replacing it with a more expensive and quiet analog. However, not always such a replacement will give the expected effect, proportional to the funds spent. Therefore, we will consider a less radical way to reduce noise, which is a program for adjusting the speed of the cooler. Naturally, reducing the number of fan revolutions has its limit, which does not threaten the computer overheating. And if the adjustment is made incorrectly, then problems can arise. We will try to explain everything in as much detail as possible, so that you have absolutely no problems when changing your settings.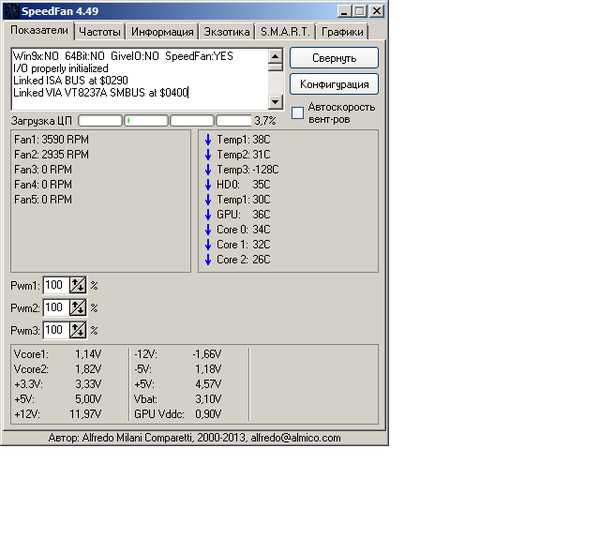
For the sake of completeness, it’s worth mentioning that in addition to programmatically changing the cooler speed, there are several other ways to reduce the fan speed: the cooler speed control system, which is programmed into the BIOS; the use of a special device — reobas; artificial lowering of the cooler supply voltage.
If the BIOS controls work well in your computer, then you can skip this article further. But, as practice shows, very often the BIOS regulates the cooler speed only superficially. Understatement occurs with a large margin of safety, which, unfortunately, is not always justified and does not lead to a decrease in fan noise.
Now let’s try to define reobas. What is it and what does it serve? Most often, a reobas is a device that is mounted in a 5.25” or 3.5” computer bay. It serves to manually adjust the rotational speed of coolers in the system unit.
Sometimes there are reobas models made for a PCI slot or even made in the form of a regular adapter for a cooler power cable. A similar device has one or several controls on the front panel at once, with the help of which the fan speed is adjusted. When choosing a reobas, first of all, you need to pay attention to the presence of a sufficient number of adjustment channels. In simple words, you need to buy a reobas that can adjust the speed of all the fans in the system. Also, when choosing a reobass, it makes sense to pay attention to the length of the wires, so that it would be enough to connect all the coolers. Additionally, you need to clarify the possibility of connecting the reobass to the FAN connector on the motherboard, which is necessary to display changes in the fan speed in the operating system. Of course, this option may not be needed if the selected reobas has an LCD display, which will display the temperature from the sensors and the rotational speed of the coolers. But any reobas costs money, and not everyone has a free amount of money that can be spent on such a little thing, far from being essential.
 Therefore, to save your money, consider a program that serves to reduce the number of cooler revolutions — SpeedFan.
SpeedFan cooler control software
SpeedFan is a multifunctional and completely free program. SpeedFan is able to control the speed of the cooler in automatic mode. You will immediately have to upset you a little that this program is not able to work on all modern laptops, but this fact can be verified only by running these utilities. In addition, the SpeedFan program is able to regulate the rotation speed of only those fans that can be controlled by the motherboard from under the BIOS. For example, in the case we are considering, from the BIOS you can enable cooler control exclusively for the central processor. But at the same time, you can view the current rotation speed of two more fans. Now the most important thing, before you start using the SpeedFan program, you must definitely disable the cooler control in the BIOS of your computer! If this is not done, then the work of coolers may go according to the following scheme.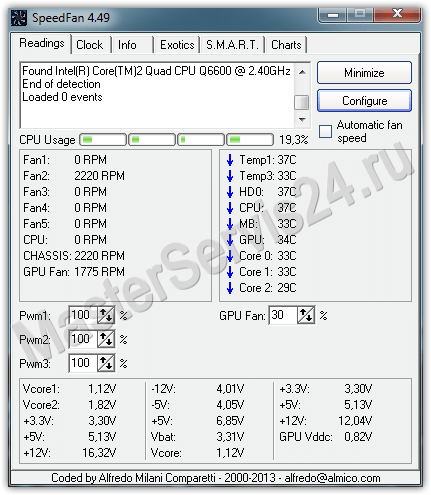 When the SpeedFan program is loaded, it reads the current cooler revolutions, which it takes as the maximum values. Therefore, if by the time the program is launched, the BIOS cannot spin up the fans to the maximum speed, then the program will not do it either. Let’s assume the following situation: by the time the program was launched, the fan on the central processor was rotating at a speed of 1100 rpm, SpeedFan, taking this rotation speed as the maximum, could not increase it when the processor warmed up further. As a result, the processor will continue to heat up to a critical temperature, and if its automatic overheating protection does not work, it may fail without having time to turn off. An experienced user, of course, will be able to catch this moment, noting that with an increase in the load on the processor (let’s say the launch of a game), the fan did not increase its speed (read, the noise it produces increased), but such a risk is not justified. Therefore, we remind you once again that before starting the SpeedFan program, be sure to disable the regulation of the speed of rotation of coolers in the BIOS.
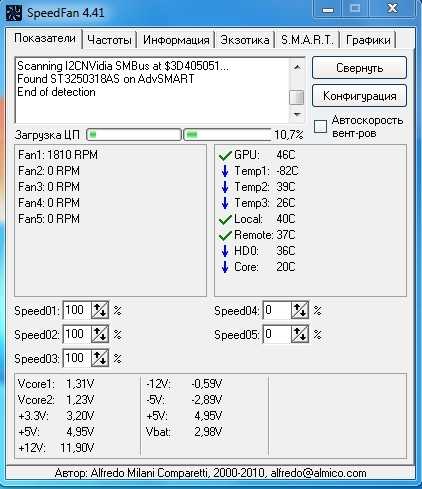
During the first launch of the SpeedFan program, a window will appear on the monitor screen offering a description of the program’s functionality. Here you can check the box and close it, so that the next time you start this message is not displayed on the screen. After that, the program will read the parameters of the microcircuits of the motherboard and the value of the temperature sensors. As a result of the successful completion of this task, you should see a window with a list of the current fan speeds, as well as the temperature of the sensors on the monitored PC components. After that, you need to go to the «Configure -> Options» menu and change the language to «Russian».
As you can see in the screenshot, the window also displays the processor load level and voltage information.
Block “1” lists detected fan speed sensors called Fan1, Fan2, etc. At the same time, the number of sensors in the list may exceed the one that actually exists. Pay your attention to the values, for example, line 2 — Fan2 and line 4 — Fan1, they have real numbers of 2837 and 3358 revolutions per minute (RPM). But the rest of the indicators are either equal to zero, like the value of Fan3, or the value called «garbage» is indicated (in the picture this is the value indicated in the first line). We will remove the extra lines later.
Block «2» indicates the temperature sensors that are detected in the system. GPU is the chipset of the video card, HD0 is the hard disk temperature sensor, CPU is the sensor on the central processing unit (instead of the CPU in the Temp3 picture). The rest of the readings are garbage (the temperature of the sensors cannot be 17 or 127 degrees in the working system). This is the main drawback of the program, that it is necessary to guess which value corresponds to which component of the system block. For the sake of truth, it is worth mentioning that on the official website you can choose the necessary configuration from the known ones, but this procedure is not easy, besides, all descriptions are available only in English.
If you have difficulty identifying the sensors, you can use another utility that serves to get the parameters of the system as a whole, for example AIDA64. And after running this utility, it will be easy for you to compare its performance with the SpeedFan parameters, thereby determining which temperature and speed indicator refers to which component of the system unit.
Block «3» contains speed controls Speed01, Speed02, etc. With these adjustments, you can set the rotation speed in percentage (sometimes they can be labeled as Pwm1, Pwm2, etc.). At this stage, we are interested in one question: which of the six Speed01..06 indicators is responsible for which Fan1..6. To determine this, you need to alternately change the value of each Speed from 100% to 85-50% and observe what speed of a particular Fan has changed. Thus, having run through all the lines of Speed, remember which of them corresponds to which line of Fan. We repeat once again that only those fans that the motherboard can control from the BIOS will be regulated.
Fan assembly
SpeedFan Settings
Now let’s move on to the program settings.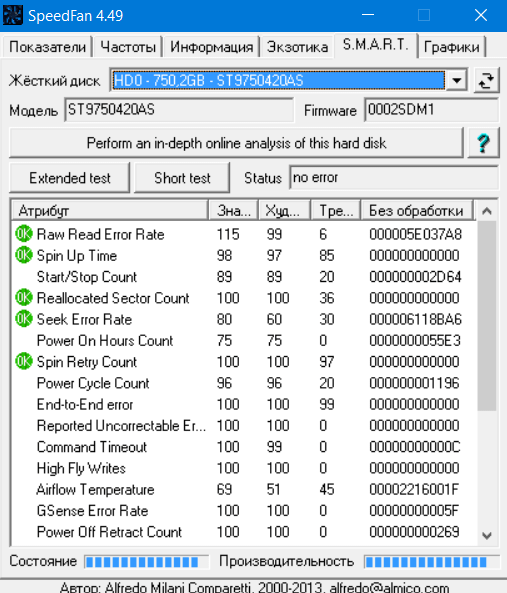 To do this, go to the «Configuration» menu and rename all sensors with names that you understand, so that in the future you no longer get confused about which value refers to which component. In our example, we will programmatically control the rotation speed of the cooler on the central processor.
Go to the “Temperatures” tab and find the temperature sensor on the processor that you defined a little earlier (in our example, it is Temp3) and click on it first once, and then a second later again, after which you can enter absolutely any name you like, for example «CPU Temp». Then, in the settings field below, enter the value of the desired temperature that will be maintained by the program at the minimum possible rotation speed of the selected cooler, and also indicate the “alarm” temperature at which the maximum fan speed will be turned on on the selected device.
In our case, the desired temperature is 40 degrees and the alarm temperature is 50 degrees Celsius.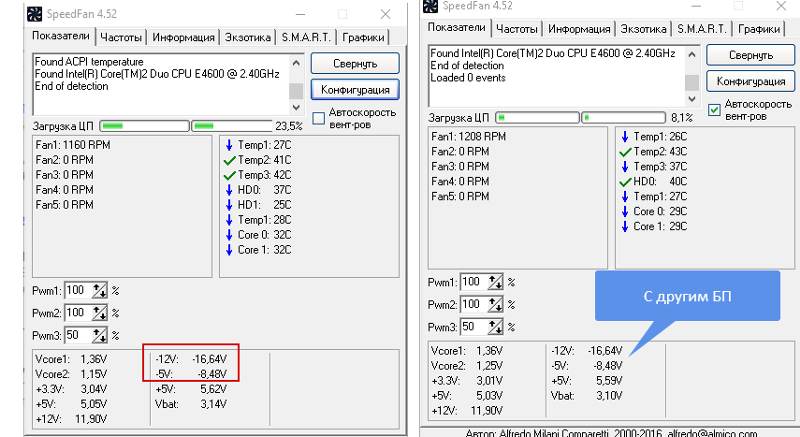 Naturally, for each case, this temperature will be different, so the optimal ratio can only be selected by experimentation.
After that, you need to expand the branch and uncheck all the checkboxes, except for the Speed, which adjusts the Fan speed corresponding to your cooler. In our example, this is Speed04. Next, uncheck the boxes next to the remaining temperatures that you do not want to be displayed in the main SpeedFan window.
On the «Fans» tab, find the necessary coolers, rename them according to their purpose, and disable the rest.
Fans
After that go to the “Speeds” tab. Go to the Speed line that is responsible for the desired fan, rename it (in our example, it is CPU Speed) and set the necessary parameters: minimum — the minimum percentage of the maximum cooler speed that can be set by the program; maximum – percentage of the maximum cooler speed. In our case, the minimum is set to 55%, and the maximum is set to 80%. It is not surprising that the cooler control program cannot set a value equal to 100%, because in the “Temperatures” tab we have already set the “alarm” value, upon reaching which the cooler speed will be forcibly set to 100%. Also, in order for the regulation to take place in automatic mode, do not forget to check the «Autochange» checkbox.
Auto change
This completes the settings, you can go to the main program window and check the «Auto fan speed» checkbox. After that, the cooler speed will be adjusted automatically. Of course, setting the optimal fan speed settings the first time will not work, so you will have to experiment a little.
SpeedFan additional parameters
The SpeedFan program has a whole bunch of additional functions and parameters with which it can control the speed of each individual cooler. It makes no sense to consider all of them, since it may take even a single page, we will describe only a few that are most useful from our point of view.
Go back to the «Configuration -> Options» tab. After that, check the «Run minimized» checkbox. It is necessary, as the name implies, in order for SpeedFan to start when Windows boots in minimized mode. If this checkbox is not checked, then after the operating system boots, the main window will be displayed on the desktop. It should be noted that if the program does not start automatically, then its shortcut should be added to the startup folder.
The next checkbox to be set is called «Static icon». You need to activate this option so that the program is displayed in the system tray as a simple icon, and not as numbers. But this, as they say, is a matter of taste.
The “Minimize on close” checkbox should be set so that after clicking on the “red X” the program does not close, but simply minimizes to the system tray.
The “Full fan speed at exit” checkbox is set so that after closing the program (exiting it), the fan speed is set to the maximum. If this item is not activated, then after closing the program, the turnover will remain at the level corresponding to the moment of closing. And this, with an increase in the load on the processor, is fraught with its overheating, since nothing controls the processor cooler.
Summing up the article, we can safely say that now with the help of the SpeedFan program you can independently adjust the speed of the coolers in the system unit, and the investigator can also reduce the noise in your apartment.
It’s no secret that as the speed of computers increases, the level of heat generated by the system components also increases: the motherboard chipset heats up, the central processor heats up seriously (at high load, the temperature of the processor core can reach 90-110 ° C), does not lag behind the central one in terms of heat dissipation and the graphics processor of the video card and even the power supplies with the increase in power began to heat up very much. Therefore, increasingly powerful and large cooling fans are required for all components, which can be very noisy. However, some of the problems associated with increased system noise can be solved by software and even BIOS settings. For example, modern processors and operating systems automatically reduce power consumption during idle periods to help keep devices cool, but they rarely slow down noisy fans.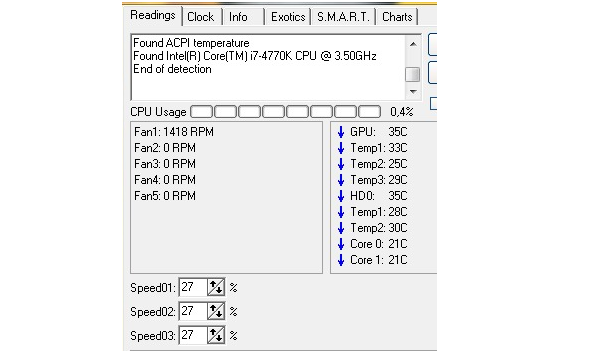
Smart Fan Control
In most modern computers, fans can be controlled through the Basic Input/Output System (BIOS). The easiest way is to change the settings in the BIOS to turn the fans on and off depending on the temperature (if, of course, there is such a possibility).
Some BIOS systems have some function in the menu (PC Health Status section) such as Smart CPU Fan Temperature, CPU Smart Fan Control or even Noise Control. It is enough to enable this function, and the noise from the fans will bother you only at the time of loading (usually, regardless of the temperature set in Smart Fan Control, the processor fan runs at full power for several seconds when the computer is turned on, and then slows down) or at those rare moments when you really load the computer with some complex operations.
After enabling this option during operation, the processor fan will increase speed only when the temperature rises, and when there is no load, it will decrease (the fan may even turn off altogether).
Note that the function of smooth automatic fan speed control Smart Fan Control usually works reliably only on those fans that are equipped with a fourth control wire. In addition, the presence of CPU Smart Fan Control sometimes depends on the installed processor. By the way, this function is usually not enabled by default, so in any case you will have to configure it manually (configuration is usually limited to enabling this function and / or setting critical temperatures).
Of course, reducing the speed of the fans will inevitably lead to an increase in the temperature inside the system unit, but as long as the processor, hard drive and other components operate within an acceptable temperature range (check with the equipment supplier), nothing threatens the hardware. Safe operating temperatures are roughly around 70°C for processors and 55°C for hard drives. The maximum allowable operating temperature for Intel processors can be found on the company’s website (for example, for Pentium 4 processors — http://www. intel.com/support/processors/pentium4/sb/CS-007999.htm). For AMD processors, you can check the Case Temp setting on the Technical Documents Page (). Recall that for a particular processor, stable operation temperatures may vary. The maximum temperature for the hard drive can be found on the website of the respective vendor.
Noise reduction technologies in the Intel Core 2 Duo
Intel’s new multi-core processors (including the Core 2 Duo) have relatively low power consumption and, as a result, generate less heat. This feature can be used in different ways: either to overclock the system, or, conversely, to reduce the noise from the cooling system.
BIOS setup on Core 2 Duo motherboards (for example, i975X chipset) is simple — it consists in activating additional features such as Intel SpeedStep (reducing power consumption in idle mode of the processor), and AI Quiet technology (intelligent fan control to noise reduction).
In silent mode (Silent mode) in a computer with a conventional cooling system, even after several hours, the temperature of the processor does not rise above 35-40 °C, and in a system with passive cooling, the processor heats up to 50-55 °C. The temperature of hard drives rarely exceeds 40-45°C, and the temperature in the case is set at 35-40°C. These are very good results for modern computers, given that in a truly silent mode, the air circulation in the case is very weak.
AMD Cool’n’Quiet Technology
AMD’s Cool’n’Quiet technology is Intel’s answer to old problems with heat and noise generated by the cooling system. The new technology, designed to reduce power consumption and therefore reduce the level of noise produced by the cooling system, has found its way into all modern motherboard chipsets designed for AMD processors. The processor fan and other cooling fans connected to the motherboard will only increase speed when the temperature rises, and if there is no load, they may turn off altogether.
Recall that AMD platforms are usually also equipped with D.O.T. (Dynamic Overclocking Technology) with the most automated overclocking of 10%.
Also note that each manufacturer of chipsets and motherboards for a particular platform contributes its own additional technologies to support such solutions to reduce noise from computers.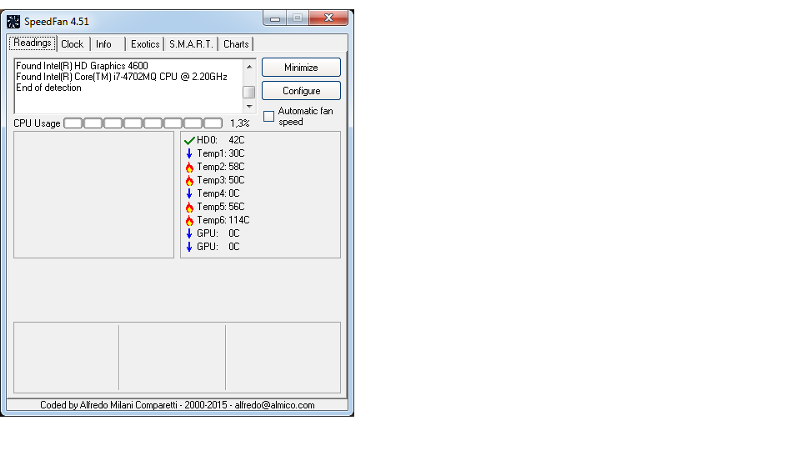
MSI’s Multifunctional CoreCell Technology
AMD’s strategic partner, motherboard manufacturer MSI, has developed its own functions to support the AMD Cool’n’Quiet solution.
MSI motherboard adopts original CoreCell multi-functional technology. The CoreCell Chip includes four components: Speedster (a technology that allows flexible BIOS settings), BuzzFree (a technology that reduces system noise by automatically adjusting fan speeds), PowerPro (a power management technology that can reduce power consumption), and LifePro (a technology that maximizes prolonging the life of the motherboard, processor and cooling fans by constantly monitoring their condition).
Speedster technology provides the user with flexible BIOS settings during overclocking, including FSB and memory asynchronous mode, the ability to increase the memory voltage in 0.05 V steps to adjust it, and the voltage applied to the memory per processor core with a minimum step of 0.0125 V.
BuzzFree technology is designed to check the current system load, its temperature and change the speed of rotation of the cooling system fans in accordance with the state of the system. Thanks to BuzzFree, the level of noise produced by the system is significantly reduced (by 10-50%), and annoying buzzing of fans practically does not bother users. We also note that BuzzFree improves the playback quality of audio and video files. This technology is coordinated with Cool’n’Quiet technology from AMD.
PowerPro technology extends the life of your motherboard and fans by keeping them in optimal condition. This system also monitors the load on the motherboard in order to avoid negative factors that could lead to a system crash.
PowerPro is a flexible system power management that reduces power consumption by up to 67%, ensures stability and increases performance.
LifePro technology also increases system reliability by maintaining the most favorable state of the system as a whole and by component.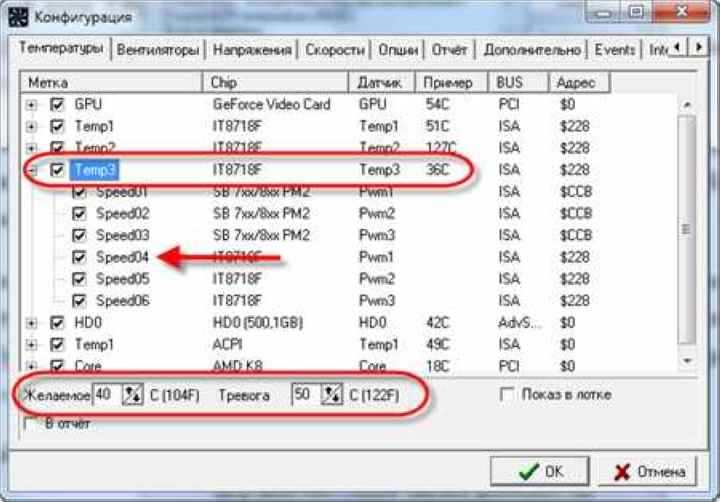 LifePro monitors all operations to prevent system failure and extend the life of the motherboard, CPU, and other components.
For the AMD Dual Core platform, MSI has implemented Dual CoreCell, a feature-rich technology similar to CoreCell but for dual-core AM2 motherboards.
MSI Dual CoreCell is MSI’s software solution for hardware monitoring, overclocking and cooling control.
Compared with CoreCell technology, Dual CoreCell is focused not only on improving performance, but also on improving the user experience. It includes four sections: performance level, noise level, and image and sound quality, providing the user with a working environment that satisfies him.
SilentTek — noise reduction technology from AOpen
Almost all motherboard manufacturers are involved in the development of noise reduction. For example, AOpen, in addition to increasing the performance and functional stuffing of motherboards, pays a lot of attention to the ergonomics of its devices, even if these are cheap solutions. To reduce the noise level from a running computer, special tools are used that allow you to adjust the fan speed depending on the temperature and limit the maximum rotation speed of the optical drive so that it also produces less noise.
The original development of AOpen engineers is called SilentTek — this function is built into the BIOS and also has a special proprietary management utility for Windows.
SilentTek manages features such as Hardware-Status Monitoring, Overheat Warning, and Fan Speed Control. With SilentTek, you can achieve the optimal balance between noise, performance and system stability.
When using a computer at home, SilentBIOS technology built into the BIOS can be an invaluable advantage, as well as support for software control of the speed of rotation of all fans, which allows minimizing system noise directly during operation.
AOpen’s proprietary SilentTek utility allows you to monitor the operation parameters of various PC components (voltages, temperatures, etc.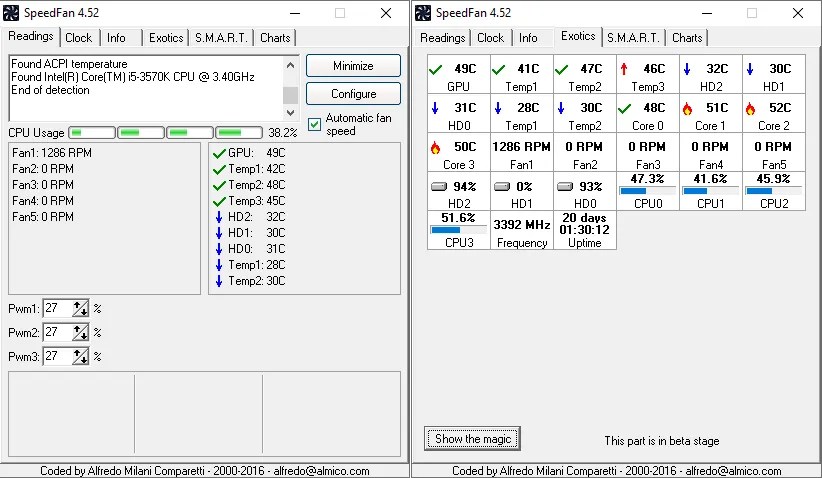 ) in real time, and also has a set of special features with which you can choose the best ratio between noise (rotation speeds fans) and cooling the motherboard, processor and power supply.
Instead of conclusion
We have not identified any shortcomings in the operation of these systems, however, it should be borne in mind that these technologies are still relatively new and therefore may well have some roughness in operation until the versions are fully debugged BIOSes that support them.
But even if there is no such function in the BIOS (or it is not open in the settings menu), then you can achieve relative silence using some special program. For example, you can note the free program SpeedFan (http://www.almico.com/speedfan.php), which has a large database of modern motherboards, reads temperature sensors, and then changes the fan speed based on temperature readings (you can use the SpeedFan program). found on our CD-ROM).
However, for such a program to work, the following conditions must be met: the hardware temperature sensors must be readable by the program (that is, the program must “know” your motherboard), the computer hardware must be able to change the fan speed, and finally, the user will have to independently configure the program and monitor the progress of its work (at least find out the safe temperature range at which certain computer components will not fail).
The processor makes a lot of noise — the problem of most people who use system units (in common people, out of ignorance, they call the processor). To be more precise, fans are noisy
, which cool the system from overheating.
There are many reasons why a fan may make noise. Most often, they need to be thoroughly cleaned of dust (including the cooling radiator) and lubricated. But there is one more thing that caused noise at my workplace — the speed of the cooler.
Coolers are divided into two types: with the function of speed control by software and without. Luckily, I have a Sumer cooler that supports software rotation control.
Everything could be set up perfectly in the BIOS, which itself controlled the cooler rotation. But there was one thing. The principle of adjusting the cooler with the BIOS is that you set the minimum rotation speed that the BIOS adheres to. And as the temperature rises, the cooler rotation speed increases in order to lower it.
And since I work in the range of 45-50 degrees, the system thinks that this is overheating and always turns the fan, so this is not an option. It was necessary to manually control the rotation speed of the cooler without any resistors, etc. A couple of queries on the Internet and found a program for controlling the speed of rotation of the cooler
SpeedFan
.
Fortunately, the program turned out to be free and compatible with Windows XP and Windows 7 (x32-64). I also ran it in Ubuntu Linux via Vine, but the program refused to work.
SpeedFan setting. Increasing and Decreasing Cooler Speed
To get started, go to the download page and download the latest version of the program. Now that the program is installed, it can take about a minute to load (sometimes much faster). The first launch of the program reads information about the hardware and coolers that are installed. This is how it is configured for me:
- all prompts are disabled
- program starts with Windows
- start program in tray
- when «closing the program» it is minimized to tray
The program has a lot of settings, and since the interface is in Russian, it’s easy to customize it.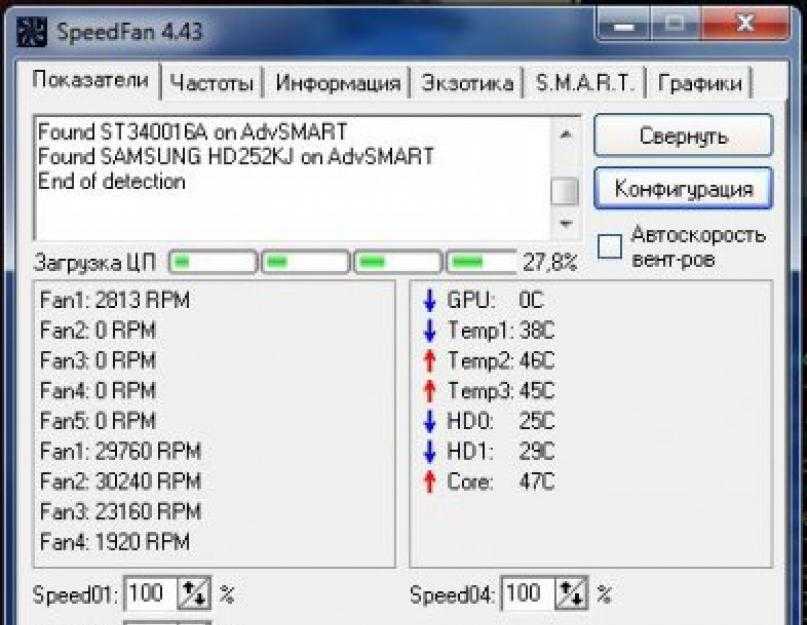 Initially, the program is installed in English, to install the Russian language, click on the configuration button:
In the window that opens, find the “Options” tab and select the language you need and click Ok:
Now the program works in Russian. Hints are turned off at the moment they are shown. They hinder more than help. Therefore, the next time you see a hint, check the box next to «Do not show again.»
In order for the program to be loaded with
Windows
, open start and select the startup folder. In this folder you need to copy the shortcut to SpeedFan. This is the easiest option.
If you want the program to be loaded invisibly (in the tray), then go back to the settings tab and check the box next to «launch minimized».
In the same tab, check the box «minimize on close» and when you click on the cross in Windows, the program will not close, but will be minimized to tray. I think this is very convenient, since it is inconvenient to open and close the program every time.
The coolers themselves are defined in the main program window. These windows with percentages are the speed controllers. I have three coolers in my system, so exactly three are displayed. By changing the power in percent, the speed will decrease or increase. Accordingly, 0% fans stop, 100% fans spin at full power.
After a half-year break, the author of the SpeedFan utility reminded himself by releasing a new release. The program is a compact but very functional tool for monitoring computer hardware. Allows you to read voltages, fan speeds and temperatures from monitoring chips. Displays S.M.A.R.T. status information as well as temperatures for hard drives. Works with HDD on EIDE, SATA and SCSI interfaces (most of «software» IDE/SATA RAID controllers, unfortunately, are not supported). It is also possible to adjust the system bus frequencies on some motherboards, but development in this direction is actually frozen. Runs on Windows 9 operating systemsx, ME, NT, 2000, 2003, XP and Vista, and x64.
advertisement
The main highlight of the program is the regulation of fan speed depending on conditions (for example, processor temperature), but again, with hardware support from the hardware. In addition, it can collect statistics on the parameters taken and write information to a log file, draw graphs of changes in temperatures, voltages and fan speeds.
Temperature directly affects the quality and duration of the operation of computer elements. That is why it is important to control the literacy of the cooling system. Dust should not accumulate in it, all computer fans must operate normally, if necessary, increasing speed during heavy loads.
Most of the users work on the computer in standard mode, without loading components in productive games and applications. In this case, the coolers on the computer may not be configured, and in such a situation they will work at maximum or close to maximum speed. To reduce noise during computer operation, you need to adjust the operation of coolers by reducing the speed of rotation of their fans.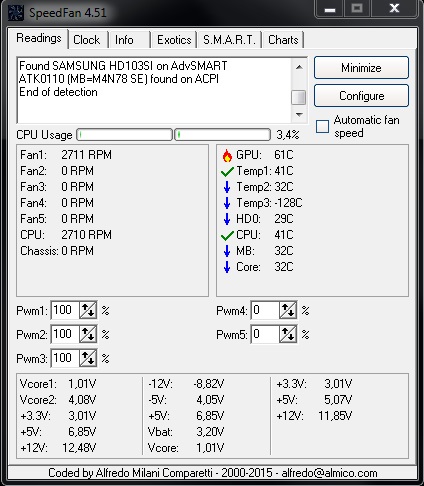
How to adjust the speed of computer coolers
The speed of computer cooling fans is initially set at the level of the motherboard. It is determined in the BIOS, and quite often the automatically set settings turn out to be incorrect. In most cases, the rotation speed of the coolers is set to the maximum, which makes the computer very noisy during operation, but does not require such serious cooling.
There are 3 main ways to adjust the rotation speed of computer coolers:
In the framework of this article, we will consider exactly the third option for software adjustment of the speed of rotation of computer coolers.
How to adjust the speed of computer fans
There are hundreds of applications that allow you to adjust the speed of computer fans. At the same time, some programs allow you to adjust only the speed of the fans of only certain components.
One of the most convenient and simple programs for adjusting the rotation speed of computer coolers is SpeedFan.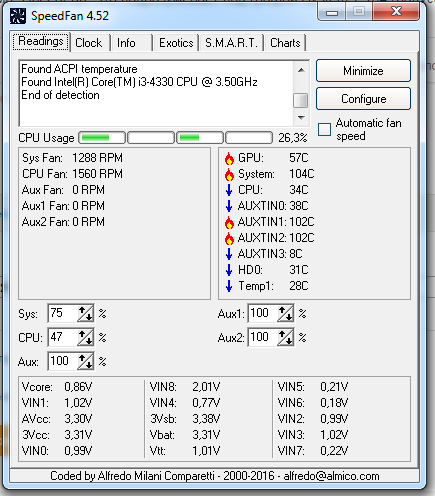 The app is free and can be downloaded from the developers website or other trusted sources on the internet. After downloading the program, you need to install it, and then run it. The first time you start the SpeedFan program, an informational message may appear, which you need to close.
Checking the speed of rotation of coolers
This is followed by a block of indicators of the speed of rotation of coolers (measured in RPM — the number of revolutions per minute) and the temperature of the computer components. Let’s figure out what each of the indicators means:
It should be noted that all the above designations are conventional and may vary. Not every motherboard gives information about the name of a particular connector for connecting a cooler on it. For example, on some motherboards in SpeedFan, you can see a picture like in the image below, that is, all coolers will be connected to the Fan1 — Fan5 connectors, without an exact definition of the purpose of each of them.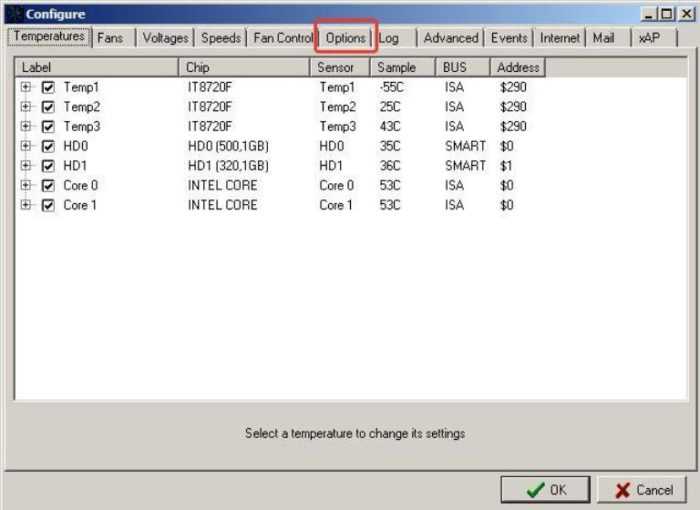
It is also important to note that the SpeedFan program only allows you to control coolers that are connected to the motherboard. The fact is that the 3-pin connector from the fan can be powered from the motherboard or directly from the power supply. If it is powered from the power supply, then it will not be possible to regulate its rotation speed. It is recommended to connect all coolers to the motherboard.
To the right of the cooler speed symbols there is a block with information about the temperature of the computer components. It is worth noting that SpeedFan is not the most accurate diagnostic tool in this regard, and it does not always determine the temperature accurately. If you are in doubt about one or more indicators, it is recommended to download more professional temperature monitoring software, such as AIDA64 or HWMonitor.
Cooler rotation speed setting
As you can see, in the upper window of the SpeedFan program there are blocks with information about the operation of coolers.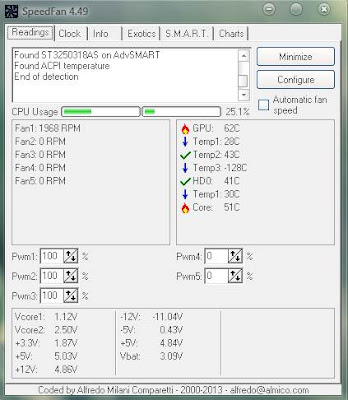 Below are the tools for adjusting the fan speed in the computer. They can be labeled Pwm1 — Pwm3 or, for example, Speed01 — Speed06. There is not much difference, since it is impossible to determine by such names which of the coolers this or that adjustment is responsible for.
To decrease or increase the cooler rotation speed, you need to press the corresponding buttons up and down in the graphs with the fan speed. When pressed, you should observe the reaction of the coolers in the diagnostic information above. Thus, it will be possible to determine which fan is responsible for one or another setting.
Important:
When reducing the fan speed to reduce the noise level during computer operation, do not forget to control the temperature of the system unit components to avoid overheating.
The best programs for adjusting the speed of the cooler. Automatic fan speed control to reduce noise
The operation of a personal computer depends on the state of all elements of the system and the load they experience.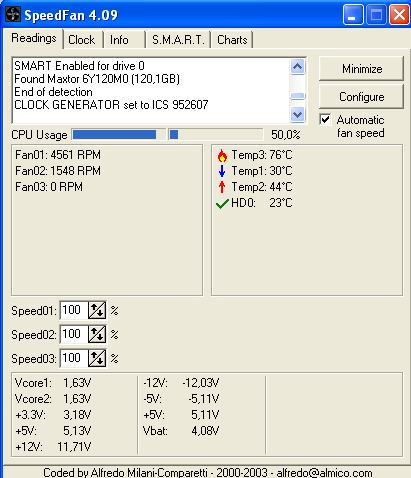 Some of them are used less intensively, while the processor or video card is constantly loaded, as a result of which they overheat. To cool such elements of the system, a cooler and a radiator grill are used, which lower the operating temperature of the devices, creating comfortable conditions. There are situations when the computer does not work stably and its elements heat up higher than expected. In such a situation, increasing the cooler speed will help. How to increase the speed of rotation of the processor cooler, we will understand below.
A bit about speed control
The system board controls the fan speed in the computer. This parameter is determined by the settings in the BIOS.
In turn, the motherboard controls the cooler by changing the supplied voltage, and this is achieved by adjusting the resistance and other nuances.
The «mother» relies both on the parameters set by the user and on the temperature indicators of the processor and inside the case. However, it is not always possible to configure these parameters correctly, even using «smart» utilities from the motherboard developer and the like.
For this reason, the propeller rotates either too fast or too fast. In any case, this is unacceptable — either the processor is overheated or there is excessive noise during its operation.
Before lowering the speed, keep in mind that the propeller cannot always be plugged into the motherboard, so the BIOS will not detect it. Accordingly, it will not be possible to configure this parameter (however, such a case is very rare).
We will not consider the option with reobas — a special «stray» that can speed up the speed of the propeller blades. This is too exotic a method that is almost never used.
When it may be necessary to adjust the cooler speed
The rotation speed is adjusted in the BIOS, taking into account the settings and temperature on the sensors.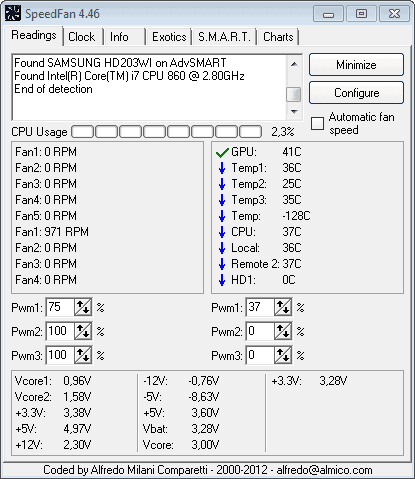 In most cases, this is enough, but sometimes the smart adjustment system does not cope. Unbalancing occurs under the following conditions:
- overclocking of the processor/video card, increase in the voltage and frequency of the main buses;
- replacement of the standard system cooler with a more powerful one;
- non-standard connection of fans, after which they are not displayed in the BIOS;
- obsolescence of the cooling system with noise at high speeds;
- cooler and heatsink dirty with dust.
If the noise and increase in the speed of the cooler is caused by overheating, you should not reduce the speed manually. It is best to start by cleaning the fans from dust, for the processor — remove completely and replace the thermal paste on the substrate. After several years of operation, this procedure will help reduce the temperature by 10-20°C.
The standard case fan is limited to about 2500-3000 revolutions per minute (RPM). In practice, the device rarely operates at full capacity, giving out about a thousand RPM. There is no overheating, but the cooler still continues to give out several thousand idle revolutions? You will have to correct the settings manually.
Temperature limit for most PC components is around 80°C. Ideally, you should keep the temperature at 30-40°C: cooler iron is only interesting for overclocking enthusiasts, it is difficult to achieve this with air cooling. You can check information on temperature sensors and fan speeds in AIDA64 or CPU-Z/GPU-Z information applications.
Adjustment methods
There are several ways to correct errors. It is possible to use one of the following ways:
- Adjust the rotation speed in the motherboard’s basic input/output system (BIOS). This method is associated with certain inconveniences, due to the need to restart the device and enter the BIOS. Thus, if it is necessary to increase the rotation speed in a short time, this method becomes unjustified.

- How to change the cooler rotation speed? There is also a large amount of software that can speed up or slow down the speed of rotation of the blades. These include SpeedFun, Msi Afterburner, OverDrive and other programs.
- The most expensive way is to buy a reobas with turntables attached to it. In this case, you can adjust the rotation speed by rotating the built-in controls in real time, each of which is responsible for a specific fan.
Which method to use is up to the user. However, the most versatile and affordable is the use of software.
On CPU
All the cooler adjustments listed for laptops work fine for desktop CPUs as well. In addition to software adjustment methods, desktops also have a physical one — connecting fans through reobas.
Reobas allows you to adjust the speed without using software
Reobas or fan controller is a device that allows you to control the speed of coolers directly. Controls are most often placed on a separate remote control or front panel. The main advantage of using this device is the direct control over the connected fans without the participation of the BIOS or additional utilities. The disadvantage is the bulkiness and redundancy for the average user.
On purchased controllers, the fan speed is controlled via an electronic panel or mechanical knobs. The control is implemented by increasing or decreasing the frequency of pulses applied to the fan.
The correction process itself is called PWM or Pulse Width Modulation. You can use reobas immediately after connecting the fans, before starting the operating system.
Programs for adjusting the speed of the cooler
The easiest way to accomplish the above task is with the help of special software that allows you to control the settings of cooling systems. You can find many programs of this kind on the network — both paid and free.
Consider the best of them below.
Speed Fan
This small application has a lot of useful features for the user.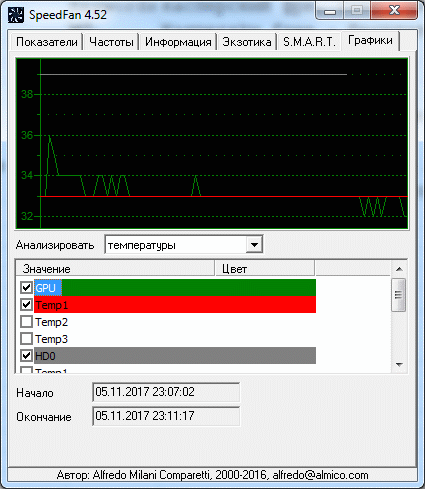
It collects real-time information from temperature sensors, allowing you to detect overheating, shows the load on the processor and the frequencies of system components.
It is also possible to reduce the speed of the processor fan or increase its speed.
The sequence is extremely simple:
- Install the program by downloading the distribution package from the official site.
- Run the program as an administrator (right-click on the executable file and select the item of the same name in the drop-down list) and do not switch from the English version to the Russian one. This way you will be sure that all parameters will be displayed correctly.
- Wait a while — the program will collect the necessary information about the hardware of your PC.
- Choose one of the two options. The first way is to automatically adjust the speed of rotation of the CPU cooler (just check the box next to the “Automatic Fan Speed” item in the main menu).

The second is manual control.
Go from the main page to the “Configure” section, and from there to the Fan Control tab.The rotation speed is set as a percentage. Select the one you want and save the changes by pressing the “OK” button.
MSI Control Center
A proprietary utility from a well-known motherboard manufacturer that allows you to overclock a processor from under Windows, monitor its temperature, and collect information about other components.
We are interested in handling coolers. How to reduce the fan speed in the computer using MSI CC will be described below:
- Install and run the program.
- Go to the Green Power section, and from there to the Advanced — Motherboard tab.
- We are looking for the point responsible for controlling coolers there (there is only one of them, so you can’t make a mistake).
- Change the value to the one you like and save the profile to a file.
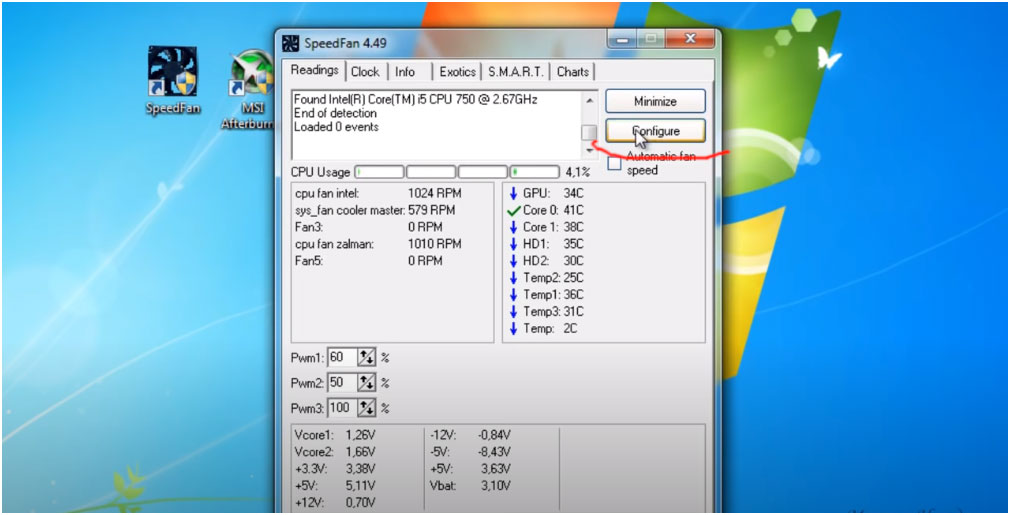
The program has two drawbacks. Firstly, it is a built-in “fool protection”, which does not allow to reduce the speed by more than 50%.
Second, the new settings are not applied at Windows startup. You will have to open the program each time and repeat steps 2-4.
Asus Eeectl
Eeectl is a laptop fan speed control program that allows you to easily and naturally change the fan speed settings on Asus devices.
If you have a gadget from another company, look for similar software on their official website.
In this case, proceed as follows:
- Install and run the application.
- Find its minimized tray icon, located in the right corner of the START panel next to the clock, and right-click on it.
- In the drop-down list, find the FAN item, go to it and select one of the values expressed as a percentage of the maximum speed.
We have described even more programs for adjusting the fan speed in our article “Fan is buzzing in a laptop What to do”
MSI Afterburner
Free software for overclocking cards from MSI.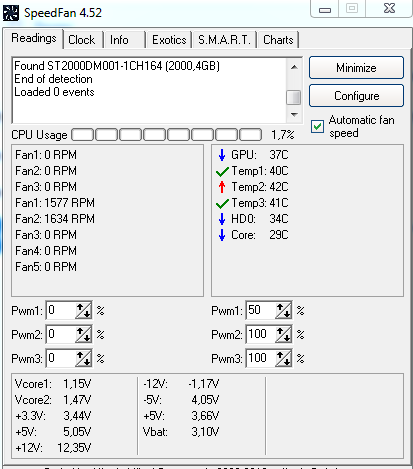 Represents a lot of functionality for testing the state of the board, the voltage on the GPU. Includes cooler adjustment function. Suitable for Intel and AMD.
Basic settings are on the main screen. Move the sliders in the desired direction, and adjust the parameters yourself. To control the cooling system, the speed is changed in the «Fan Speed» section. The «Auto» button automatically changes the speed of rotation, depending on the load of the computer.
Riva Tuner
Suitable for all versions of Windows to control the operation of the cooler. The utility is easy to use and free of charge. To change the fan settings follow a few simple steps:
- Open Riva Tuner
- Find advanced settings
- Fan section
- come out.
Adjust the cooler speed based on the state of your computer. Maintain the optimum temperature by changing the program.
SpeedFan
The utility, which has earned a good reputation among PC users, helps to overclock the cooler, test the processor and hard drive under load.
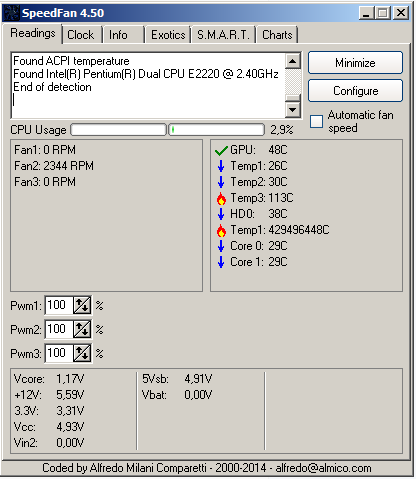 The program is free and has a simple and intuitive interface. Checking the fan speed at high temperatures is as follows:
 - Download and open SpeedFan
- Pay attention to the speed of the cooler and the temperature of the main components in the «Readings» tab
- We move to the “Configure” section
- V “Temperatures” select the desired component
- Below displays the value “Desired” and “Warning”
9000 9000
-
- Set the temperature regime in 4066
- Click OK.
In addition, if desired, go to the “Speeds” parameter and change the speed of the cooler blades. There are upper and lower bounds for indicating speed.
Launch and appearance of the program
Download and install the application from the official site.
At the first start, a regular window will appear offering help on program functions. You can check the box so that it does not appear again and close it.
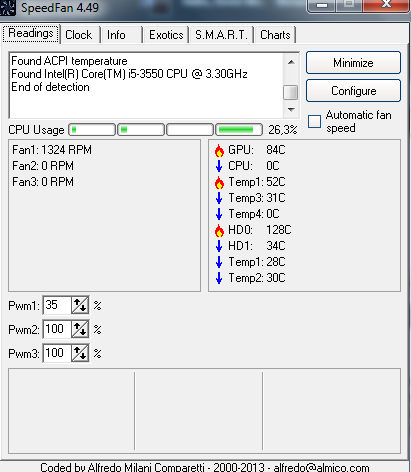 Next, SpeedFan reads the parameters of the microcircuits on the motherboard and the values of the sensors. A sign of success will be a list with the current fan speeds and component temperatures. If the fans are not detected, then the program will not be able to help you. Immediately go to «Configure -> Options» and change the language to «Russian».
 As you can see, it also shows the processor load and information from the voltage sensors.
Block «1» contains a list of detected cooler speed sensors with the names Fan1 , Fan2 …, and their number may be more than it actually is (as in the picture). We pay attention to the values, for example, Fan2 and the second Fan1 have real indicators of 2837 and 3358 RPM (revolutions per minute), and the rest are zero or with garbage (in the picture 12 RPM is garbage). We’ll remove the rest later.
In block «2» the detected temperature sensors are shown. GPU is a graphics chipset, HD0 is a hard drive, CPU is a central processing unit (instead of a CPU in the Temp3 picture), and the rest is rubbish (cannot be 17 or 127 degrees).
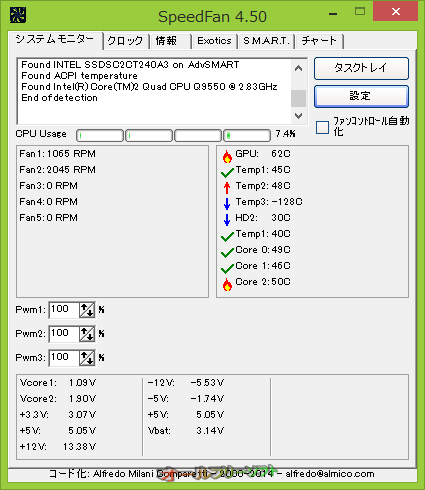 This is the disadvantage of the program, that you need to guess where everything is (but then we will rename the sensors ourselves as needed). True, on the site you can download known configurations, but the procedure is not simple and complicated in English.
 If it is not clear which parameter is responsible for what, then you can look at the values in some other program to determine the parameters of the computer and sensors, for example AIDA64 and compare with those determined by the SpeedFan program in order to know exactly where the speed and temperature readings are (in the video under I will show everything in the article).
And in block «3» we have speed controls Speed01 , Speed02 …, with which you can set the rotation speed in percent (it can be displayed as Pwm1, Pwm2 …, see the video for more details). For now, we need to determine which Speed01-06 affects which FanX. To do this, change the values of each from 100% to 80-50% and see if the speed of any Fan has changed.
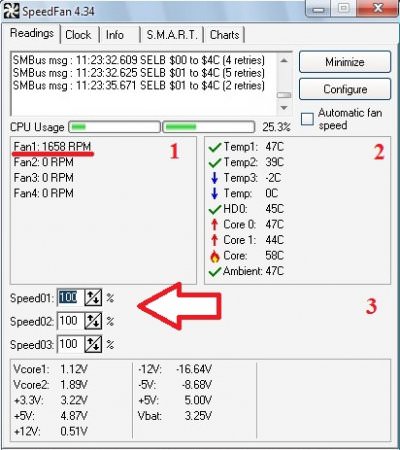 We remember which Speed influenced which Fan.
 I repeat that not all fans will be regulated, but only those that the motherboard can control from the BIOS.
SpeedFan setting
So we got to the settings. We press the “Configuration” button and first of all we will name all the sensors with understandable names. In my example, I will programmatically control the CPU cooler.
On the «Temperatures» tab, we find the processor temperature sensor defined in the previous step (I have Temp3) and click on it first once, and then again a second later — now you can enter any name, for example «CPU Temp». In the settings below, enter the desired temperature that the program will maintain with the minimum possible cooler rotation speed, and the alarm temperature at which the maximum rotation turns on.
I set 55 and 65 degrees respectively, but it’s different for everyone, experiment. At a very low set temperature, the fans will always spin at maximum speed.

Next, expand the branch and uncheck all the checkboxes, except for the Speed0X that regulates the processor’s FanX (we already determined this earlier). In my example, this is Speed04. And also uncheck all other temperatures that we do not want to see in the main program window.
On the fans tab, simply find the necessary fans, name them as you like, and turn off the unnecessary ones.
We go further to the «Speeds» tab. We get on the Speed0X that is responsible for the desired cooler, rename it (for example, to CPU Speed) and set the parameters:
- Minimum — the minimum percentage of the maximum speed that the program can set
- Maximum — the maximum percentage, respectively.
I have a minimum of 55% and a maximum of 80%. It’s okay that the program will not be able to set the value to 100%, because on the «Temperatures» tab, we set the alarm threshold at which 100% rpm will be forced. Also, for automatic adjustment, do not forget to check the box «Autochange».