How to Uninstall AMD Drivers [4 Ways]
- Partition Wizard
- Partition Manager
- How to Uninstall AMD Drivers [4 Ways]
By Linda | Follow |
Last Updated
Are you using AMD components? For example, AMD GPUs. Sometimes, you may need to uninstall AMD drivers. This post from MiniTool Partition Wizard tells you how to uninstall AMD drivers properly.
AMD (Advanced Micro Devices, Inc.) is a multinational company specializing in the design of microprocessors and related technologies. Its main products are central processing units, graphics processors, motherboard chipsets and computer memory.
In terms of CPUs, it can compete with Intel. In terms of GPUs, it can compete with Nvidia. If you use AMD GPUs, sometimes, you may need to uninstall AMD drivers to fix some GPU issues.
Of course, if you want to replace the current AMD graphics card, uninstalling improper AMD GPU drivers is also necessary. Uninstalling the improper graphics driver prior to installing another one can help prevent potential file conflicts which may corrupt the installation of new drivers.
But how to uninstall AMD drivers? You can try the following ways.
How to Update AMD Drivers in Windows 10? 3 Ways for You!
Way 1. Use Device Manager
This method is the most common method and you can use Device Manager to uninstall most drivers. In addition, this tool comes along Windows. Here is the guide:
- Open Windows Device Manager. In Windows 8 or later version, you can press Windows key + X key and choose Device Manager from the shortcut menu. But if you use Windows 7 or other old versions, please click Start menu and search this tool in the search box.
- In the Device Manager tool, expand Display adapters, right-click the AMD graphics driver and click Uninstall device.

- Select the checkbox of Delete the driver software for this device, and then click Uninstall.
Way 2. Use Control Panel
Some AMD drivers are like programs (eg. Radeon Software and AMD Catalyst Drivers) and you should uninstall them like uninstalling software. Here is the guide:
- Search and open Control Panel.
- In the Control Panelselect Programs and Features.
- Select the AMD driver software and then click Uninstall. The uninstall process will begin removing drivers and software components.
How to Download, Install, Update Nvidia Drivers on Windows 10
Way 3. Use AMD Cleanup Utility
The AMD Cleanup Utility is an AMD official tool designed to thoroughly remove any previously installed AMD driver files, registries, and driver store from systems running Microsoft Windows 7 and later.
If the normal AMD driver uninstall procedure was unsuccessful, this tool can help you. It will remove AMD display and audio drivers as well as AMD software components but does not remove AMD chipset driver components such as GPIO, SATA, USB, etc. It can help to prepare the system for a successful driver installation. Here is the guide:
- Download the AMD Cleanup Utility from the AMD official website.
- Locate the file where it was saved and double-click on the exefile.
- A dialogue box should appear asking whether to run the AMD Cleanup Utility in safe mode. Click Yes.
- The next dialogue box provides a warning message stating that the AMD Cleanup Utility will remove all AMD driver and application components. Click OK to begin remove these drivers and software components.
Way 4. Use Third-Party Software
Some people may recommend you to use third-party software like DDU (Display Driver Uninstaller) and Driver Easy to uninstall these drivers. In general, these third-party driver uninstallers can work on many drivers including audio driver, hard drive driver, etc. In addition, these uninstallers can get and handle drivers from various manufacturers.
About The Author
User Comments :
How to Uninstall AMD Drivers
- By Joel Hruska on May 21, 2018 at 11:30 am
This site may earn affiliate commissions from the links on this page. Terms of use.
Whether you’re moving from an older driver to a newer one or replacing your video card altogether, properly uninstalling your drivers is a critical component of system maintenance. In this guide, we’ll walk through using AMD’s standard utility for driver removal, as well as discussing whether or not you need to use a third-party tool.
It’s best to download the new driver you intend to use before uninstalling the old one. While this isn’t absolutely required, there’s a necessary reboot between uninstalling one driver and reinstalling the other (and we recommend rebooting between the two steps in any case). Once the system is rebooted, it’ll typically be running at a lower resolution and menus may be harder to navigate as a result. It’s just easier to download the replacement driver first.
The first uninstallation step is extremely simple. You can use either the “Add/Remove Programs” menu from the Windows Settings menu or “Programs and Features” if you prefer to use the Windows 7-style Control Panel. Either way, find the “AMD Software” option and click “Uninstall.” You’ll be asked to confirm this option. Click yes, and your Radeon software installation will be removed, along with any other AMD drivers if you’re also running on a Ryzen system. Unlike Nvidia, which has multiple pieces of software to remove, AMD uses a simplified uninstaller.
Once you’ve uninstalled the old driver, you’ll be prompted to reboot. It’s at this point that people typically ask “Is running the default uninstaller from AMD or Nvidia enough, or do I need to use a third-party product to perform a more comprehensive system sweep?”
How Third Party Uninstallers Work
The uninstallers that AMD and Nvidia use don’t actually scrub everything they install to your system. It’s common for registry keys, folders, and installation files to be left behind. This speeds the reinstallation process, and it’s part of why you can uninstall one driver, install the next, and still have the same profile settings you were previously using. A third-party tool like Display Driver Uninstaller (DDU) will remove even these elements, restoring your machine to a pristine state.
15-20 years ago, using a third-party tool to scrub display drivers was a practical requirement, especially when switching between an AMD and an Nvidia GPU. These days, the overall situation is much improved. You can typically swap from one driver to the next with no problem, and Windows may not bat an eyelash if you pull an AMD card out and drop an Nvidia GPU in. I’ve even tested GPU swapping without uninstalling the other vendor’s software. You’ll get error messages when vendor-dependent software attempts to initialize, but that’s about it.
Do you need to run a third-party driver uninstaller? Probably not. Windows has gotten much better at handling these kinds of swaps. But if you’re trying to troubleshoot a problem with your system, or want to make absolutely positive that there’s no way leftover cruft from a previous AMD or Nvidia installation could be mucking up your operating system, then the best way to do that is to use a third-party utility like DDU.
Once you run the application, it’ll recommend that you reboot into Safe Mode (you can click on the “Options” menu and choose the “Enable Safe Mode dialog”). Exit the application and run it again after doing this, and you’ll get a screen like this one. Choose “Safe Mode” from the drop-down menu, then hit “Launch” to reboot into Safe Mode:
We recommend running DDU from Safe Mode. The application advises that you should unplug your computer’s Ethernet cable during the uninstallation and new driver installation process, to prevent Windows 10 from downloading new drivers for your GPU and attempting to install them. I don’t usually find that necessary, but YMMV. When you run it for the first time, DDU attempts to prevent Microsoft from continually downloading its own driver updates and overwriting the drivers distributed by AMD and Nvidia. If you don’t want it to do this, you can click the “Set Windows Device Installation settings to Default” button, as pictured above. This will restore Windows’ default behavior.
If you only want to install a new driver, click “Clean and Restart.” If you have other tasks to take care of while in Safe Mode, click “Clean and do NOT restart.” If you need to install a new GPU, choose “Clean and Shutdown.” Once you boot your system back up, you’ll be able to install your new GPU driver without worrying that old crufty elements were left behind. And if you don’t want to bother with the extra steps of DDU, Windows is generally flexible enough these days to handle a switch without a problem, provided you use the vendor uninstall first.
Now read: Windows 10: The Best Hidden Features, Tips, and Tricks
Tagged In
This site may earn affiliate commissions from the links on this page. Terms of use.
ExtremeTech Newsletter
Subscribe Today to get the latest ExtremeTech news delivered right to your inbox.
This newsletter may contain advertising, deals, or affiliate links. Subscribing to a newsletter indicates your consent to our
Terms of Use and
Privacy Policy. You may unsubscribe from the newsletter at any time.
More articles
How to uninstall AMD video card drivers
Category: Windows / Drivers
Added by: admin
access_time Published: 2-05-2015
visibility Views: 248 300
chat_bubble_outline Comments: 15
Hello experts, the problem is that when you remove the driver for the AMD video card on a laptop, various errors appear, and when you install a new driver over the old one, Windows goes into a blue screen.
I tried to get rid of the old driver in different ways, and using the «Uninstall Programs» panel, I also simply deleted it in the Device Manager, but, apparently, not everything is removed by traditional means and new ones are not installed due to the remnants of previous drivers.
How can I remove the drivers for the AMD video card completely so that there are no traces left? Do not reinstall the same in the end, the operating system? They say that there is a special utility for such purposes?
Hello friends! The Display Driver Uninstaller 15.1.0.0 program can help us, which completely removes the drivers for AMD, NVIDIA, Intel HD video cards, but you need to use it only when problems arise when installing new driver versions, in normal cases, use the built-in Windows tool to remove programs and components .
When should I expect errors when installing new drivers on a video card and do I need to clean the system from the remnants of old drivers using Display Driver Uninstaller 15.1.0.0?
- If you installed unofficial drivers on your video card and then wanted to remove them and install normal ones.
- After replacing the video card, there may be problems installing drivers for the new graphics adapter and you will have to uninstall the old video card drivers using the program I mentioned.

- If your Windows has seen a couple of hundred games in the last year (some games modify video card drivers), then you will have to clean the system of the old drivers.
- When using non-original assemblies of Windows (usually they lack some system components), then troubles with drivers are also possible.
Whatever one may say, getting a special utility for removing drivers for a video card will be useful to everyone reading these lines.
Just in case, here are two ways to uninstall drivers for an AMD video card.
Easy removal. Control Panel -> Uninstall a program.
Select the AMD Catalyst Install Manager with the left mouse and click on the Change button.
Next
Check the box Quickly remove ALL software components of the AMD software and click Next, the AMD GPU drivers are completely removed.
Be sure to create a system restore point before you start.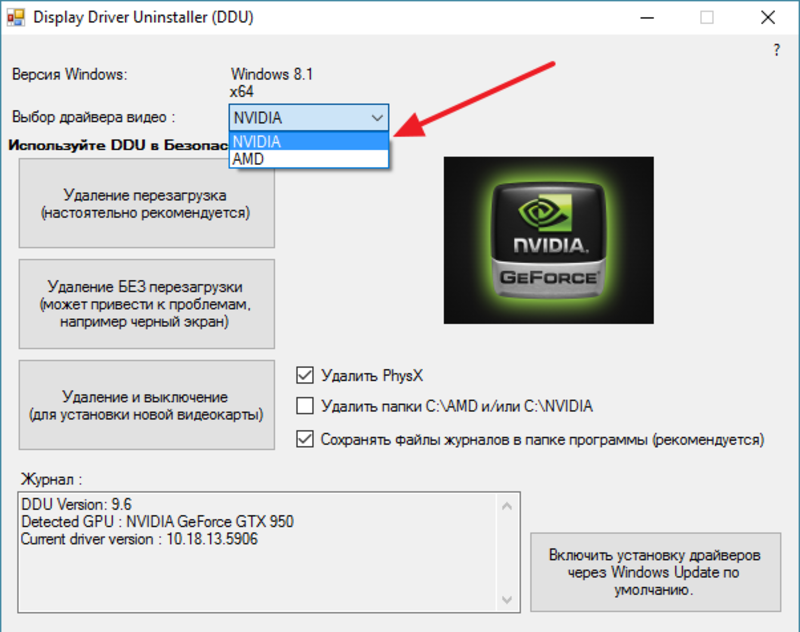
Official website of the utility http://www.wagnardmobile.com/DDU/. Click Download
Official Download
The archive with the program is downloaded, double-click on it with the left mouse button
and enter the folder name, for example DDU. Click on the Extract button.
The program files are unzipped to the DDU folder, the executable file of the Display Driver Uninstaller.exe program is located in the DDU folder, but you need to run it in safe mode.
If you have Windows 7, 8.1, 10 installed, then go, click Start -> Perform ->
MSCONFIG
Select the Contamine load , Keeping Paragraph 9005, Keeping Para mode . Apply and OK .
Reboot, enter Safe Mode.
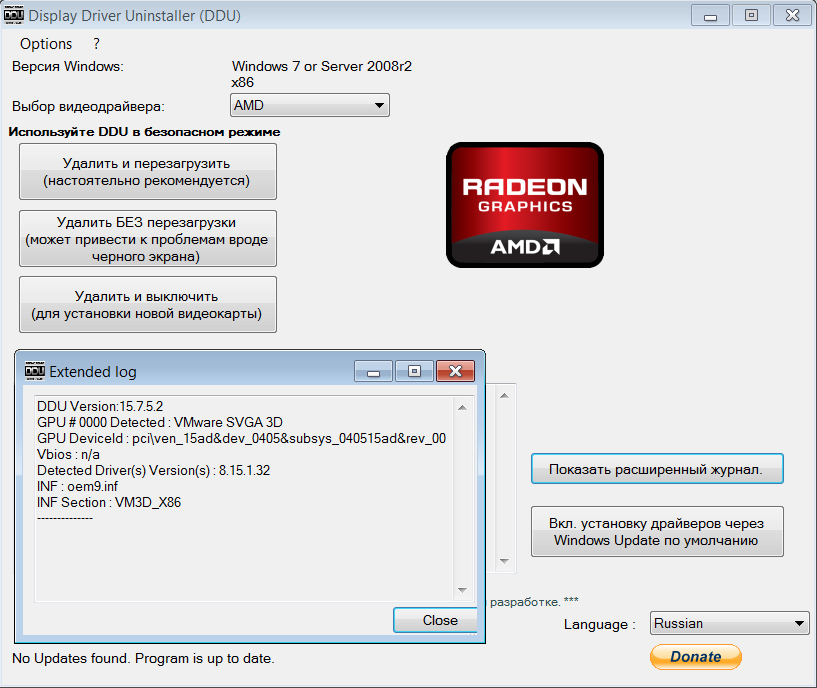
We launch the Device Manager, open the Video adapters item, we see our AMD Radeon HD 8550G video card.
Run the Display Driver Uninstaller 15.1.0.0,
in the main program window, select the Russian language, also select the AMD video driver and click on the button and Uninstall and reboot (highly recommended) .
The process of uninstalling the video driver.
OK
Note: The Display Driver Uninstaller disables the ability to automatically download and install all drivers in the device installation options, but it can be enabled after installing a new graphics card driver (this article shows how).
Reboot in progress.
We start the Device Manager and see that the driver for the video card has been removed.
Don’t forget to uncheck Safe Mode. Apply and OK.
We boot into the operating system and install new versions of the drivers.
How to uninstall AMD, nVidia, Intel video driver
Question from user
Greetings!
Tell me how you can remove video drivers from Windows if they are not displayed in Add/Remove Programs (in Control Panel). The fact is that I want to install newer drivers, but during installation an error pops up that the driver is already there. What can be done?
ATP in advance.
Dmitry, Kemerovo
Good day.
Quite a popular problem… In fact, if you don’t find an application (including the driver) in Add/Remove Programs in the Windows Control Panel, this does not mean at all that it is not in the system ?!
In addition, it also happens that when installing a new driver, no errors appear and everything seems to be going well — but you will continue to use the old driver in the same way. That is why, in many cases, it is always recommended to remove the old driver completely from the system, and then install the new one.
Let’s do this now…
*
suitable for any video drivers — AMD (Ati Radeon), nVidia (GeForce), Intel. The same methods will work in all currently popular Windows: XP, 7, 8, 10 (32/64 bits).
DDU can also be used to check if everything has been uninstalled if you used the standard uninstall procedure.
? Note!
Before using the DDU utility, I recommend creating a restore point in Windows (just in case) — https://ocomp.info/vosstanovlenie-windows-10.html#i
The utility files are distributed in an archive. After downloading the utility, you need to unpack the archive and run the executable file — Display Driver Uninstaller (see screenshot below).
I would like to draw your attention to the fact that the utility can start for a bit long — 20-30 seconds, apparently, when it starts, it analyzes the system and searches for installed drivers.
Extracted files from the archive
Next, DDU will prompt you to select the startup mode, for example, «Normal mode» . Ideally, of course, you need to reboot the system in safe mode and remove the driver from it. However, I will immediately note that in most cases everything works and is normal …
? Note!
Just in case, I’ll leave a link to my article on how to enter safe mode (just in case).
Utility startup mode
Actually, when the utility is launched, you need to perform only two actions:
- select the video driver: AMD or nVidia (in most cases, DDU detects it automatically, but still…). See «1» in the screenshot below;
- select deletion mode — recommended «Delete and reboot» . In general, nothing else is required of you — the utility will delete everything and clean it up automatically!
Uninstall and reboot / uninstall driver option
This method is one of the simplest and most effective. I want to note once again that all traces will be completely removed from the system and it will be easy to install any new driver (without any notifications and warnings that you already have some kind of driver in the system).
*
? Option 2
Through the installation and removal of programs
? control panel and follow the link «Uninstall a program» .
Uninstall programs
Next, you will see a list with 99% of the programs installed on your system. Including here there will be a driver for a video card, a sound card, etc. Of course, a complete list of drivers will not be here, but nevertheless …
To uninstall — just find the required driver in the list, select it and click the «Change» button . If everything is in order with the installer and the driver itself, as a rule, there are no problems and everything is removed normally (nothing else needs to be done!).
Programs and Features — Windows 7
utilities (see below ?).
*
? Option 3
Via Device Manager
The Device Manager displays all drivers and all devices available in your system (even those devices for which there are no drivers are displayed as unknown).
To open Device Manager: press the Win+R key combination, then type devmgmt.msc and press Enter.
Note! You can also open the device manager through the control panel. It’s just that the above method is universal, and allows you to open this manager in all popular versions of Windows: XP, 7,8,10.
Launch Device Manager — devmgmt.msc
Next, open the tab «Display adapters» and double-click on the desired adapter (if you have 2 of them, like me).
You can simply open properties of the required adapter — to do this, right-click and select the required one from the menu.
Selecting and viewing the properties of the video adapter
In the opened properties go to the tab «Driver» : here you can get information about the driver — vendor, development date, driver version, signature, etc. By the way, it is useful to compare the version of the driver you want to install with what is already in the system.
To delete it, click the button of the same name at the bottom of the window (see screenshot below).
View driver details, delete
*
? Option 4 utilities to remove any drivers
There are actually quite a lot of such utilities: Treexy Driver Fusion, Driver Sweeper, Driver Cleaner , etc. In addition, most programs designed to automatically search for and update drivers can also remove and archive an objectionable driver.
? Help!
In general, I have one big article on my blog about programs for working with drivers
*
Driver Sweeper
Developer site: http://phyxion.
net/
Softportal: http://www.softportal.com/software-18719-driver-sweeper.html
A simple and reliable utility that specializes in one of its main tasks — removing any drivers from the system completely and so cleanly , as much as possible!
Driver Sweeper will even check the system registry for various remaining «tails», and if they are found, they will also be deleted! By the way, the program makes a backup copy of the drivers before working with them — I do not advise you to refuse this moment!
In general, , using the utility is quite simple, I see no reason to write about it separately (see the screenshot below: one window in which you can view the list of found drivers, then select those that are no longer needed, and purge the system of them).
Found drivers, including NVIDIA
*
PS: To 100% remove any video driver from the system, you can reinstall Windows ? .