Use Bootrec.exe in the Windows RE to troubleshoot startup issues
Windows 7 Starter Windows 7 Starter N Windows 7 Home Basic Windows 7 Home Premium Windows 7 Professional Windows 7 Professional N Windows 7 Enterprise Windows 7 Enterprise N Windows 7 Ultimate Windows 7 Ultimate N Windows Vista Ultimate Windows Vista Enterprise Windows Vista Business Windows Vista Home Premium Windows Vista Home Basic Windows Vista Business 64-bit Edition Windows Vista Enterprise 64-bit Edition Windows Vista Home Premium 64-bit Edition Windows Vista Home Basic 64-bit Edition Windows Vista Ultimate 64-bit Edition More…Less
Summary
When you use the Recovery Environment (Windows RE) to troubleshoot startup issues, first try the Startup Repair option in the System Recovery Options dialog box. If this does not resolve the issue, or if you have to manually troubleshoot additional issues, use the Bootrec.exe tool. This article talks about how to use the Bootrec. exe tool in the Windows RE to troubleshoot and repair the following items in Windows Vista or Windows 7:
You can also use the Bootrec.exe tool to troubleshoot a Windows Boot Configuration Data file is missing required information error.
How to run the Bootrec.exe tool
To run the Bootrec.exe tool, first start the Windows RE:
-
Put the Windows Vista or Windows 7 media in the DVD drive, and then start the computer.
-
Press a key when you are prompted.
-
Select a language, a time, a currency, a keyboard, or an input method, and then click Next.

-
Click Repair your computer.
-
Select the operating system that you want to repair, and then click Next.
-
In the System Recovery Options dialog box, click Command Prompt.
-
Type Bootrec.exe, and then press Enter.
Note To start the computer from the Windows Vista or Windows 7 DVD, the computer must be configured to start from the DVD drive. For information about how to do this, see the documentation that was included with the computer, or contact the computer manufacturer.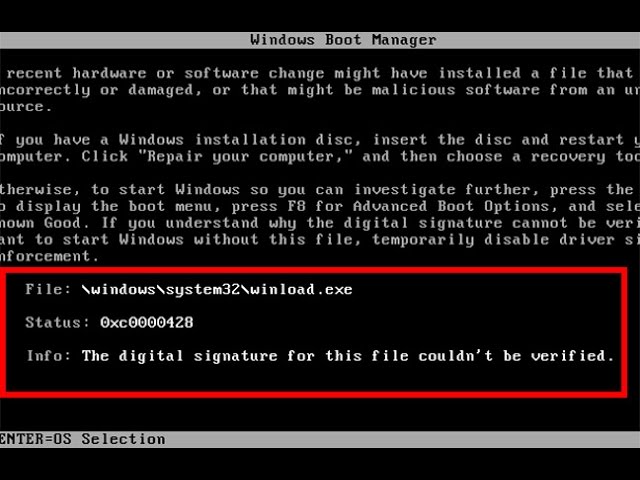
The Bootrec.exe tool supports the following options. Use the option that’s appropriate for your situation.
/FixMbr
This option writes a Windows 7 or Windows Vista-compatible MBR to the system partition. It does not overwrite the existing partition table. Use this option when you must resolve MBR corruption issues, or when you have to remove nonstandard code from the MBR.
/FixBoot
This option writes a new boot sector to the system partition by using a boot sector that’s compatible with Windows Vista or Windows 7. Use this option if one of the following conditions is true:
-
The boot sector was replaced with a nonstandard Windows Vista or Windows 7 boot sector.
-
The boot sector is damaged.
-
An earlier Windows operating system was installed after Windows Vista or Windows 7 was installed. In this situation, the computer starts by using Windows NT Loader (NTLDR) instead of Windows Boot Manager (Bootmgr.exe).
/ScanOs
This option scans all disks for installations that are compatible with Windows Vista or Windows 7. It also displays the entries that are currently not in the BCD store. Use this option when there are Windows Vista or Windows 7 installations that the Boot Manager menu does not list.
/RebuildBcd
This option scans all disks for installations that are compatible with Windows Vista or Windows 7.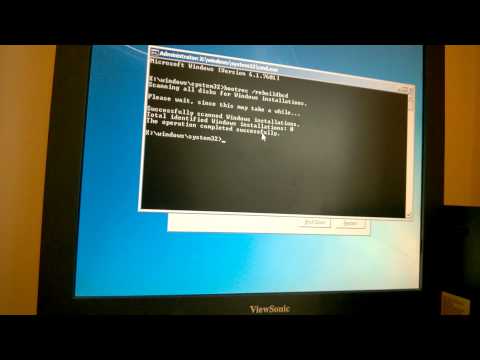 Additionally, it lets you select the installations that you want to add to the BCD store. Use this option when you must completely rebuild the BCD store.
Note Use the Bootrec.exe tool to troubleshoot a «Bootmgr Is Missing» error. If rebuilding the BCD store doesn’t resolve the startup issue, you can export and delete the BCD store and then run this option again. By doing this, you make sure that the BCD store is completely rebuilt.
To do this, type the following commands at the Windows RE command prompt:
How to Fix Windows 7 When It Fails to Boot
When you purchase through links on our site, we may earn an affiliate commission. Here’s how it works.
Whether caused by a virus, a new operating system or by simple mistake, being faced with an «Operating System not found» or similar error during your computer system’s boot up can be a nerve rattling experience. Assuming you have Microsoft’s Window 7 installed however, do not fear, such a boot error can often be resolved in just a few simple steps.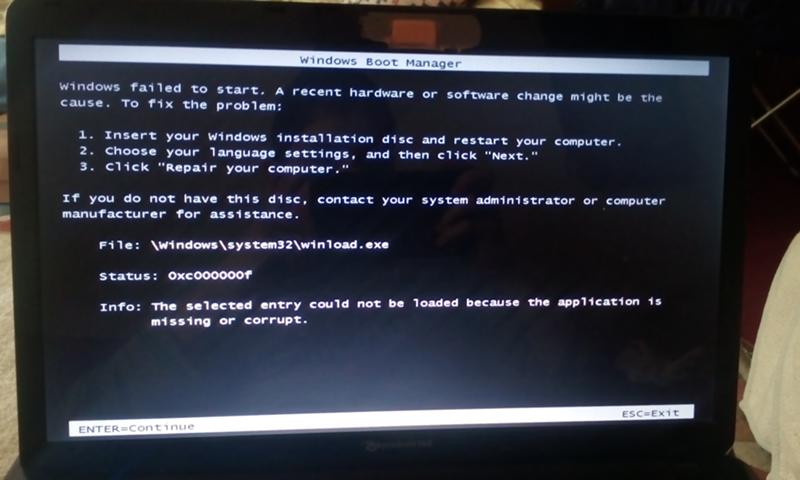
First, check your BIOS and hardware
In many cases, having Windows 7 fail to boot may be as simple as having your BIOS set with an incorrect boot order sequence. It can be quite common if you have more than one hard drive installed in your computer and your BIOS gets reset. Usually you can access your BIOS seconds after your computer turns on by pressing the Delete button or by pressing a specific function key. Once in the BIOS, check to see that your system drive is listed appropriately in the boot order sequence; you may need to refer to your motherboard manual for help.
Another possible reason for Windows not being detected upon start up is a hardware issue. If your BIOS is unable to detect your system drive, check to make sure all the cables are plugged in properly. If your hard drive is making an odd noise, such as a clicking sound, your hard drive may be broken. Finally, it is possible that the hard drive is having data corruption issues, which has damaged important system data, such as the Master Boot Record (MBR). If you suspect a faulty hard drive, it may be a good idea to backup and scan your hard drive for errors from another computer and possibly consider buying a replacement. Trying to repair a boot problem on a damaged drive can possibly lead to even more data loss, so backup your data before attempting anything.
The MBR and other important boot data can also be damaged by trying to install an earlier version of Windows, such as Windows XP, alongside Windows 7 and by third-party programs, such as viruses. In the case of a virus, it is recommended that you run a virus scan of the drive before attempting any repairs as otherwise it could lead to more data loss. It is further possible to achieve the appearance of damaged boot data by having the wrong drive partition set to active, which can be the outcome of an overly curious Windows user with administrative permissions.
Fixing the MBR and other start up problems in Windows 7 is most quickly accomplished by using the Windows 7 Installation DVD. If you do not have a Windows 7 Installation DVD however, you can alternatively use a Windows 7 System Recovery Disc, which we will show you how to create further down in this article. If you do not yet have either a Windows 7 Installation DVD or a recovery disc, do yourself a big favor and make a recovery disc right away to avoid any unnecessary headaches down the road.
Fixing the Master Boot Record (MBR)
Step one: Turn your computer on, booting from either your Windows 7 Installation DVD or Windows 7 System Recovery Disc. Remember, you may need to change the boot order inside your BIOS to have the your DVD drive boot first.
Step two: After the installation or recovery disc loads, if prompted, select your language settings and then continue. If you are using the installation DVD, when prompted by the following screen select Repair your computer.
Step three: The computer will take a moment now to scan itself for any Windows installations, after which you will likely be given a choice to select which installation you wish to repair.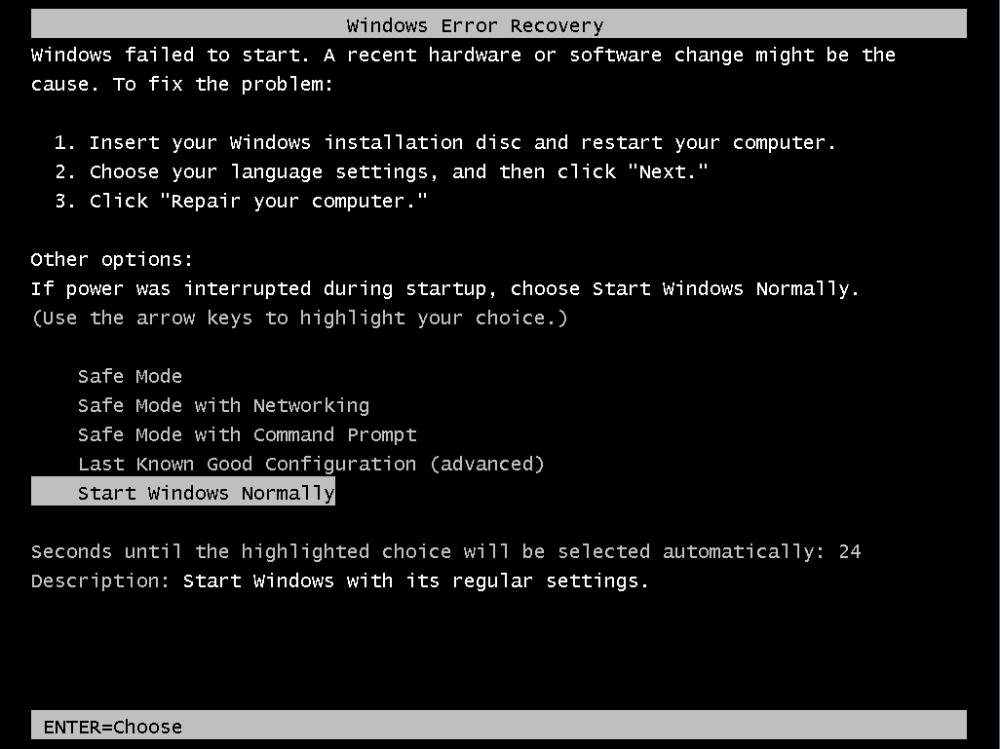 Select the appropriate Windows installation from the list and then continue. If by chance a problem is detected in one of your Windows installations at this initial stage, the system may also ask you if it can try to repair the problem automatically. It is up to you if you wish to let the system try to repair itself, but otherwise just select No.
Step four: Once you have reached the System Recovery Options screen, as shown below, you will be faced with a list of choices that can aid you in repairing a damaged Windows 7 operating system. If you wish to try the Startup Repair option first, it is often successful in automatically fixing many different start up issues, but in this article we will be using the Command Prompt option to resolve our problems manually. So, click Command Prompt to continue.
Step five: Now sitting at the command prompt, enter the following command and then press enter:
bootrec.exe /FixMbr
If successful, you should be greeted with the message The operation completed successfully.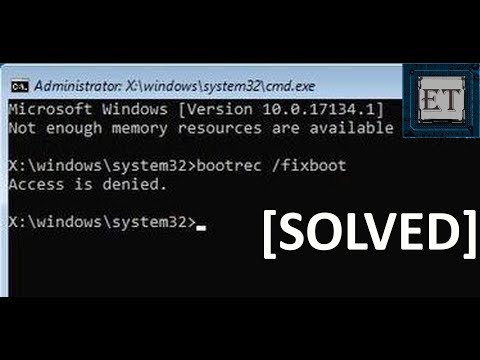 That’s it! Your Master Boot Record has been repaired.
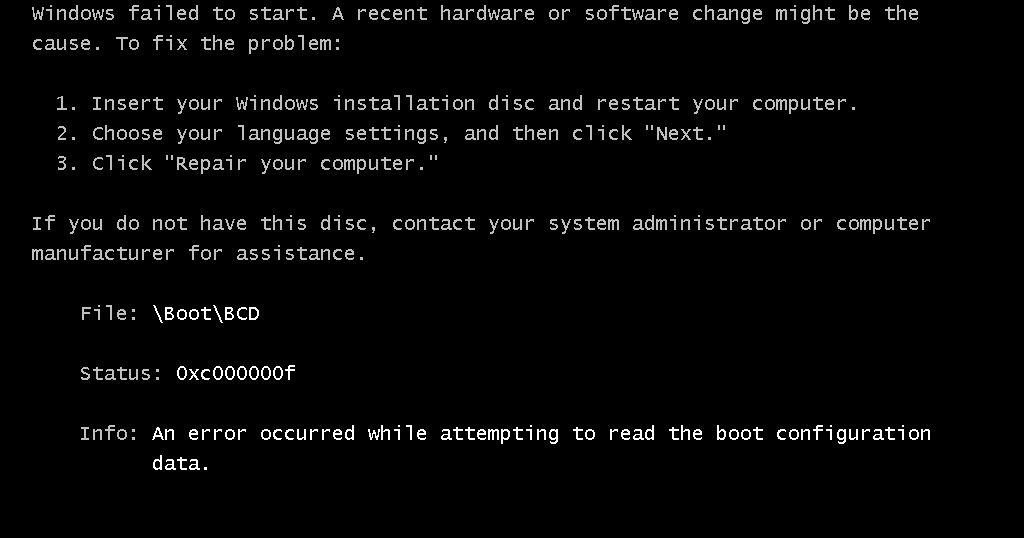
While the above command does fix the MBR, and sometimes that is enough, there still might be an error with the system partition’s boot sector and Boot Configuration Data (BCD). This might occur if you have tried to install another operating system alongside Windows 7, such as Windows XP. To write a new boot sector, try the following command:
bootrec.exe /FixBoot
If you are still faced with your Windows 7 installation not being detected during start up, or if you wish to include more than one operating system choice to your system’s boot list, you can try the following command to rebuild your BCD:
bootrec.exe /RebuildBcd
The above command will scan all your disks for other operating systems compatible with Windows 7 and allow you to add them to your system’s boot list. If this fails, you may need to backup the old BCD folder* and create a new one in its place with the following commands:
bcdedit /export C:\BCD_Backup
c:
cd boot
attrib bcd -s -h -r
ren c:\boot\bcd bcd.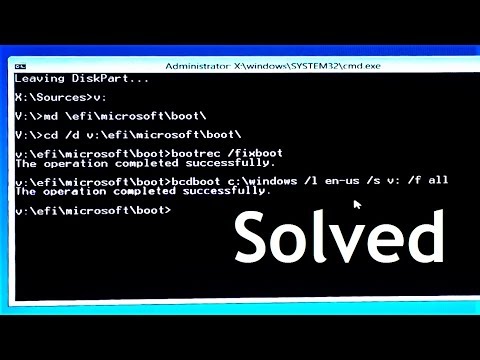 old
old
bootrec /RebuildBcd
*Some users also find simply deleting the boot folder and retrying the above steps effective at resolving boot issues, but it is not recommended.
How to change active partitions
Upon purposely changing the active partition on my system drive, I was faced with a BOOTMGR is missing error during my system’s start up that prevent Windows from starting. It is a common mistake to make when playing with partitions on a system drive and it can be a headache to solve if not prepared. To change your active partition back using the Windows 7 recovery disc or Installation DVD, follow the steps below.
Step one: Follow steps one to four in the above guide. This should take you to the Command Prompt in the Windows Recovery Environment.
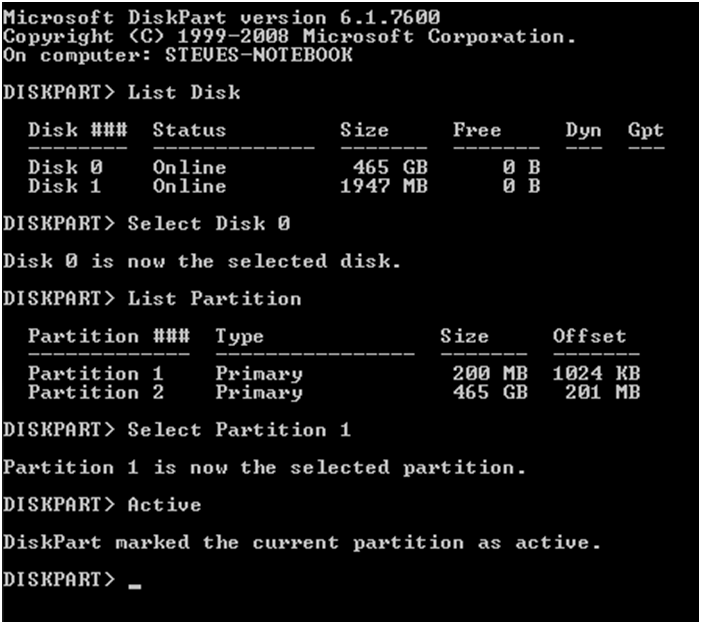
Step two: Type DiskPart and then press Enter.
Step three: Type List Disk now and then press Enter. This command will list all disks attached to your computer and assign them a disk number.
Step four: Type Select Disk x, where x is the number for the disk containing the partition you wish to make active. Press Enter.
Step five: Type List Partition and then press Enter. You will now be shown a list of the partitions on the selected disk. Determine which partition you wish to make active.
Step six: Type Select Partition x, where x is the number of the partition you wish to make active.
Step seven: Now, just type Active and then press Enter. That should be it — the selected partition is now active.
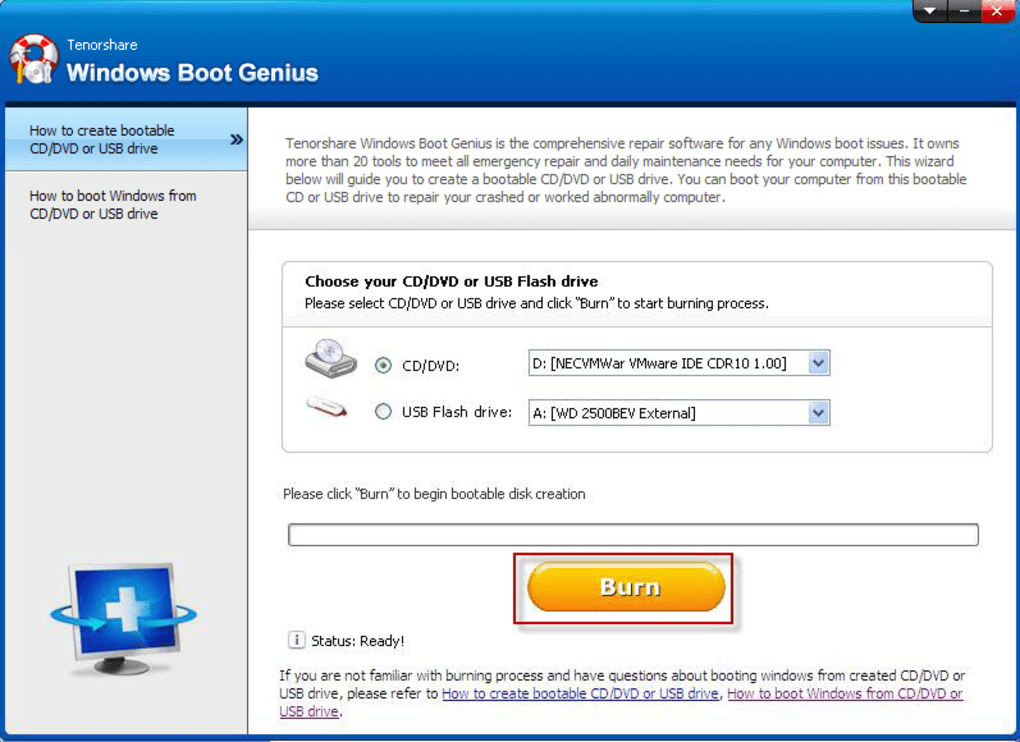
How to create a Windows 7 System Recovery Disc
Windows 7 makes it easy to create a System Recovery Disc if you already have Windows 7 installed and running.
Step one: Click Start > All Programs > Maintenance > Create a System Repair Disc
Step two: Insert a blank CD or DVD into your disc drive.
Step three: Click Create disc and let the program do its thing.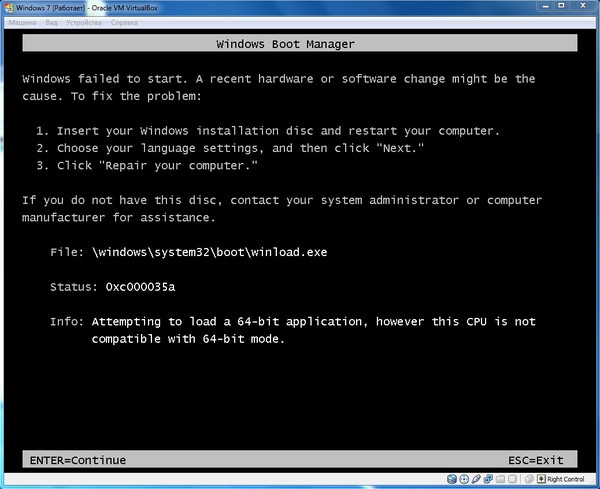
That’s it! It only needs to write about 140- to 160-megabytes to the disc, depending on whether your OS is 64-bit or 32-bit, and that should only take a minute. If you do not have a CD/DVD-R drive to create a recovery disc with, you can alternatively download the ISO image of the Windows 7 System Recovery Disc and use it to make a bootable USB flash drive.
How to create a Windows 7 System Recovery USB flash drive
Step one: If you do not have a DVD drive, download the appropriate Windows 7 Recovery Disc image from Here. You will need a torrent client for this step, such as µTorrent. Alternatively, if you have a DVD drive, you can use an existing Windows 7 Installation DVD or a Windows 7 Recovery Disc when at step seven.
Using a Windows 7 Installation DVD at step seven will also allow you to install Windows 7 via USB, not just recover a damaged system; very useful if you have a netbook!
Step two: Open a command prompt with administrative rights.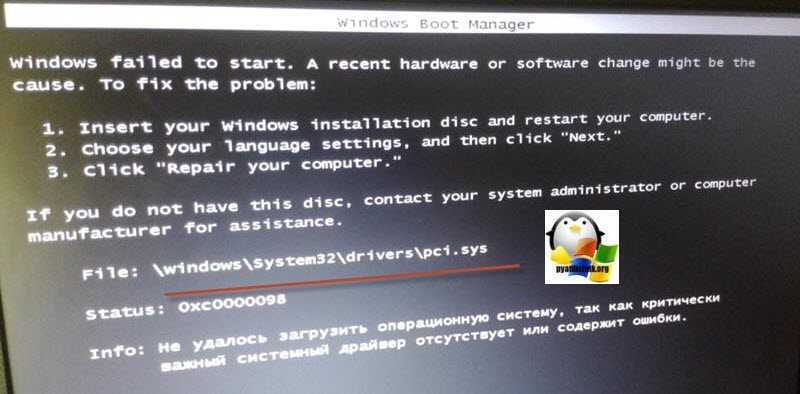 To do this, click Start > All Programs > Accessories and then right click Command Prompt, followed by clicking Run as administrator.
Step three: After accepting any UAC verification questions, you should now be at the command prompt. Make sure your USB flash drive is plugged in and then type DiskPart, followed by pressing Enter.
Step four: Type List Disk and then press Enter. Determine which disk number corresponds to your USB flash drive. In the following scenario, Disk 1 corresponds to our USB drive since we know our USB drive has a capacity of 2-gigabytes.
Step five: Enter the following commands in order, changing the disk number to the disk number listed for your USB drive. Warning — the following commands will erase everything on your USB drive or the disk you select.
Select Disk 1
Clean
Create Partition Primary
Select Partition 1
Active
Format FS=NTFS
Step six: After DiskPart successfully formats the USB drive, which might take a few minutes, you will want to enter the following commands:
Assign Exit
Step seven: You will now need to copy the contents of the ISO image you downloaded, or the contents of a DVD you wish use, to the USB flash drive.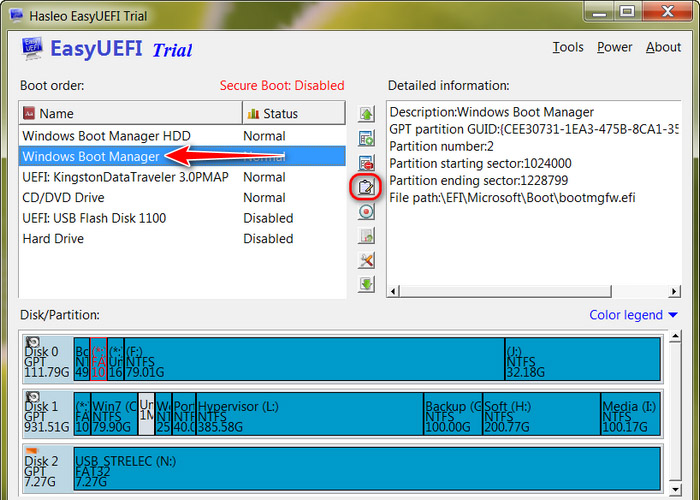 There should be two folders and a file in the ISO image that need to be copied. To extract the files contained within an ISO image, you will need to use a program such as WinRAR. You can download WinRAR from here.
Step eight: Now that the files are copied, we will want to make the USB drive bootable. To accomplish this however we will need to download a small file called bootsect.exe; it can be downloaded from here or here. The file can also be found in the boot directory of the Windows 7 Installation DVD. Once downloaded, place the bootsect.exe file in the root directory of your USB flash drive.
Step nine: Back at the command prompt, we will want to change the current directory to that of the USB drive and run the bootsect command. In our case this is drive E, so we will be using the following respective commands:
e:
bootsect /nt60 e:
The bootsect command will update the target volume with a compatible bootcode. If all goes well, you should now have a bootable USB recovery drive; just remember to add the USB drive to the boot list in your system’s BIOS for it to work upon start up.
Get instant access to breaking news, in-depth reviews and helpful tips.
Contact me with news and offers from other Future brandsReceive email from us on behalf of our trusted partners or sponsors
Restoring the Windows 7 bootloader
Need some good advice on how to restore the Windows 7 bootloader if the startup repair using the 7 installation disc did not help. I’ll briefly explain what’s the matter: Windows 7 was first installed on the computer, then Windows XP was needed as the second system, after installation it naturally started alone, I used the EasyBCD program to load two operating systems. In the future, XP became unnecessary and I formatted the partition on which it was located from Windows 7. Now, when loading, there is nothing but a black screen. What can be done in this case? More details if possible. Sergey.
Hello friends! Most importantly, don’t worry, your problem is simple and, in principle, the simple Windows 7 Startup Repair tool described in our article should help, but! If this article does not help you, then two others should help:
- BOOTMGR is missing press CTR-Alt-Del for restart error when loading Windows 7
- NTLDR is missing error when loading Windows 7 «System Reserved» 100 MB volume containing Windows 7 boot files and further automatic system recovery
these articles describe some more good ways to restore the boot of your operating system, besides them there is another one How to restore the Windows 7 system, so try it and don’t just give up.
Let me remind you that you cannot install an older operating system after a younger one, Windows 7 will in no case boot after installation on a Windows XP computer, since the latter overwrites the master boot record (MBR) on itself during installation. Therefore, you installed an additional boot manager EasyBCD, which is used to configure the boot of several operating systems and has its own bootloader.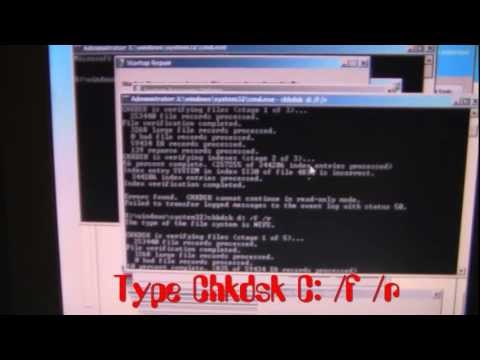
- I also want to say that file system errors are often to blame for unsuccessful loading of Windows 7, you can fix them even when the operating system does not load, all the details in our other article «Chkdsk program»
- Friends, in this article we we will work with the Windows 7 recovery environment, or more precisely with the command line of the recovery environment. I will give you the necessary commands, but if it is difficult for you to remember them, you can create a cheat sheet — a text file with a list of the necessary resuscitation commands and open it directly in the recovery environment. This will greatly facilitate your work.
- The Master Boot Record (MBR) is the first sector on the hard disk, which contains the partition table and a small loader program that reads data in this table from which partition of the hard disk to boot the OS, then the information is transferred to the partition with installed operating system to boot it.
 If the master boot record contains incorrect information about the location of the system, then we will receive various errors during boot, here is one of them «BOOTMGR is missing press CTR-Alt-Del for restart» or we will observe a black screen. Problem 9 is being fixed0026 bootloader recovery Windows 7 .
When you uninstalled old XP along with EasyBCD, you left your computer to fend for itself with an incomprehensible boot record and it gives you a black screen as a token of gratitude. To remedy the situation, we will restore the Windows 7 bootloader, namely, we will overwrite the master boot record using the Bootrec.exe utility located on the recovery disk or on the Windows 7 installation disk (friends, if you have a netbook and want to use the recovery environment located on a flash drive, read the comments first). Also, with this utility, we will write a new boot sector, understandable by Windows 7.
We boot from the recovery disk or the installation disk with Windows 7, in the initial phase of booting the computer, when prompted to boot from the “Press any key to boot from CD…” disk, press any key on the keyboard for 5 seconds, otherwise you will do not boot
next System Restore.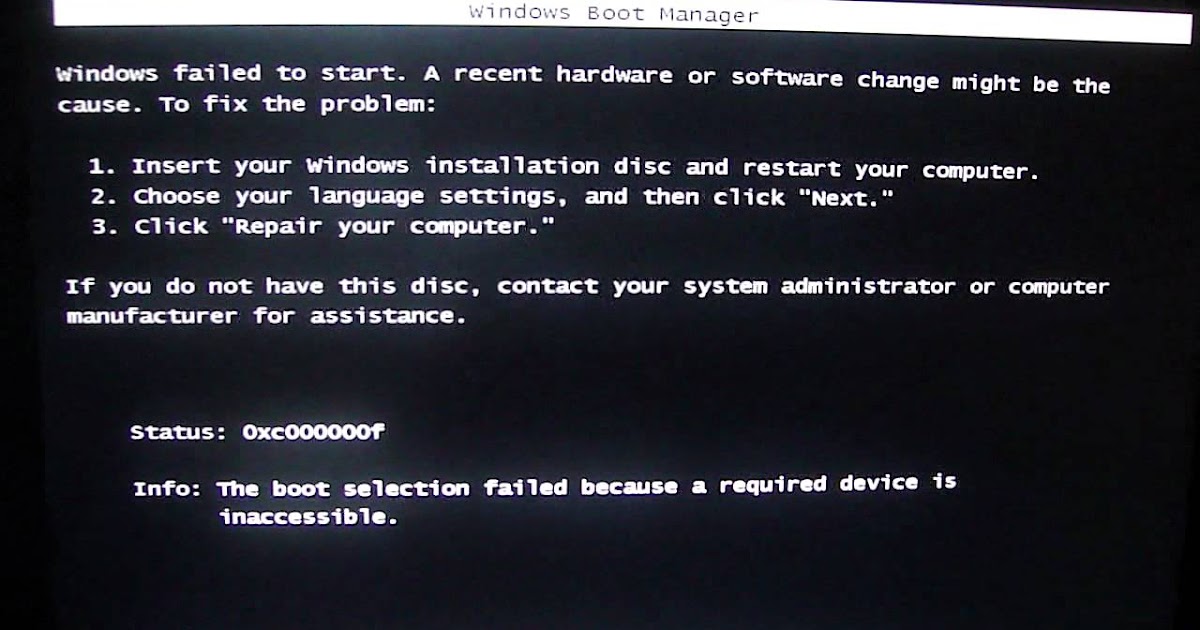
Briefly searches for installed Windows systems and analyzes problems preventing them from booting
Usually, problems are quickly found and the recovery environment offers to fix them automatically. Click on the «Fix and restart» button, after which the computer will restart and the Windows 7 boot will be restored.
If problems with booting the system continue or you are not prompted to fix problems automatically, then in this window you need to select the operating system that you want to restore, you most likely have one and Next.
First of all, select the Startup Repair tool, it can also solve problems with booting Windows 70003
We enter the commands:
diskpart
lis vol (we display a list of hard disk partitions and see that “Volume 1” is a hidden partition System Reserved (Reserved by the system), the volume is 100 MB, it should contain Windows 7 boot files and that is it needs to be active). We also see a partition with Windows 7 installed, it has the letter D:, the volume is 60 GB.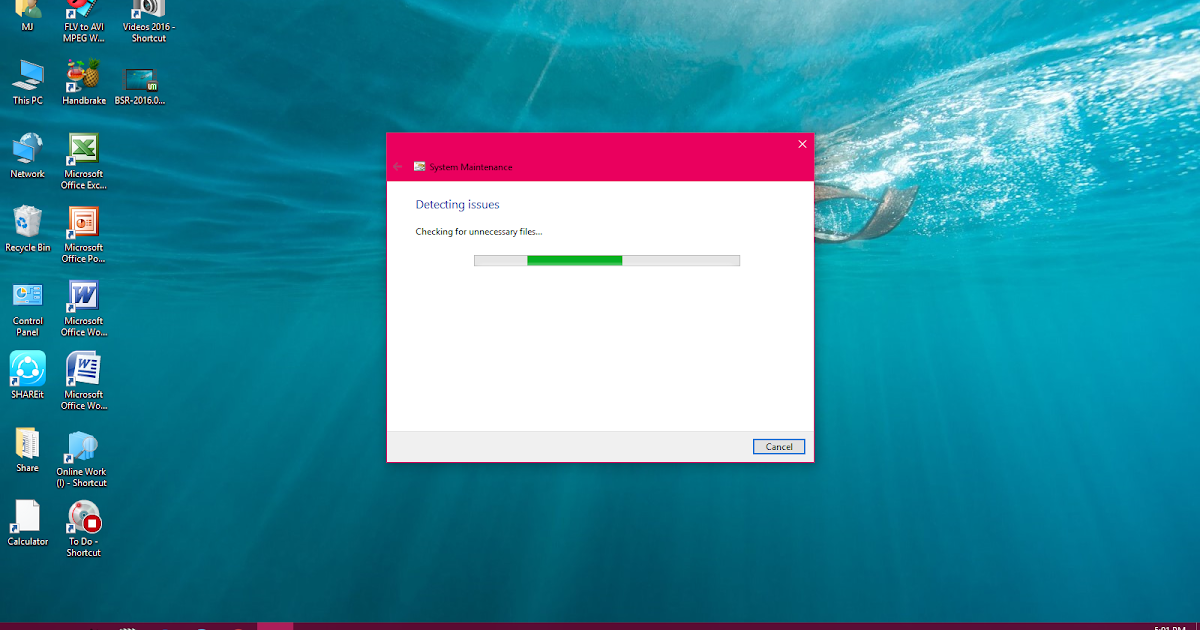
sel vol 1 (select Volume 1)
activ (make it active)
exit (exit diskpart)
bcdboot D:\Windows (where D: is the partition where Windows 7 is installed), this command restores the Windows 7 boot files (bootmgr file and boot storage (BCD) configuration files)!
«The boot files were created successfully»
In the command line window, enter the Bootrec command and Enter
complete information about the utility’s capabilities appears. Select the MBR entry Bootrec.exe /FixMbr.
Operation completed successfully. A new boot record has been written to the first sector of the boot partition.
The second Bootrec.exe /FixBoot command writes a new boot sector.
Operation completed successfully. exit. Next, we try to load our Windows 7.
Friends, if the Bootrec.exe /FixMbr and Bootrec.exe /Fixboot commands do not help you, do not despair, there is another tool.
Method No. 3
Enter the command Bootrec /ScanOs , it will scan all your hard drives and partitions for operating systems and if any are found, a corresponding warning will appear. Then you need to enter the command Bootrec.exe / RebuildBcd , this utility will offer to add the found Windows to the boot menu, agree and enter Y and press Enter, all the Windows found are added to the boot menu.
In my case, two operating systems were found. Everything is visible on the screenshot.
In addition to the above method, there is another one, enter bootsect /NT60 SYS on the command line, the main boot code will also be updated.
Exit
Our found Windows 7 appears in the boot menu of operating systems
If all that is said above does not help, try to overwrite all the BCD boot storage files again, I will not repeat, everything is explained in detail in this article
http://remontcompa.ru/421-ntldr-is-missing- v-windows-7.html
Recently, a friend of mine brought me a computer with a complaint that two operating systems installed on different hard drives, Windows 7 and Windows 8, would not boot, giving different errors during boot.
First of all, I booted the computer from the Acronis Disk Director boot disk and saw this picture. As you can see, there are two hard drives, the first is Disk 1 with Windows 7 installed, and the second is Disk 2 with Windows 8 installed. Pay attention to the two red flags that mark the wrong sections at all. Why? The red flag means that this section is active and the operating system should be loaded from it.
So, the error is that on both hard drives, the first hidden partitions System Reserved (Reserved by the system) should be marked with a red flag. On Windows 7, the volume of such a partition is 100 MB, and on Windows 8 350 MB, these partitions have the following attributes: System. is active and it is on these partitions that the boot storage configuration files (BCD) and the system boot manager file (bootmgr file) are located. And we get these attributes are other sections. Because of this, Windows 7 and Windows 8 won’t boot.
You can make the System Reserved partition active using the command line or AOMEI Partition Assistant and Acronis Disk Director.
Select the first hard Disk 1, click on the first partition System Reserved (Reserved by the system) with the right mouse and select «Mark as active»
The «System Reserved» volume will be marked as active. We press OK.
Do the same with Disk 2. Acronis Disk Director runs in pending operation mode, so that the changes take effect, click the «Apply pending operations» button
Continue.
As you can see, after our changes, those sections that you need have become active.
Exit the program and reboot. The result of the work is positive — both operating systems are loaded in turn.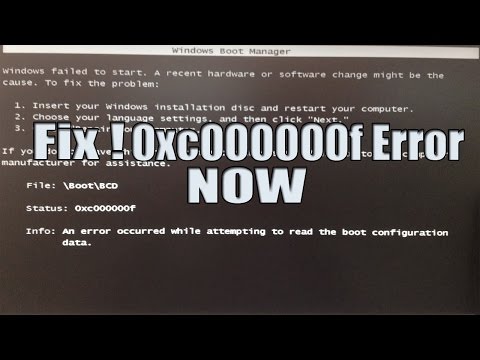
If all else fails, see this article: Recreating the Windows 7 Boot Loader
Using Bootrec.exe in Windows Recovery Environment to Troubleshoot Startup Problems
Windows 7 Starter Windows 7 Starter N Windows 7 Home Basic Windows 7 Home Premium Windows 7 Professional Windows 7 Professional N Windows 7 Enterprise Windows 7 Enterprise N Windows 7 Ultimate Windows 7 Ultimate N Windows Vista Ultimate Windows Vista Enterprise Windows Vista Business Windows Vista Home Premium Windows Vista Home Basic Windows Vista Business 64-bit Edition Windows Vista Enterprise 64-bit Edition Windows Vista Home Premium 64-bit Edition Windows Vista Home Basic 64-bit Edition Windows Vista Ultimate 64-bit Edition More…Less
Abstract
When using the Windows Recovery Environment (Windows RE) to troubleshoot startup problems, first use the Startup Repair option in the System Recovery Options dialog box. If this does not resolve the issue, or if you need to manually perform additional troubleshooting steps, you should use the Bootrec. exe tool. This article explains how to use the Bootrec.exe tool in Windows RE to troubleshoot the following Windows Vista and Windows 7 components.0003
You can also use the Bootrec.exe tool to resolve the Windows Boot Configuration Data file is missing required data error.
How to run the Bootrec.exe tool
To use the Bootrec.exe tool, you must first start the Windows RE recovery environment.
-
Insert the Windows 7 or Windows Vista installation disc into the DVD drive and turn on the computer.
-
Press the key when prompted.
-
Select Repair your computer .
-
Specify the operating system you want to restore and click Next .
-
In the System Recovery Options dialog box, select Command Prompt .
-
Type Bootrec.exe, and then press ENTER.
Note. To start your computer using the Windows Vista or Windows 7 DVD, you must set up your computer to boot from the DVD drive.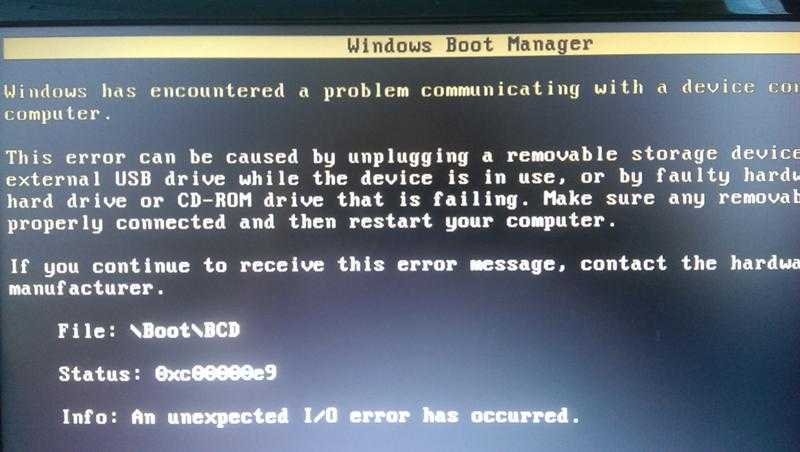 For more information about how to do this, see the documentation that came with your computer or contact your computer manufacturer.
The Bootrec.exe tool supports the following options, which you can choose from.
/FixMbr
This option writes a MBR that is compatible with Windows 7 or Windows Vista to the system partition. It does not overwrite the existing partition table. This option should be used to troubleshoot MBR corruption or if you need to remove custom code from the MBR.
/FixBoot
This option writes a new boot sector to the system partition using a Windows Vista or Windows 7 compatible boot sector. Use this option if any of the following conditions are true.
-
The boot sector has been replaced with a non-standard Windows Vista or Windows 7 boot sector.
-
The boot sector is corrupted.
-
After installing Windows Vista or Windows 7, an earlier version of the Windows operating system was installed on the computer. In this case, Windows NT Loader (NTLDR) is used to start the computer instead of Windows Boot Manager (Bootmgr.exe).
/ ScanOs
This option searches all drives for installed systems that are compatible with Windows Vista or Windows 7. It also displays any entries that are not included in the Boot Configuration Data store. This option should be used if the computer has Windows Vista or Windows 7 installed and does not appear in the Boot Manager menu.
/RebuildBcd
This option searches all drives for installed systems that are compatible with Windows Vista or Windows 7.